While QuickBooks is a powerful accounting platform, many finance teams find themselves regularly working with Google Sheets for their financial analysis and reporting.
Spreadsheets offer more flexibility than QuickBooks’ built-in reporting, letting finance teams create the exact reports and analysis they need.
But importing Google Sheets into QuickBooks presents challenges.
If users want to import their Google Sheets into QuickBooks, they typically have two options:
Manual data entry in QuickBooks or using limited native import features.
But spoiler alert: there’s a better solution for importing Google Sheets into QuickBooks! This guide will show you how to automatically import Google Sheets into QuickBooks.
Let’s get started!
Step-by-Step Walkthrough: How to Import Google Sheets into QuickBooks
Finance professionals can use Coefficient to manage any QuickBooks analysis and reporting needs. Check out Coefficient’s Templates Gallery for pre-built QuickBooks dashboards.
And that’s not all!
With Coefficient, you can import Google Sheets into QuickBooks in a few clicks!
Here’s a step-by-step tutorial to show you how.
Step 1: Install Coefficient
Coefficient’s QuickBooks connector allows you to import Google Sheets into QuickBooks.
But first, you’ll need to install it from the Google Workspace Marketplace.
Start by opening a new spreadsheet.
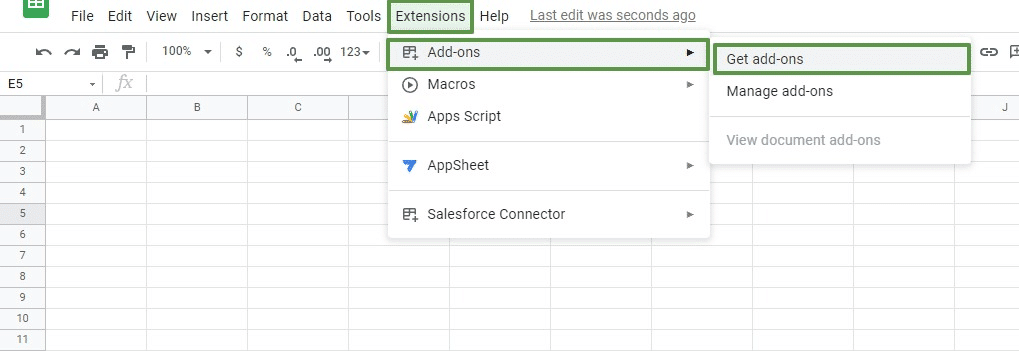
Navigate to the top navigation and click Extensions > Add-ons > Get add-ons.
This will direct you to the Google Workspace Marketplace.
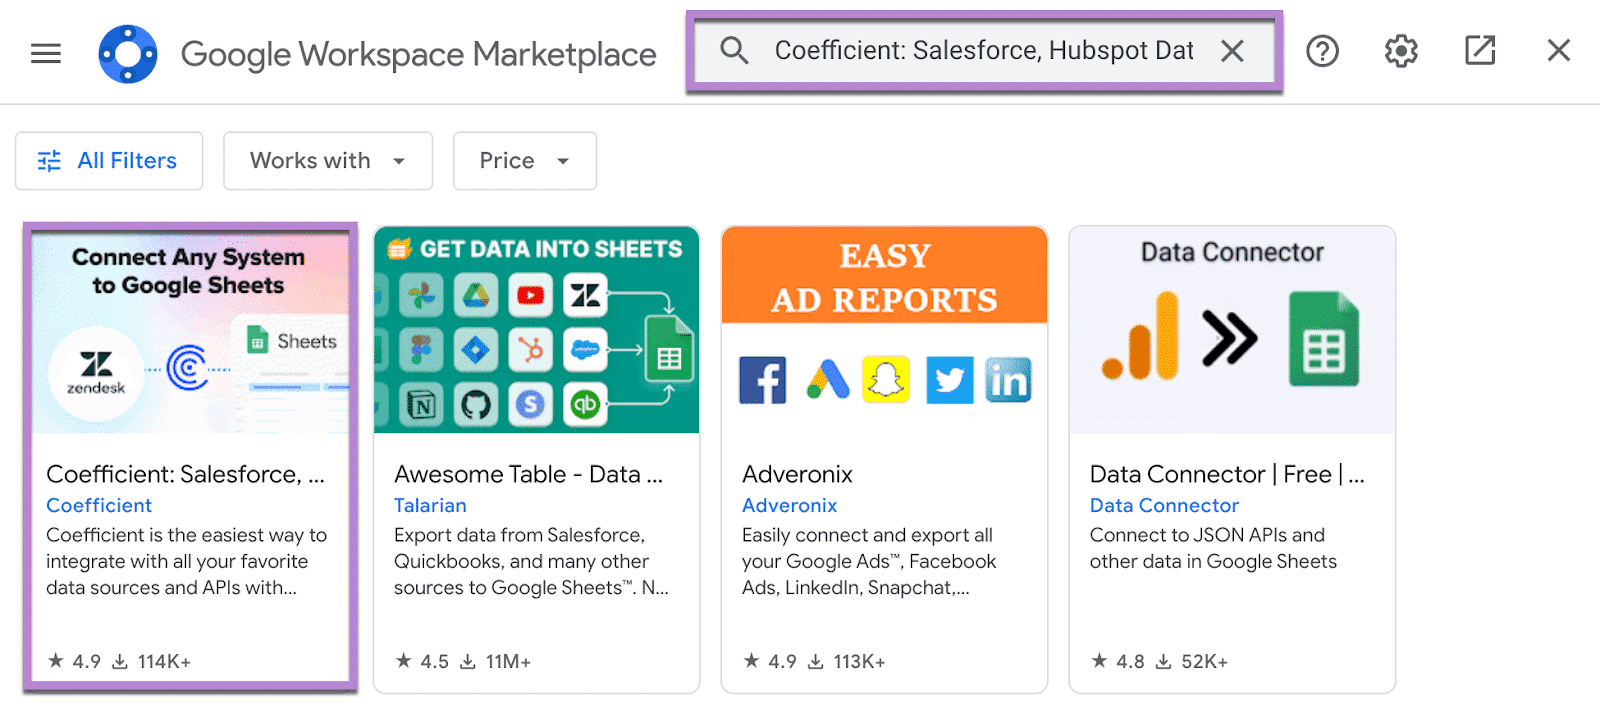
Type in “Coefficient” in the search bar and select the Coefficient app.
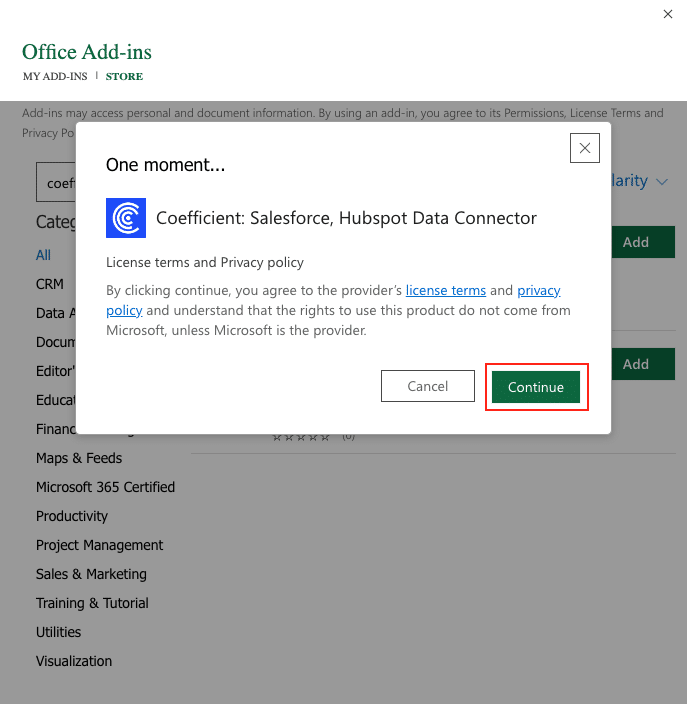
Accept the prompts to install.
Once installation is finished, return to Extensions on the Google Sheets menu.
Coefficient will appear as an add-on.
Launch the app. Now Coefficient will run on the sidebar of your Google Sheet.
Step 2: Set Up QuickBooks Import
Next, we need to configure how to import your Google Sheet into QuickBooks.
Select Export To… on the Coefficient sidebar.
Choose QuickBooks as your destination.
Select your data range and header row.
Click Next.
Step 3: Configure Import Settings
Select the QuickBooks Object you are exporting the data to and the Action you would like to take, then hit Next.
Step 4: Map Your Fields
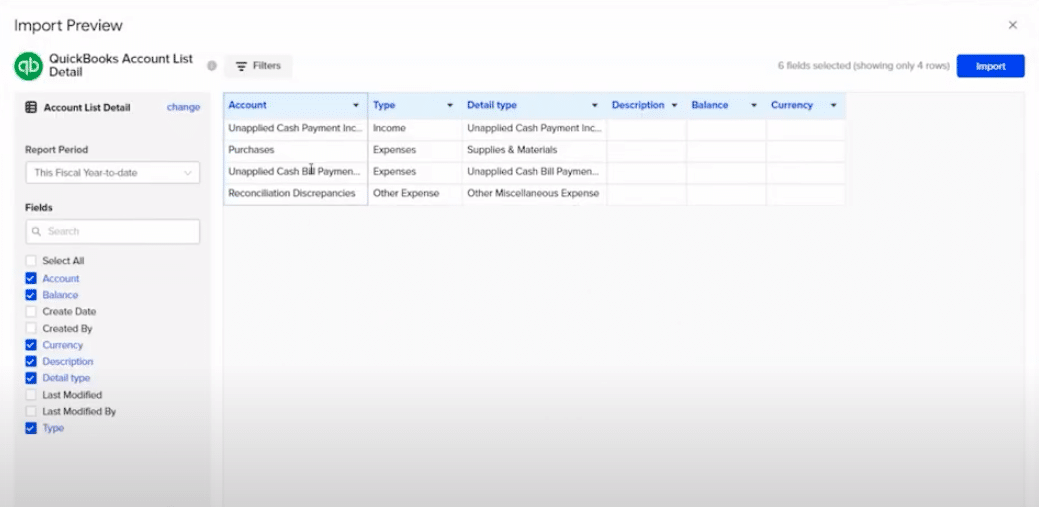
Under the Field Mappings section, match your Google Sheets columns to QuickBooks fields.
Click Save Mappings when finished.
Step 5: Import Google Sheets to QuickBooks
Review your import settings.
Click Export to begin.
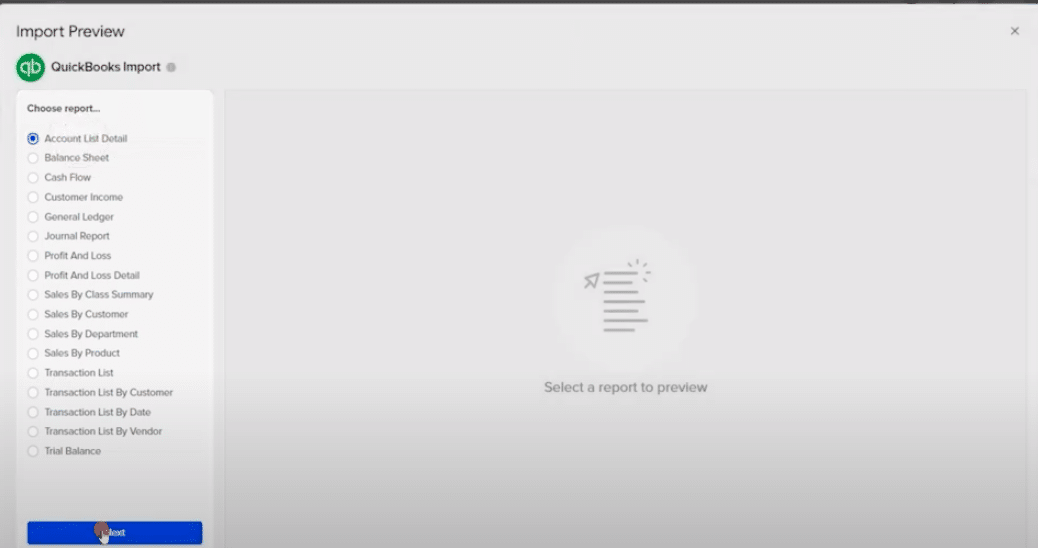
Choose which rows to import:
All rows
Selected rows
Filtered rows
Preview the changes before confirming.
Click Update ‘n’ rows in QuickBooks to send your Google Sheets data to QuickBooks.
Coefficient will notify you when the import is complete.
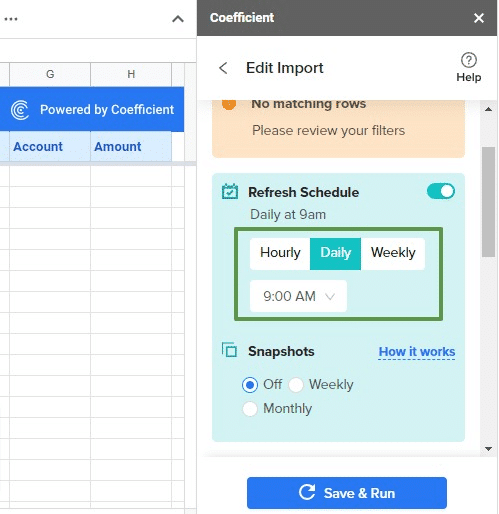
Step 6 (Optional): Set Up Auto-Refresh
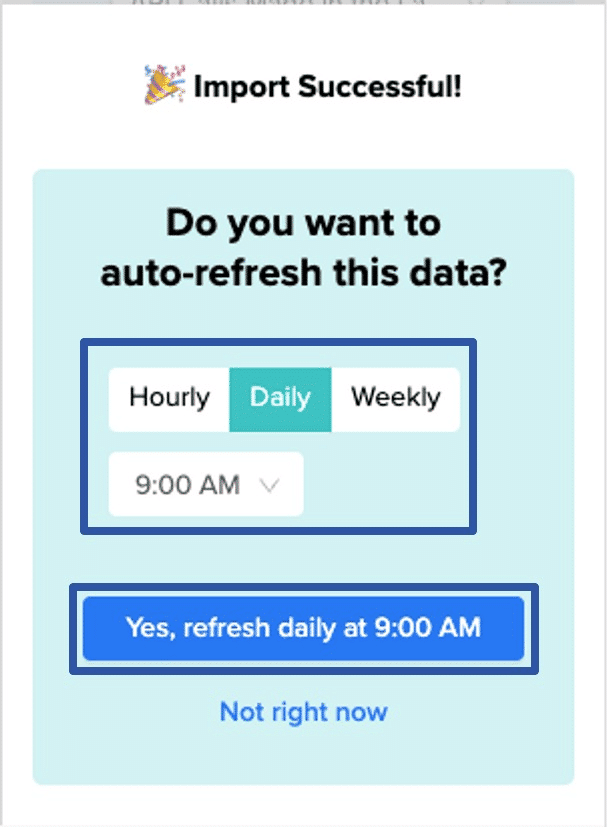
After importing your data into your spreadsheet, you can set up Coefficient’s auto-refresh scheduler for automatic updates.
Just select your frequency (hourly, daily, or weekly) and the specific time, and Coefficient will handle the rest.
Import Google Sheets into QuickBooks with Coefficient
Why manually import Google Sheets into QuickBooks if you don’t have to?
With Coefficient, you can import Google Sheets into QuickBooks without ever leaving your spreadsheet.
Get started for free and automatically import Google Sheets into QuickBooks in just a few clicks.
While QuickBooks is a powerful accounting platform, many finance teams find themselves regularly working with Excel spreadsheets for their financial analysis and reporting.
Spreadsheets offer more flexibility than QuickBooks’ built-in reporting, letting finance teams create the exact reports and analysis they need.
But importing Excel files into QuickBooks presents challenges.
If users want to import their Excel files into QuickBooks, they typically have two options:
Manual data entry in QuickBooks or using limited native import features.
But spoiler alert: there’s a better solution for importing Excel files into QuickBooks! This guide will show you how to automatically import Excel files into QuickBooks.
Let’s get started!
Step-by-Step Walkthrough: How to Import Excel Files into QuickBooks
Finance professionals can use Coefficient to manage any QuickBooks analysis and reporting needs. Check out Coefficient’s Templates Gallery for pre-built QuickBooks dashboards.
And that’s not all!
With Coefficient, you can import Excel files into QuickBooks in a few clicks!
Here’s a step-by-step tutorial to show you how.
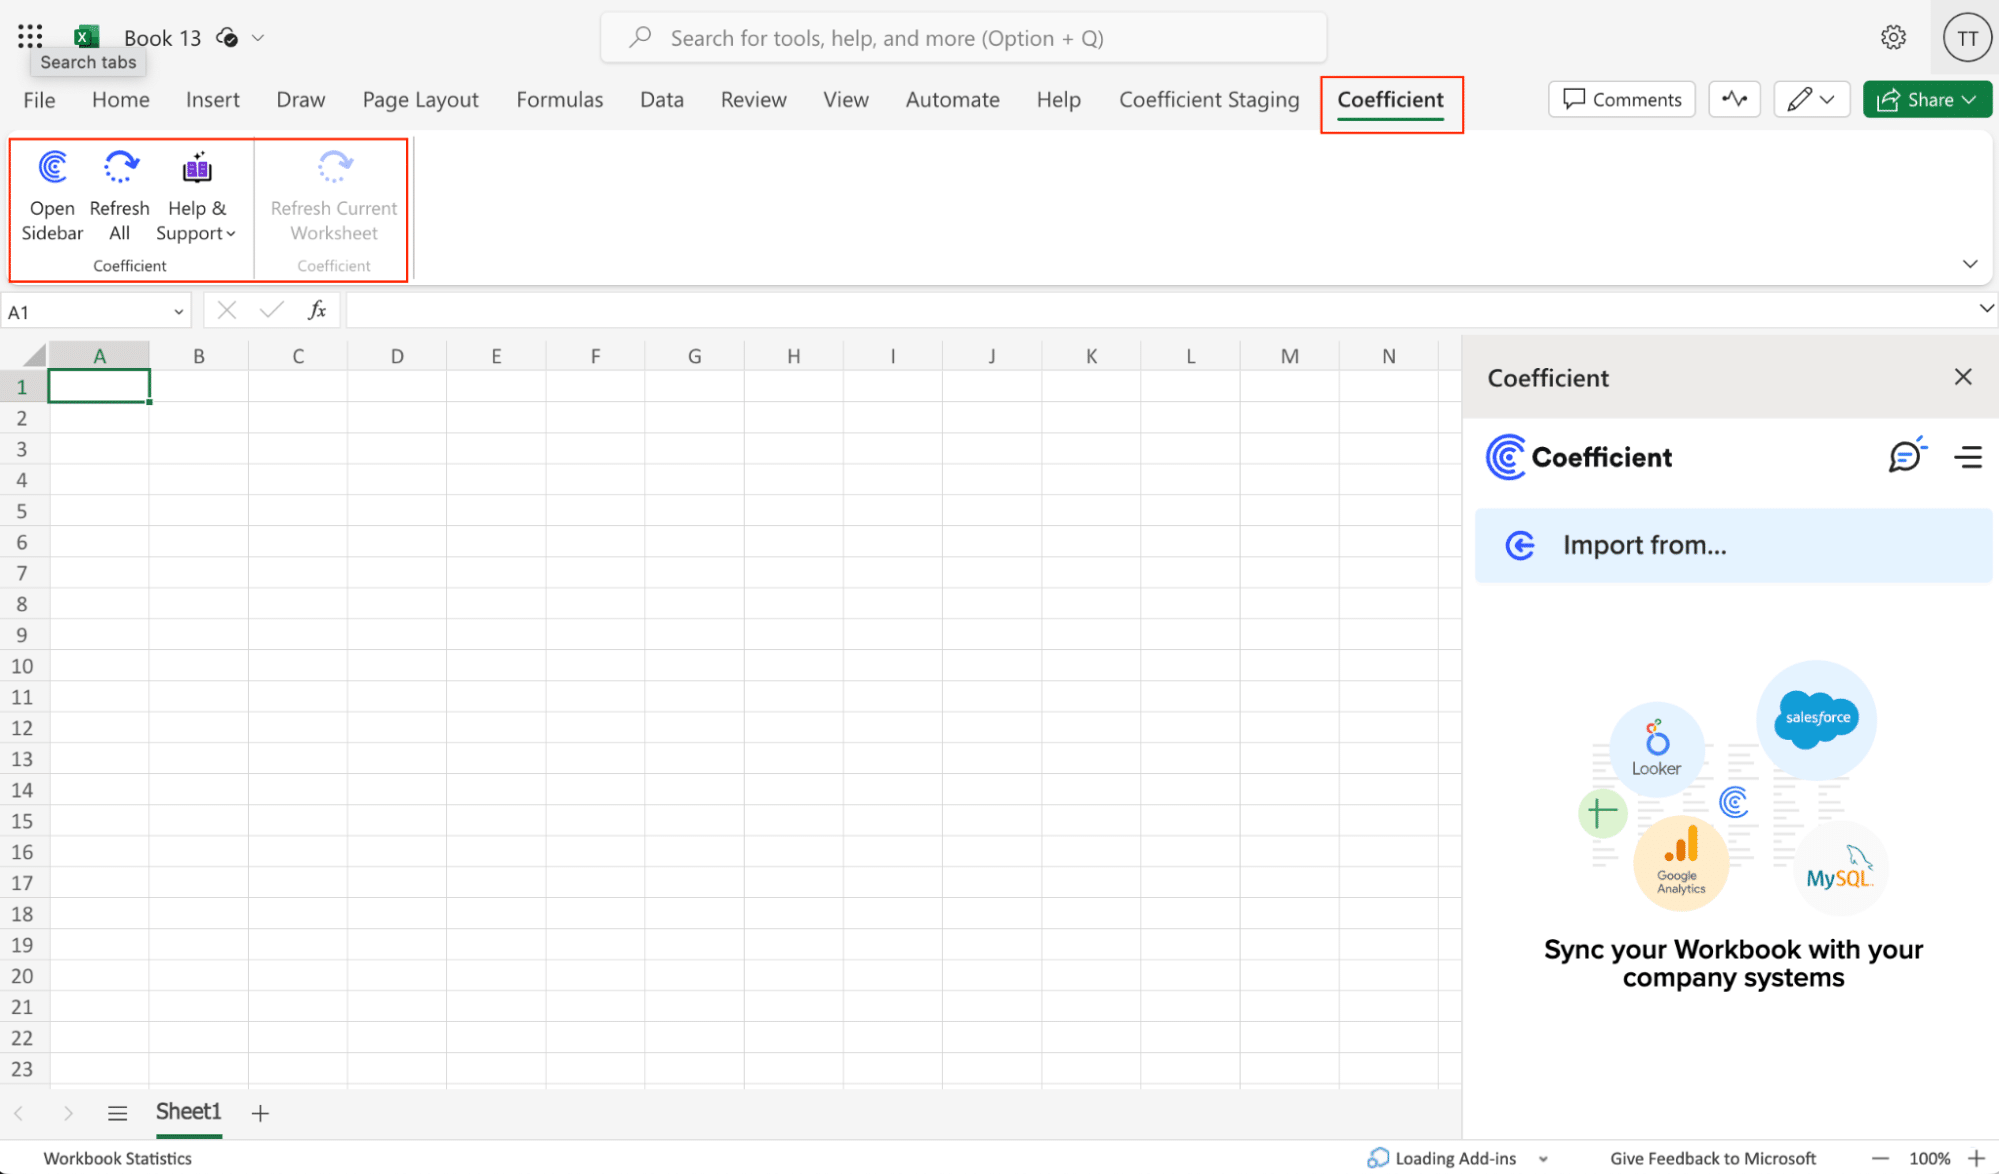
Step 1: Install Coefficient
Open Excel from your desktop or in Office Online. Click ‘File’ > ‘Get Add-ins’ > ‘More Add-Ins.’
Type “Coefficient” in the search bar and click ‘Add.’
Follow the prompts in the pop-up to complete the installation.
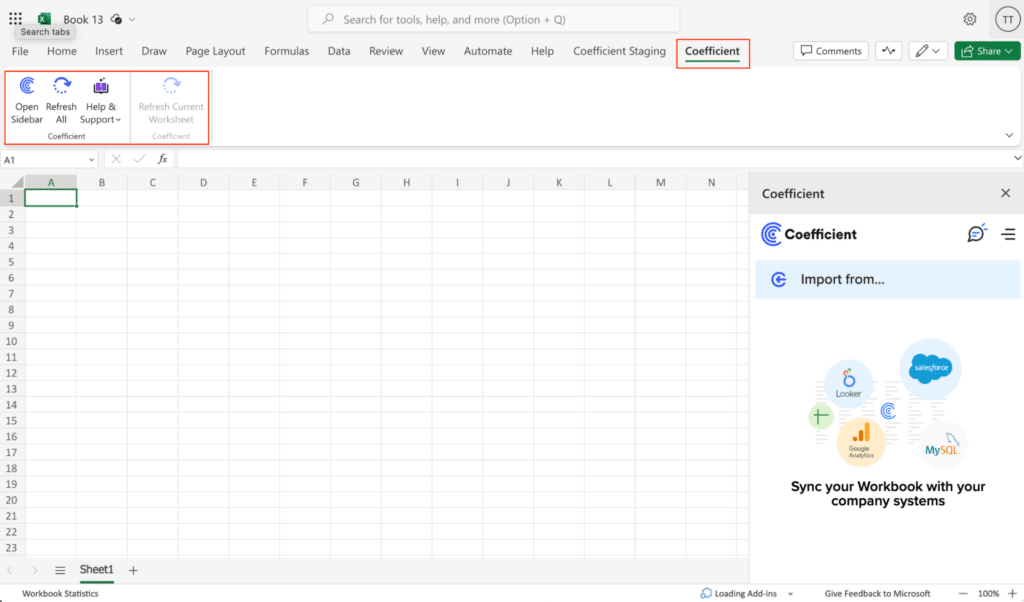
Once finished, you will see a “Coefficient” tab in the top navigation bar. Click ‘Open Sidebar’ to launch Coefficient.
Step 2: Set Up QuickBooks Import
Next, we need to configure how to import your Excel file into QuickBooks.
Select Export To… on the Coefficient sidebar.
Choose QuickBooks as your destination.
Select your data range and header row.
Click Next.
Step 3: Configure Import Settings
Select the QuickBooks Object you are exporting the data to and the Action you would like to take, then hit Next.
Step 4: Map Your Fields
Under the Field Mappings section, match your Excel columns to QuickBooks fields.
Step 5: Import Excel File to QuickBooks
Review your import settings.
Click Export to begin.
Choose which rows to import:
All rows
Selected rows
Filtered rows
Preview the changes before confirming.
Click Update ‘n’ rows in QuickBooks to send your Excel data to QuickBooks.
Step 6 (Optional): Set Up Auto-Refresh
After importing your data into your spreadsheet, you can set up Coefficient’s auto-refresh scheduler for automatic updates.
Just select your frequency (hourly, daily, or weekly) and the specific time, and Coefficient will handle the rest.
Import Excel Files into QuickBooks with Coefficient
Why manually import Excel files into QuickBooks if you don’t have to?
With Coefficient, you can import Excel files into QuickBooks without ever leaving Excel.
Get started for free and automatically import Excel files into QuickBooks in just a few clicks.
QuickBooks Online (QBO) from Intuit is cloud accounting software used by many business owners. QuickBooks Online allows you to export reports directly from their platform into Excel so you can manipulate or analyze the report data.
One common issue when exporting reports to Excel is that zero values will appear in your Excel file. This issue can lead to extensive troubleshooting steps to determine why your Excel reports are displaying zero values.
This guide will walk through how to run and create QuickBooks export files and provide workarounds for common issues that cause zero values in your workbook.
Let’s get started!
Step-by-Step Guide: Exporting QBO Reports to Excel
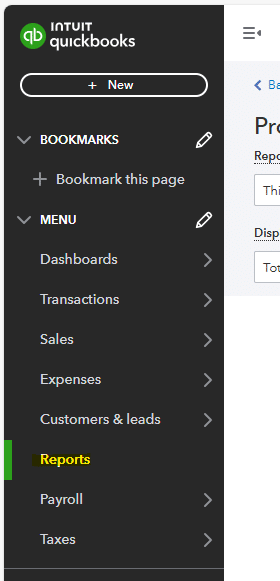
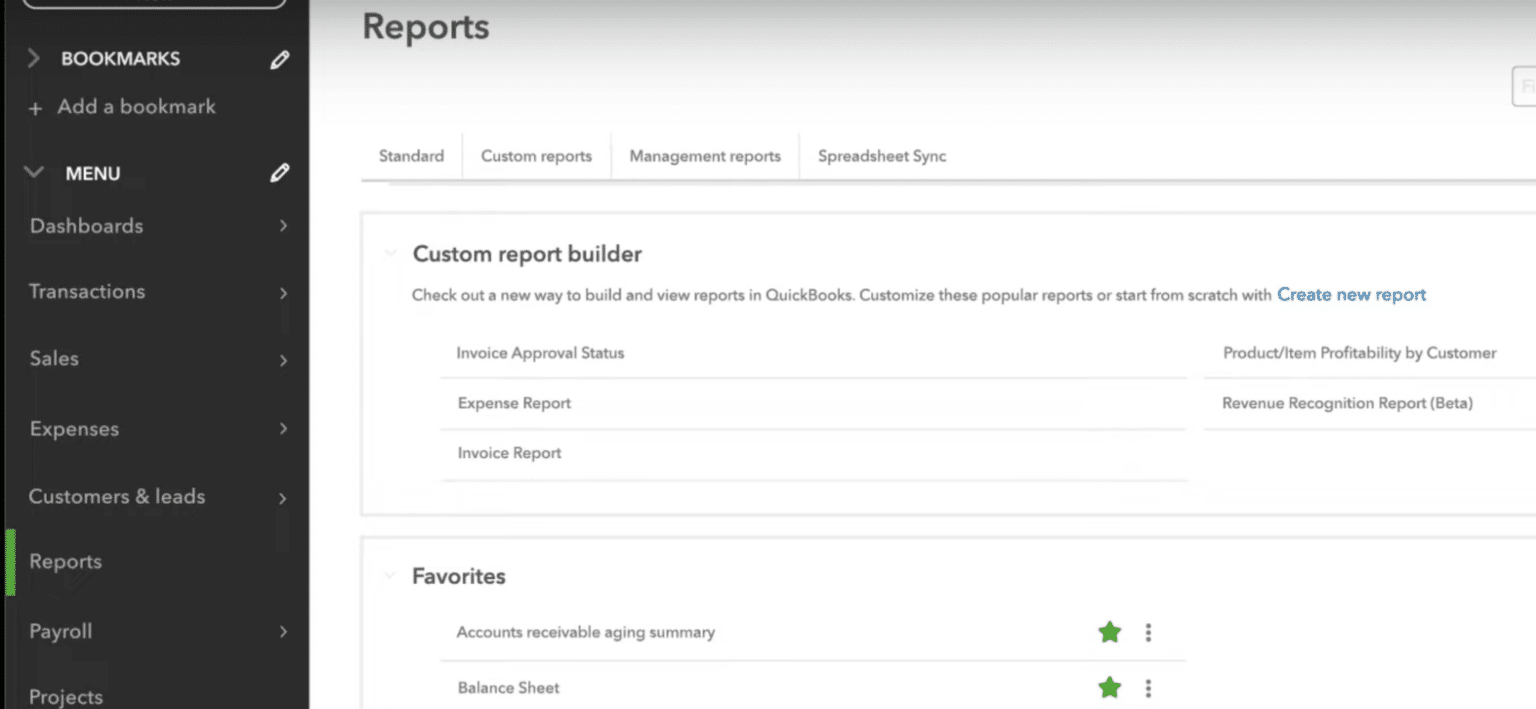
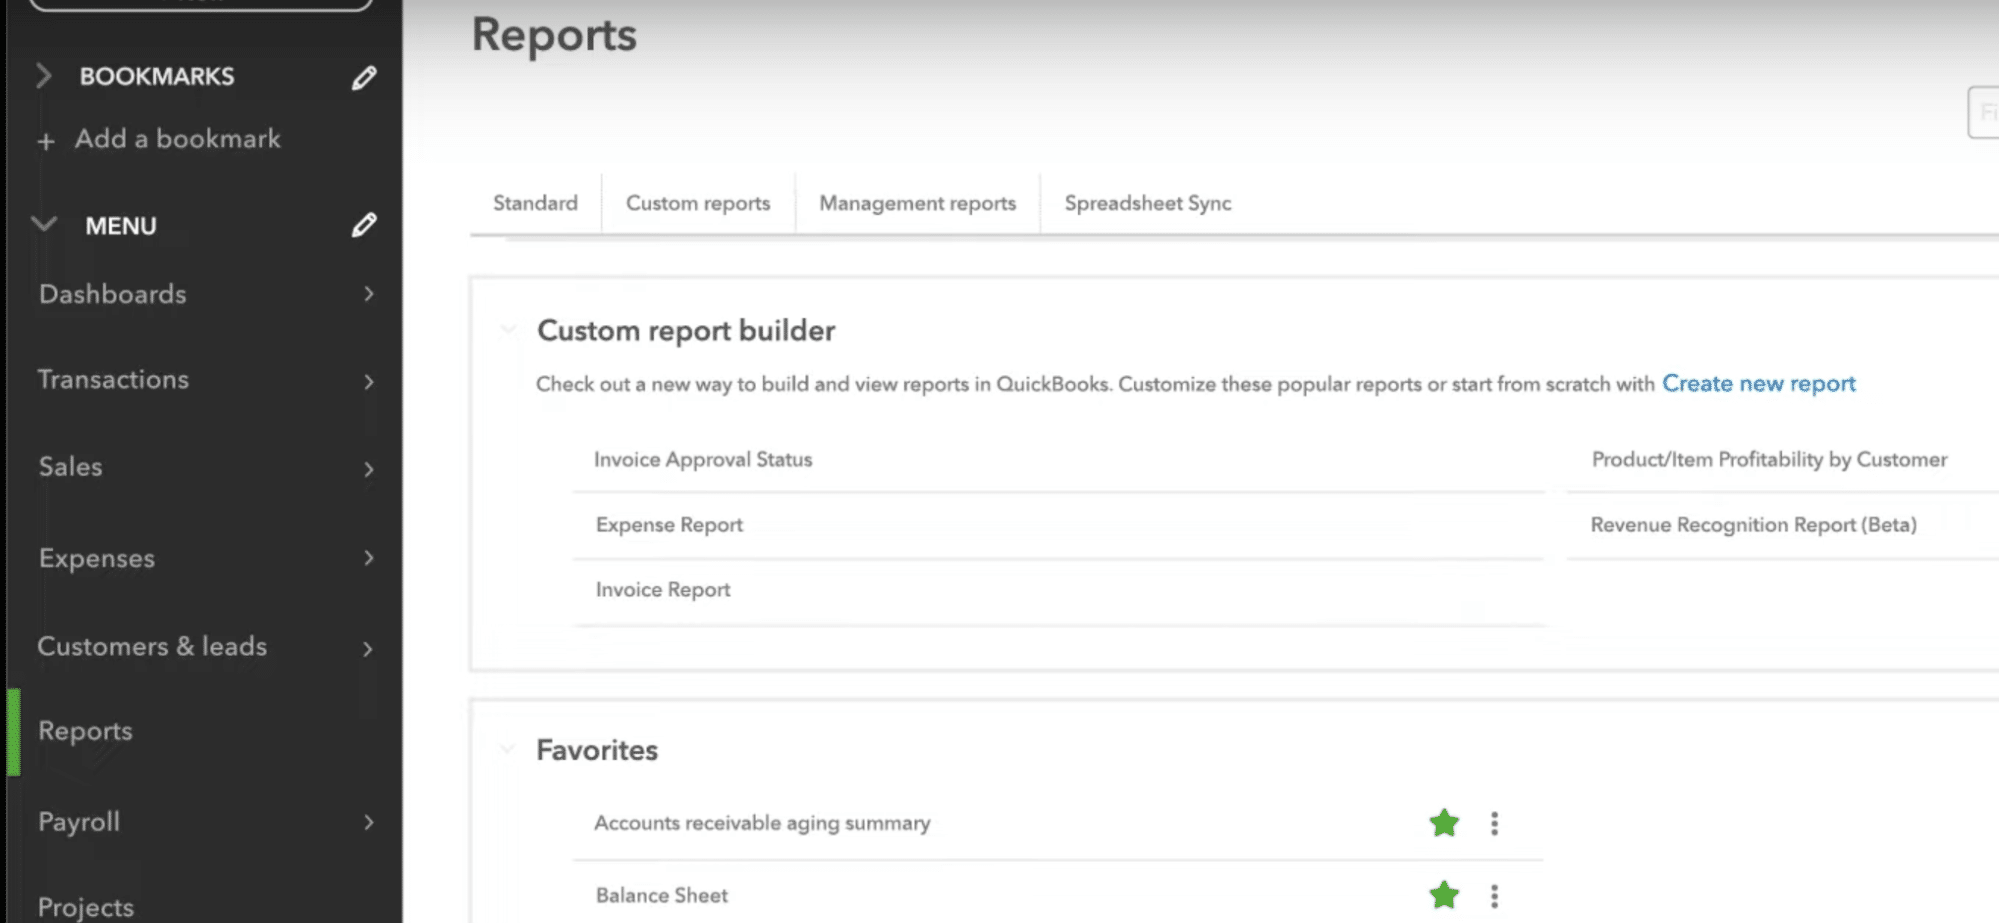
Step 1: Navigate to the Reports Section in QBO
Within QBO navigate to the reports section in the menu section. This process works across platforms, including Mac and Quickbooks Enterprise systems. Use the drop-down menu to access report options.
Step 2: Select the Report to Run
Before diving into solutions, it’s important to understand that QuickBooks Online can generate various types of reports, including:
Profit and Loss statements
Balance sheet reports
Accounts Receivable Aging
Accounts Payable Aging
Custom reports
These reports can be exported to different formats, including Excel files, CSV files, and PDFs. While QuickBooks Desktop users might have different experiences, this guide focuses specifically on QBO exports.
In this example, we are going to select the Profit and Loss report to run.
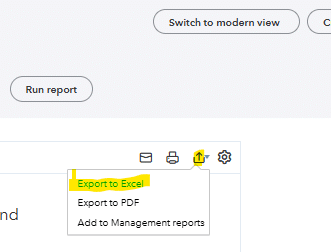
Once you’ve selected your QuickBooks report and filled out the relevant data (date range, columns displayed, cash vs accrual method, etc.), you can export your reports to Excel. Click the export dropdown at the top of your report and select export to Excel.
Common Issues and Solutions
Potential Issue 1: Check Protected View Settings
The first issue you may encounter when exporting reports to Excel is that the Excel file is in protected view. If this occurs, you’ll see an “Enable editing” button at the top of your Excel file. Clicking this button should resolve the issue and display values in your QuickBooks export.
This is the most common issue, and most reports you export from QuickBooks Online will have this protection enabled.
Potential Issue 2: Excel Version Compatibility
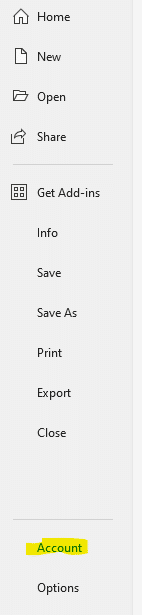
Another common issue when exporting a report from QuickBooks Online to Excel is an outdated version of Excel. Depending on your Microsoft Excel version, you may need to upgrade for compatibility with QBO’s export capabilities.
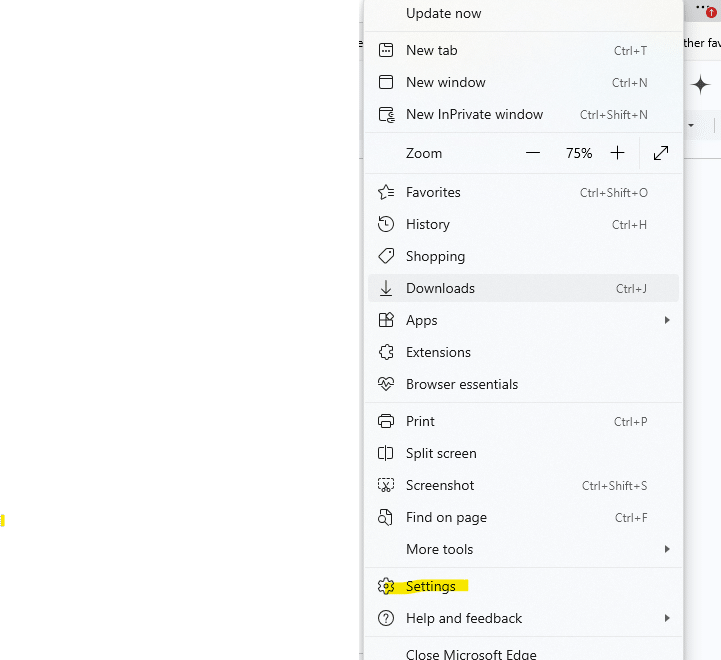
To check whether you need to update your version of Excel, navigate to File > Account.
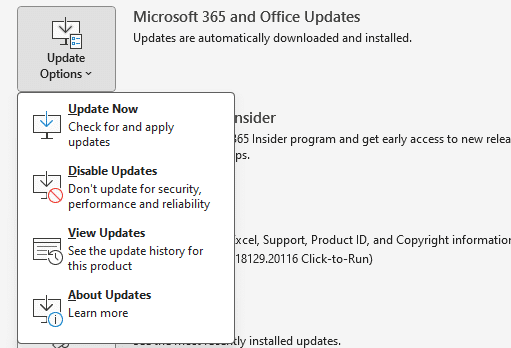
Select update options dropdown and click “Update Now.” Press Ctrl + F5 to refresh if needed.
Once you’ve selected update now Excel will let you know that you have been updated to the most recent version of Excel, which should fix the zero values export issue out of QuickBooks Online.
Potential Issue 3: Browser Cache and Cookies
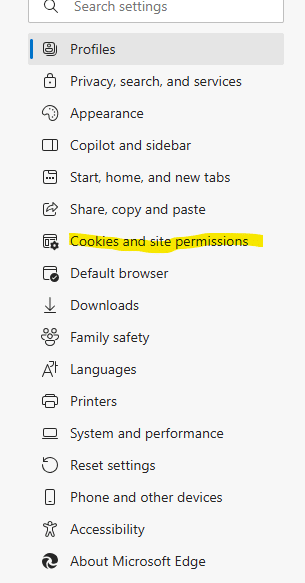
A third potential issue is that your browser cache and cookies may be interfering with and not allowing you to export Excel reports out of QuickBooks Online. To check if that is the issue you will want to navigate to the settings section of the web browser you are using. In this example we are using Google Chrome or Firefox as our web browser.
First navigate to the setting section, which is in the dropdown in the top right corner of the browser.
Once you’ve selected settings there is a cookies and site permissions section that you will need to select.
In the cookies and site permissions section you can then clear any cookies and modify site permissions to allow exports out of Quickbooks with values instead of zero value reports.
Potential Issue 4: Excel Calculation Settings
Another potential issue that may be causing your Excel report out of QuickBooks Online to be zero values is the calculation settings set-up in your workbook. Excel has the option to either manually or automatically calculate formulas.
To check if your Excel is set to manually calculate formulas, you will want to navigate to the formulas section at the top of your Excel file. Use Ctrl + Alt + F5 to refresh your worksheet and totals if needed.
In the formulas section you will then need to select the calculation options dropdown in the far right side of the formulas section. In this dropdown you will see a checkbox by which calculation option your Excel file is currently set-up as.
If your file is set-up to manually or partially calculate, you will want to switch the calculation method to automatic.
Potential Issue 5: Out-of-Date Browsers
The web browser you are using Quickbooks Online on may also be causing the export zero values issue in Excel. Most of the common web browsers support exporting Excel files out of Quickbooks Online, if you have already gone through troubleshooting other common issues and it hasn’t fixed your Excel export try switching your web browser.
Improve Your Excel Reporting out of Quickbooks Online
Running into zero values or other issues in your Excel reporting out of Quickbooks Online can be frustrating and cause a lot of troubleshooting for you and your organization. This can be a waste of both time and resources on non value-add work for you and your team.
One solution to this issue is to use a tool that integrates with Excel to help alleviate some of the issues that you can run into exporting Quickbooks Online reports out of Exce. One such tool is Coefficient, which is a data connector and can seamlessly pull information out of Quickbooks Online. Coefficient also enhances your reporting capabilities out of Quickbooks Online so you are less reliant on the standard reporting out of the system.
Ready to take your data analysis to the next level?
Try Coefficient to seamlessly integrate your Excel with live data from various business systems, enabling real-time analysis and more advanced financial modeling.
If you want to connect QuickBooks to Excel, this blog is for you.
QuickBooks is an indispensable tool for businesses managing their accounting and financial processes.
Yet, when it comes to data analysis, reporting, and sharing insights, Excel remains unmatched for many professionals. Linking QuickBooks data with Excel not only enhances your reporting capabilities but also provides greater flexibility in managing financial data.
Here’s a step-by-step guide on how to connect QuickBooks to Excel, highlighting some of the most popular methods.
TL;DR: Coefficient is the fastest and safest way to Export data from QuickBooks to Excel
Coefficient integrates QuickBooks to Excel in a single click, with no coding required.
In fact, Coefficient can connect Excel to any business system, enabling you to blend and analyze your QuickBooks data with a variety of other data sources, including:
Coefficient’s automatic data updates allow you to build live accounting reports and dashboards in Excel with your QuickBooks Data.
And with Slack/email alerts, you can update stakeholders in real-time when key accounting reports and KPIs change. It’s the easiest way to connect Excel to QuickBooks, pull in accounting data, develop real-time dashboards, and share them with your team.
How to Export Data from QuickBooks to Excel: Top 3 Methods
While there are many ways and tools to connect QuickBooks to Google Sheets, we’ll focus on the best methods in this guide.
Method 1. Coefficient (no code)
Coefficient’s no-code solution is the fastest and easiest option to export QuickBooks data to Excel. Especially for Excel for Web users who can’t access Power Query.
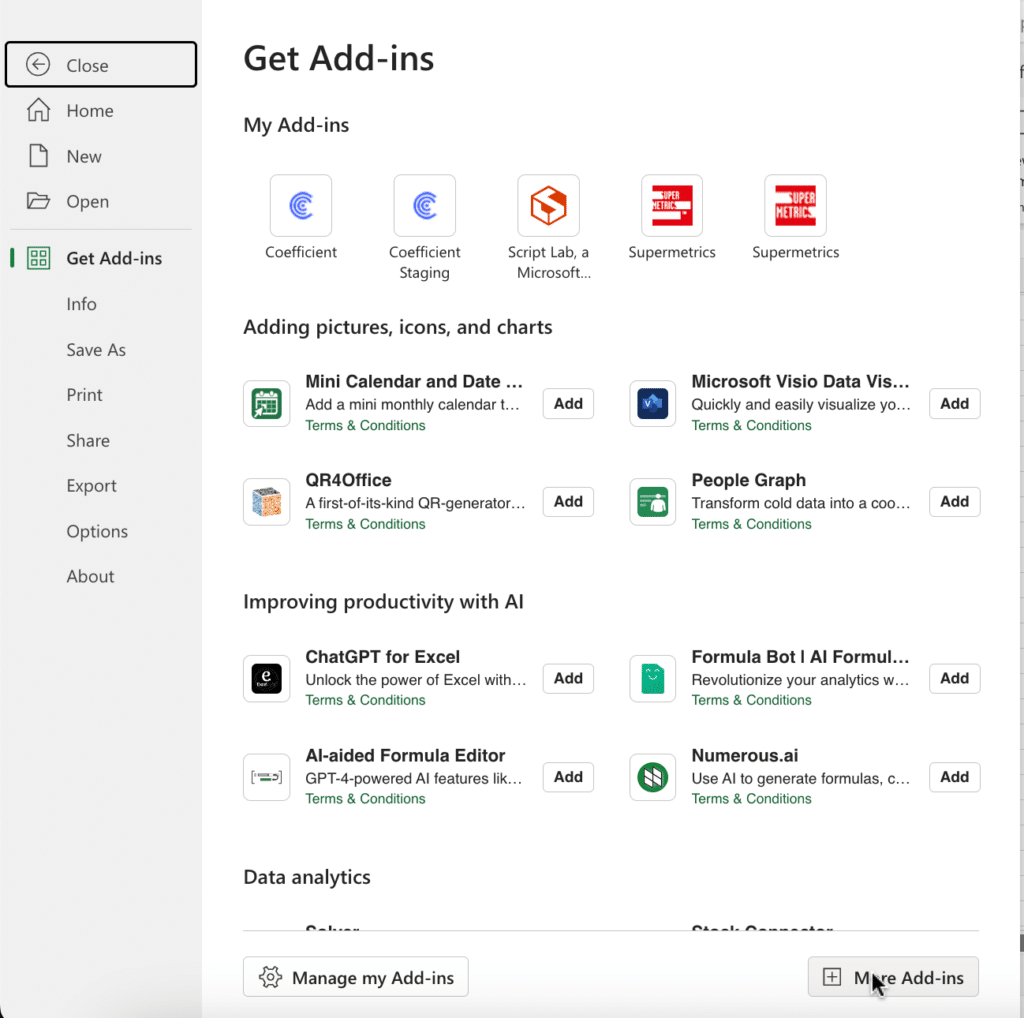
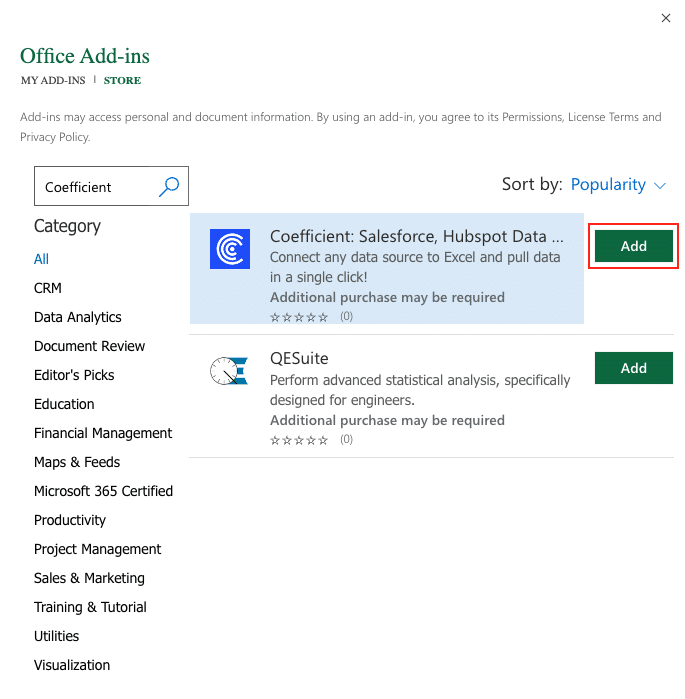
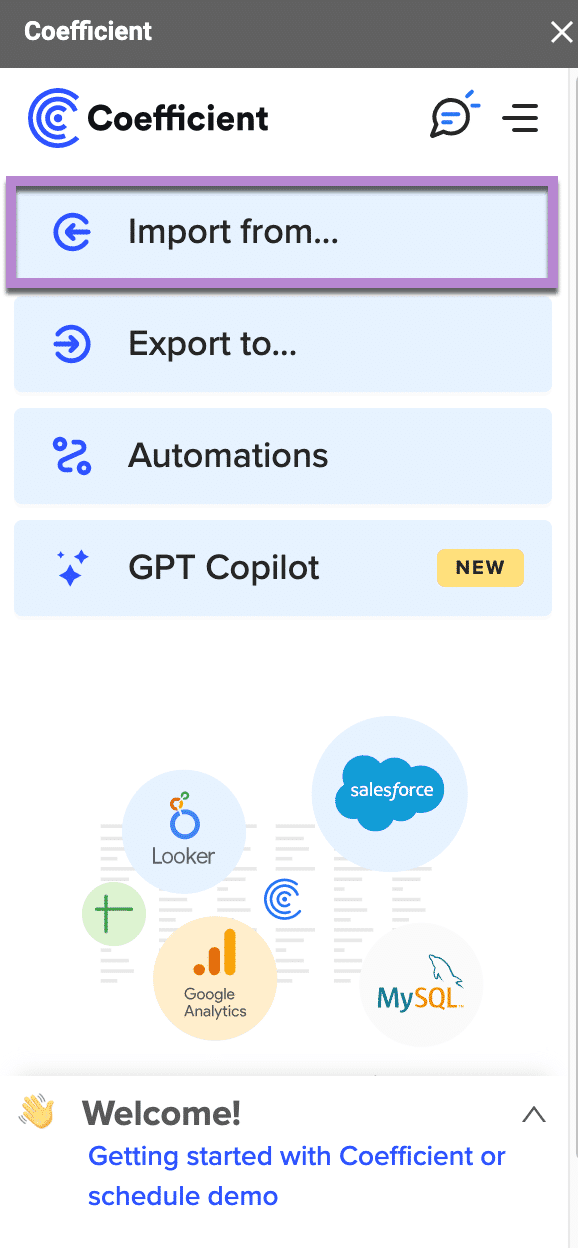
Step 1: Install Coefficient for Excel
To kick start the process, open a new workbook. Click ‘File’ > ‘Get Add-ins’ > ‘More Add-Ins.’
Search for Coefficient and click “Add” to install it.
A pop-up will open up. Follow the prompts to complete the installation.
Step 2: Connect Your QuickBooks Account
After installation, you will see a “Coefficient” tab at the top navigation bar.
Select ‘Open Sidebar’ to launch Coefficient.
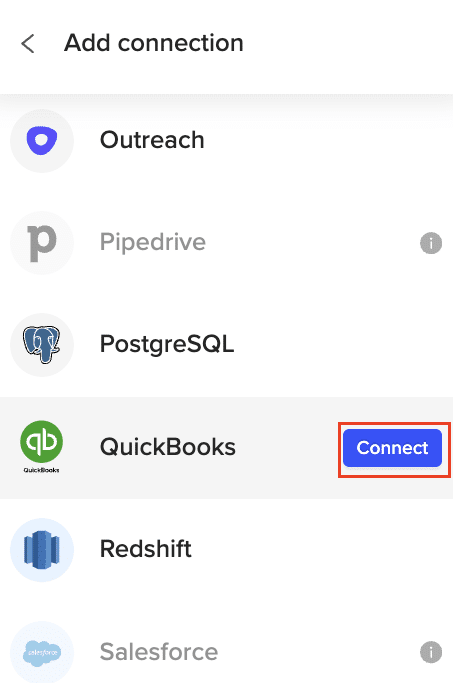
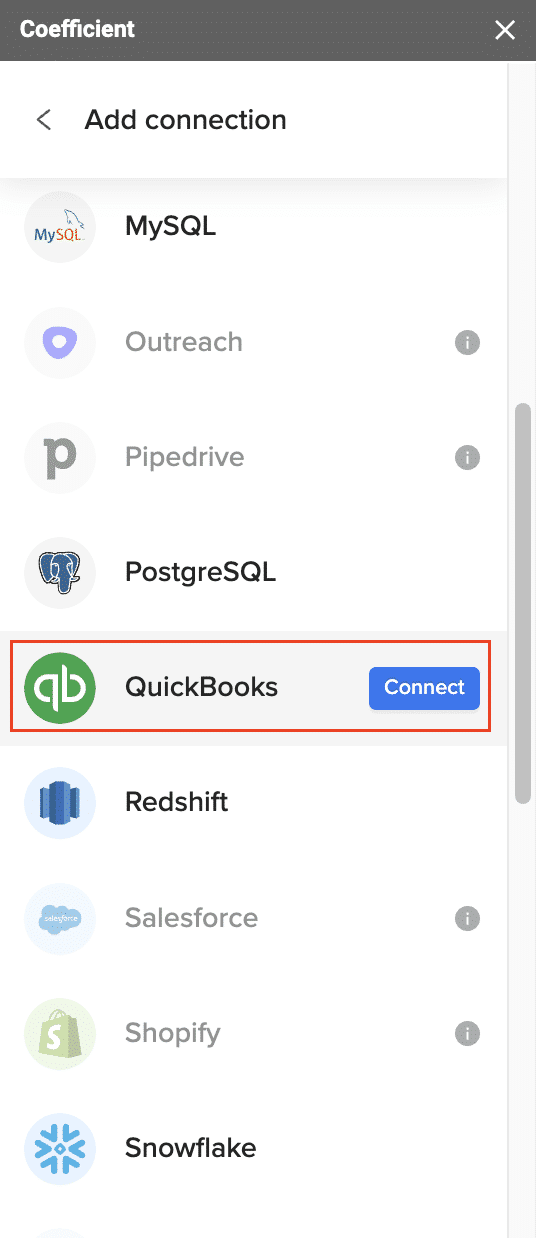
Click ‘Import from…’ and scroll down until you find QuickBooks.
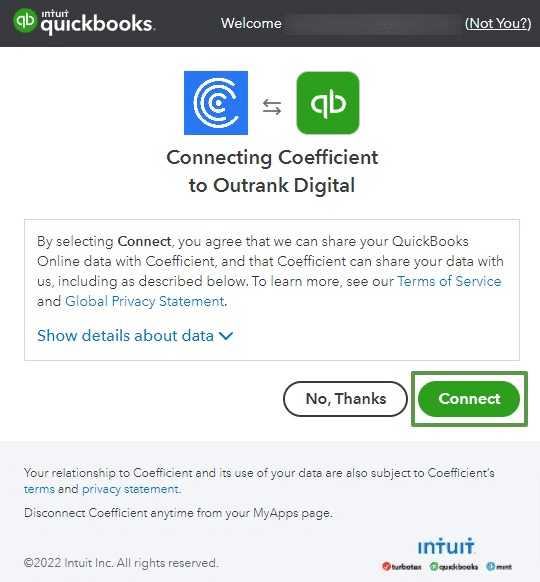
Click ‘Connect’ to continue.
A couple notes:
You need Admin access in QuickBooks to establish a connection with Coefficient.
QuickBooks API permits only one admin to connect through Coefficient simultaneously.
You can connect multiple QuickBooks accounts to Excel with Coefficient.
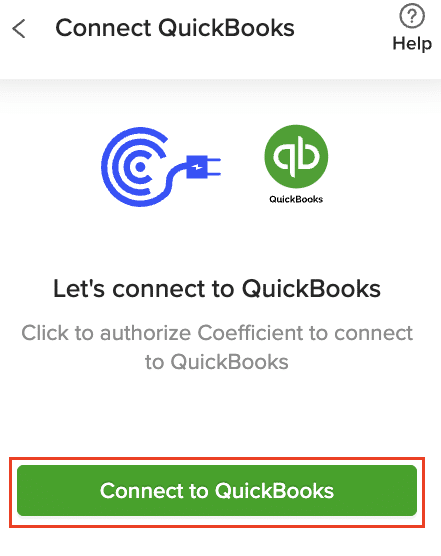
Follow the prompts to connect Coefficient to your QuickBooks account.
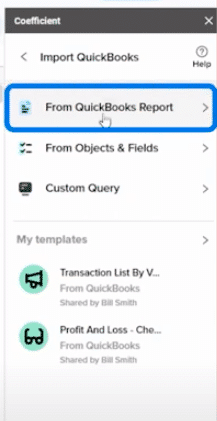
Step 3: Define QuickBooks Data to Export to Excel
Next, specify the QuickBooks data you’re looking to bring into Excel.
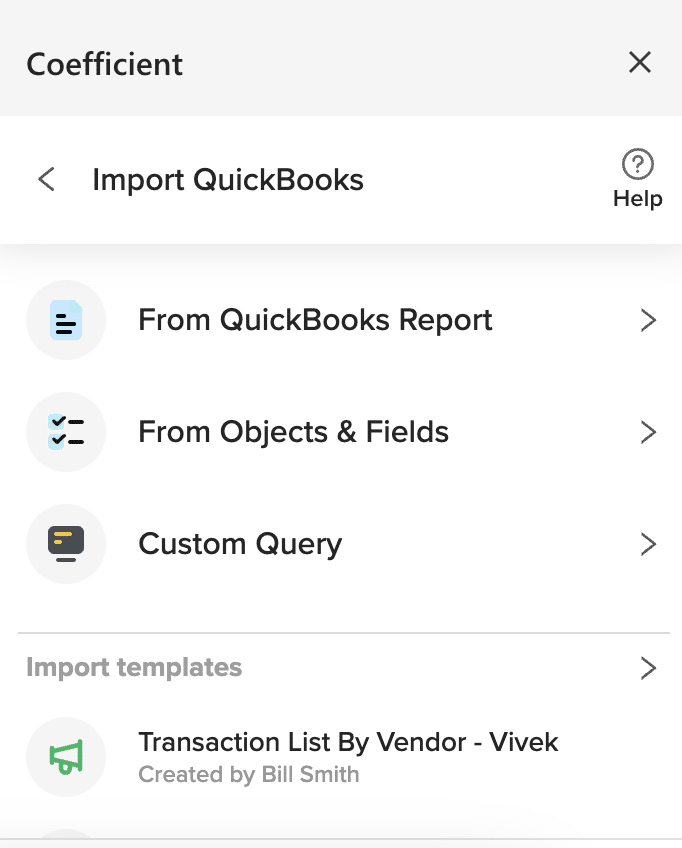
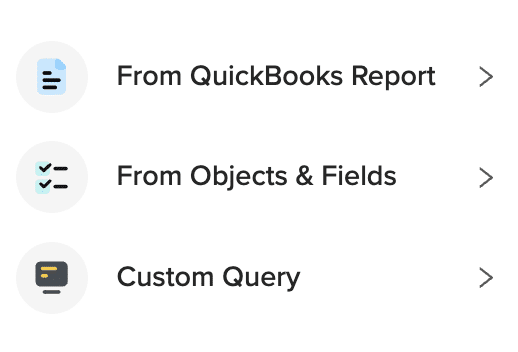
Coefficient’s flexibility allows you to choose from over 17 standard QuickBooks reports, build one from scratch, or write a custom query.
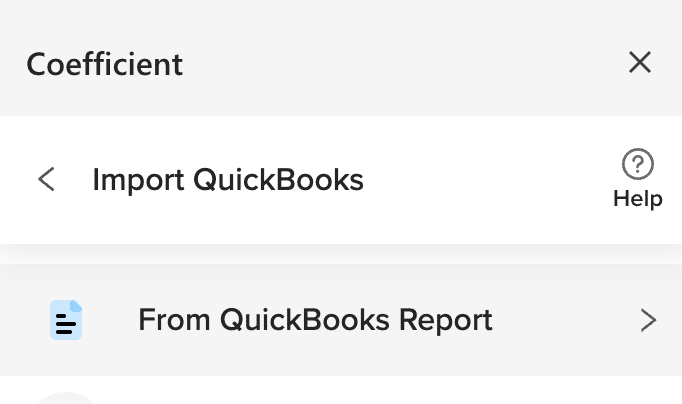
Click ‘From QuickBooks Report’ to continue.
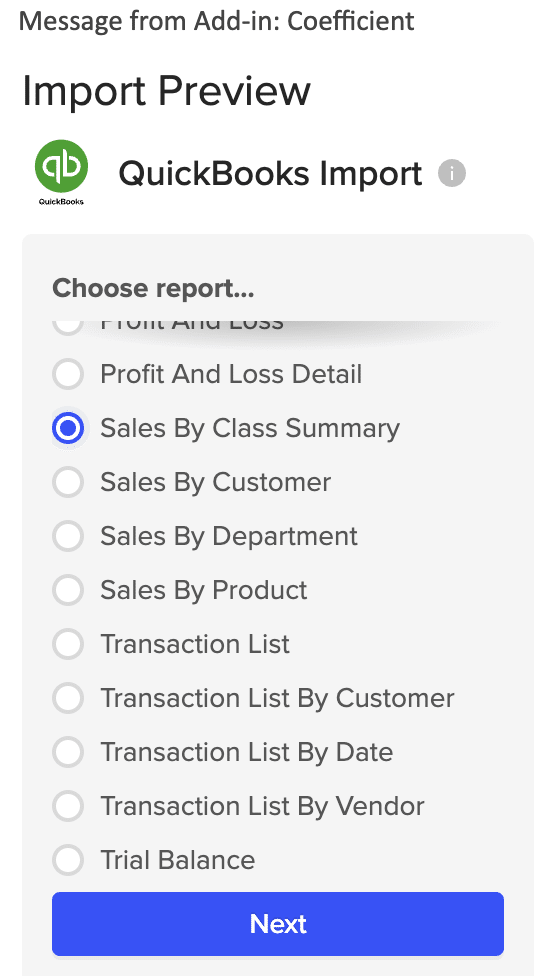
Choose a Report from the list then hit ‘Next.’
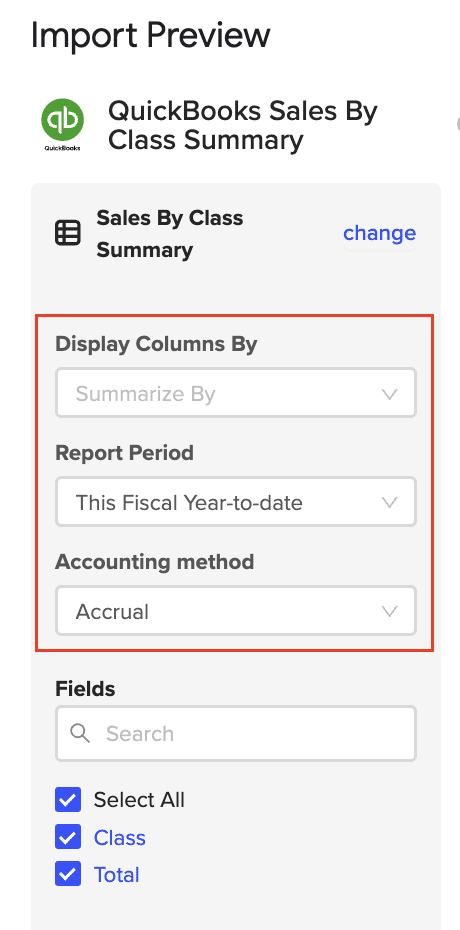
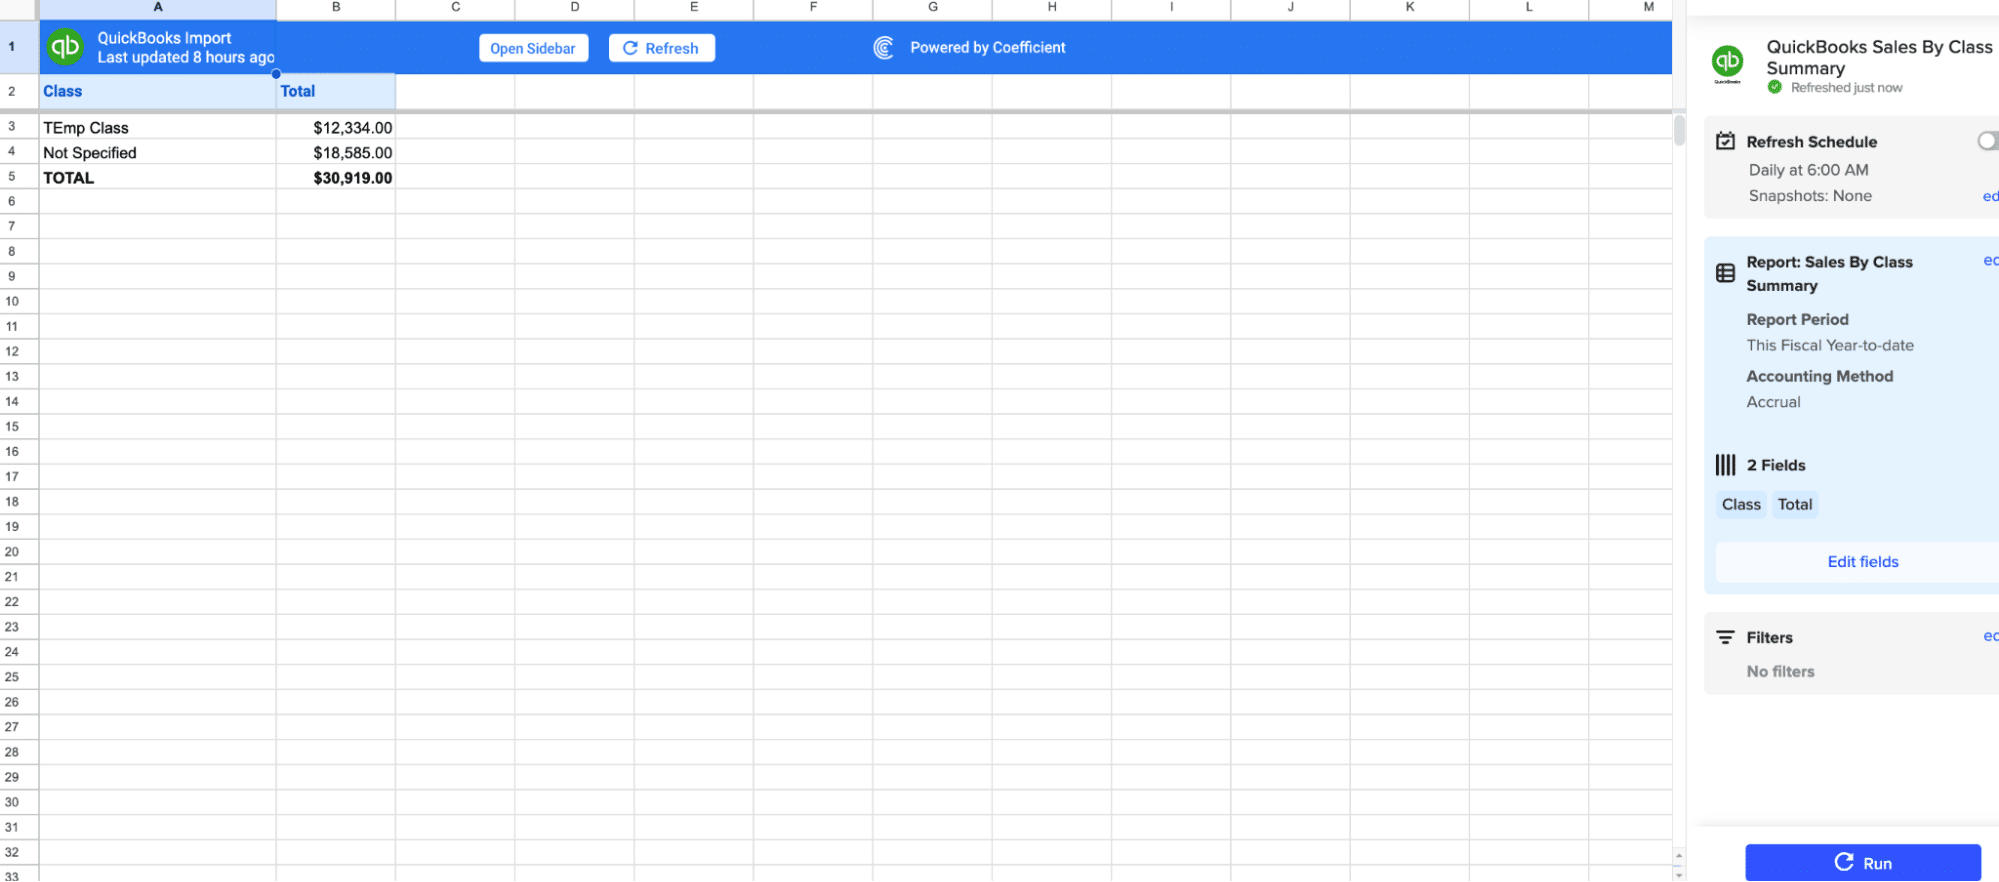
Customize your Report import by selecting “Display Columns By” and applying filters such as “Report Period” and “Accounting Method”.
Select your desired fields and click ‘Import.’
In just a few seconds, your QuickBooks export to Excel will automatically populate your spreadsheet.
Step 4: Set Data Refresh Schedule
To maintain up-to-date records in Excel, Coefficient enables setting an automatic data refresh rate. Opt for hourly, daily, or weekly updates to keep your Excel reports consistently current with real-time QuickBooks data.
Pros:
Ease of use with an intuitive, straightforward interface.
Fast, one-click installation and setup.
Real-time data synchronization with automatic updates.
QuickBooks itself offers built-in capabilities to export reports directly to Excel but with a few caveats:
You must have QuickBooks Online Advanced
Payroll reports cannot be exported to Google Sheets
QuickBooks data exports are static and cannot be automatically refreshed
Step 1: Choose Report in QuickBooks
First, navigate through your QuickBooks account to select the report or data you wish to export.
Step 2: Export to Excel
Utilize QuickBooks’ export function to save the report as an Excel file (.xlsx). This option can typically be found in the report viewing window.
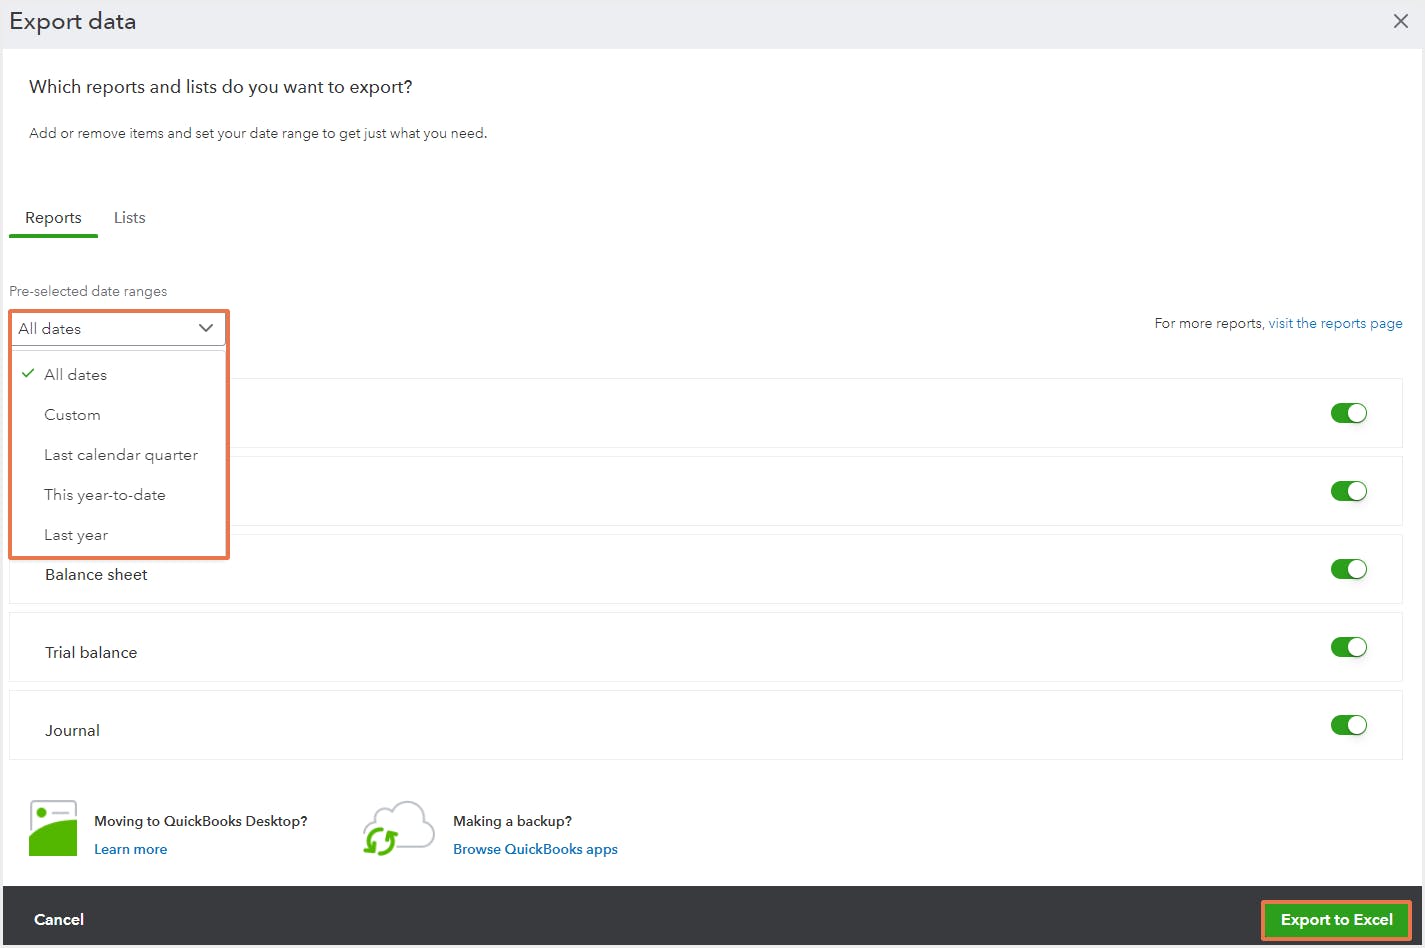
Click ‘Export data’ underneath the column labeled ‘TOOLS.’
Select the date range you want to export: ‘All dates,’ ‘Custom date range,’ ‘Last calendar quarter’, ‘This year-to-date,’ and ‘Last year.’
Finally, toggle off unwanted fields to remove them from your export.
Click the ‘Export to Excel’ button in the bottom right corner.
Your data will download as a ZIP file. Open it to access your CSV.
Step 3: Open and Analyze in Excel
With the file saved, simply open it in Excel to leverage Excel’s powerful analytical tools on your QuickBooks data.
Cons of QuickBooks Export to Excel:
Exporting data to Excel needs to be done by hand every time, which is time-consuming.
Exported data won’t automatically update, so you might use old information unless you keep exporting new data.
After exporting, you often have to spend more time in Excel arranging the data how you need it.
Method 3. Power Query (Only for Desktop)
If you’re using Excel for Desktop and want to integrate QuickBooks data, Power Query is a good alternative for more technical users. It simplifies importing, refreshing, and managing QuickBooks data within Excel, enhancing your analysis and reports.
Here’s how to connect QuickBooks to Excel using Power Query in a few steps.
Step 1: Open Power Query in Excel
From Excel, access Data > Get Data > From Other Sources > From Web. Power Query will prompt you for a web API URL.
Step 2: Connect to QuickBooks Online
Enter your QuickBooks Online API endpoint. You’ll need to go through authentication steps to establish a secure connection.
Step 3: Load and Transform Your Data
Select the specific sets of data you want to import into Excel. Power Query allows for data transformation and conditioning before loading it into your worksheet for analysis.
Power Query Cons:
Getting the hang of Power Query’s many features can take some time, especially if you’re new to handling data.
Power Query works just on the Excel Desktop app, not on web or mobile versions.
Linking to QuickBooks Online with its API is complex and needs regular checks and maintenance to keep it working correctly.
Streamlining Financial Data Analysis and Reporting
Exporting data from QuickBooks to Excel expands your data manipulation and reporting capabilities significantly. Coefficient streamlines this integration, making it efficient for anyone on your team to develop comprehensive dashboards and reports in Excel using QuickBooks data.
Ready to transform your financial reporting and data analysis workflows?
Get started with Coefficient today for seamless QuickBooks to Excel integration, and harness the full potential of your financial data.
Exporting invoices from QuickBooks is crucial for analyzing financial data. Learn two quick methods to extract your invoice information quickly and accurately.
Method 1: Automatically with Coefficient
Coefficient is a powerful data integration tool that connects QuickBooks to spreadsheet applications. It allows real-time syncing of QuickBooks data, including invoices, directly to Google Sheets or Excel for advanced analysis and reporting.
Benefits of using Coefficient:
Real-time data synchronization ensures your spreadsheets always contain the most up-to-date information.
Automated report generation saves time and reduces manual errors.
Customizable data views allow you to tailor the exported information to your specific needs.
Seamless integration with Google Sheets and Excel makes it easy to work with familiar tools.
Step-by-step walkthrough:
Step 1. Install Coefficient
For Google Sheets
Open a new or existing Google Sheet, navigate to the Extensions tab, and select Add-ons > Get add-ons.
In the Google Workspace Marketplace, search for “Coefficient.”
Follow the prompts to grant necessary permissions.
Launch Coefficient from Extensions > Coefficient > Launch.
Coefficient will open on the right-hand side of your spreadsheet.
For Microsoft Excel
Open Excel from your desktop or in Office Online. Click ‘File’ > ‘Get Add-ins’ > ‘More Add-Ins.’
Type “Coefficient” in the search bar and click ‘Add.’
Follow the prompts in the pop-up to complete the installation.
Once finished, you will see a “Coefficient” tab in the top navigation bar. Click ‘Open Sidebar’ to launch Coefficient.
Step 2. Connect your QuickBooks account.
Click “Import from…” and select QuickBooks.
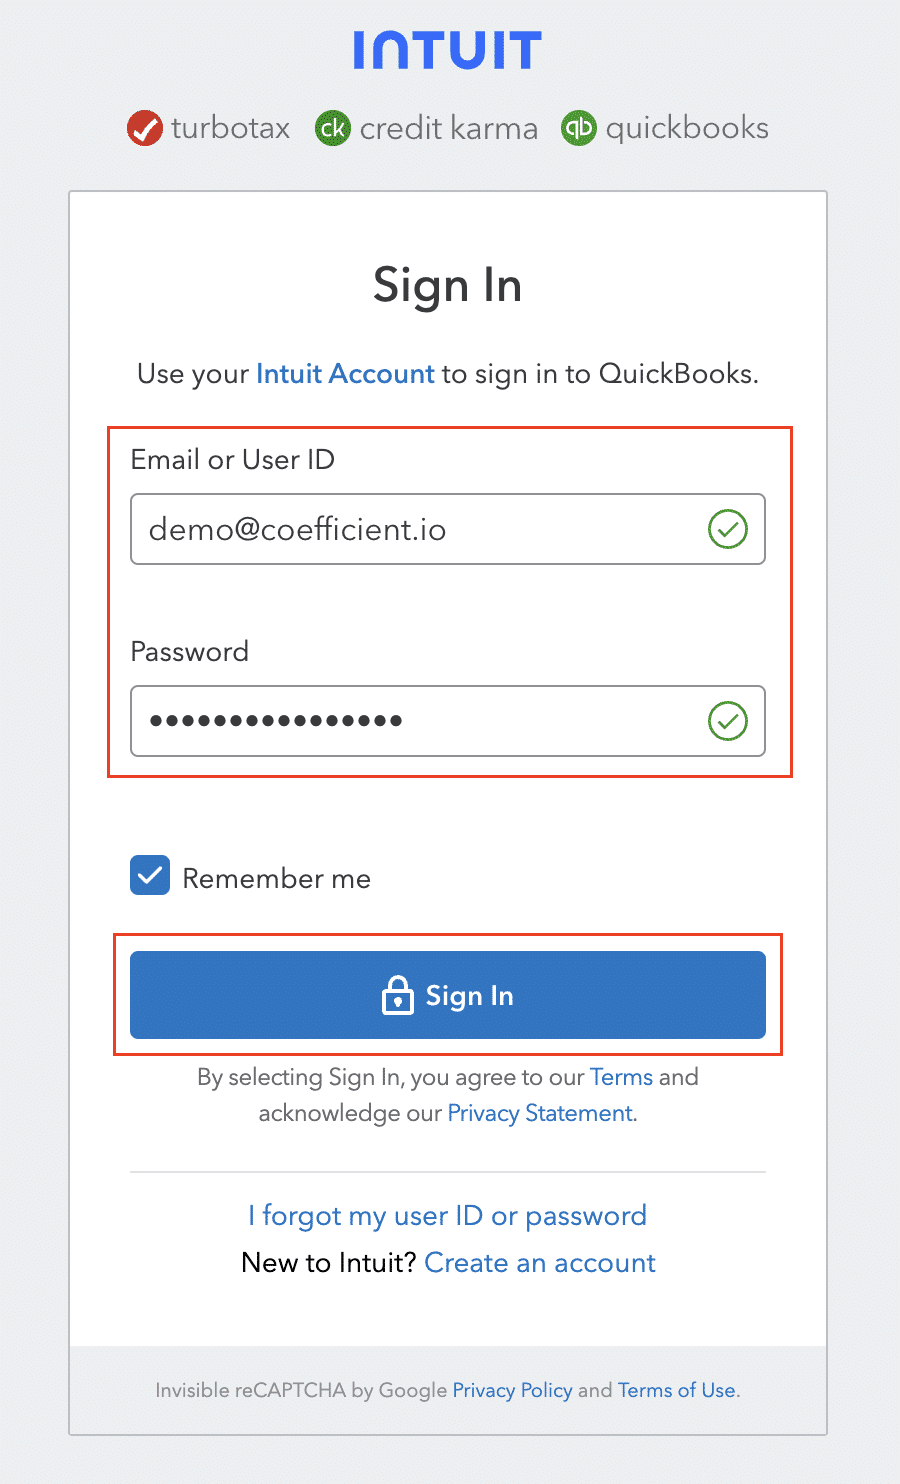
Sign in to your QuickBooks account and authorize the connection.
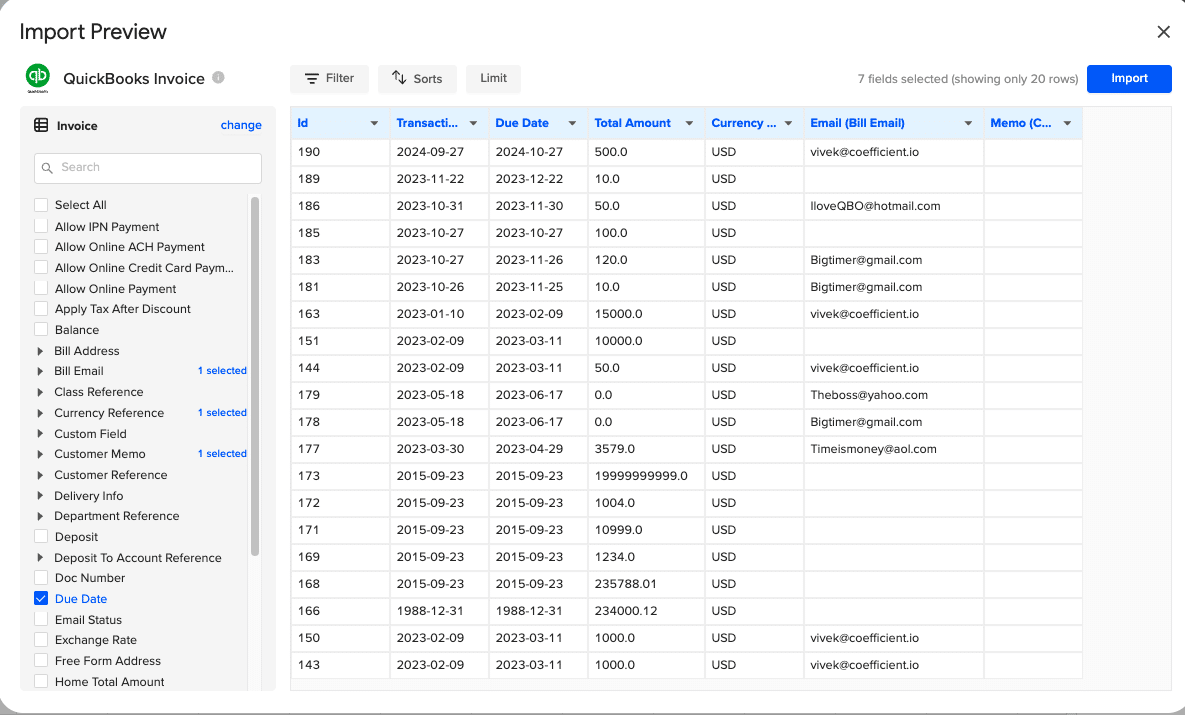
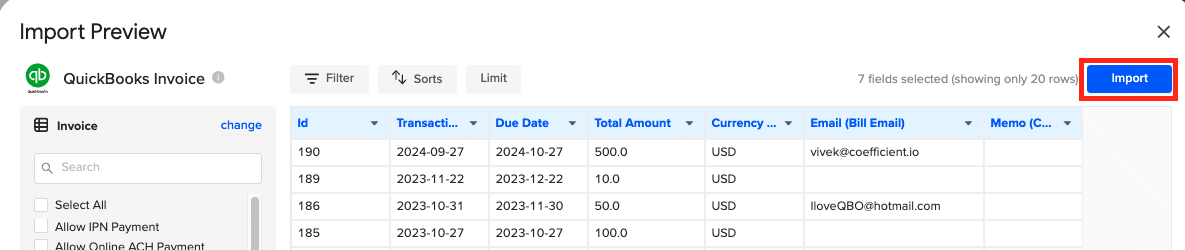
Step 3. Select the invoice data you want to export.
After connecting, return to QuickBooks and select “From Objects & Fields”
In the Coefficient sidebar, choose “Invoices” from the available QuickBooks data sources.
Select the fields you want to export from the left-hand panel
When ready, click “Import” to bring the data into your spreadsheet
Step 4. Set up automatic refresh schedules (optional).
After exporting your data into your spreadsheet, you can set up Coefficient’s auto-refresh scheduler for automatic updates. Choose from options like hourly, daily, or weekly refreshes.
Method 2: Manually from QuickBooks
QuickBooks Online offers built-in export functionality for basic invoice data extraction. This method is suitable for simple exports and is directly accessible within the QuickBooks interface.
Step-by-step walkthrough:
Step 1. Log in to your QuickBooks Online account.
Open your web browser and navigate to the QuickBooks Online login page.
Enter your credentials and click “Sign In”.
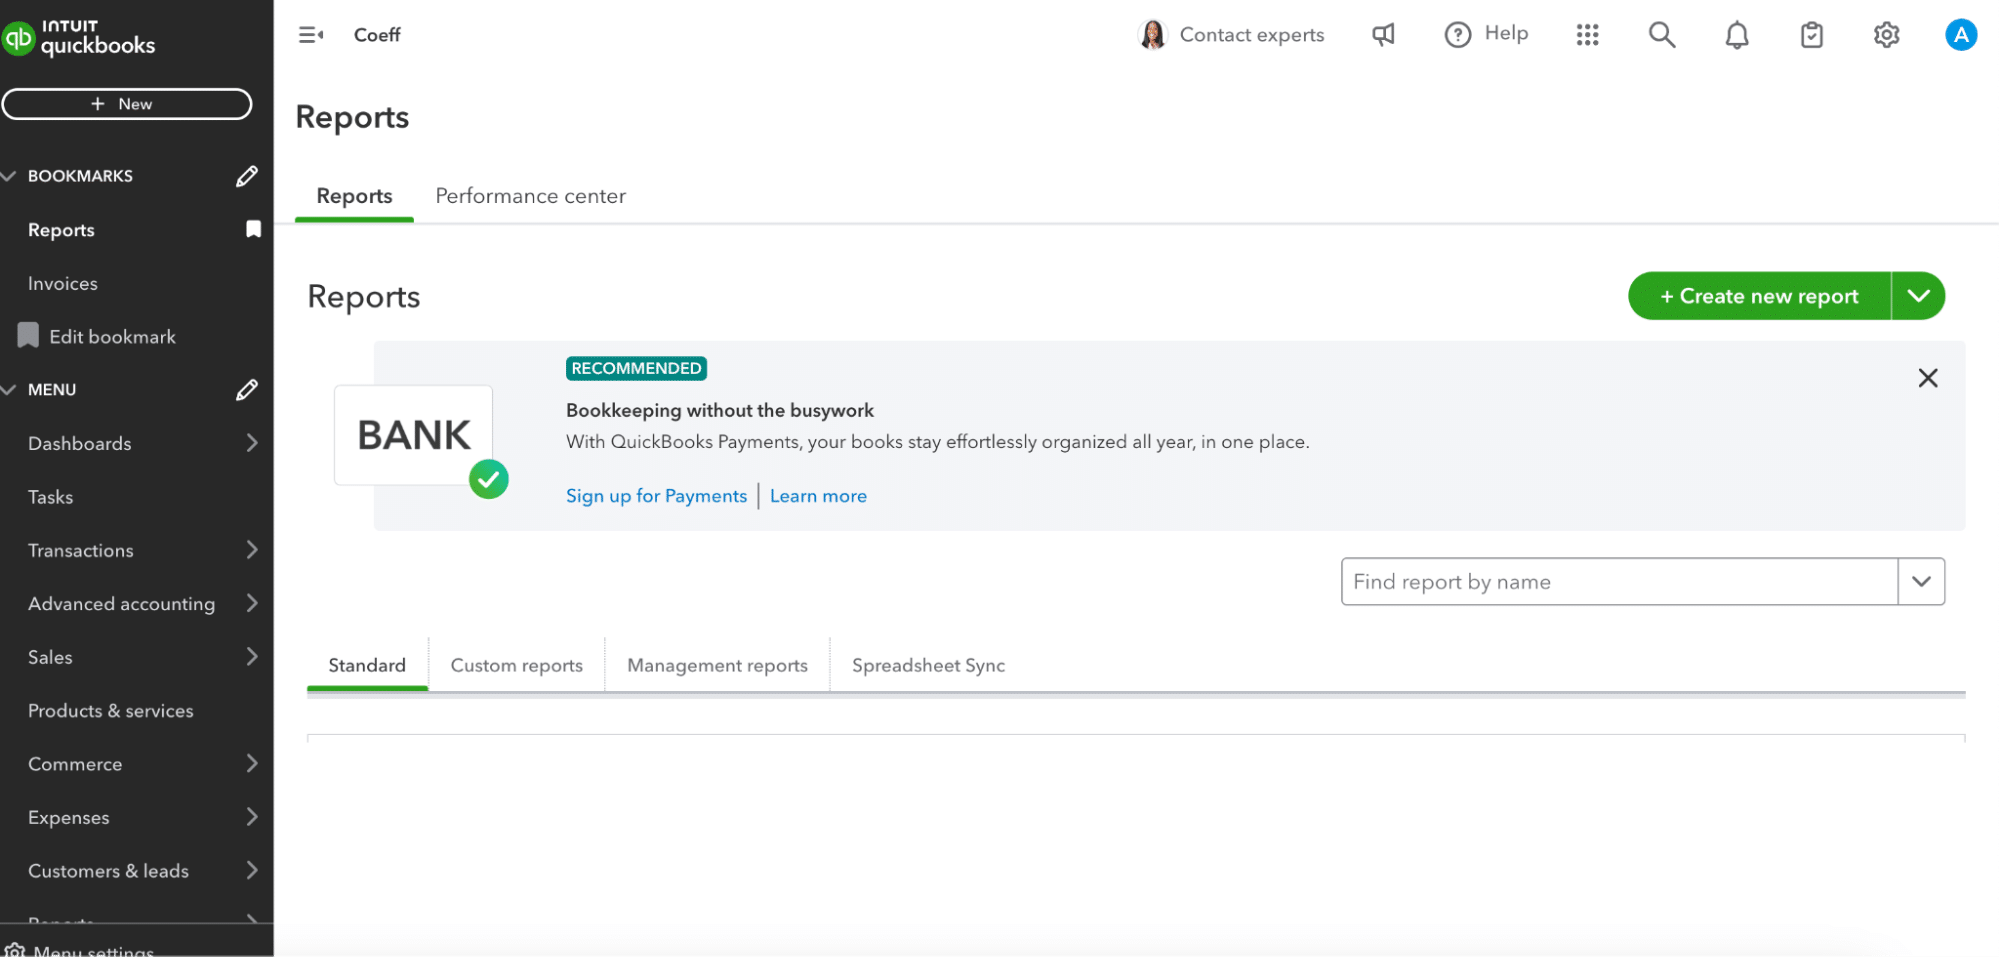
Step 2. Navigate to the Reports section.
From the QuickBooks dashboard, locate and click on the “Reports” tab in the left-hand menu.
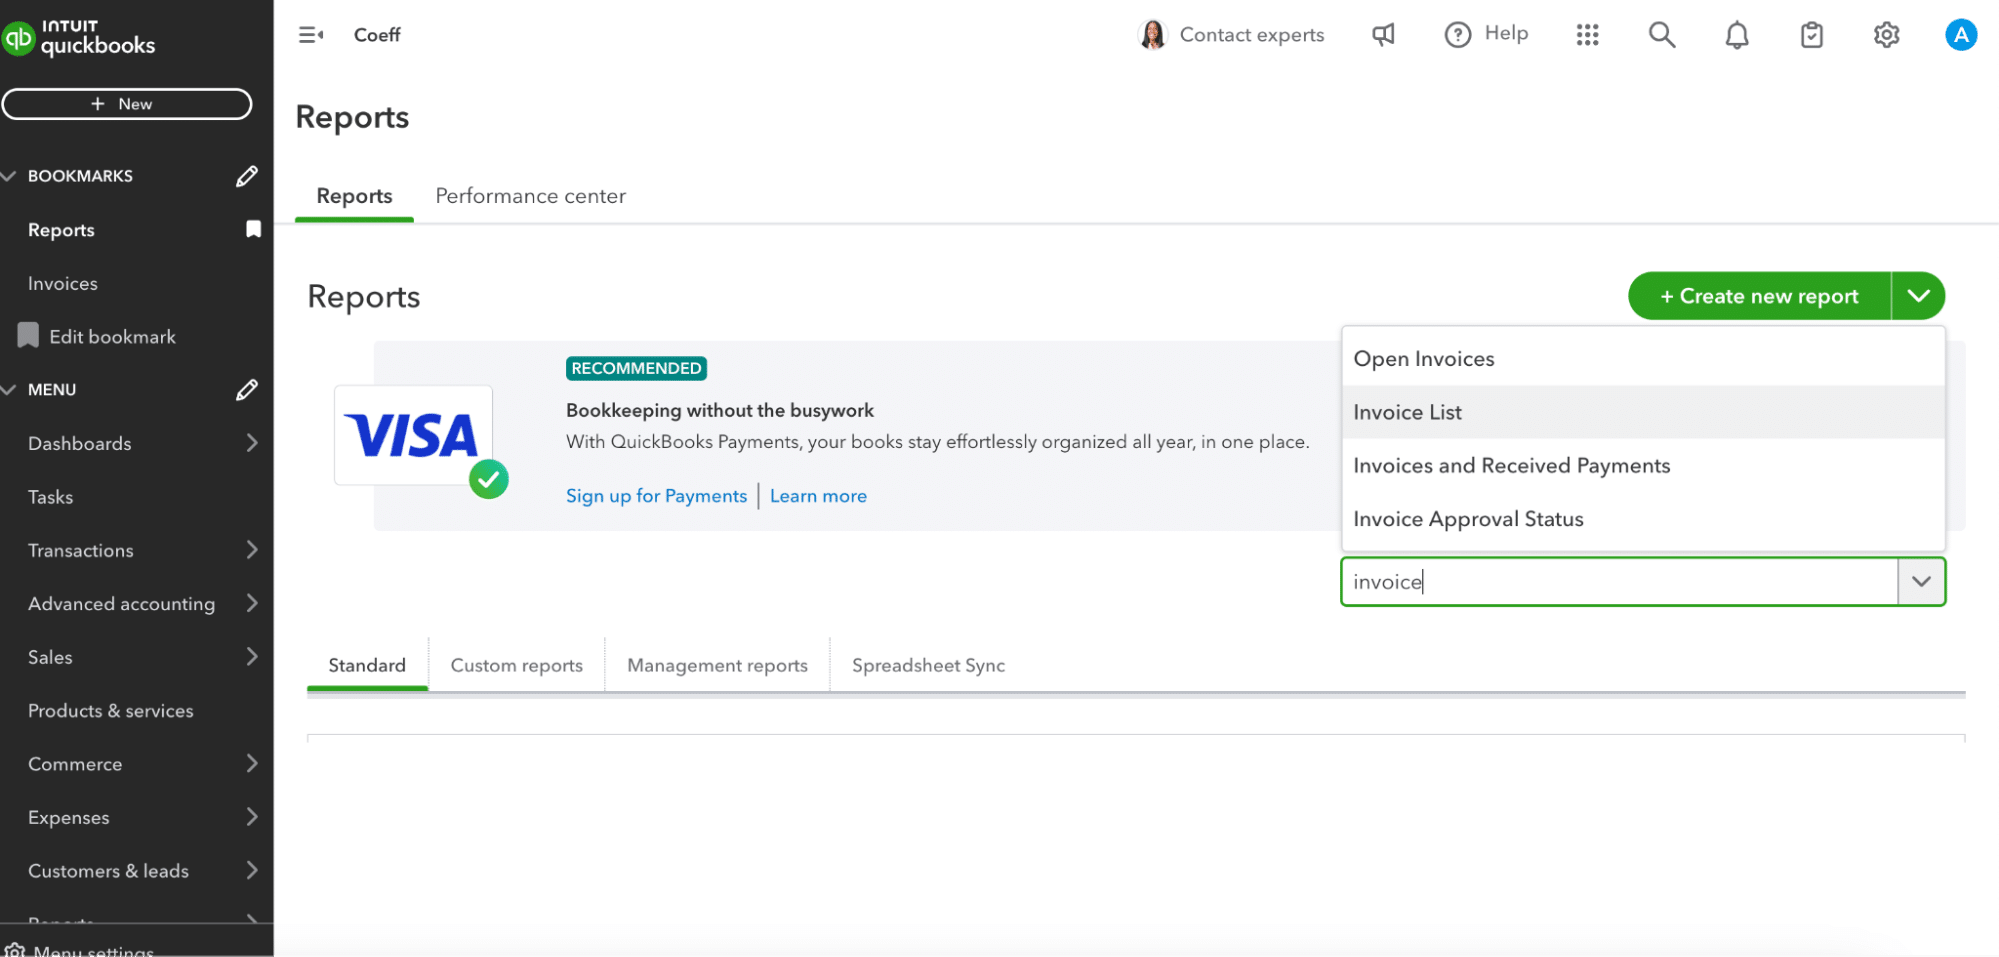
Step 3. Search for and select “Invoice List” report.
In the Reports search bar, type “Invoice List”.
Click on the “Invoice List” report when it appears in the search results.
Step 4. Customize the report as needed.
Use the available options to set your desired date range for the invoices.
Click “Customize” to add or remove columns, such as invoice number, customer name, or amount.
Apply any filters to narrow down the data (e.g., specific customers or invoice status).
Step 5. Click “Export” and choose your desired format.
Look for the “Export” button, typically located near the top of the report.
Click on it to open the export options.
Choose either Excel or PDF format, depending on your needs.
Save the exported file to your preferred location on your computer.
Disadvantages of native exports:
Limited customization options restrict the ability to tailor exports to specific needs.
Manual process requiring regular updates can be time-consuming for frequent reporting.
Lack of real-time data synchronization means exported data may quickly become outdated.
Export Invoices from QuickBooks and Keep them Live!
Exporting invoices from QuickBooks is crucial for effective financial management and analysis. While QuickBooks Online and CSV exports offer basic functionality, Coefficient provides a more robust solution with real-time data synchronization and advanced reporting capabilities. Choose the method that best fits your needs and streamline your invoice management process.
To learn more about exporting QuickBooks data to Google Sheets, explore our comprehensive guide on the topic.
In the following step-by-step guide, you’ll learn how to export data from QuickBooks.
While QuickBooks is a powerful platform on its own, combining it with Google Sheets makes it even better. Exporting data on autopilot from QuickBooks to Sheets allows financial professionals to dive deep into their data, create customized analyses, and more!
Read on to learn how to export data from QuickBooks based on examples and step-by-step walkthroughs.
But first, let’s discuss why.
Reasons to Export QuickBooks Data into Google Sheets
Centralized Reporting: Exporting QuickBooks data to Google Sheets allows businesses to centralize their financial reports and even consolidate data from multiple platforms in one easily accessible location.
Enhanced Customization: Exporting QuickBooks data allows users to create custom reports, graphs, and charts.
Collaboration: Google Sheets is known for its collaborative features, allowing multiple users to view, edit, and comment on a document in real-time. By exporting QuickBooks data to Sheets, teams can collaborate on financial data analysis and strategic planning.
Automated Updates & Scheduling: With the right add-ons or integrations, data in Google Sheets can be set to automatically update data, ensuring your financial reports are up-to-date without the constant need for manual exports.
No Extra Log-In’s Required: Sharing QuickBooks data in Google Sheets doesn’t require extra log-in permissions or granting edit access to your source data.
It can also connect Google Sheets to any business system, enabling you to blend and analyze your QuickBooks data with a variety of other data sources (Salesforce, HubSpot, MySQL, Looker, and so on).
To install Coefficient, open a new spreadsheet and navigate to Extensions>Add-ons>Get Add-ons.
Search for “Coefficient” in the Google Workspace Marketplace’s search bar.
Click the first app in the results.
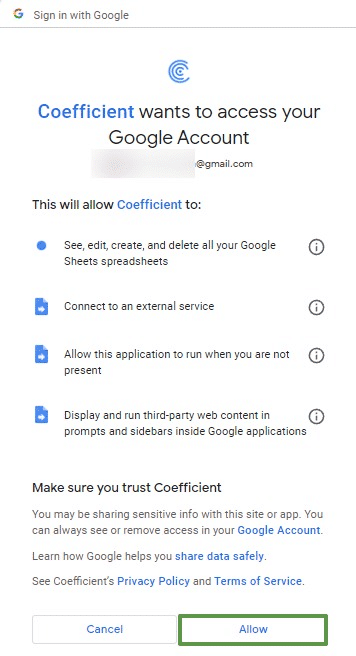
Grant Coefficient access to your Google Account.
After the installation is complete, return to your spreadsheet and open Coefficient by clicking Extensions>Coefficient>Launch.
Coefficient will open on the side of your spreadsheet.
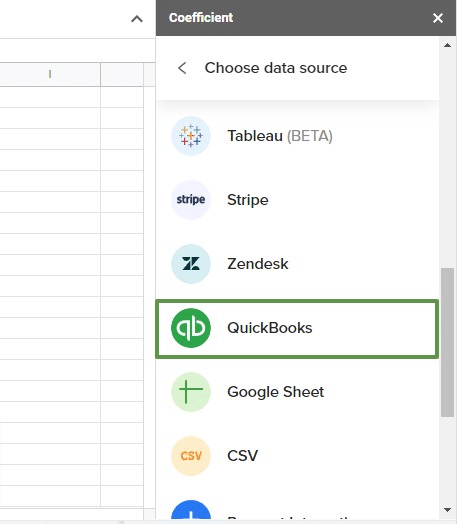
To start your import, click ‘Import from…’ in the menu.
Choose QuickBooks as your data source.
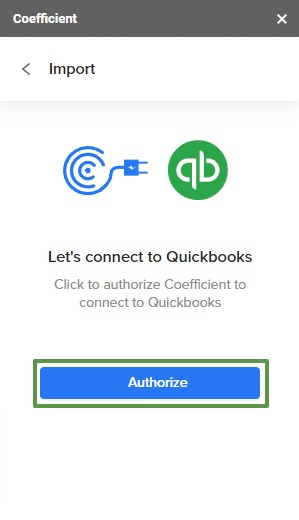
Click ‘Authorize’ to let Coefficient connect to your QuickBooks account.
A separate popup will open. Click ‘Connect.’
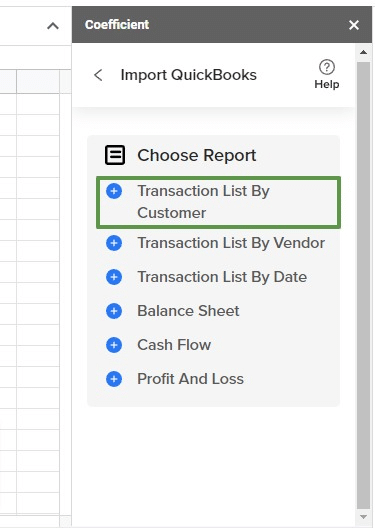
Click ‘From QuickBooks Report.’
Choose the QuickBooks report you want to export to Google Sheets from the Data Preview window.
Select the fields you want to bring into your export (e.g. Account, Balance, Description, etc.)
Click ‘Import’ to continue. Your data from QuickBooks will auto-populate into Google Sheets in seconds.
Finally, you can automate data updates by setting an auto-refresh schedule: hourly,
daily, or weekly.
Automatic data updates are set-and-forget. They continuously sync live data from QuickBooks into Google Sheets, so you always have up-to-date reporting and analytics.
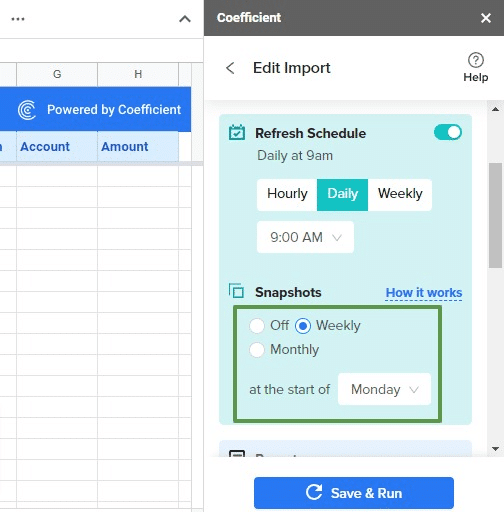
You can also schedule Snapshots to make a copy of your data before updates – very useful for week-over-week reporting.
2. QuickBooks
You can export data from QuickBooks to Google Sheets but with a few caveats:
You must have QuickBooks Online Advanced
Payroll reports cannot be exported to Google Sheets
QuickBooks data exports are static
Begin by logging into your QuickBooks Online account.
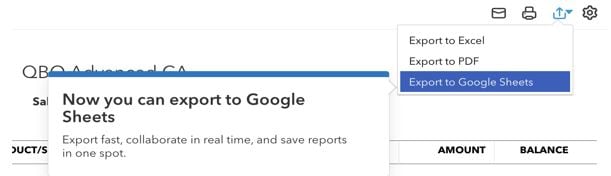
Navigate to the menu on the left and go to Business Overview > Reports.
Select the report you want to export and click the Export icon in the top right corner.
Select ‘Export to Google Sheets’ from the drop down menu.
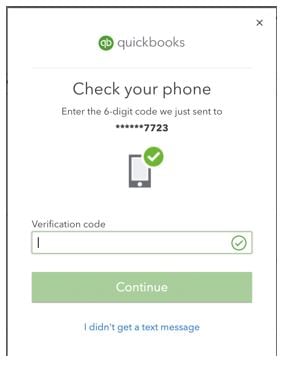
QuickBooks will send you a verification code as a security precaution.
Enter your code and click ‘Continue.’
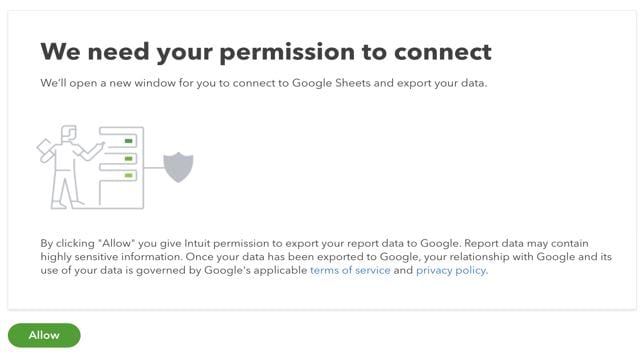
Another pop-up will open, prompting you to connect QuickBooks to Google Sheets.
Click ‘Allow.’
If prompted, sign into your Google account to finish linking your accounts.
Now, you can export data from QuickBooks to Google Sheets.
3. CSVs
CSVs allow you to export all your transaction data from QuickBooks to Google Sheets.
Start by signing into your QuickBooks account.
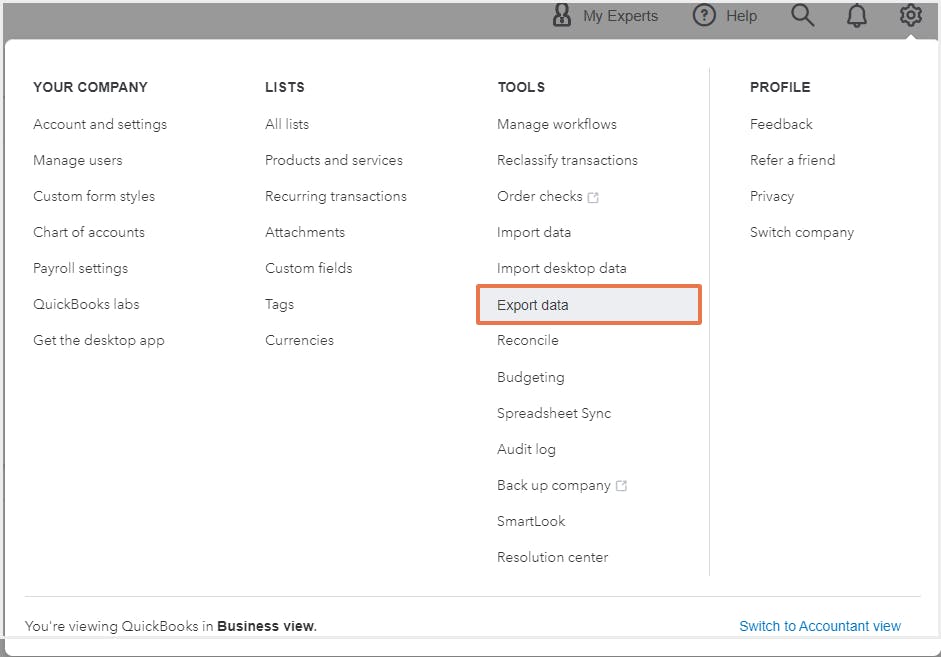
Navigate to the top right corner and click the gear icon to open the Settings menu.
Click ‘Export data’ underneath the column labeled ‘TOOLS.’
Select the date range you want to export: ‘All dates,’ ‘Custom date range,’ ‘Last calendar quarter’, ‘This year-to-date,’ and ‘Last year.’
Finally, toggle off unwanted fields to remove them from your export.
Click the ‘Export to Excel’ button in the bottom right corner.
Your data will download as a ZIP file. Open it to access your CSV.
Export QuickBooks Data in One-Click with Coefficient
Connecting QuickBooks to Google Sheets streamlines accounting, financial, and expense reporting workflows while reducing potential errors. It’s the easiest – and safest – way to export data from QuickBooks, allowing you to create live dashboards and share them with your team.
Looking to learn how to export your Chart of Accounts from QuickBooks? This guide details two effective methods to accomplish this task.
Let’s dive in!
Method 1. Coefficient: Seamlessly Sync QuickBooks Data to Google Sheets or Excel
Coefficient is a powerful spreadsheet add-on that connects various business systems to Google Sheets and Excel. It allows users to import live QuickBooks data, including the chart of accounts, directly into their spreadsheets. This method is ideal for those seeking real-time data syncing and automated reporting.
Benefits of using Coefficient:
Real-time data synchronization ensures up-to-date financial information.
Automated report generation and distribution saves time and reduces manual errors.
Direct integration with Google Sheets and Excel simplifies data analysis.
Customizable data imports allow for tailored financial reporting.
Scheduled data refreshes keep your spreadsheets current without manual intervention.
Step-by-step walkthrough:
Step 1. Install Coefficient
For Google Sheets
Open a new or existing Google Sheet, navigate to the Extensions tab, and select Add-ons > Get add-ons.
In the Google Workspace Marketplace, search for “Coefficient.”
Follow the prompts to grant necessary permissions.
Launch Coefficient from Extensions > Coefficient > Launch.
Coefficient will open on the right-hand side of your spreadsheet.
For Microsoft Excel
Open Excel from your desktop or in Office Online. Click ‘File’ > ‘Get Add-ins’ > ‘More Add-Ins.’
Type “Coefficient” in the search bar and click ‘Add.’
Follow the prompts in the pop-up to complete the installation.
Once finished, you will see a “Coefficient” tab in the top navigation bar. Click ‘Open Sidebar’ to launch Coefficient.
Step 2. Connect your QuickBooks account to Coefficient.
Launch the Coefficient add-on within your spreadsheet.
Click on the “Import from…” button in the Coefficient sidebar.
Select QuickBooks from the list of available integrations.
Log in to your QuickBooks account and authorize Coefficient to access your data.
Step 3. Select the chart of accounts data you want to import.
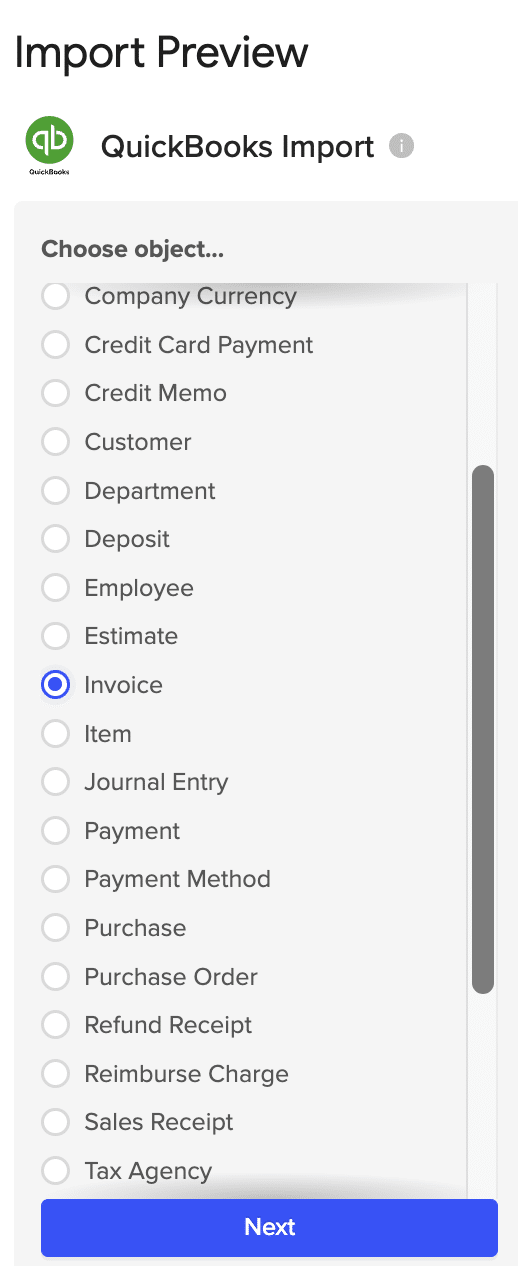
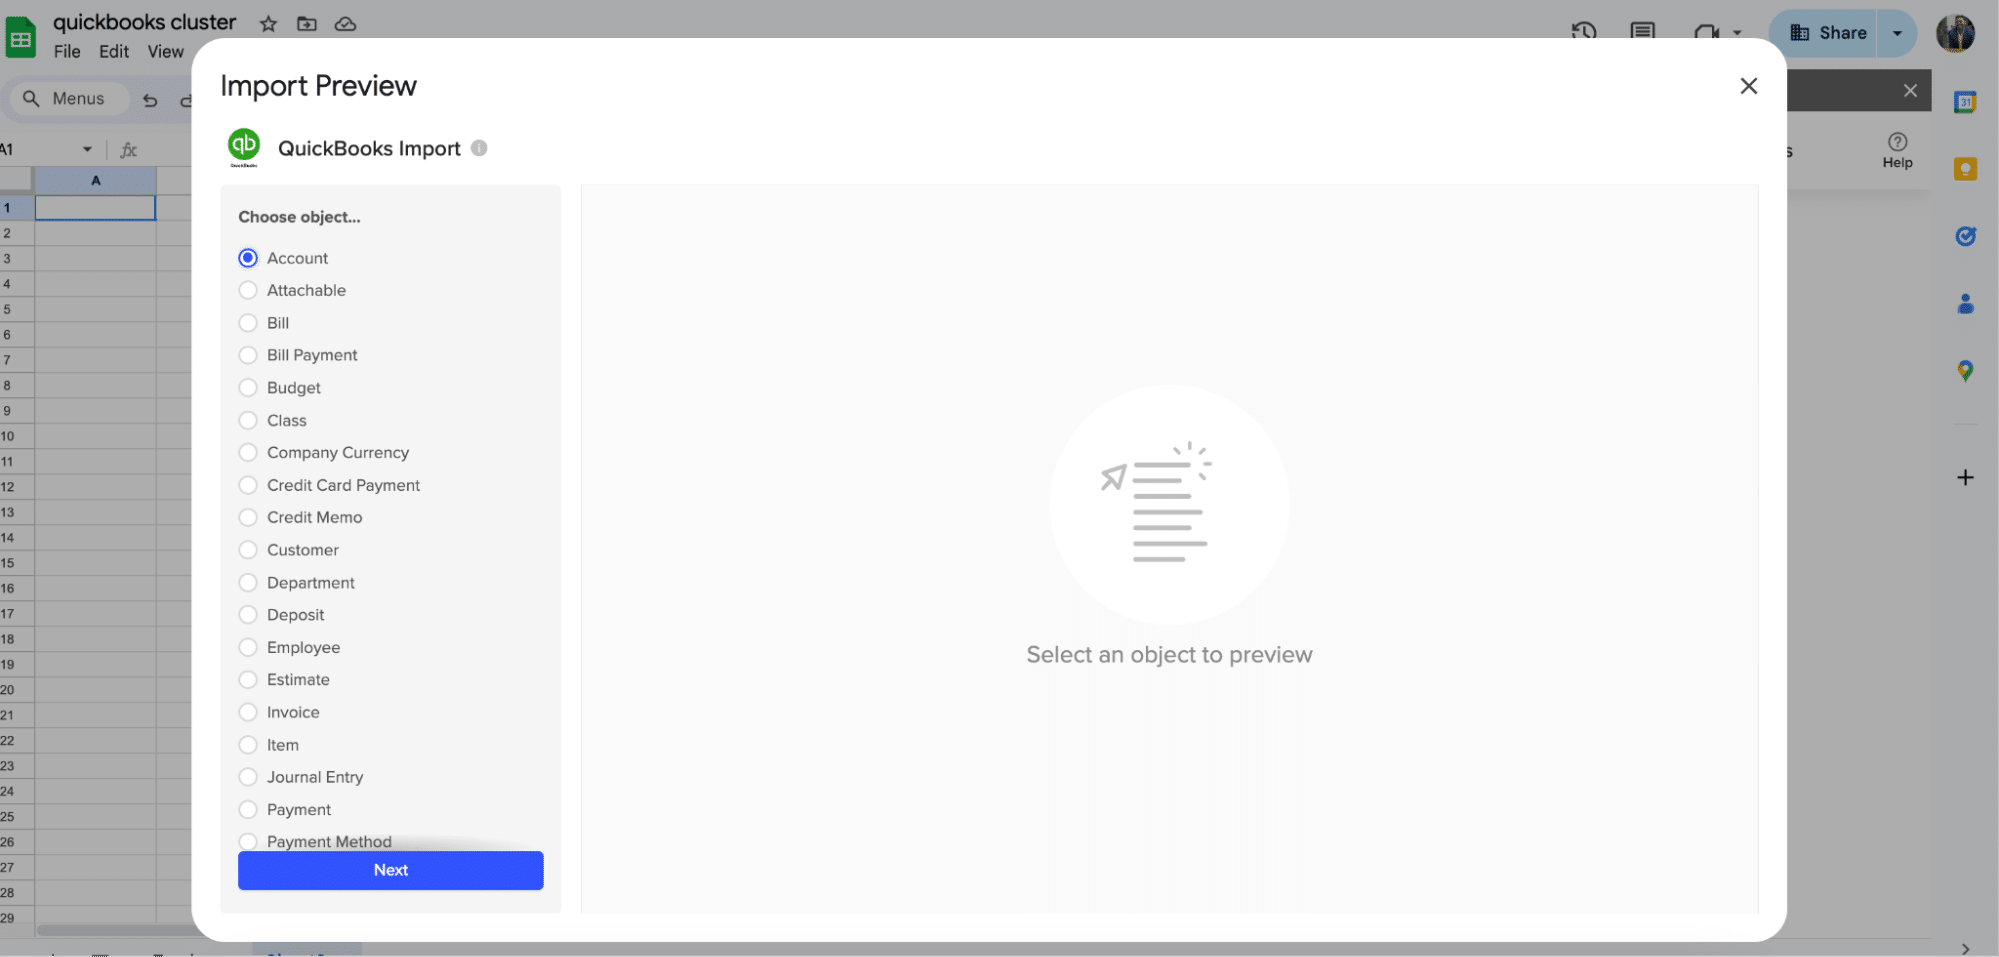
After connecting, return to QuickBooks and select “From QuickBooks Report”
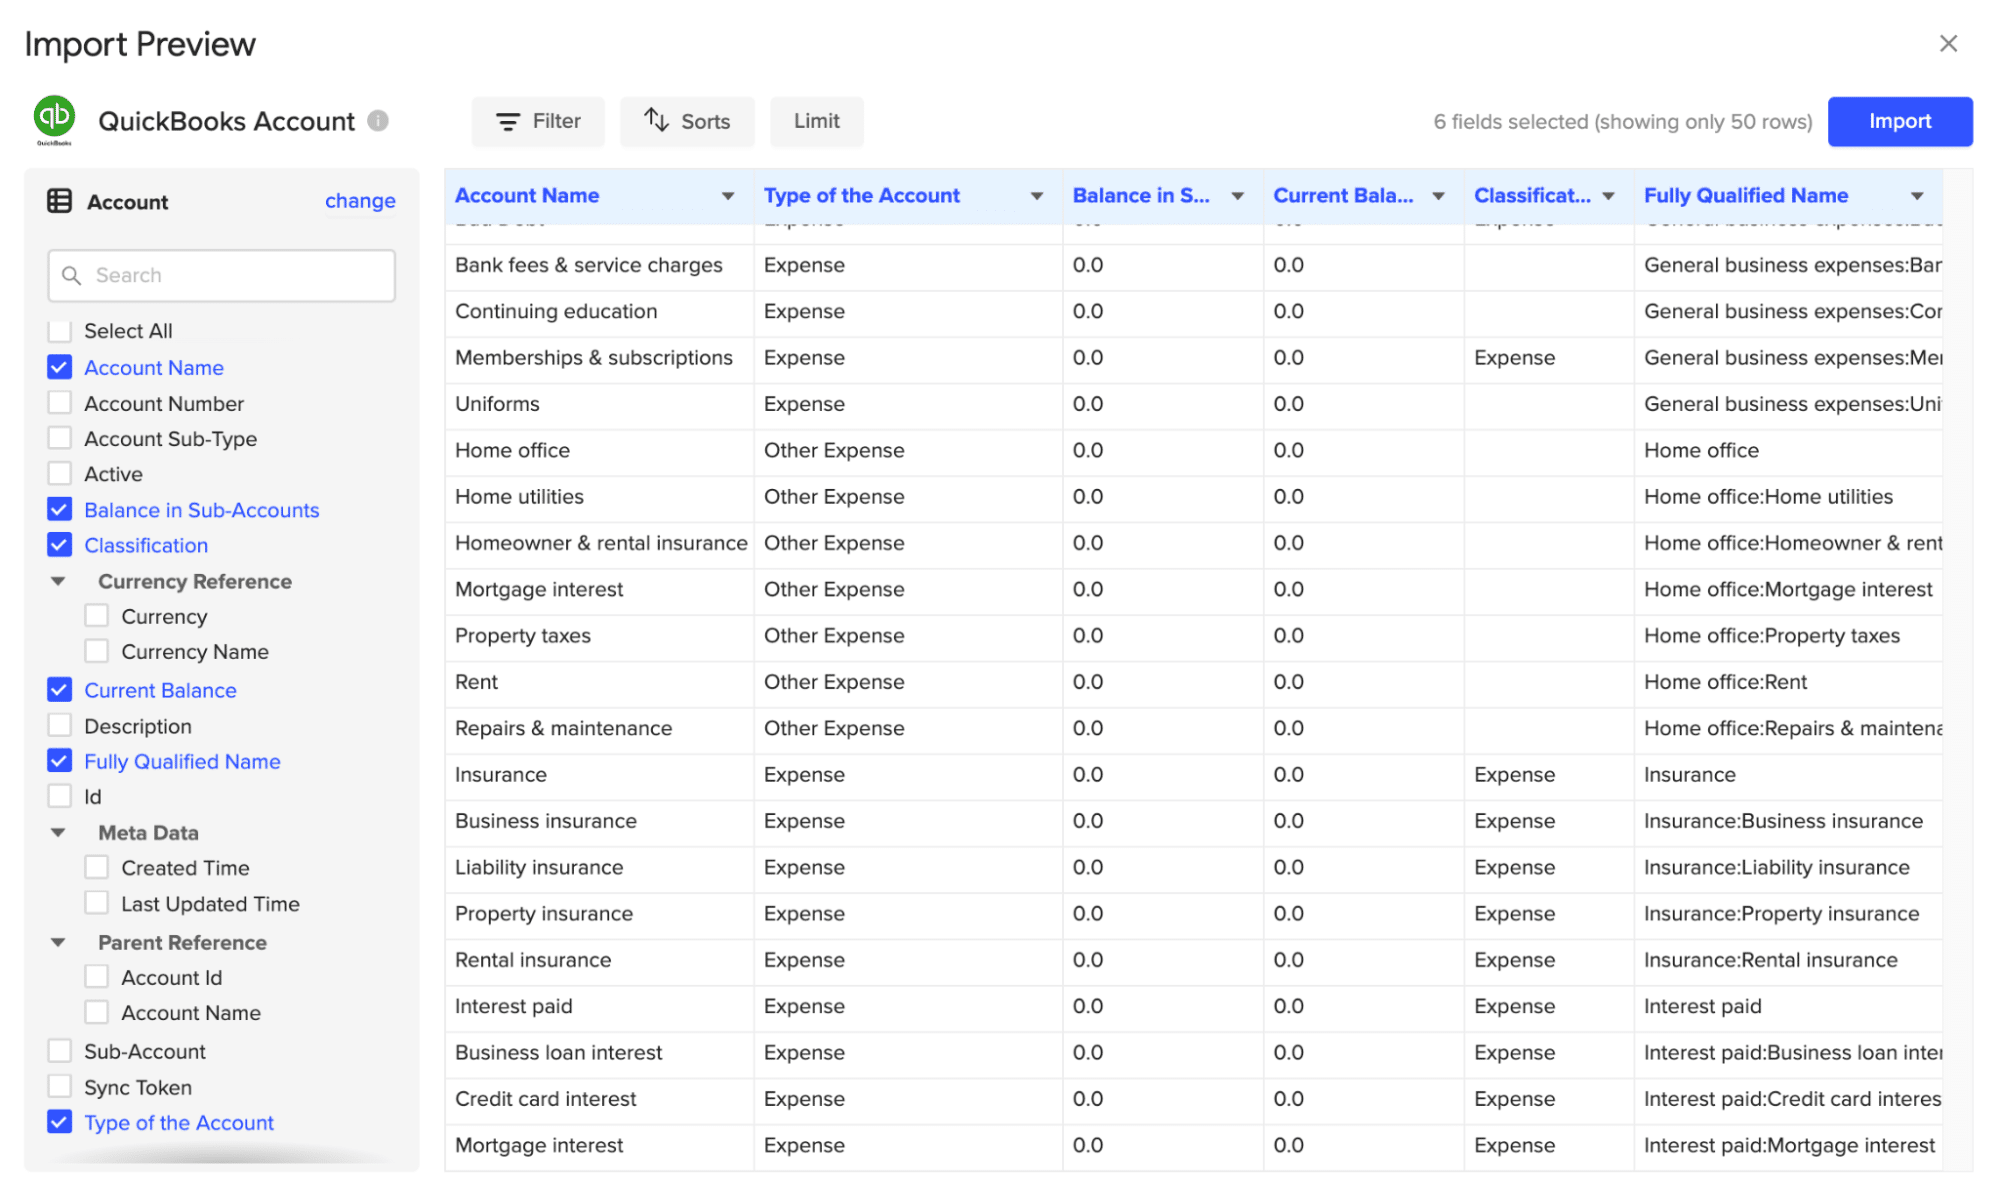
Select “Accounts” from the Import Preview Menu
Use the interface to select “Account Name,” “Balance in Sub-Accounts,” “Classification,” “Current Balance,” “Fully Qualified Name,” and “Type of Account.”
Click “Import” when you’re finished
Step 4. Set up automatic refresh schedules (optional).
Click on the “Schedule” option in the Coefficient sidebar.
Choose how often you want the data to refresh (e.g., daily, weekly, monthly).
Set the specific time and day for the refresh to occur.
Exporting your chart of accounts to a CSV (Comma-Separated Values) file is a versatile option offered by QuickBooks Online. This method creates a file format that can be easily imported into various spreadsheet applications and accounting software. It’s useful for one-time exports or when working with multiple platforms.
Step-by-step walkthrough:
Step 1. Log in to your QuickBooks Online account.
Open your preferred web browser and go to the QuickBooks Online login page.
Enter your username and password, then click “Sign In.”
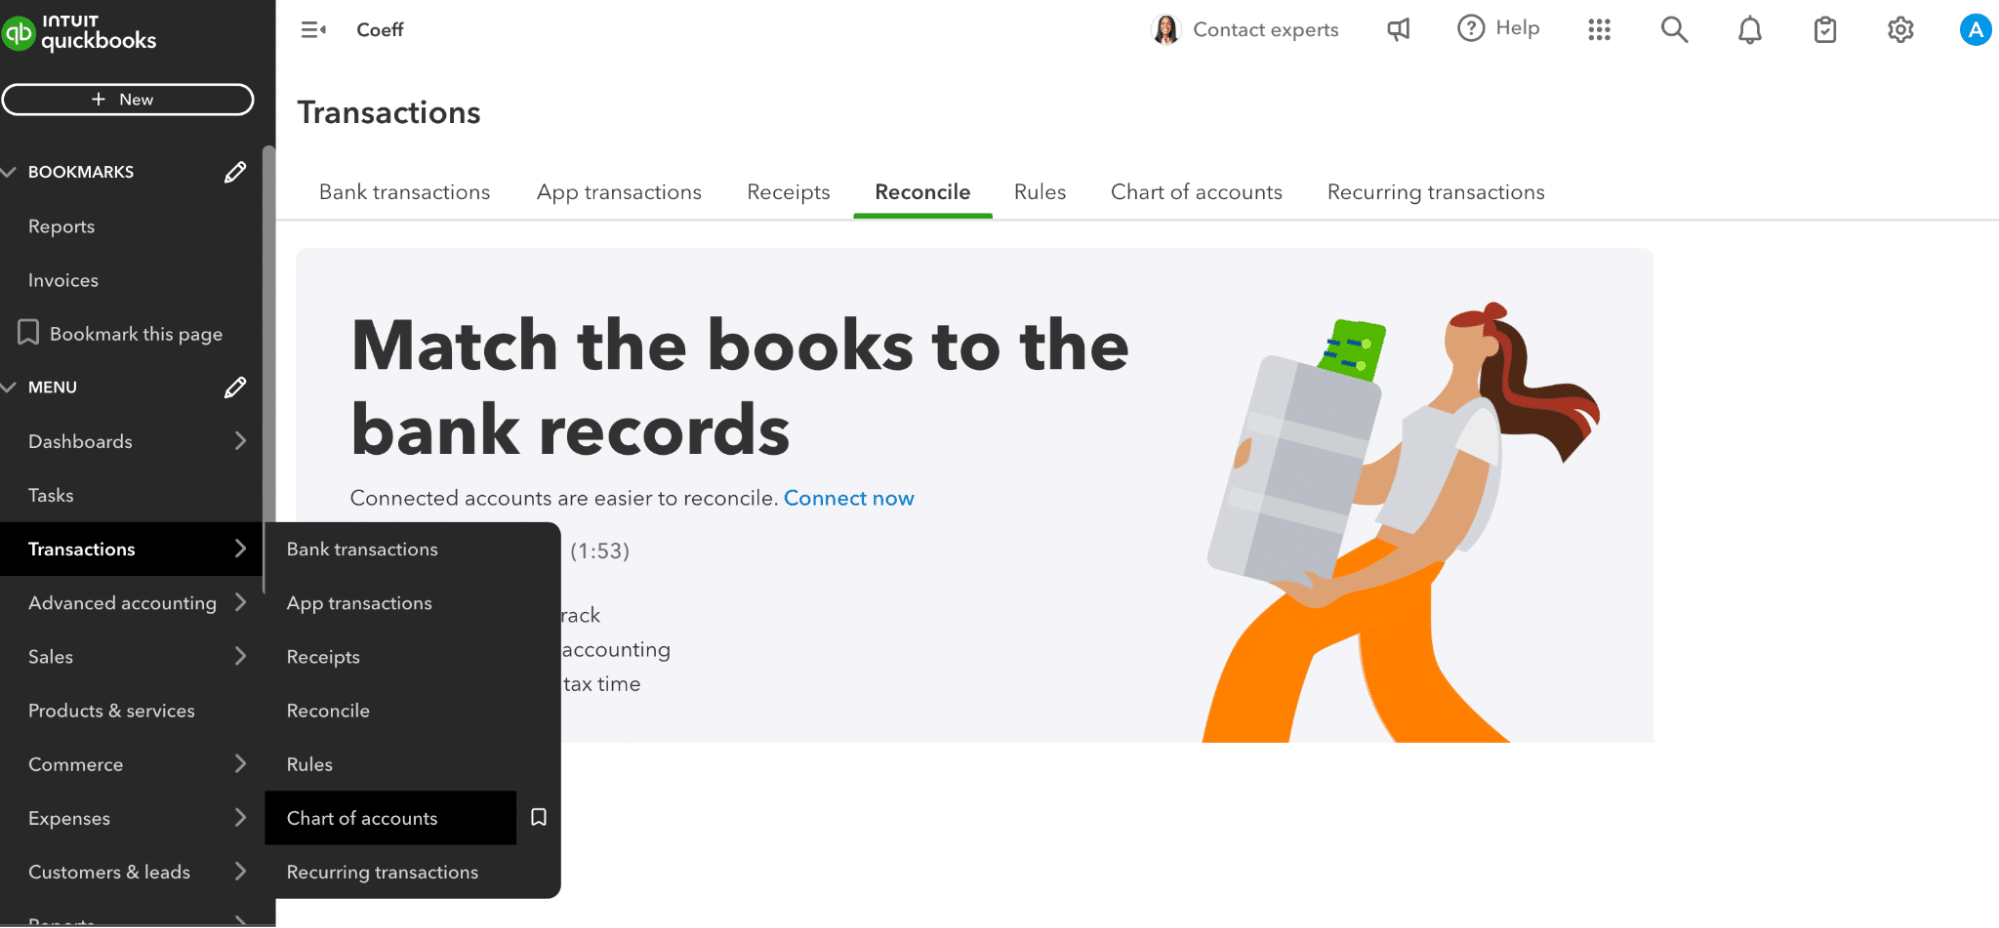
Step 2. Go to the Accounting menu and select “Chart of Accounts”
Once logged in, find the left-side navigation menu.
Click on “Transactions” to reveal the submenu options.
Choose “Chart of Accounts” from the list.
Step 3. Click on “Run Report” in the top right corner.
On the Chart of Accounts page, locate the “Run Report” button in the upper right area.
Click this button to generate a report of your chart of accounts.
Step 4. In the report view, click the “Export” icon and select “Export to CSV”.
After the report loads, find the “Export” icon (usually represented by a download arrow).
Click on this icon to see the available export formats.
Select “Export to CSV” from the options provided.
Step 5. Choose a location to save the file and click “Save”.
A file save dialog will appear, asking where you want to save the CSV file.
Navigate to your preferred folder on your computer.
Name the file if desired, and click “Save” to complete the export process.
Export Chart of Accounts and Keep it Live with Coefficient
While QuickBooks Online offers native export options for both Excel and CSV formats, Coefficient provides a more robust solution for real-time data syncing and automated reporting.
Ready to streamline your QuickBooks data exports and take control of your financial reporting? Get started with Coefficient today and experience the power of automated, real-time data syncing.
To find your Chart of Accounts in QuickBooks Online, click the gear icon in the upper right corner and select “Chart of Accounts” under “Your Company.” Alternatively, click “Accounting” in the left-side menu, then select “Chart of Accounts.”
For real-time access to your Chart of Accounts data, consider using Coefficient to sync QuickBooks with your spreadsheets.
Can I customize my QuickBooks Chart of Accounts export?
Yes, you can customize your QuickBooks Chart of Accounts export by selecting specific columns and data points before exporting.
For more advanced customization options and real-time data syncing, Coefficient offers flexible import settings and automated report generation.
How often should I export my Chart of Accounts from QuickBooks?
The frequency of exporting your Chart of Accounts depends on your business needs. For the most up-to-date financial data, consider using Coefficient to maintain a live connection between
QuickBooks and your spreadsheets, eliminating the need for manual exports.
Keeping your financial records accurate and up-to-date is crucial for any business. But let’s face it: manual data entry is tedious and prone to errors. That’s where importing journal entries from Google Sheets to QuickBooks Online (QBO) comes in handy.
This guide will walk you through three methods to make this process smoother and more reliable.
Why Import Journal Entries?
Picture this: You’re hunched over your keyboard, squinting at spreadsheets, and manually entering data into QuickBooks Online. Sound familiar? It’s not just time-consuming—it’s a recipe for mistakes.
Accurate financial data is the backbone of sound business decisions. When your numbers are off, even by a little, it can lead to:
Misguided budget allocations
Inaccurate tax filings
Skewed performance metrics
By automating the import process, you’re not just saving time. You’re:
Minimizing human error
Ensuring data consistency
Freeing up resources for more strategic tasks
Now, let’s dive into the methods you can use to import those journal entries and reclaim your time.
Method 1: Using Coefficient to Sync Google Sheets with QuickBooks Online
Coefficient syncs live data from various business systems, like QuickBooks, directly into Excel and Google Sheets.
For QuickBooks users, this means you can build real-time financial reports, automate data updates, and streamline your accounting workflows without leaving your familiar spreadsheet environment.
Open a new or existing Google Sheet, navigate to the Extensions tab, and select Add-ons > Get add-ons.
In the Google Workspace Marketplace, search for “Coefficient.”
Follow the prompts to grant necessary permissions.
Launch Coefficient from Extensions > Coefficient > Launch.
Coefficient will open on the right-hand side of your spreadsheet.
Step 2. Connect to QuickBooks
Click “Import from…” on the sidebar. Select QuickBooks from the list of data sources.
Follow the prompts to authorize Coefficient to your Intuit QuickBooks account.
Step 3. Import and Consolidate Your Data
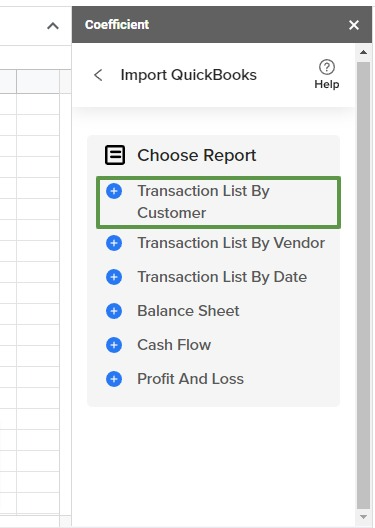
After connecting, return to QuickBooks from the menu and browse the available reports:
Transaction list by customer
Transaction list by vendor
Transaction list by date
Balance sheet
Cash Flow
Profit and Loss.
Adjust your filters as needed. Choose your date range. Decide which companies to include.
Choose the fields you want to include (or exclude), name your import, and click the button to push your data to your spreadsheet.
Pros and Cons
Pros:
No coding needed, so anyone on the team can use it.
Simple and easy-to-use interface with plug-and-play connectors.
Quick installation; you can start using it in less than a minute.
Automatic data updates keep your spreadsheet data up-to-date in real-time.
Automates tasks like importing accounting data and invoice reconciliation.
Cons:
Some features require an upgrade
Method 2: Importing Journal Entries Manually with CSV
This method uses QuickBooks Online’s native import function to bring in journal entries from a CSV file exported from Google Sheets. It’s a quick, straightforward method but prone to error.
Key Features
Direct use of QuickBooks Online tools
Complete control over data formatting
No additional software required
Step-by-Step Guide
Prepare Your Journal Entries in Google Sheets
Set up columns: Date, Account, Debit, Credit, Description
Ensure debits and credits balance for each entry
Verify account names match your QuickBooks chart of accounts exactly
Export to CSV
In Google Sheets: File > Download > CSV
Save with a clear name (e.g., “JE_Import_[Date].csv”)
Import to QuickBooks Online
Go to: Gear icon > Tools > Import Data > Journal Entries
Upload your CSV
Map your columns to QuickBooks fields
Review the preview carefully
Complete the import
Verify the Import
Check Accounting > Journal Entries
Run a Trial Balance to ensure everything balances
Review any unmatched accounts or import errors
Pros and Cons
Pros:
Control: Full visibility and control over each entry before it hits the books.
No Extra Cost: Uses existing QuickBooks tools without additional expenses.
Familiarity: No learning curve; uses processes most accountants already know.
Cons:
Time Drain: Can be painfully slow for high volume of entries.
Error Risk: More chance of typos or missed entries due to manual handling.
Repetitive Work: Becomes a chore for recurring journal entries.
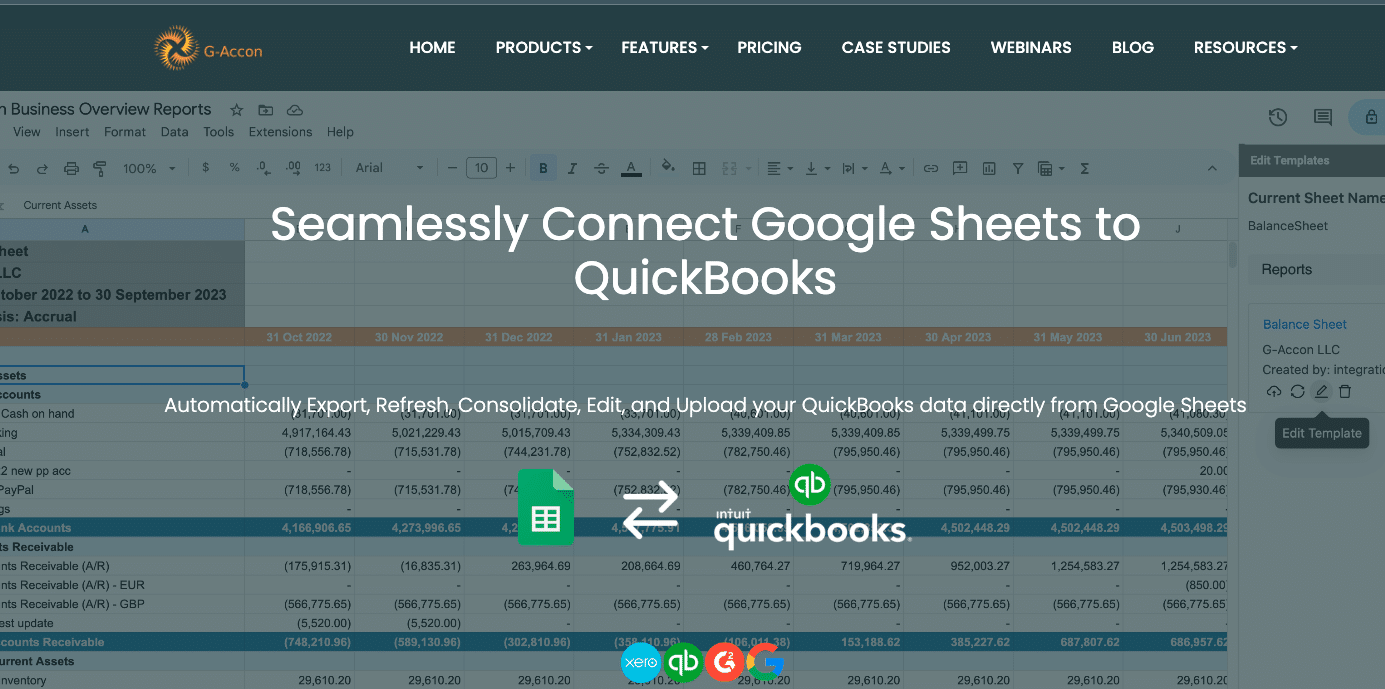
Method 3: Using G-Accon
G-Accon is a third-party add-on that creates a direct link between Google Sheets and QuickBooks Online. It automates the journal entry import process, reducing manual work and potential for errors.
Step-by-Step Guide
Automated syncing between Google Sheets and QuickBooks Online
G-Accon allows for additional fields like Class or Location
Configure and Run the Import
Open G-Accon sidebar: Upload Data > Journal Entries
Select your data range
Map columns to QuickBooks fields
Set any default values or import rules
Run the import
Verify in QuickBooks
Check Accounting > Journal Entries
Run a Trial Balance and General Ledger report
Address any errors flagged by G-Accon
Pros:
Time Saver: Dramatically cuts down on data entry time, especially for recurring entries.
Accuracy Boost: Reduces human error in the transfer process.
Handles Complexity: Better for complicated entries like multi-currency or inter-company transactions.
Cons:
Extra Expense: Subscription cost adds to the accounting budget.
Setup Time: Initial configuration and learning curve to get it right.
Best Practices for Importing Journal Entries
Regardless of your chosen method, these best practices will serve you well:
Ensuring data accuracy and consistency:
Double-check account names and numbers. A minor typo can cause major headaches.
Verify that debits and credits balance. This is Accounting 101, but it’s easy to overlook.
Use consistent date formats. YYYY-MM-DD is your safest bet.
Proper formatting of journal entries in Google Sheets:
Use clear, consistent headers that match QBO fields.
Avoid merged cells or complex formatting. Keep it simple.
Include all required fields for journal entries. Don’t leave QBO guessing.
Regular reconciliation and error checking:
Compare imported data with source documents. Trust, but verify.
Run QBO reports to confirm successful imports.
Address discrepancies immediately. Small errors can snowball quickly.
Troubleshooting Common Import Issues
Even with the best tools, issues can arise. Here’s how to tackle common problems:
Addressing formatting errors:
Check date formats. QBO can be picky about this.
Look for hidden characters or extra spaces. They’re invisible troublemakers.
Ensure numerical values are formatted correctly. No commas in thousands, please.
Resolving account mapping problems:
Verify account names in your sheet exactly match QBO. Case sensitivity matters.
When in doubt, use account numbers. They’re unique identifiers.
Handling duplicate entries:
Use unique identifiers for each journal entry. A combination of date and entry number works well.
With Coefficient, set up filters to exclude previously imported data. It’s smart like that.
Choose Your Import Method Wisely
Importing journal entries from Google Sheets to QuickBooks Online doesn’t have to be a chore. While QBO’s native import and G-Accon offer basic functionality, Coefficient stands head and shoulders above the rest for finance professionals who demand the best.
With Coefficient, you’re not just importing data—you’re transforming your entire financial workflow. Real-time syncing, powerful automation, and flexible data manipulation put you in control.
The choice is clear. Streamline your processes. Enhance your data accuracy. Free up time for strategic financial analysis. Don’t let inefficient data management hold you back.
If you want to connect QuickBooks to Google Sheets, this blog is for you. And we understand why you want to: one of the best ways to manage and analyze your QuickBooks data is to link it to Google Sheets.
Here’s a step-by-step guide on how to connect QuickBooks to Google Sheets, highlighting some of the most popular methods.
TLDR
Step 1:
Get Started by installing Coefficient Add-on for Google Sheets.
Step 2:
Launch Coefficient from Google Sheets Extensions Menu.
Step 3:
Click Import Data from the Coefficient sidebar, then select Quickbooks.
Step 4:
Authorize and click Connect on the Quickbooks popup window.
Step 5:
Choose the QuickBooks reports and fields you want to pull data from.
Step 6:
Click import. QuickBooks data will auto-populate in Google Sheets within seconds.
Video Walkthrough: How to Connect Quickbooks to Google Sheets
Coefficient is the fastest and safest way to connect QuickBooks to Google Sheets
Coefficient integrates QuickBooks to Google Sheets in a single click, with no coding required. In fact, Coefficient can connect Google Sheets to any business system, enabling you to blend and analyze your QuickBooks data with a variety of other data sources (Salesforce, HubSpot, MySQL, Looker, and so on).
Coefficient’s automatic data updates allow you to build live accounting reports and dashboards in Google Sheets with your QuickBooks data. And with Slack/email alerts, you can update stakeholders in real-time when key accounting reports and KPIs change. It’s the easiest way to connect to QuickBooks, pull in accounting data, develop real-time dashboards, and share them with your team.
QuickBooks Google Sheets Integration: Best Tools and Methods
While there are many ways and tools to connect QuickBooks to Google Sheets, we’ll focus on the best methods in this guide.
Method 1: Coefficient (no-code)
Coefficient’s no-code solution is the fastest and easiest option to connect, import, and sync your QuickBooks data on Google Sheets.
Step 1: Install Coefficient to Google Sheets by navigating to Extensions>Add-ons>Get Add-ons.
Type in Coefficient on the Google Workspace Marketplace’s search bar. Click the Coefficient app in the results.
Select your Google Account and click Allow to authorize access.
After installing, launch the Coefficient app by going back to the Google Sheet top menu and click Extensions>Coefficient Salesforce, HubSpot Data Connector>Launch.
You’ll see the Coefficient app as a sidebar within the Google Sheet interface.
Step 2: Click Import from… on the sidebar.
Select QuickBooks from the list of data sources.
Click Authorize to let Coefficient connect to your Intuit QuickBooks account.
Click Connect on the separate popup window.
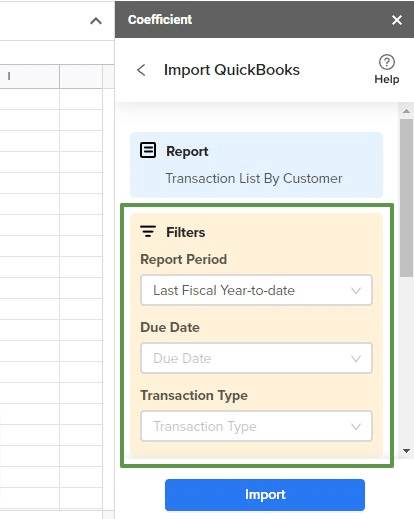
Step 3: Once you’re connected successfully, choose the QuickBooks reports you want to pull data from. Let’s choose the Transaction List By Customer report for this example.
Choose any Filters you want to use, including the Report Period, Due Date, and Transaction Type.
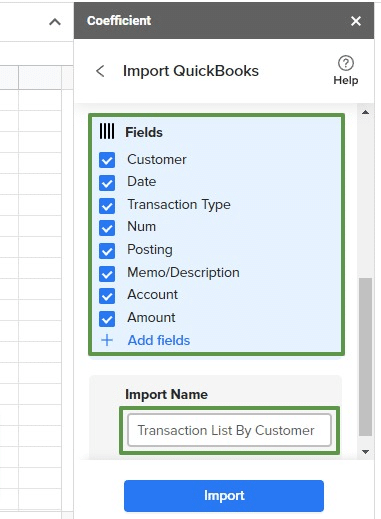
Step 4: Choose the fields you want to include (or exclude) and name your import.
Click Import. Your data from QuickBooks will auto-populate Google Sheets within seconds.
Step 5: Automate data updates by setting an auto-refresh schedule. You can schedule hourly, daily, or weekly automatic data updates.
Automatic data updates sync live data into Google Sheets continuously, so you always have up-to-date reporting and analytics. You can also schedule Snapshots to make a copy of your data before updates.
Pros
Coefficient doesn’t require coding or advanced technical skills to use — any team member can leverage it
Zapier offers a QuickBooks web connector for Google Sheets. Follow the steps below to configure and use the web connector.
Step 1: After logging into Zapier, connect your QuickBooks Online account to the Zapier platform.
Follow the prompts to allow Zapier to connect to your QuickBooks Online account.
Click Next to connect your Google Sheets account to Zapier and follow the prompts to authorize the connection.
Step 2: Create your Zaps (custom automated workflows). Set up your Trigger by choosing Google Sheets as your app.
Next, select your Trigger event (New Spreadsheet for this example) and click Continue.
Choose your connected Google Sheets account and the Google Drive where your spreadsheet is stored.
Click Continue.
You can test your trigger to confirm you connected the right account and whether you configured your trigger correctly.
Step 3: Configure your Action by selecting QuickBooks Online as your app.
Choose your action event, such as a new row, new payment, new bill, purchase order, and more.
We’ll use Create Invoice for this example.
Click Continue.
Select your connected QuickBooks Online account.
Step 4: Set up the action of the Zap by filling out the required fields, including the customer value, tracking number, billing address, and so on.
Click Continue when you’re done.
Step 5: Test your action to see if it works.
You’ll see the data input summary for your action. You can either click Test & Review or click Test and Continue to run the action.
The Zap sends live data to your action app when testing your action step, which means a real invoice template gets automatically created in your QuickBooks account when you make an invoice in your Google spreadsheet.
After a successful test, you can retest the action or turn on the Zap to activate your automated data flow between QuickBooks and Google Sheets.
Add other actions to your Zap if necessary, or finish setting up by clicking Close.
Pros
Imports QuickBooks data in Sheets with no-code interface
Automates basic spreadsheet tasks
Cons
You must define the specific data you want to pull, creating a significant manual workload for all of your imports.
Actions and automations are not customizable or fully controllable.
Zaps can only leverage limited, pre-defined integrations.
Method 3: Google Apps Script (code required)
Google Apps Script is an option for tech-savvy teams. You can combine QuickBooks Open Database Connectivity (ODBC) Driver from CData and SQL Gateway to access your QuickBooks Online data from Google Apps Script.
The SQL Gateway allows your local ODBC data sources to look and act like a standard MySQL database.
Start by creating a new MySQL remoting service within the SQL Gateway for the QuickBooks Online ODBC Driver.
You’ll also need to ensure the SQL Gateway is installed and can connect to a hosted Secure Shell (SSH) server or a web-facing machine.
Before configuring your connection, provide the necessary connection properties values in the Data Source Name (DSN). Then, configure the DSN using the (built-in) Microsoft ODBC Data Source Administrator.
QuickBooks Online utilizes the OAuth authentication standard, which means the authenticating user needs to log in via the browser.
Use the embedded OAuthClientSecret, OAuthClientId, and CallbackURL to authenticate with OAuth. You can also register an app with Intuit to get your own CallBackURL.
Once you’re done with the pre-configurations, follow the steps below to use Google Apps Script to access the MySQL remoting service and import your QuickBooks Online data within Google Sheets.
Step 1: Go to your spreadsheet’s top menu and click Extensions > Apps Script.
Step 2: Create several class variables for functions created within the script.
Step 3: Include a function that adds a Menu option to your Sheet. That way, the UI can call the function.
Step 4: Create a Helper function used to find the first empty row in your spreadsheet.
Step 5: Use the function below to write your QuickBooks Online data to your spreadsheet.
In the first input box, enter the Sheet’s name to hold your data.
Next, enter the name of the QuickBooks Online table for the function to read.
Note: The function is intended as a menu option, but you can extend its use as a spreadsheet formula.
Pros
Using the Google Script editor means you won’t need to add new app integrations for comprehensive workflow customization based on your unique needs.
Cons
The Script Editor is geared towards users with technical and coding skills (JavaScript).
Tons of potential errors, even for experienced programmers.
Your QuickBooks credentials, such as your username and password, can be seen in the script source, which doesn’t make the Script editor the most secure option.
Encryption/decryption requires significant coding and technical knowledge
Link QuickBooks to Google Sheets Seamlessly
Connecting QuickBooks to Google Sheets streamlines accounting, financial, and expense reporting workflows. Your accounting team saves time while reducing potential errors, improving data analysis and financial modeling. Choose Coefficient – the easiest and most seamless method — to connect QuickBooks with Google Sheets.