Summarize using AI:


Table of Contents
![]()
- 1. Top 5 Snowflake Reporting Tools for 2025
- 2. 5 Best Snowflake ETL Tools for 2025 [w/ Feature Comparison Table]
-
3. How to Migrate Data from SQL Server to Snowflake
- Why Migrate from SQL Server to Snowflake?
- Before You Migrate: A Checklist
- Migrating Data from SQL Server to Snowflake: 4 MethodsMethod 1: SQL Server Integration Services (SSIS)
- Method 2: Snowflake Connector for Kafka
- Method 3: Snowpipe
- Method 4: Coefficient for Data Analysis and Collaboration
- Handling SQL Dialect Differences
- Post-Migration Optimization
- Start Your Snowflake Migration Journey Today
- 4. How to Connect Snowflake to Power BI
- 5. How to Connect BigQuery to Snowflake? Top 3 Methods
- 6. Connect Google Ads to Snowflake – Step-by-Step Guide
- 7. How to Connect Mailchimp to Snowflake? Top 3 Methods
- 8. How to Connect Freshdesk to Snowflake
- 9. How to Connect Klaviyo to Snowflake
- 10. How to Migrate from Redshift to Snowflake: A Comprehensive Guide
- 11. How to Connect Razorpay to Snowflake
- 12. How to Connect Chargebee to Snowflake?
- 13. How to Connect MongoDB to Snowflake? Top 3 Methods
- 14. How to Migrate from BigQuery to Snowflake
- 15. How to Connect Outreach to Snowflake
- 16. How to Connect Zoho CRM to Snowflake
- 17. How to integrate Shopify to Snowflake? 3 Simple ways explained

Are you looking to move your data from SQL Server to Snowflake? Migrating to Snowflake opens up a world of possibilities for your data, with unparalleled scalability, performance, and flexibility.
In this comprehensive guide, we’ll walk you through the process of migrating your data from SQL Server to Snowflake, exploring multiple methods and best practices.
Why Migrate from SQL Server to Snowflake?
There are several compelling reasons to migrate from SQL Server to Snowflake:
Snowflake uses a schema-less approach that makes it easy to store and query data without predefined schemas, unlike SQL Server’s rigid relational model.
Snowflake’s cloud architecture enables independent scaling of compute and storage, providing flexibility to handle workload variations that SQL Server’s shared-disk architecture lacks.
Snowflake’s data sharing capabilities and support for structured and semi-structured data offer advantages over SQL Server for modern analytics use cases.
Before You Migrate: A Checklist
Before embarking on the migration journey, there are a few crucial steps to take:
Analyze your SQL Server data in-depth to understand the structure, dependencies, and potential migration challenges.
Provision a Snowflake account and get familiar with the platform’s core concepts and architecture.
Evaluate the available data extraction and loading methods and choose the approach that best fits your data volumes, frequency, and transformation needs.
Migrating Data from SQL Server to Snowflake: 4 Methods
Method 1: SQL Server Integration Services (SSIS)

SQL Server Integration Services (SSIS) is a platform for building enterprise-level data integration and transformation solutions. With its graphical interface and wide range of built-in tasks and connectors, SSIS is a powerful choice for migrating data from SQL Server to Snowflake.
Configure an ADO.NET connection in SSIS to connect to your SQL Server database and a Snowflake ODBC connection to your Snowflake account.
Create an SSIS package with a data flow task that extracts data from SQL Server, applies necessary transformations, and writes to a Snowflake stage using the Snowflake destination component.
Execute the SSIS package to perform the initial data migration and configure it to run on a schedule for incremental loads.
Pros:
Leverages existing SSIS skills and allows reuse of existing packages
Supports complex transformations during data movement
Provides a visual, drag-and-drop interface for designing data pipelines
Integrates with SQL Server Agent for scheduling and automation
Cons:
Requires installation and licensing of SSIS and Snowflake ODBC driver
Can be resource-intensive and challenging to scale for large data volumes
May necessitate refactoring of existing SSIS packages to adjust for Snowflake data types and syntax
Lacks real-time or continuous ingestion capabilities
Method 2: Snowflake Connector for Kafka
The Snowflake Connector for Kafka is a powerful solution for streaming data from Kafka topics into Snowflake tables in real-time. By capturing changes from SQL Server and publishing them to Kafka, you can establish a low-latency pipeline for continuously migrating data to Snowflake.
Install and configure the Snowflake Connector for Kafka, linking it to your Kafka cluster and Snowflake account.
Create a Kafka producer to publish SQL Server change data to a Kafka topic. This can be done using the Debezium SQL Server CDC Source Connector or custom CDC logic.
Define a Kafka Connect Snowflake Sink that maps the fields from the Kafka record value to Snowflake columns and specify the target table.
Launch the Kafka Connect cluster, configure the SQL Server source and Snowflake sink, and let it stream changes continuously from SQL Server to Snowflake.
Pros:
Enables real-time, event-driven data loading with low latency
Handles schema evolution by automatically propagating schema changes from Kafka to Snowflake
Supports fault-tolerant, exactly-once semantics to ensure data consistency
Integrates with stream processing frameworks for in-flight transformations
Cons:
Requires a Kafka environment and specific expertise to implement and manage the real-time pipeline
Necessitates upfront work to configure change data capture from SQL Server to publish to Kafka
Introduces additional infrastructure components to provision and maintain
May have higher cost and complexity compared to batch-oriented methods
Method 3: Snowpipe
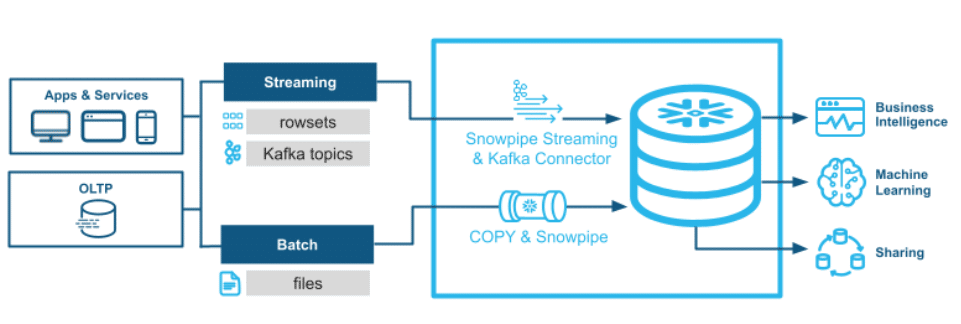
Snowpipe is a continuous data ingestion service built into the Snowflake platform. By loading data from files staged in cloud storage, Snowpipe offers a simple and scalable method for migrating data from SQL Server to Snowflake.
Extract data from SQL Server tables or query results into text files, such as CSV or JSON.
Upload the data files to a cloud storage location, like Amazon S3 or Azure Blob Storage, that Snowflake can access.
Create an external stage in Snowflake that points to the cloud storage location and file path where you staged the data files.
Define a Snowpipe using the CREATE PIPE command, specifying the target table and external stage, file format options, and copy frequency.
Snowpipe will automatically detect new files staged to the external stage and load them into the target table based on the defined schedule.
Pros:
Simplifies data loading by automatically detecting and loading new data files
Scales to handle large volumes of data by loading files in parallel
Supports loading semi-structured data formats like JSON, Avro, and XML
Integrates with third-party ETL and data integration tools
Cons:
Requires extracting data from SQL Server into staged files, which can add complexity
May not be suitable for real-time or streaming ingestion needs
Necessitates access permissions and integration with cloud storage services
Can incur additional storage costs and egress charges for cloud storage
Method 4: Coefficient for Data Analysis and Collaboration
While not technically a true data migration solution, Coefficient is perfect for quickly moving data from SQL Server and Snowflake.
By democratizing data access and enabling collaborative, spreadsheet-driven analysis, Coefficient complements your Snowflake migration by putting data in the hands of business experts.
Step 1. Install Coefficient
Before getting started, install Coefficient for your spreadsheet. It only takes a few seconds, and you only have to do it once.
Step 2: Import Data from MS SQL Server
Open the Coefficient Sidebar. Click on the menu icon and select “Connected Sources.”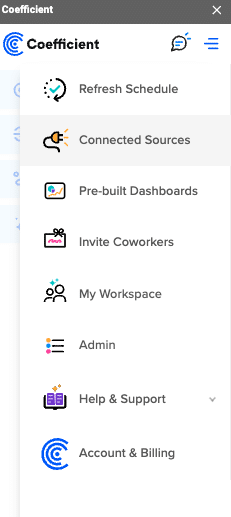
Search for MS SQL and click “Connect”.
Enter the required fields (Host, Database name, Username, Password, and Port).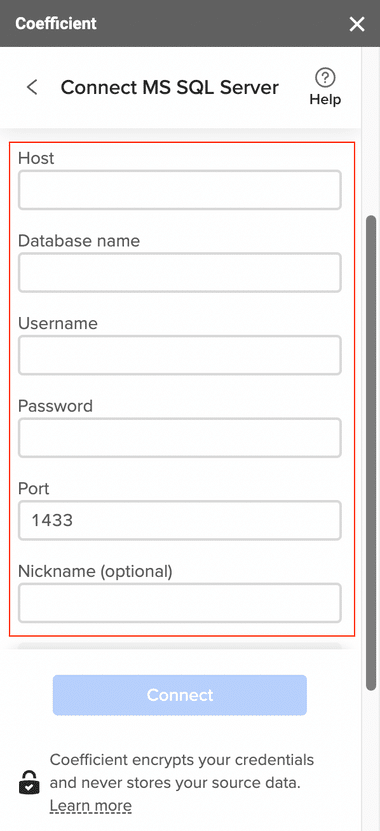
Step 2. Import Data from Microsoft SQL Server
After connecting, click “Import from…” > “MS SQL Server”.
Select “From Tables & Columns”.
Pick the schema and tables you want to import data from.
Once you select a table, the fields will appear in a list on the left side of the Import Preview window. To include fields in your import, check the corresponding boxes.
Customize your import by applying filters, sorts, or limits.
Click “Import” to load the data into your spreadsheet.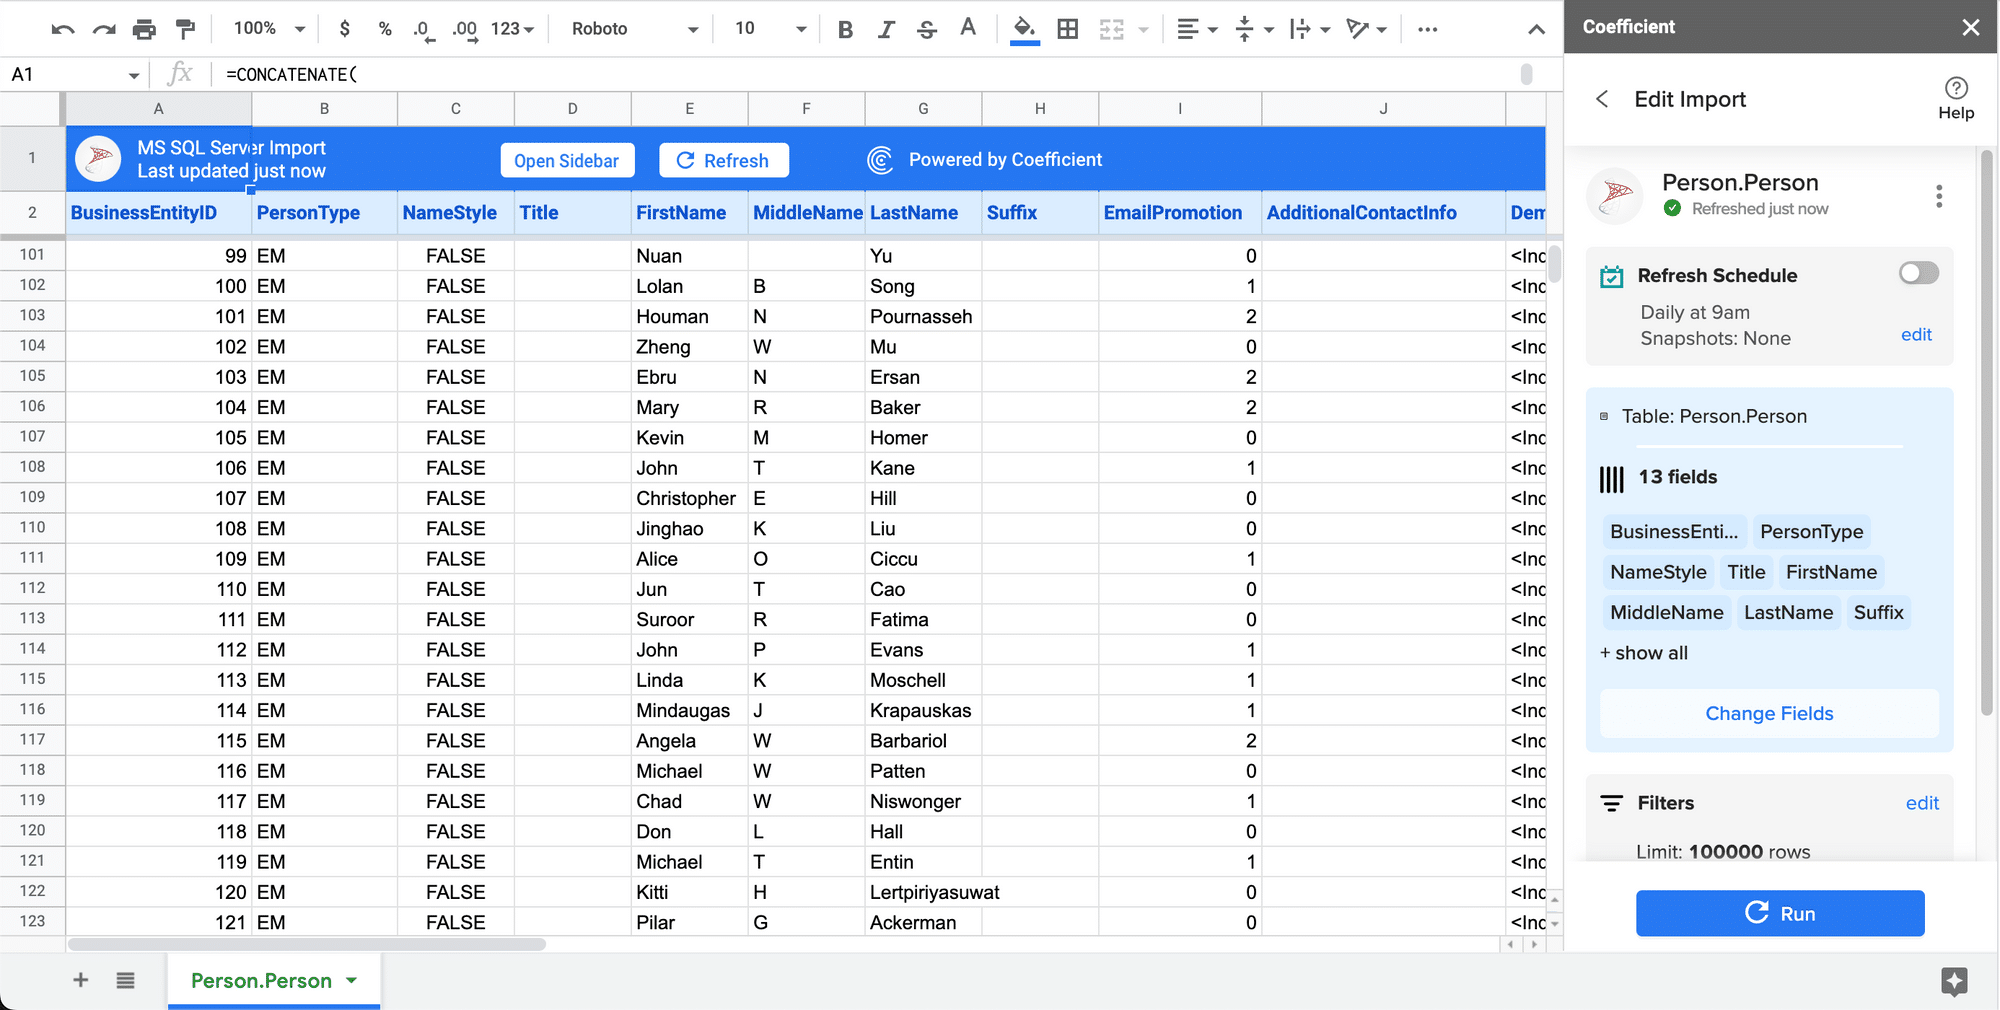
Step 3: Connect to Snowflake
Open the Coefficient Sidebar. Click on the menu icon and select “Connected Sources.”
Search for Snowflake and click “Connect”.
Enter your account credentials (Snowflake Account Name, Database Name, Username, Password, and Warehouse Name) to complete the connection.
Step 4: Prepare Your Data
Ensure your spreadsheet is organized with a header row that matches the Snowflake table fields and is ready for export.
Step 5: Start the Export Process
In the Coefficient sidebar, click on “Export to” and select “Snowflake.”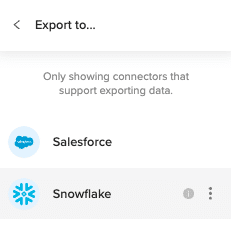
Choose the tab and the header row containing the Snowflake field headers. Coefficient automatically selects the sheet you have open, but you can choose a different tab if needed.
Select the table in your database that you want to update.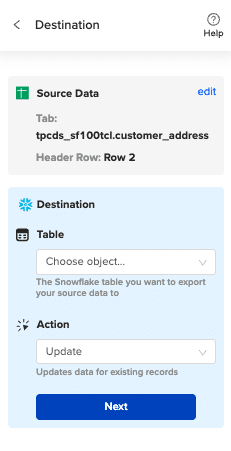
Then select “Insert” from the drop-down.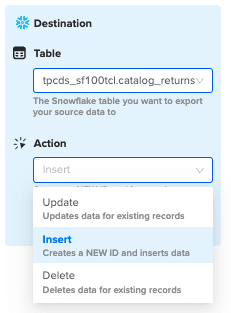
Map the sheet columns to Snowflake table fields and click “Save”
Review and confirm your settings. Click
Highlight the rows in your sheet that you need to export.
Confirm the rows to update and commit the changes. Note that these actions cannot be undone.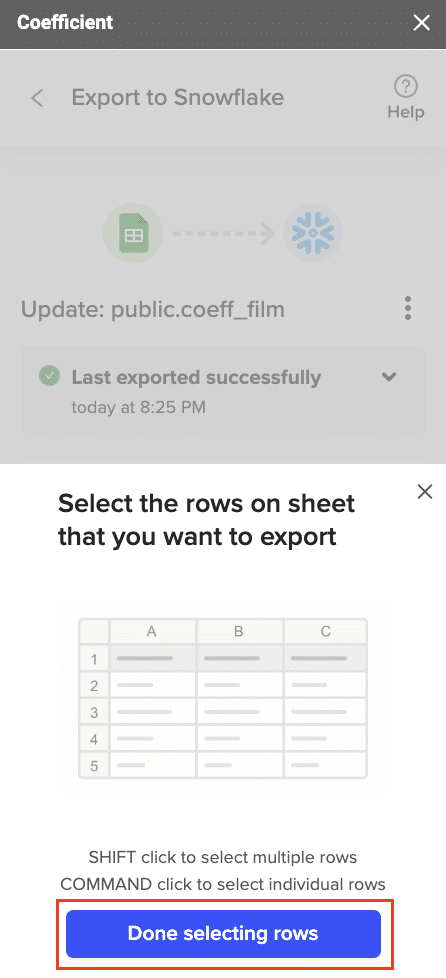
Records that have been updated will have the export status and the date/time stamp of the update in your Sheet.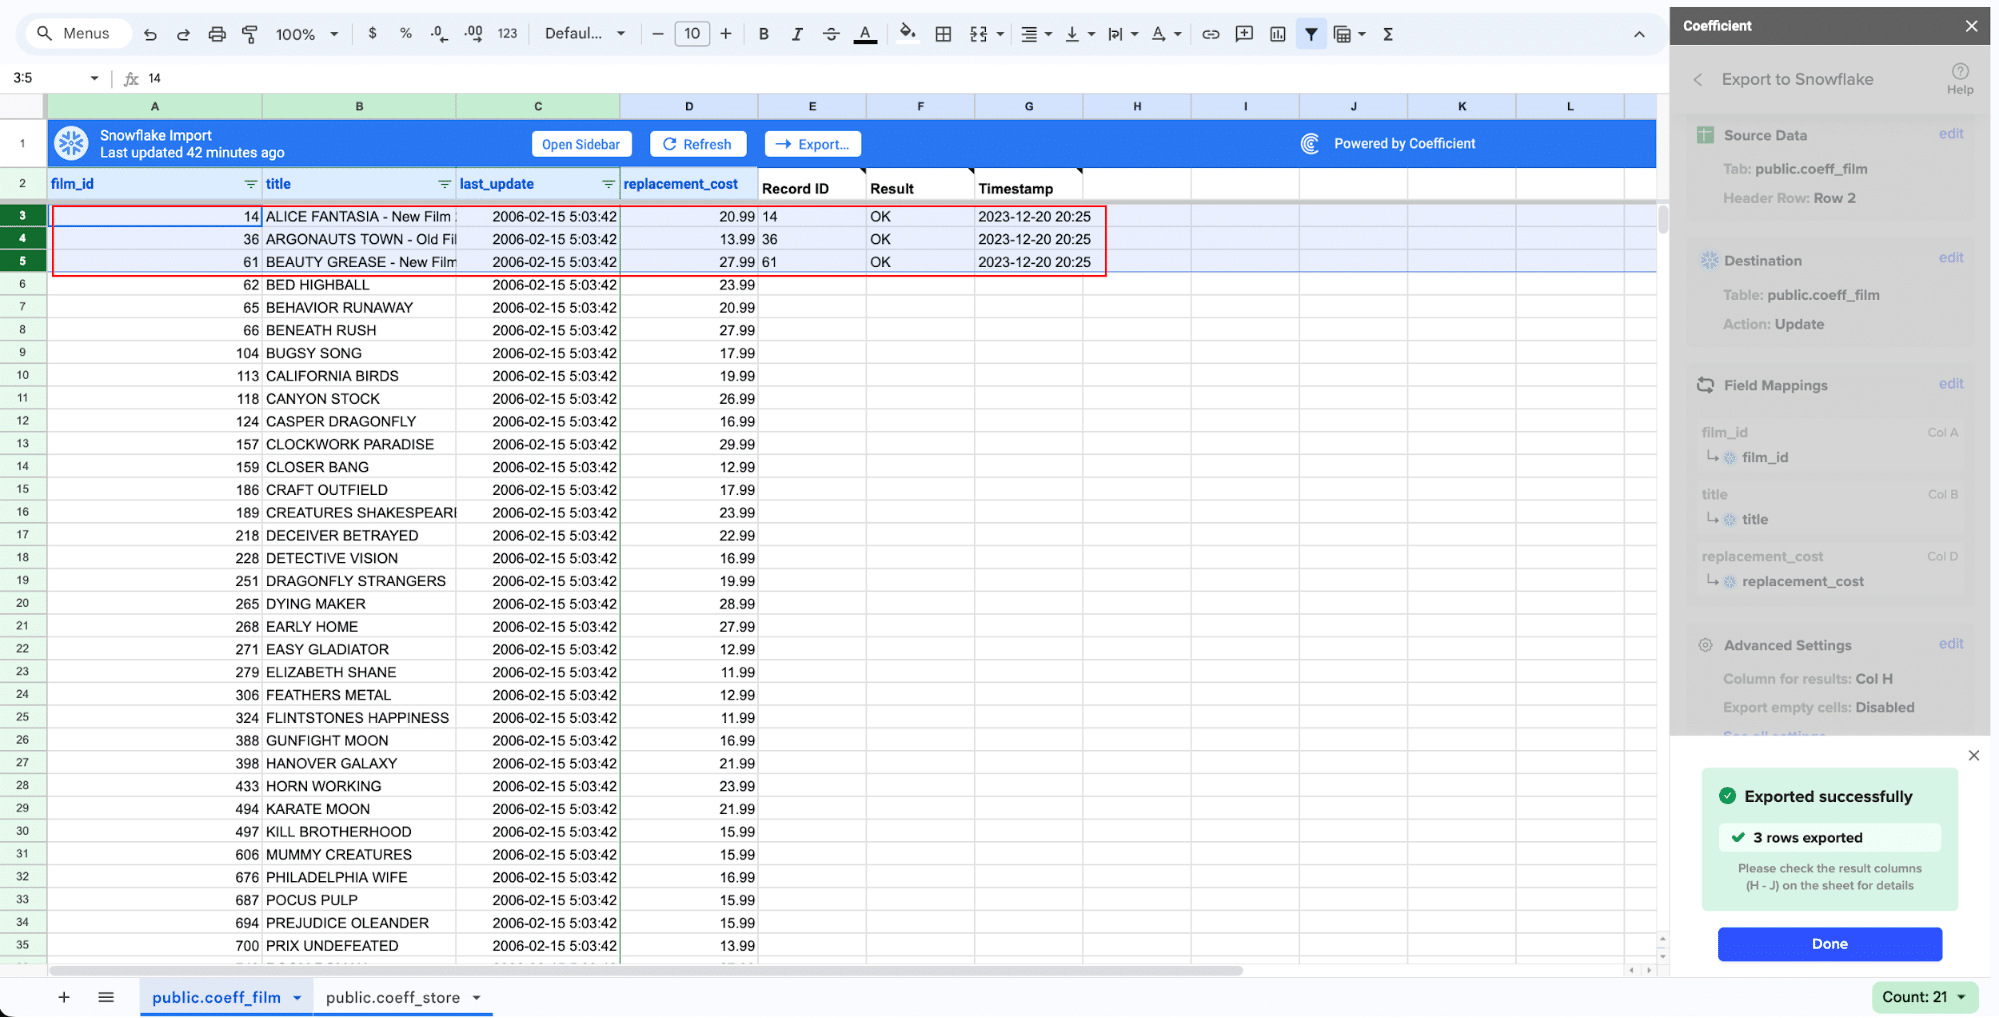
Handling SQL Dialect Differences
One significant challenge when migrating from SQL Server to Snowflake is adapting to the differences in SQL dialects between the two platforms. Some key differences to be aware of include:
Data type variations: Snowflake supports a more limited set of data types compared to SQL Server. For example, Snowflake does not have a DATE type, using TIMESTAMP instead. Some types like DATETIME2 and DATETIMEOFFSET may need to be converted to Snowflake equivalents.
Function and operator differences: Many SQL Server functions and operators have different names or signatures in Snowflake. Common examples include LEN() vs LENGTH(), SUBSTRING() vs SUBSTR(), and ISNULL() vs NVL().
Procedural code: Snowflake does not support stored procedures, functions, or triggers written in Transact-SQL. Instead, Snowflake provides support for stored procedures and user-defined functions written in JavaScript, Java, or Scala.
Unsupported features: Some SQL Server features, like IDENTITY columns, sequences, and MERGE statements, are not available in Snowflake and may require workarounds or alternative approaches.
To navigate these differences and ensure your SQL code is compatible with Snowflake, consider these strategies:
Thoroughly review Snowflake’s SQL reference documentation to understand the supported data types, functions, and syntax.
When migrating existing SQL Server stored procedures or complex queries, analyze and rewrite the code to use Snowflake-compatible functions and syntax.
Utilize code conversion tools like the Snowflake SQL Translator or third-party tools to automatically convert SQL Server SQL dialects to Snowflake-compliant code.
Test and validate your converted SQL code thoroughly in Snowflake to ensure expected functionality and performance.
Post-Migration Optimization
Once you’ve successfully migrated your data from SQL Server to Snowflake, it’s crucial to optimize your Snowflake environment for peak performance and cost-efficiency. Key strategies include:
Optimizing Table Design and Query Performance
Use Snowflake’s automatic clustering to co-locate related data and improve query performance by minimizing data scans.
Analyze query profiles to identify slow-running queries and optimize them by rewriting inefficient code, adding filters, or restructuring joins.
Materialize frequently accessed result sets into new tables to speed up repeat query performance.
Partition data by date or category columns to enable partition pruning and limit data scans.
Rightsizing Compute Resources
Choose the appropriate size and number of Snowflake warehouses for your workloads to balance performance and cost.
Use multi-cluster warehouses to scale resources elastically based on concurrency needs.
Implement Snowflake Resource Monitors to track credit usage and alert on unexpected spikes.
Suspend warehouses when not in use to avoid consuming credits during idle time.
Implementing Security Best Practices
Use role-based access control to govern user and application permissions on databases, schemas, tables, and views.
Implement multi-factor authentication and federated SSO to strengthen access controls.
Encrypt sensitive data using Snowflake’s encryption features and manage keys securely.
Use Snowflake Access History to monitor and audit user and application activity.
Establishing Proactive Monitoring and Maintenance
Implement Snowflake’s Account Usage and Query History dashboards to monitor workload and user activity.
Use third-party tools or Snowflake-provided connectors to integrate Snowflake metrics with your monitoring stack.
Regularly review and optimize table structures, data distribution, and clustering keys.
Archive cold data to lower-cost storage tiers like Snowflake’s Fail-safe or a cloud storage service
Start Your Snowflake Migration Journey Today
Migrating from SQL Server to Snowflake is a significant undertaking, but one that pays dividends in terms of scalability, flexibility, and performance for analytics workloads. By following this guide and leveraging tools like Coefficient, you can simplify the migration process and start realizing value from Snowflake faster.
Ready to supercharge your Snowflake migration and experience the power of your data cloud? Sign up for Coefficient’s free trial and start moving data today – no engineering favors needed.