Migrating from Redshift to Snowflake is a significant step for organizations looking to enhance their data warehousing capabilities. This guide provides a detailed walkthrough of the migration process, from initial planning to post-migration optimization.
Why Migrate from Redshift to Snowflake?
Both Amazon Redshift and Snowflake are popular cloud data warehouses, but they differ in key aspects:
- Architecture:
- Redshift uses a shared-nothing architecture
- Snowflake separates compute and storage, offering more flexibility
- Performance:
- Snowflake often outperforms Redshift for complex queries and concurrent workloads
- Snowflake’s multi-cluster, shared data architecture allows for better query optimization
- Scalability:
- Snowflake offers more flexible scaling options, allowing independent scaling of compute and storage
- Redshift requires more manual intervention for scaling
- Data Support:
- Snowflake provides better support for semi-structured data (JSON, Avro, XML)
- Snowflake offers native support for geospatial data
- Ease of Use:
- Snowflake’s interface and SQL dialect are often considered more user-friendly
- Snowflake requires less maintenance and tuning compared to Redshift
Benefits of Migrating to Snowflake
- Improved Performance:
- Better handling of diverse workloads
- Faster query execution for complex analytics
- Cost-effectiveness:
- Separate billing for compute and storage
- Pay-per-second pricing for compute resources
- Enhanced Features:
- Time Travel for data recovery and reproducibility
- Zero-copy cloning for efficient development and testing
- Secure data sharing without data movement
- Scalability:
- Instant and unlimited scaling of compute resources
- Automatic storage scaling without performance impact
- Simplified Management:
- Reduced need for manual optimization and tuning
- Automated security and encryption features
Redshift to Snowflake: Challenges and Solutions
Handle Complex Data Types
Challenge: Redshift and Snowflake handle semi-structured data differently.
Solution: Use Snowflake’s VARIANT data type and JSON functions to work with semi-structured data effectively.
Address Performance Issues
Challenge: Queries that performed well in Redshift may be slow in Snowflake.
Solution: Analyze query plans, implement proper clustering, and use materialized views where appropriate.
Manage Costs During and After Migration
Challenge: Unexpected costs during and after migration.
Solution:
- Use Snowflake’s resource monitors to set spending limits.
- Implement auto-suspend for warehouses to avoid idle compute costs.
- Regularly review and optimize storage usage.
Step 1. Plan Your Migration
Assess Your Current Redshift Environment
- Data volume and complexity: Analyze your current data size and query patterns.
- Schema structure and dependencies: Document your existing schema and identify any dependencies.
- Existing workflows and integrations: List all systems and processes that interact with Redshift.
For example, if you’re using Redshift with Google Sheets, you’ll need to plan for migrating these connections to Snowflake.
Set Migration Goals and Timelines
- Define success criteria: Establish clear objectives for performance, cost, and functionality.
- Create a realistic timeline: Break down the migration into phases with specific deadlines.
- Allocate resources and budget: Determine the team and financial resources needed for the migration.
Choose a Migration Approach
- Lift and shift: Migrate the entire system at once.
- Phased migration: Move data and processes gradually.
- Hybrid approach: Combine elements of both methods based on your specific needs.
Step 2. Prepare for Migration
Data Cleaning and Optimization
- Identify and resolve data quality issues: Run data profiling tools to detect inconsistencies.
- Optimize current Redshift schema: Remove unused tables and columns, and normalize data where appropriate.
Map Redshift to Snowflake Components
- Schema conversion considerations: Analyze differences in data types and schema structures.
- Data type mapping: Create a mapping document for Redshift to Snowflake data types.
- Handle unsupported features: Identify Redshift-specific features and plan alternatives in Snowflake.
Set Up Snowflake Environment
- Create Snowflake account and database: Set up your Snowflake account and create the target database.
- Configure warehouses and resource allocation: Define compute warehouses based on workload requirements.
- Establish security measures and access controls: Set up user roles, access policies, and network security.
Pro-Tip: Analyze Your Database Before Migration
Before moving your data from Redshift to Snowflake, it’s crucial to thoroughly examine your current database. This step will help you plan more effectively and identify potential issues early in the process.
Coefficient can be a valuable tool in this pre-migration analysis. It allows you to pull live data from your Redshift database into spreadsheets like Google Sheets or Excel, making it easier to examine your data without interfering with your production environment.
Step 1. Connect Both Data Sources
First, ensure Coefficient has access to both Redshift and Snowflake.
For Redshift:
- Open the Coefficient sidebar in Google Sheets or Excel.
- Navigate to the “Connected Sources” menu.
- Add a new connection, select Redshift, and provide the necessary details such as Host, Database Name, Username, Password, and Port.
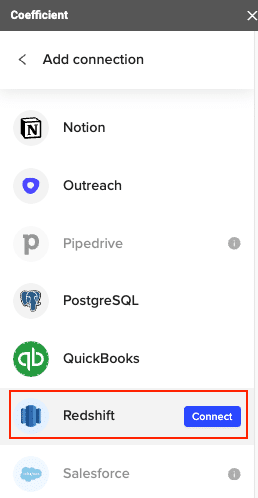
For Snowflake:
- In the Coefficient sidebar, go to “Connected Sources.”
- Click “Add Connection,” then select “Connect to Snowflake.”
- Enter your Snowflake account credentials including Account Name, Database Name, Username, Password, and Warehouse Name.

Step 2. Import Data from Redshift
Use Coefficient to pull data from Redshift:
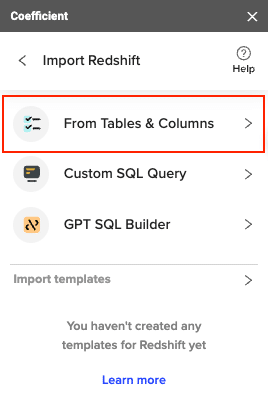
- From the Coefficient sidebar, select “Import from” and then “Redshift.”
- Choose “From Tables & Columns” or use a custom SQL query based on your needs.
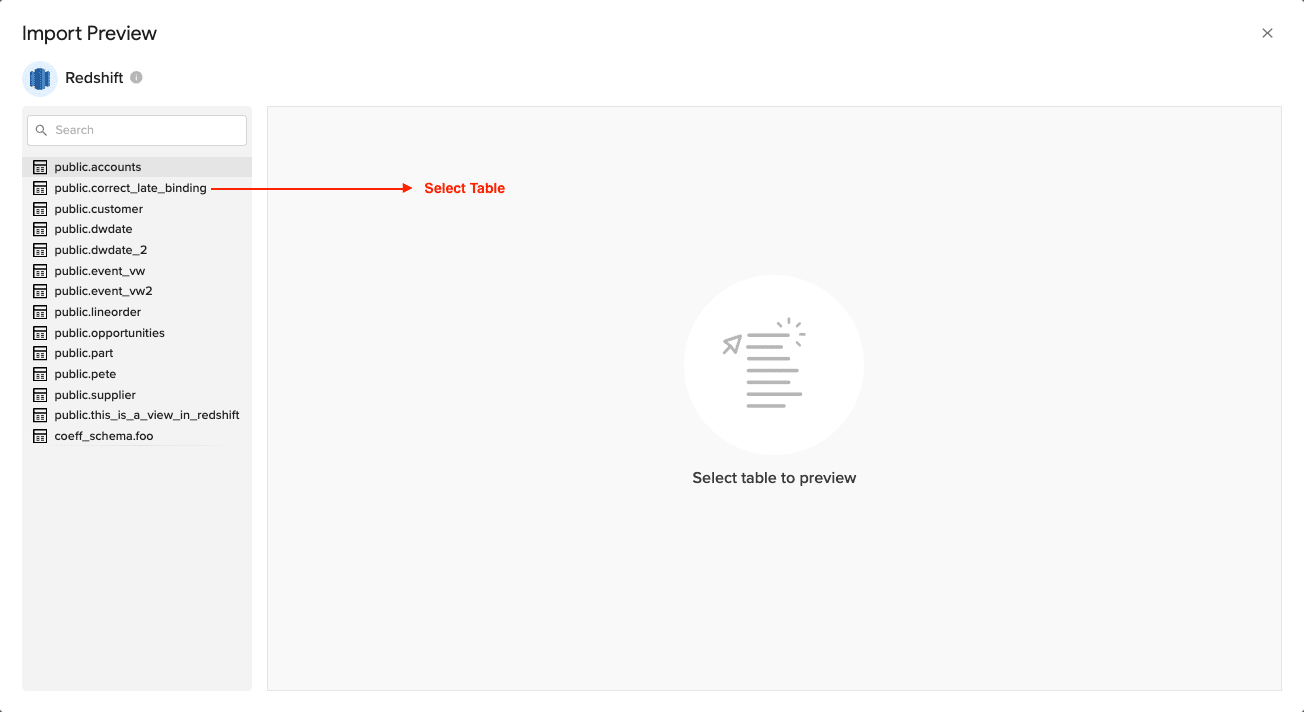
A Data Preview window will appear, allowing you to select the table that you want to import from.
- Customize your import by selecting the tables, columns, and applying any necessary filters.
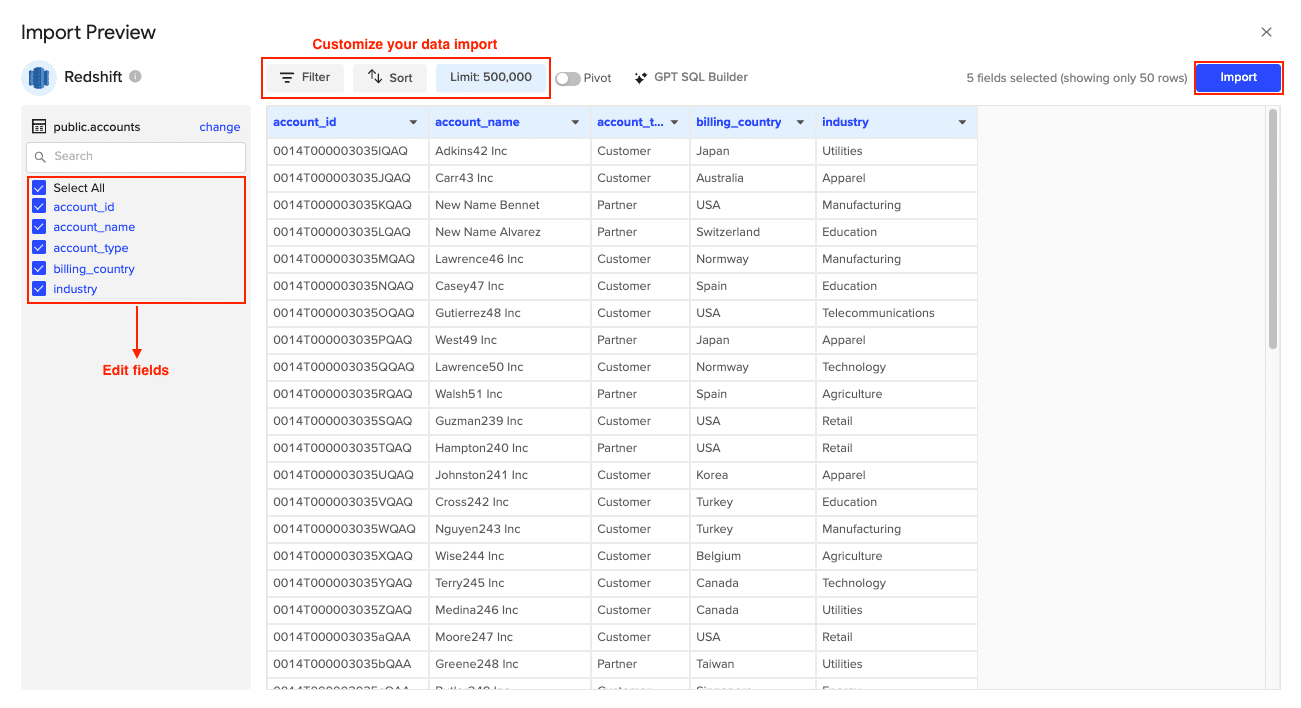
Click Import when finished.
Step 3. Prepare Data in Google Sheets/Excel
Once the data is imported, it will appear in your spreadsheet. Review and organize the data to ensure:
- Proper headers are set.
- Data accuracy is verified.
- Necessary transformations are made to fit the right schema.
Step 4. Export Data to Snowflake
Finally, push the data to Snowflake:
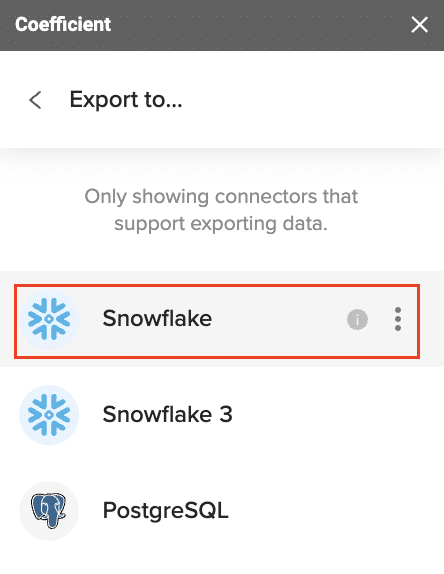
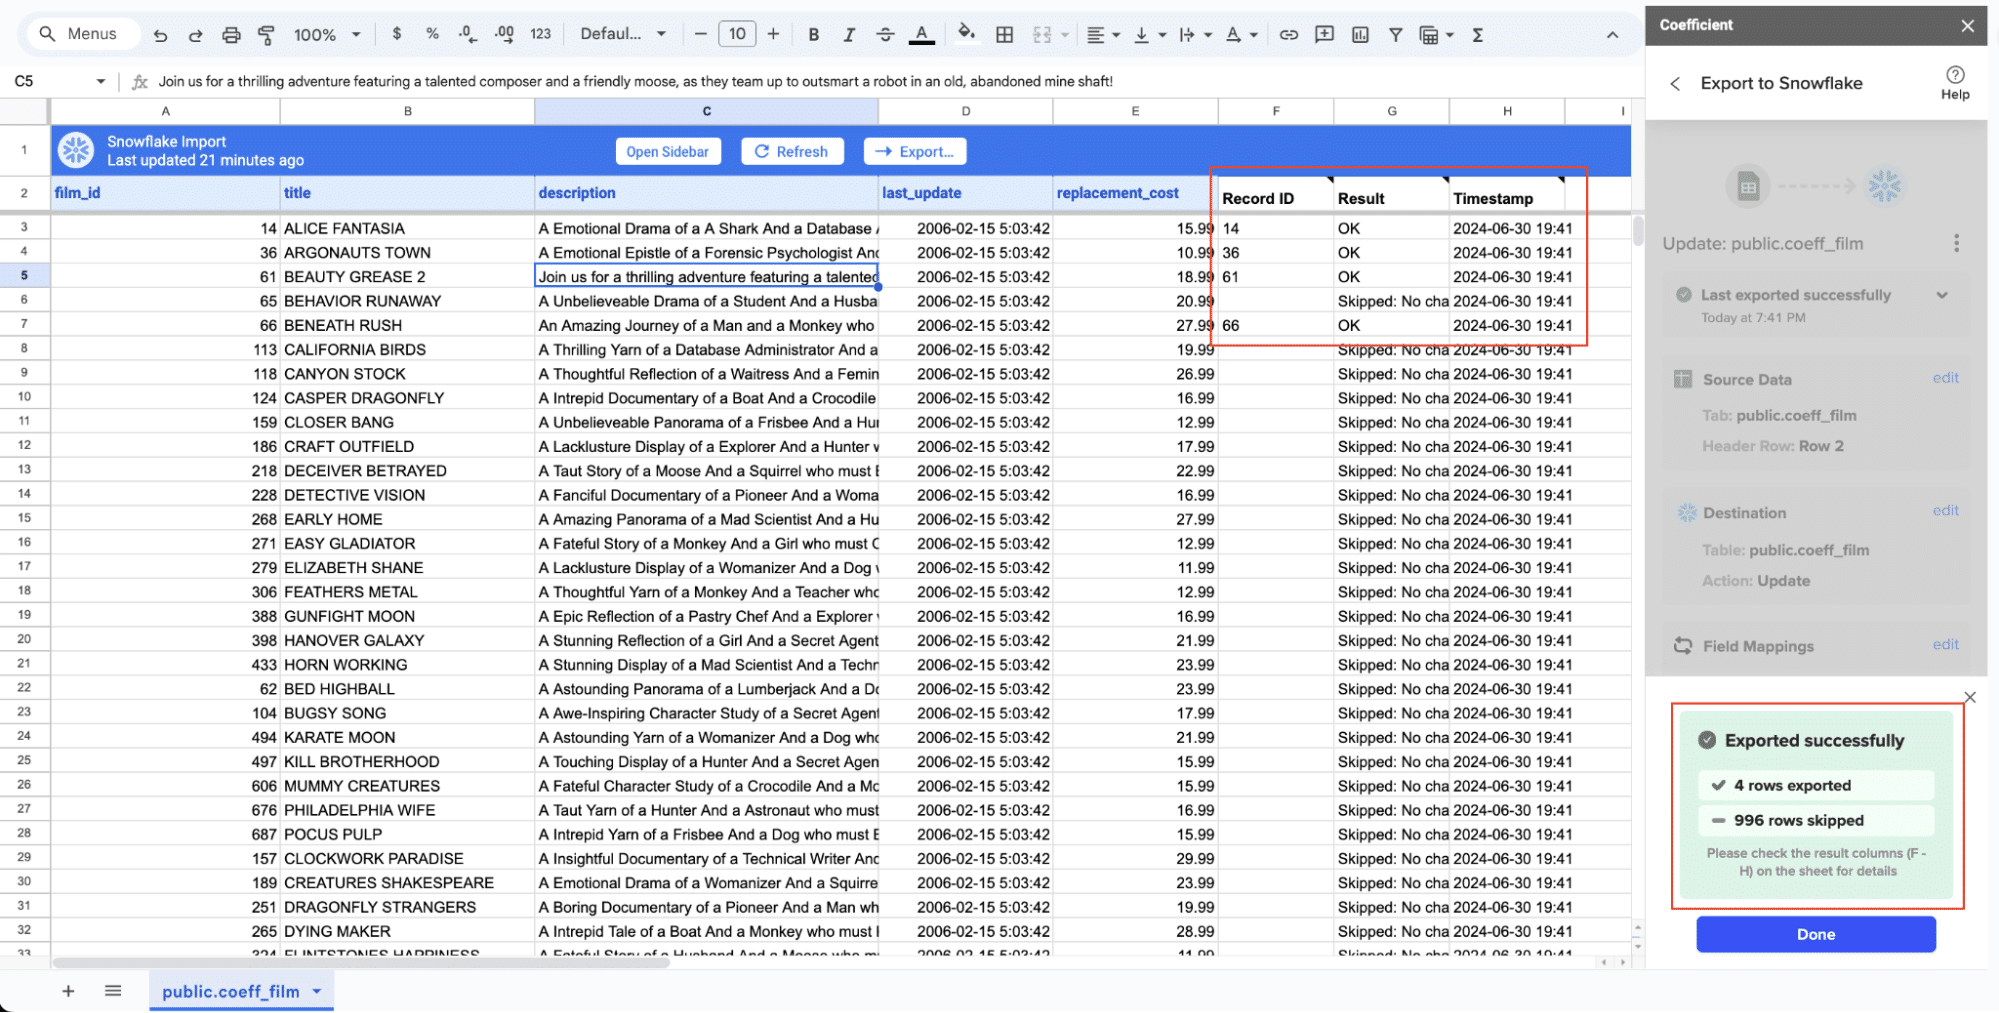
- In the Coefficient sidebar, click “Export to…” and then “Snowflake”.
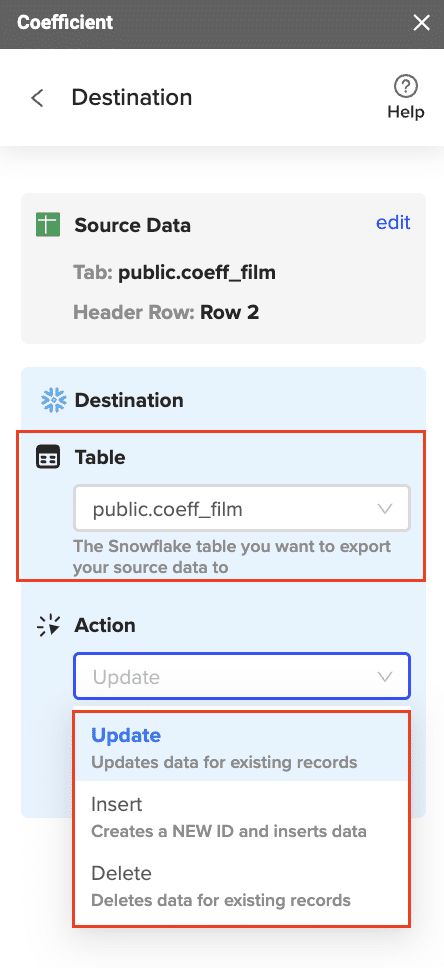
- Select the action (Insert, Update, Delete) and confirm your settings.
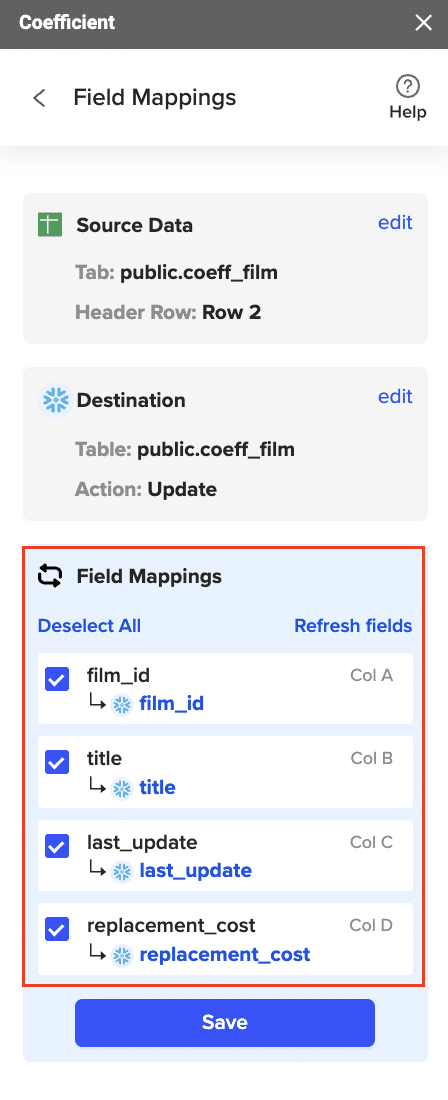
- Designate the appropriate Snowflake table and complete field mappings.
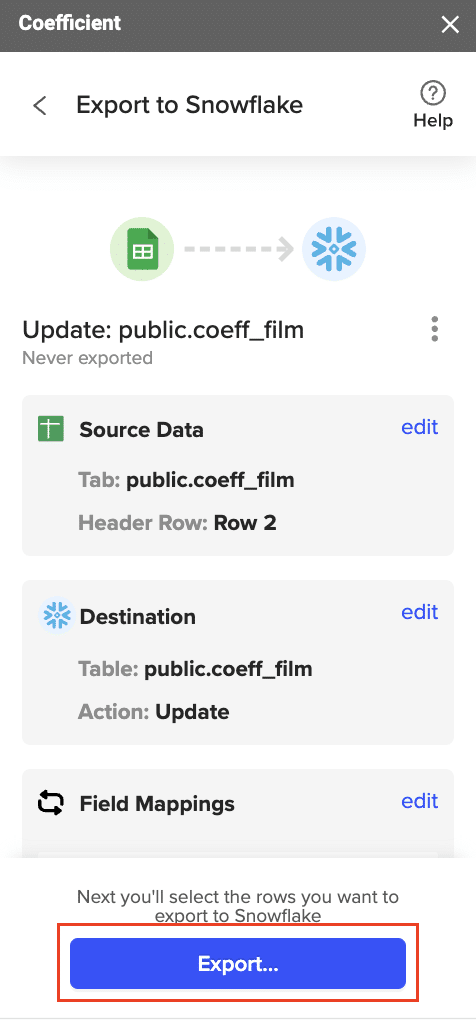
- Confirm your settings and then click “Export”.
When the Export to Snowflake is complete (and successful), you can see the number of rows exported/skipped.
Step 3. Execute the Migration
Data Export from Redshift
- Use UNLOAD command to export data to S3:
UNLOAD (‘SELECT * FROM your_table’)
TO ‘s3://your-bucket/your-prefix/’
IAM_ROLE ‘arn:aws:iam::your-account-id:role/your-role’
PARALLEL OFF
ALLOWOVERWRITE
GZIP;
- Handle large datasets and partitioning: For tables exceeding 1 TB, consider using partitioned unloads:
UNLOAD (‘SELECT * FROM your_table WHERE date_column BETWEEN ”2023-01-01” AND ”2023-12-31”’)
TO ‘s3://your-bucket/your-prefix/year=2023/’
IAM_ROLE ‘arn:aws:iam::your-account-id:role/your-role’
PARALLEL OFF
ALLOWOVERWRITE
GZIP;
Data Import into Snowflake
- Use Snowflake’s COPY INTO command:
COPY INTO your_table
FROM @your_stage/your-prefix/
FILE_FORMAT = (TYPE = ‘CSV’ FIELD_OPTIONALLY_ENCLOSED_BY = ‘”‘ COMPRESSION = GZIP)
ON_ERROR = ‘CONTINUE’;
- Leverage Snowpipe for continuous data loading:
CREATE OR REPLACE PIPE your_pipe
AUTO_INGEST = TRUE
AS
COPY INTO your_table
FROM @your_stage/your-prefix/
FILE_FORMAT = (TYPE = ‘CSV’ FIELD_OPTIONALLY_ENCLOSED_BY = ‘”‘ COMPRESSION = GZIP);
Validate Data Integrity
- Compare record counts and checksums:
— In Redshift
SELECT COUNT(*), SUM(CAST(column1 AS BIGINT)) FROM your_table;
— In Snowflake
SELECT COUNT(*), SUM(CAST(column1 AS NUMBER)) FROM your_table;
- Sample and detailed comparisons: Randomly select rows for in-depth comparison.
- Address discrepancies: Investigate and resolve any differences found during validation.
Step 4. Post-Migration Optimization
Performance Tuning in Snowflake
- Optimize query performance:
- Use EXPLAIN PLAN to analyze query execution.
- Implement appropriate clustering keys.
- Implement proper clustering and partitioning:
ALTER TABLE your_table CLUSTER BY (date_column, category_column);
Adapt Existing Workflows
- Update ETL processes: Modify data loading scripts to use Snowflake-specific commands.
- Modify reporting and analytics tools: Update connection strings and adapt queries for Snowflake syntax.
Monitor and Maintain
- Set up Snowflake-specific monitoring:
- Use Snowflake’s Account Usage views to track query performance and resource usage.
- Implement automated alerts for long-running queries or high credit consumption.
- Implement cost control measures:
- Set up resource monitors to cap warehouse usage.
- Use auto-suspend and auto-resume features for warehouses.
Redshift to Snowflake: Elevating Your Data Warehouse
Migrating from Redshift to Snowflake opens up new possibilities for data analytics and scalability. A successful transition requires meticulous planning, focusing on data integrity and minimizing operational disruptions.
Post-migration, prioritize optimizing your Snowflake implementation. Leverage its unique features like Time Travel and Zero-Copy Cloning to enhance your data operations. Ensure your team is trained to fully utilize Snowflake’s capabilities.
Want to maximize your Snowflake investment? Discover how to connect your Snowflake data directly to Excel and Google Sheets for seamless analysis and reporting.


