Do you want to know how to connect Snowflake with Google Sheets?
We’ve got you covered.
With the right steps and tools, you’d be surprised how straightforward the process can be. Over 2,500 Snowflake-powered orgs like Miro use pre-built Snowflake Google Sheets connectors to make their spreadsheet feel like an instance of Snowflake.
In this guide, we’ll cover several methods of connecting your Snowflake data with Google Sheets using a streamlined process. Also, check out our video tutorial below for a step-by-step walkthrough.
Video Tutorial: How to Connect Snowflake to Google Sheets in One Click
Advantages of using Google Sheets to analyze Snowflake data
Before we talk about merging your Snowflake data with Google Sheets, let’s go over some essential facts about Google Sheets first.
- Many business owners and teams use Google Sheets as a database, particularly for the experimental phase of a web development project, because of the program’s Microsoft Excel-like interface that makes it familiar and easy to use.
- Obtaining Google Sheets data to generate reports, such as sales operations reporting, and performing preliminary analytics is also a breeze since you can easily save and download files in CSV or XLSX format.
- The manual Extract-Transform-Load (ETL) process can take too much time. It might not even be a feasible method if you’re handling datasets with thousands of columns and rows.
Key facts about Snowflake Data Warehouse
- Snowflake is a cloud data `warehouse that works on a Software as a Service (SaaS) model.
- The software’s infrastructure is built on Amazon Web Services (AWS), offering an architecture based on a new Structured Query Language (SQL) database engine. This allows for more dynamic and faster queries, including performant data integration.
Can Google Sheets connect to Snowflake?
Yes, Google Sheets can connect to Snowflake. There are three common ways to connect snowflake and google sheets but some are a bit more work-intensive than the others.
- Coefficient Data Connector – Easy and out of the box solution with automation
- Export via CSV – Manual, laborious and repetitive task
- Google Apps Script – Complex setup and requires coding
Top three methods to connect Snowflake to Google Sheets
While there are many ways to establish a Snowflake database connection with Google Sheets, we’ll focus on the three best methods in this guide.
1. Coefficient
Coefficient provides an automated, no-code way to connect Snowflake with Google Sheets bi-directionally. You won’t need to create functions or write scripts like the following two options when using the Coefficient app to connect Snowflake to Google Sheets.
- Pros –
- No Coding needed – You only need to install Coefficient to Google Sheets, connect it to Snowflake to import your desired data. Coefficient is uber-easy to use and requires little to no coding.
- Time saver – The steps required to connect Snowflake to Google Sheets take minimal effort and time. This frees you and your team from countless hours of moving your Snowflake data to your spreadsheets manually.
- Real-time sync – Any update on your connected Snowflake data automatically syncs with your Google Spreadsheets in real-time, so you always work with the latest information. This allows for more effective and efficient data reporting and analysis, such as building a sales dashboard in Google Sheets.
- Snowflake Technology Select Partner – Coefficient is the one of the only Google Sheets connectors with Snowflake Partner Status. With over 60 Google Sheets connectors, blending data that resides outside of Snowflake is even simple.
- 2-way sync – Coefficient offers a bi-directional sync with Snowflake, meaning you can even update Snowflake data from Google Sheets manually or on a schedule. Of course, there are admin controls to ensure this is only available for the right stakeholders within your organization.
- Cons –
- The only downside to Coefficient is that any scheduled automations are not free forever. However, its pricing plans are affordable, and its benefits far outweigh the app’s costs.
Steps to connect Snowflake to Google Sheets –
Install the Coefficient data connector to Google Sheets, launch it from the Add-on tab on the menu.

Click Import data on the Coefficient window.
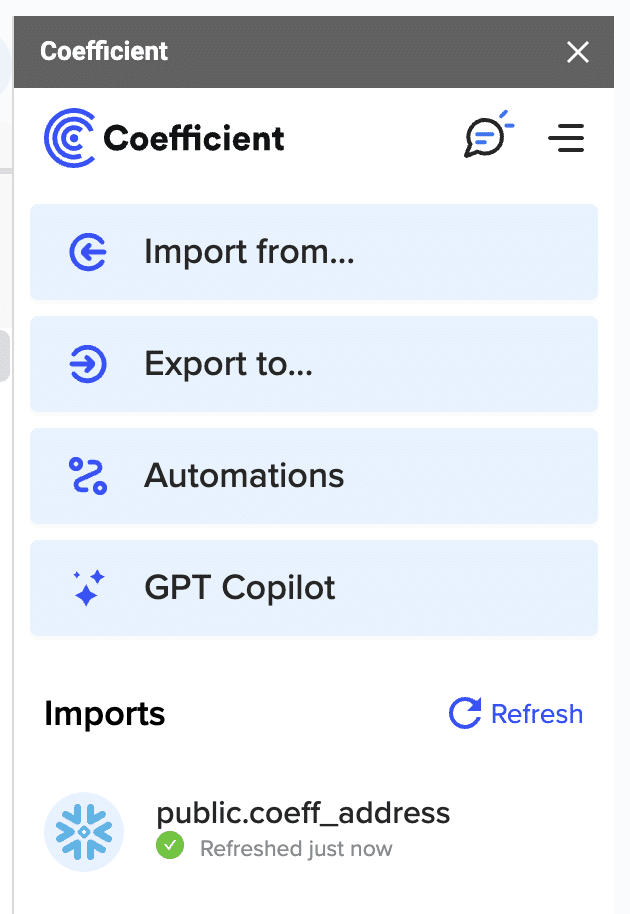
Then, choose Snowflake as your data source.
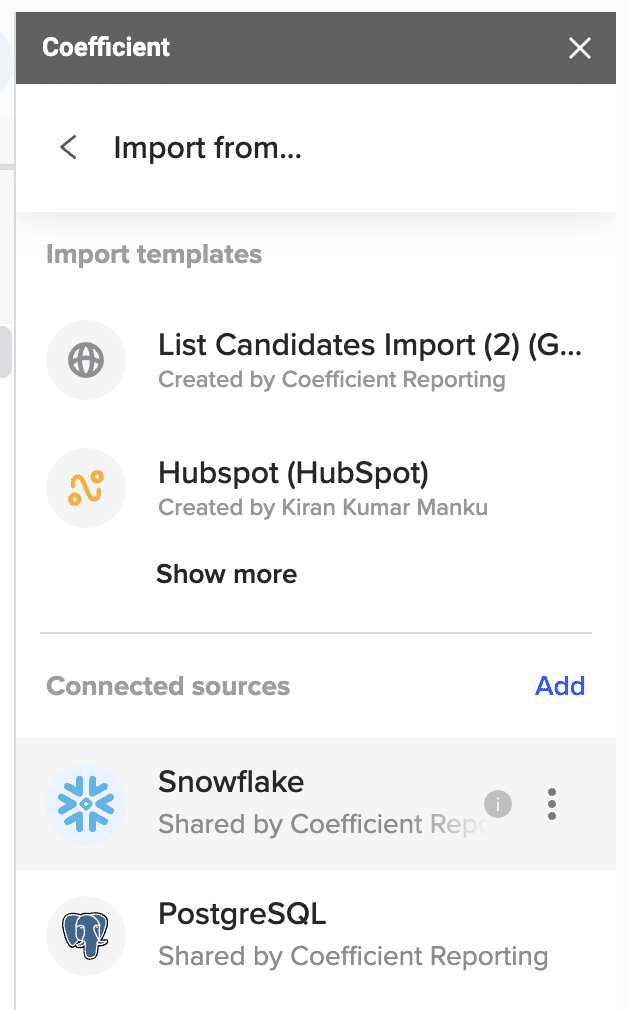
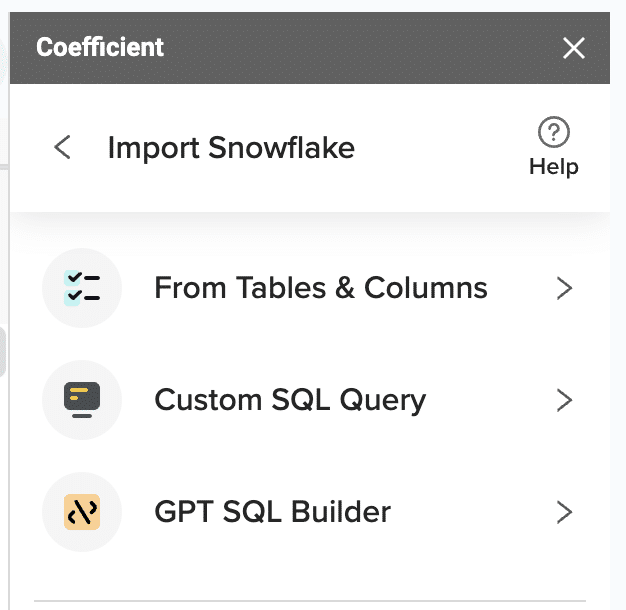
You can import from your Snowflake account’s tables or use a custom SQL query.
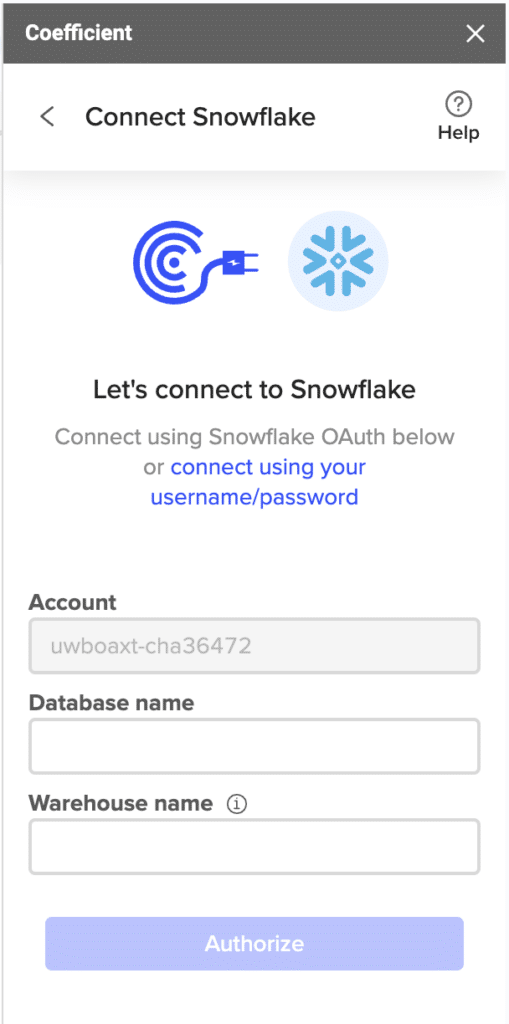
Enter your connection details, such as your account name, database name, username, and password, to connect to Snowflake.
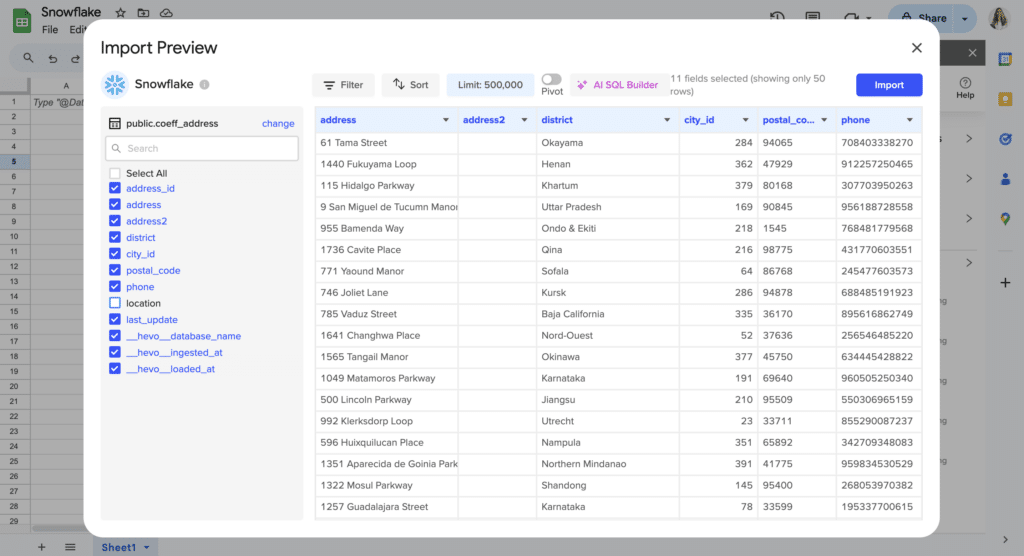
Once connected, select the specific Snowflake tables you want to import. Use the search function to look up your tables quickly.
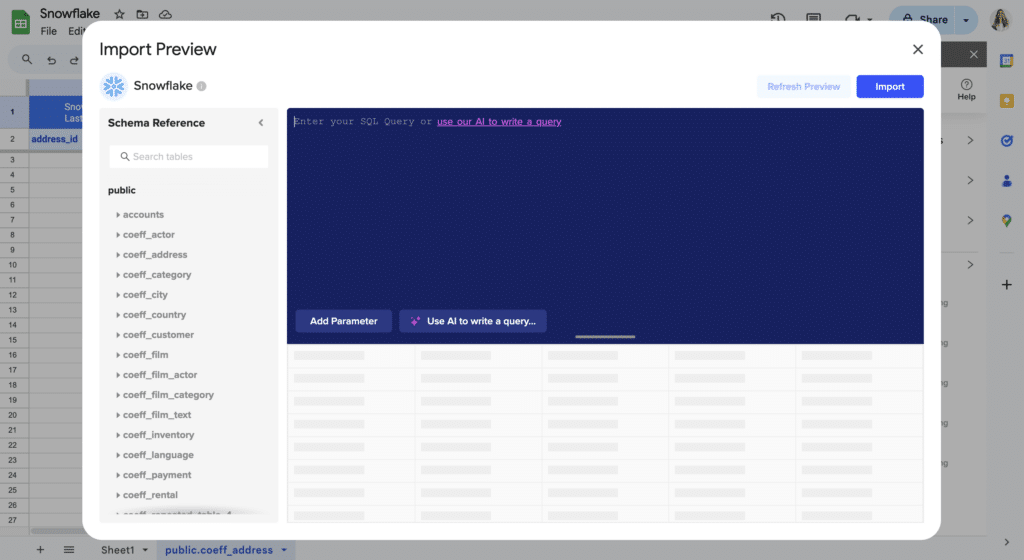
If you’re pulling data using a Custom SQL, type in or copy and paste it on the space provided and name your import.
From here, you can set filters to specify the columns and data you want to include in your import.
When you’re done, click Import, and within a few seconds or minutes (depending on your import data size), your Snowflake data should populate your Google spreadsheet.
What happens if you update your Snowflake database and tables?
Coefficient has you covered, so you won’t need to import your tables every time your Snowflake data changes.
Use the app’s auto-refresh feature to schedule automatic data syncing hourly, daily, or weekly.

The app’s automated data syncing feature allows you to get real-time data for your reporting and analysis needs — from building your weekly sales report in Google Sheets to your sales forecasting.
If you need the latest data, click refresh, and you’ll instantly get up-to-date information of your connected Snowflake datasets.
Automated updates reduce human error, streamline your data reporting and analysis processes, allow you to gain insights faster, and ensure you always have accurate datasets.
You can also set up custom notifications that let you notify anyone in your company of any critical data changes.
Select a cell (or cell ranges) to trigger alerts when the data changes or when new data (or a new row) gets added to your spreadsheets.
Schedule and send an automated daily or weekly digest containing the relevant data updates through email or Slack.

In a nutshell, Coefficient simplifies yet supercharges the process of connecting Snowflake to Google Sheets. You can set up the connection quickly and get your desired data in a few clicks, with minimal to no coding required.
Coefficient’s powerful features save you boatloads of time, effort, and resources, allowing you and your team to get the most out of your data and do work more efficiently.
2. Export Snowflake Table Data to Local CSV format
Exporting table data from Snowflake to local CSV format and connecting Snowflake with Google Sheets is a pretty straightforward process.
Start by installing and setting up a Snowsql command line option that lets you format and redirect the table output to the local CSV file.
For this example, let’s use the Snowsql command below.
snowsql -c my_example_connection -d sales_db -s public -q “select * from mytable limit 10” -o output_format=csv -o header=false -o timing=false -o friendly=false > output_file.csv

It’s always a good idea to use connection file for security reasons. Configure SQL environment variables so you won’t need to type in a password every time you export your Snowflake data tables.
Once you install the Snowsql command line option, execute it with your connection file and SQL query.
The example below shows how you can execute it (assuming you’re using a simple table with minimal data).
D:Snowflakeexport>snowsql -c myconnection -q “select * from E_DEPT” -o output_format=csv -o header=false -o timing=false -o friendly=false -o output_file=D:Snowflakeexportdept_file.csv
Or
D:Snowflakeexport>snowsql -c myconnection -q “select * from E_DEPT” -o output_format=csv -o header=false -o timing=false -o friendly=false > dept_file.csv
The connection file includes the necessary details, such as the password, username, schema, and database.
Snowsql can take a few seconds or minutes to export your query results, depending on the query’s table size and complexity.
Next, check the dept_file.csv content using this command:
D:Snowflakeexport>more dept_file.csv
“1”,”Engineering”
345678″2″,”Support”
By default, the Snowsql export query result will show in the double-quoted format.
- Pros
- Exporting Snowflake table data to local CSV format using the Snowsql command line option isn’t too complicated. Snowsql also supports various command line options, allowing you to format your table output as you prefer (in this case, a CSV file format).
- Cons
- You’ll need some in-depth knowledge about creating and configuring SQL commands. This can get complex when you’re trying to export volumes of Snowflake table data, which is often challenging if you’re unfamiliar with the process.
- It can become tedious and cumbersome if you have to export multiple reports daily or even weekly.
3. Google Apps Scripts
Google Sheets comes with Apps Script, a built-in app development platform you can use to create custom sidebars, menus, web apps.
It includes a MySQL protocol natively supported through a Java Database Connectivity (JDBC) service that allows you to connect specific databases.
You can set up a MySQL remoting service using Google Apps Script to work with your Snowflake data in Google Sheets and follow these steps.
Step 1: Make an empty script
Create a script for your Google spreadsheet by clicking Tools on the menu, then Script editor.

Step 2: Create class variables
Make several class variables that are available for any functions created within the script. It can look something like this:

Step 3: Include a Menu Option
Add a menu option to your spreadsheet so you can use the Google Sheets User Interface (UI) to call your function. It can look like this.


Step 4: Create a helper function
Write a helper function to find the first empty row in your Google spreadsheet, such as this one.

Step 5: Make a function to write your Snowflake data to your spreadsheet
Use the Google Apps Script JDBC functionality to link to your MySQL remoting service, select the data, and populate your spreadsheet to write the Snowflake data.


After running the script, you should see two input boxes. The first one will ask you to type in the sheet’s name (where you hold the data). If the spreadsheet doesn’t exist, the function automatically creates it for you.

The second input box will ask you to input the Snowflake table’s name to read. You’ll get an error message and exit the function if you choose an invalid table.

The function is generally designed for you to use as a menu option, but you can extend its use as a formula in a Google spreadsheet.
Once you complete the function, you should have a Google spreadsheet populated with your Snowflake data.
With this method, you can pull data from your Snowflake database and use Google Sheets’ calculating, charting, and graphing functionalities to create your reports and even build a world-class dashboard.
- Pros
- The process is fairly easy to follow if you have experience and knowledge in creating functions (and codes) and running scripts.
- Cons
- The entire process can be long-winded and requires writing scripts and functions, which can take up too much time and resources if you don’t have in-depth knowledge or skills.
- The method can leave plenty of room for human error, leading to delays and inefficient data handling.
- Using Apps Script also requires setting up pre-requisite configurations before you can start creating the functions to connect your Snowflake data to Google Sheets, adding to your workload and eating up more of your time.
- Any changes to the data sets that you need will require edits to your apps scripts.
Next Steps: Ready to simplify connecting Google Sheets with Snowflake?
While there are several ways to link your Snowflake data with your Google spreadsheets, the three methods in this guide are the best options to do it.
Simplifying the process of connecting Snowflake to Google Sheets helps eliminate the time-consuming and energy-draining aspects of importing, exporting, and syncing your data.
You’re better off automating critical parts of the process, so you get insights, create reports, and perform analysis more efficiently. This, in turn, optimizes your company workflows, increasing your productivity and effectiveness.
Try Coefficient for free today!


