


Table of Contents
![]()
- 1. 8 Ways to Improve Query Optimization in Snowflake (With Examples)
- 2. How to Prevent Data Silos Using Snowflake Semantic Views
- 3. Snowflake Semantic Views vs Semantic Model: Key Differences Explained
- 4. What Is Snowsight? A Complete Guide to Snowflake’s Web Interface
- 5. How Snowflake Customers Can Unlock More Value through Last-Mile Activation
- 6. From Snowflake Intelligence to the Spreadsheet: A Builder’s Guide to Last-Mile Data Activation
-
7. How to Ingest Data into Snowflake: Methods, Tools, and Best Practices
- Choosing the right ingestion method
- Method 1: INSERT statement
- Method 2: COPY INTO
- Method 3: Coefficient - Ingest from SaaS tools and spreadsheets
- Method 4: Snowpipe
- Method 5: Snowpipe Streaming
- Method 6: Kafka connector
- Method 7: Third-party ETL and ELT tools
- Best practices for Snowflake data ingestion
- How to choose: a quick decision guide
- Frequently asked questions
- 8. How to Query JSON Data in Snowflake
- 9. How to Copy Data from One Table to Another Table in Snowflake
- 10. How to Load Unstructured Data in Snowflake: Files, Documents, and AI Pipelines
- 11. How to Flatten JSON Data in Snowflake
- 12. How to Load Data into Snowflake
- 13. How to Parse JSON Data in Snowflake?

Getting data into Snowflake sounds straightforward. In practice there are multiple ways to do it, each suited to different data volumes, latency requirements, and team skill sets. Picking the wrong method means either paying too much in warehouse credits, dealing with pipeline complexity you did not need, or leaving useful data stranded in SaaS tools while the data team fields requests to move it.
This guide covers every major Snowflake ingestion method: when to use each one, how to configure it, and a decision framework for choosing based on your actual situation.
If you are a less technical user looking for a simpler file-upload walkthrough, see How to Upload Data to Snowflake.
Choosing the right ingestion method
Most teams end up using more than one of these depending on the use case. This table gives you the high-level picture before going deeper on each.
| Method | Latency | Who manages compute | Best for |
| INSERT | Immediate | Customer warehouse | Small one-off inserts, testing |
| COPY INTO | Minutes | Customer warehouse | Bulk batch loads from staged files |
| Coefficient | On-demand or scheduled | None required | Pulling live data from 100+ SaaS tools into Snowflake; pushing spreadsheet and CRM data back |
| Snowpipe | 1 to 5 minutes | Snowflake serverless | Continuous file-based ingestion |
| Snowpipe Streaming | Sub-5 seconds | Snowflake serverless | Real-time event and telemetry data |
| Kafka connector | Near real-time | Snowflake serverless | High-throughput event streaming from Kafka topics |
| Third-party ETL tools | Varies | Tool-managed | Managed pipelines from databases and SaaS apps without custom code |
Method 1: INSERT statement
INSERT works the same as in any relational database. It is the right choice for writing small amounts of data directly: seeding reference data, testing a table structure, or applying a one-off correction.
INSERT INTO customers (customer_id, name, plan, mrr)
VALUES (1001, ‘Acme Corp’, ‘pro’, 2988.00);
Snowflake supports multi-row INSERT syntax but it is not optimized for large volumes. Anything beyond a few thousand rows belongs in COPY INTO. INSERT runs against your customer-managed virtual warehouse, so credits are consumed for the duration of the operation.
Method 2: COPY INTO
COPY INTO is the foundation of batch loading in Snowflake. It reads data files from a stage — either an internal Snowflake stage or an external cloud storage location like Amazon S3, Azure Blob Storage, or Google Cloud Storage — and loads them into a target table.
Step 1: Create a stage
— Internal stage
CREATE STAGE my_internal_stage;
— External stage pointing to S3
CREATE STAGE my_s3_stage
URL = ‘s3://my-bucket/data/’
CREDENTIALS = (AWS_KEY_ID = ‘…’ AWS_SECRET_KEY = ‘…’);
Step 2: Stage your files
For internal stages, use the PUT command from SnowSQL:
PUT file:///local/path/to/data.csv @my_internal_stage;
For external stages, files go directly to your cloud storage bucket. Snowflake reads them from there.
Step 3: Load with COPY INTO
COPY INTO customers
FROM @my_s3_stage/customers/
FILE_FORMAT = (TYPE = CSV FIELD_OPTIONALLY_ENCLOSED_BY = ‘”‘ SKIP_HEADER = 1)
ON_ERROR = ‘CONTINUE’;
Run the load in validation mode first to catch format errors without writing any data:
COPY INTO customers
FROM @my_s3_stage/customers/
FILE_FORMAT = (TYPE = CSV)
VALIDATION_MODE = RETURN_ERRORS;
Cost model and performance
COPY INTO bills against your virtual warehouse’s credit consumption while it runs. File count determines parallelism: each warehouse thread processes one file at a time. An XS warehouse has 8 threads. For 100 files on an XS warehouse, you are running 13 sequential batches. If throughput matters, size up the warehouse or align file count with thread count.
Target file sizes between 100MB and 250MB. Smaller files create per-file overhead. Larger files reduce parallelism. Aggregate small source files before staging where possible.
Supported formats: CSV, JSON, Avro, ORC, Parquet, XML.
When to use COPY INTO: You have historical files in cloud storage, you run scheduled batch loads, or you need file-level transaction control where a partial file load is never acceptable.
Method 3: Coefficient – Ingest from SaaS tools and spreadsheets
Most Snowflake ingestion methods assume data is already in files or already in a database. A large portion of operational data does not start there. It lives in Salesforce, HubSpot, QuickBooks, Google Ads and other SaaS tools, and in spreadsheets that finance, sales, and operations teams maintain every day.
Getting that data into Snowflake typically means either building a custom ETL pipeline, paying for a managed connector service, or someone manually exporting CSVs and uploading them. None of those scale well.
Coefficient connects directly to 100+ SaaS tools and business systems and syncs that data into Snowflake on a schedule you define without any pipeline code. It works in both directions: pull live data from your SaaS stack into Snowflake or push data from a spreadsheet back into Snowflake tables.
What you can pull into Snowflake with Coefficient
Coefficient connects to the systems where your operational data actually lives:
- CRM data: Salesforce opportunities, HubSpot deals, contacts, companies, pipeline stages
- Finance data: QuickBooks P&L, invoices, payments, general ledger; NetSuite saved searches and financial reports
- Marketing data: Google Ads, Facebook Ads, Google Analytics campaign performance
- Product data: Stripe charges, subscriptions, refunds; Shopify orders, customers
- HR and payroll: Rippling headcount, Gusto payroll
- Any other connected source: 100+ integrations across the Coefficient connector library
Once connected, Coefficient syncs data into your Snowflake tables on a schedule — hourly, daily, or weekly — without any manual exports or pipeline maintenance.
Pushing data from spreadsheets into Snowflake
For teams that maintain validated data in spreadsheets — budget figures, enriched lead lists, reconciled finance records, manually reviewed data — Coefficient pushes that data directly into Snowflake tables without SQL or engineering involvement.
Step 1: Install Coefficient
Install the Coefficient add-on from the Google Workspace Marketplace or Excel add-in store.
Step 2: Connect to Snowflake
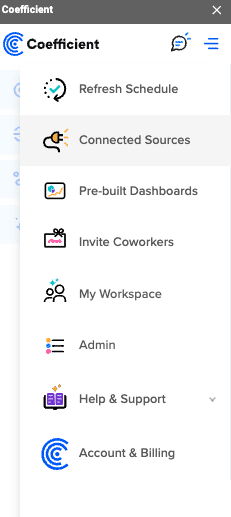
Open Coefficient from the Extensions menu and click “Connected Sources.” Search for Snowflake and click Connect. Enter your Account Name, Database, Username, Password, and Warehouse.
Step 3: Connect your SaaS source
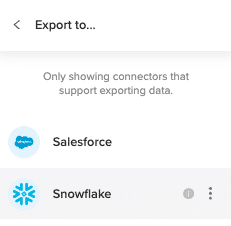
In the same Connected Sources menu, connect the SaaS tool you want to pull from like Salesforce, HubSpot, QuickBooks, NetSuite, or any of the 100+ available connectors. Coefficient handles authentication via OAuth for most sources.
Step 4: Import your data and configure the Snowflake export
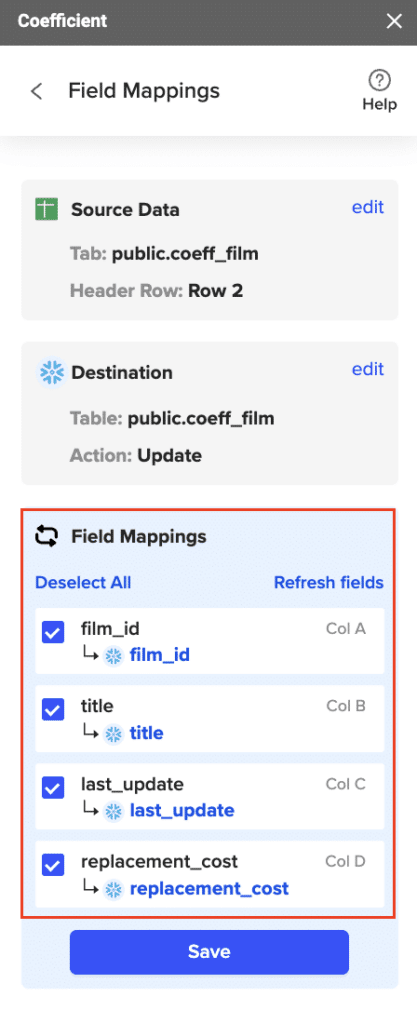
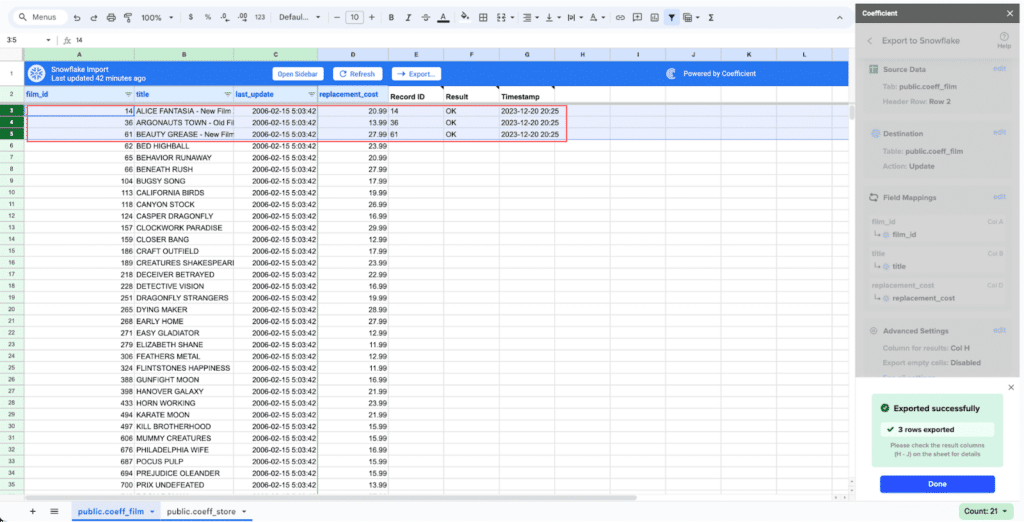
Click “Import from” and select your SaaS source. Choose the object and fields you want. Coefficient pulls the data into your spreadsheet. Then click “Export to Snowflake,” map the columns to your target table fields, and run the export.
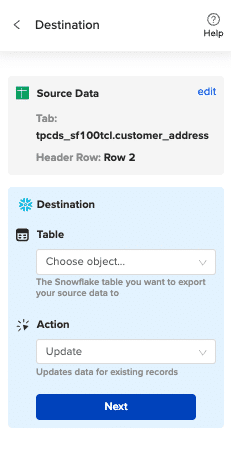
Step 5: Map fields and export
Map your sheet columns to Snowflake table fields. Select Insert, Update, or Upsert depending on whether you are creating new records or updating existing ones.
Step 6: Schedule recurring syncs
Set a refresh schedule so Coefficient re-pulls from the SaaS source and pushes updated data to Snowflake automatically — daily, weekly, or hourly. The sync runs without any manual intervention.
When to use Coefficient: Your data lives in SaaS tools or spreadsheets rather than files or databases. Your team wants data in Snowflake without building or maintaining pipeline code. Business users need to push manually maintained data into Snowflake on a regular cadence.
Start with Coefficient for free
Method 4: Snowpipe
Snowpipe is Snowflake’s serverless continuous ingestion service. Instead of manually triggering COPY INTO, Snowpipe watches a stage for new files and loads them automatically. Snowflake manages the compute and bills on serverless credits — no warehouse to configure, size, or suspend.
Create the pipe
CREATE PIPE orders_pipe
AUTO_INGEST = TRUE
AS
COPY INTO orders
FROM @my_s3_stage/orders/
FILE_FORMAT = (TYPE = JSON);
AUTO_INGEST = TRUE tells Snowpipe to use cloud storage event notifications (S3 event notifications, Azure Event Grid, or GCS Pub/Sub) to trigger loading as soon as a new file lands. Without it, you trigger loads manually via the Snowpipe REST API.
Monitor pipe status
SELECT SYSTEM$PIPE_STATUS(‘orders_pipe’);
This returns a JSON object with the pipe’s current state, files queued, files processed, and any errors.
Snowpipe vs COPY INTO: cost comparison
Snowpipe runs on Snowflake-managed serverless compute, billed at approximately 1.4x the per-credit rate compared to a customer-managed warehouse. For intermittent or low-volume loads, Snowpipe is usually cheaper because you are not paying for an idle warehouse between loads. For high-volume sustained loads, a well-sized customer warehouse with COPY INTO can be more cost-efficient.
Best practice: Use one stage per Snowpipe. Shared stages create contention and complicate monitoring. Keep individual files between 100MB and 250MB for optimal per-file cost.
When to use Snowpipe: You have a continuous stream of files arriving in cloud storage and you want automated ingestion without managing warehouse schedules.
Method 5: Snowpipe Streaming
Snowpipe Streaming is Snowflake’s row-level real-time ingestion API. Unlike Snowpipe which is file-based, Snowpipe Streaming accepts data row by row via an SDK, with no intermediate file staging required. Median latency is under 5 seconds.
It is purpose-built for use cases where file-based ingestion introduces unacceptable lag: clickstream data, telemetry, IoT sensor feeds, application event logs.
How it works
Snowpipe Streaming is accessed through Snowflake’s Ingest SDK (available for Java and Python). Your application calls insertRows() on a channel, which is a logical stream bound to a target table. Snowflake batches the incoming rows internally and commits them to the table continuously.
// Java example: open a channel and stream rows
OpenChannelRequest channelRequest = OpenChannelRequest.builder(“MY_CHANNEL”)
.setDBName(“MY_DB”)
.setSchemaName(“MY_SCHEMA”)
.setTableName(“events”)
.setOnErrorOption(OpenChannelRequest.OnErrorOption.CONTINUE)
.build();
SnowflakeStreamingIngestChannel channel = client.openChannel(channelRequest);
Map<String, Object> row = new HashMap<>();
row.put(“event_id”, “e001”);
row.put(“user_id”, 1001);
row.put(“event_type”, “page_view”);
row.put(“ts”, System.currentTimeMillis());
channel.insertRow(row, “offset_token_1”);
Snowpipe vs Snowpipe Streaming
| Snowpipe | Snowpipe Streaming | |
| Input unit | Files | Rows |
| Staging required | Yes | No |
| Typical latency | 1 to 5 minutes | Under 5 seconds |
| Best for | Frequent file feeds | Event streams, telemetry |
| Error handling | File-level | Row-level, dead-letter queue support |
When to use Snowpipe Streaming: You need sub-minute data availability and your source data is event-driven rather than file-based. It is also the method the Snowflake Kafka connector uses under the hood when configured in streaming mode.
Method 6: Kafka connector
For teams already running Apache Kafka, the Snowflake Kafka connector is the most direct path from Kafka topics into Snowflake tables. It is a Kafka Connect plugin, available in both a Confluent-managed version and an open-source version.
The connector reads messages from one or more Kafka topics and writes them to Snowflake. It supports two ingestion modes under the hood: the traditional Snowpipe file-based mode, and Snowpipe Streaming for sub-second row-level latency.
How the connector works
- Applications publish JSON or Avro records to Kafka topics
- The connector buffers incoming messages from the topic partitions
- When a threshold is reached (time, memory, or message count), the connector writes to a Snowflake internal stage and triggers Snowpipe — or streams rows directly via the Snowpipe Streaming API
- Snowflake loads the data into the target table and the connector deletes the staged file after confirming success
The connector handles fault tolerance automatically. Messages are neither duplicated nor silently dropped. If Snowpipe fails to load a record, it moves to the table stage for review rather than disappearing.
Key configuration decisions:
Use Snowpipe mode when you can tolerate 1 to 5 minute latency and want simpler setup. Use Snowpipe Streaming mode when you need sub-second latency and your Kafka version and connector version support it.
When to use the Kafka connector: You have a Kafka-based data architecture and need to centralize event data in Snowflake with minimal custom code. It is the standard choice for clickstream, application logs, IoT telemetry, and any event-driven pipeline already running through Kafka.
Method 7: Third-party ETL and ELT tools
For teams that need to pull from databases, data warehouses, or SaaS APIs and land data in Snowflake without writing custom pipeline code, managed ETL and ELT tools handle the heavy lifting. They provide pre-built connectors, schema management, incremental sync logic, and monitoring out of the box.
The main categories:
Managed ELT platforms like Fivetran and Airbyte handle incremental data sync from hundreds of sources like databases, SaaS applications, APIs into Snowflake with automated schema change handling. They are the fastest way to get a reliable pipeline running without engineering work.
Cloud-native ETL tools like Matillion are built specifically for cloud data warehouses. They provide a visual interface for building transformation logic that runs directly inside Snowflake’s compute, which keeps data processing efficient and cost-effective.
Open-source options like dbt (for transformation) and Apache Airflow (for orchestration) are widely used in data engineering teams that want more control over their pipeline logic without vendor lock-in.
The right choice depends on how many sources you are connecting, how much transformation you need before loading, and whether you want a managed service or prefer to run your own infrastructure.
When to use third-party ETL tools: You have structured data in relational databases or SaaS APIs that needs regular sync to Snowflake, your team wants managed connectors rather than custom code, or you need complex transformation logic applied before data lands in its final table.
Best practices for Snowflake data ingestion
File sizing for COPY INTO and Snowpipe
Target 100MB to 250MB per file. Below 10MB, the per-file overhead from Snowpipe’s serverless billing starts adding up. Above 5GB, you lose flexibility in error handling and recovery. For source systems that produce small files — application logs, hourly exports — aggregate before staging.
Match file count to warehouse threads for COPY INTO
Each XS warehouse thread handles one file at a time. XS gives you 8 threads, S gives 16, M gives 32, and so on, doubling with each size increment. If you are loading 200 files, an XS warehouse runs 25 batches sequentially. Size the warehouse to match your file count for optimal throughput, then suspend it when done.
Incremental loading over full refreshes
Load only new or changed records rather than reloading full datasets. Use COPY_HISTORY to track which files have already been processed. For database sources, use Change Data Capture where available. Reloading unchanged data wastes credits and creates unnecessary churn in downstream queries.
COPY INTO vs Snowpipe: cost tradeoffs
COPY INTO charges warehouse credits for the time the warehouse runs, including idle time if you do not auto-suspend. Snowpipe charges serverless compute at approximately 1.4x the per-credit rate but eliminates idle charges entirely. For sporadic loads with long gaps between runs, Snowpipe typically costs less. For high-volume continuous loads, a right-sized warehouse with COPY INTO can be more economical.
Use VALIDATION_MODE before loading
Run COPY INTO with VALIDATION_MODE = RETURN_ERRORS before your first production load of a new data source. This surfaces format mismatches, type errors, and encoding issues without writing any data. It is much cheaper to catch problems here than to clean up a partially loaded table.
Stage hygiene
Keep separate stages per pipeline. Mixing multiple data sources in a single stage makes monitoring harder, creates contention in Snowpipe, and complicates error isolation. Clean up successfully loaded files from stages regularly to avoid accumulation and cost.
Secure ingestion
Use Snowflake’s role-based access control to limit which roles can write to which tables. For external stages, use storage integrations rather than embedding credentials in stage definitions. Rotate access keys on schedule and audit stage access via QUERY_HISTORY.
How to choose: a quick decision guide
- Historical files sitting in cloud storage that you need loaded once or on a batch schedule: COPY INTO
- Data living in Salesforce, HubSpot, QuickBooks, NetSuite, or other SaaS tools: Coefficient
- Spreadsheet data that needs to be pushed into Snowflake regularly: Coefficient
- Continuous stream of files arriving in S3, Azure Blob, or GCS: Snowpipe
- Real-time event data, telemetry, or application logs needing sub-minute availability: Snowpipe Streaming
- Already running Kafka and need to centralize event streams: Kafka connector
- Database sources or SaaS APIs, managed pipelines preferred over custom code: Third-party ETL tools
- Small one-off inserts or table seeding: INSERT statement
Frequently asked questions
What is the difference between Snowpipe and COPY INTO?
Both use staged files as input. COPY INTO runs against a customer-managed virtual warehouse on demand and gives you file-level transaction control. Snowpipe is serverless and event-driven — it detects new files automatically and loads them without a warehouse. Snowpipe is cheaper for intermittent loads; COPY INTO can be more cost-efficient for high-volume continuous loads.
What is Snowpipe Streaming?
Snowpipe Streaming is Snowflake’s row-level real-time ingestion API. Unlike Snowpipe which requires files as input, Snowpipe Streaming accepts rows directly via the Snowflake Ingest SDK with no intermediate staging. Median latency is under 5 seconds. It is the right choice for event-driven architectures where file-based ingestion introduces too much lag.
Does Snowflake support Kafka integration natively? Yes. Snowflake provides a Kafka connector — available in both open-source and Confluent-managed versions — that reads from Kafka topics and writes to Snowflake tables. It supports both Snowpipe (file-based) and Snowpipe Streaming (row-level) ingestion modes.
What file formats does Snowflake support for ingestion?
Snowflake’s COPY INTO command supports CSV, JSON, Avro, ORC, Parquet, and XML. Compressed versions of all these formats are supported with automatic decompression.
How do I get data from Salesforce or HubSpot into Snowflake?
You have two main options. Third-party ETL tools like Fivetran or Airbyte provide managed connectors that sync CRM data to Snowflake on a schedule. Coefficient connects to Salesforce, HubSpot, and 100+ other SaaS tools, pulls live data into a spreadsheet, and pushes it to Snowflake — without pipeline code. Coefficient is particularly useful when business users need to control the sync or when the data requires review before landing in Snowflake.
How do I push data from Google Sheets into Snowflake?
Coefficient handles this directly. Connect your Snowflake account in Coefficient, prepare your sheet with a header row matching your target table fields, and use the Export to Snowflake function to insert or upsert rows. You can also schedule recurring exports so the sheet data syncs automatically.
What is the most cost-effective way to ingest large files into Snowflake?
Use COPY INTO with files sized between 100MB and 250MB, and size your warehouse so the thread count matches your file count. Suspend the warehouse immediately after the load completes. For continuous loads with unpredictable timing, Snowpipe on serverless compute often works out cheaper because there is no idle warehouse cost.