Are you looking to enhance your financial data management by connecting QuickBooks to SQL Server? You’re in the right place. This guide will walk you through three proven methods to establish this connection, helping you choose the best solution for your business needs.
Why Connect QuickBooks to SQL Server?
Before we dive into the how-to, let’s explore why businesses are increasingly connecting QuickBooks to SQL Server:
- Advanced Financial Reporting: By combining QuickBooks financial data with other business metrics in SQL Server, you can create more comprehensive reports and perform in-depth analytics.
- Automatic Data Synchronization: Say goodbye to manual data entry. Connecting these systems ensures real-time accuracy between your accounting and operational data.
- Improved Data Management: SQL Server’s advanced capabilities allow you to handle large volumes of financial data while still using QuickBooks as your primary accounting system.
Now that we understand the benefits, let’s explore the top three methods to connect QuickBooks to SQL Server.
Top 3 Methods to Connect QuickBooks to SQL Server
| Solution | Best For |
| Coefficient | Non-technical users who need to sync QuickBooks data to SQL Server through spreadsheets with automated updates and no coding required |
| QODBC Driver | Technical teams requiring direct database connectivity and custom SQL queries for QuickBooks data |
| Hevo Data | Organizations needing enterprise-grade ETL capabilities with advanced data transformation features |
#1 Coefficient: The No-Code Solution

Coefficient provides a user-friendly approach to connecting QuickBooks to SQL Server using spreadsheets as an intermediate layer. This method is perfect for business users who want to maintain data accuracy while using familiar tools.
Setting Up Coefficient
Step 1. Install Coefficient
For Google Sheets
- Open a new or existing Google Sheet, navigate to the Extensions tab, and select Add-ons > Get add-ons.
- In the Google Workspace Marketplace, search for “Coefficient.”
- Follow the prompts to grant necessary permissions.
- Launch Coefficient from Extensions > Coefficient > Launch.
- Coefficient will open on the right-hand side of your spreadsheet.

For Microsoft Excel
- Open Excel from your desktop or in Office Online. Click ‘File’ > ‘Get Add-ins’ > ‘More Add-Ins.’
- Type “Coefficient” in the search bar and click ‘Add.’
- Follow the prompts in the pop-up to complete the installation.
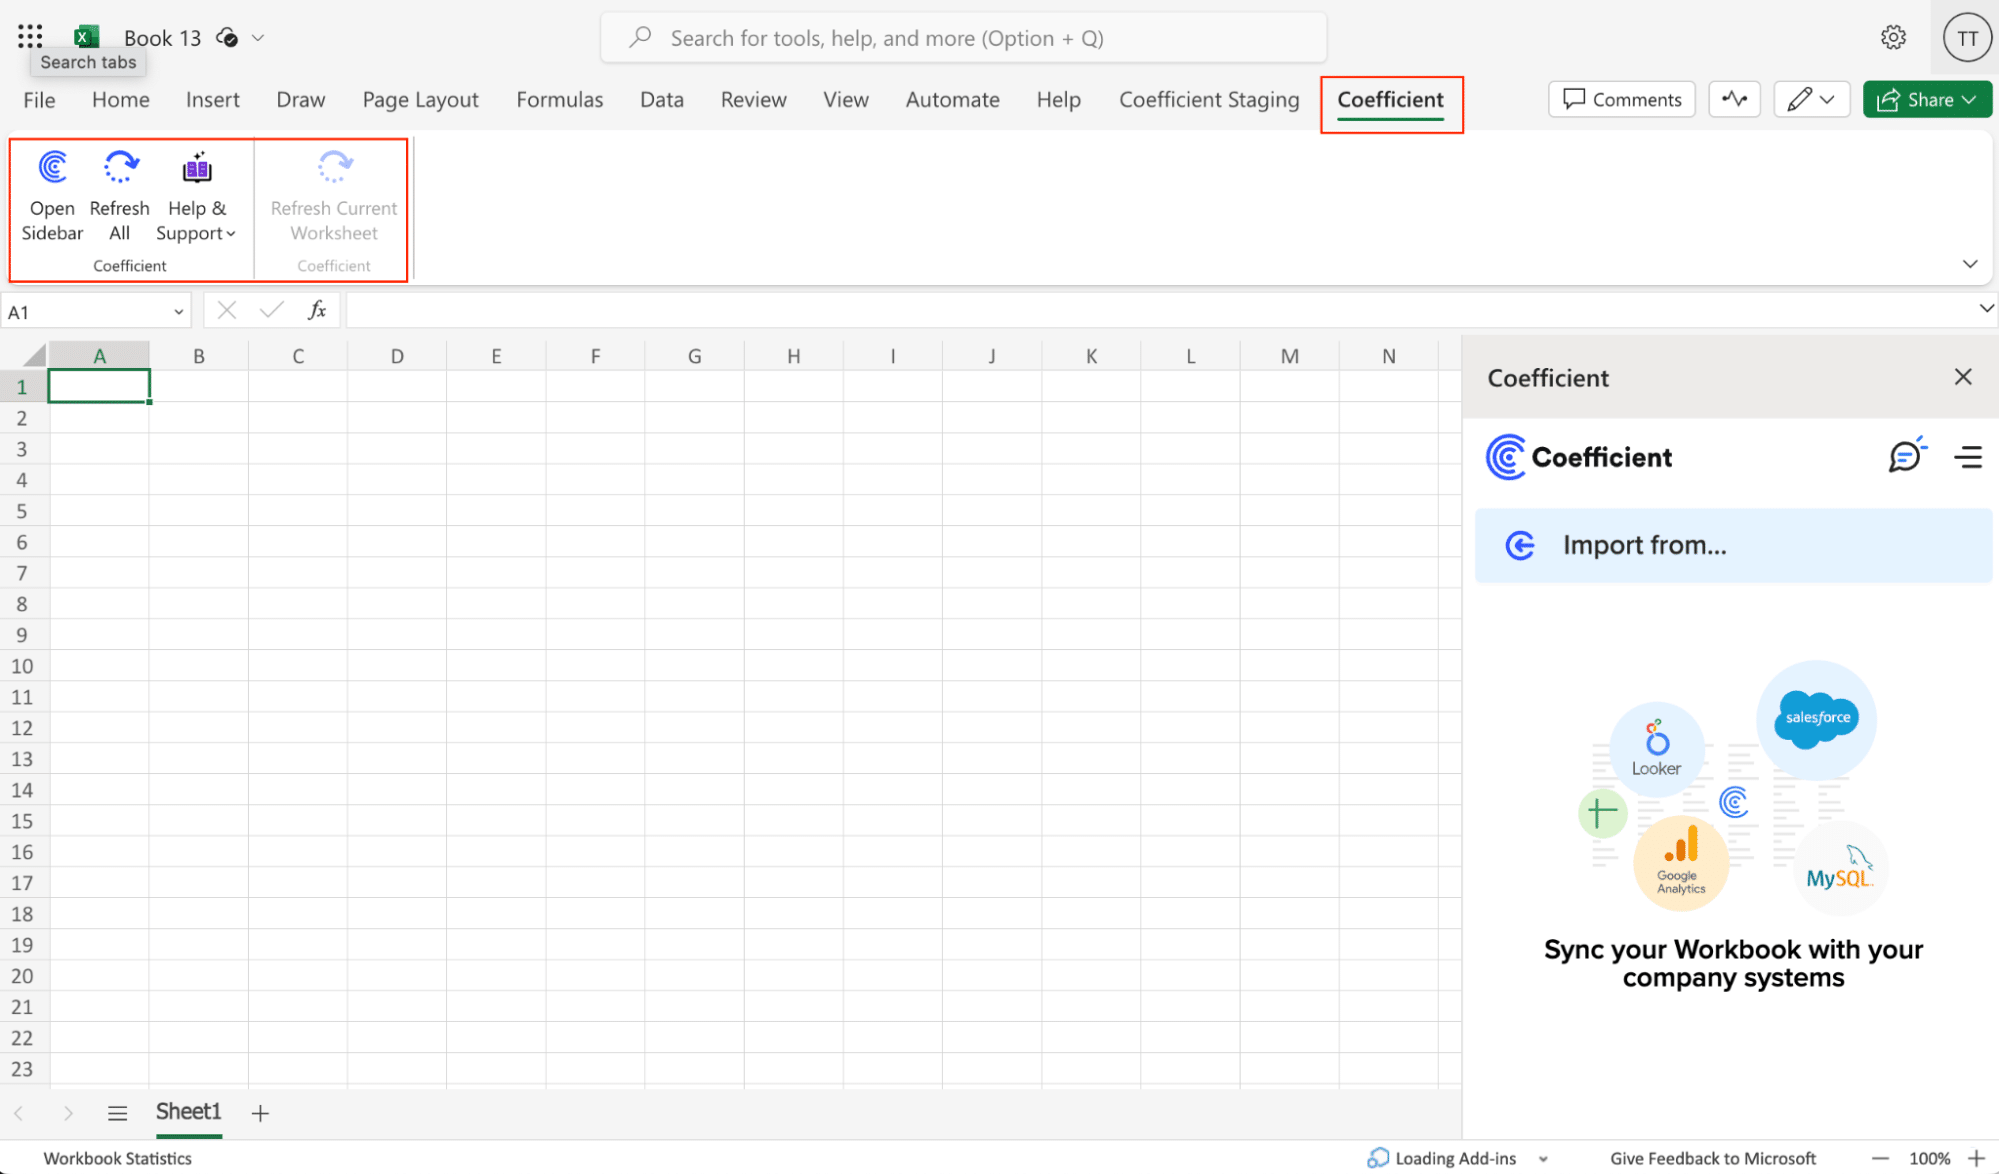
- Once finished, you will see a “Coefficient” tab in the top navigation bar. Click ‘Open Sidebar’ to launch Coefficient.
Step 2. Connect and Import Data from QuickBooks
Open Coefficient Sidebar and Click on the Menu icon.

In the menu, Select “Import From…” and Select “Connected Sources.”

Select “Add Connection” at the bottom of the “Connected Sources” list and select QuickBooks.
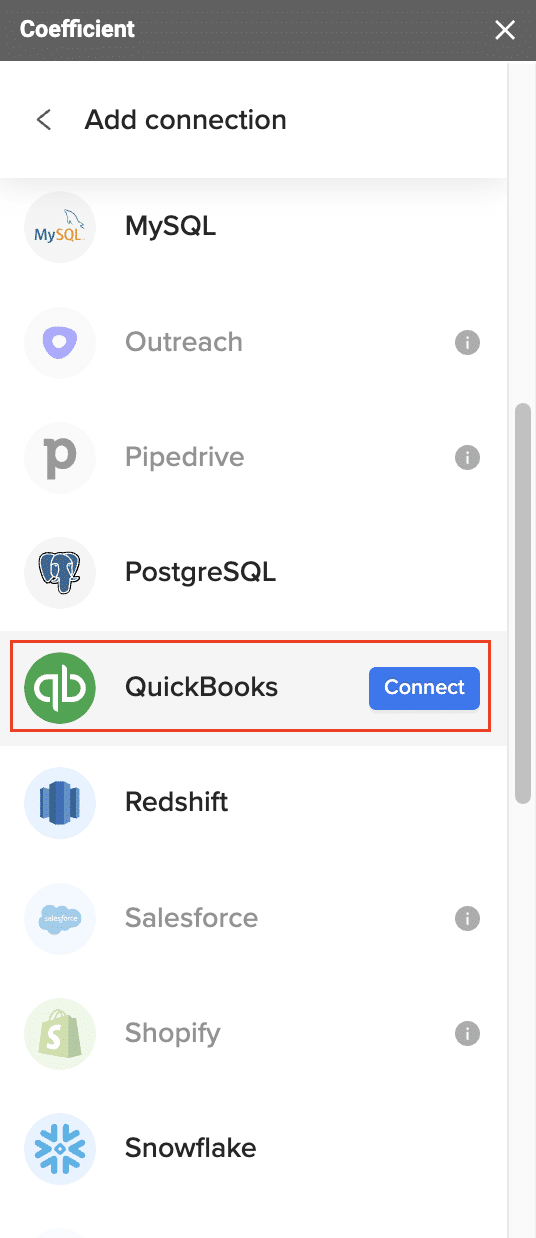
Click on Connect. In the next window, you will be asked to authorize QuickBooks by providing your log in details and allowing data exchange to connect the Coefficient with the platform.

Open the Coefficient Sidebar and click the “Import from…” button to start the import. Choose “QuickBooks” from the provided list, and select “From QuickBooks Report“.


Pick the specific QuickBooks report you wish to import from your account (e.g., Profit and Loss).
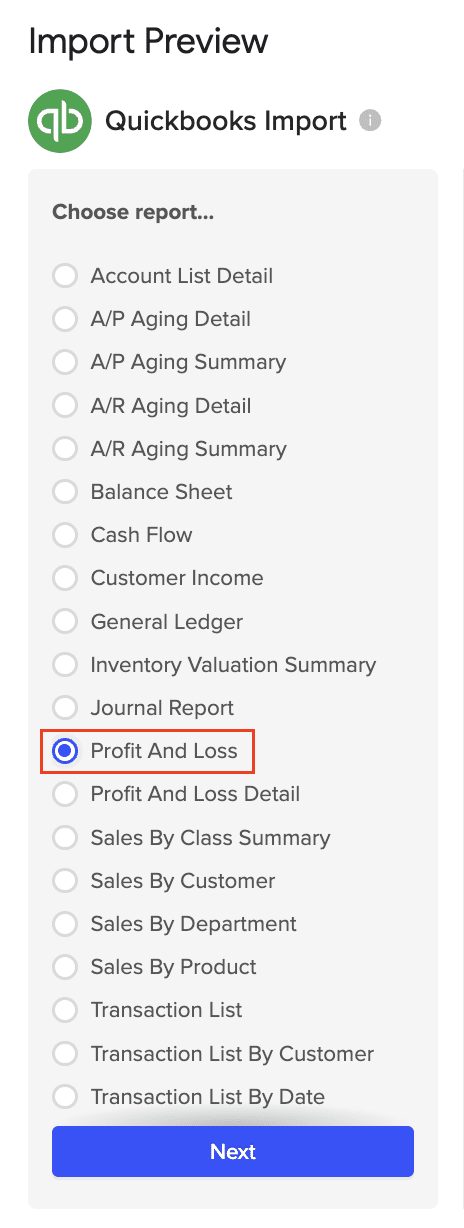
Personalize your import settings by selecting options for “Display Columns By, “”Report Period,” “Accounting Method,” and the necessary fields for this import.

Note: When adjusting your import settings, click “Refresh Preview” to see the updated sample data. The data will be sorted automatically based on the columns shown. For instance, “Customers” will appear alphabetically.
Click on Import in the top right corner, and you will have a spreadsheet synced with your QuickBooks!

Step 3. Export Data from Your Spreadsheet to MS SQL
Before starting, make sure you’ve connected to MS SQL.
Then, navigate to Coefficient’s menu >Click “Export to…”
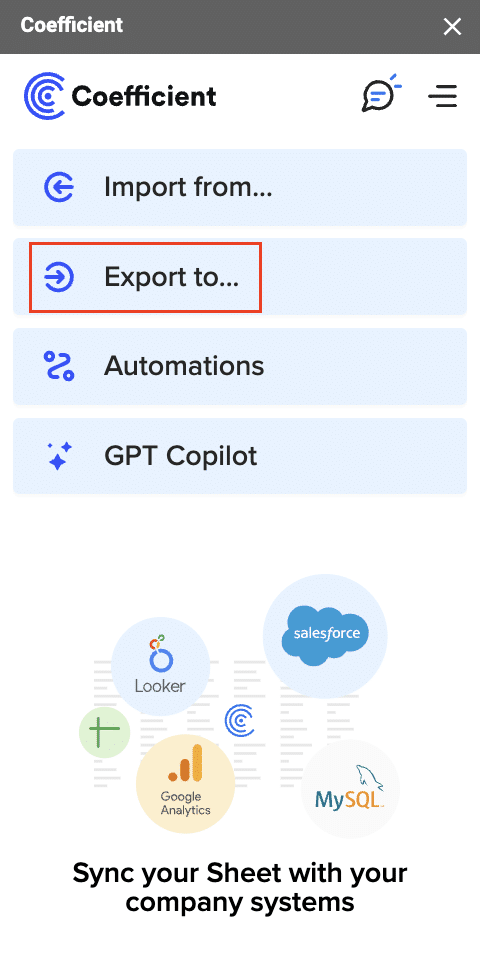
Select MS SQL.
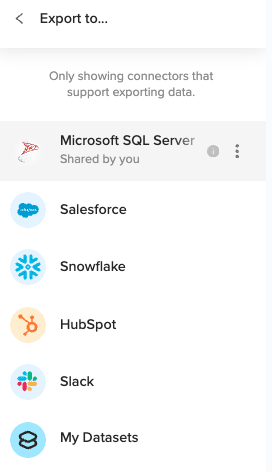
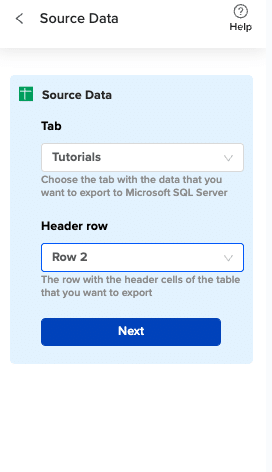
Choose the tab in your workbook that contains the data you want to export and specify the header row that contains the database field headers.
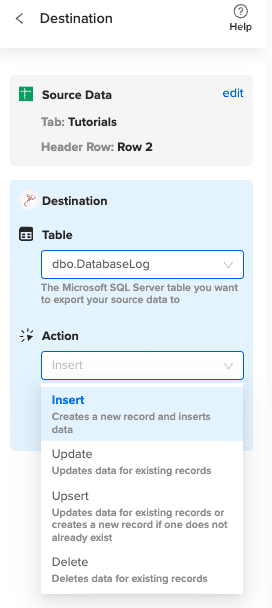
Specify the table in your database where you want to insert the data and choose the appropriate action (Insert, Update, Delete).
Complete the field mappings for the export. Then, confirm your settings and click “Export” to proceed.

Then, highlight the specific rows in your sheet that you want to export, or choose to export all rows.
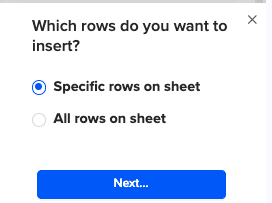
Review your settings and follow the prompts to push your data back to MS SQL.
Pros:
- No coding required
- User-friendly interface
- Automated scheduling
- Real-time data updates
Cons:
- Requires spreadsheet intermediate step
- Limited to spreadsheet data volume constraints
Related Resources:
#2 QODBC Driver: For Direct Database Connection
QODBC Driver enables a direct connection between QuickBooks and SQL Server through ODBC protocol, allowing for native database integration and custom SQL queries.
Setting Up QODBC Driver:
Let’s walk you through the complete process of setting up a direct connection between QuickBooks and SQL Server using QODBC:
- Install QODBC Driver First, let’s properly set up the QODBC environment:
- Download the latest QODBC Driver from qodbc.com
- Run the installer as administrator
Choose installation type:
Installation Type: Complete
Version: 64-bit (recommended for modern systems)
Features: Select all components including:
– QODBC Driver
– Sample Programs
- – Documentation
- After installation, restart your computer to ensure all components are properly registered
- Configure QuickBooks Database Server Manager Now we’ll prepare QuickBooks for external connections:
- Open QuickBooks Database Server Manager
Configure the server settings:
Server Settings:
– Monitor Path: C:QBData (or your QuickBooks company file location)
– Scan Interval: 60 seconds
– Allow remote connections: Yes
- – Port: 8019 (default)
Set up security:
Security Settings:
– Enable SSL/TLS: Yes
– Authentication Mode: Mixed
– Create dedicated service account:
Username: qbservice
- Password: [Strong Password]
- Set up ODBC Data Source Create and configure your ODBC connection:
- Open ODBC Data Source Administrator (64-bit)
Add new System DSN:
Driver: QODBC Driver for QuickBooks
Data Source Name: QB_Production
Description: QuickBooks Production Connection
Connection Settings:
– Application: Your application name
– Connection Type: QODBC Desktop
- – Company File: [Path to your .QBW file]
Configure advanced settings:
Advanced Options:
– Connection Pooling: Yes
– Max Pool Size: 100
– Connection Timeout: 30
– Command Timeout: 300
- – Auto Reconnect: Yes
- Configure SQL Server Linked Server Set up the connection in SQL Server:
— Create the linked server
EXEC sp_addlinkedserver
@server = ‘QUICKBOOKS’,
@srvproduct = ‘QODBC for QuickBooks’,
@provider = ‘MSDASQL’,
@datasrc = ‘QB_Production’;
— Configure security
EXEC sp_addlinkedsrvlogin
@rmtsrvname = ‘QUICKBOOKS’,
@useself = ‘FALSE’,
@locallogin = NULL,
@rmtuser = ‘qbuser’,
@rmtpassword = ‘your_password’;
— Set up distributed transaction support
EXEC sp_serveroption
@server = ‘QUICKBOOKS’,
@optname = ‘rpc out’,
@optvalue = ‘true’;
- Test Connection and Execute Queries Let’s verify everything works and set up some useful queries:
— Test basic connectivity
SELECT * FROM OPENQUERY(
QUICKBOOKS,
‘SELECT TOP 1 * FROM Customer’
);
— Create a stored procedure for data synchronization
CREATE PROCEDURE dbo.SyncQuickBooksData
AS
BEGIN
BEGIN TRY
BEGIN TRANSACTION;
— Sync customers
INSERT INTO dbo.QB_Customers
SELECT * FROM OPENQUERY(
QUICKBOOKS,
‘SELECT
CustomerID,
FullName,
CompanyName,
BillAddressStreet,
BillAddressCity,
BillAddressState,
Balance
FROM Customer
WHERE TimeModified >= DATEADD(hour, -24, GETDATE())’
);
— Sync invoices
INSERT INTO dbo.QB_Invoices
SELECT * FROM OPENQUERY(
QUICKBOOKS,
‘SELECT
TxnID,
CustomerID,
TxnDate,
DueDate,
BalanceRemaining,
IsPaid
FROM Invoice
WHERE TimeModified >= DATEADD(hour, -24, GETDATE())’
);
COMMIT TRANSACTION;
END TRY
BEGIN CATCH
ROLLBACK TRANSACTION;
THROW;
END CATCH;
END;
Pros:
- Direct database connection
- Native SQL query support
- No intermediate tools required
Cons:
- Requires technical expertise
- Complex setup process
- Additional licensing costs
#3 Hevo Data: Enterprise-Grade ETL Solution
Hevo Data offers a cloud-based ETL platform for seamlessly moving data from QuickBooks to SQL Server with advanced transformation capabilities.
Hevo Data Setup Process:
Let’s set up your QuickBooks to SQL Server pipeline using Hevo Data:
- Create Hevo Data Account Begin by setting up your Hevo environment:
- Visit Hevo Data website and sign up for an account
- Choose “Enterprise” plan for full QuickBooks integration
Complete organization setup:
Organization Details:
Name: Your Company
Industry: Your Industry
Data Volume: Estimated monthly records
- Time Zone: Your local timezone
- Configure QuickBooks as Source Connect your QuickBooks account:
- In Hevo dashboard, go to “Sources” → “Add Source”
- Select “QuickBooks Online”
Connect your QuickBooks account:
Connection Details:
Name: QuickBooks Production
Environment: Production
Authentication: OAuth 2.0
Data Selection:
Entities:
– Customers
– Invoices
– Bills
– Payments
– Items
Sync Settings:
Initial Sync: Full load
Incremental Sync: Modified date
- Sync Frequency: 15 minutes
- Set up SQL Server as Destination Configure your target database:
Destination Configuration:
Type: Microsoft SQL Server
Name: Production DB
Connection Details:
Host: your-server.database.windows.net
Port: 1433
Database: your_database
Schema: quickbooks
Username: hevo_user
Password: your_password
Advanced Settings:
Batch Size: 10000
Connection Timeout: 300
SSL Mode: require
- Define Data Mapping Create your data transformation rules:
Mapping Rules:
Customers:
Source: QB_Customer
Target: dbo.Customers
Transformations:
– Name: CONCAT(FirstName, ‘ ‘, LastName)
– Email: LOWER(Email)
– ModifiedDate: TO_TIMESTAMP(LastUpdatedTime)
Invoices:
Source: QB_Invoice
Target: dbo.Invoices
Transformations:
– Amount: CAST(TotalAmount AS DECIMAL(18,2))
– Status: CASE WHEN IsPaid THEN ‘Paid’ ELSE ‘Outstanding’ END
- Schedule Data Pipeline Set up your automation:
Pipeline Schedule:
Frequency: 15 minutes
Retry Settings:
Max Attempts: 3
Delay: 5 minutes
Error Handling:
Failed Records: Load to error table
Notification: Email and Slack
Monitoring:
Metrics:
– Record count
– Processing time
– Error rate
Dashboard: Enabled
Alerts:
– Pipeline failure
– High latency (>30 min)
– Error threshold (>1%)
Pros:
- Enterprise-grade ETL features
- Advanced data transformations
- Scalable architecture
Cons:
- Higher cost for small businesses
- Requires technical configuration
- May have learning curve
Choosing the Right Method for Your Business
When selecting the best method to connect QuickBooks to SQL Server, consider your team’s technical expertise, budget, and specific data needs.
For most small to medium-sized businesses, Coefficient offers the most straightforward approach. It’s user-friendly, requires no coding, and provides reliable data synchronization without technical complexity.
QODBC Driver is ideal for organizations with in-house technical teams that need direct database access and custom SQL queries.
Hevo Data suits larger enterprises requiring advanced ETL features and data transformations.
Start Syncing Your QuickBooks Data to SQL Server Today
Connecting QuickBooks to SQL Server doesn’t have to be complicated. While each method has its merits, Coefficient provides the most user-friendly approach for business users who need reliable data synchronization without technical complexity. Get started with Coefficient today to streamline your data integration process.
Frequently Asked Questions
How do I connect QuickBooks to SQL?
While there are multiple methods, the easiest way is using Coefficient’s no-code solution that allows you to sync QuickBooks data to SQL Server through spreadsheets with automated updates.
Can QuickBooks be used as a database?
Yes, QuickBooks has database capabilities through its Database Server Manager, but connecting it to SQL Server through Coefficient provides more robust database functionality and reporting capabilities.
Can you put QuickBooks desktop on a server?
Yes, QuickBooks can be installed on a terminal server for network access, but using Coefficient eliminates the need for complex server setup while maintaining data synchronization.
Does QuickBooks Online use SQL?
QuickBooks Online can be connected to SQL through various methods, with Coefficient offering the most straightforward approach for non-technical users.
By following this guide, you’ll be well on your way to leveraging the power of SQL Server with your QuickBooks data, opening up new possibilities for financial analysis and reporting in your business.


