QuickBooks Online (QBO) from Intuit is cloud-based accounting software that helps small business owners manage their finances. By implementing automation in QBO, you can eliminate manual data entry, reduce human error, and focus on growing your business.
This guide walks through five practical ways to automate your accounting processes in QuickBooks Online, from basic features to advanced integrations.
Built-in Automation Features in QuickBooks Online
QBO includes several automation options within its core functionality. These built-in features offer cost-effective solutions for small businesses looking to reduce manual work. You can also connect additional apps to enhance your automation capabilities for tasks like payroll, timekeeping, accounts payable, and invoicing.
QuickBooks Online (QBO) from Intuit is cloud accounting software used by many business owners. QuickBooks Online allows accountants to do job costing within their software.
Automation 1: Payroll
To search for apps that QuickBooks Online may already have a pre-built connection with, navigate to the nine dots in the top right of your QBO home page.
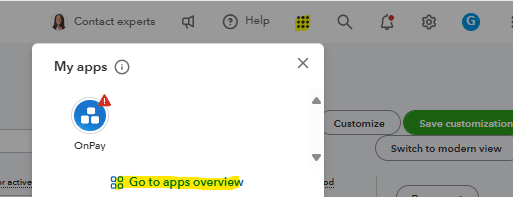
Once you’ve opened that prompt, select “go to apps overview” to review applications that integrate with QuickBooks Online. On this page, you can search for whatever application you want to connect.
If you’re using QBO and don’t yet have a payroll, invoicing, timekeeping, or other system, first check if QuickBooks Online has an existing connection with that application.

In this example, we searched and selected Gusto, which is a payroll and human resources application. After selecting Gusto, choose “get the app now” to connect it to your QBO instance.
For existing users, you’ll need to provide login credentials and other relevant information such as general ledger coding and data you want to import into QuickBooks Online.

The more apps you have that integrate with QBO, the more you can automate.
In the Gusto example, any payroll you process will automatically pull into QuickBooks Online and code to the correct account based on your business rules.
Automation 2: Accounts Receivable / Invoicing
Automating your accounts receivable and invoicing processes can be extremely beneficial, especially for recurring invoices every month.
One way to automate your accounts receivable process is to automatically send out invoices to subscribers. This works particularly well for subscription models where the QuickBooks invoice goes out the same day each month.
To set this up:
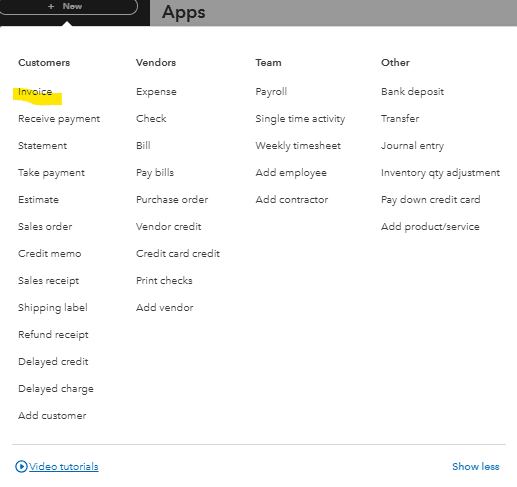
- Navigate to the “+ New” button on the top left of your QBO home page
- Select the invoice module under the customer column
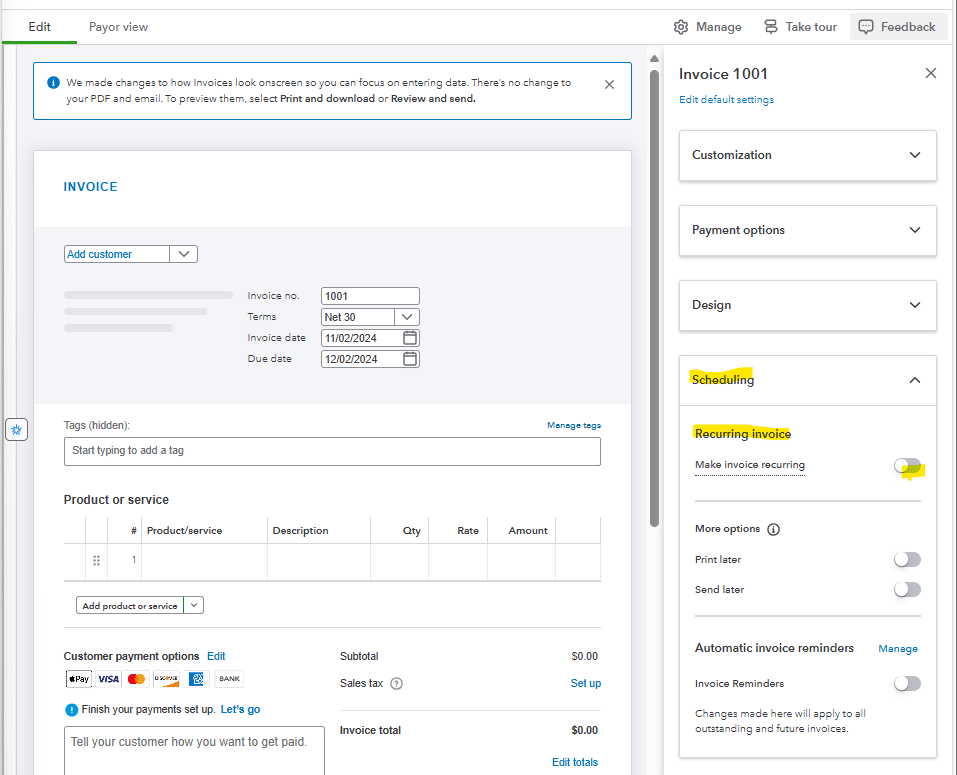
Once you’ve navigated to the invoice page and filled out the relevant customer and invoice information, you can set-up the invoice as recurring the scheduling drop-down. This creates automated workflow for regular billing.
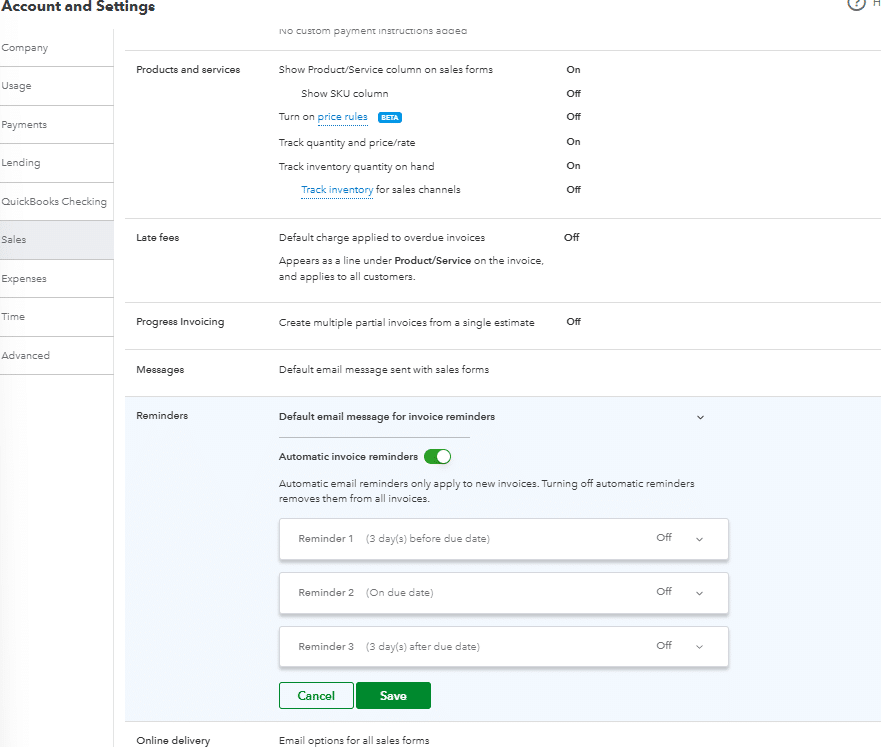
Within the accounts receivable/invoicing process another area that can be automated is the past due invoice reminders for customers. This is helpful to improve your company’s cash flow and get paid by customers on time.
In order to automate the past due reminders to customers you first navigate to the settings gearbox in the top right corner of QuickBooks Online and select account and settings under the your company column.

Once in account and settings you can select the edit button in reminders under the sales section.

Then, toggle the automatic invoice reminders option. You will have the option to customize when you would like the past-due reminders to be sent out. You can select before the invoice due date, on the invoice due date, after the invoice due date, or a combination of all three. It may be helpful to send a reminder before the due date so customers to have ample time to process the invoice through their accounts payable system and bank.
Automation 3: Financial Reporting
QuickBooks Online houses a plethora of reports that you can send to internal and external stakeholders.
A lot of times, businesses send out monthly, quarterly, or annual reports on a regular, scheduled basis. Instead of logging in and running each report everytime you need to send it, you can automate reports being sent directly out of QuickBooks Online.
To automate sending a report out of QuickBooks Online you first must navigate to the report section of the menu.
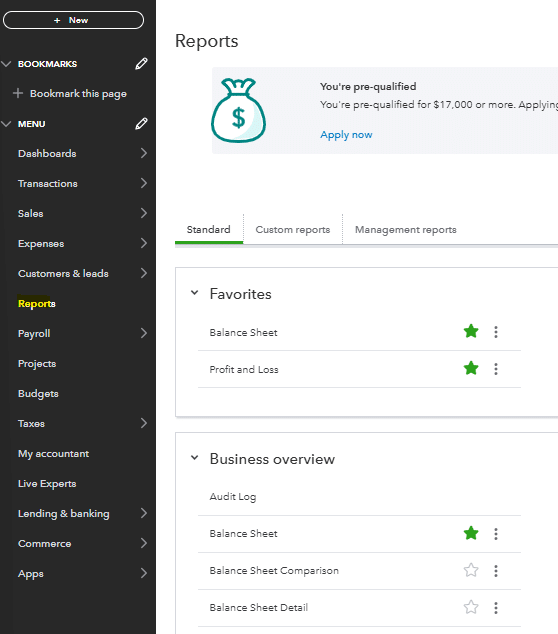
Once in the reports menu, you can select the report or reports that you would like to send out automatically. In this example, I’ve selected the profit and loss report and then hit customize.
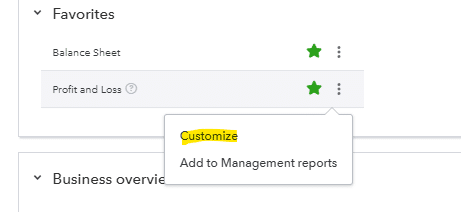
Once in the customize report screen, adjust your time period and formatting to match your reporting needs. This creates near real-time access to financial data.

,
Once you’ve customized your report to your liking, you can navigate back to the reports list and select the custom report you created.

Next, select Edit in the action column for that particular report and toggle the set email schedule on.
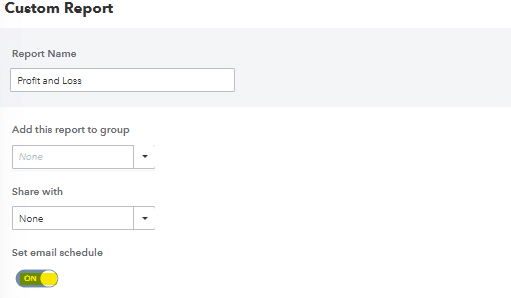
Once toggled on you can set the recurrence, end date, recipients, subject, and message that are sent out on a recurring basis.
You will want to make sure you give yourself ample time to record all transactions in a timely manner before scheduling the report to be sent out. For example, if your month-end close process is typically 5 days, you will want to wait until at least day 6 to automatically send out the report.

Automation 4: Accounts Payable
Along with the accounts receivable/invoicing process, the accounts payable and bill payment process can also be automated within QuickBooks Online. This helps ensure timely invoice payments for your routine vendors and eliminates manual data entry in your accounting processes.
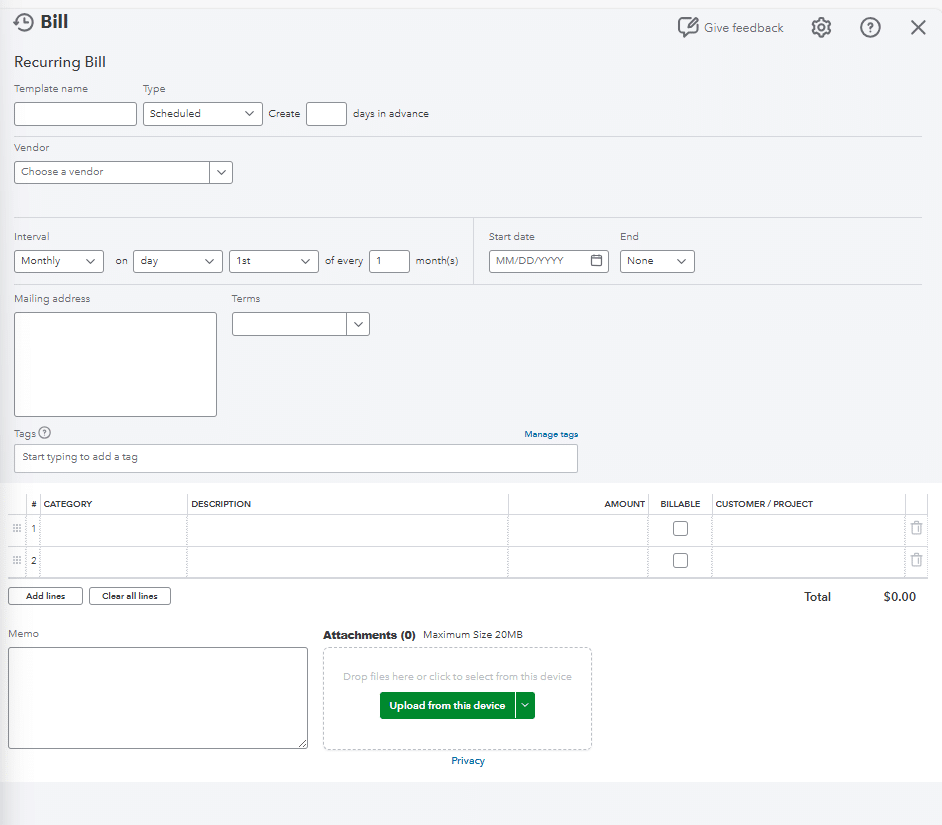
To automate a recurring bill in QBO, first navigate to the expenses and bills section of the menu.
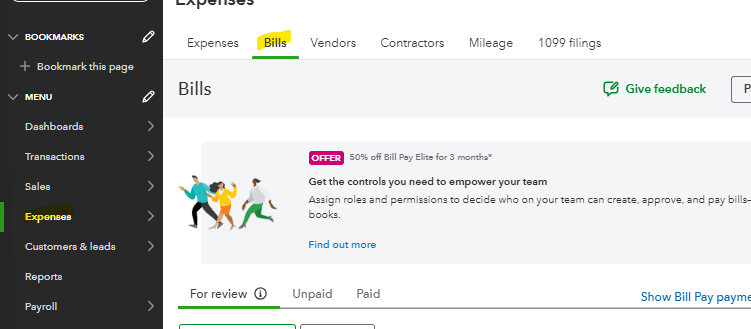
Once in the bills module, select the create recurring bill option in the add bill dropdown.

After selecting the recurring bill option, build out the bill with vendor and payment information. You’ll need to:
- Name the template
- Choose the vendor for payment
- Set up payment frequency
- Define start and end dates
This workflow automation is particularly helpful when setting up recurring bills for vendors with specific contract periods. The end date feature automatically stops payments when the contract ends, reducing human error in vendor management.
Next, categorize how you want the recurring bill coded in your general ledger by selecting the expense category and adding a description. This supports accurate bookkeeping and financial reporting.
Beyond recurring bills, you can also:
- Create reminders for non-regular invoices
- Set up automated workflows for purchase orders
- Manage credit card payments
- Track vendor expenses in real-time
To set up automatic reminders in your QuickBooks Online account for upcoming bills, select “reminder” as the type instead of “scheduled.” This allows your team to review and adjust amounts or dates as needed.

You can also automate the template creation and set it to unscheduled in the type dropdown. This is useful for infrequent vendor payments, saving less time on repetitive setup tasks.
Automation 5: Transaction Matching
Small business owners often receive transactions from regular vendors that need consistent general ledger coding. Instead of manually matching transactions from recurring vendors, you can set up automatic matching in QuickBooks Online.
This process automation reduces manual touches and helps your bookkeeping team work more efficiently.
To automatically match transactions:
- Navigate to the transactions section of the menu
- Select the rules header

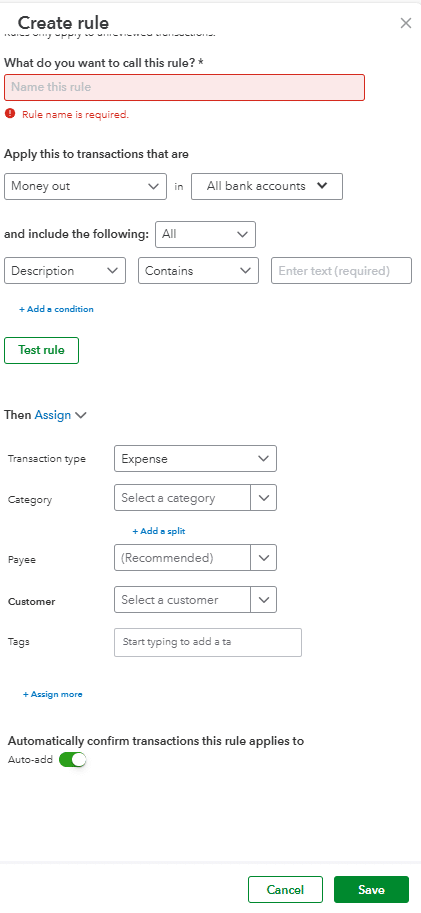
In the rules header, click the new rule button. This opens the create rule prompt where you’ll:
- Name the rule
- Define applicable transaction types
- Set up assignment criteria
- Specify coding preferences
For regular vendor invoices, set up the rule as a money out transaction with the corresponding description. This automation helps maintain consistent accounting processes across your business.
Next, configure your transaction coding preferences, including:
- Transaction type
- Expense category
- Payee information
- Cash flow tracking
Test each rule thoroughly before activation. Once set up, transactions matching your criteria will automatically code as they enter your QBO system, supporting efficient accounting tasks and accurate financial reporting.
You can create multiple rules for both deposits and withdrawals, and adjust existing rules as your business needs change. This flexibility ensures your automated workflows evolve with your growing business while maintaining accurate transaction categorization in your QuickBooks Online instance.
Automate QuickBooks and Combine with All Your Business Data
While manual exports work well for occasional use, businesses that require frequent data updates or real-time reporting can benefit from using Coefficient.
Coefficient is a powerful tool that integrates seamlessly with QuickBooks, allowing for effortless and automated data exports to spreadsheets like Google Sheets and Microsoft Excel.
Key benefits of using Coefficient for QuickBooks exports:
- Real-time data syncing
- Automated scheduled refreshes
- Custom data transformations
- Advanced filtering and sorting capabilities
Watch this video to see how Coefficient simplifies the process of connecting QuickBooks to your spreadsheets:
Use Cases for Automation in QuickBooks Online
Automating processes within QBO helps businesses:
- Eliminate manual data entry and human error
- Create more efficient accounting processes
- Generate accurate reports for stakeholders
- Improve cash flow management
- Save valuable time on routine tasks
Improve QuickBooks Online with Automation
Automation helps organizations reduce costs and improve efficiency. It allows your team to focus on strategic work instead of routine accounting tasks. By implementing these automated workflows, you’ll streamline your QuickBooks Online processes significantly.
Ready to take your data analysis further? Try Coefficient to seamlessly integrate your Excel and Google Sheets with live data from QuickBooks Online, enabling real-time analysis and advanced financial modeling. Get started with Coefficient today.


