Xero enforces strict API rate limits to protect their servers from overload. You get 60 calls per minute and 5,000 daily calls per organization. Hit these limits? Your app stops working.
Most businesses struggle with these constraints when pulling financial data. Automated reports break. Dashboard updates fail. Manual workarounds eat up hours.
Coefficient solves this problem. Our smart caching and optimized sync protocols work within Xero’s limits while keeping your data fresh. Connect once, pull unlimited reports, and never worry about rate limits again.
Xero rate limits
API Rate Limits
Concurrent Limit: 5 API calls in progress at a time (per-organization, per-app)
Minute Limit: 60 API calls per minute (per-organization, per-app)
Daily Limit: 5,000 API calls per day (per-organization, per-app)
App-wide Minute Limit: 10,000 calls per minute across all tenancies for a single app
API Usage Limits
Per Organization: All rate limits are enforced per Xero organization (tenant) per connected app instance
Uncertified Apps: Limited to 25 concurrent organization connections (no limit for certified apps)
Payload Size: Max 3.5MB for a single POST to Accounting/Payroll APIs; 10MB max for Files API uploads
Recommended Batching: Xero recommends batching up to 50 elements per request and keeping within typical monthly volumes of around 1,000 invoices/purchases for optimal performance
High Volume Threshold: GET requests on high-volume endpoints may be further limited unless you apply Xero-specified optimized filters (subject to change)
Methods to prevent Xero rate limits
Implement request batching and smart caching. Bundle multiple data requests into single API calls. Cache frequently accessed data locally. This reduces your total API consumption while maintaining data freshness.
Use optimized filters and pagination. Apply Xero’s recommended filters to reduce payload sizes. Implement proper pagination to avoid large data dumps that consume multiple API calls unnecessarily.
Switch toCoefficient for Excel orGoogle Sheets. Our platform handles rate limit management automatically. Smart sync protocols ensure your financial data stays current without hitting API constraints.
Step-by-step walkthrough to avoid rate limits using Coefficient
Coefficient manages Xero’s rate limits automatically through intelligent caching and optimized sync protocols. You get real-time financial data without the technical complexity.
Connect in minutes, not months
Install Coefficient from Google Workspace Marketplace or Microsoft AppSource
Authenticate with Xero using secure one-click OAuth (no developer setup required)
Import invoices, contacts, financial reports, and chart of accounts with a click of a button
Configure automatic refresh schedules for real-time financial data
No code required. No rate limit worries. Just clean, fresh data flowing into your spreadsheets exactly when you need it.
Common use cases that trigger API rate limits
Large financial report pulls during month-end closing. Businesses often extract comprehensive data sets for financial analysis, quickly exhausting daily limits with multiple report requests.
Real-time dashboard updates with frequent refresh cycles. Automated systems polling Xero every few minutes for live data can easily exceed the 60 calls per minute threshold.
Bulk data synchronization across multiple business units. Organizations with several Xero instances often hit concurrent connection limits when attempting simultaneous data imports across tenants.
Get started with Coefficient today
Xero’s API rate limits don’t have to slow you down. Smart businesses use tools that work within these constraints while delivering the financial insights they need.
Coefficient transforms how you work with Xero data. No more broken reports. No more manual exports. No more API headaches.
Ready to eliminate rate limit frustrations? Get started with Coefficient today and experience seamless Xero integration that just works.
FAQs
What are the restrictions on Xero API?
Xero limits apps to 60 API calls per minute, 5,000 calls per day, and 5 concurrent requests per organization. Uncertified apps can only connect to 25 organizations simultaneously. Coefficient bypasses these restrictions through optimized data management.
What is the rate limit for API?
Xero enforces a 60 calls per minute limit and 5,000 daily calls per organization per app. There’s also a 5 concurrent request limit and an app-wide limit of 10,000 calls per minute across all tenancies.
How to fix API rate limit exceeded?
Wait for the rate limit window to reset, implement request batching, or use a tool like Coefficient that manages rate limits automatically. Coefficient’s smart caching eliminates rate limit issues while keeping your data fresh.
Is the Xero API free?
Yes, Xero’s API is free to use within their rate limits. However, managing these limits effectively often requires additional tools or development resources. Coefficient provides a cost-effective solution that handles the complexity for you.
Xero webhooks provide real-time notifications when accounting data changes in your Xero organization. Setup requires registering an app in the Xero Developer Portal, configuring webhook subscriptions for specific events (invoices, contacts, etc.), and creating a publicly accessible HTTPS endpoint.
Your endpoint must respond within 5 seconds with HTTP 200 OK and validate incoming requests using HMAC-SHA256 signature verification. Xero enforces rate limits of 5 concurrent calls, 60 calls per minute, and 5,000 calls per day. For no-code solutions, Coefficient offers instant webhook integration with Xero data in spreadsheets.
Prerequisites and requirements
Before setting up Xero webhooks, ensure you have the following foundational elements in place.
Registered Xero app: Create an app in the Xero Developer Portal at developer.xero.com under “My Apps.” Your app must be connected to at least one Xero organization capable of generating webhook events.
Webhook subscription configuration: Set up webhook subscriptions within the developer portal, specifying which event types your webhook should monitor. Options include contact changes, invoice updates, payment notifications, and other accounting events.
Publicly accessible HTTPS endpoint: Xero requires SSL (port 443) for webhook delivery and won’t send notifications to localhost unless you use tunneling services like ngrok. Your endpoint must be reachable from Xero’s servers.
Webhook signing key access: Obtain your webhook key from the developer portal. This key validates incoming requests from Xero by verifying the x-xero-signature header using HMAC-SHA256 encryption.
Proper server response logic: Your endpoint must respond within 5 seconds with HTTP 200 OK for valid requests (no body or cookies). Invalid signatures must return HTTP 401 Unauthorized to maintain webhook functionality.
API limits and constraints
Xero enforces strict rate limits that directly impact webhook performance and integration reliability.
Per-minute restrictions: 60 calls per minute per connected organization, per app. Short-term bursts above this threshold receive 429 error responses and require retry logic implementation.
Batch processing recommendations: Keep batch sizes to approximately 50 items for optimal performance. Larger batches may encounter processing delays or timeouts.
High-volume considerations: Organizations using multiple Xero accounts face an overall minute limit of 10,000 calls across all accounts. Plan accordingly for multi-organization integrations.
Step-by-step Xero webhook setup
Follow this systematic approach to configure functional Xero webhooks for your integration.
Step 1: Create or select your Xero app
Navigate to the “My Apps” section in the Xero Developer portal and choose your existing app or create a new one for webhook functionality.
Configure app settings: Ensure your app has appropriate scopes and permissions for the data you want to monitor. Webhook subscriptions require corresponding API access rights.
Note your app credentials: Record your Client ID and Client Secret for authentication purposes. These credentials are essential for OAuth 2.0 flows and API access.
Set up OAuth flows: Configure redirect URIs and authentication settings if your integration requires user consent for data access.
Step 2: Configure webhook subscription settings
Access your app settings and navigate to the “Webhooks” section to set up event monitoring.
Choose event categories: Select specific events you want to subscribe to, such as:
Invoice creation, updates, or status changes
Contact additions or modifications
Payment notifications and bank transaction updates
Purchase order changes
Account and organization modifications
Enter endpoint URL: Provide your publicly accessible HTTPS endpoint URL where Xero will deliver webhook notifications. Ensure this URL can handle POST requests and process JSON payloads.
Configure retry settings: Xero automatically retries failed webhook deliveries. Understand the retry schedule to avoid processing duplicate events.
Step 3: Verify your endpoint with “Intent to Receive”
Xero sends a verification request to confirm your endpoint can properly handle webhook notifications.
Handle verification requests: Your endpoint must process the verification payload and respond appropriately:
Respond within time limits: Ensure your endpoint responds within 5 seconds. Delayed responses cause verification failures and webhook disabling.
Process raw request body: Use the raw request body for signature verification, not parsed JSON. Many frameworks automatically parse JSON, breaking signature validation.
Step 4: Save configuration and obtain webhook key
After successful verification, save your webhook settings to activate event monitoring.
Record webhook key: Xero generates a unique webhook key for your app. Store this key securely as it’s required for all future signature validations.
Enable webhook subscriptions: Activate the specific event types you want to monitor. You can modify these subscriptions later as your integration needs evolve.
Monitor webhook status: Use the developer portal to track webhook delivery success rates and identify any configuration issues.
Step 5: Test your webhook integration
Trigger test events in Xero to validate your webhook receives and processes notifications correctly.
Create test events: Perform actions in your Xero organization that should trigger webhooks, such as creating invoices or adding contacts.
Monitor delivery logs: Check your server logs and the Xero developer portal for webhook delivery confirmations and any error messages.
Validate payload processing: Ensure your application correctly processes webhook payloads and performs the intended actions based on the received data.
Common integration issues
Real-world Xero webhook implementations encounter several recurring challenges that require careful attention.
“WebhookNotConfigured” errors and endpoint accessibility
Incorrect URL configuration: Webhook URLs not properly set or publicly accessible due to firewall rules, DNS issues, or incorrect endpoint paths. Users notice changes in Xero don’t appear in their applications, causing data synchronization gaps.
HTTPS protocol requirements: Servers unable to handle HTTPS traffic or respond using required secure protocols. According to developer documentation, Xero rejects HTTP endpoints and requires SSL encryption for all webhook deliveries.
Connectivity validation failures: Common mistakes include typos in endpoint URLs, incorrect route handling, or firewalls blocking Xero’s webhook delivery servers. Tools like webhook.site or ngrok help identify connectivity issues during development.
Signature verification and “Intent to Receive” validation
HMAC implementation complexity: Many developers struggle with Xero’s x-xero-signature header validation using HMAC-SHA256 encryption. Community discussions highlight confusion around base64 encoding, proper header comparison, and signature generation logic.
Validation handshake failures: Incorrect status codes or response body content during the “Intent to Receive” process prevents Xero from enabling webhook delivery. Responses must be exactly HTTP 200 for valid signatures and HTTP 401 for invalid ones.
Raw payload processing: Frameworks that automatically parse JSON break signature validation since HMAC calculation requires the raw request body. Developers must access unparsed request data for accurate signature verification.
Slow responses and retry loops during high server load
Timeout cascade failures: Servers under high load that exceed Xero’s 5-second response requirement trigger retry loops. Stack Overflow discussions document cases where busy Apache servers delay webhook responses, creating cascading retry buildups.
Retry storm amplification: Xero’s automatic retry logic can overwhelm already-stressed servers, creating exponentially increasing webhook queues that effectively break the integration until manually reset.
Asynchronous processing solutions: Best practices include immediately logging and responding to webhooks, then processing payloads asynchronously. Switching from legacy server setups to lightweight Node.js or Go-based webhook receivers improves response times.
Hitting API and rate limits unexpectedly
Downstream API call accumulation: Webhooks often trigger additional API calls to Xero or other systems, quickly exhausting the 60 calls per minute limit. Bulk updates or synchronized processes can breach daily limits unexpectedly.
Rate limit monitoring gaps: Insufficient tracking of API usage leads to request failures and missed webhook events. Community recommendations stress monitoring x-rate-limit-remaining headers and implementing proactive alerts.
Cascading failure prevention: Implement exponential backoff retry logic, queue management systems, and rate limit tracking to prevent webhook-triggered API calls from overwhelming Xero’s limits and breaking data synchronization.
No-code webhook workflows for Google Sheets or Excel
Webhooks trigger live data pulls into Coefficient from any system you use. Your external systems tell Coefficient exactly when to refresh Xero data imports. Whether data changes in Xero, your spreadsheet reacts in real-time.
Instead of waiting for scheduled syncs or manual refreshes, keep dashboards and reports current the moment source data changes. Click the three dots on your import details and copy your webhook URL to get started.
How Coefficient’s Xero webhooks work
Import Xero data: Begin by importing data from Xero into your Google Sheet or Excel file using the Coefficient sidebar. Connect to invoices, contacts, payments, or any Xero accounting data.
Access import settings: In the Coefficient sidebar, locate your desired Xero import under the “Imports” section. This displays all active data connections in your spreadsheet.
Open the management menu: Click the three-dot menu icon next to your import’s name. This reveals additional configuration options for the data connection.
Select edit mode: From the dropdown menu, choose the “Edit” option. This opens the import configuration interface where you can modify connection settings.
Generate webhook URL: In the “Edit Import” screen, click the three-dot menu icon again. Look for the “Webhook URL” option in the expanded menu.
Configure refresh scope: Select “Webhook URL” to open the “Refresh with webhook” popup. Choose between refreshing only the specific import or all imports within the entire spreadsheet.
Implement in Xero systems: Paste the webhook URL into your Xero app webhook settings or third-party automation platforms. When Xero data changes, automatic refreshes occur in your spreadsheet.
Real-time synchronization: Your spreadsheets stay current with Xero changes without manual intervention, complex signature validation, or server maintenance requirements.
Custom development vs Coefficient comparison
Aspect
Custom Development
Coefficient.io
Setup Time
2-4 weeks
5 minutes
Development Cost
$5,000-$15,000
$29-$299/month
Maintenance
Ongoing dev resources
Fully managed
Security
Must implement yourself
Enterprise-grade built-in
Monitoring
Build your own
24/7 automated monitoring
Scaling
Handle infrastructure yourself
Auto-scaling included
Updates
Maintain API changes
Automatic updates
Automate your Xero workflows today
Xero webhooks enable powerful real-time accounting data synchronization when properly implemented. While requiring technical expertise for custom development, they provide immediate notification capabilities for critical business events.
Consider your team’s development capacity and maintenance requirements when choosing between custom webhook implementation and managed solutions. Both approaches eliminate manual data checking and improve financial process automation.
Ready to streamline your Xero data workflows? Get started with Coefficient and connect Xero to your spreadsheets without complex webhook development.
Frequently asked questions
Does Xero support webhooks?
Yes, Xero provides comprehensive webhook functionality through the Xero Developer Portal. You can subscribe to various events including invoice changes, contact updates, and payment notifications. However, setup requires technical implementation including HMAC signature validation and proper endpoint configuration.
How do I set up Xero webhooks?
Create an app in the Xero Developer Portal, configure webhook subscriptions for desired events, and provide a secure HTTPS endpoint URL. Your endpoint must validate HMAC-SHA256 signatures and respond within 5 seconds. Complete the “Intent to Receive” verification process to activate webhook delivery.
What are Xero webhook rate limits?
Xero enforces 5 concurrent calls, 60 calls per minute, and 5,000 calls per day per organization. Exceeding these limits results in 429 “Too Many Requests” errors. Monitor your API usage carefully, especially when webhooks trigger additional API calls to Xero or other systems.
How do I validate Xero webhook signatures?
Use HMAC-SHA256 encryption with your webhook key to generate a signature from the raw request body. Compare this with the x-xero-signature header value. Return HTTP 200 for matching signatures and HTTP 401 for invalid ones. Signature validation is required for webhook functionality.
Can I use Xero webhooks without coding?
While Xero webhooks require technical implementation, Coefficient provides a no-code solution for real-time Xero data integration with spreadsheets. This eliminates the need for custom webhook development, signature validation, and server maintenance while providing the same real-time data benefits.
Setting up Xero API integration requires registering an OAuth app in the Xero Developer Portal, implementing proper authentication flows, and managing strict rate limits (60 calls/minute, 5,000/day). The process involves configuring redirect URIs, handling chart of accounts mapping, and building robust error handling for API quotas and token management.
While custom development provides comprehensive control over accounting workflows, it demands significant expertise in OAuth protocols, data mapping complexities, and ongoing maintenance as Xero’s platform evolves. Coefficient for Excel and Coefficient for Google Sheets eliminate this complexity entirely, providing instant Xero connectivity to spreadsheets in minutes without rate limiting concerns, authentication headaches, or data mapping challenges.
Prerequisites and Requirements
Before you begin:
Xero Account: Active Xero account (use free trial or demo company for testing)
Developer App Registration: Register app in Xero Developer Portal to generate Client ID and Client Secret
Programming Experience: Backend development knowledge and OAuth flow understanding
SDK Selection: SDKs available for Node.js, Python, Java, PHP, Ruby, C#
OAuth Scopes: Choose appropriate API scopes for use case (e.g., accounting.transactions)
Sandbox Environment: Use Xero demo company for testing without affecting real data
API Limits:
Per Minute: 60 API calls per minute per organization/app
Per Day: 5,000 API calls per day per organization/app
Concurrent Requests: Maximum 5 at any time per tenant
Bulk/Paging: Up to 1,000 results per page (as of 2025)
High Volume Endpoints: Elevated limits for endpoints like GET /invoices
Rate Limit Headers: Track x-rate-limit headers for monitoring
Best Practices: Implement exponential backoff, use webhooks to reduce polling, cache static data, batch requests efficiently, proactive token refresh
Step-by-Step Xero API Integration Setup
Step 1: Create Your Developer Account and App
Start with the basics. Sign up for a free Xero account and enable the demo company for safe testing.
Navigate to the Xero Developer Portal and create your OAuth 2.0 application. This generates your Client ID and Client Secret—store these securely.
Choose your OAuth scopes carefully. Request only necessary permissions to reduce friction during user authorization.
Step 2: Configure Authentication Flow
Set your redirect URI precisely. Even small mismatches will break OAuth authentication entirely.
For local development, use something like http://localhost:3000/callback. For production, ensure HTTPS and exact URL matching.
Implement the complete OAuth flow:
Redirect users to Xero’s authorization endpoint
Handle the callback with authorization code
Exchange code for access and refresh tokens
Store tokens securely with proper encryption
Step 3: Handle Chart of Accounts Mapping
This step separates amateur from professional integrations. Don’t assume default accounts exist—users customize their chart of accounts extensively.
After successful authentication, immediately fetch the user’s chart of accounts using the /accounts endpoint. Build dropdown controls populated with actual account data, never text fields.
Best practices for account mapping:
Set intelligent defaults (look for “Sales” accounts for revenue mapping)
Filter by appropriate account types for each use case
Offer to create new accounts when relevant ones don’t exist
Validate mappings before each data export
Step 4: Implement Data Synchronization Logic
Choose between one-way or bidirectional sync based on your use case. One-way is simpler but limits functionality.
For bidirectional sync, establish foreign key relationships by storing Xero’s ContactID in your system or setting ContactNumber with your unique identifier.
Handle contact synchronization carefully:
Match existing contacts by name or email to prevent duplicates
Prompt users to map or create new contacts when conflicts arise
Use “If-modified-since” headers to sync only changed records
Step 5: Build Rate Limiting and Error Handling
Rate limits will break your integration without proper handling. Monitor x-rate-limit headers religiously and implement exponential backoff for 429 errors.
Most commercial integrations only support one-way sync, creating significant operational friction. Data flows from Xero to external systems or vice versa, but never both directions automatically. This forces manual workarounds, custom scripts, and delayed data updates.
Real-world impact: Finance teams lose visibility when invoice updates in Xero don’t reflect in CRM systems. Sales teams create opportunities that never sync back to accounting. Users resort to building custom middleware or maintaining duplicate data entry processes.
Reddit users consistently report dealing with “manual” sync processes even with premium integration tools. The lack of robust bidirectional data flows creates visibility gaps across business platforms, especially for project-level financial data and deal associations.
Workaround complexity: Teams build custom scripts, use multiple middleware tools, or accept data inconsistency as “normal.” The rare integrations offering two-way sync often fail on edge cases or custom objects.
Rate Limiting and Throttling
API rate limits cause widespread integration failures. The 60 calls per minute and 5,000 daily limits seem generous until you hit them during batch operations or automated workflows.
Sync failures multiply quickly. Each invoice sync might require multiple API calls for line items, contacts, and tax rates. Hitting limits blocks all further operations until the quota resets, creating cascading delays in business processes.
Reddit developers emphasize that rate limiting errors are the most prevalent issue, especially during month-end processing when multiple systems attempt bulk operations simultaneously. Missing or failed syncs have real consequences for financial reporting and compliance.
Required mitigation: Implement comprehensive retry logic, monitor rate limit headers continuously, and design systems that gracefully handle quota exhaustion. Many developers underestimate the complexity required for production-grade rate limit handling.
Developer estimates suggest over 30% of API failures relate to credential or token management issues. The secure-by-design OAuth flow becomes a significant implementation hurdle without deep authentication expertise.
Common failure points:
Redirect URI mismatches breaking the entire OAuth flow
Access tokens expiring without proper refresh logic
Missing or incorrect scopes preventing API access
Insecure token storage compromising integrations
Stack Overflow and Reddit threads document extensive troubleshooting around these authentication challenges, with recommendations for proactive refresh logic and precise environment configuration.
Data Mapping and Complex Workflows
Xero’s flexible data model creates mapping nightmares. Chart of accounts variations, custom tax codes, multi-currency transactions, and project associations don’t map cleanly between systems without extensive customization.
Contact/invoice syncing to incorrect projects or deals
Custom fields and objects not transferring between systems
Workflow brittleness: Commercial connectors often fail on edge cases that work fine in demonstrations. Users describe using multiple middleware tools simultaneously to handle what should be standard accounting integrations.
Reddit threads document ongoing complaints about data mapping reliability, forcing teams to build custom scripts or accept incomplete synchronization as normal business operations.
Building a Xero API Integration for Google Sheets or Excel?
Bypass the development complexity entirely. Coefficient for Google Sheets and Coefficient for Excel provide instant Xero connectivity without authentication challenges, rate limiting concerns, or data mapping headaches.
Connect in minutes, not months:
Install Coefficient from Google Workspace Marketplace or Microsoft AppSource
Authenticate with Xero using secure one-click OAuth (no developer setup required)
Import invoices, contacts, financial reports, and chart of accounts using simple formulas
Configure automatic refresh schedules for real-time financial data
No more integration headaches: Rate limiting, token management, chart of accounts mapping, and sync logic become Coefficient’s responsibility. Your team focuses on financial analysis while Coefficient handles the technical complexity.
Enterprise-grade reliability with built-in error handling, automatic retries, and 24/7 monitoring. Import balance sheets, profit & loss statements, aged receivables, and custom reports directly into familiar spreadsheet environments.
Perfect for finance teams, accountants, and business analysts who need Xero data without the overhead of custom API development.
Custom Xero API Integration vs. Coefficient.io Comparison
Aspect
Custom Development
Coefficient.io
Setup Time
2-4 weeks
5 minutes
Development Cost
$5,000-$15,000
$29-$299/month
Maintenance
Ongoing dev resources
Fully managed
Security
Must implement yourself
Enterprise-grade built-in
Monitoring
Build your own
24/7 automated monitoring
Scaling
Handle infrastructure yourself
Auto-scaling included
Updates
Maintain API changes
Automatic updates
Start Connecting Today
Xero API integration offers powerful accounting automation—if you have the expertise to handle OAuth complexity, rate limiting, and data mapping challenges. For most teams, the fastest path to Xero data access runs through proven no-code solutions.
Your finance team needs insights, not integration maintenance. Coefficient bridges that gap instantly, providing enterprise-grade Xero connectivity without the development burden.
Ready to connect Xero to your spreadsheets? Get started with Coefficient and transform how your team accesses accounting data.
FAQs
Is there an API for Xero?
Yes, Xero provides comprehensive REST APIs for accounting, payroll, assets, projects, and more. The APIs support standard accounting operations like creating invoices, managing contacts, handling payments, and generating financial reports. However, integration requires OAuth 2.0 setup, rate limit management, and complex data mapping. For spreadsheet users, Coefficient provides instant API connectivity without technical complexity.
How to connect to Xero API?
Connect to Xero API by registering an OAuth app in the Xero Developer Portal, implementing the OAuth 2.0 authentication flow, and using your Client ID/Secret for API requests. You’ll need to handle redirect URIs, token management, and rate limiting. The process typically takes weeks for custom development. Coefficient offers one-click Xero connectivity for Excel and Google Sheets users.
What is the limit of Xero API?
Xero enforces 60 API calls per minute and 5,000 calls per day per organization/app, with maximum 5 concurrent requests per tenant. High-volume endpoints like invoices have elevated limits. Exceeding limits results in 429 “Too Many Requests” errors requiring exponential backoff retry logic. Rate limits are shared across all integrations for each Xero organization.
Is API integration free?
Xero API access is free for developers up to 25 connected organizations. However, building and maintaining integrations requires significant development resources, often costing $5,000-$15,000 for professional implementation. App partners can connect unlimited organizations but must go through Xero’s approval process. Managed solutions like Coefficient offer predictable monthly pricing with enterprise features included.
Are you looking to harness the full power of Xero’s reporting capabilities?
Whether you’re an accountant, financial controller, or business owner, understanding how to build effective reports and dashboards in Xero is crucial for making informed decisions.
This guide will walk you through everything you need to know about Xero reporting in 2025, from basic report types to advanced dashboard creation and automation.
Common Xero Report Types
Xero offers a variety of report types to help you analyze your financial data. Let’s explore the most commonly used reports and their applications:
Accounting Reports
Xero provides several essential accounting reports that give you a clear picture of your financial health:
Executive Summary: This report offers a high-level overview of your business’s financial performance, including key metrics like income, expenses, and cash flow.
Cash Summary: Track your cash inflows and outflows over a specific period, helping you manage your liquidity effectively.
Income Statement (Profit and Loss): Analyze your revenue, expenses, and profitability over a given timeframe.
Balance Sheet: Get a snapshot of your company’s financial position, including assets, liabilities, and equity.
Accounts Payable Aging Summary: Keep track of your unpaid bills and manage your cash flow more effectively.
These reports, along with the Financial Reports & Sales Overview Dashboard, offer a snapshot of your company’s performance. For example, the Executive Summary provides a high-level overview of your financial position, while the Accounts Receivable Aging Summary helps you track outstanding invoices and manage cash flow.
Exporting Reports from Xero
Xero allows you to export reports in various formats for further analysis or sharing with stakeholders. Here’s how to export a report:
Step 1: Generate the desired report in Xero. Navigate to the Reports section and select the report you want to export.
Step 2: Click on the “Export” button. This is typically located at the top of the report page.
Step 3: Choose your preferred export format. Xero usually offers CSV and XLSX (Excel) formats for most reports.
Step 4: Configure any additional export options. Depending on the report, you may be able to customize the data included in the export.
Step 5: Click “Export” to download the file. The report will be saved to your device in the chosen format.
While Xero’s native export functionality is useful, tools like Coefficient can streamline this process for spreadsheet users. Coefficient allows you to pull Xero data directly into Google Sheets or Excel, enabling real-time updates and more flexible reporting options.
How to Build a Custom Report in Xero
Creating custom reports in Xero allows you to tailor the information to your specific needs. Here’s a step-by-step guide to building a custom report:
Step 1: Navigate to the Reports section in Xero. Click on “Reports” in the main menu.
Step 2: Select “New Report” or “Custom Reports.” Look for an option to create a new custom report.
Step 3: Choose a report type. Xero offers various report types as starting points for customization.
Step 4: Set your report parameters. Define the date range, accounts, and other relevant filters for your report.
Step 5: Select the columns and data you want to include. Customize the layout by adding or removing columns and choosing specific data points.
Step 6: Apply any necessary formulas or calculations. Use Xero’s built-in functions to perform calculations within your report.
Step 7: Format and style your report. Adjust fonts, colors, and other visual elements to improve readability.
Step 8: Save and name your custom report. Give your report a descriptive name for easy future access.
Step 9: Run the report and review the results. Make any final adjustments to ensure the report meets your needs.
Remember that the exact steps may vary slightly depending on your Xero plan and any updates to the platform.
Building Advanced Reports & Dashboards in Xero
While Xero’s native reporting capabilities are robust, creating truly advanced reports and dashboards often requires additional tools or expertise. Here’s how you can take your Xero reporting to the next level:
Step 1: Identify your reporting goals. Determine the key metrics and insights you need to track.
Step 2: Gather data from multiple sources. Combine Xero data with information from other systems for a more comprehensive view.
Step 3: Use Xero Analytics Plus (if available). This add-on provides more advanced reporting features, including cash flow projections and business snapshots.
Step 4: Leverage third-party reporting tools. Consider using specialized tools like Coefficient to create more flexible and dynamic reports.
Step 5: Design your dashboard layout. Organize your key metrics and visualizations in a logical, easy-to-read format.
Step 6: Create custom visualizations. Use charts, graphs, and other visual elements to make your data more digestible.
Step 7: Implement interactivity. Add filters and drill-down capabilities to allow users to explore the data.
Step 8: Set up automated data refreshes. Ensure your dashboard always displays the most up-to-date information.
Step 9: Test and refine your dashboard. Gather feedback from users and make improvements as needed.
While Xero offers some advanced reporting features, tools like Coefficient provide greater flexibility and familiarity, especially for users comfortable with spreadsheet environments. Coefficient allows you to pull Xero data directly into Google Sheets or Excel, enabling you to create highly customized reports and dashboards with real-time data updates.
Automating Xero Reporting
Automation is key to efficient reporting. Here’s how you can automate your Xero reporting process:
Schedule regular reports: Set up Xero to automatically generate and email reports on a recurring basis.
Use Xero’s API: For more advanced automation, leverage Xero’s API to pull data into other systems or custom applications.
Implement third-party automation tools: Platforms like Zapier or Coefficient can help automate data transfers and report generation.
Set up alerts: Configure notifications for key financial events or when certain thresholds are met.
Create report templates: Save time by creating reusable report templates for common reporting needs.
By automating your reporting processes, you can save time, reduce errors, and ensure you always have access to the latest financial insights.
Limitations of Xero Reporting
While Xero offers robust reporting capabilities, it’s important to be aware of its limitations:
Cash flow projections: Detailed cash flow projections for 60 or 90 days are only available in higher-tier pricing plans.
Advanced reporting features: Some advanced reporting tools, like Xero Analytics Plus, require an additional subscription.
Limited customization: While Xero offers some customization options, creating highly specialized reports can be challenging within the native platform.
Lack of smart notifications: Xero doesn’t offer advanced alert systems, such as Slack notifications for specific financial events.
Consolidated reporting challenges: Creating consolidated reports for multiple entities can be time-consuming and complex in Xero.
To overcome these limitations, many businesses turn to specialized reporting platforms like Coefficient. These tools can provide greater flexibility, more advanced features, and easier integration with other business systems.
Free Xero Reporting Dashboards for Accountants and Finance Controllers
To help you get started with advanced Xero reporting, Coefficient offers several pre-built dashboard templates:
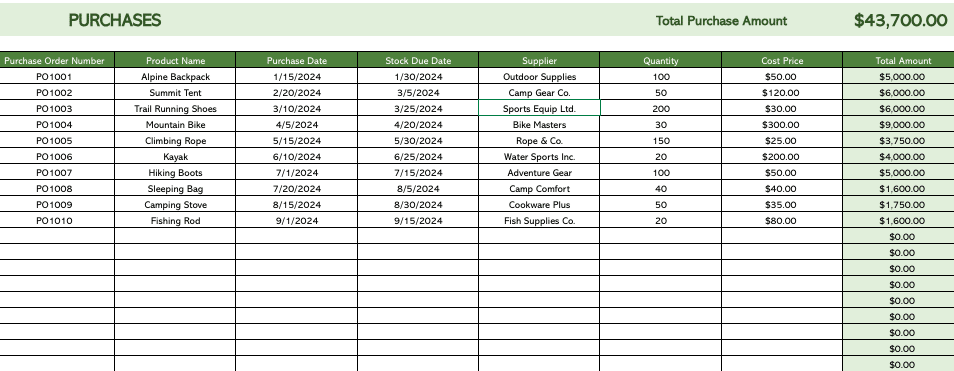
#1 Xero Inventory Excel Template
The Xero Inventory Excel Template streamlines your inventory management process. By integrating directly with your Xero account, this template provides real-time visibility into your stock levels, product performance, and inventory trends, all within Excel.
Use Case: Inventory Management and Optimization
This template helps businesses:
Monitor current inventory across all products
Identify top-selling items and slow-moving stock
Set up alerts for when stock reaches reorder levels
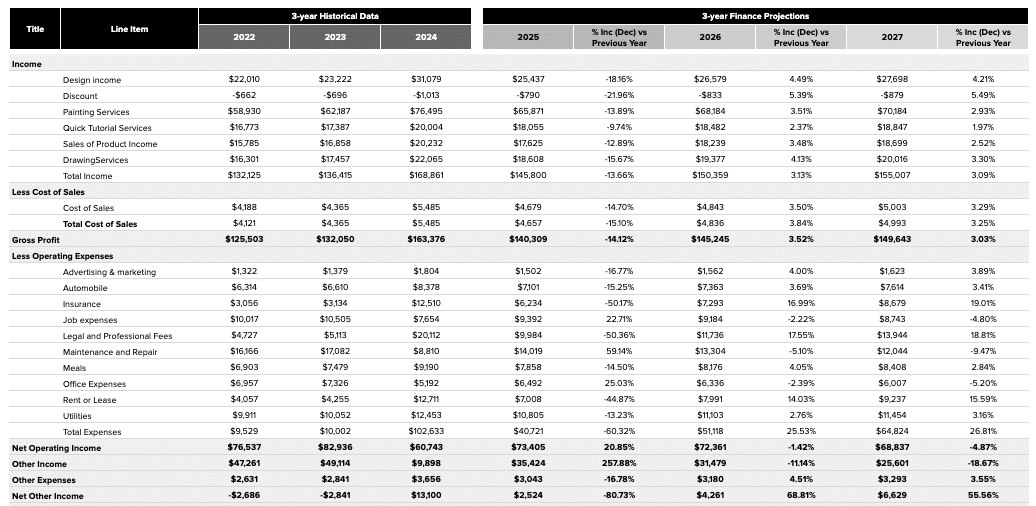
The Xero Finance Projections Template is crucial for businesses aiming to forecast their financial future. This template connects directly to your Xero account, pulling in real-time financial data to create accurate and dynamic financial projections.
Use Case: Financial Forecasting and Planning
This template enables businesses to:
Generate detailed financial projections based on historical data
Develop multiple financial scenarios to prepare for different outcomes
Use projections to inform budget decisions and resource allocation
Create professional financial forecasts for stakeholders and potential investors
The Xero Consolidated Reporting Dashboard is essential for businesses managing multiple entities or subsidiaries. This dashboard automates the process of consolidating financial data from various Xero organizations, providing a comprehensive view of your overall business performance.
Use Case: Multi-entity Financial Consolidation
This template helps businesses:
Automate the process of combining financial data from multiple Xero entities
Gain a holistic view of your organization’s financial performance across all entities
Reduce errors associated with manual consolidation processes
Easily prepare consolidated financial statements for regulatory requirements
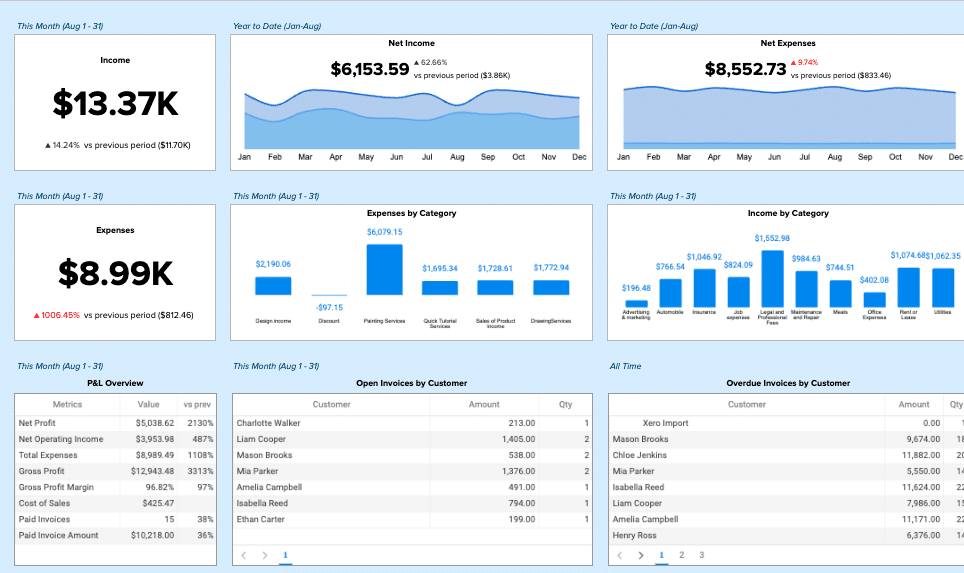
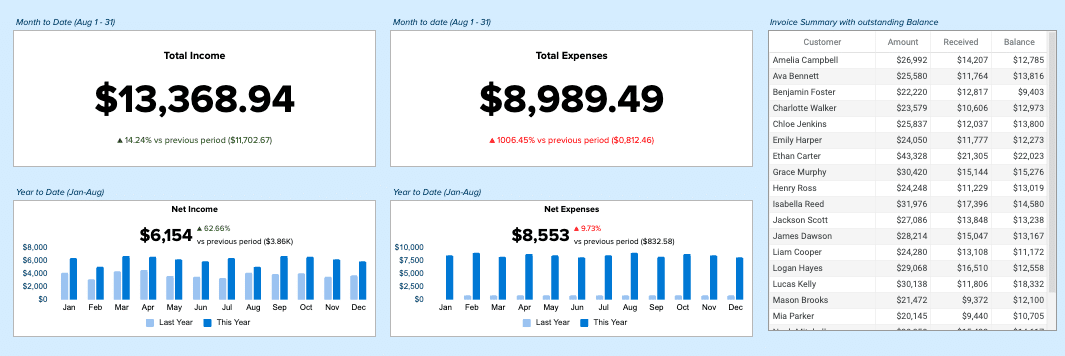
The Xero Finance Dashboard offers a comprehensive visual representation of your business’s financial health. By pulling real-time data directly from Xero, this dashboard provides an at-a-glance overview of key financial metrics, enabling quick and informed decision-making.
Use Case: Financial Performance Monitoring
This dashboard allows businesses to:
Track critical financial KPIs in real-time
Identify financial trends and patterns through intuitive charts and graphs
Easily share financial insights with stakeholders and team members
Make data-driven decisions based on up-to-date financial information
Metrics Tracked
Income Overview (Total Income, Income by period)
Expense Overview (Total Expenses, Expenses by period)
Bank Summary (Account balances and received amounts)
Profitability (Income, Gross Profit, Net Profit, Other Income, Profit/Loss)
Effective reporting and dashboarding are crucial for making informed business decisions. By leveraging Xero’s built-in features and enhancing them with Coefficient’s advanced capabilities, you can gain deep insights into your financial performance and drive growth.
Ready to take your Xero reporting to the next level? Get started with Coefficient today and discover how easy it can be to create powerful, data-driven reports and dashboards that integrate seamlessly with your Xero data.
Xero’s ecosystem is vast. But which integrations truly deliver value? As a finance professional, you need tools that streamline processes and provide actionable insights.
We’ve done the legwork.
Here are the 7 best Xero integrations for 2025, each vetted for their ability to transform your financial workflows.
Why the Right Xero Integrations Matter
Xero is a solid accounting platform, but it really shines when paired with the right add-ons. Good integrations can:
Save Time: By automating tedious tasks like data entry and reconciliations, you’ll spend less time on paperwork and more on growing your business. Imagine your invoices, bills, and bank transactions all syncing automatically – that’s the power of smart integrations.
Provide Better Insights: Connecting Xero to your other business tools (like your online store or CRM) gives you a clearer picture of your finances. You’ll see how sales impact cash flow in real time, making it easier to spot trends and make informed decisions.
Tailor to Your Needs: Every business is different. Integrations let you add features Xero might be missing, whether that’s detailed inventory tracking or industry-specific tax reports. It’s like customizing Xero to fit your business perfectly.
Choosing integrations can be overwhelming, but focus on tools that solve your biggest headaches and align with how you work. The right combo can turn Xero into a financial powerhouse for your business.
Comparison Table of Top Xero Integrations
Integration
Primary Function
Key Feature
Pricing
Best For
Coefficient
Data Integration & Reporting
Real-time data sync from 50+ sources
Free tier available. Paid starts at $49/month
Businesses needing advanced reporting and data integration
Gusto
Payroll Management
Automated tax filings
$40/mo + $6/person
SMBs looking for comprehensive payroll solution
Stripe
Payment Processing
Automatic reconciliation
2.9% + $0.30/transaction
Online businesses with high transaction volumes
Hubdoc
Document Management
Automated data extraction
Included with Xero
Businesses struggling with document organization
Shopify
E-commerce
Automated order-to-invoice
From $29/mo
Online retailers seeking seamless accounting
Fathom
Financial Reporting
Customizable KPI dashboards
From $39/mo
Businesses needing in-depth financial analysis
ApprovalMax
Approval Workflows
Multi-level approval chains
From $36/mo
Organizations with complex approval processes
Now, let’s dive deeper into each integration, exploring how they can transform your financial processes.
1. Coefficient: Supercharge Your Reporting with Live Data
Coefficient is a data integration and reporting tool that connects Xero with 50+ other business systems. It allows real-time syncing of financial data into Excel and Google Sheets, enabling automated, customizable reporting and analysis.
Coefficient eliminates manual data entry and provides up-to-the-minute financial insights for improved decision-making.
Key Features:
Builds and refreshes reports using real-time data
Pushes spreadsheet data back to source systems
Automates report distribution via Slack and email
How it integrates with Xero: Coefficient acts as a bridge between Xero and your spreadsheets. It pulls financial data directly from Xero into Excel or Google Sheets, allowing you to create live, auto-updating reports. This means no more manual data exports or outdated financial snapshots.
Pros:
Eliminates manual data entry, reducing errors and saving time
Advanced features may require some initial setup time
Custom pricing might be a barrier for very small businesses
Pricing:
Free Plan: Includes basic features such as data imports for up to 5,000 rows and 10,000 OpenAI API calls
Starter Plan: $49 per user per month, with features like daily automatic refreshes and limited bulk write-backs
Pro Plan: $99 per user per month, offering unlimited import size, hourly refreshes, and unlimited bulk write-backs
Enterprise Plan: Custom pricing based on specific needs
2. Gusto: Simplify Payroll and HR Management
Gusto is a comprehensive payroll and HR management system that integrates seamlessly with Xero. It automates payroll calculations, tax filings, and benefits administration for U.S.-based businesses. Gusto syncs payroll data directly with Xero, creating accurate journal entries without manual intervention.
Key Features:
Automates payroll calculations and tax filings
Manages benefits administration
Provides employee self-service portal
Offers time tracking and PTO management
How it integrates with Xero: Gusto automatically syncs payroll data with Xero after each pay run. It creates journal entries for wages, taxes, and deductions, ensuring your books are always up-to-date without manual intervention.
Pros:
Simplifies complex payroll processes
Ensures tax compliance with automatic filings
Improves employee experience with self-service options
Reduces payroll processing time significantly
Cons:
Primarily focused on U.S. businesses
May have more features than necessary for very small teams
Pricing: Starts at $40/month + $6/person.
3. Stripe: Streamline Payment Processing and Reconciliation
Stripe is a payment processing platform that integrates with Xero to automate online payment handling and reconciliation. It accepts various payment methods, automatically creates and matches invoices in Xero, and provides detailed transaction reporting.
Key Features:
Processes online payments securely
Automatically reconciles transactions in Xero
Provides detailed reporting on payment trends
Supports multiple currencies and payment methods
How it integrates with Xero: Stripe automatically creates and matches invoices in Xero for each payment received. This means your books are always up-to-date, with minimal manual intervention required.
Pros:
Seamless payment processing reduces friction for customers
Automatic reconciliation saves hours of manual work
Detailed reporting provides valuable insights into cash flow
Supports global transactions with multiple currency options
Cons:
Transaction fees can add up for high-volume, low-value transactions
Advanced features may require some technical setup
Pricing: 2.9% + $0.30 per transaction for most online card payments. While this can seem high, the time saved on reconciliation often offsets the cost.
4. Hubdoc: Automate Document Collection and Data Entry
Hubdoc is a document collection and data extraction tool designed to work with Xero. It automatically fetches bills and receipts from hundreds of vendors, extracts key data using OCR technology, and pushes this information directly into Xero.
Hubdoc simplifies document organization, reduces manual data entry, and aids in audit preparation.
Key Features:
Automatically fetches bills and receipts from over 700 vendors
Extracts key data using OCR technology
Provides secure document storage and organization
Syncs data and documents directly to Xero
How it integrates with Xero: Hubdoc pushes documents and their extracted data directly into Xero, creating transactions and attaching source documents automatically. This ensures your books are always up-to-date and audit-ready.
Pros:
Drastically reduces manual data entry time
Improves accuracy of financial records
Simplifies document storage and retrieval for audits
Enhances expense tracking and reporting
Cons:
May require initial setup time to connect all relevant accounts
Some users report occasional issues with data extraction accuracy
Pricing: Included with Xero subscriptions, providing excellent value for Xero users.
5. Shopify: Seamless E-commerce Accounting
Shopify is an e-commerce platform that offers seamless integration with Xero for online retailers. It automatically syncs orders, payments, refunds, and inventory data with Xero, creating matching transactions for easy reconciliation.
This integration eliminates manual data entry for online sales and provides real-time visibility into store performance.
Key Features:
Syncs orders, payments, and refunds automatically
Creates and matches invoices in Xero
Tracks inventory levels across platforms
Provides detailed sales tax reporting
How it integrates with Xero: Shopify automatically sends sales data, fees, and payouts to Xero, creating matching transactions for easy reconciliation. This ensures your financial records always reflect your latest sales data.
Pros:
Eliminates manual data entry for online sales
Improves accuracy of financial records
Simplifies tax compliance with detailed reporting
Provides real-time visibility into online store performance
Cons:
Can be complex to set up for stores with many product variations
May require additional apps for very specific needs
Pricing: Shopify plans start at $29/month. The Xero integration itself is free, providing excellent value for e-commerce businesses.
6. Fathom: Advanced Financial Reporting and Analysis
Fathom is a financial reporting and analysis tool that enhances Xero’s native capabilities. It pulls data directly from Xero to create customizable, visually appealing reports and dashboards.
Fathom offers in-depth financial analysis, benchmarking, and forecasting features, allowing businesses to gain deeper insights from their Xero data.
Key Features:
Creates customizable, visually appealing reports
Offers in-depth financial analysis and forecasting
Provides benchmarking capabilities
Allows for consolidation of multiple Xero companies
How it integrates with Xero: Fathom pulls data directly from Xero, allowing for real-time reporting and analysis. This means your reports are always up-to-date, reflecting the latest data in Xero.
Pros:
Produces professional-quality reports quickly
Offers deeper insights than Xero’s native reporting
Simplifies group reporting for multiple entities
Improves decision-making with clear financial visualizations
Cons:
Learning curve for advanced features
May be more than needed for very small businesses
Pricing: Starts at $39/month, with plans varying based on the number of companies and users.
7. ApprovalMax: Streamline Approval Workflows
ApprovalMax is an approval automation tool that integrates with Xero to enhance financial control and governance. It allows businesses to create customizable, multi-step approval workflows for bills and purchase orders before they enter Xero.
ApprovalMax provides a detailed audit trail and helps organizations reduce approval bottlenecks while improving spending visibility.
Key Features:
Creates customizable approval workflows
Integrates with bills and purchase orders in Xero
Provides a clear audit trail for all approvals
Offers mobile app for on-the-go approvals
How it integrates with Xero: ApprovalMax sits between the document capture stage and Xero, ensuring all documents go through proper approval before entering Xero. This adds a crucial layer of control to your financial processes.
Pros:
Reduces approval bottlenecks significantly
Enhances financial compliance and control
Improves visibility into spending patterns
Allows for complex, multi-level approval workflows
Cons:
May be unnecessary for very small teams or simple approval processes
Some users report a learning curve in initial setup
Pricing: Starts at $36/month, with plans varying based on the number of approvers and documents.
Transform Your Financial Processes with the Right Integrations
The right Xero add-ons can significantly improve financial processes, making them faster and more insightful. Coefficient connects Xero with various business systems, offering real-time data and improved reporting.
When choosing integrations, consider specific business needs and take advantage of free trials. The right tools can streamline processes and provide a fresh perspective on financial management.
Ready to take your Xero experience to the next level?
Try Coefficient today and experience the power of seamless data integration and real-time financial insights.
Coefficient’s Xero connector is by-request only at the moment as we finish up the marketplace approval process with Xero. If you’d like early access to our Xero connector, please reach to sales@coefficient.io.
Xero is a leading cloud-based accounting software that enables businesses to manage their financial data, including invoices, quotes, purchase orders, bank transactions, and more.
By connecting Xero to Excel using Coefficient, you can seamlessly import your financial data into a spreadsheet for in-depth analysis and reporting. This tutorial will walk you through the steps of setting up the integration and fetching your Xero data into Excel.
Prefer to watch? Check out our video tutorial below for a step-by-step guide.
Advantages of Using Excel to Analyze Xero Data
Familiar interface: Excel provides a well-known interface for financial data analysis, making it easy for users to navigate and work with Xero data.
Powerful analysis tools: Excel offers a wide range of built-in functions, formulas, and pivot tables to help you analyze and visualize your financial data.
Flexible reporting: Create custom financial reports and dashboards in Excel to share insights with stakeholders and make data-driven decisions.
How to Install Coefficient in Excel
Before we get started, you’ll need to install Coefficient in Excel. Don’t worry, it’s a fast and straightforward process that you only need to do once. Follow these simple steps to get started:
Open Excel from your desktop or in Office Online.
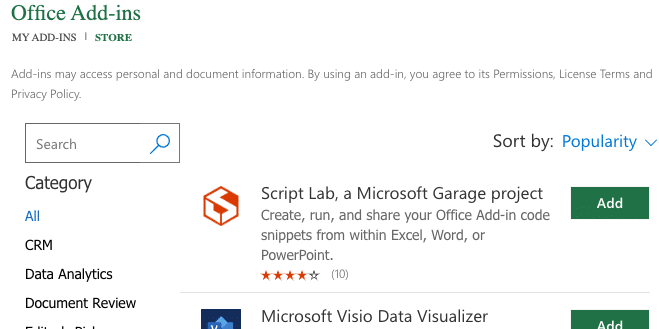
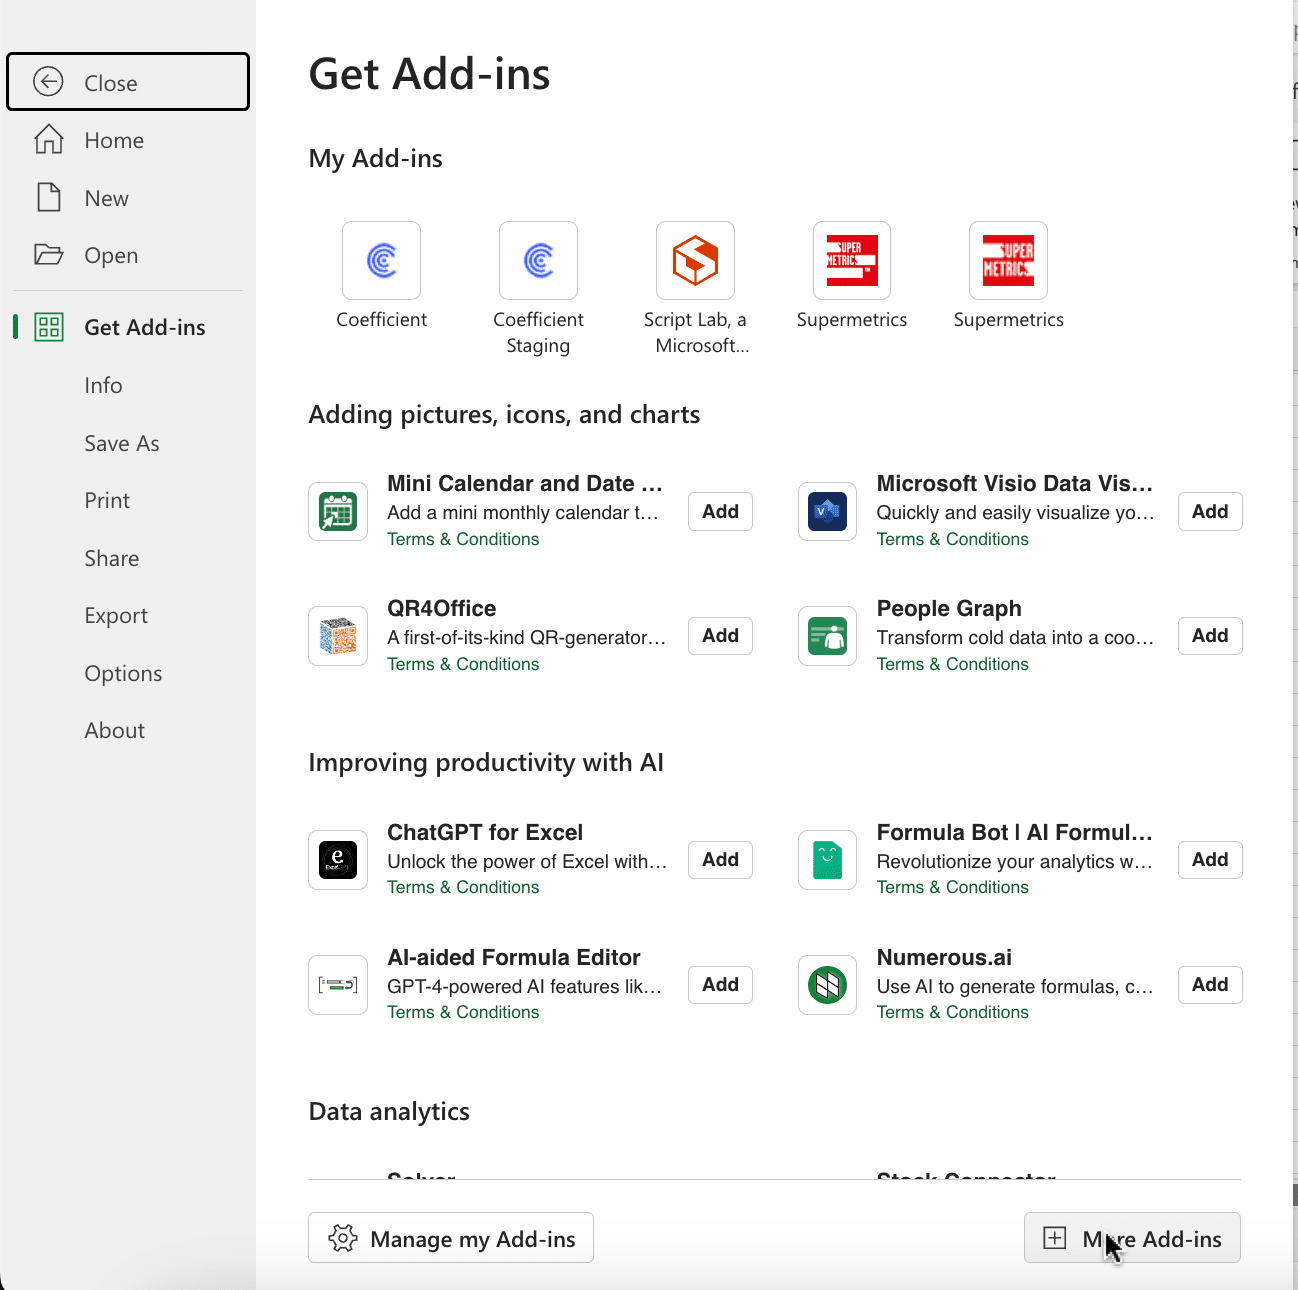
Navigate to the ‘File’ menu and select ‘Get Add-ins.’
Click on ‘More Add-ins’ to access the available add-ins.
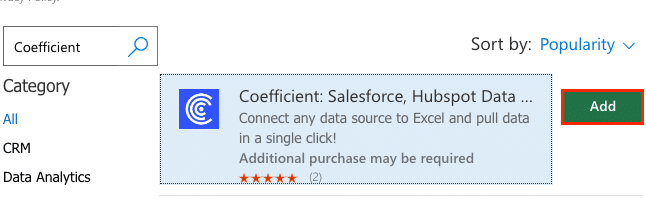
Type ‘Coefficient’ in the search bar and click ‘Add.’
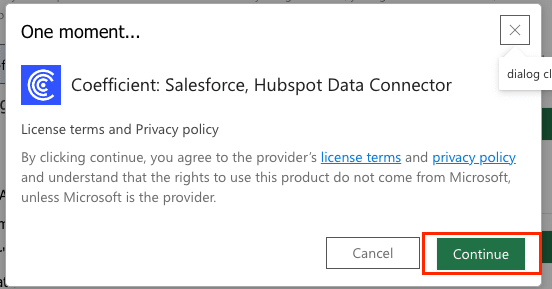
A pop-up window will appear, guiding you through the installation process. Follow the prompts to complete the setup.
Once installed, you will see a ‘Coefficient’ tab in the top navigation bar. Click ‘Open Sidebar’ to launch Coefficient.
Connecting Xero to Excel Using Coefficient
With Coefficient installed, you’re now ready to import your ClickUp data into Excel
Step 1: Add Xero as a data source in Coefficient
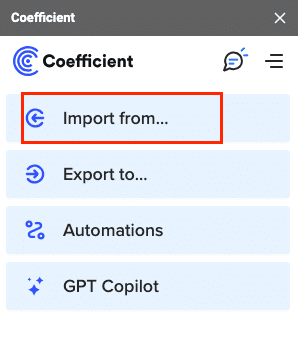
In the Coefficient sidebar, click ‘Import From.’
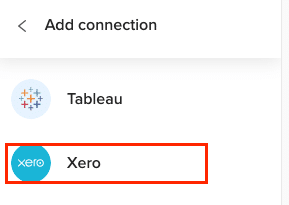
Select “Xero” from the list of available data sources.
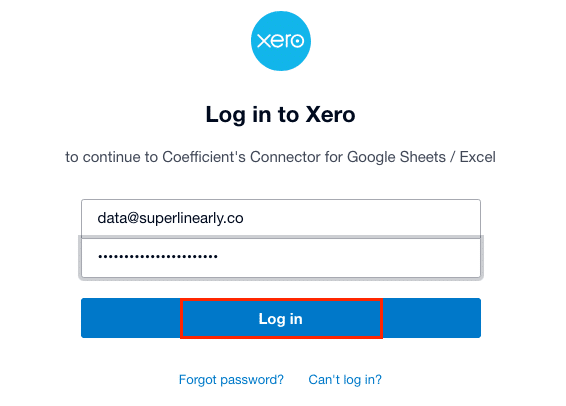
Step 2: Log in to your Xero account
Enter your Xero credentials and click ‘Login.’
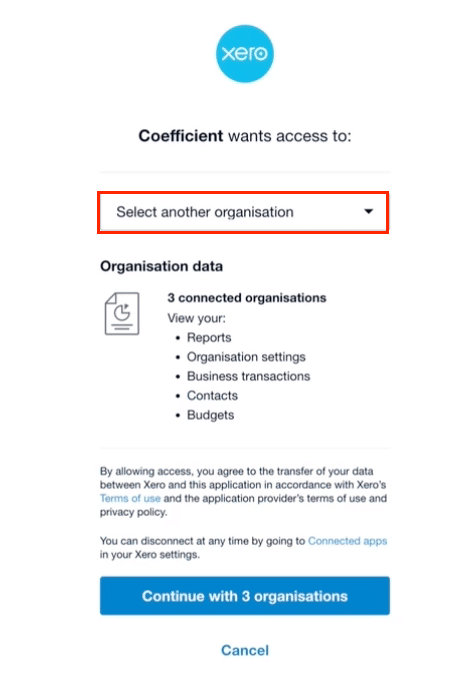
Step 3: Choose an organization to connect
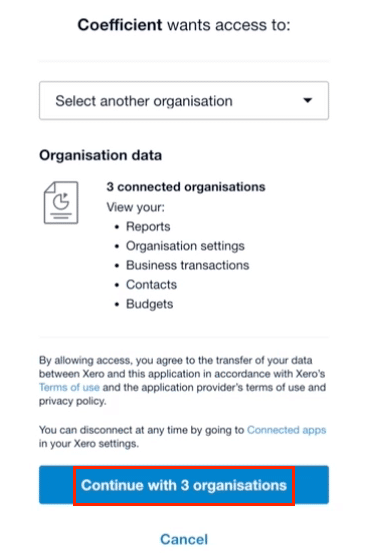
Select one or more of the available organizations to connect to Coefficient.
Click “Continue” to proceed with the selected organization(s).
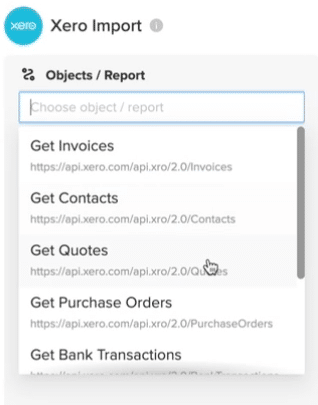
Step 4: Select an endpoint to fetch data from
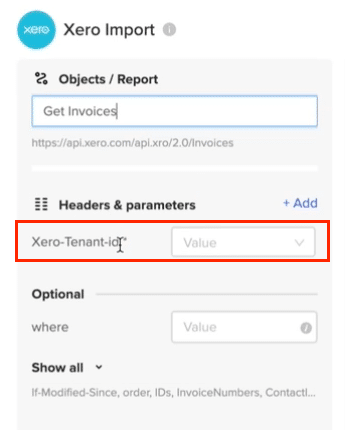
Choose an endpoint from the available options, such as Invoices, Contacts, or Users.
For this example, select “Get Invoices” to fetch invoice data from Xero.
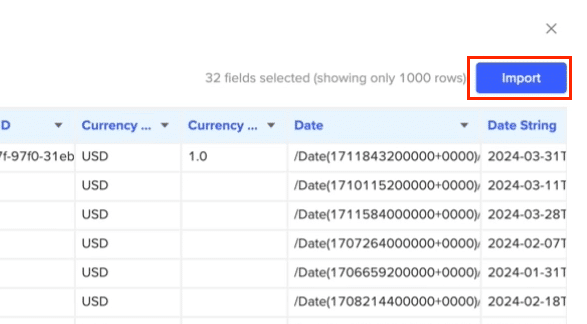
Step 5: Configure the data import
Enter the Tenant ID (organization ID) for the selected Xero organization.
Optionally, select additional fields to include in the data import.
Click “Import” to fetch the invoice data into your spreadsheet.
Tips and Tricks: Analyzing Xero Data in Excel
Create Interactive Dashboards: Utilize Excel’s powerful charting and formatting capabilities or Coefficient’s pre-built templates to create interactive dashboards that provide a clear overview of your Xero financial data.
Ensure Data Freshness: Set up automatic data refreshes with Coefficient to keep your Xero data in Excel always up-to-date, providing a reliable foundation for your analyses and reports.
Get Timely Notifications: Use Coefficient to configure alert notifications sent to Slack or email when specific conditions are met, such as when an invoice becomes overdue or a customer’s balance exceeds a certain threshold, helping you stay informed of critical financial updates without constantly monitoring your spreadsheets.
Streamline Your Xero Data Analysis with Coefficient and Excel
Connecting Xero to Excel using Coefficient simplifies the process of importing and analyzing your financial data.
By following this tutorial, you can easily fetch your Xero accounting data into an Excel spreadsheet and leverage the powerful analysis tools available in Excel to uncover valuable insights into your business’s financial performance.
Coefficient’s Xero connector is by-request only at the moment as we finish up the marketplace approval process with Xero. If you’d like early access to our Xero connector, please reach to sales@coefficient.io.
Xero is a powerful cloud-based accounting software that helps businesses manage their invoices, quotes, purchase orders, bank transactions, and more.
By connecting Xero to Google Sheets using Coefficient, you can easily import your financial data into a spreadsheet for further analysis and reporting. This tutorial will guide you through the process of setting up the integration and fetching your Xero data into Google Sheets.
Prefer to watch? Check out our video tutorial below for a step-by-step guide.
Advantages of Using Google Sheets to Analyze Xero Data
Centralized financial data: Consolidate your Xero accounting data in one place, making it easier to access and analyze your financial information.
Customizable reporting: Create custom reports and dashboards in Google Sheets to gain insights into your business’s financial performance.
Collaborative analysis: Share your Xero data with team members and collaborate on financial analysis and decision-making in real time.
How to Install Coefficient in Google Sheets
Open a new Google Sheets spreadsheet.
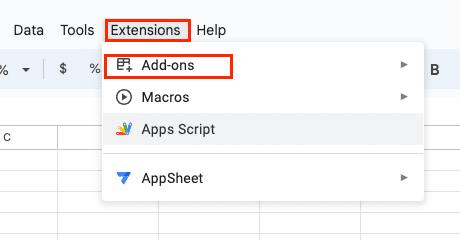
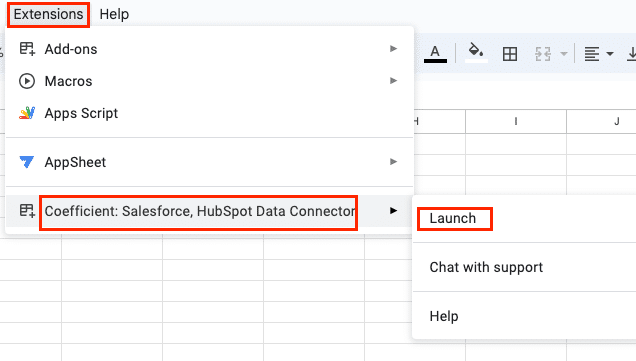
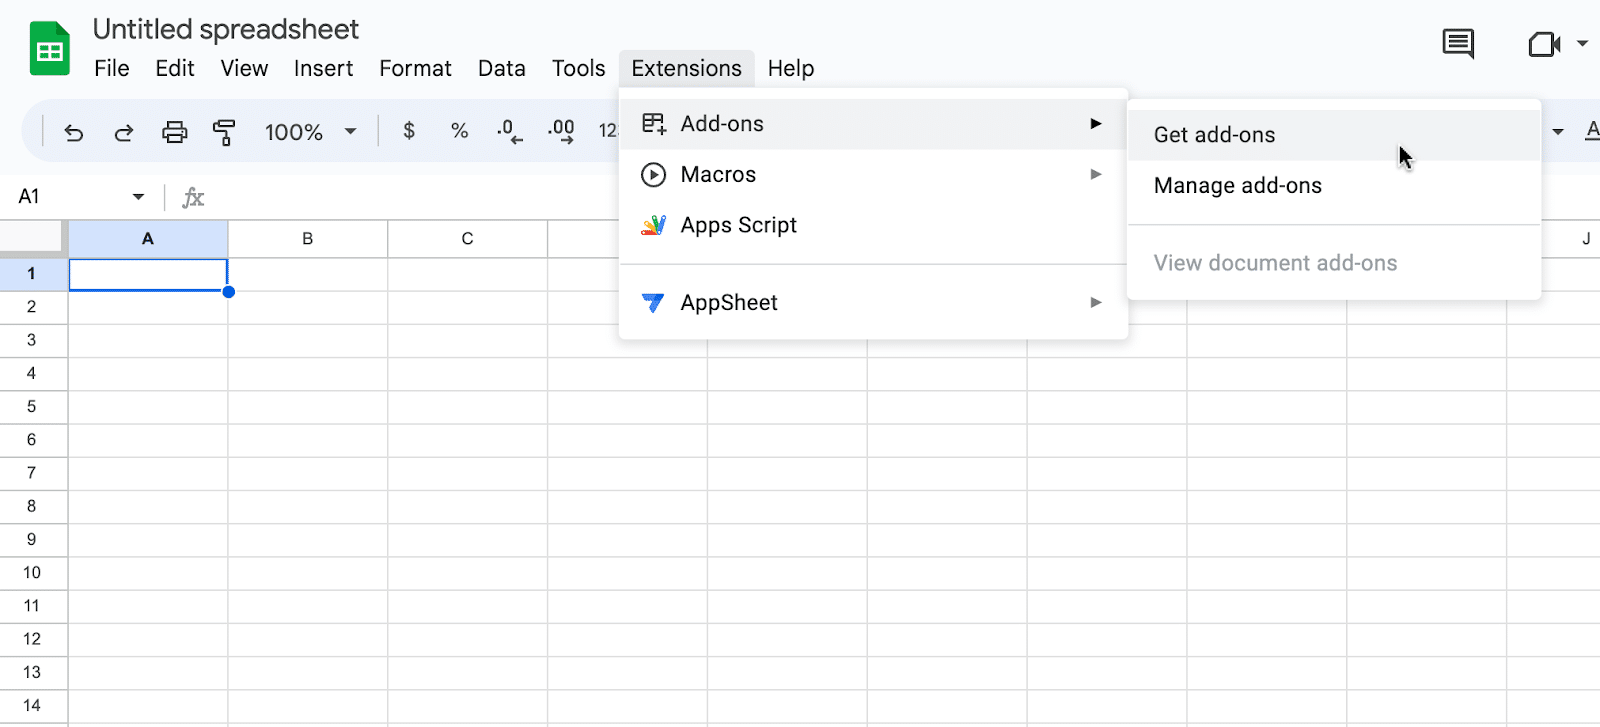
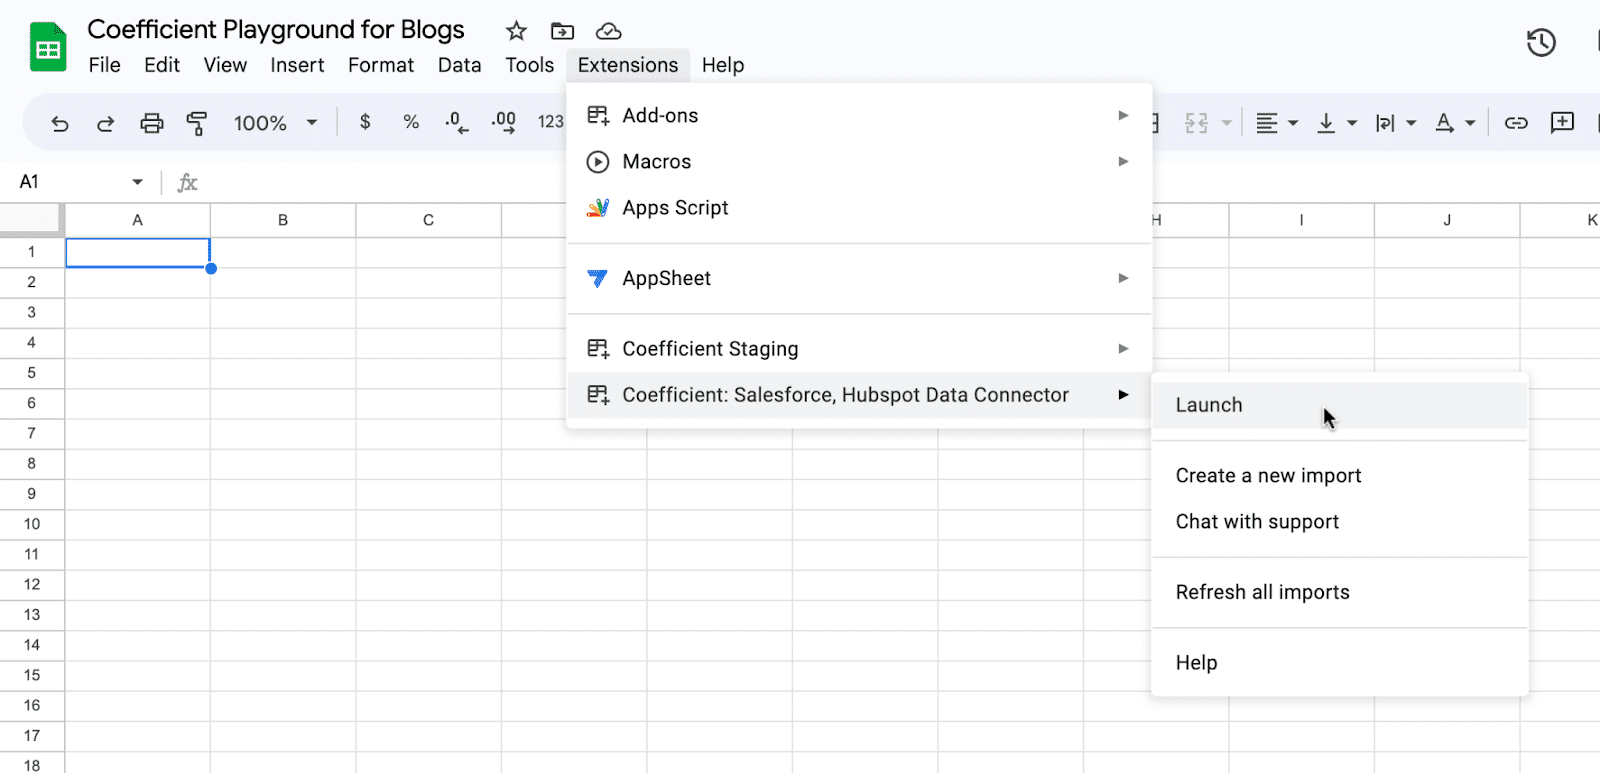
Click on “Extensions” in the top menu, then “Add-ons” > “Get add-ons.”
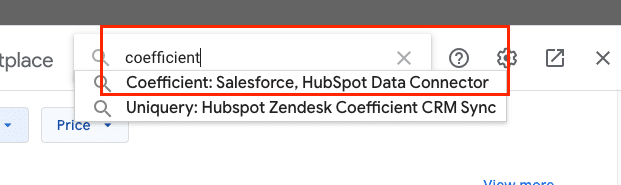
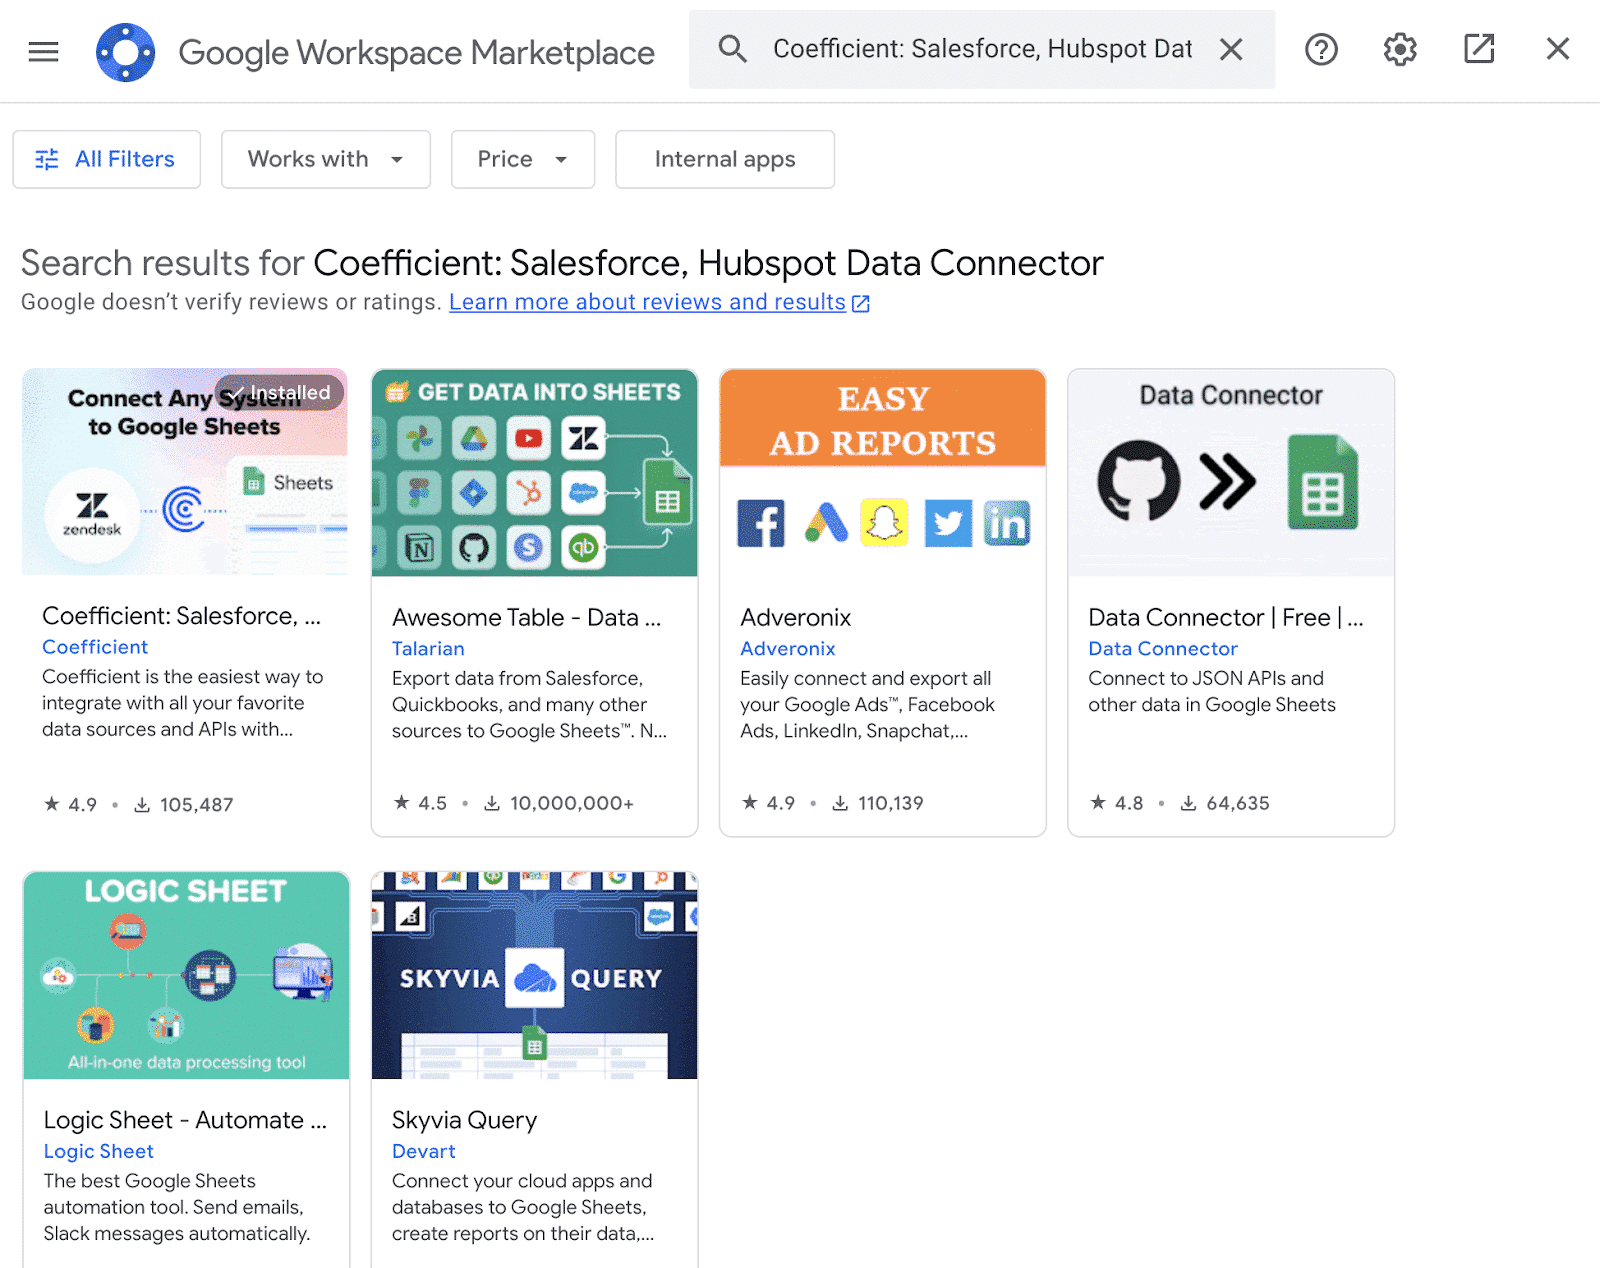
In the Google Workspace Marketplace, search for “Coefficient” and select the first app that appears.
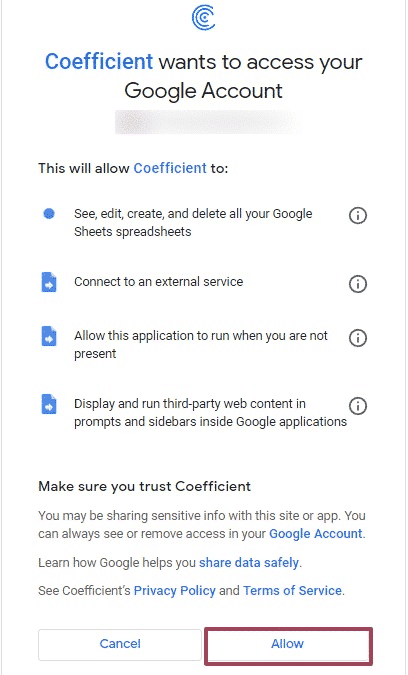
Grant Coefficient access to your Google Account by clicking “Allow” when prompted.
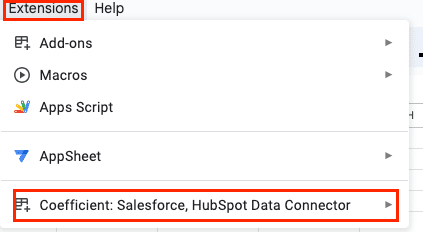
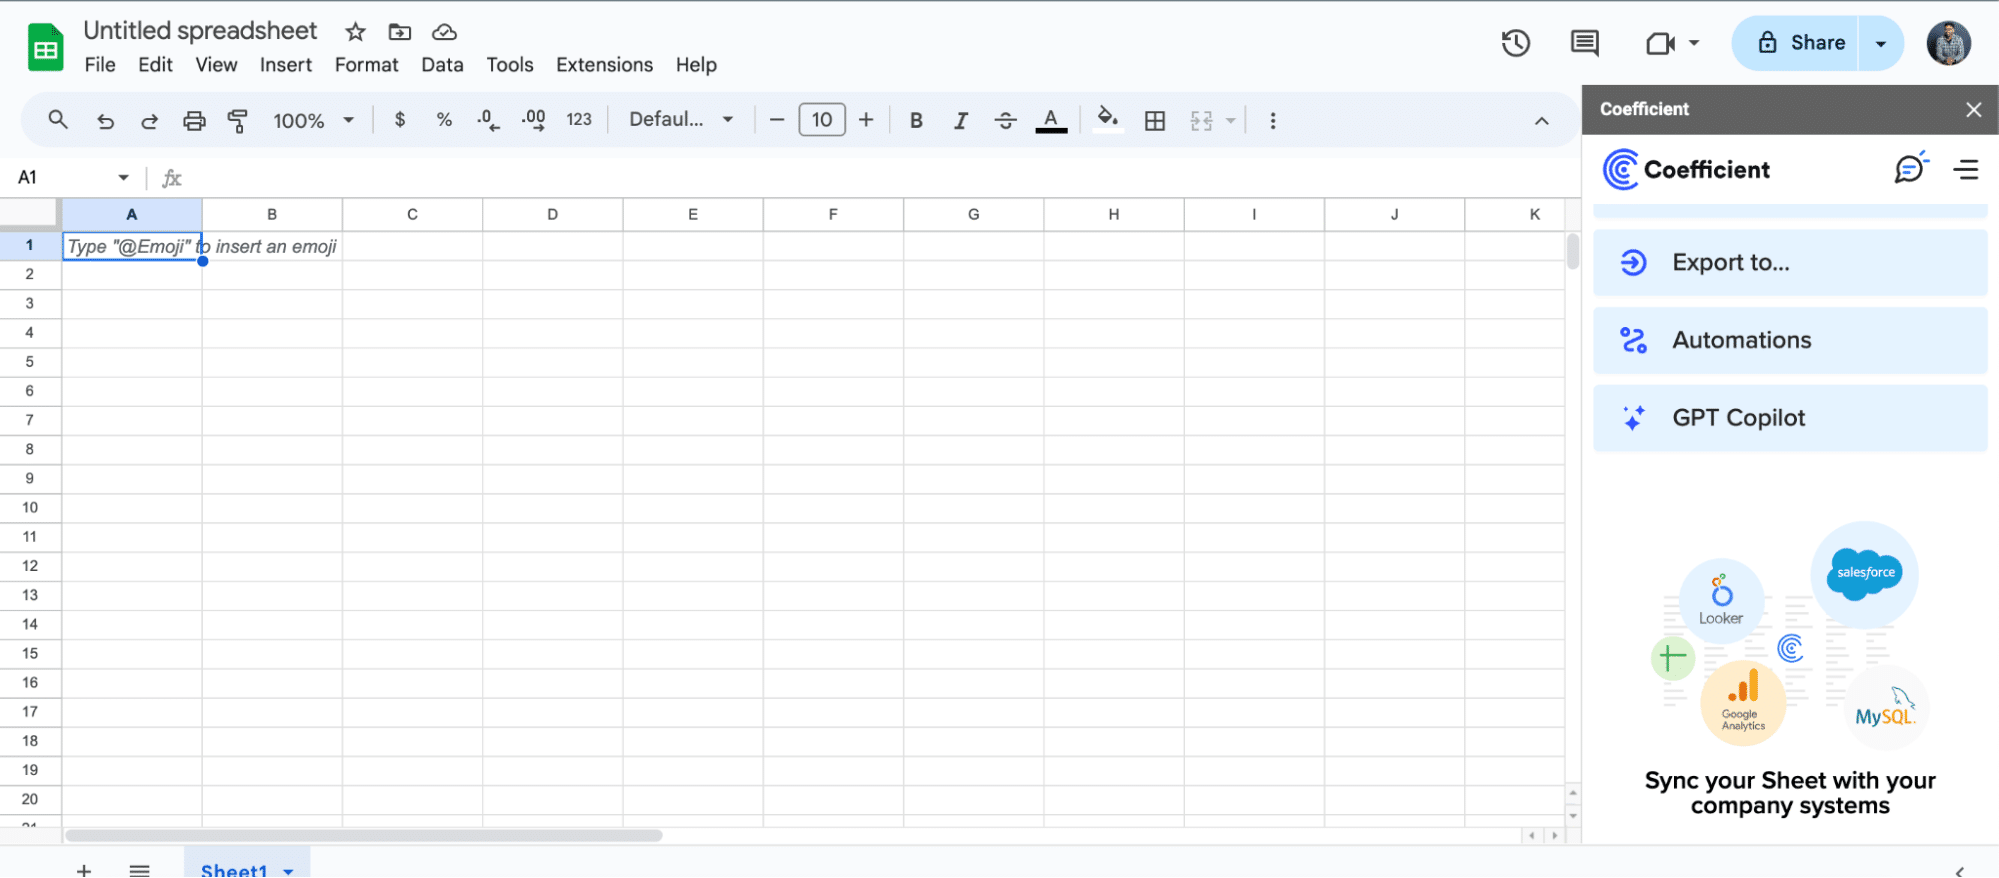
Coefficient will now appear in the extension menu of Google Sheets.
Click “Launch” to open Coefficient in the right sidebar of your spreadsheet.
Step-by-Step Tutorial: Connecting Xero to Google Sheets Using Coefficient
Step 1: Add Xero as a data source in Coefficient
In the Coefficient sidebar, click on “Import from.“
Select “Xero” from the list of available data sources.
Step 2: Log in to your Xero account
Enter your Xero credentials and click “Login.”
Step 3: Choose an organization to connect
Select one or more of the available organizations to connect to Coefficient.
Click “Continue” to proceed with the selected organization(s).
Step 4: Select an endpoint to fetch data from
Choose an endpoint from the available options, such as Invoices, Contacts, or Users.
For this example, select “Get Invoices” to fetch invoice data from Xero.
Step 5: Configure the data import
Enter the Tenant ID (organization ID) for the selected Xero organization.
Optionally, select additional fields to include in the data import.
Click “Import” to fetch the invoice data into Google Sheets spreadsheet.
Tips and Tricks: Analyzing Xero Data in Google Sheets
Create Interactive Dashboards: Utilize Excel’s powerful charting and formatting capabilities or Coefficient’s pre-built templates to create interactive dashboards that provide a clear overview of your Xero financial data.
Ensure Data Freshness: Set up automatic data refreshes with Coefficient to keep your Xero data in Excel always up-to-date, providing a reliable foundation for your analyses and reports.
Get Timely Notifications: Use Coefficient to configure alert notifications sent to Slack or email when specific conditions are met, such as when an invoice becomes overdue or a customer’s balance exceeds a certain threshold, helping you stay informed of critical financial updates without constantly monitoring your spreadsheets.
Streamline Your Xero Data Analysis with Coefficient and Google Sheets
Connecting Xero to Google Sheets using Coefficient streamlines the process of importing and analyzing your financial data.
By following this tutorial, you can easily fetch your Xero accounting data into a Google Sheets spreadsheet and take advantage of the powerful analysis tools available in Google Sheets to gain valuable insights into your business’s financial performance.
Xero’s built-in reporting capabilities are solid. But for many businesses, they’re just the starting point. Third-party Xero reporting tools take your financial analysis to the next level. They offer deeper insights, more customization, and advanced features that can transform your decision-making process.
Let’s dive into the top 5 Xero reporting tools for 2025. We’ll explore their strengths, weaknesses, and how they can elevate your financial reporting game.
Feature Comparison Table of Top Xero Reporting Tools
Feature
Coefficient
Xero Analytics Plus
Spotlight Reporting
Fathom
Calxa
Row Limits / Export Limits
Up to 5,000 rows for free and starter plans. Unlimited for Pro and Enterprise.
Unlimited
Unlimited
Unlimited
Unlimited
Data Sources
50+ business systems
Xero accounting data
Xero, MYOB, QuickBooks, and 30+ other sources
QuickBooks, Xero, MYOB, and 5000+ via Zapier
Xero, MYOB, QuickBooks, Excel, and 10+ others
Builder License Cost
Free tier available. Paid starts at $49/month
Included with Xero plans (Starting at $33/month)
Starts at $329/month for Small plan
Starts at $55/month for Lite plan
Starts at $54/month for Express plan
Viewer License Cost
Included
Included in main license
$50/month per additional user
Included in main license (up to 3 users in standard plans)
$10/month per additional user
AI Functionality
AI-powered tools for connecting data, building reports, and analysis
AI-powered insights and anomaly detection
AI-assisted reporting and forecasting
AI-powered insights and suggestions
AI-assisted cashflow forecasting
Refresh Frequency
Real-time
Daily
Daily (hourly available on higher plans)
Daily
Daily (hourly available on higher plans)
Alerts
Yes, via Slack and email
Basic alerts via email
Customizable alerts via email and in-app
Customizable alerts via email and in-app
Basic alerts via email
Security
Enterprise-grade security and access controls, likely SOC 2 compliant
SOC 2 compliant, two-factor authentication
SOC 2 compliant, role-based access control
SOC 2 compliant, role-based access control
Role-based access control, data encryption
This table gives you a quick overview. But let’s dig deeper. Each tool has its unique strengths and potential drawbacks.
1. Coefficient
Coefficient stands out as the most versatile and powerful Xero reporting tool. It seamlessly integrates with Xero and 50+ other business systems, allowing you to create comprehensive reports that blend data from multiple sources. Real-time data syncing ensures your reports are always up-to-date, crucial for fast-paced financial decision-making.
May have a steeper learning curve for non-technical users
More features than some small businesses might need
Pricing
Free Plan: Includes basic features such as data imports for up to 5,000 rows and 10,000 OpenAI API calls
Starter Plan: $49 per user per month, with features like daily automatic refreshes and limited bulk write-backs
Pro Plan: $99 per user per month, offering unlimited import size, hourly refreshes, and unlimited bulk write-backs
Enterprise Plan: Custom pricing based on specific needs
What do users say about Coefficient?
I used to spend an hour updating sheets so that others had access to real time data and with Coefficient it does it all on it’s own even several times a day if I need. Saves me so much time to focus on real issues instead of manually updating sheets.
Makes it incredibly easy to share data across the org and since the query is visible it is always clear what the source of truth is. It limits breakage and enables fast automation of regular analyses.
Knowledge base with comprehensive documentation and tutorials
Dedicated account managers, Slack for enterprise clients
2. Xero Analytics Plus
Xero Analytics Plus is the native advanced reporting solution for Xero users. It offers enhanced cash flow forecasting and business snapshot features, making it a solid choice for businesses already deeply integrated with Xero.
Pros
Seamless integration with Xero
User-friendly interface
No additional software to learn
Short-term cash flow forecasting
Cons
Limited to Xero data only
Fewer customization options compared to third-party tools
2,000 row limit may be restrictive for larger businesses
Pricing
Included with Xero Premium plans or as an add-on for $10/month
What do users say about Xero Analytics Plus?
“Xero Analytics Plus provides valuable insights into our business performance, but the interface can be a bit overwhelming for new users. It takes some time to get used to the various features and customization options.”
Quote: “The cash flow forecasting in Xero Analytics Plus has been a game-changer for our business. We can now anticipate potential cash flow issues and make informed decisions to ensure our financial stability.”
Support is provided through Xero’s standard channels, including email and an extensive knowledge base.
3. Spotlight Reporting
Spotlight Reporting offers a range of reporting options, from simple dashboards to complex three-way forecasts. It’s known for its visually appealing reports and customization options.
Pros
Visually striking reports
Customizable templates
Multi-entity consolidation
Scenario planning features
Cons
Higher price point
Can be complex for new users
Limited to 10,000 rows
Pricing
Builder License: $350/month
Viewer License: $50/month
What do users say about Spotlight Reporting?
“The software is quite complex and can be overwhelming for new users. It takes some time to learn how to use all the features and create custom reports. Additionally, the pricing can be expensive for small businesses.”
Spotlight Reporting is easy to use and has helped us to provide our clients with valuable insights into their businesses. The reports are visually appealing and easy to understand, and the forecasting feature is invaluable for helping our clients plan for the future.”
Spotlight offers email support and a rich library of resources, including webinars and tutorial videos.
4. Fathom
Fathom focuses on providing clear, actionable insights through its reporting and analysis tools. It’s particularly strong in KPI tracking and benchmarking.
Pros
Intuitive KPI tracking
Benchmarking capabilities
Clean, professional report designs
Good balance of features and usability
Cons
5,000 row limit
Fewer integration options compared to Coefficient
Limited customization for more complex reporting needs
Pricing
Builder License: $55/month
Viewer License: $40/month
What do users say about Fathom?
“Fathom has allowed me to provide so much more value to my clients. I am able to generate reports so much faster, and present them in a way that is easy for my clients to understand. This allows me to spend more time actually consulting with my clients, rather than spending hours putting together reports.”
“Some of the features are not as intuitive as I would like, and it takes some time to figure out how to use them. Additionally, the pricing can be a bit high for smaller businesses.”
Fathom provides email support and offers a comprehensive knowledge base for users.
5. Calxa
Calxa specializes in budgeting and cashflow forecasting, making it a good choice for businesses focused on financial planning and projections.
Pros
Strong budgeting and forecasting features
Supports multiple entities
Suitable for non-profit organizations
Free viewer licenses
Cons
3,000 row limit
Less focus on general reporting compared to other tools
User interface can be less intuitive
Pricing
Builder License: $159/month
Viewer License: Free
What do users say about Calxa?
“Calxa has been a lifesaver for our non-profit organization. It has simplified our budgeting and reporting processes, allowing us to easily track our financial performance and make informed decisions. The customer support is also excellent, always quick to respond and provide helpful assistance.”
“Calxa is a powerful tool, but it can be overwhelming for beginners. The initial setup and configuration can be time-consuming, and the sheer number of features and options can be intimidating. However, once you get the hang of it, it’s definitely worth the effort.”
Calxa offers email support and provides a range of tutorial videos and documentation.
Choosing the Right Reporting Tool for Your Business
Reporting tools can significantly enhance Xero’s capabilities, offering deeper insights and streamlined processes. Coefficient’s wide range of integrations and real-time data syncing make it a versatile option for comprehensive reporting.
When selecting a tool, consider your specific reporting needs, data sources, and budget. Many options offer free trials, allowing you to test their features firsthand. The right reporting tool can transform financial data into valuable insights, supporting better business decisions.
Ready to take your Xero reporting to the next level? Get started with Coefficient today and transform your financial data into actionable insights.
Need to connect Xero to HubSpot? You’re in the right place.
By linking Xero and HubSpot, you’ll sync financial data with customer information, enabling faster invoicing and more accurate sales forecasts.
This guide covers three proven methods to integrate these platforms, from simple native connections to powerful custom solutions. We’ll walk you through each option, helping you choose the best fit for your needs.
Let’s dive in!
Advantages of Connecting Xero to HubSpot
Before we dive into the how-to, let’s explore why integrating Xero with HubSpot is essential for your business:
Accelerated Invoice-to-Cash Cycle: Reduce days sales outstanding by personalizing payment reminders based on customer data. Get paid faster, improving cash flow and financial stability.
More Accurate Revenue Forecasting: Create precise revenue projections by combining financial data with sales pipeline information. Make confident decisions on investments and communicate financial outlook more effectively.
Streamlined Financial Reporting: Eliminate hours of manual data entry and reconciliation each week. Gain a comprehensive view of business performance by blending financial metrics with customer acquisition costs and lifetime value data.
Top 3 Methods to Connect Xero to HubSpot
Let’s explore the three best ways to integrate Xero with HubSpot, each catering to different needs and levels of complexity:
let’s create a 2×3 table for the “Best For” section:
Solution
Best For
Coefficient
Non-technical users who want to sync Xero financial data with HubSpot CRM data in spreadsheets for custom reporting and analysis.
Native Integration
Small to medium-sized businesses looking for a straightforward, out-of-the-box solution to connect Xero and HubSpot without extensive customization.
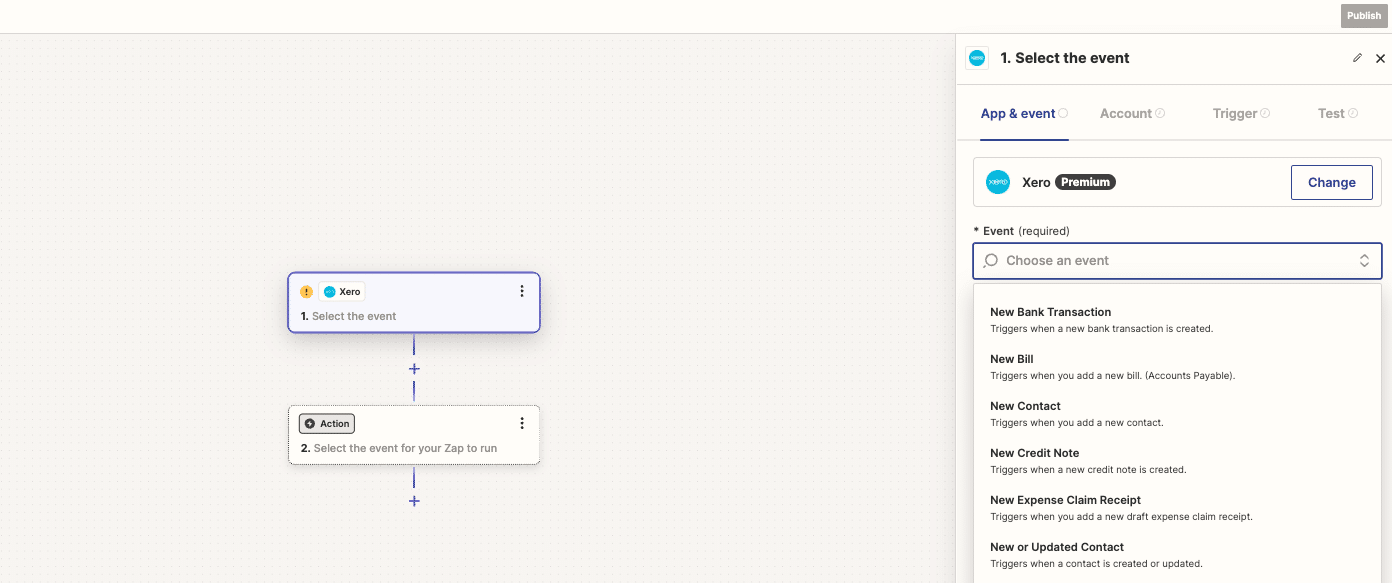
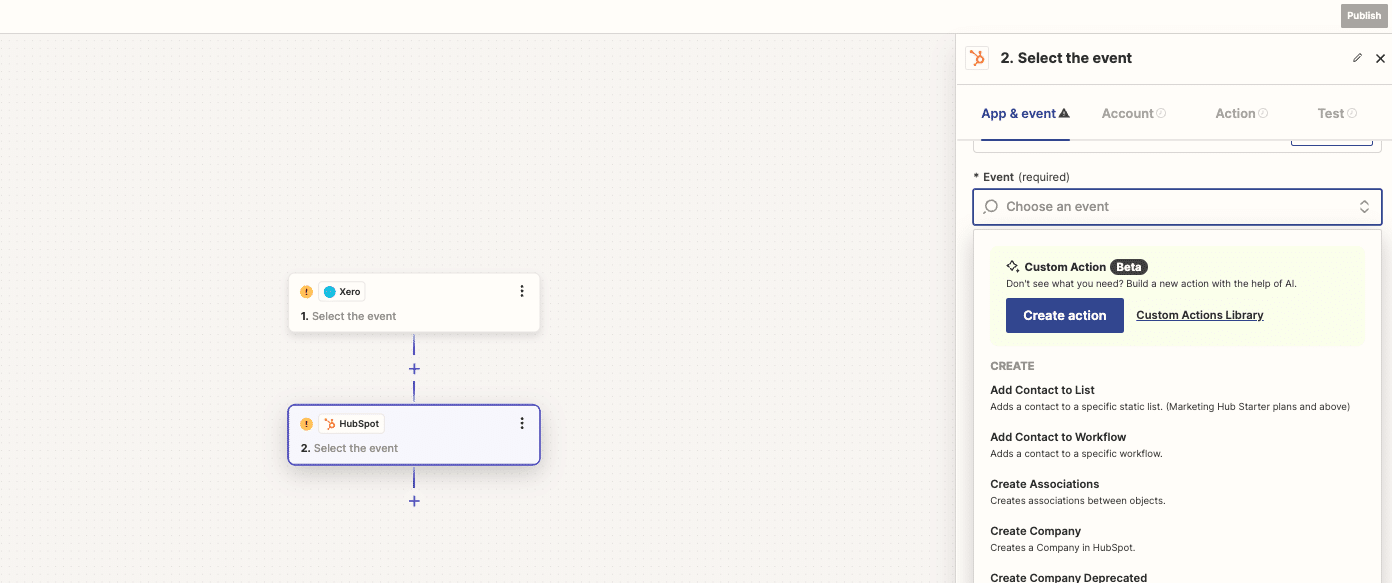
Zapier
Users who need to automate specific workflows between Xero and HubSpot, such as creating contacts in HubSpot when new invoices are added in Xero.
#1 Coefficient: The Powerful Data Integration Solution
Coefficient syncs live data from various business systems, like Xero, directly into Excel and Google Sheets. For Xero users, this means you can build real-time financial reports, automate data updates, and streamline your accounting workflows without leaving your spreadsheet.
Step-by-step walkthrough:
Step 1. Install Coefficient for your spreadsheet of choice
For Google Sheets
Open a new or existing Google Sheet, navigate to the Extensions tab, and select Add-ons > Get add-ons.
In the Google Workspace Marketplace, search for “Coefficient.”
Follow the prompts to grant necessary permissions.
Launch Coefficient from Extensions > Coefficient > Launch.
Coefficient will open on the right-hand side of your spreadsheet.
For Microsoft Excel
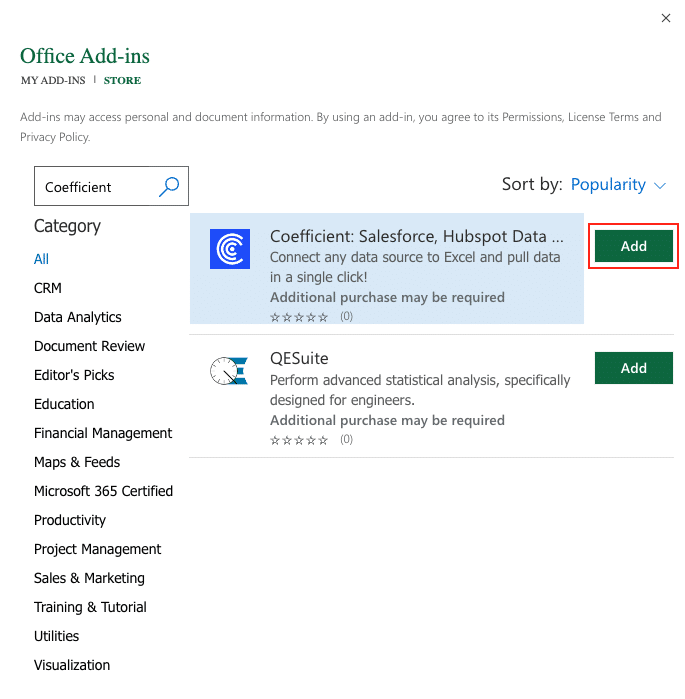
Open Excel from your desktop or in Office Online. Click ‘File’ > ‘Get Add-ins’ > ‘More Add-Ins.’
Type “Coefficient” in the search bar and click ‘Add.’
Follow the prompts in the pop-up to complete the installation.
Once finished, you will see a “Coefficient” tab in the top navigation bar. Click ‘Open Sidebar’ to launch Coefficient.
Step 2. Import Xero Data into Your Spreadsheet
In the Coefficient sidebar, click ‘Import From.’ Select “Xero” from the list of available data sources.
Enter your Xero demo credentials and click ‘Login.’
Select one or more of the available organizations to connect to Coefficient. Click “Continue” to proceed with the selected organization(s).
Choose an endpoint from the available options, such as Invoices, Contacts, or Users.
For this example, select “Get Invoices” to fetch invoice data from Xero.
Enter the Tenant ID (organization ID) for the selected Xero organization.
Optionally, select additional fields to include in the data import.
Click “Import” to fetch the invoice data into your spreadsheet.
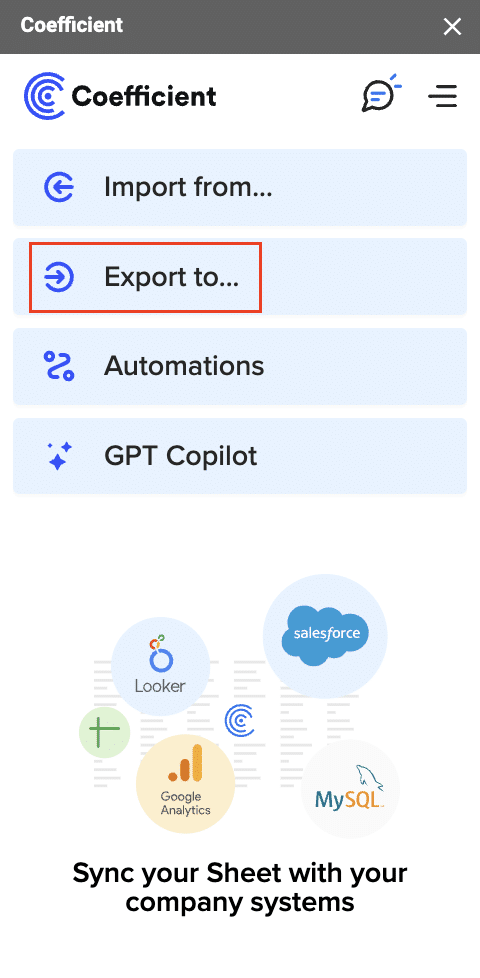
Step 3. Export Data from Your Spreadsheet to HubSpot
Before starting, make sure you’ve connected to HubSpot.
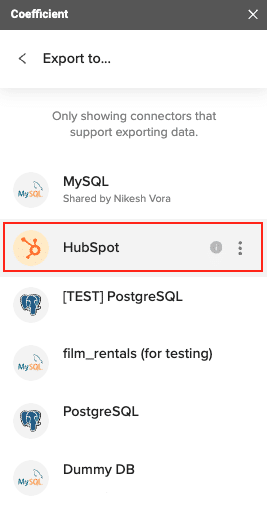
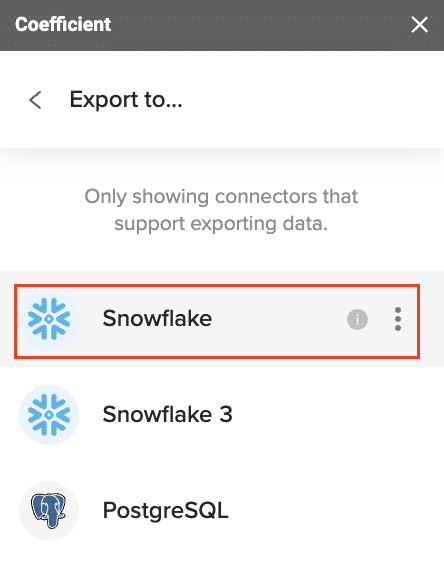
Then, navigate to Coefficient’s menu >Click “Export to…”
Select HubSpot.
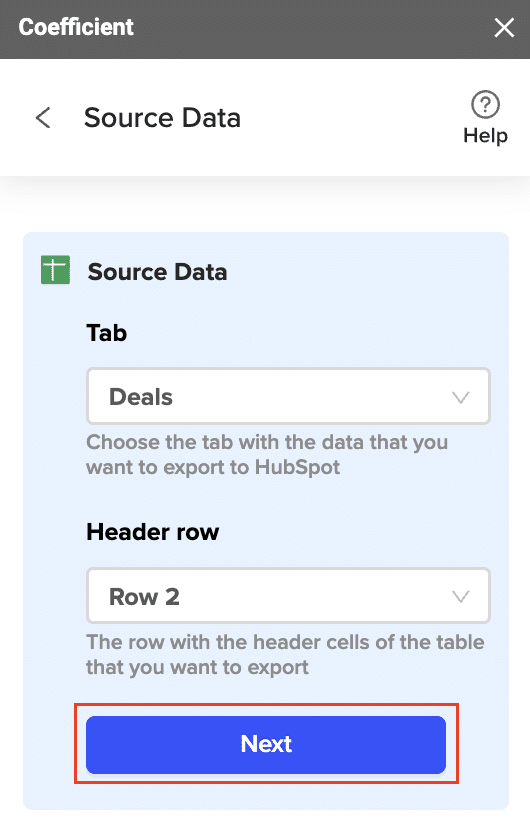
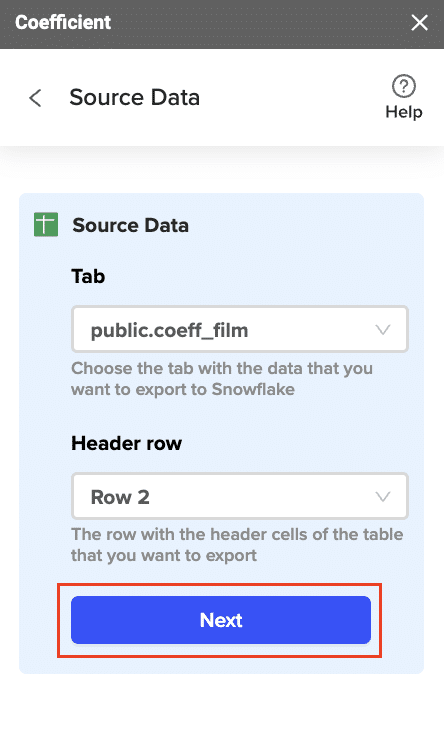
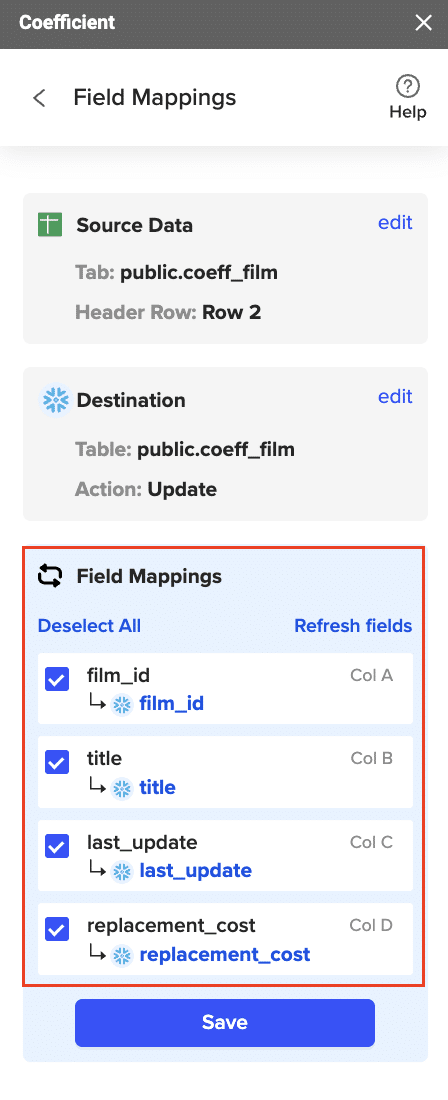
Select the tab and header row in your spreadsheet. The header row should contain the HubSpot field headers.
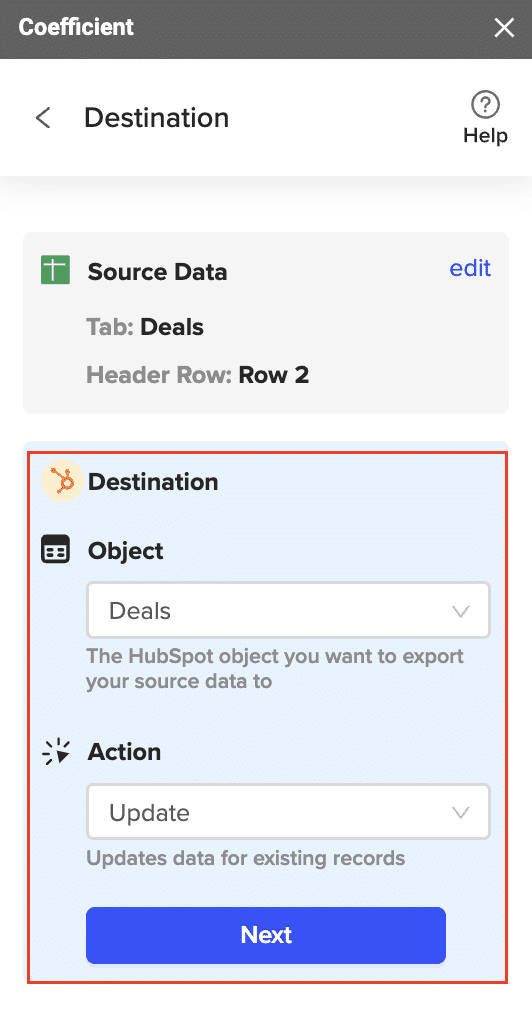
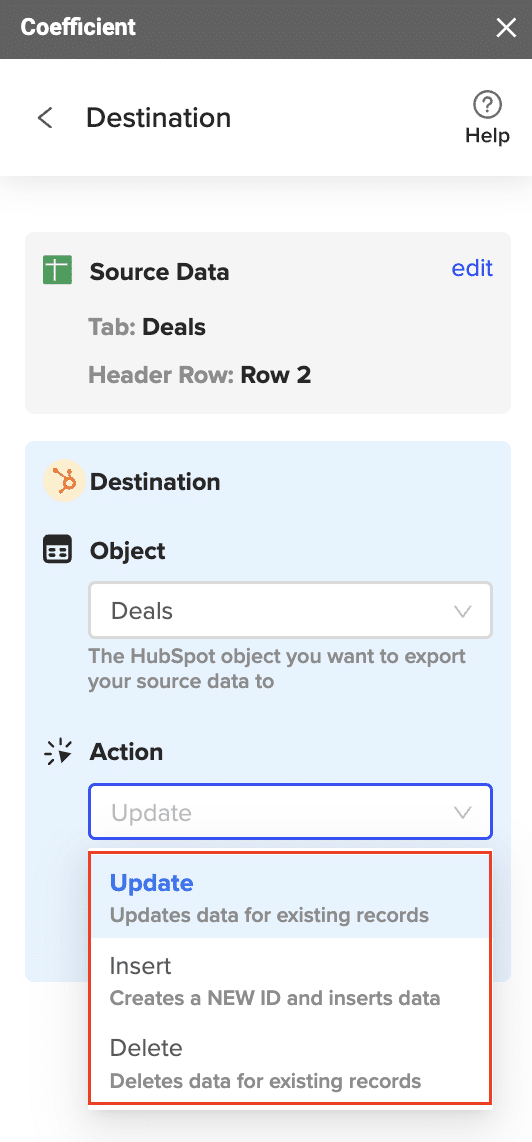
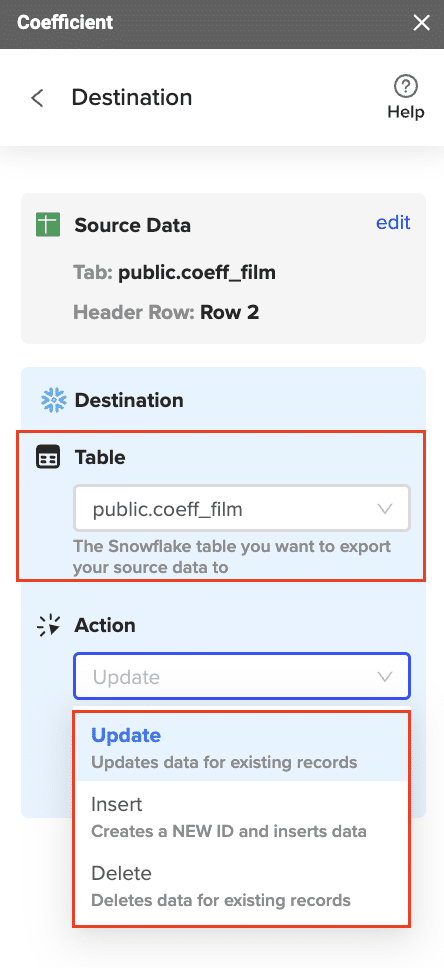
Choose the HubSpot property you are exporting the data to.
Then, select the action you want to perform (Update, Insert, or Delete).
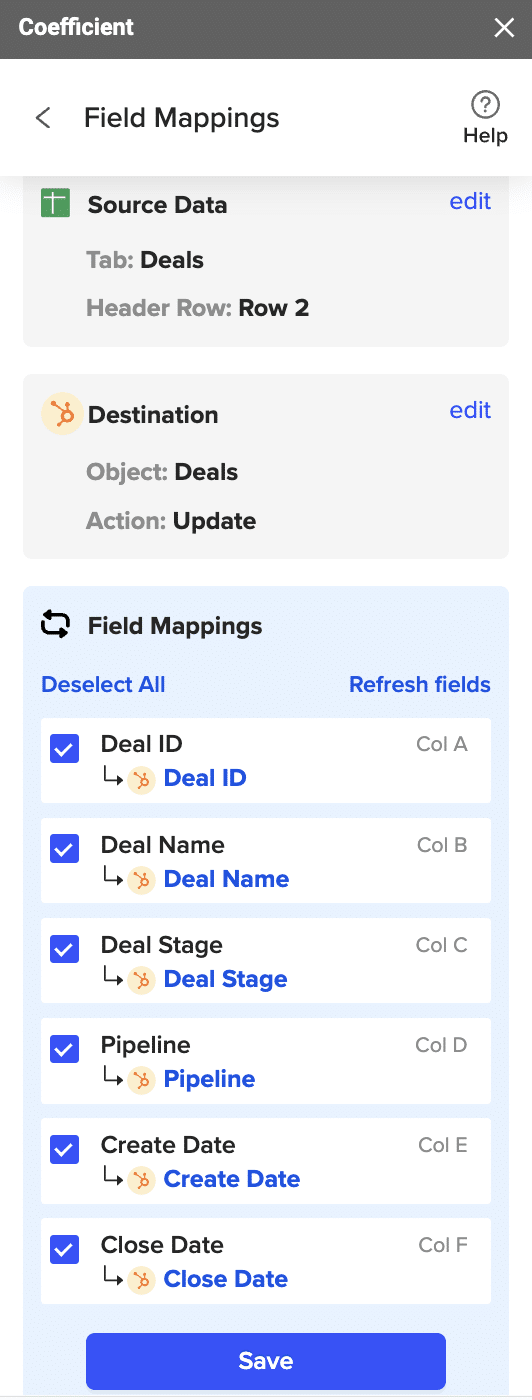
Map the fields in your spreadsheet to the corresponding HubSpot fields. If your data came from a HubSpot import using Coefficient, the fields will be automatically mapped. Otherwise, you will need to map them manually.
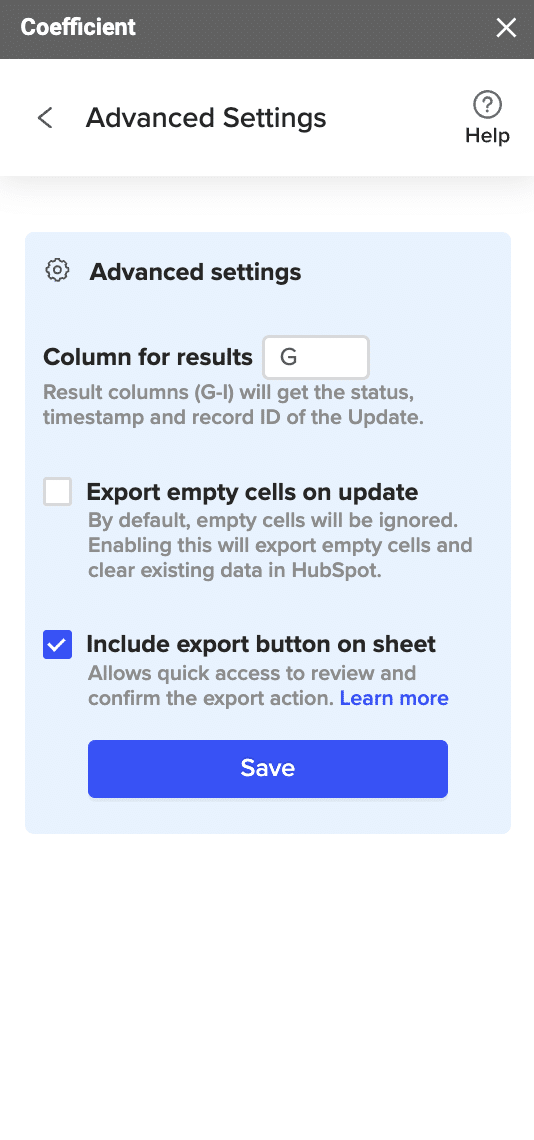
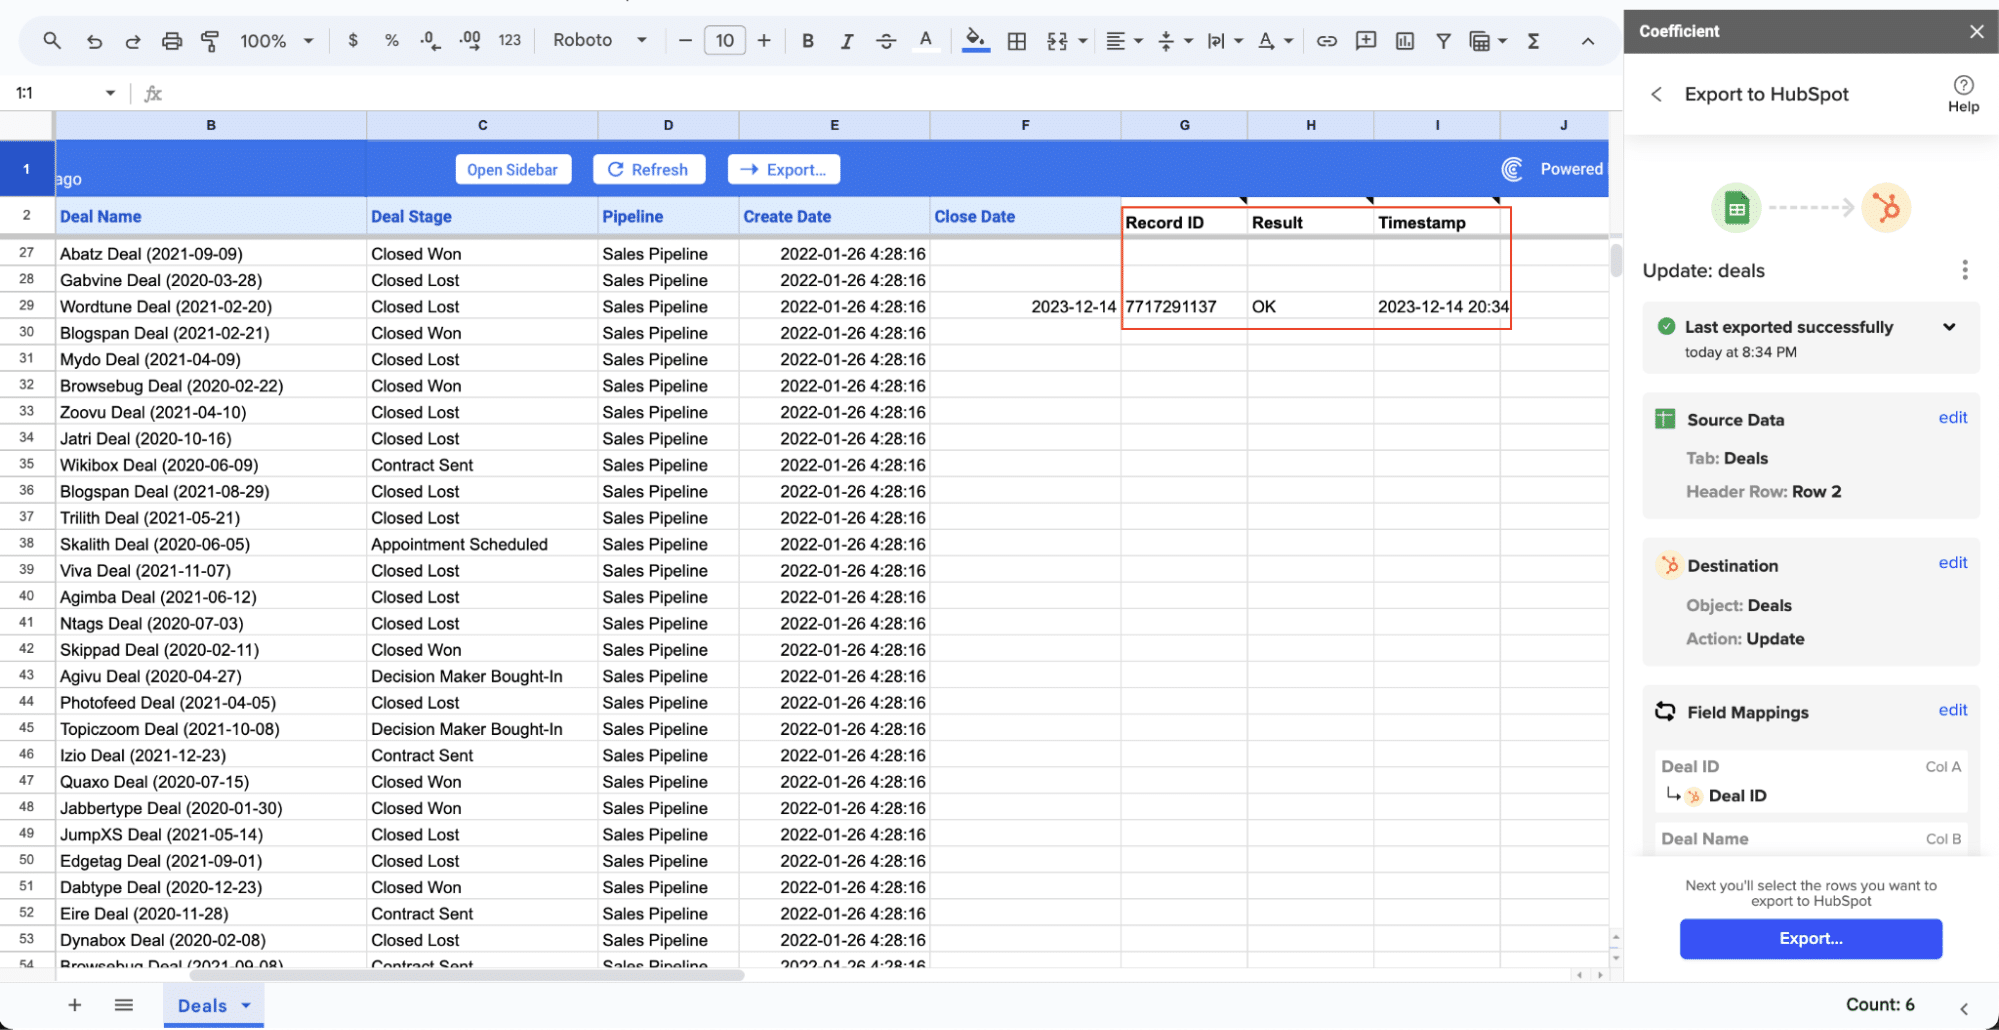
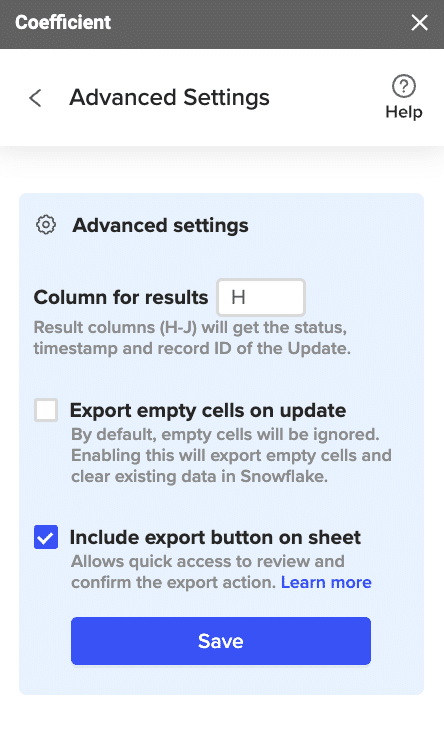
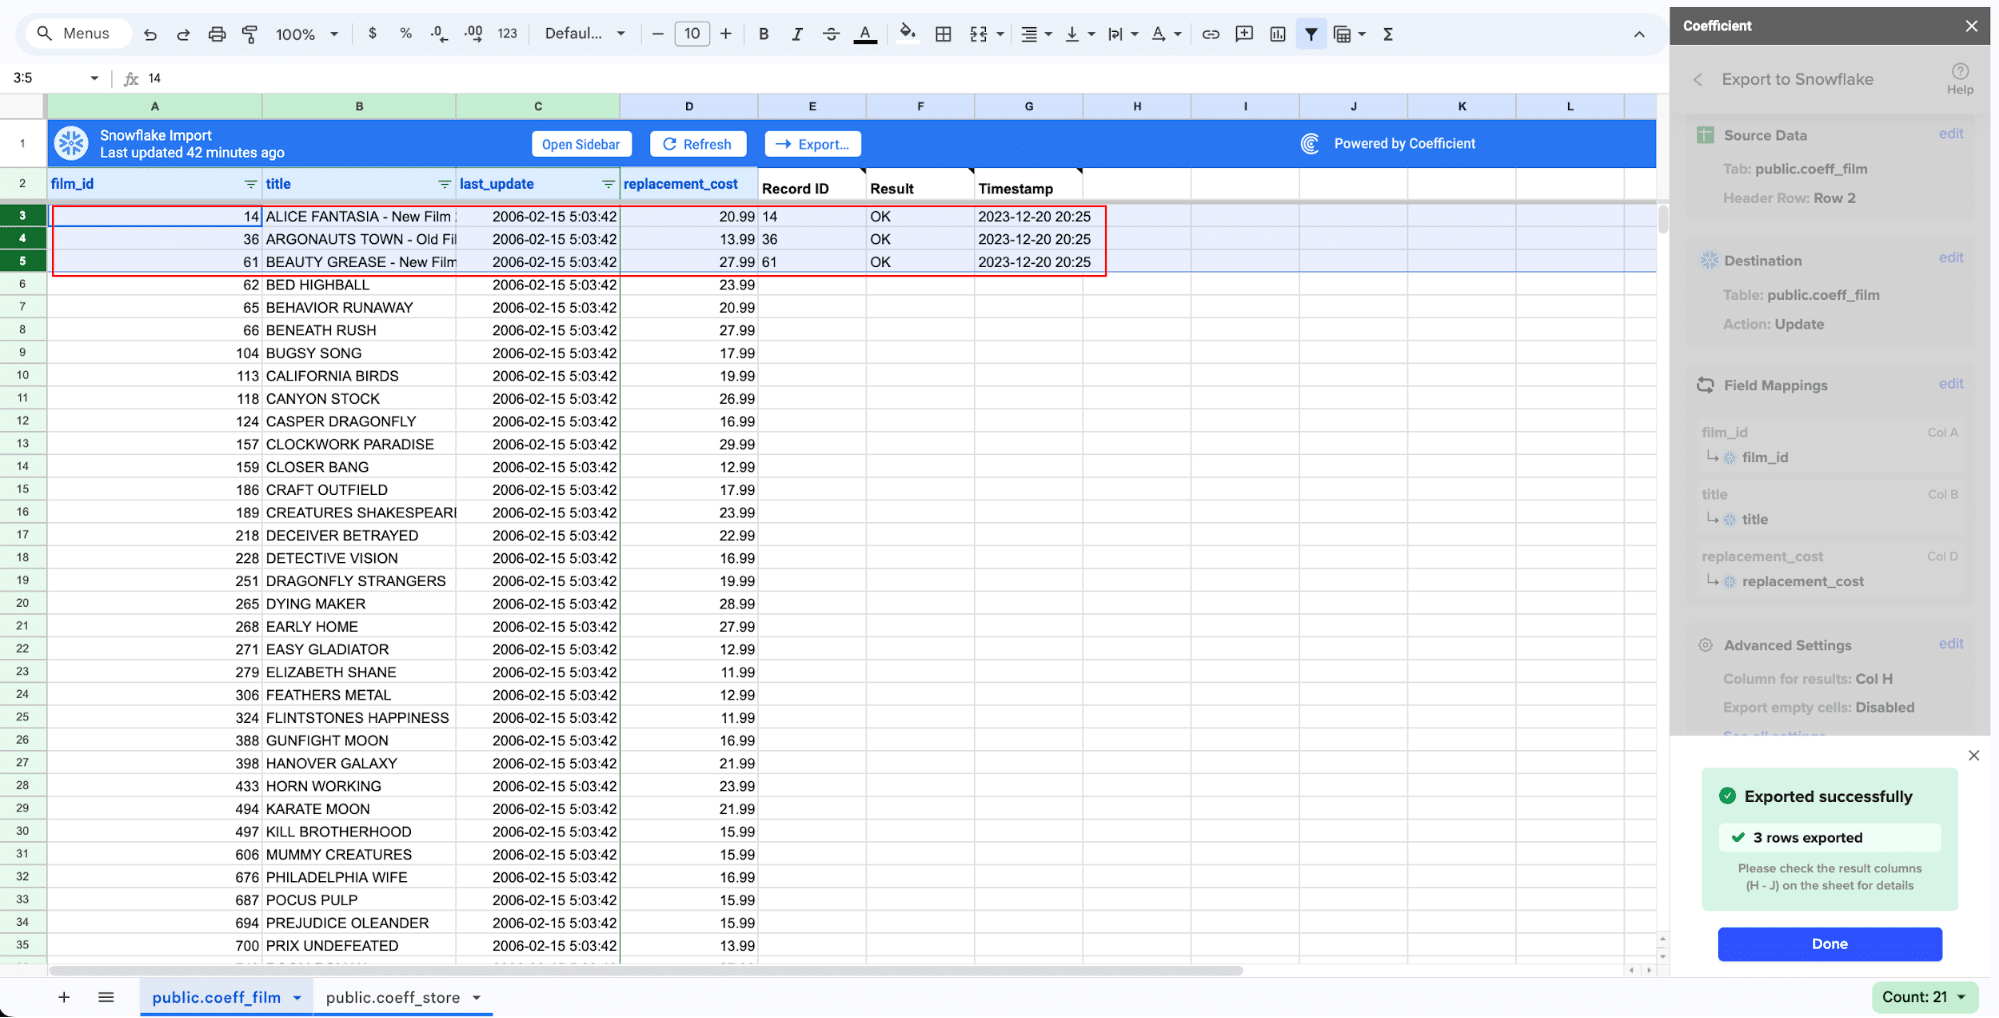
Configure any advanced settings such as the column for results. Coefficient will write back information to your spreadsheet related to the update, including the HubSpot record ID, status of the export, and timestamp.
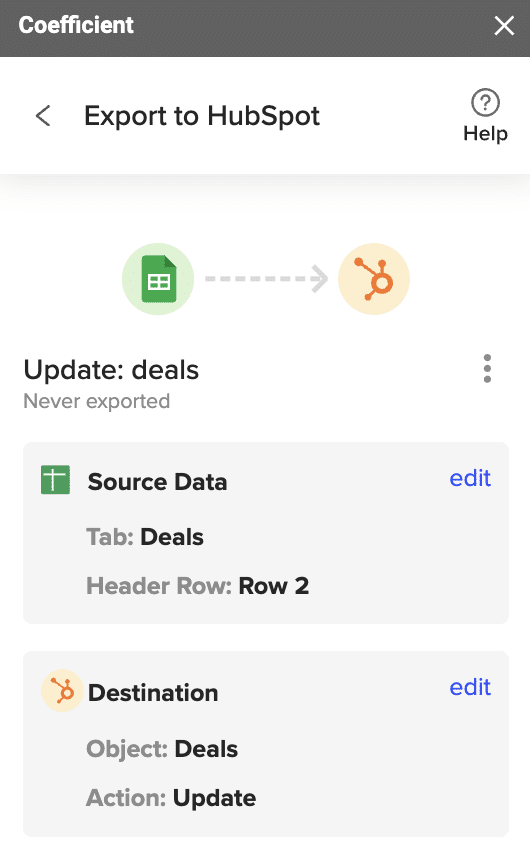
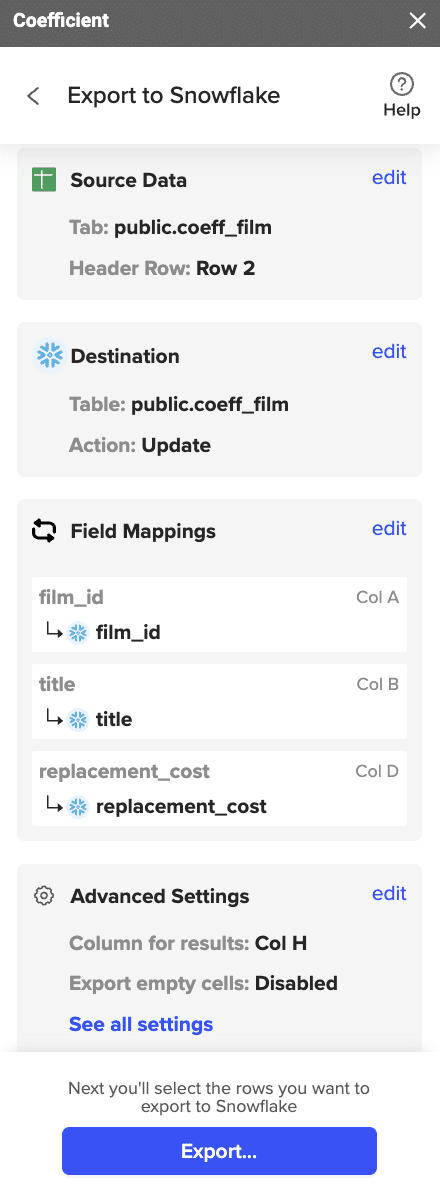
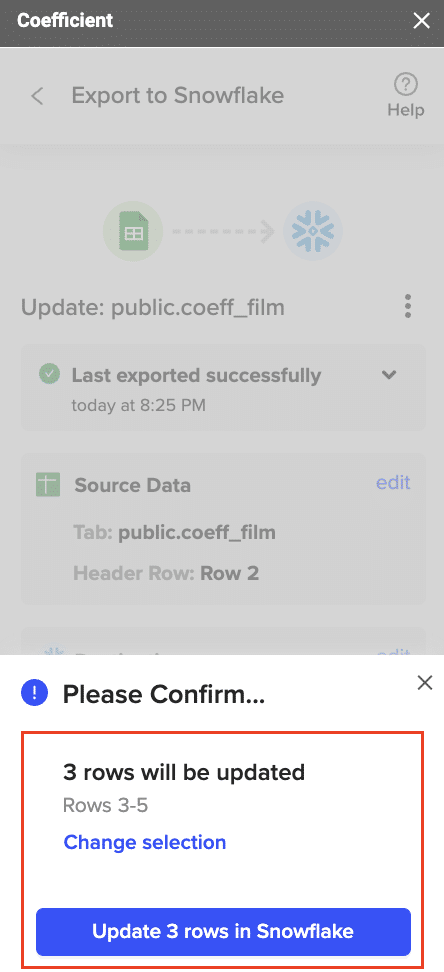
Review your settings and click “Export”.
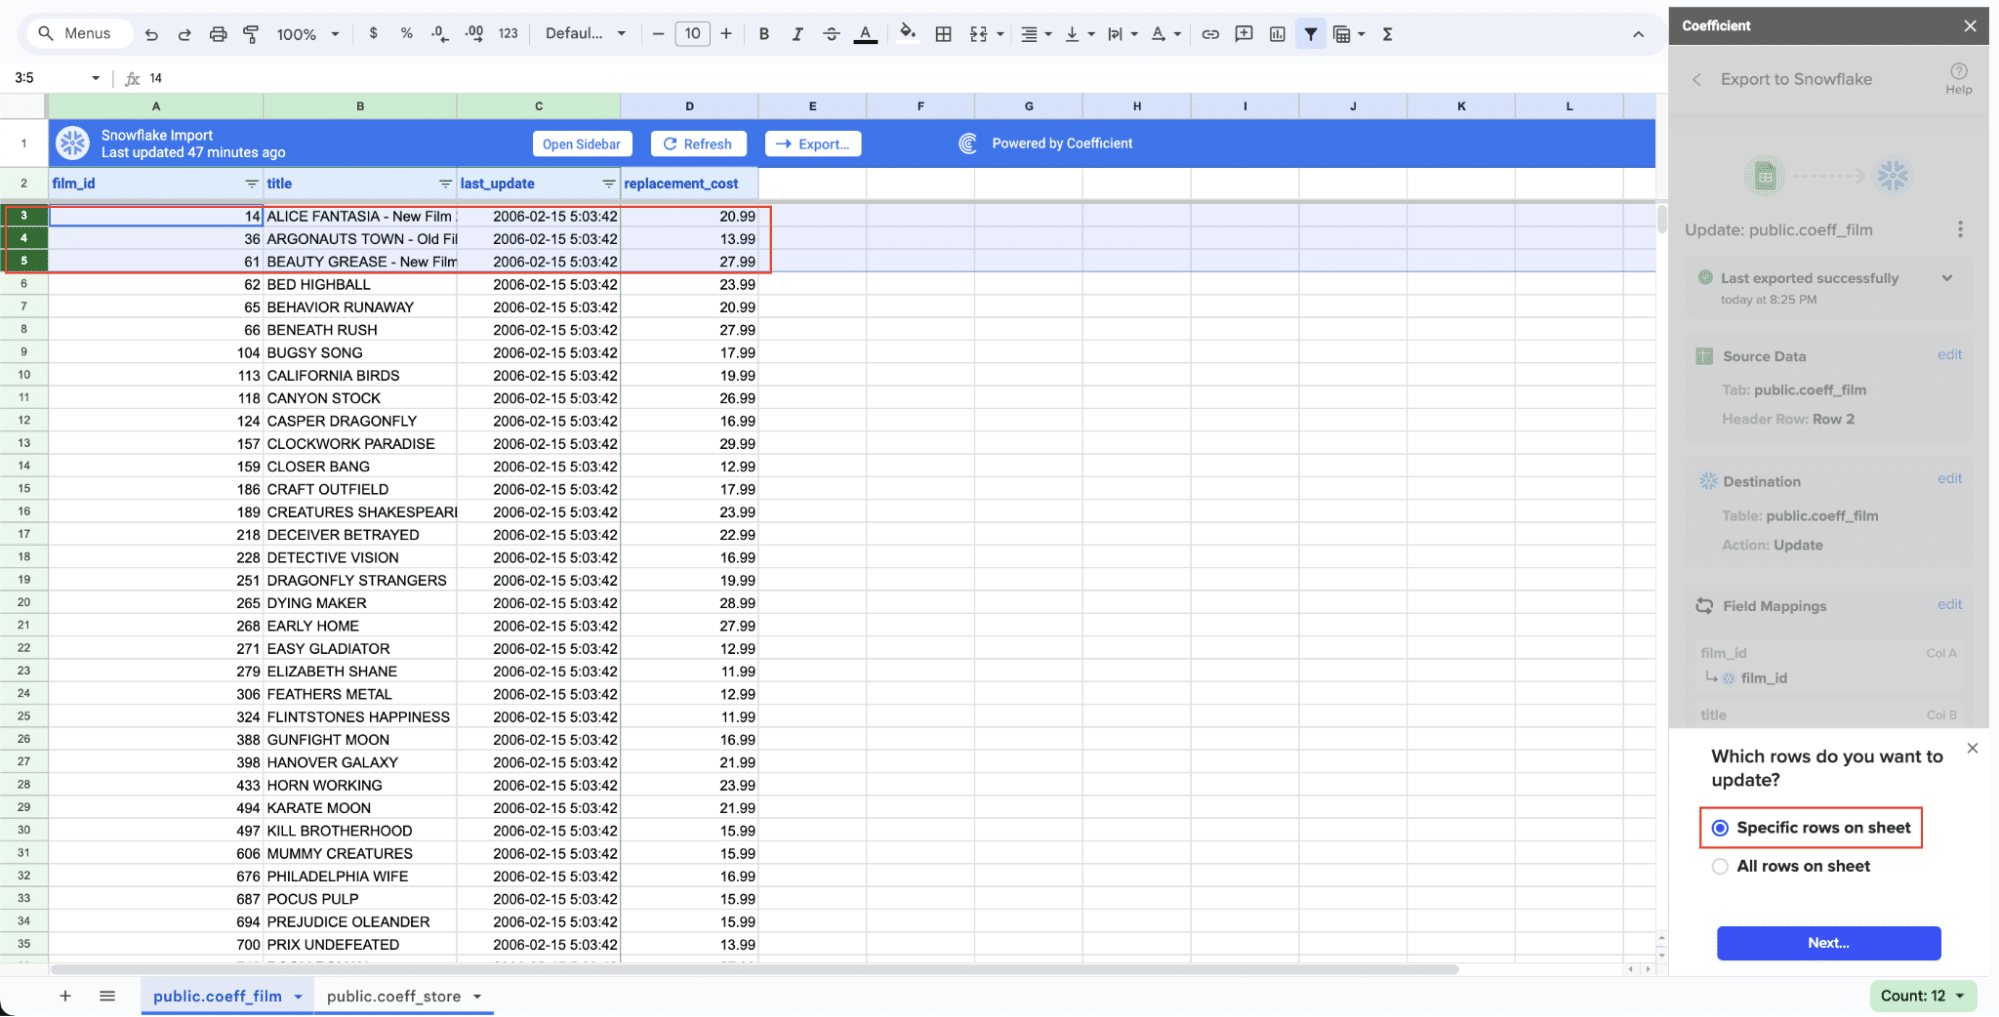
Select the rows in your sheet that you want to export to HubSpot. You can update a single row or all rows in your sheet.
Coefficient will confirm the rows that have been updated in your HubSpot instance. The records will have the record ID, result status, and timestamp of the update.
Pros and Cons of Coefficeint
Pros:
Consolidate financial data from multiple systems into Excel and Google Sheets
Create real-time dashboards for cash flow monitoring and forecasting
Automate financial reporting and data refreshes, reducing manual work
Cons:
Some advanced features, such as scheduled automations, are only available on paid plans. However, Coefficient’s pricing is still very competitive compared to other solutions.
#2 Native HubSpot-Xero Integration
For those looking for a straightforward, basic integration, the native HubSpot-Xero integration is a good starting point.
Step-by-step guide to setting up the native integration:
Log in to your HubSpot account and navigate to the App Marketplace.
Search for “Xero” and select the official Xero integration.
Click “Install app” and follow the prompts to connect your Xero account.
Grant the necessary permissions for data sharing between HubSpot and Xero.
Configure the basic sync settings for contacts and invoices.
Pros:
Easy setup process
Basic functionality included at no additional cost
Official support from both HubSpot and Xero
Cons:
Limited customization options
Basic data syncing only, lacking advanced features
#3 Zapier for Custom Xero-HubSpot Workflows
Zapier is an excellent option for creating custom automation workflows between Xero and HubSpot.
Steps to create Zaps for Xero and HubSpot integration:
Create a new Zap and select Xero as the trigger app.
Choose a trigger event (e.g., “New Invoice Created”).
Connect your Xero account to Zapier.
Select HubSpot as the action app and choose an action (e.g., “Create or Update Contact”).
Connect your HubSpot account to Zapier.
Map the fields between Xero and HubSpot.
Test your Zap and activate it.
Pros:
Highly customizable automation options
Wide range of possible integrations beyond just Xero and HubSpot
No coding required for basic automations
Cons:
Automations can break for complex workflows
Xero is only available for premium plans
Xero to HubSpot? Do it in Seconds with Coefficient
Connecting Xero to HubSpot is a powerful way to streamline your revenue operations, improve forecasting accuracy, and gain a comprehensive view of your customers. While the native integration and Zapier offer viable options for basic needs, Coefficient stands out as the superior choice for revenue operations professionals seeking advanced data integration, analysis, and reporting capabilities.
By choosing the right integration method and following best practices, you can unlock the full potential of your financial and customer data, driving growth and efficiency across your organization.
Ready to take your Xero-HubSpot integration to the next level? Try Coefficient today and experience the power of advanced data integration for your revenue operations.
In today’s data-driven business landscape, integrating financial data from Xero with a powerful data warehousing solution like Snowflake can unlock valuable insights and streamline reporting. This guide will walk you through the advantages of connecting Xero to Snowflake and provide step-by-step instructions for three methods to achieve this integration.
Advantages of Connecting Xero to Snowflake
Integrating Xero with Snowflake offers several key benefits:
Real-Time Cash Flow Visibility: Sync invoice statuses and payment data from Xero to Salesforce, allowing sales reps to see real-time cash flow impacts of their deals. This empowers them to prioritize collections or adjust payment terms for at-risk accounts, improving overall financial health.
Automated Quote-to-Cash Process: By connecting Salesforce opportunities to Xero invoices, you can automate the entire quote-to-cash cycle. This reduces processing time, minimizes errors, and accelerates revenue recognition, particularly beneficial for businesses with complex pricing or high transaction volumes.
Data-Driven Sales Forecasting: Combine historical sales data from Salesforce with actual financial performance from Xero to create more accurate sales forecasts. This integration allows you to factor in seasonality, payment patterns, and customer profitability, leading to more realistic projections and better resource allocation.
Connecting Xero and Snowflake: 3 Methods
There are several methods to connect Xero and Snowflake, each with their own advantages and use cases. Here’s a high-level comparison:
Solution
Best For
Coefficient
Small to medium-sized businesses with limited IT resources but a strong need for data analysis. Ideal for finance teams or sales operations who frequently work in spreadsheets and need to combine Xero financial data with Salesforce CRM data for custom reporting.
Zapier
Marketing and sales teams in organizations with diverse software ecosystems beyond just Xero and Salesforce. Best for companies that need to create multi-step workflows involving additional apps (e.g., triggering a Slack notification when a high-value invoice is paid in Xero and updating the corresponding Salesforce opportunity).
Dataloader.io
Enterprise-level organizations or those dealing with high data volumes and complex data structures. Optimal for IT teams or data administrators who need granular control over large-scale data migrations or regular bulk updates between Xero and Salesforce.
Let’s dive into each method in more detail, including step-by-step setup guides.
Method 1: Coefficient – No-Code, User-Friendly
Coefficient is an analytics and automation platform that allows you to easily connect data sources like Xero to destinations like Snowflake without any coding required. It’s an excellent choice for quick integration setup.
Features:
Intuitive, no-code interface: Simplifies the setup process for users without technical expertise.
Automated data syncs in real-time: Keeps your Snowflake data up-to-date with the latest from Xero.
Ability to define custom data workflows: Allows for flexible data management tailored to your needs.
Affordable pricing plans for businesses of all sizes: Makes it accessible to small and medium-sized businesses.
Pros:
Simple setup process with no technical skills needed: Enables quick and easy integration.
Real-time data sync keeps Snowflake always up-to-date: Ensures you have the latest data for analysis.
Customizable automation fits your unique data needs: Offers flexibility in data management.
Cons:
Less flexibility compared to code-based solutions: Limited customization for complex data transformations.
Some advanced features limited to higher-tier plans: Full functionality requires a premium subscription.
How to Connect Xero to Snowflake with Coefficient
Step 1: Install the Coefficient
For Google Sheets
Open a new or existing Google Sheet, navigate to the Extensions tab, and select Add-ons > Get add-ons.
In the Google Workspace Marketplace, search for “Coefficient.”
Follow the prompts to grant necessary permissions.
Launch Coefficient from Extensions > Coefficient > Launch.
Coefficient will open on the right-hand side of your spreadsheet.
For Microsoft Excel
Open Excel from your desktop or in Office Online. Click ‘File’ > ‘Get Add-ins’ > ‘More Add-Ins.’
Type “Coefficient” in the search bar and click ‘Add.’
Follow the prompts in the pop-up to complete the installation.
Once finished, you will see a “Coefficient” tab in the top navigation bar. Click ‘Open Sidebar’ to launch Coefficient.
Step 2. Import Xero Data into Your Spreadsheet
In the Coefficient sidebar, click ‘Import From.’
Select “Xero” from the list of available data sources.
Enter your Xero demo credentials and click ‘Login.’
Select one or more of the available organizations to connect to Coefficient.
Click “Continue” to proceed with the selected organization(s).
Choose an endpoint from the available options, such as Invoices, Contacts, or Users.
For this example, select “Get Invoices” to fetch invoice data from Xero.
Enter the Tenant ID (organization ID) for the selected Xero organization.
Optionally, select additional fields to include in the data import.
Click “Import” to fetch the invoice data into your spreadsheet.
Step 3. Export Data Snowflake
Before starting, make sure you’ve connected to Snowflake.
Then, navigate to Coefficient’s menu. Click “Export to…”
Choose Snowflake from the list of available data sources.
Select the tab and header rows in your spreadsheet that contains the data you want to export.
Click “Next” to continue.
Select the table in your Snowflake database that you want to update. Then, select the type of action you want to perform—Update, Insert, Upsert, or Delete.
Map the fields from your spreadsheet to the corresponding Snowflake fields.
Note: Primary Keys (ID fields) are required for Update and Delete actions. For Insert actions, the Primary Key field can be set to auto populate if it’s configured in Snowflake.
Specify additional settings such as batch size, whether to export empty cells on an update, and the column for results.
Confirm your settings.
Then, highlight the rows you want to update or export. You can choose to export all rows or specific rows.
After you’re finished, review your settings and click “Export.”
Follow the prompts to confirm your changes.
In a few seconds, data from your spreadsheet will push to Salesforce.
Review your settings and click “Export” to push your data from the spreadsheet to Snowflake.
Coefficient will then update the records in Snowflake, displaying the status, record ID, and timestamp of the updates in your spreadsheet.
Method 2: Hevo Data
Hevo Data is a fully managed, no-code data pipeline platform. It enables automated, real-time data replication from 150+ sources including Xero to destinations like Snowflake, without the need for any coding.
Features:
Fully automated, codeless data pipelines: Eliminates the need for manual data handling and maintenance.
Real-time data replication from source to destination: Ensures your data is always current.
Pre-built integrations with 150+ data sources: Provides extensive connectivity options.
Automatic schema mapping and evolution: Handles changes in data structure seamlessly.
Secure and compliant with enterprise-grade security: Ensures data integrity and compliance with regulations.
Pros:
Completely automated pipeline, no coding or maintenance needed: Simplifies the data integration process.
Supports a wide variety of data sources out-of-the-box: Offers flexibility and connectivity.
Handles schema changes seamlessly: Adapts to changes in data structure without manual intervention.
Robust security and compliance features: Ensures data protection and regulatory compliance.
Cons:
Higher pricing compared to some alternatives: May be a consideration for small businesses.
Initial setup and data mapping can take some time: Requires careful configuration to ensure accuracy.
How to Connect Xero to Snowflake with Hevo
Step 1. Create a Hevo Account:
Go to the Hevo website and sign up for an account.
Log in to the Hevo dashboard.
Step 2. Add Xero as a Data Source:
Click on “Add Pipeline” and select Xero as the data source.
Provide your Xero account credentials and grant Hevo access.
Step 3. Configure Data Ingestion Settings:
Select the Xero objects and fields to replicate.
Configure the data ingestion settings according to your needs.
Step 4. Add Snowflake as a Data Destination:
Select Snowflake as the data destination and enter your account details.
Provide the necessary Snowflake account information, including the account URL, username, password, and the database and schema where you want to load the data.
Step 5. Map Fields and Configure Replication:
Map the Xero fields to the desired Snowflake table and columns.
Choose your replication frequency and other relevant settings.
Step 6. Save and Run the Pipeline:
Click “Save and Run” to create the data pipeline.
Hevo will automatically begin replicating data from Xero to Snowflake in real-time.
Method 3: Fivetran
Fivetran is a fully-managed, enterprise-grade ETL solution. It provides reliable, secure data pipelines to replicate data from Xero and 150+ other sources into destinations like Snowflake.
Features:
Fully-managed, zero-maintenance data pipelines: Simplifies data integration without the need for manual intervention.
Pre-built, analyst-ready data schemas: Provides ready-to-use data structures for analysis.
Automated in-warehouse transformations: Supports data transformations directly within Snowflake using DBT integration.
Advanced security and compliance certifications: Ensures data protection and regulatory compliance.
Extensive performance monitoring and logging: Offers comprehensive insights into data pipeline performance.
Pros:
Fully managed service, no pipeline maintenance required: Simplifies data management.
Highly scalable to handle large data volumes: Suitable for enterprises with extensive data needs.
Automated in-warehouse transformations via DBT integration: Enhances data processing capabilities.
Enterprise-grade security and compliance: Ensures data integrity and regulatory compliance.
Cons:
More expensive than other solutions: Higher cost may be a consideration for smaller businesses.
Initial setup can be complex for non-technical users: Requires careful configuration and setup.
How to Connect Xero to Snowflake with Fivetran
Step 1. Sign Up for Fivetran:
Go to the Fivetran website and sign up for an account.
Complete the onboarding process and log into your dashboard.
Step 2. Add Xero as a Connector:
Click “Add Connector” and select Xero from the list of sources.
Authenticate with Xero and grant Fivetran access to your data.
Step 3. Configure Sync Settings:
Choose the Xero objects and fields to replicate.
Configure your sync settings, including the replication frequency and other relevant options.
Step 4. Add Snowflake as a Destination:
Add Snowflake as your destination and provide your account details.
Enter the necessary Snowflake account information, including the account URL, username, password, and the database and schema where you want to load the data.
Step 5. Map Fields and Save Configuration:
Map the Xero data to the appropriate Snowflake tables and columns.
Review your configuration to ensure all settings are correct.
Click “Save & Run” to initiate the data pipeline.
Step 6. Monitor and Manage Data Pipeline:
Fivetran will initiate a historical data sync and then continuously replicate new data from Xero to Snowflake.
Monitor the status of your data pipeline from the Fivetran dashboard.
Verify that data is being synced correctly by checking the tables in your Snowflake database.
Address any errors or issues by following Fivetran’s troubleshooting guides.
Set up email alerts for pipeline issues to stay informed of any problems.
Connect Xero to Snowflake Without a Line of Code
Connecting Xero to Snowflake empowers businesses to centralize their financial data, enabling richer insights and streamlined reporting. The three methods outlined in this guide – Coefficient, Hevo Data, and Fivetran – provide flexible options for replicating Xero data into Snowflake, catering to different business needs and technical capabilities.
Ready to get started? Coefficient offers a user-friendly, no-code platform for quickly connecting Xero to Snowflake. Sign up today to begin syncing your financial data and unlocking valuable insights.