Connecting Redshift to MySQL: A Step-by-Step Guide for 2026
Ever wonder how to seamlessly blend Redshift’s data warehousing power with MySQL’s transactional prowess? You’re in the right place. This guide will walk you through connecting Redshift to MySQL, opening up a world of possibilities for your data management and analysis.
Advantages of Connecting Redshift to MySQL
- Accelerate data warehousing processes: Offload large-scale analytical queries from MySQL to Redshift. This allows you to maintain MySQL’s rapid transactional performance while leveraging Redshift’s columnar storage for complex analytics, improving overall system efficiency.
- Enable hybrid cloud strategies: Combine on-premises MySQL data with cloud-based Redshift analytics. This facilitates a gradual migration to the cloud or a long-term hybrid architecture, providing flexibility in your data infrastructure.
- Enhance data archiving and compliance: Use Redshift as a long-term storage solution for historical MySQL data. This allows you to maintain easy access to archived data for compliance or analysis purposes without impacting MySQL’s performance.
Top 3 Methods to Connect Redshift to MySQL
Top 3 Methods to Connect Redshift to MySQL
| Solution | Best For |
| Coefficient | Business analysts needing to combine Redshift and MySQL data in spreadsheets for ad-hoc analysis and reporting. |
| AWS Data Pipeline | IT teams in AWS environments requiring scheduled, scalable data transfers between Redshift and MySQL. |
| Fivetran | Organizations needing automated, real-time data sync between Redshift and MySQL with minimal maintenance. |
Method 1 Coefficient: The User-Friendly Powerhouse

Coefficient is a user-friendly solution that leverages Google Sheets or Excel as an intermediary to connect Redshift and MySQL. This method is ideal for users who prefer a no-code approach and are comfortable working with spreadsheets.
Here’s how to use Coefficient to connect Redshift to MySQL:
Step 1. Install Coefficient
For Google Sheets
- Open a new or existing Google Sheet, navigate to the Extensions tab, and select Add-ons > Get add-ons.
- In the Google Workspace Marketplace, search for “Coefficient.”
- Follow the prompts to grant necessary permissions.
- Launch Coefficient from Extensions > Coefficient > Launch.
- Coefficient will open on the right-hand side of your spreadsheet.

For Microsoft Excel
- Open Excel from your desktop or in Office Online. Click ‘File’ > ‘Get Add-ins’ > ‘More Add-Ins.’
- Type “Coefficient” in the search bar and click ‘Add.’
- Follow the prompts in the pop-up to complete the installation.
- Once finished, you will see a “Coefficient” tab in the top navigation bar. Click ‘Open Sidebar’ to launch Coefficient.
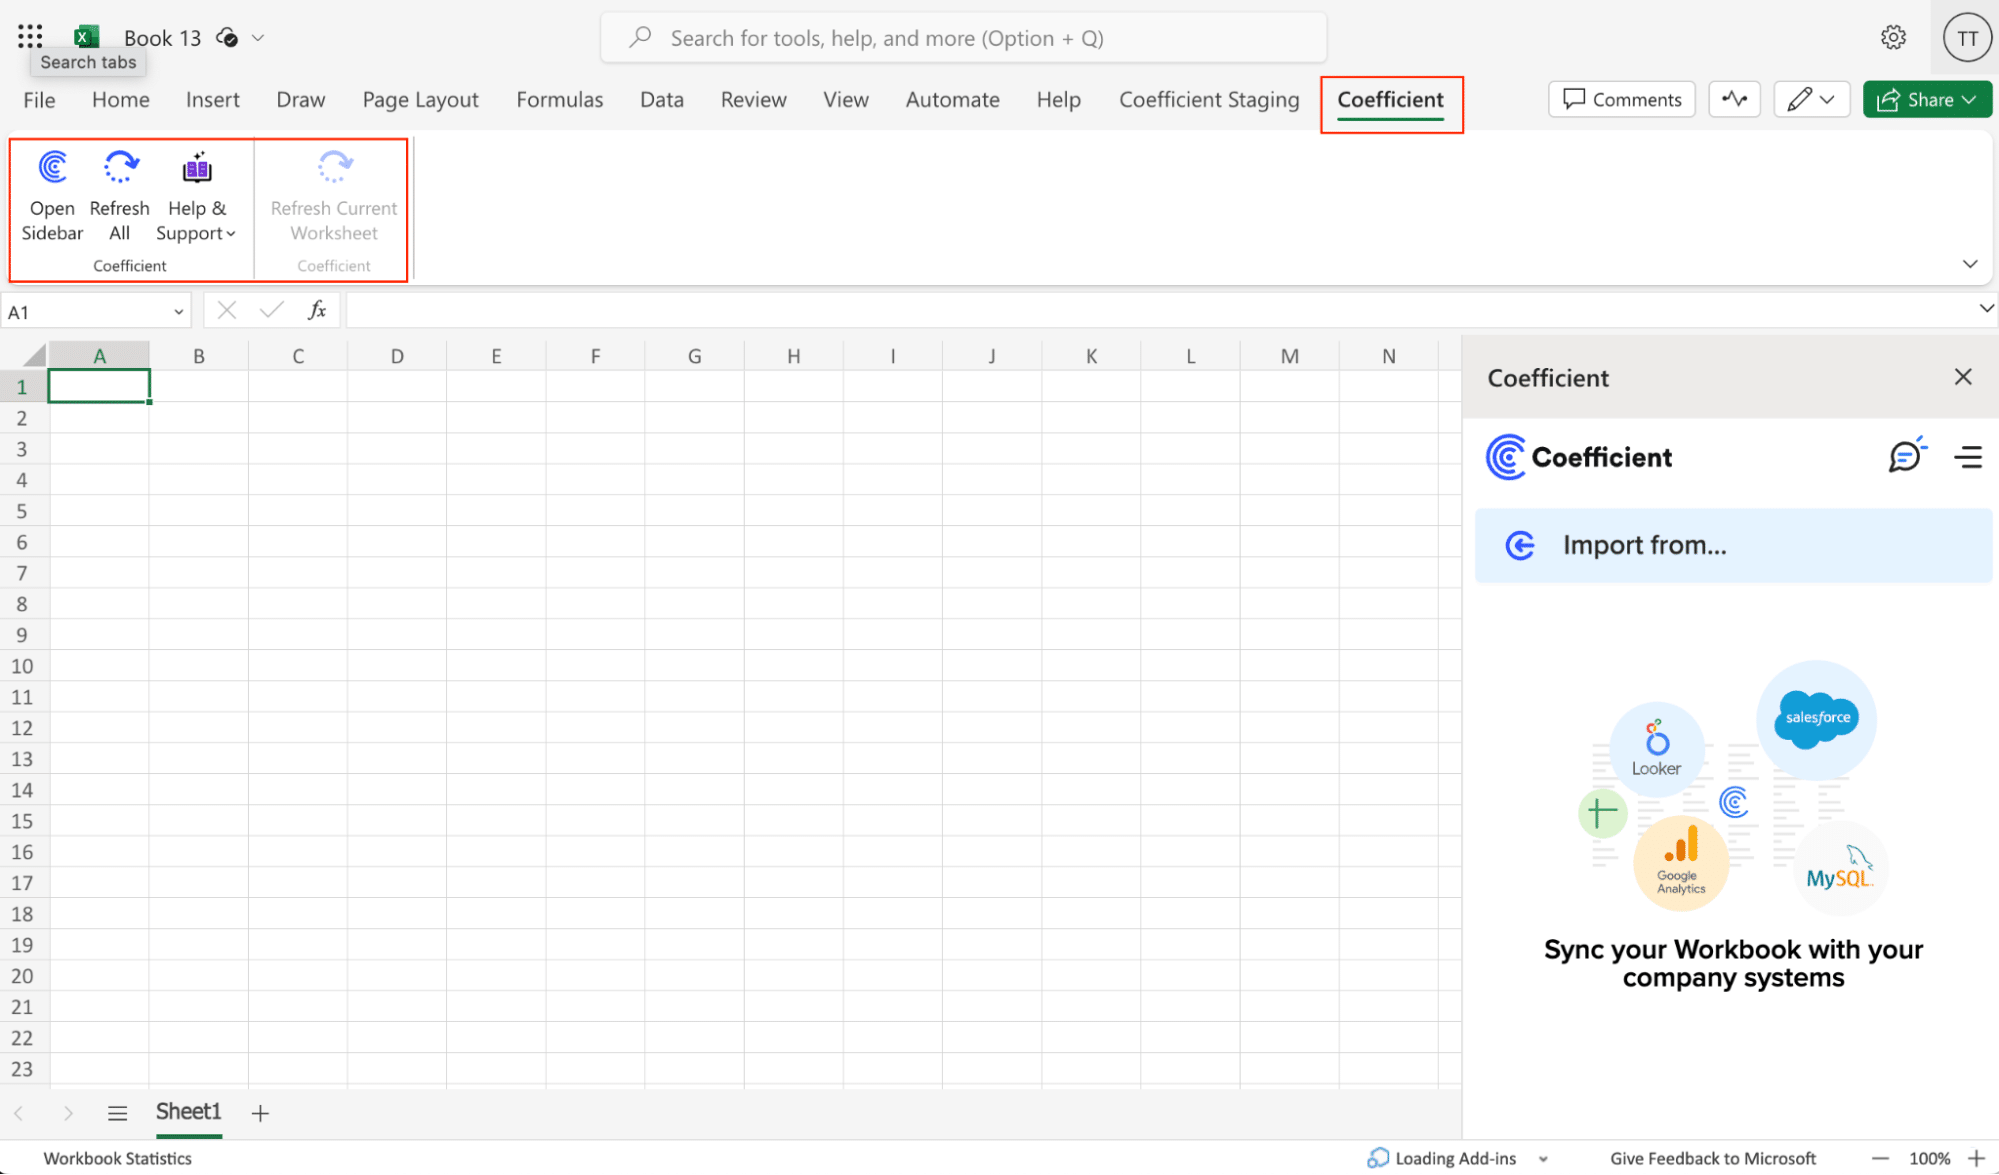
Step 2: Import Data from Redshift
- Open Coefficient Sidebar: In Google Sheets, go to Extensions > Coefficient > Launch.
- Connect Redshift: Click Import from… and select Redshift.
- Authenticate: Enter Redshift credentials (Host, Database Name, Username, Password, Port) and click Connect.
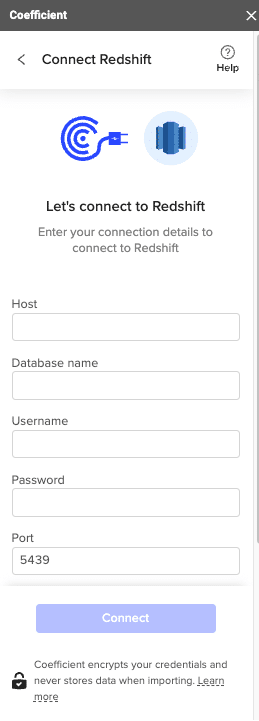
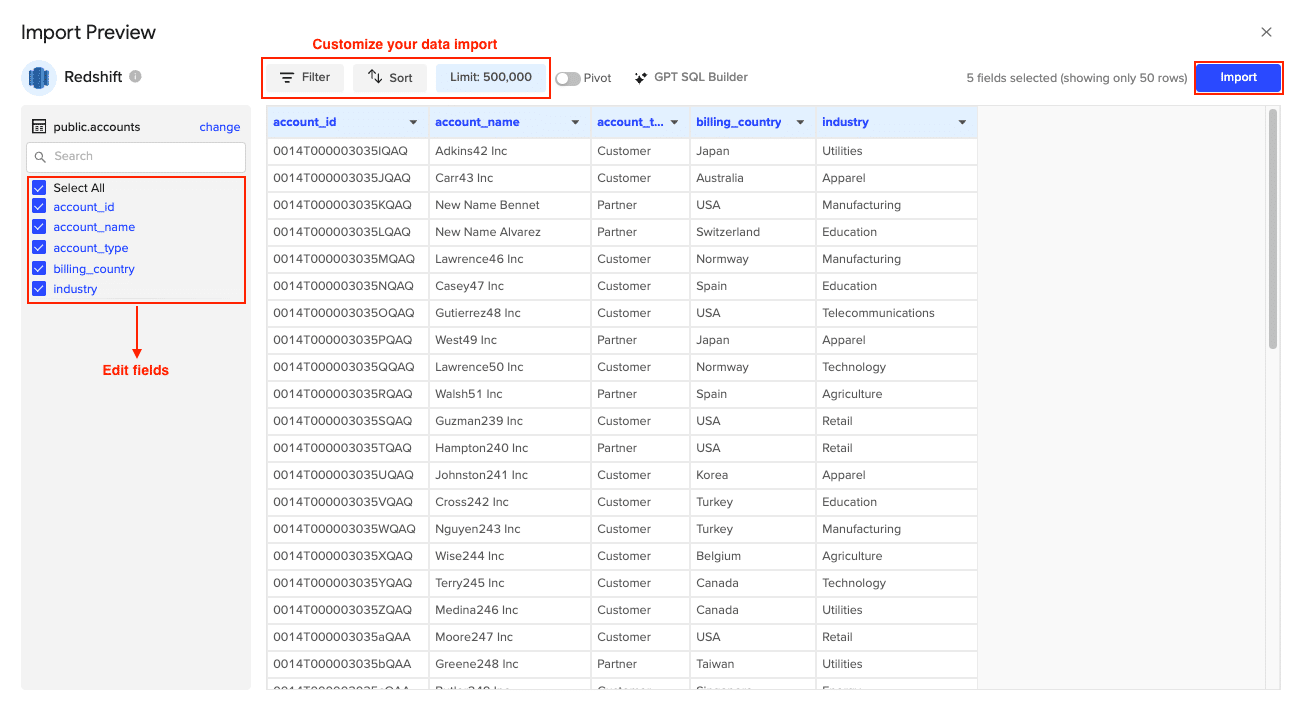
- Select Data: Choose tables/columns or run a custom SQL query. Click Import.
Step 3. Export Data to MySQL
- Navigate to Export: In Coefficient’s sidebar, click Export to…, then select MySQL.

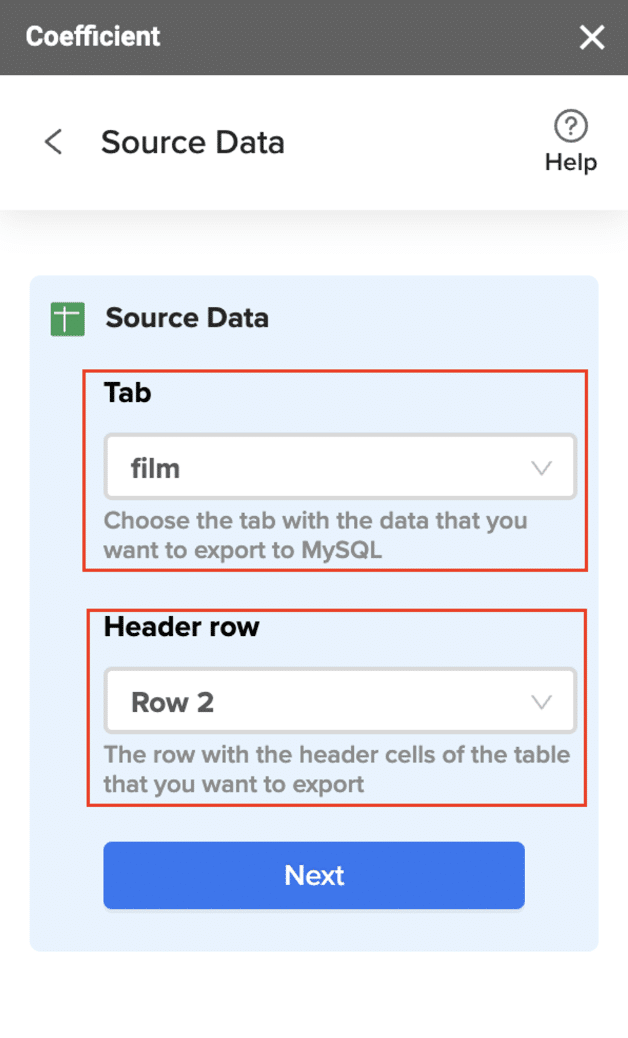
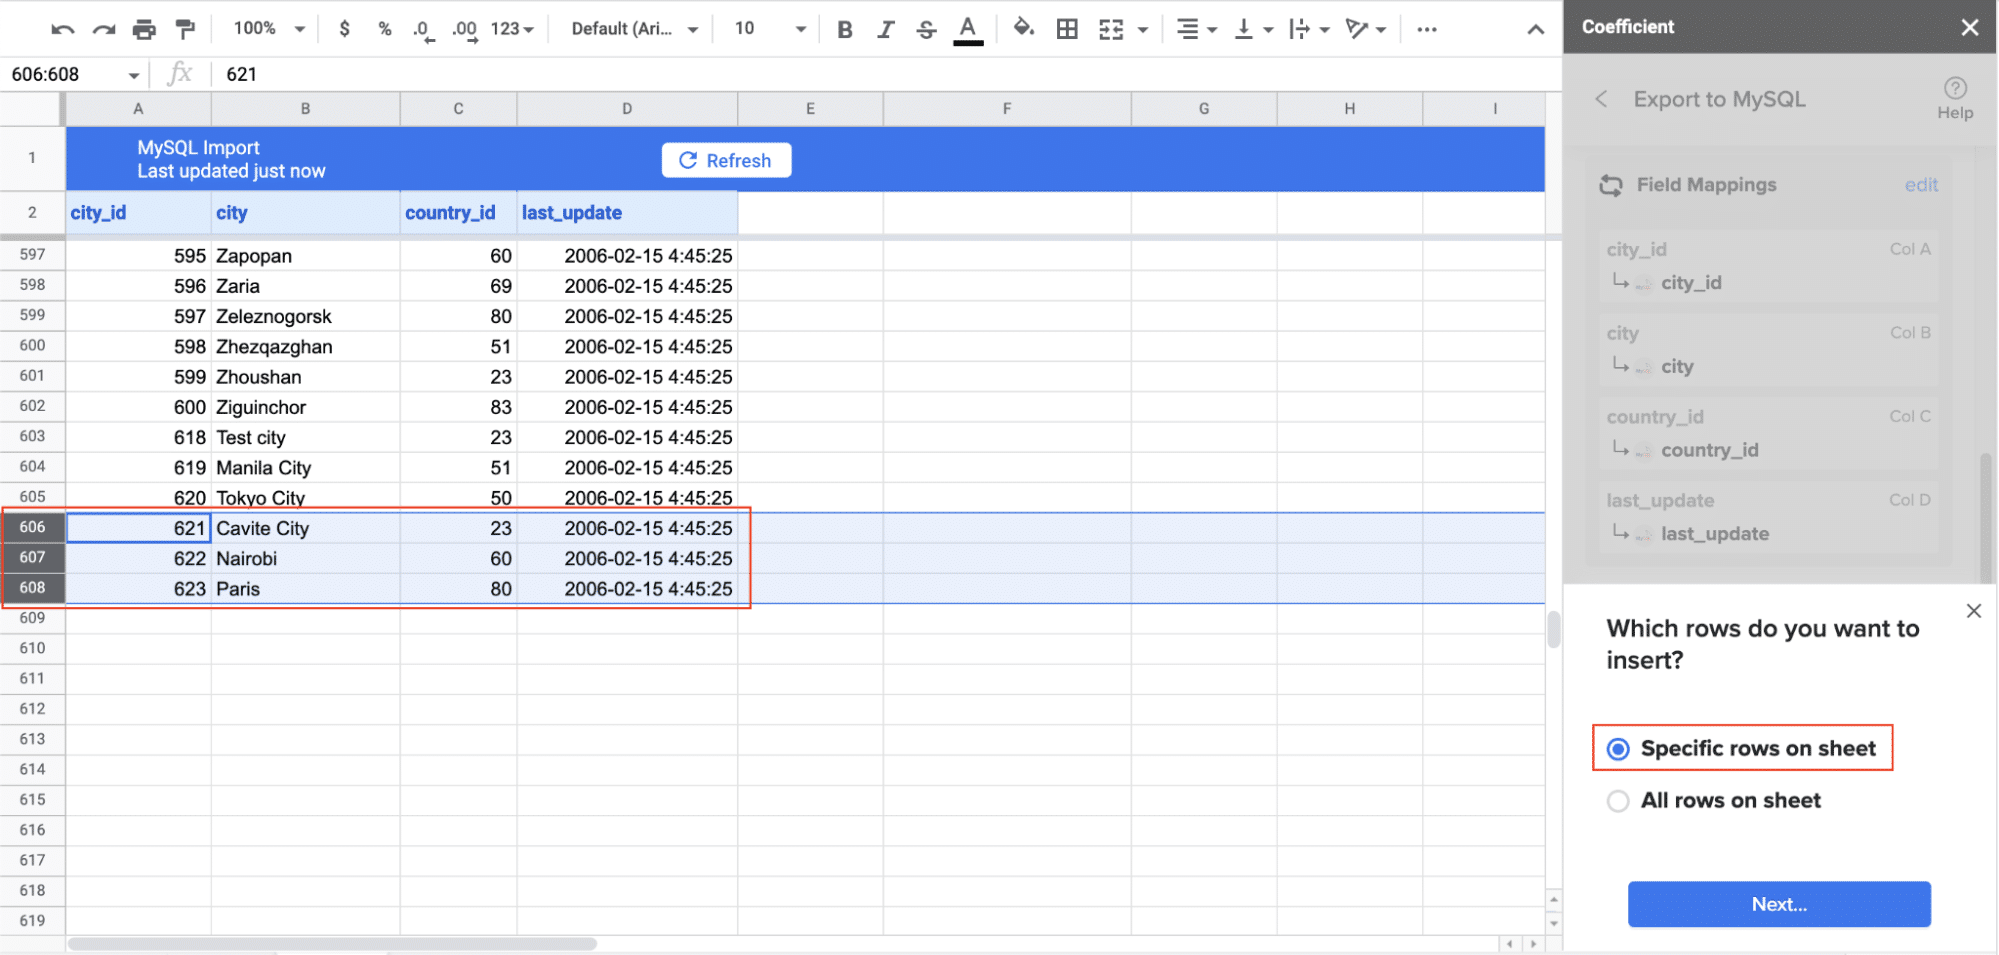
- Select Data and Action: Choose the tab and header row in your sheet that contains the data you want to export. Define your tab and header row. Specify the table in your database where you want to insert the data and choose the action type: Update, Insert, Upsert, or Delete.
- Map Fields: Map the rows from your spreadsheet to the corresponding fields in MySQL. Manual mapping is required for first-time setups.

- Customize and Export: Specify batch size and any additional settings. Confirm your settings and click Export.
Pros:
- User-friendly interface that doesn’t require coding skills
- Real-time data syncing keeps your MySQL database up-to-date
- Flexible and customizable data import options
Cons:
- Requires Google Sheets as an intermediary step
- May have limitations for extremely large datasets
Method 2: AWS Data Pipeline
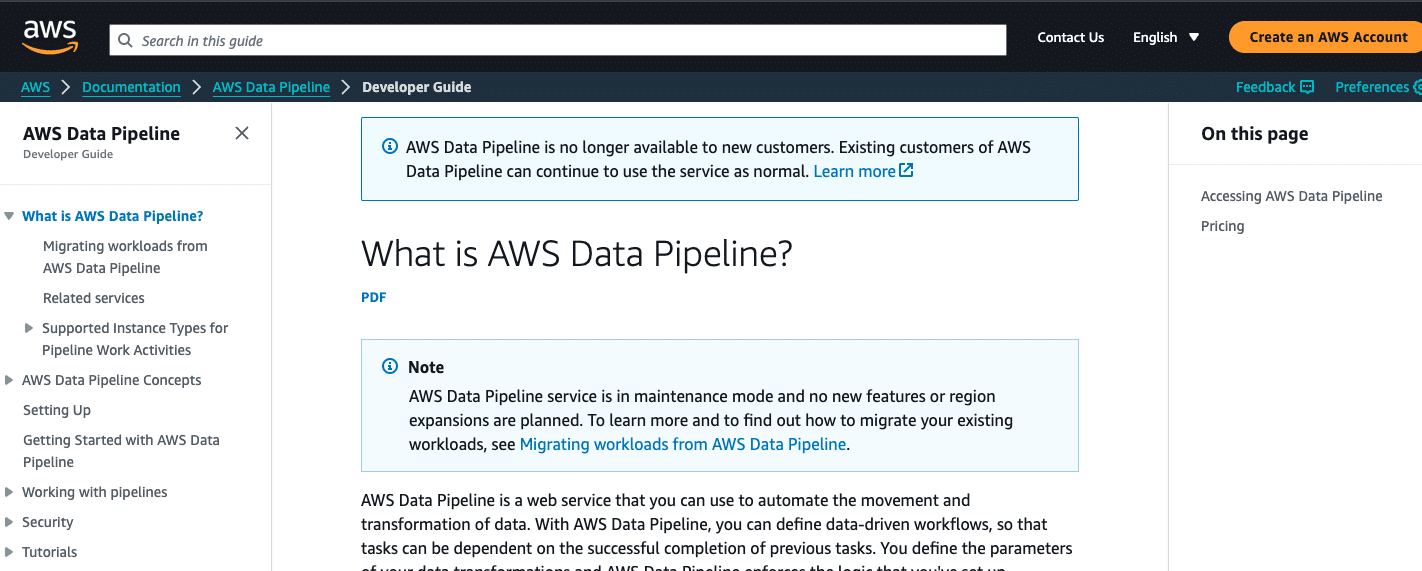
AWS Data Pipeline is a native AWS solution that provides a scalable and flexible way to automate the movement and transformation of data between Redshift and MySQL. This method is well-suited for large enterprises with complex data architectures and existing AWS expertise.
Step 1. Set up IAM roles and permissions. Before creating a Data Pipeline, ensure you have the necessary IAM roles and permissions set up in your AWS account. You’ll need roles that allow Data Pipeline to access both your Redshift cluster and your MySQL database.
Step 2. Create a new Data Pipeline. Log in to the AWS Management Console and navigate to the Data Pipeline service. Click “Create new pipeline” and provide a name and description for your pipeline.
Step 3. Define the pipeline schedule. Set up the frequency at which you want the data transfer to occur. This could be hourly, daily, or on a custom schedule depending on your requirements.
Step 4. Configure the Redshift source. In the pipeline definition, add a “RedshiftDataNode” to represent your Redshift data source. Specify the Redshift cluster details, including the cluster identifier, database name, and the SQL query to extract the desired data.
Step 5. Set up the MySQL destination. Add a “SqlDataNode” to represent your MySQL destination. Provide the JDBC connection string for your MySQL database, along with the necessary credentials.
Step 6. Create a copy activity. Add a “CopyActivity” to your pipeline definition. This activity will handle the actual data transfer from Redshift to MySQL. Configure the input as your RedshiftDataNode and the output as your SqlDataNode.
Step 7. Define data transformations (optional). If you need to transform the data during the transfer process, you can add transformation steps using AWS Data Pipeline’s built-in functions or by incorporating custom scripts.
Step 8. Validate and activate the pipeline. Use the AWS Data Pipeline validation tool to check your pipeline definition for errors. Once validated, activate the pipeline to start the automated data transfer process.
Step 9. Monitor and manage the pipeline. Regularly check the pipeline’s execution status and logs in the AWS Data Pipeline console. Set up notifications to alert you of any failures or issues with the data transfer process.
Pros of using AWS Data Pipeline:
- Native AWS solution, providing seamless integration with other AWS services.
- Highly scalable, capable of handling large datasets and complex data flows.
- Offers fine-grained control over the data transfer and transformation process.
- Supports automated scheduling for regular data synchronization.
- Provides robust logging and monitoring capabilities.
Cons of using AWS Data Pipeline:
- Requires significant AWS expertise to set up and manage effectively.
- Can be complex to configure, especially for users unfamiliar with AWS services.
- May incur additional costs based on AWS usage and data transfer volumes.
- Lacks a user-friendly interface for non-technical users.
Method 3: Fivetran
Fivetran is a cloud-based data integration platform that offers automated connectors for various data sources and destinations, including Redshift and MySQL. This solution is ideal for companies that need real-time data synchronization and automated schema management.

Stop exporting data manually. Sync data from your business systems into Google Sheets or Excel with Coefficient and set it on a refresh schedule.
Get Started
Step 1. Sign up for a Fivetran account. Visit the Fivetran website and create an account. You’ll need to provide your company details and select a plan that suits your data volume and integration needs.
Step 2. Set up the Redshift source connector. In the Fivetran dashboard, click on “Add Connector” and select Redshift as your source. Provide the necessary connection details, including the host, port, database name, schema, and credentials.
Step 3. Configure the MySQL destination connector. Similarly, set up the MySQL destination connector by providing the required connection information for your MySQL database.
Step 4. Define the data mapping. Use Fivetran’s interface to map the tables and columns from your Redshift source to the corresponding structures in your MySQL destination. Fivetran will automatically create tables in MySQL if they don’t exist.
Step 5. Set up data sync schedule. Configure the frequency of data synchronization. Fivetran offers options for real-time syncing or scheduled updates at specific intervals.
Step 6. Initialize the data sync. Start the initial data sync process. Fivetran will perform a full load of the selected data from Redshift to MySQL.
Step 7. Monitor and manage the data pipeline. Use Fivetran’s dashboard to monitor the status of your data syncs, view sync history, and manage any schema changes or data discrepancies.
Step 8. Set up alerts and notifications. Configure alerts to notify you of any issues with the data sync process or significant changes in data volume or schema.
Pros of using Fivetran:
- Offers automated schema management, adapting to changes in your Redshift schema.
- Provides real-time data synchronization capabilities.
- Includes a wide range of pre-built connectors for various data sources and destinations.
- Features a user-friendly interface for setting up and managing data pipelines.
- Handles data transformations and type conversions automatically.
Cons of using Fivetran:
- Pricing can be expensive for large data volumes or frequent syncs.
- May require additional configuration for complex data transformations.
- Depends on a third-party service, which could introduce potential reliability or security concerns.
- Limited customization options compared to more flexible ETL tools.
Streamline Your Redshift to MySQL Connection Today
Connecting Redshift to MySQL can significantly enhance your organization’s data management and analytics capabilities. Whether you choose Coefficient for its user-friendly approach, AWS Data Pipeline for its scalability and native AWS integration, or Fivetran for its automated schema management and real-time syncing, each method offers unique advantages to suit different needs and technical expertise levels.
Consider your specific requirements, such as data volume, real-time needs, technical resources, and budget constraints, when selecting the best method for your organization. By implementing one of these solutions, you’ll be well on your way to creating a more integrated and efficient data ecosystem that leverages the strengths of both Redshift and MySQL.
Ready to take the next step in optimizing your data workflow? Get started with Coefficient today and experience seamless data integration between your favorite platforms.
Further Reading
To expand your knowledge on related topics, check out these helpful resources:
