
Right-click on the cell you want to lock and select “Protect range”
Select the cells, rows, columns, or cell range you want to lock in the Protected sheets and ranges side pane
Click “Set permissions” and select “Custom” under Range editing permissions to restrict who can edit
Enter a description and confirm your protection settings
To unlock later, go to Data > Protect sheets and ranges, then click the trash bin icon next to the protected range
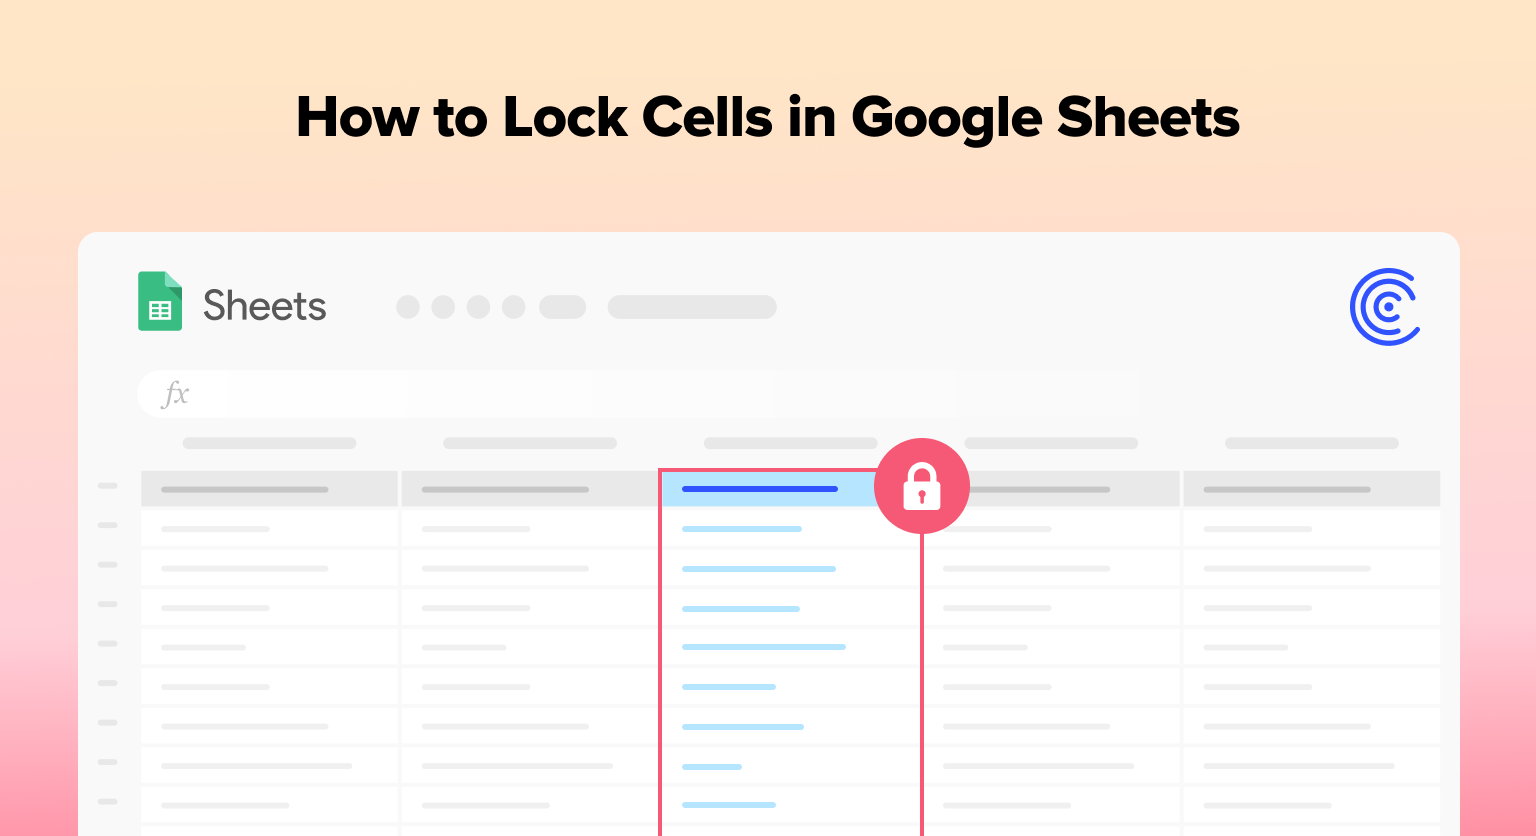
If you want to learn how to lock cells in Google Sheets, this guide will show you everything you need to know.
Locked cells protect data or formulas from accidental editing or deletion. This is helpful for a wide variety of use cases, from budget spreadsheets and receipt templates containing sensitive financial information, to collaborative projects with multiple team members.
This guide will show you how to lock cells in Google Sheets, based on real examples and step-by-step tutorials.
Video Walkthrough: How to Lock Cells in Google Sheets
Step-by-Step Tutorial: How to Lock Google Sheets Cells
Google Sheets allows you to lock one cell or multiple cells in your spreadsheet. This enables other users to access the cells without modifying the values in the cells.
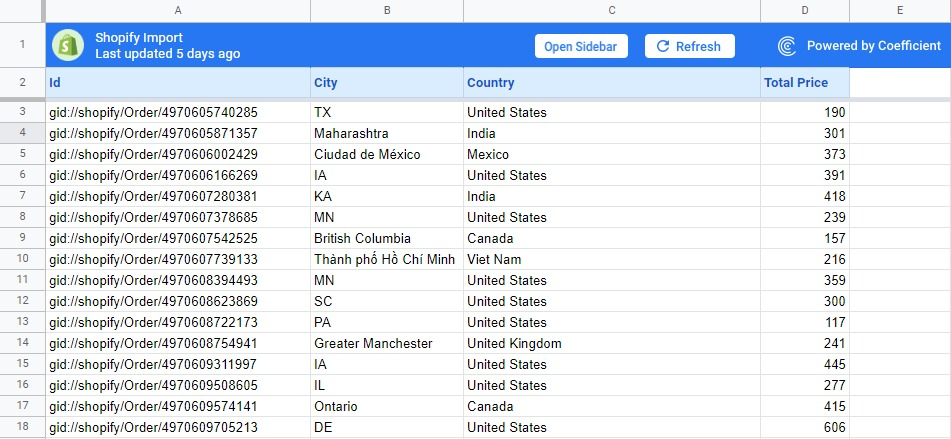
The sections below will outline the main methods for locking cells in Google Sheets. But first, let’s pull a sample Shopify dataset into Google Sheets using Coefficient to help demonstrate each method.
Read our blog on how to connect Shopify to Google Sheets using Coefficient. Install the Coefficient Google Sheets add-on, connect your company system, and import live data in minutes.
How to Lock a Single Cell or Multiple Cells
Let’s start by locking a single cell in Google Sheets.
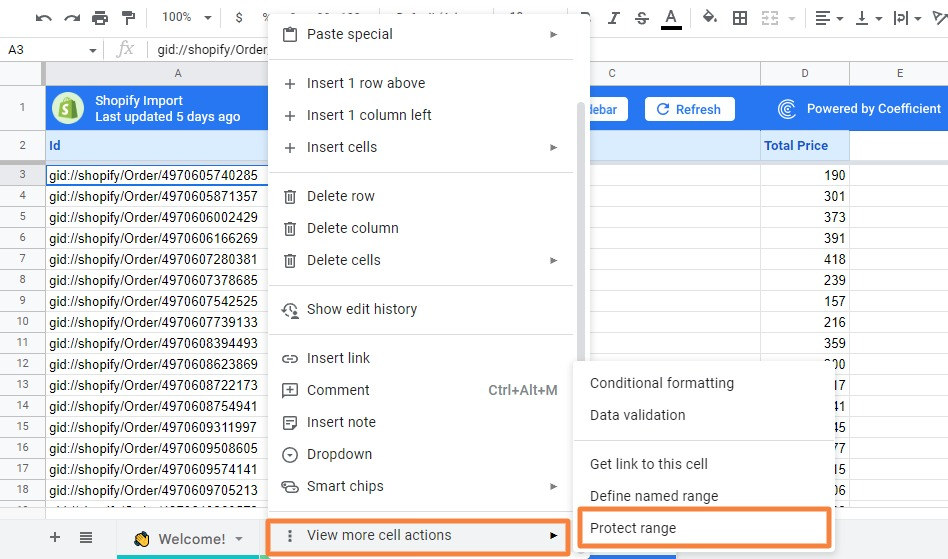
Right-click your mouse on the cell you wish to lock. Let’s lock cell A3 in our sample table. Then click on Protect range.
Scroll down, hover your mouse over View more cell actions, and select Protect range.
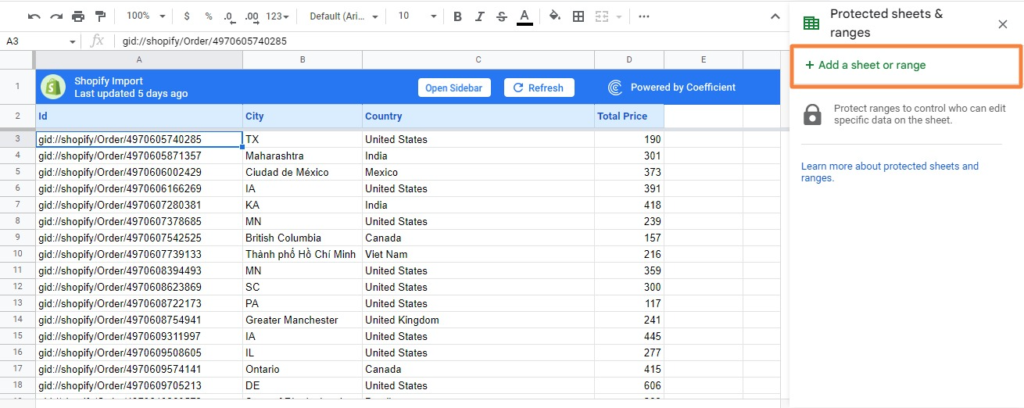
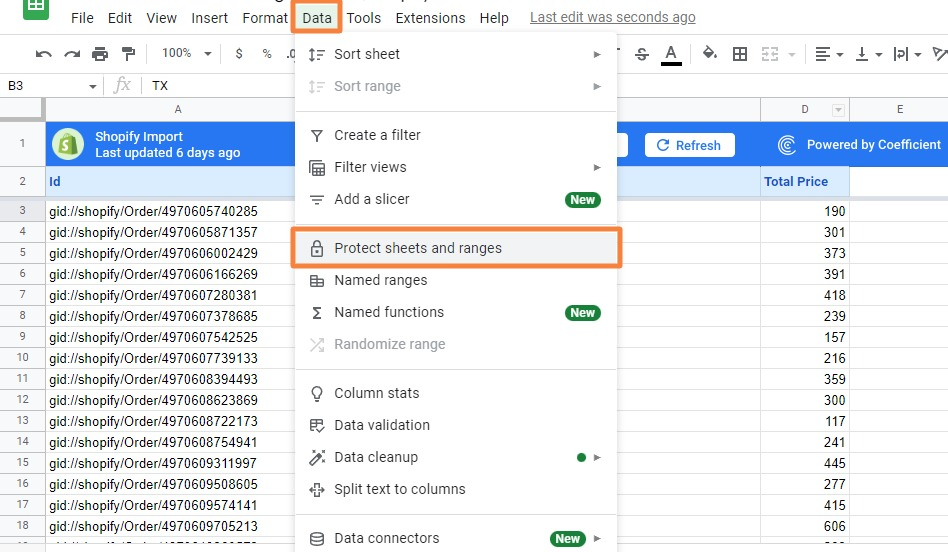
Alternatively, you can select your cell or range of cells and click on the Data tab on the top menu. Then select Protected sheets and ranges from the drop-down menu.

You should see the Protected sheets and ranges side pane displayed on the right side of your screen. Click on Add a sheet or range.
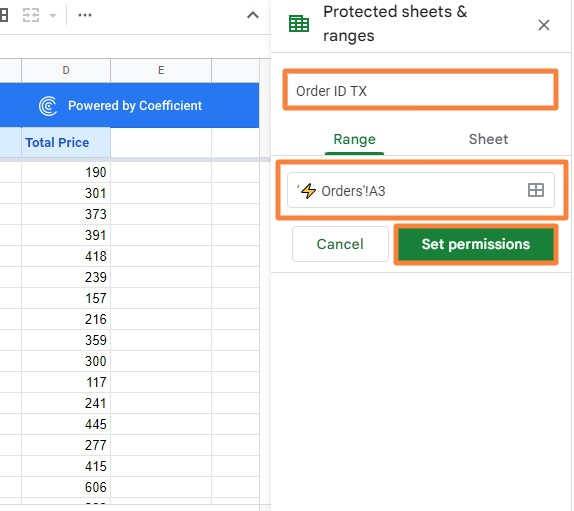
Enter a description for the cell you want to lock in the designated field.
The selected cell reference should show in the Range option field. You can edit this to include other cells and specify your cell range.
Click on Set Permissions.
In the Range editing permissions pop up window, set the Restrict who can edit this option to Only you and click Done.
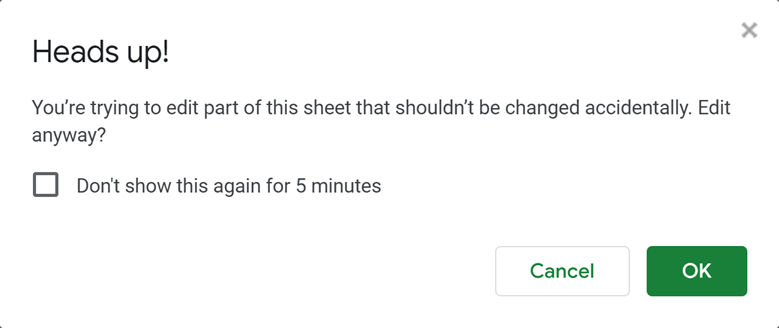
Now only you can edit cell A3. Other users who try to modify the cell will see a dialog box that tells them the cell is protected.
They’ll need to contact you (or the spreadsheet owner) to remove the protection and allow editing by other users.
You can follow the same steps when locking multiple cells. Select the cells, rows, columns, or cell range you want to lock in the Protected sheets and ranges side pane.
However, Google Sheets doesn’t let you lock non-adjacent cells all at once. In that scenario, you’ll need to select and lock the cells individually.
Set Edit Permissions for Locked Cells to Specific Users
Here’s how to allow selected users to edit locked cells in Google Sheets. This limits the people who can change your locked cells, protecting your data and reducing mistakes.
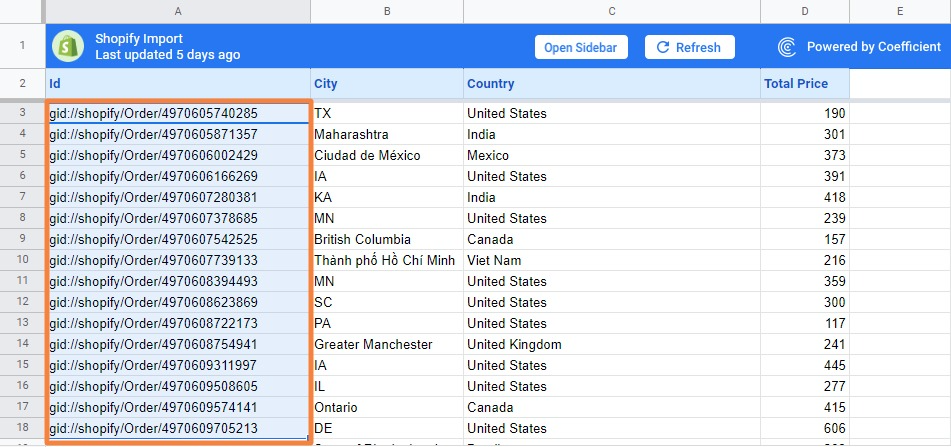
In the below example, let’s lock the data under the Id column (cells A3:A18). After doing so, let’s enable your sales manager to edit the locked cells.
Follow the initial steps from the previous section by selecting the cell or cell range you want to lock. Then open the Protected sheets and ranges side pane.
Click on Set permissions. Select Custom in the Range editing permissions under the Restrict who can edit this range.
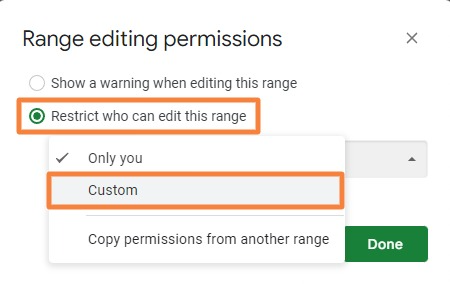
Enter the email addresses of the users who are allowed to edit the locked cells in the Add editors field.
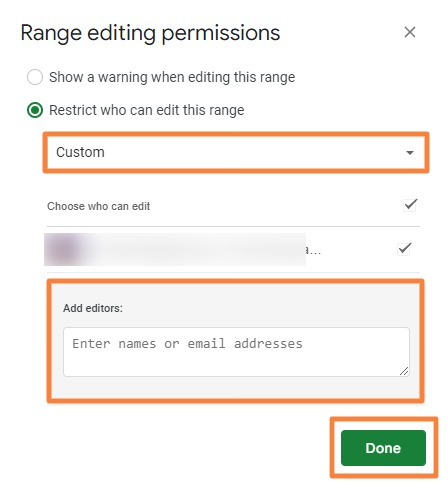
Click Done. The users with editing permissions can now modify the locked cells or cell range.
You can also revoke editing permissions in the Range editing permissions pop up window and remove the user’s name or email address.

Supercharge your spreadsheets with GPT-powered AI tools for building formulas, charts, pivots, SQL and more. Simple prompts for automatic generation.

Lock an Entire Google Spreadsheet
Besides locking a cell or range of cells, you can also lock an entire sheet in Google Sheets to keep other users from editing it.
You can set permissions for a locked sheet as well. Easily grant specific users edit access to the locked sheet. Also, you can lock one sheet within the same worksheet and keep the others unlocked.
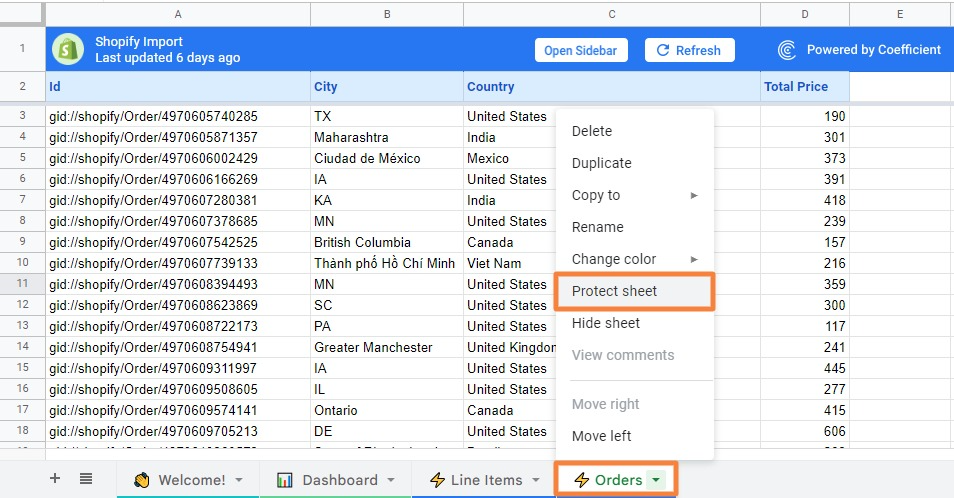
Here’s how to lock a sheet. Right-click your mouse on the sheet tab you want to lock and click Protect sheet.
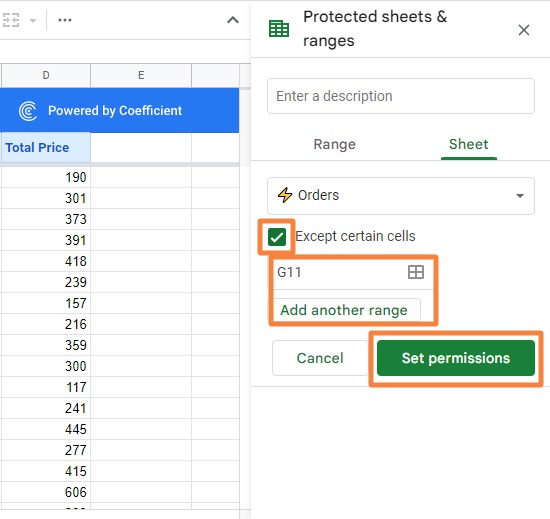
Then select the Sheet tab in the Protected sheets and ranges side pane. Enter a description in the designated field and select the sheet you want to protect.
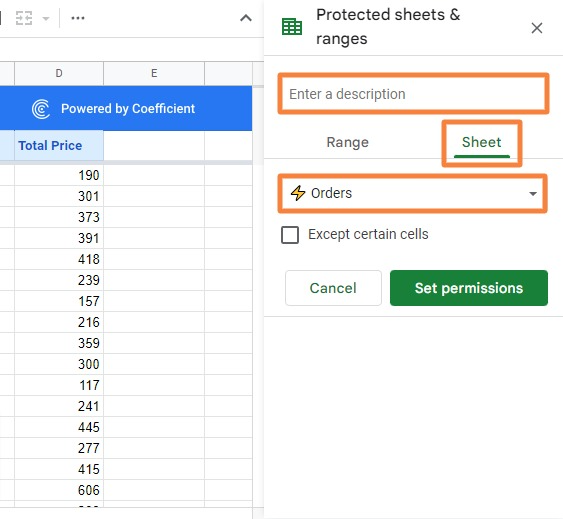
You can keep specific cells unlocked within your locked sheet. Check the Except certain cells box and specify the cell or range of cells you wish to stay unlocked.
Click on Set Permissions.
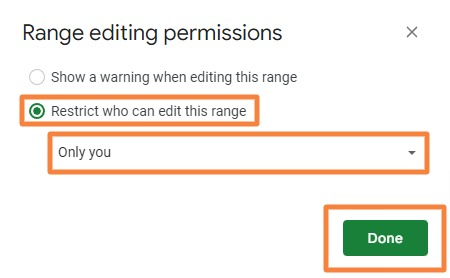
Select Only you below the Restrict who can edit this range option in the Range editing permissions pop up window. Then click Done.
Your Google sheet is now protected. Users with permissions to edit the sheet can edit unlocked cells in the sheet.
Allow Editing in Your Google Sheet but Show a Soft Warning
Google Sheets can display a warning message when a user with editing access tries to change a locked cell.
Users can still edit your locked cells, but they’ll be shown the warning prompt below when they attempt to edit the cell.
To set up a warning, select the Show a warning when editing this range option in the Range editing permissions pop up window.

With this, you can remind other users to avoid changing data in locked cells, although they will have the ability to do so.
How to Unlock Your Locked Cells in Google Sheets
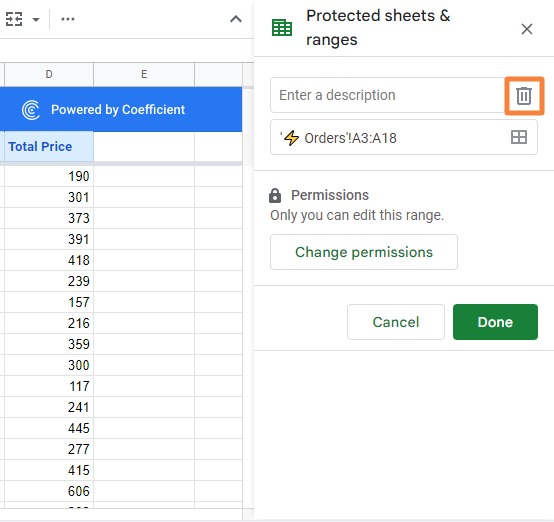
To unlock the cells you’ve already locked, click on the Data option in the Google Sheets top menu. Then select Protect sheets and ranges.
The side pane should display the list of cells, ranges, or sheets you locked.
Select which one you wish to unlock and click on the trash bin icon beside the Enter a description field.
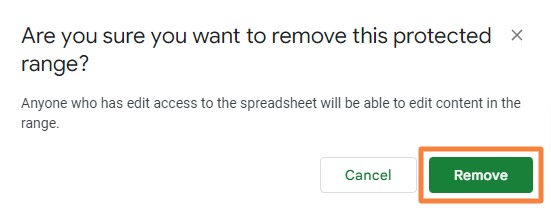
Google Sheets will display a prompt asking if you want to remove the protected range and allow editing access to other users.
Click on the Remove button, and this will unlock the cell, range, or sheet you locked.
Key Points: Locked Cells in Google Sheets
Here are some key points about locked cells in Google Sheets.
- If you are not the sheet’s owner, or if you don’t have editing permission, you can’t edit the contents of locked cells.
- Locked cells can be selected and copied. Even if a cell is locked, you can still select it and copy its contents to another location in the sheet. However, you can’t edit the contents of the cell.
- Locked cells do not prevent formatting changes. While you cannot edit the contents of a locked cell, you can still apply formatting changes, such as changing the font size, cell background color, or alignment.
- If you have permission to edit the sheet, you can still insert or delete rows and columns, even if they contain locked cells.
- Locking cells only apply to a particular sheet. You will need to set up cell protection separately for each sheet.
Protect Your Data by Locking Cells in Google Sheets
Locking cells in Google Sheets helps protect your essential data from changes or deletions. With locked cells, you can control who can edit specific cells, ensuring that your data will stay accurate and up-to-date.
Coefficient makes managing your spreadsheet data easier by automatically importing and syncing live data from your business systems. Try Coefficient for free to speed up your work in Google Sheets.