HubSpot API rate limits when connecting directly to Excel

HubSpotDirectAPI connections through Power Query hit strict rate limits of 100 requests per 10 seconds for most endpoints. This causes connection failures and incomplete data imports when pulling large datasets, requiring custom throttling logic in your M code.

Here’s how to import large HubSpot datasets without rate limit errors or custom retry mechanisms.

Import HubSpot data without rate limit failures using Coefficient

Coefficientautomatically manages HubSpot API rate limits and optimizes data retrieval to prevent connection errors. The platform handles request throttling, retry logic, and efficient batching behind the scenes.

How to make it work

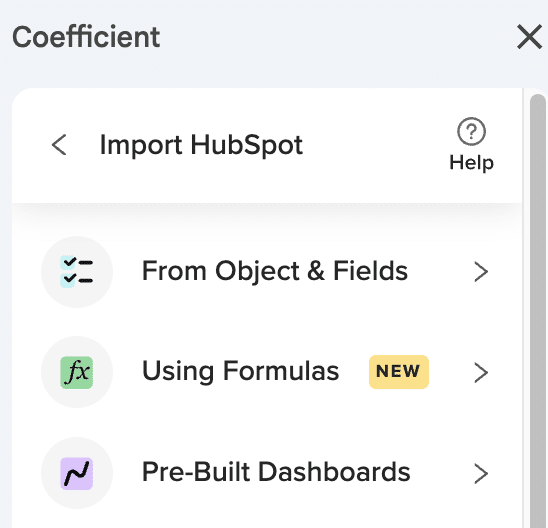
Step 1. Connect HubSpot through Coefficient’s managed system.

Install Coefficient and connect your HubSpot account. The platform automatically configures optimal request patterns that respect HubSpot’s rate limits without requiring manual throttling configuration.

Step 2. Import large datasets without size restrictions.

Select your HubSpot objects and fields normally. Coefficient supports minimum 50,000 rows with no maximum limit, automatically managing the API calls needed to retrieve complete datasets without hitting rate limits.

Step 3. Let automatic retry logic handle temporary failures.

If rate limits are temporarily exceeded, Coefficient automatically implements retry mechanisms with appropriate delays. This eliminates the need for custom error handling code and ensures complete data retrieval.

Step 4. Monitor imports with built-in error alerts.

Set up Slack and email alerts to notify you if any connection issues occur during scheduled imports. The platform provides clear error messaging and automatic resolution for most rate limit scenarios.

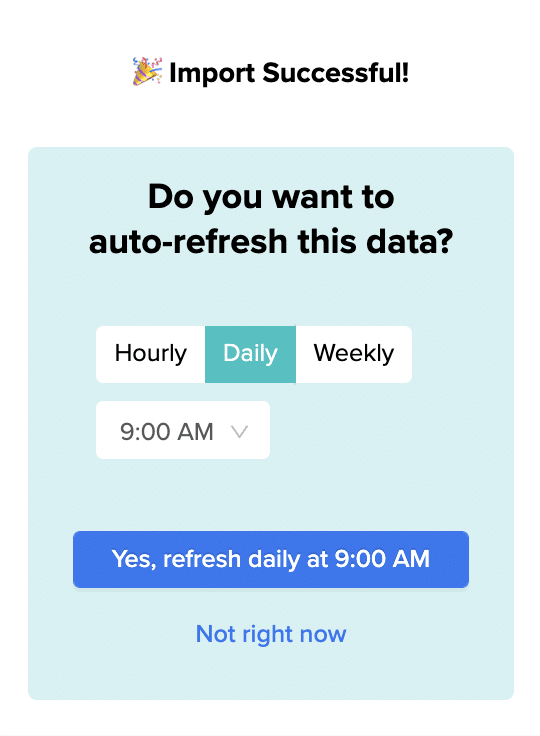
Step 5. Schedule imports during optimal times.

Use Coefficient’s scheduling features to run large imports during off-peak hours when rate limits are less likely to be an issue. The platform optimizes request timing automatically.

Import large HubSpot datasets reliably

Start importingStop dealing with rate limit errors and incomplete imports. Coefficient handles all the technical complexity of API throttling so you can focus on analyzing your complete HubSpot dataset.without rate limit worries today.

HubSpot API scopes required for Excel data connection

HubSpotDetermining the correctAPI scopes for Power Query connections requires understanding HubSpot’s permission model and mapping specific scopes to the data you want to access. Incorrect scope configuration can lead to authentication failures or incomplete data access.

Here’s how to connect HubSpot to Excel without manual scope configuration or permission mapping.

Connect HubSpot to Excel with automatic scope management using Coefficient

Coefficientsimplifies HubSpot API scope management by guiding you through the connection process and automatically requesting appropriate permissions. The platform handles scope requirements for different HubSpot objects and features without manual configuration.

How to make it work

Step 1. Start the guided connection process.

Install Coefficient and begin connecting your HubSpot account through the Connected Sources menu. The platform automatically identifies the necessary API scopes based on your intended data access.

Step 2. Let Coefficient handle scope requirements automatically.

During the connection process, Coefficient requests appropriate permissions for standard HubSpot objects like contacts, deals, companies, and tickets. The platform also handles specialized requirements like e-commerce permissions for Engagement objects.

Step 3. Complete authentication with proper permissions.

Follow the guided authentication flow, which ensures you have the necessary access rights for your intended data imports. Coefficient validates permissions during setup to prevent access issues later.

Step 4. Access all available objects based on your permissions.

Once connected, Coefficient displays all HubSpot objects you can access based on your account permissions and API scopes. The platform automatically adapts to your specific permission level.

Step 5. Handle permission updates seamlessly.

If you need access to additional HubSpot objects or features, Coefficient guides you through updating your connection permissions without requiring manual scope reconfiguration.

Connect with confidence and proper permissions

Connect yourStop guessing about API scope requirements and permission mapping. Coefficient ensures you have the right access for your HubSpot data imports through guided setup and automatic scope management.HubSpot account with proper permissions today.

HubSpot API workaround to export activity history on free plan

HubSpot’s free plan limits UI-based exports, but the API remains accessible for activity data extraction. Building custom API integrations requires significant technical expertise that most users don’t have.

Here’s how to leverage HubSpot’s API capabilities for activity export without any programming knowledge or custom development work.

Access HubSpot’s API without coding using Coefficient

CoefficientHubSpot’sserves as a no-code API workaround that connects toengagement endpoints. It handles all the complex authentication, rate limiting, and data formatting automatically.

How to make it work

Step 1. Connect through Coefficient’s pre-built API integration.

HubSpot’sInstead of building custom API connections, use Coefficient’s existing integration withREST API. It manages OAuth authentication and API rate limiting automatically, eliminating technical barriers.

Step 2. Query multiple engagement endpoints in a single workflow.

Pull from calls, emails, notes, meetings, and tasks endpoints simultaneously. Coefficient handles API pagination to retrieve complete activity datasets and presents them in familiar spreadsheet format.

Step 3. Apply filters and date ranges for targeted data extraction.

Use up to 25 filters to focus on specific contacts, date ranges, or activity types. The filtering happens at the API level, making data retrieval more efficient than manual methods.

Step 4. Schedule automatic refreshes to maintain current activity data.

Set up hourly, daily, or weekly refreshes to keep your activity data current. This provides ongoing API-level access without manual intervention or custom maintenance.

Skip the custom development headaches

Get startedWhy spend weeks building custom API integrations when you can access HubSpot’s activity data immediately? Coefficient provides enterprise-level API access with built-in error handling and automatic updates.with your API workaround today.

HubSpot custom objects API endpoint configuration in Power Query

HubSpotConfiguring Power Query forcustom objects requires identifying specific API endpoints, handling custom property schemas, and managing object-specific authentication scopes. Each custom object needs individual endpoint configuration and field mapping.

Here’s how to import HubSpot custom objects without manual endpoint configuration or API knowledge.

Import HubSpot custom objects without endpoint configuration using Coefficient

Coefficientautomatically detects and supports all HubSpot custom objects without manual endpoint setup. The platform’s import interface displays all available objects, including custom objects, with their associated properties and fields.

How to make it work

Step 1. Connect your HubSpot account with custom objects.

Install Coefficient and connect your HubSpot account through the Connected Sources menu. The platform automatically discovers all custom objects in your HubSpot portal during the connection process.

Step 2. Select custom objects from the import interface.

When creating a new import, browse through all available HubSpot objects. Custom objects appear alongside standard objects like contacts and deals, with clear labeling and descriptions of their properties.

Step 3. Choose custom fields and properties.

Select the specific custom fields you want to import from your custom objects. Coefficient displays all available properties with their data types and descriptions, eliminating guesswork about field structures.

Step 4. Apply filters to custom object data.

Use up to 25 filters with AND/OR logic to focus your custom object imports. Apply filters based on custom properties, creation dates, or any other available fields using the same intuitive process as standard objects.

Step 5. Handle custom object associations.

Import associated records between custom objects and standard HubSpot objects. Choose from Primary Association, Comma Separated, or Row Expanded display options to structure your data appropriately.

Access all your HubSpot custom objects easily

Start importingSkip the complex API endpoint research and configuration. Coefficient provides seamless access to all your custom objects using the same simple interface as standard HubSpot data.your custom objects today.

HubSpot OData feed URL format for Excel Power Query connection

If you’re here, you’ve probably spent the last hour searching for HubSpot’s OData feed URL format to connect Power Query to your CRM data. We have bad news and good news.

The bad news: HubSpot doesn’t provide OData feeds. At all.

The worse news: To connect HubSpot to Excel via Power Query, you’d need to:

  • Manually construct REST API URLs for each object type (contacts, deals, companies)
  • Handle complex JSON-to-table transformations
  • Write custom M code for pagination
  • Manage API rate limits and authentication tokens
  • Update everything manually when HubSpot changes their API

The good news: There’s a much simpler way to get your HubSpot data into Excel—without touching a single API endpoint.

Why Power Query + HubSpot = Hours of Frustration

Let’s be honest about what you’re facing if you try the Power Query route:

https://api.hubapi.com/crm/v3/objects/contacts?hapikey=YOUR_API_KEY&limit=100&after=0

That’s just to get your first 100 contacts. Need deals? Different endpoint. Want associated data? Multiple API calls. Need more than 100 records? Welcome to pagination hell.

Most Excel users give up after realizing they need to become API experts just to pull a simple contact list.

A Better Way: Connect HubSpot to Excel in 2 Minutes (Not 2 Hours)

Coefficient is an Excel add-in that connects HubSpot (and 50+ other business systems) directly to your spreadsheets—no API knowledge required. Think of it as Power Query, but built specifically for business users who need data now, not after a coding bootcamp.

Here’s what makes it different:

  • Pre-built connectors for all HubSpot objects (contacts, deals, companies, tickets, custom objects)
  • Point-and-click interface instead of URL construction
  • Automatic updates so your data stays fresh
  • No API limits or throttling issues to manage

How to Import HubSpot Data to Excel (The Easy Way)

Step 1: Install Coefficient and Connect HubSpot

Install Coefficient directly from the Microsoft AppSource store (it takes 30 seconds). Once installed, click “Add Connection” and select HubSpot from the list of 50+ integrations.

Simply authorize your HubSpot account with one click—Coefficient handles all the OAuth authentication and API configuration behind the scenes.

Step 2: Select Your Data (No API Endpoints Required)

Instead of memorizing API endpoints, you’ll see a simple menu of all your HubSpot objects:

  • Contacts (with all custom properties)
  • Deals (including pipeline stages)
  • Companies
  • Tickets
  • Activities
  • Custom objects

Just check the boxes for the data you want. It’s like browsing a menu instead of writing a recipe from scratch.

Step 3: Configure Your Import (With Actual Filtering Options)

Apply filters using plain English instead of API parameters:

  • “Deals created this month”
  • “Contacts from California”
  • “Companies with revenue > $1M”

Select exactly which fields you want—no more downloading 200 columns when you only need 10.

Step 4: Set It and Forget It with Auto-Refresh

This is where Coefficient really shines. Set your data to refresh:

  • Every hour for live dashboards
  • Daily at 9 AM for morning reports
  • Weekly for executive summaries

Your Excel file becomes a living document that updates itself—no more manual exports or broken Power Query connections.

What This Means for Your Workflow

Instead of spending hours:

  • Learning HubSpot’s API documentation
  • Debugging Power Query M code
  • Manually refreshing data
  • Fixing broken connections

You can focus on:

  • Analyzing your data
  • Building dynamic reports
  • Making data-driven decisions
  • Actually using Excel for what it’s meant for

Real Results from Real Users

“We tried Power Query for months. Coefficient got us connected in minutes. Our sales reports now update automatically every morning—it’s been a game-changer.” – Robinson J, Analyst @ Miro

The Bottom Line: Stop Fighting with APIs

HubSpot’s lack of OData support isn’t going to change. But your approach to getting HubSpot data into Excel can change—today.

With Coefficient, you get:

 ✅ All your HubSpot data in Excel without writing a single line of code 

✅ Automatic updates that keep your reports fresh 

✅ Pre-built templates for common HubSpot reports 

✅ Support for Excel formulas, pivot tables, and charts on live data 

✅ Peace of mind knowing your connections won’t break

Ready to Skip the API Headache?

Stop searching for OData feeds that don’t exist. Start importing your HubSpot data the easy way.Start Free Trial → 

HubSpot task import contact lookup field not appearing

The contact lookup field not appearing during HubSpot task import is a common interface issue where the association field doesn’t display properly in the import mapping screen.

Here’s a reliable workaround that bypasses this interface problem entirely and ensures your task imports always include proper contact associations.

Bypass the interface issue with direct export using Coefficient

CoefficientHubSpoteliminates this interface problem by providing a more reliable import method that doesn’t depend on’s problematic CSV import interface. You get consistent, reliable contact association options that always work.

How to make it work

Step 1. Prepare task data with contact identifiers in your spreadsheet.

HubSpotSet up your task data in Google Sheets or Excel with columns for Task Subject, Task Type, Due Date, and Contact ID or Contact Email. This preparation happens outside of’s interface, avoiding the field display issues entirely.

Step 2. Validate contact IDs exist using Coefficient’s import feature.

Import your existing contacts from HubSpot through Coefficient to create a reference list. Use VLOOKUP or INDEX/MATCH functions to verify that every contact identifier in your task data corresponds to an actual contact in your CRM.

Step 3. Configure the export with guaranteed association options.

Set up Coefficient’s export with the INSERT action for tasks. Unlike HubSpot’s inconsistent import interface, Coefficient’s interface reliably shows contact association options and lets you map your contact identifier column to the appropriate association field.

Step 4. Execute the export with visual confirmation.

Run the export and get clear confirmation of which contacts will be associated with each task before committing the changes. This eliminates the uncertainty and interface quirks that cause problems with HubSpot’s native import process.

Reliable imports without interface headaches

Try CoefficientThis approach provides a dependable alternative when HubSpot’s native import interface fails to display contact lookup fields properly, ensuring your task imports always work correctly.to eliminate interface issues and streamline your task import process.

HubSpot task import missing associated contact column error

The “missing associated contact column” error happens because HubSpot’s import interface doesn’t consistently show association fields or validate them properly during CSV processing.

Here’s how to eliminate this error completely and ensure your task imports always include proper contact associations.

Prevent the missing contact column error with Coefficient

CoefficientThis error occurs because HubSpot’s CSV import tool struggles with relationship mapping between objects.eliminates this problem by handling object relationships directly, with pre-validation that prevents association errors before they happen.

How to make it work

Step 1. Import existing contacts to validate IDs.

HubSpotUse Coefficient to pull your currentcontacts into your spreadsheet. This gives you a verified list of Contact IDs and emails that actually exist in your CRM, preventing the association failures that cause the missing column error.

Step 2. Prepare task data with verified contact references.

Structure your task data with Contact IDs or emails that match your imported contact list. Use spreadsheet functions like VLOOKUP or INDEX/MATCH to cross-reference and ensure every task has a valid contact association before attempting the export.

Step 3. Configure Coefficient’s INSERT action for tasks.

HubSpotSet up a new export in Coefficient using the INSERT action fortasks. The interface clearly shows association options and validates your contact mappings in real-time, unlike HubSpot’s problematic CSV import screen.

Step 4. Execute with automatic association handling.

Run the export and let Coefficient handle the association creation automatically. You’ll get clear status reporting on successful task creation and contact linking, with no mysterious errors or missing associations.

Reliable task imports every time

Start using CoefficientThis method bypasses HubSpot’s unreliable CSV import interface entirely, ensuring your tasks always get properly associated with contacts.to eliminate import errors and streamline your task management workflow.

HubSpot task import template with contact email matching

Creating effective HubSpot task import templates with contact email matching is challenging because the native import doesn’t provide reliable templates, and email matching often fails due to formatting issues.

Here’s how to build robust, reusable import templates with advanced contact email matching that achieves 99%+ successful association rates.

Build reliable task import templates with email validation using Coefficient

CoefficientHubSpotenables creation of sophisticated import templates with built-in email validation and matching logic. Instead of hopingCSV import will match emails correctly, you get visual confirmation of contact matching before any data is exported.

How to make it work

Step 1. Create the template structure with validation columns.

HubSpotSet up columns for Task Subject, Task Type, Due Date, Contact Email, Task Description, and Priority Level. Add validation columns that use Coefficient to import existingcontacts, creating a reference list for email matching verification.

Step 2. Build email standardization and matching logic.

Use spreadsheet functions to clean and standardize email formats: TRIM to remove spaces, LOWER to standardize case, and SUBSTITUTE to fix common formatting issues. Create VLOOKUP or INDEX/MATCH formulas to verify each email exists in your HubSpot contact database.

Step 3. Implement confidence indicators and fallback logic.

Add columns that show matching confidence levels and handle cases where primary emails don’t match. Use conditional formatting to highlight successful matches in green and potential issues in red. Build fallback logic that tries alternative email formats or domain matching when exact matches fail.

Step 4. Add dynamic validation and error flagging.

Create formulas that identify rows likely to fail before export: invalid email formats, non-existent contacts, or missing required fields. Use conditional formatting and data validation to make issues immediately visible to users.

Step 5. Test and refine the template with real data.

Run test exports with sample data to validate your matching logic and identify edge cases. Refine the email cleaning and matching formulas based on actual results, building a template that handles your specific data patterns reliably.

Reusable templates that actually work

Try CoefficientThis creates a reliable, repeatable process for task imports with contact email matching that far exceeds HubSpot’s native capabilities, ensuring successful associations every time.to build templates that eliminate import failures and streamline your task management workflow.

Identifying companies incorrectly marked as parent when they should be child companies in HubSpot

HubSpotlacks automated validation tools to identify companies with incorrect parent/child designations, creating ongoing data quality issues in company database management.

You’ll learn how to analyze company characteristics and identify misclassified companies using sophisticated validation logic that HubSpot can’t perform natively.

Identify misclassified companies using multi-factor analysis

CoefficientHubSpotHubSpot can’t analyze company characteristics to determine appropriate hierarchy positioning automatically.provides sophisticated analysis capabilities to identify and correct misclassified companies inhierarchies through comprehensive data validation.

How to make it work

Step 1. Export companies with classification indicators.

Import companies marked as parents alongside key metrics including employee count, revenue, number of associated contacts, deal volume, and domain authority. Use Coefficient’s filtering to focus on companies marked as parents but potentially exhibiting child company characteristics.

Step 2. Build misclassification detection formulas.

Create spreadsheet formulas to identify parent companies that are smaller than their supposed children, have fewer employees, or lower revenue. Use functions like =IF(AND(B2

Step 3. Analyze domain-based hierarchy clues.

Use domain analysis to identify cases where supposed parent companies have subdomain relationships to their children (like subsidiary.parentcompany.com marked as parent of parentcompany.com). Create formulas to extract root domains and identify these clear hierarchy errors.

Step 4. Create business logic scoring systems.

Build scoring formulas that evaluate multiple factors to determine likelihood of misclassification, including industry standards, company size relationships, and ownership patterns. Weight factors like =SUM(size_score*0.4, revenue_score*0.3, domain_score*0.3) for comprehensive analysis.

Step 5. Execute bulk hierarchy corrections.

Use Coefficient’s Association Management and UPDATE capabilities to correct parent-child designations in bulk. Remove incorrect parent status and establish proper hierarchy relationships based on your analysis.

Step 6. Set up ongoing validation monitoring.

Implement scheduled imports to continuously monitor for new misclassification cases and alert when hierarchy logic violations occur. This prevents future classification errors from accumulating.

Maintain accurate company hierarchies

Start identifyingThis comprehensive approach provides the analytical depth and systematic correction capabilities that HubSpot’s basic company association tools simply can’t deliver.your misclassified companies today.

Improving Salesforce report builder experience for users when report type includes optional relationship paths

Salesforce’s Report Builder becomes confusing for end users when custom report types include optional relationship paths, with users struggling to understand blank fields and differentiate between relationship types.

While you can’t directly improve the native Report Builder experience, here’s how to create better data access for your users.

Create simplified data interfaces for better user experience using Coefficient

CoefficientSalesforceoffers mixed benefits for improving the report builder experience. While it doesn’t provide a native report builder interface, it can simplify data access for technical users who can set up sophisticated data imports and create user-friendly spreadsheet interfaces that are much more intuitive than complexreports.

How to make it work

Step 1. Set up pre-configured data views for end users.

Use automated refresh scheduling and dynamic filters to create simplified, pre-configured data views that hide the complexity of multiple relationship paths from end users. Technical team members can configure these once for ongoing use.

Step 2. Create clear labeling and conditional formatting.

Use spreadsheet conditional formatting and clear column headers to help users understand optional relationship paths. Color-code different relationship types and add explanatory text that makes the data structure obvious.

Step 3. Implement business logic with Formula Auto Fill Down.

Create calculated fields and conditional displays that make optional relationships more understandable. Use formulas that explain why certain fields are blank or show alternative data when primary relationships don’t exist.

Step 4. Build simplified data extracts for dashboard tools.

SalesforceUsedata imports to create simplified extracts that can feed into easier-to-understand dashboard tools or simplified report types that focus on single relationship paths rather than complex multi-path structures.

Step 5. Consider user technical comfort levels.

For non-technical users who prefer Salesforce’s native interface, focus on creating simplified data extracts rather than complex spreadsheet solutions. Use Coefficient to prepare clean, single-path data that works better in standard Salesforce reports.

Find the right balance for your users

Explore CoefficientThe best approach depends on your users’ technical comfort levels and whether they prefer spreadsheet interfaces or native Salesforce tools.to see if simplified data access works better for your team than complex report types.