HubSpotYou need a reliable alternative to Superjoin for syncingdata to Google Sheets that offers automated refreshes and advanced filtering capabilities.
This guide shows you how to set up live data connections that eliminate manual exports and provide more flexibility than HubSpot’s basic reporting features.
Set up automated HubSpot to Google Sheets sync using Coefficient
Coefficientserves as a powerful Superjoin alternative that creates live, refreshable connections between HubSpot and Google Sheets. Unlike HubSpot’s static export functionality, you get automated updates with custom field selection and advanced filtering options.
How to make it work
Step 1. Install Coefficient from the Google Workspace Marketplace.
Open your Google Sheet and navigate to Extensions > Add-ons > Get add-ons. Search for “Coefficient” and install it to your workspace.
Step 2. Connect to HubSpot through Connected Sources.
Click the Coefficient sidebar and select “Connected Sources.” Choose HubSpot from the list and authenticate your account to establish the connection.
Step 3. Select your HubSpot objects and specific fields.
Choose which HubSpot objects you want to import (contacts, deals, companies, etc.) and select only the properties you need instead of downloading entire object exports.
Step 4. Configure filters and refresh schedule.
Apply up to 25 filters with AND/OR logic to focus your data imports. Set up automated refresh scheduling for hourly, daily, or weekly updates to eliminate manual export cycles.
Step 5. Enable Auto Fill Down for formula preservation.
Turn on the Auto Fill Down feature so your formulas automatically apply to new rows when data refreshes add records to your sheet.
Start syncing your HubSpot data automatically
Get startedThis approach eliminates the manual download-upload cycle while maintaining real-time data accuracy and supporting unlimited record imports.with Coefficient to automate your HubSpot data sync today.
SalesforceBug status gets out of sync betweenand JIRA when teams update one system but forget the other. Manual status checking wastes time and creates confusion about which system has the current information.
CoefficientHere’s how to create bidirectional bug tracking usingas a centralized monitoring system that imports data from both platforms and automatically detects discrepancies.
Create centralized status monitoring using Coefficient
Salesforceand JIRA status tracking becomes reliable when you have a single source of truth that monitors both systems. Coefficient imports data from both platforms and identifies status mismatches automatically.
How to make it work
Step 1. Set up dual data imports for both systems.
Create separate imports for Salesforce Cases and JIRA issues (if API access is available) with hourly refresh schedules. Import key fields like Case ID, JIRA Issue Key, Status, Priority, Assignment, and Last Modified Date. This creates a complete view of bug status across both platforms.
Step 2. Build status reconciliation with automated matching.
Create a master reconciliation view that shows both statuses side-by-side using VLOOKUP formulas to match records across systems. Map status values between platforms: Salesforce “New” to JIRA “Open”, “In Progress” to “In Progress”, “Resolved” to “Resolved”. Use conditional formatting to highlight status mismatches immediately.
Step 3. Configure discrepancy detection and alerts.
Set up Coefficient’s “Cell values change” alerts to notify teams when status discrepancies are detected and create formulas that identify records where statuses don’t match expected mappings. Generate daily reconciliation reports showing sync issues and their resolution status.
Step 4. Implement bidirectional update processes.
Use Coefficient’s scheduled exports to push status corrections back to Salesforce and export JIRA update files for bulk import or API processing. Create update queues that show which records need status synchronization and track the success of bidirectional updates.
Maintain synchronized bug status across platforms
Set upThis approach provides complete audit trails of status changes, automated detection of synchronization failures, and centralized monitoring of bug tracking system health. You eliminate manual status checking while maintaining data integrity across both platforms.bidirectional bug status tracking with Coefficient today.
HubSpot’s NPS reporting aggregates all responses into overall scores, making it impossible to track trends for specific products over time. You can see your general NPS direction but can’t identify which products are improving or declining in customer satisfaction.
Here’s how to build historical trend analysis for each product line using live data imports combined with snapshot capabilities that preserve data over time.
Combine live imports with historical snapshots using Coefficient
Coefficientenables product-specific NPS trend tracking by combining live data imports with snapshot capabilities. You can build time-series analysis that shows NPS evolution by product while maintaining current data for ongoing analysis.
How to make it work
Step 1. Set up live imports with product-specific filtering.
HubSpotConnect toand import NPS responses with timestamps and product associations. Use filtering to create separate datasets for each product line, giving you current NPS calculations that update automatically as new survey responses arrive.
Step 2. Capture historical data points with scheduled snapshots.
Use Coefficient’s snapshot feature to capture product-specific NPS scores on scheduled intervals – weekly, monthly, or quarterly. This preserves historical data points while your live imports continue updating with current responses, building the time-series data you need for trend analysis.
Step 3. Build comparative trend dashboards for multiple products.
Create dashboards showing multiple product NPS trends side-by-side using your captured snapshots. Track “Product A NPS” monthly while simultaneously monitoring “Product B NPS” and “Product C NPS” trends, identifying which products are improving or declining over time.
Step 4. Automate trend updates with scheduled refreshes.
HubSpotSet up scheduled imports that automatically update product-specific trend charts as new survey responses are collected from. Your trend analysis stays current while historical snapshots preserve the data points needed for long-term pattern recognition.
Identify product performance patterns over time
Start trackingProduct-specific NPS trends reveal which parts of your business are gaining or losing customer satisfaction momentum. Historical tracking combined with live updates gives you both current insights and long-term perspective.your product-specific NPS trends today.
HubSpotYou can update existingcontacts from Google Sheets without creating duplicates by using UPDATE export actions that modify existing records instead of creating new ones. This approach identifies contacts by email address and updates their information while preserving their contact history.
Here’s how to set up contact updates that maintain data integrity and prevent the duplicate management overhead that manual CSV imports typically create.
Update existing contacts without duplicates using Coefficient
Coefficientprovides UPDATE export actions specifically designed to modify existing HubSpot contacts rather than create new ones. This eliminates duplicate contact creation entirely while keeping your contact records current with Google Sheets information.
How to make it work
Step 1. Configure UPDATE export actions for existing contact modification.
Set up your Coefficient export to use UPDATE instead of INSERT. This tells the system to look for existing HubSpot contacts with matching email addresses and modify their information rather than creating new duplicate records.
Step 2. Map Google Sheets columns to specific contact properties for updating.
Choose which HubSpot contact properties you want to update from your Google Sheets data. Map columns like phone numbers, job titles, or custom fields to their corresponding HubSpot properties. The system updates only the specified fields while preserving other existing contact data.
Step 3. Use conditional logic for targeted record updates.
Set up conditional export rules to only update records that meet specific criteria. For example, only update contacts where a “last modified” timestamp in your Google Sheets is more recent than the last update, or where a status column indicates changes are ready.
Step 4. Enable bulk processing with error handling for large datasets.
Configure bulk update processing that handles large datasets efficiently without overwhelming HubSpot’s API limits. Turn on error handling to identify contacts that don’t exist or encounter update issues, with detailed logging for troubleshooting.
Keep your contact data current without duplicates
Set upUPDATE actions ensure data integrity while keeping contact records current, eliminating the duplicate management overhead that manual CSV imports create.your duplicate-free contact update system today.
HubSpotYou can upload Google Sheets data towithout downloading CSV files or using the manual import wizard. Direct spreadsheet-to-CRM integration eliminates the time-consuming download and upload process entirely.
Here’s how to set up automated data transfer that runs without any manual file handling or import steps.
Transfer Google Sheets data directly to HubSpot using Coefficient
Coefficientcreates a direct connection between your Google Sheets and HubSpot that bypasses the manual CSV workflow completely. Your spreadsheet data flows straight into your CRM on whatever schedule you choose.
How to make it work
Step 1. Connect your Google Sheets directly to HubSpot.
Install Coefficient and open your spreadsheet. In the sidebar, go to “Connected Sources” and add both your Google Sheets and HubSpot accounts. This establishes the direct connection that eliminates file downloads.
Step 2. Configure automatic field mapping between platforms.
Set up your export with automatic field mapping between Google Sheets columns and HubSpot contact properties. Choose INSERT for new contacts or UPDATE for existing ones. The system saves these mapping preferences for future transfers.
Step 3. Schedule automated runs for continuous data flow.
Set your exports to run hourly, daily, or weekly based on how current you need your HubSpot data. Add conditional logic to only export relevant data changes, like new rows or updated information since the last sync.
Step 4. Enable error handling and notifications.
Turn on automated alerts to get notified when transfers complete successfully or encounter issues. This gives you visibility into your data flow without having to manually check import status.
Eliminate manual CSV workflows permanently
Set upDirect Google Sheets to HubSpot integration transforms a manual, error-prone process into a fully automated system that requires no ongoing intervention.your automated contact import system today.
Custom report types in Professional Edition can help organize data relationships but cannot bypass the fundamental running user limitation for dashboards since dashboard components still display the same data to all users regardless of the underlying report type structure.
Here’s how to get true user-specific data access that works with any Salesforce report or object.
Get genuine user-specific data access beyond report type limitations
Coefficientprovides true user-specific data access through direct object access, user-specific filtering, cross-object analysis, and real-time personalization that custom report types cannot provide at the dashboard level. You can import from any standard or custom object without requiring custom report type configuration.
How to make it work
Step 1. Access any object with user-specific filtering.
Use Coefficient’s “From Objects & Fields” to build ad-hoc reports from any object with user-specific filtering like Owner.Email = CURRENT_USER. This eliminates the need to create custom report types just to link objects like Opportunities with Campaign Members and Tasks.
Step 2. Build dynamic cross-object relationships.
Import related Account fields, Campaign Member data, and Associated Tasks in a single import with automatic user filtering. Access related object data on-demand versus predefined report type relationships, and automatically filter across all related objects based on user ownership or territory.
Step 3. Create advanced analytics without report type constraints.
Write custom SOQL queries that join multiple objects and apply user-based conditions that would require complex custom report type configurations. Build complex calculations, pivot tables, and visualizations that would require extensive custom development to achieve through report types.
Step 4. Enable historical tracking and export capabilities.
SalesforceUse Snapshots to track user performance over time without complex report type configurations for historical data. Push user-specific updates back toobjects directly from personalized dashboards, and access all standard objects (Account, Contact, Lead, Opportunity) plus any custom objects without object limitations.
Move beyond custom report type workarounds
Start accessingThis eliminates the need for complex custom report type workarounds while providing genuinely dynamic, user-specific functionality that Professional Edition cannot achieve through report types alone.user-specific data without the custom report type complexity.
When Salesforce reports can’t surface duplicate accounts, SOQL queries offer a direct path to identify duplicates. But native SOQL tools like Developer Console and Workbench have significant limitations including 50,000 row query limits and manual export processes.
Here’s how to use advanced SOQL capabilities that overcome these native limitations and provide automated duplicate account identification.
Execute advanced SOQL queries without native limitations using Coefficient
CoefficientSalesforceSalesforceprovides superior SOQL functionality that eliminates the row limits and manual processes ofornative tools. You can run complex duplicate detection queries, schedule automatic execution, and export results directly to spreadsheets for analysis.
How to make it work
Step 1. Create aggregate queries to identify duplicate names.
Use queries like SELECT Name, COUNT(Id) cnt FROM Account GROUP BY Name HAVING COUNT(Id) > 1 to find accounts with identical names. This aggregate approach quickly surfaces the most obvious duplicates without hitting query limits.
Step 2. Build complex matching logic queries.
Write queries that identify duplicates based on multiple criteria: SELECT Id, Name, Website, Phone FROM Account WHERE Website IN (SELECT Website FROM Account GROUP BY Website HAVING COUNT(Id) > 1). This finds all accounts sharing websites with other accounts.
Step 3. Schedule automated query execution.
Unlike Developer Console’s manual execution, schedule your SOQL queries to run automatically on hourly or daily intervals. This ensures your duplicate detection stays current as new accounts are added to Salesforce.
Step 4. Import larger datasets without row limits.
Execute queries that return more than the 50,000 row limit of native Salesforce tools. This is crucial for comprehensive duplicate analysis in organizations with large account databases.
Step 5. Combine multiple objects in single queries.
Create join queries that combine Account data with related objects for complex duplicate detection scenarios. This advanced capability goes beyond what’s possible with standard Salesforce reporting or basic SOQL tools.
Start running unlimited SOQL queries today
Begin buildingAdvanced SOQL capabilities provide the duplicate detection power that native Salesforce tools can’t match. You get unlimited row queries, automated execution, and direct spreadsheet integration for comprehensive analysis.advanced duplicate detection queries today.
While HubSpot’s API supports creating tasks with contact associations, it requires significant development resources, multiple API calls, and complex error handling for reliable implementation.
Here’s how to achieve the same programmatic task creation with contact associations using a no-code approach that’s easier to implement and maintain.
Automate task creation with contact associations using Coefficient
CoefficientHubSpotprovides API-like automation through scheduled exports that function like programmatic calls but use familiar spreadsheet interfaces. You get the same automated task creation capabilities without the technical complexity of directAPI integration.
How to make it work
Step 1. Set up dynamic data sources for task triggers.
Connect external systems to your spreadsheet through Coefficient or other integrations. This could be support tickets, form submissions, deal stage changes, or any other trigger that should create tasks. Use scheduled imports to pull this trigger data automatically.
Step 2. Build task creation logic with spreadsheet formulas.
Use spreadsheet functions to determine when and how to create tasks with specific contact associations. Apply conditional logic with IF statements, lookup functions to find the right contacts, and date formulas to set due dates. This replaces the complex code you’d write for API integration.
Set up Coefficient’s scheduled export feature to automatically push new tasks to HubSpot with proper contact associations. Use conditional exports to only create tasks when specific criteria are met, mimicking the logic you’d build into API calls.
Step 4. Implement error handling and monitoring.
Use Coefficient’s built-in status reporting and email alerts to monitor task creation success. Set up notifications for failed exports or validation errors, giving you the same visibility you’d build into custom API integration.
Step 5. Scale with multiple automation scenarios.
Create different automated workflows for various use cases: follow-up tasks when deals reach certain stages, support tasks from ticket systems, or project tasks from external management tools. Each can have its own logic and contact association rules.
Get API-level automation without the complexity
Try CoefficientThis approach delivers programmatic task creation with the reliability and automation of API integration, but without requiring development resources or ongoing maintenance.to automate your task creation workflows with simple, powerful no-code tools.
HubSpotDirectAPI connections through Power Query hit strict rate limits of 100 requests per 10 seconds for most endpoints. This causes connection failures and incomplete data imports when pulling large datasets, requiring custom throttling logic in your M code.
Here’s how to import large HubSpot datasets without rate limit errors or custom retry mechanisms.
Import HubSpot data without rate limit failures using Coefficient
Coefficientautomatically manages HubSpot API rate limits and optimizes data retrieval to prevent connection errors. The platform handles request throttling, retry logic, and efficient batching behind the scenes.
How to make it work
Step 1. Connect HubSpot through Coefficient’s managed system.
Install Coefficient and connect your HubSpot account. The platform automatically configures optimal request patterns that respect HubSpot’s rate limits without requiring manual throttling configuration.
Step 2. Import large datasets without size restrictions.
Select your HubSpot objects and fields normally. Coefficient supports minimum 50,000 rows with no maximum limit, automatically managing the API calls needed to retrieve complete datasets without hitting rate limits.
Step 3. Let automatic retry logic handle temporary failures.
If rate limits are temporarily exceeded, Coefficient automatically implements retry mechanisms with appropriate delays. This eliminates the need for custom error handling code and ensures complete data retrieval.
Step 4. Monitor imports with built-in error alerts.
Set up Slack and email alerts to notify you if any connection issues occur during scheduled imports. The platform provides clear error messaging and automatic resolution for most rate limit scenarios.
Step 5. Schedule imports during optimal times.
Use Coefficient’s scheduling features to run large imports during off-peak hours when rate limits are less likely to be an issue. The platform optimizes request timing automatically.
Import large HubSpot datasets reliably
Start importingStop dealing with rate limit errors and incomplete imports. Coefficient handles all the technical complexity of API throttling so you can focus on analyzing your complete HubSpot dataset.without rate limit worries today.
If you’re here, you’ve probably spent the last hour searching for HubSpot’s OData feed URL format to connect Power Query to your CRM data. We have bad news and good news.
The bad news: HubSpot doesn’t provide OData feeds. At all.
The worse news: To connect HubSpot to Excel via Power Query, you’d need to:
Manually construct REST API URLs for each object type (contacts, deals, companies)
Handle complex JSON-to-table transformations
Write custom M code for pagination
Manage API rate limits and authentication tokens
Update everything manually when HubSpot changes their API
The good news: There’s a much simpler way to get your HubSpot data into Excel—without touching a single API endpoint.
Why Power Query + HubSpot = Hours of Frustration
Let’s be honest about what you’re facing if you try the Power Query route:
That’s just to get your first 100 contacts. Need deals? Different endpoint. Want associated data? Multiple API calls. Need more than 100 records? Welcome to pagination hell.
Most Excel users give up after realizing they need to become API experts just to pull a simple contact list.
A Better Way: Connect HubSpot to Excel in 2 Minutes (Not 2 Hours)
Coefficient is an Excel add-in that connects HubSpot (and 50+ other business systems) directly to your spreadsheets—no API knowledge required. Think of it as Power Query, but built specifically for business users who need data now, not after a coding bootcamp.
Here’s what makes it different:
Pre-built connectors for all HubSpot objects (contacts, deals, companies, tickets, custom objects)
Point-and-click interface instead of URL construction
Automatic updates so your data stays fresh
No API limits or throttling issues to manage
How to Import HubSpot Data to Excel (The Easy Way)
Step 1: Install Coefficient and Connect HubSpot
Install Coefficient directly from the Microsoft AppSource store (it takes 30 seconds). Once installed, click “Add Connection” and select HubSpot from the list of 50+ integrations.
Simply authorize your HubSpot account with one click—Coefficient handles all the OAuth authentication and API configuration behind the scenes.
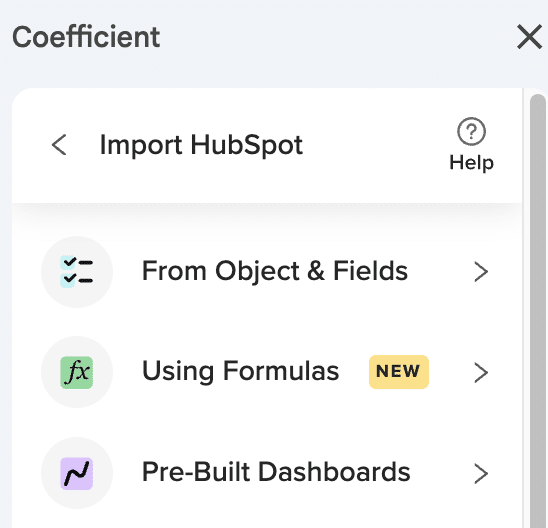
Step 2: Select Your Data (No API Endpoints Required)
Instead of memorizing API endpoints, you’ll see a simple menu of all your HubSpot objects:
Contacts (with all custom properties)
Deals (including pipeline stages)
Companies
Tickets
Activities
Custom objects
Just check the boxes for the data you want. It’s like browsing a menu instead of writing a recipe from scratch.
Step 3: Configure Your Import (With Actual Filtering Options)
Apply filters using plain English instead of API parameters:
“Deals created this month”
“Contacts from California”
“Companies with revenue > $1M”
Select exactly which fields you want—no more downloading 200 columns when you only need 10.
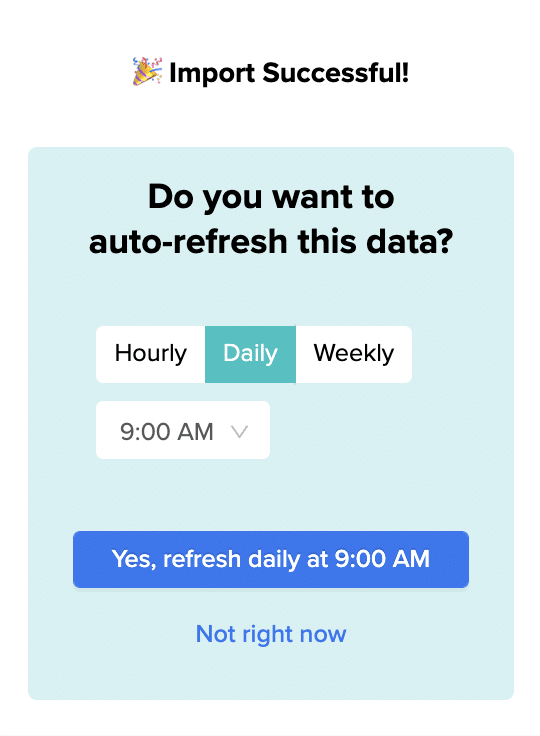
Step 4: Set It and Forget It with Auto-Refresh
This is where Coefficient really shines. Set your data to refresh:
Every hour for live dashboards
Daily at 9 AM for morning reports
Weekly for executive summaries
Your Excel file becomes a living document that updates itself—no more manual exports or broken Power Query connections.
What This Means for Your Workflow
Instead of spending hours:
Learning HubSpot’s API documentation
Debugging Power Query M code
Manually refreshing data
Fixing broken connections
You can focus on:
Analyzing your data
Building dynamic reports
Making data-driven decisions
Actually using Excel for what it’s meant for
Real Results from Real Users
“We tried Power Query for months. Coefficient got us connected in minutes. Our sales reports now update automatically every morning—it’s been a game-changer.” – Robinson J, Analyst @ Miro
The Bottom Line: Stop Fighting with APIs
HubSpot’s lack of OData support isn’t going to change. But your approach to getting HubSpot data into Excel can change—today.
With Coefficient, you get:
✅ All your HubSpot data in Excel without writing a single line of code
✅ Automatic updates that keep your reports fresh
✅ Pre-built templates for common HubSpot reports
✅ Support for Excel formulas, pivot tables, and charts on live data
✅ Peace of mind knowing your connections won’t break
Ready to Skip the API Headache?
Stop searching for OData feeds that don’t exist. Start importing your HubSpot data the easy way.Start Free Trial →