In today’s data-driven business world, connecting your HubSpot data with your PostgreSQL database is crucial for gaining comprehensive insights and making informed decisions. By integrating these two powerful platforms, data and business intelligence professionals can streamline their workflows, ensure data accuracy, and unlock advanced reporting capabilities.
In this blog post, we’ll explore the top three methods for connecting HubSpot to PostgreSQL: Coefficient, Hevo Data, and Skyvia. Each of these solutions offers a unique approach to data integration, catering to different skill levels and use cases. We’ll dive into the advantages of connecting these platforms and provide step-by-step guides to help you get started.
Advantages of Connecting HubSpot to PostgreSQL
- Centralize customer data for comprehensive analysis: By combining HubSpot’s rich customer interaction data with PostgreSQL’s robust data storage capabilities, you can gain a 360-degree view of your customers. Analyze key metrics such as lead generation, customer engagement, and sales performance across both platforms for deeper insights.
- Automate data synchronization to minimize manual efforts: Manually exporting and importing data between HubSpot and PostgreSQL can be time-consuming and error-prone. By automating data synchronization, you can ensure your PostgreSQL database always has the most up-to-date information from HubSpot, saving you valuable time and effort.
- Enhance data accuracy and reliability: Integrating HubSpot with PostgreSQL eliminates the need for manual data entry, reducing the risk of human errors. With automated data transfer, you can trust that your PostgreSQL database accurately reflects your HubSpot data, providing a reliable foundation for analysis and decision-making.
- Enable advanced reporting and business intelligence: By combining HubSpot and PostgreSQL data, you unlock the potential for advanced reporting and business intelligence. Merge data from both platforms to create comprehensive dashboards, perform complex queries, and uncover valuable insights that drive business growth.
Connecting HubSpot to PostgreSQL – 3 Methods
| Solution Name | Best For |
| Coefficient | Non-technical users and businesses that need a quick, user-friendly solution for connecting HubSpot to PostgreSQL. Ideal for teams without dedicated data engineers or those looking to empower business users to handle data integration tasks. |
| Hevo Data | Organizations handling large volumes of data that require real-time synchronization between HubSpot and PostgreSQL, as well as other data sources. Suited for businesses with complex data ecosystems needing a robust, scalable solution. Ideal when real-time analytics, extensive integration options, and minimal data latency are crucial. |
| Skyvia | Businesses that need powerful data transformation capabilities without coding expertise. Best for scenarios requiring complex ETL (Extract, Transform, Load) processes, data cleansing, or restructuring before loading into PostgreSQL. Suitable for organizations that want to automate sophisticated data workflows without investing in custom development. |
How to Connect HubSpot to PostgreSQL
Method 1: Coefficient – No-Code, User-Friendly

Coefficient is a user-friendly, no-code solution that simplifies data integration for non-technical users. With its intuitive interface and automatic data updates, Coefficient makes connecting HubSpot to PostgreSQL a breeze.
Pros and Cons
Pros:
- Easy to use: You don’t need to know how to code. Anyone can set it up quickly.
- Works with spreadsheets: Use it directly in Google Sheets or Excel, which many people already know how to use.
- Affordable: It’s cheaper than many other options, especially for small businesses.
Cons:
- Scheduled automations are not free forever
How to Connect HubSpot to PostgreSQL with Coefficient
Step 1: Install the Coefficient
For Google Sheets
Open a new or existing Google Sheet, navigate to the Extensions tab, and select Add-ons > Get add-ons.

In the Google Workspace Marketplace, search for “Coefficient.”

Follow the prompts to grant necessary permissions.

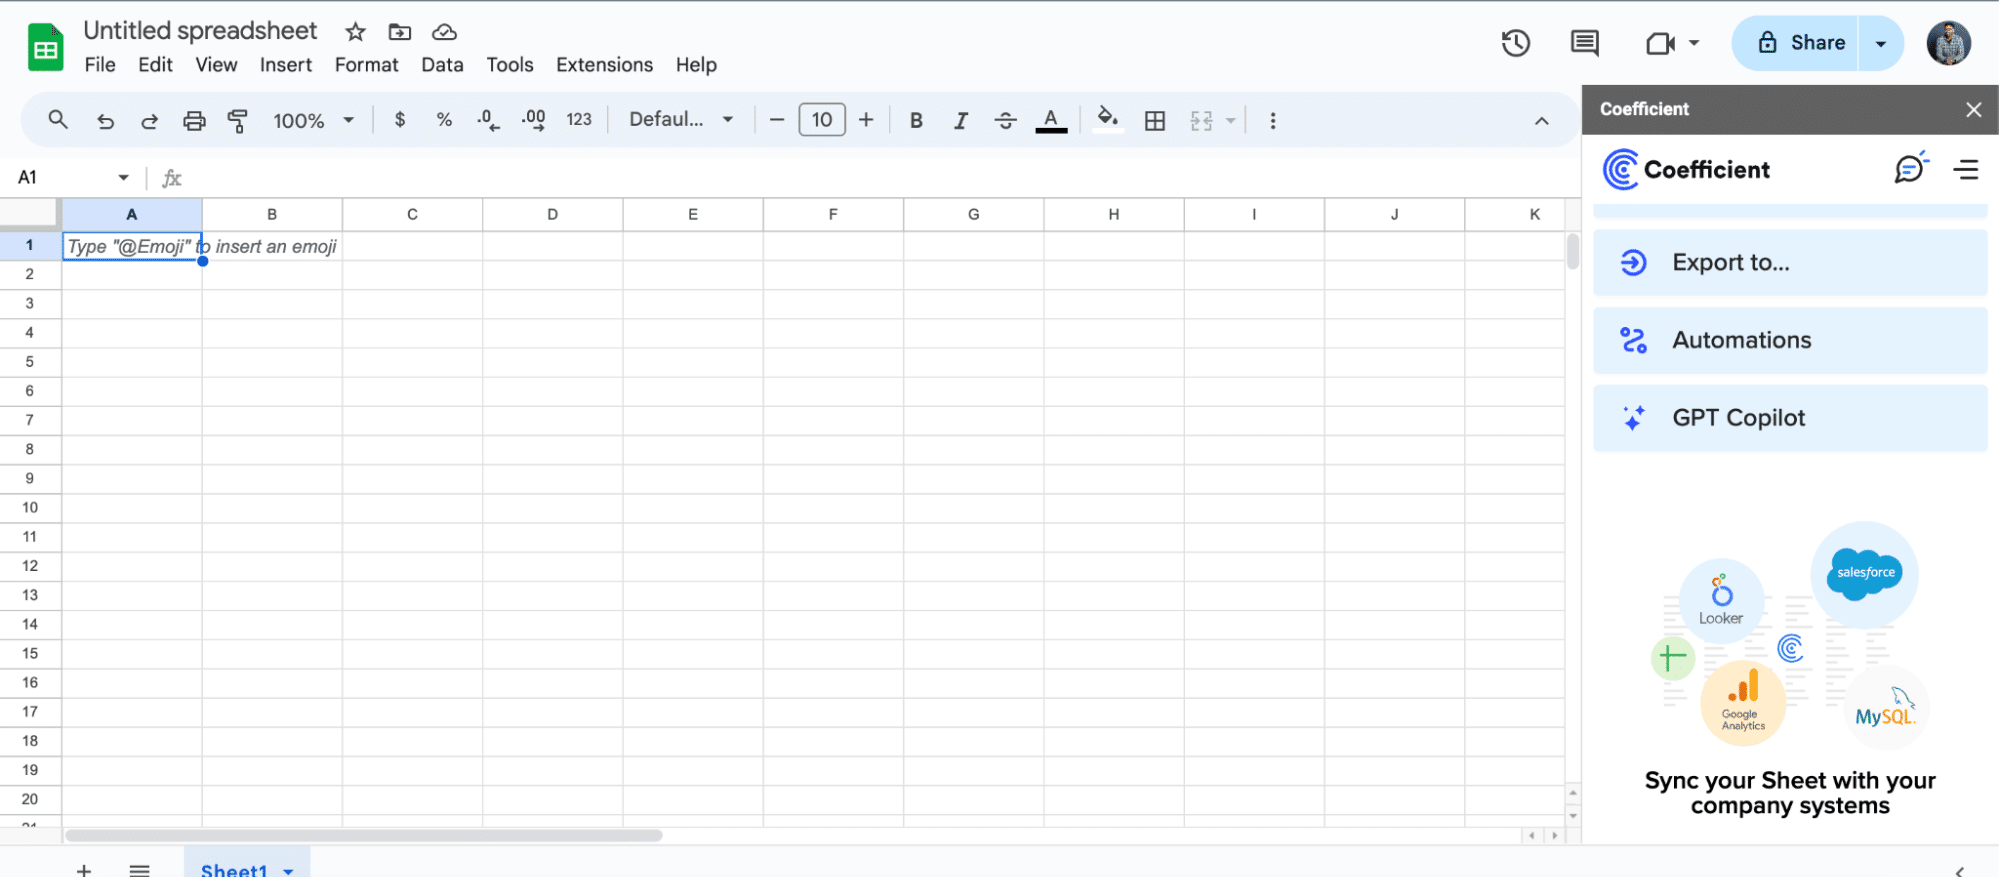
Launch Coefficient from Extensions > Coefficient > Launch.

Coefficient will open on the right-hand side of your spreadsheet.
For Microsoft Excel
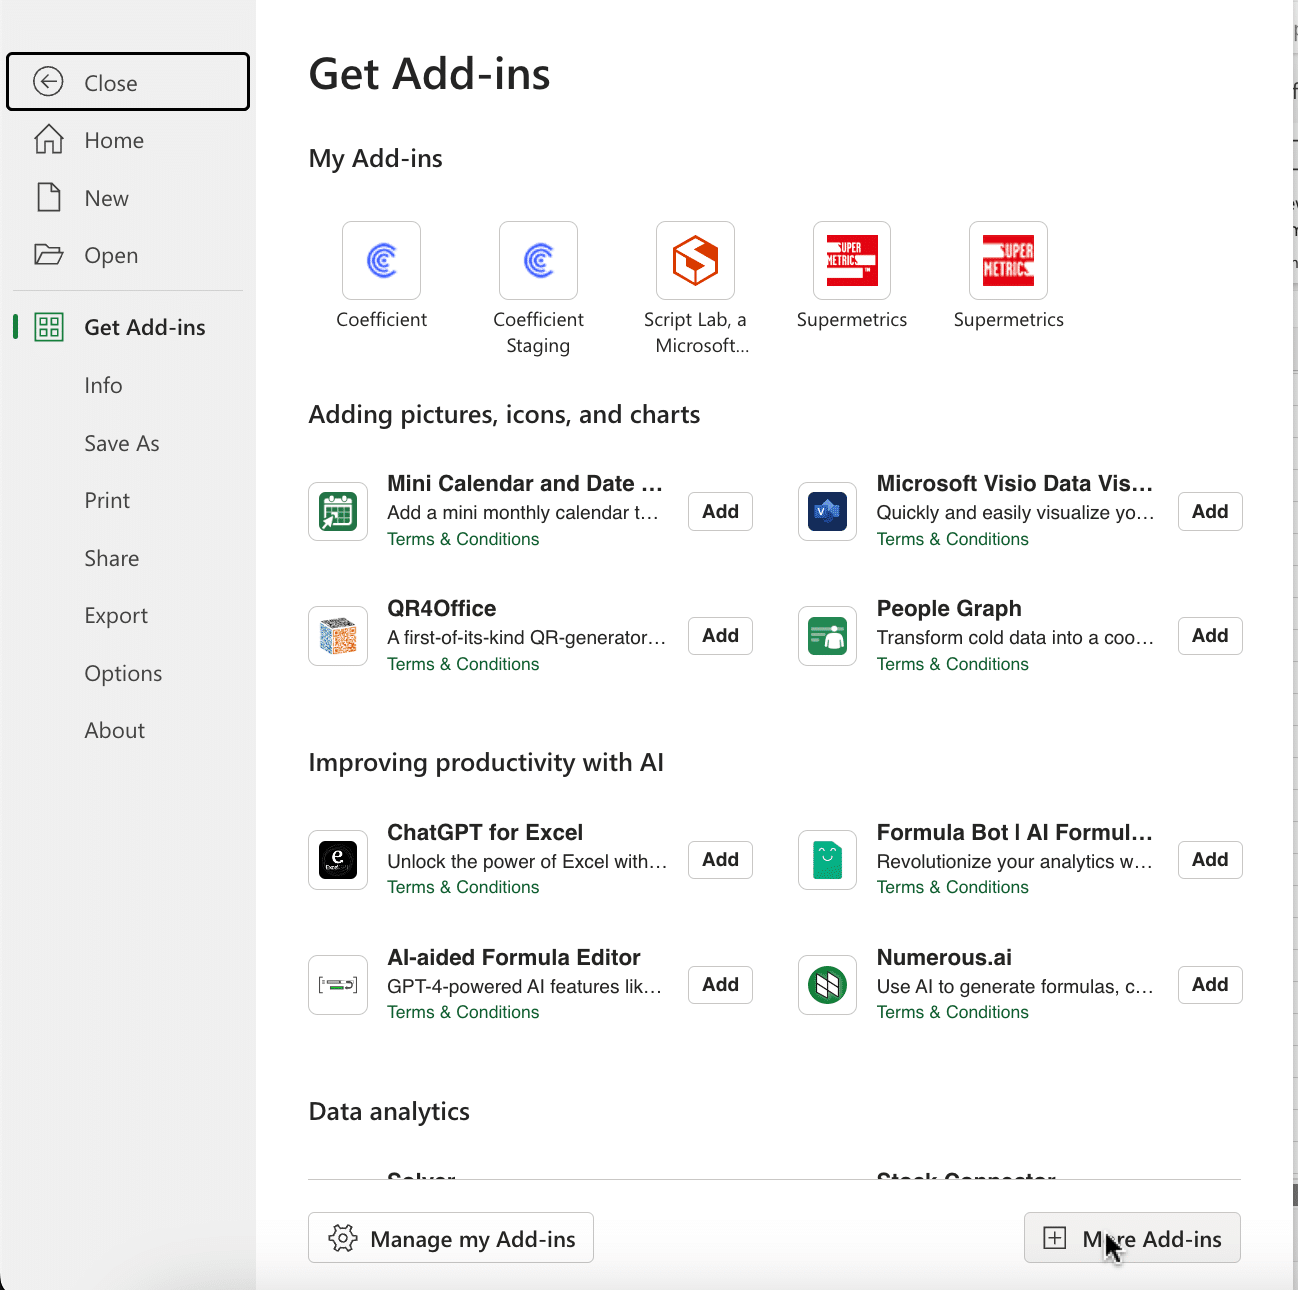
Open Excel from your desktop or in Office Online. Click ‘File’ > ‘Get Add-ins’ > ‘More Add-Ins.’
Type “Coefficient” in the search bar and click ‘Add.’
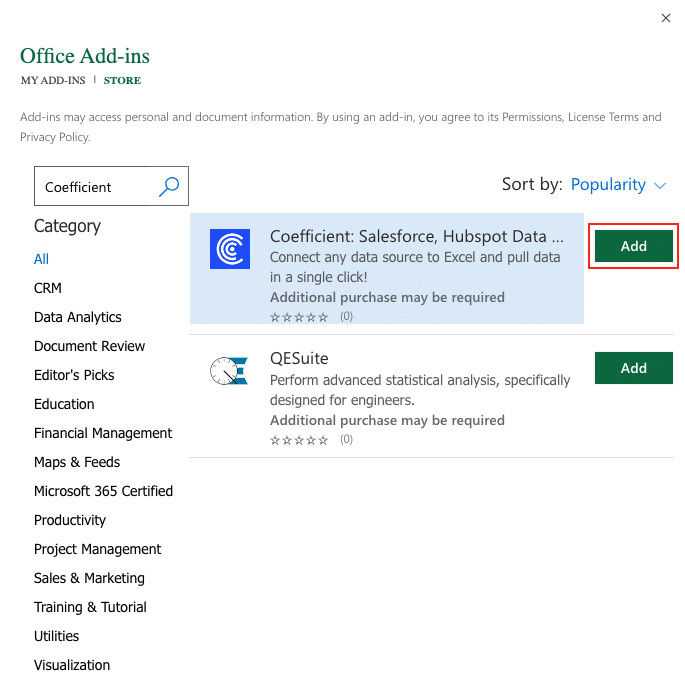
Follow the prompts in the pop-up to complete the installation.
Once finished, you will see a “Coefficient” tab in the top navigation bar. Click ‘Open Sidebar’ to launch Coefficient.

Step 2: Import data from HubSpot into Google Sheets
Now, you can connect HubSpot and your spreadsheet in a few clicks.
Select ‘Import from…’

Scroll down until you find HubSpot in the menu.

Note: If this is your first time exporting HubSpot contacts to Excel or Google Sheets with Coefficient you will need to authorize Coefficient’s access to your HubSpot account. Coefficient is Soc II compliant and data imports using Data Connectors are never stored on Coefficient servers.
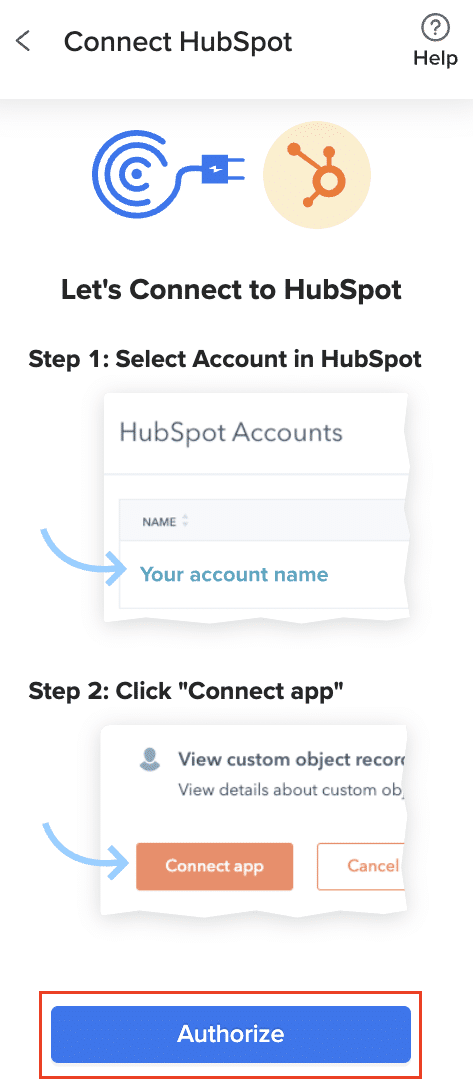
Follow the prompts to authenticate and link Coefficient with HubSpot as your data source. You’re now ready to create imports from HubSpot using Coefficient.
After selecting HubSpot as your data source, click ‘From Object & Fields.’

Choose the object for your export – in this case, ‘Contacts.’

Click ‘Next’ > ‘Select fields…’ and choose the fields you need from the list. Hit ‘Done Selecting Fields’ when you’re finished.
Scroll down the menu and click ‘Import.’

In just a few clicks, you’ve successfully imported HubSpot Contacts to your spreadsheet

Step 3. Export Data from Your Spreadsheet to PostgreSQL
Before starting, make sure you’ve connected to PostgreSQ
Then, navigate to Coefficient’s menu. Click “Export to…”

Select PostgreSQL from the menu.

Choose the tab in your workbook that contains the data you want to export and specify the header row that contains the database field headers.

Specify the table in your database where you want to insert the data and choose the appropriate action (Insert, Update, Delete).

omplete the field mappings for the export. Ensure that primary keys or ID fields are mapped if required for the action you are performing.

Confirm your settings and click “Export” to proceed.

Highlight the specific rows in your sheet that you want to export, or choose to export all rows.

Review your settings and follow the prompts to push your data back to PostgreSQL.
Method 2: Hevo Data
Hevo Data is an ETL tool that enables real-time data transfer from HubSpot to PostgreSQL with minimal technical knowledge required. Its pre-built connectors and intuitive interface make setting up data integrations a simple process.
Pros and Cons
Pros:
- Updates quickly: Your PostgreSQL database gets new data from HubSpot almost instantly.
- Connects to many tools: Besides HubSpot, it can pull data from lots of other sources too.
- Handles complex data: You can do complicated data transformations and it manages errors well.
Cons:
- Can be expensive: The more data you have and the more features you need, the more it costs.
- Takes time to learn: It’s not as simple as spreadsheets. You’ll need time to learn how to use it well.
- Complicated setup: Getting started can be tricky, especially if you’re new to data integration.
How to Connect HubSpot to PostgreSQL with Hevo
Step 1. Sign Up for Hevo:
- Visit the Hevo Data website and click “Start Free Trial”
- Enter your details and create an account
- Verify your email address
- Log in to the Hevo Data dashboard
Step 2. Set Up HubSpot as a Source:
- In the Hevo dashboard, navigate to “Sources” > “Add Source”
- Search for and select “HubSpot” from the list of available connectors
- Click “Authenticate” and log in to your HubSpot account
- Grant necessary permissions for Hevo to access your HubSpot data e. Name your HubSpot source (e.g., “HubSpot CRM”)
Step 3. Configure HubSpot Data Extraction: a. Select the HubSpot objects you want to sync (e.g., Contacts, Companies, Deals) b. Choose between full extract or incremental updates c. Set up any required filters to limit the data being synced d. Configure the sync frequency (real-time, hourly, daily)
Step 4. Set Up PostgreSQL as a Destination:
- Go to “Destinations” > “Add Destination”
- Select “PostgreSQL” from the list of available destinations
- Enter your PostgreSQL connection details:
- Host
- Port
- Database name
- Schema
- Username
- Password d. Test the connection to ensure it’s working correctly e. Name your PostgreSQL destination (e.g., “Analytics DB”)
Step 5. Create a Data Pipeline:
- Go to “Pipeline” > “Create Pipeline”
- Select your HubSpot source and PostgreSQL destination
- For each HubSpot object:
- Map fields to corresponding PostgreSQL table columns
- Set up primary key for accurate data updates
- Configure update strategies (insert, update, or upsert)
Step 6. Apply Transformations (Optional):
- Click on “Transform” in your pipeline setup
- Use Hevo’s built-in functions for basic transformations (e.g., date formatting, string operations) For complex transformations:
- Write custom Python scripts
- Use SQL transformations for data aggregation or joins
Step 7. Set Up Real-Time Sync: a. In the pipeline settings, enable real-time sync b. Configure Hevo’s CDC (Change Data Capture) feature for instant updates c. Set up retry mechanisms and error thresholds
Step 8. Validate and Start the Pipeline:
- Review all pipeline settings
- Run a test to validate the entire data flow
- Check the data in PostgreSQL to ensure correct mapping and transformations
- If everything looks good, activate the pipeline for continuous syncing
Step 9. Monitor and Maintain: a. Use Hevo’s monitoring dashboard to track sync status and data flow b. Set up alerts for any errors or anomalies:
- Pipeline failures
- Data quality issues
- Latency thresholds c. Regularly review pipeline logs and performance metrics d. Update pipeline configurations as your data needs evolve
Method 3: Skyvia

Skyvia is a cloud-based data integration platform that offers a no-code approach to ETL processes. With its extensive connector support and advanced transformation capabilities, Skyvia simplifies data integration for users of all skill levels.
Pros and Cons
Pros:
- Visual tool: You can set up your data flows by dragging and dropping, without coding.
- Flexible timing: You can choose exactly when and how often to sync your data.
- Powerful data changes: You can use SQL to make complex changes to your data as it moves.
Cons:
- Online only: You can’t install it on your own computers; it only works online.
- Can get pricey: The cost goes up as you use more advanced features.
- Might be too much: If you just need a simple connection, it has many features you won’t use.
How to Connect HubSpot to PostgreSQL with Skyvia
Step 1: Create Skyvia Account
- Visit Skyvia website and click “Sign Up”
- Enter your details and create an account
- Verify your email address
- Log in to the Skyvia dashboard
Step 2: Set Up Connections
- Navigate to “Connections” > “New Connection”
- Set up HubSpot connection:
- Choose HubSpot from the list
- Connect and authorize your HubSpot account
- Name your connection (e.g., “HubSpot CRM”)
- Set up PostgreSQL connection:
- Select PostgreSQL from the list
- Enter database details (host, port, database name, username, password)
- Test the connection
- Name your connection (e.g., “Analytics DB”)
Step 3: Create Integration Package
- Go to “Integration” > “New Package”
- Name your package (e.g., “HubSpot to PostgreSQL Sync”)
- Select HubSpot as source and PostgreSQL as target
- Choose integration type (one-way or bi-directional)
Step 4: Configure Data Mapping
- For each HubSpot object (Contacts, Companies, Deals):
- Select source object and target table
- Map HubSpot fields to PostgreSQL columns
- Set up primary key mappings
- Configure sync behavior (insert, update, or upsert)
- Set up conflict resolution strategies
Step 5: Apply Transformations (if needed)
- Click on “Transformations” tab
- Use built-in functions for basic transformations
- For advanced needs:
- Write custom SQL queries
- Set up lookup operations
- Create derived fields
Step 6: Set Up Error Handling
- Configure error logging preferences
- Set up error notifications (email alerts)
Step 7: Schedule and Activate Integration
- Define sync frequency
- Run a manual sync to test
- Enable the integration package for automated syncing
Step 8: Monitor and Maintain
- Regularly check sync logs
- Monitor performance and adjust as needed
- Update mappings periodically as data structures change
Connect HubSpot to PostgreSQL From Your Spreadsheet
Connecting HubSpot to PostgreSQL is a game-changer for data and business intelligence professionals looking to streamline their workflows and unlock valuable insights.
Ready to experience the power of your live business data?
Get started with Coefficient today and discover how easy it is to connect HubSpot, PostgreSQL, and all your favorite tools. With Coefficient, you can focus on what matters most: making data-driven decisions that drive your business forward.


