


Table of Contents
![]()
- 1. How to integrate Google Forms with Salesforce: Top 2 methods
- 2. How to Automate Salesforce Data Imports from Any System (Even Without an API)
-
3. Common Methods to Export and Import Salesforce Data
- Top 5 methods to export and import Salesforce data
- Video Walkthrough: How Export Data from Google Sheets to Salesforce
- Method 1. Coefficient
- Top 5 methods to export and import Salesforce data
- Video Walkthrough: How Export Data from Google Sheets to Salesforce
- Method 1: Coefficient
- Method 2: Salesforce native data management functionality
- Method 3. Dataloader.io
- Method 4: Manual CSV Export/Import
- Method 5: Salesforce API
- How to bulk update records in Salesforce?
- Conclusion
- 4. How to Connect Salesforce to Google Sheets
- 5. How to Connect Salesforce to Excel
- 6. How Can I Open a Large Salesforce Export
- 7. How to Set Up Salesforce Reporting Snapshots
- 8. How to Export Data from Salesforce into Excel
- 9. How to Import Leads in Salesforce Like a Pro
- 10. How to Install Coefficient on Salesforce
- 11. Top 5 Alternatives to Google’s Salesforce Connector (2026 Comparison)
- 12. A Simpler Way to Use Salesforce Change Data Capture
- 13. How The Pros Are Setting Up Salesforce Lead Scoring in 2026
- 14. Salesforce Data Management for Teams Who Need Real Answers

Do you want to shorten your long-winded Salesforce data export and import processes?
We’re here to help you.
When you’re done reading this guide, you’ll have actionable tips to streamline your data export and import processes so you don’t spend countless hours inputting and updating data.
Top 5 methods to export and import Salesforce data
There are several ways to export and import data into your Salesforce account, including using built-in tools and third-party data connectors for Salesforce. However, in this guide, we’ll focus on the five common ways to export and import your Salesforce data.
- Coefficient – Top-rated data automation solution for Salesforce imports and exports
- Native Salesforce Data Management – Import Wizard & Data Export Service
- Dataloader.io – Third-party data loading app
- Manual CSV Export/Import – Built-in CSV functionality
- Salesforce API – Developer-focused programmatic access
TLDR
-
Step 1:
Get Started by installing Coefficient Add-on for Google Sheets or Excel
-
Step 2:
Launch Coefficient from Extensions Menu.
-
Step 3:
Click Import Data from the Coefficient sidebar, then select Salesforce as your data source.
-
Step 4:
Select the Salesforce account you want to connect and click Connect.
-
Step 5:
Specify your import’s Object fields by clicking Select Fields
-
Step 6:
Click on Import to start pull data from Salesforce into your spreadsheet.
-
Step 7:
Set an auto-refresh schedule hourly, daily, or weekly. This automates updating your Salesforce data on Google Sheets or Excel when your source data changes.
Video Walkthrough: How Export Data from Google Sheets to Salesforce
Method 1. Coefficient
Out of the three methods presented, Coefficient is the best option to export and import Salesforce data from Google Sheets and Excel, especially for businesses dealing with massive data volumes with a simple six step process that’d take 2-3 minutes. Companies like Klaviyo reclaimed two months worth of manual operations work using Coefficient.
Coefficient’s solution makes building your dashboards and reports effortless and analyzing data a breeze since it gets updated in real time, let alone automatically. In fact, you can give a Google Sheets Salesforce dashboard template a try in just a few clicks.
For instance, if you want to export Salesforce data and import it into Google Sheets, simply open a new Google Sheets file and launch the Coefficient Data Connector Add-on.
Note: You can follow the same steps in Excel as well after installing the Coefficient for Salesforce Excel Add-in.
Click Import Data, select Salesforce as your data source, and choose whether to import from reports, objects or specific fields, or a custom SOQL query.

After authorizing the connection, your data instantly exports from Salesforce to your Google Sheets file.
You can add and remove data fields as you go along, so you only work with the data you need without repeating the exporting process.
Coefficient also auto-refreshes your exported data on Google Sheets, so you never have to build the same analysis or keep exporting your file every time your Salesforce data changes or gets updated.
Schedule live data refreshes hourly, daily, or weekly by setting the frequency, day, and time in the Scheduled Run option. This ensures your data is always accurate and up-to-date.
Coefficient’s powerful features make your Salesforce data exporting (and importing) quick, easy, automated, and completely effortless, bolstering your data workflows and analysis.
Common Methods to Export and Import Salesforce Data
Do you want to shorten your long-winded Salesforce data export and import processes?
We’re here to help you.
When you’re done reading this guide, you’ll have actionable tips to streamline your data export and import processes so you don’t spend countless hours inputting and updating data.
Top 5 methods to export and import Salesforce data
There are several ways to export and import data into your Salesforce account, including using built-in tools and third-party data connectors for Salesforce. However, in this guide, we’ll focus on the five common ways to export and import your Salesforce data.
- Coefficient – Top-rated data automation solution for Salesforce imports and exports
- Native Salesforce Data Management – Import Wizard & Data Export Service
- Dataloader.io – Third-party data loading app
- Manual CSV Export/Import – Built-in CSV functionality
- Salesforce API – Developer-focused programmatic access
TLDR
- Step 1: Get Started by installing Coefficient Add-on for Google Sheets or Excel
- Step 2: Launch Coefficient from Extensions Menu.
- Step 3: Click Import Data from the Coefficient sidebar, then select Salesforce as your data source.
- Step 4: Select the Salesforce account you want to connect and click Connect.
- Step 5: Specify your import’s Object fields by clicking Select Fields
- Step 6: Click on Import to start pull data from Salesforce into your spreadsheet.
- Step 7: Set an auto-refresh schedule hourly, daily, or weekly. This automates updating your Salesforce data on Google Sheets or Excel when your source data changes.
Video Walkthrough: How Export Data from Google Sheets to Salesforce
Method 1: Coefficient
Out of the five methods presented, Coefficient is the best option to export and import Salesforce data from Google Sheets and Excel, especially for businesses dealing with massive data volumes with a simple six step process that’d take 2-3 minutes. Companies like Klaviyo reclaimed two months worth of manual operations work using Coefficient.
Coefficient’s solution makes building your dashboards and reports effortless and analyzing data a breeze since it gets updated in real time, let alone automatically. In fact, you can give a Google Sheets Salesforce dashboard template a try in just a few clicks.
For instance, if you want to export Salesforce data and import it into Google Sheets, simply open a new Google Sheets file and launch the Coefficient Data Connector Add-on.
Note: You can follow the same steps in Excel as well after installing the Coefficient for Salesforce Excel Add-in.
Click Import Data, select Salesforce as your data source, and choose whether to import from reports, objects or specific fields, or a custom SOQL query.
Show Image
Coefficient lets you choose from several data sources.
After authorizing the connection, your data instantly exports from Salesforce to your Google Sheets file.
You can add and remove data fields as you go along, so you only work with the data you need without repeating the exporting process.
Coefficient also auto-refreshes your exported data on Google Sheets, so you never have to build the same analysis or keep exporting your file every time your Salesforce data changes or gets updated.
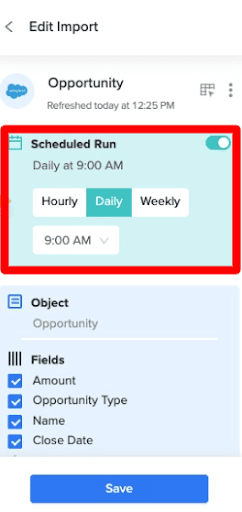
Show Image
Schedule your data imports in Coefficient easily.
Schedule live data refreshes hourly, daily, or weekly by setting the frequency, day, and time in the Scheduled Run option. This ensures your data is always accurate and up-to-date.
Advanced Coefficient Features
Beyond basic imports and exports, Coefficient offers powerful advanced features that transform how you work with Salesforce data. These capabilities eliminate manual data entry and provide real-time access to your CRM data directly within your spreadsheets.
Export to Salesforce (Upserts and Writebacks)
Coefficient’s Export to Salesforce feature lets you push updated data from your spreadsheets directly back into Salesforce, supporting sophisticated operations like upserts that can update existing records or create new ones automatically.
How to Export to Salesforce:
Step 1: Prepare your data
We recommend creating a Salesforce import of your data into Google Sheets/Excel using Coefficient before performing the Export to Salesforce. This allows automatic field detection and mapping.
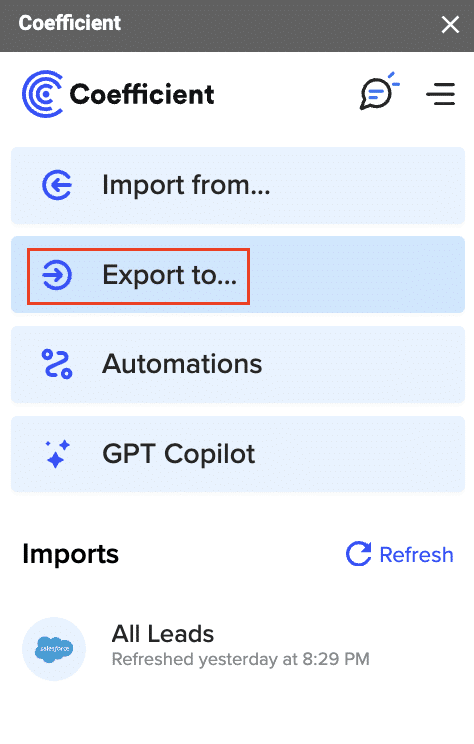
Step 2: Click “Export to…”
Open the Coefficient sidebar and click on the “Export to…” button, then select Salesforce as your destination.
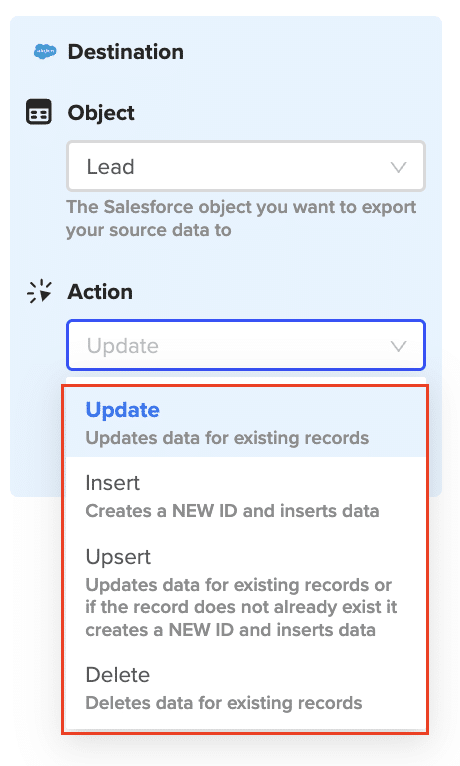
Step 3: Configure destination settings
Select the Tab and Header row (the row with Salesforce field headers), then choose your Salesforce Object and desired Action:
- Update: Modifies existing records (requires record ID)
- Insert: Creates new records
- Upsert: Updates existing or creates new records (requires External ID field)
- Delete: Removes entire records
Step 4: Map your fields
Coefficient automatically maps fields if your data came from a Salesforce import. For manual data, you’ll need to map columns to Salesforce fields yourself.
Step 5: Configure advanced settings
- Column for Results: Choose where to write export status information
- Batch Size: Set processing batch size (max 10,000 rows)
- Export Empty Cells: Enable to clear existing Salesforce values in bulk
- Include export button: Add a quick-access button to your sheet
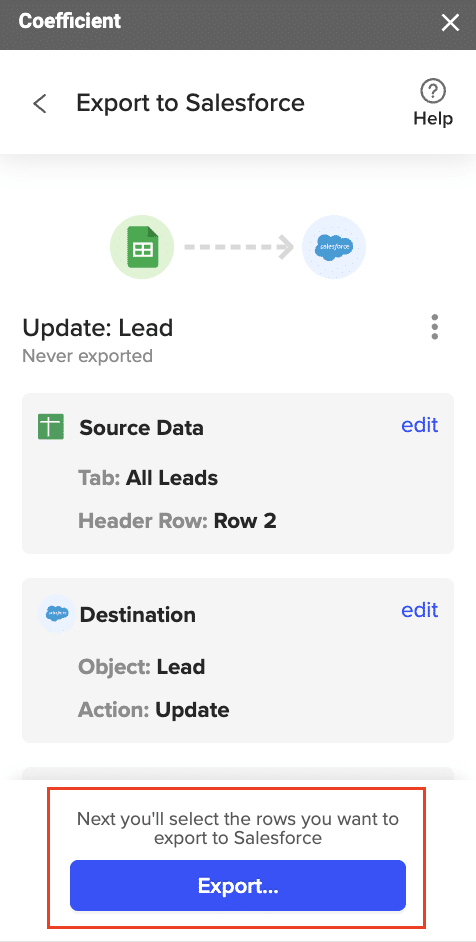
Step 6: Preview and execute
Review your settings, select which rows to export, and use the “Preview Changes” option to see exactly what will be updated before pushing to Salesforce.
Real-time Formula Functions
Access live Salesforce data directly in your spreadsheet cells using Coefficient’s powerful formula functions. These formulas work like native spreadsheet functions but pull data straight from your Salesforce org.
=salesforce_lookup Function
Pull field values from a single Salesforce record by matching any field. It works just like VLOOKUP, but for your Salesforce data.
Syntax: =salesforce_lookup(object_type, lookup_field, lookup_value, fields_list)
Example: Fetch account industry and type using the account name:
=salesforce_lookup("Account", "Name", "Acme Corp", "Industry, Type")Batch lookup example: Look up multiple contacts by email:
=salesforce_lookup("Contact", "Email", A3:A25, "First Name, Last Name, Phone")=salesforce_search Function
Query Salesforce objects with filters directly from your spreadsheet, returning multiple matching records in a tabular format.
Syntax: =salesforce_search(object_type, fields, filter_string, settings)
Example: Find opportunities with specific criteria:
=salesforce_search("Opportunity", "Name,Stage,Amount", "Stage = Proposal and Amount > 25000")Advanced filtering example: Use complex filters with sorting:
=salesforce_search("Opportunity", "Name,Stage,Amount",,"sort=amount:desc, include_header=true")=salesforce_report_search Function
Fetch multiple rows from saved Salesforce reports with optional filtering and sorting. Perfect for pulling filtered datasets from existing reports.
Syntax: =salesforce_report_search(report_name, fields, [filter_string], [settings])
Example: Get top closed won opportunities:
=salesforce_report_search("All Opportunities", "Opportunity Name, Amount, Stage", "Stage = Closed Won", "limit=100,sort=amount:desc")=salesforce_report_lookup Function
Pull field values from Salesforce reports by matching any field. Ideal when your report contains pre-filtered or aggregated data.
Syntax: =salesforce_report_lookup(report_name, lookup_field, lookup_value, fields, settings)
Example: Look up opportunity details from a report:
=salesforce_report_lookup("All Opportunities", "Opportunity Name", "Acme Inc", "Stage, Amount")Coefficient’s powerful features make your Salesforce data exporting (and importing) quick, easy, automated, and completely effortless, bolstering your data workflows and analysis.
Pros
- Coefficient is uber-easy to set up and install and you can get it up and running in seconds.
- It’s a powerful tool that requires little to no effort when exporting and importing your Salesforce data.
- Build once and refresh forever with auto-refresh schedules to ensure you always work with the latest and most accurate data.
- You can use AI to build custom SOQL queries.
- Coefficient supports multiple data source integrations to your spreadsheet like Hubspot, Stripe, Quickbooks for advanced data analysis.
- No object data mapping and manual query building required since Coefficient works instantly and on the fly as soon as you set up your data source connections.
- Upserts and writebacks are native to the Coefficient app
Cons
- Coefficient has a free plan which is limited, but it offers affordable pricing plans.
Method 2: Salesforce native data management functionality
Salesforce has two native features that allows its users to export and import data: the Salesforce data import wizard and Salesforce data export service.
A. Export Salesforce Data using Import Wizard
To import using Salesforce data import wizard, follow these steps.
Step 1: Prepare your file for import
In our example, we’ll show you how to import leads into Salesforce.
To prepare your file for import, be sure to:
- Clean your import file for consistency and accuracy, such as deleting unnecessary details, enforcing name conventions, updating the info, removing duplicates, and correcting any spelling errors.
- Change any configurations necessary to ensure successful Salesforce import. For instance, you may need to add new values to your picklists, make new custom fields, or temporarily deactivate some workflow rules.
- Compare your import file’s data fields with the Salesforce fields you’re importing into to verify and ensure your data gets mapped into the right fields.
After preparing your import data, save it as a CSV file.
Step 2: Launch the Salesforce Data Import Wizard
Click the Setup icon on the Salesforce interface, type in “Data Import Wizard” in the Quick Find search box, and select Data Import Wizard.

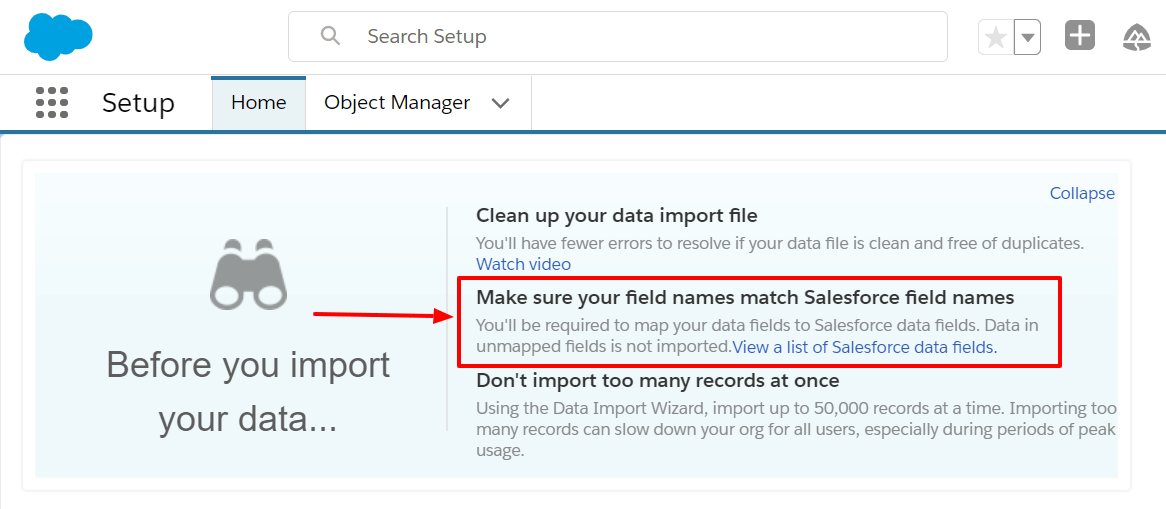
Review the Salesforce field names in your import file to ensure they match the standard Salesforce field names by clicking the View a list of Salesforce data fields link.
Click Launch Wizard! and choose the data to import. Under Standard Objects, click Leads. Other options under this tab include, Solutions, Accounts, Contacts, and Campaign Members.
Specify if you want to update your existing Salesforce records, add new records, or perform both simultaneously.
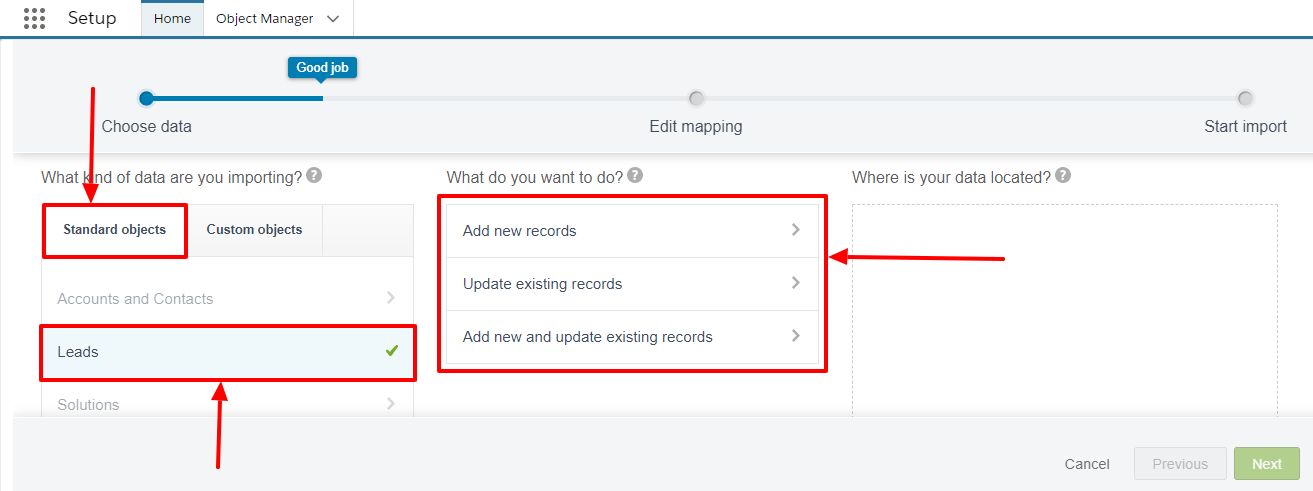
Select matching and other required criteria and upload the file where your data is located.
Drag and drop your CSV lead import file in the space provided or choose from the data source options, specify the character encoding method, and select your file.
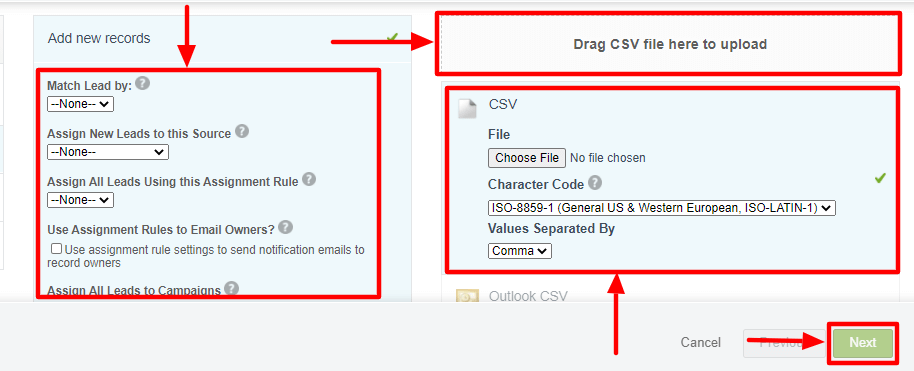
Click Next when you’re done.
Step 3: Map your import file data fields to Salesforce data fields
The data import wizard will automatically map as many data fields to Salesforce standard data fields as possible. If it can’t, you’ll need to do it manually since unmapped fields won’t be imported to Salesforce.
Salesforce will mark your unmapped fields. Click Map under the Edit column to change and map the fields to an existing Salesforce field.
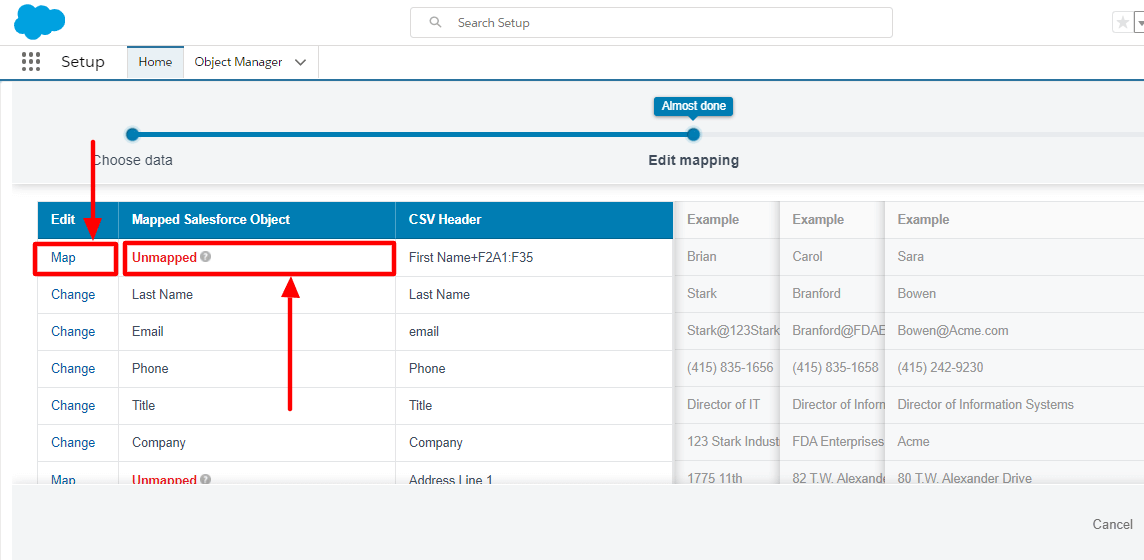
In our example, you’ll need to change the unmapped field by selecting Map and choosing the First Name in the Salesforce standard list fields.
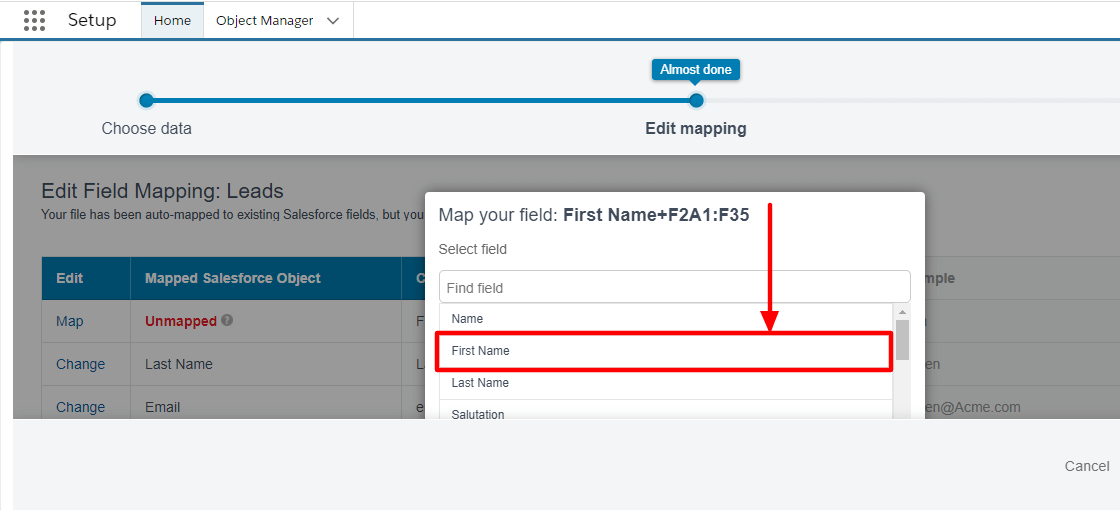
You can also change the automatic mappings performed by Salesforce by clicking Change under the Edit column beside the field you want to modify.
After reviewing your import information, you can go back to the previous steps to change unmapped data and ensure all the information is correct. Click Start Import.
B. Export Salesforce Data using in-built Data Export
Follow the steps below to export data from Salesforce via the data export service.
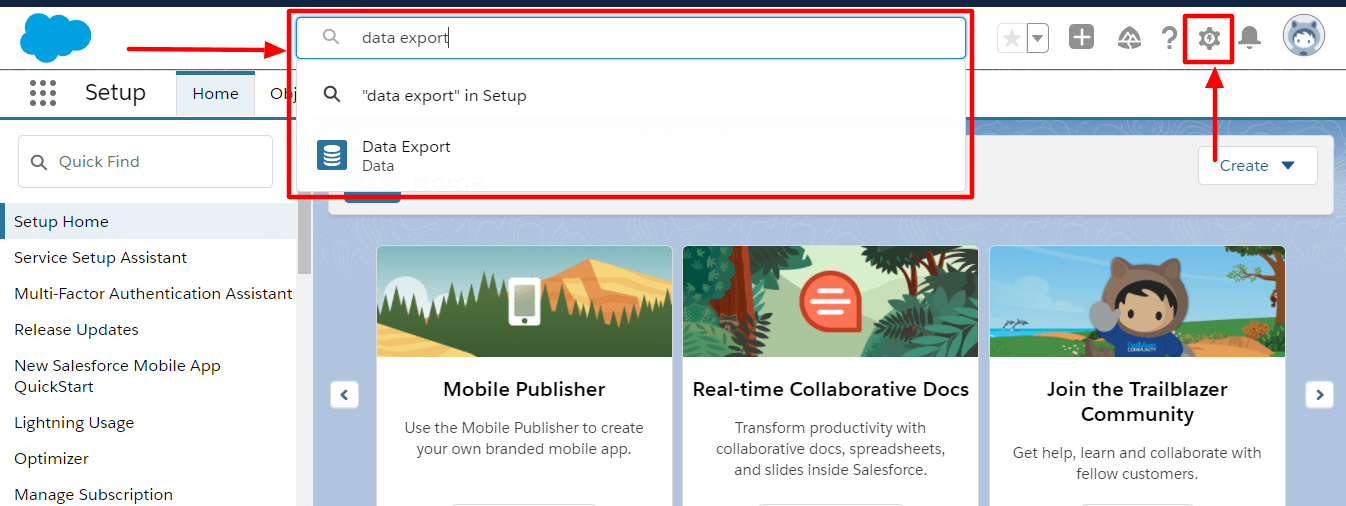
Step 1: Navigate to the Data Export option on Salesforce
On the Salesforce interface, navigate to Setup and enter Data Export in the search box.
Choose Export Now, which prepares your data for export immediately, or select Schedule Export, which lets you schedule your file exporting to weekly or monthly intervals.
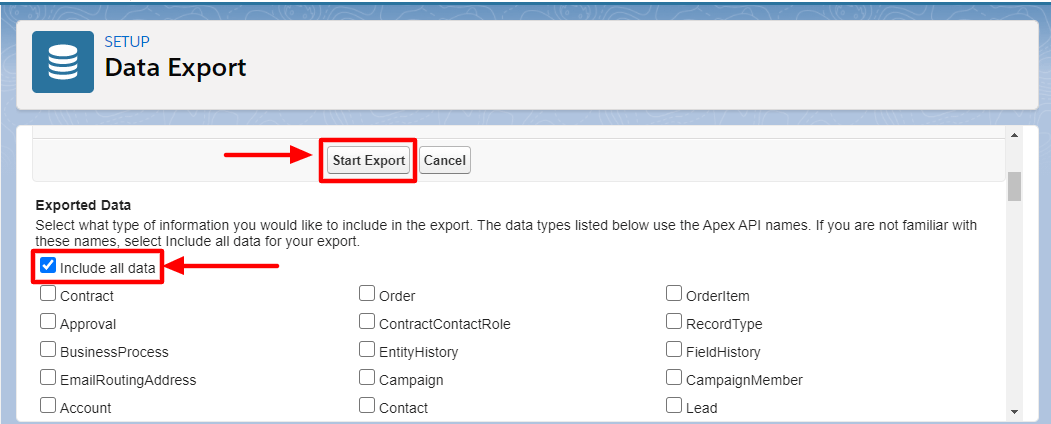
Step 2: Choose the types of information to export
Choose your preferred encoding for your export file.
Click the box beside Replace carriage returns with spaces, so your export files have spaces instead of line breaks or returns. This is useful for importing and for other integrations.
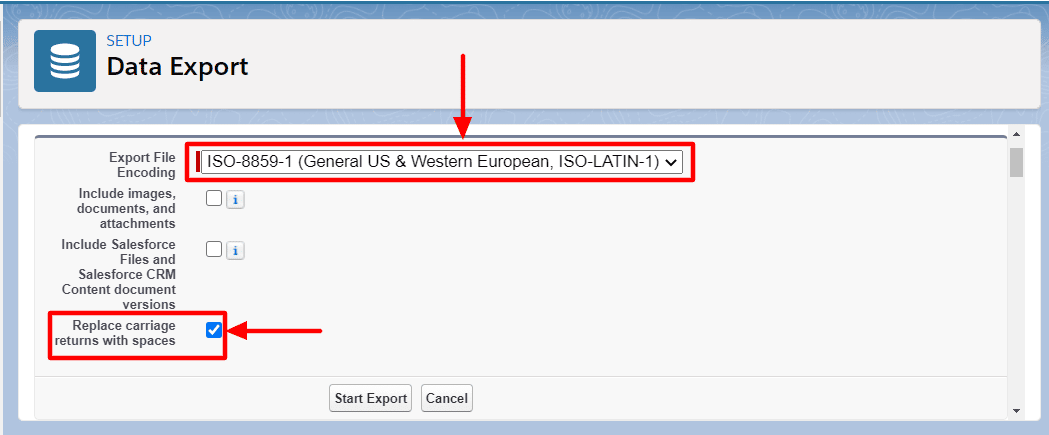
Select the types of info you want to include in your export. If you’re not familiar with Apex API names, choose Include all data and click Start Export.
Step 3: Schedule your export
Configure your export schedule by setting the frequency, start and end dates, and the time.
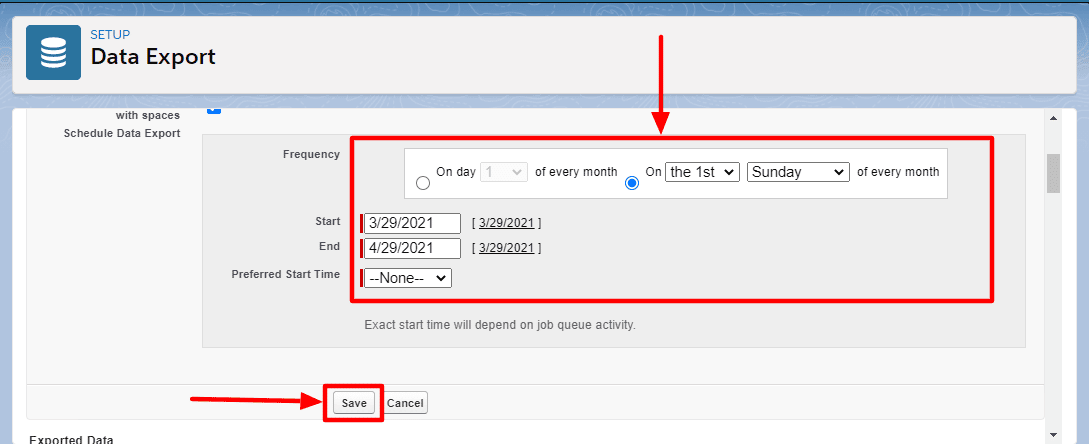
Click Save when you’re done (or Start Export if you’re not scheduling, but instead exporting your Salesforce files immediately).
You’ll receive an email from Salesforce when your zip archive of CSV files is ready. Large exports are usually broken into multiple files, and you can download the zip files from the link within the email.
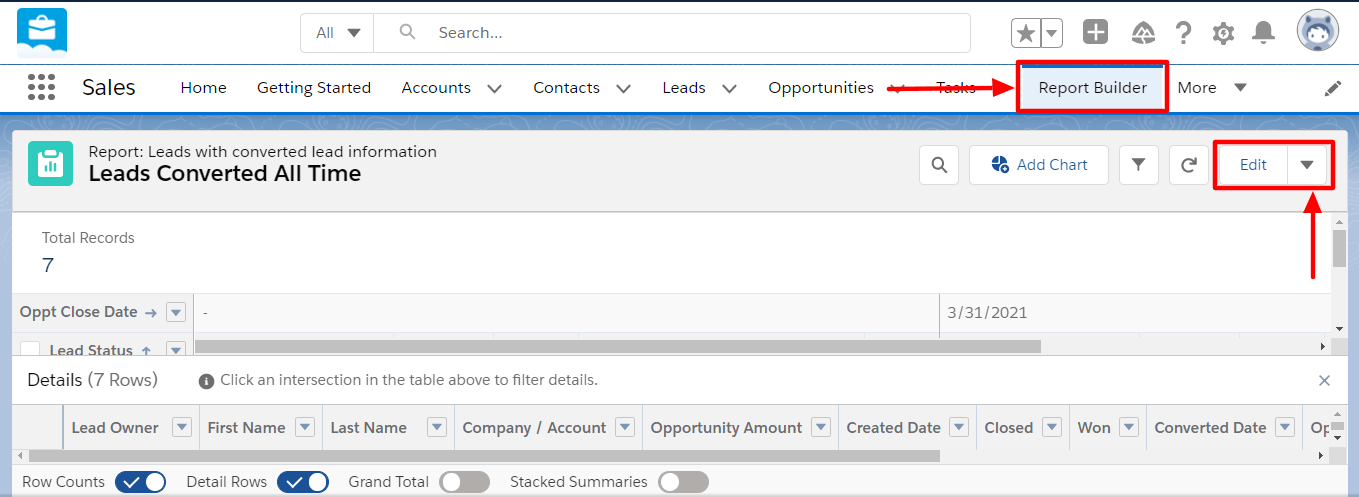
Want to learn how to export leads from Salesforce quickly? Open your report, click the dropdown arrow beside the Edit button, and select Export.
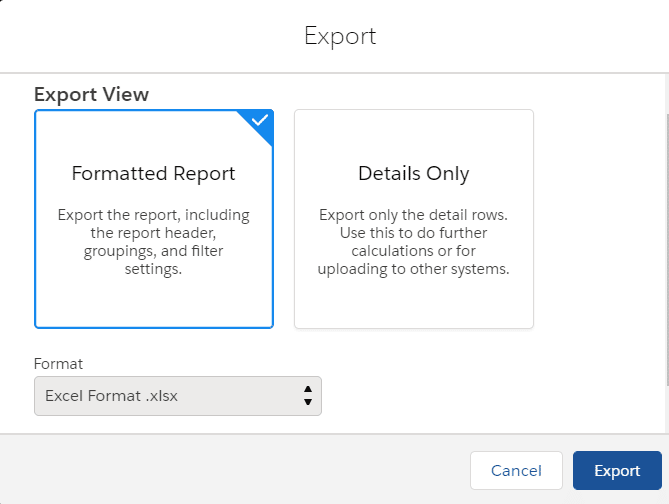
Choose your export view, click Export, and you’ll instantly get a downloaded CSV or .xlsx spreadsheet file.
Pros
- The Salesforce data import wizard and export data service are native Salesforce tools. This means you won’t need to install third-party apps for your Salesforce data export and import.
Cons
- Both methods are tedious and time-consuming since you’ll need to set up your data import and export manually. What’s more, whenever you want to update the data on your Spreadsheets, you’d have to repeat the import/export process every time.
- You might also need to map some of your data if Salesforce fails to do it automatically, which can be cumbersome and labor-intensive.
- Your exported files in zip format will only be available for 48 hours upon exporting and will be deleted afterwards.
- You can only import up to 60,000 records at a time. Also, all the objects for importing must be supported by the Wizard. The process is not fully automated since you’ll need to set your data importing manually.
Method 3. Dataloader.io
Dataloader.io is a third-party data loader app for Salesforce that lets you import and export your data in bulk.
It allows you to update, insert, export, import, upsert, and delete your Salesforce records for standard and custom objects with ease.
In our example on importing Salesforce contacts, we’ll use the Upsert operation. That means we’ll create a new record or update an existing one. We’ll also enable email notifications so reports are automatically sent when the import is complete.
We’ll also show how you can schedule daily imports, so your CSV file gets imported to your Salesforce account automatically.
Step 1: Select your Salesforce connection, operation, and object type
After installing and logging into Dataloader.io, select New Task, then Import.
In this example, we’ll use the default connection. Select Upsert, then search for the object type you want to import (in this case, Contacts), and click Next.
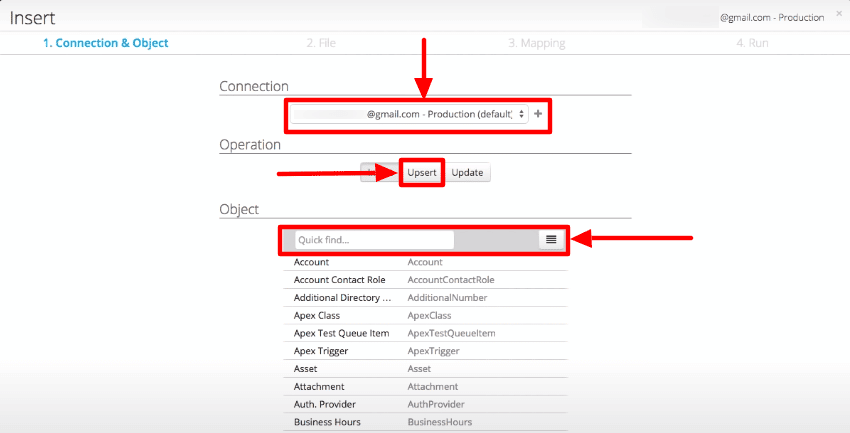
Image source: dataloader.io.
Step 2: Choose a CSV file
Dataloader.io offers direct connectivity to File Transfer Protocol (FTP), Secure FTP, Dropbox, and Box. Select where your CSV file is stored for uploading.
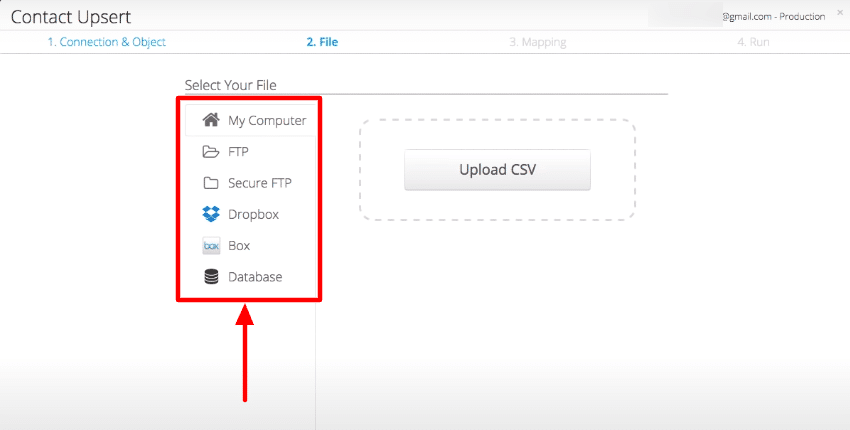
Image source: dataloader.io.
You can also configure a third system, such as Database or another Salesforce instance (the server your Salesforce organization lives on), to upload the CSV file in the same location automatically.
This allows Dataloader.io to automatically import your up-to-date data from their data sources directly into Salesforce.
Step 3: Define the mapping
Dataloader.io automatically inputs your data into the matching Salesforce fields: First name, Last name, Email, and Phone.
Modify Email to map to a Contact ID and configure a Lookup via email to set the email address as a unique identifier.
Select the check box on the left side of Insert as new if no match is found and click Next.
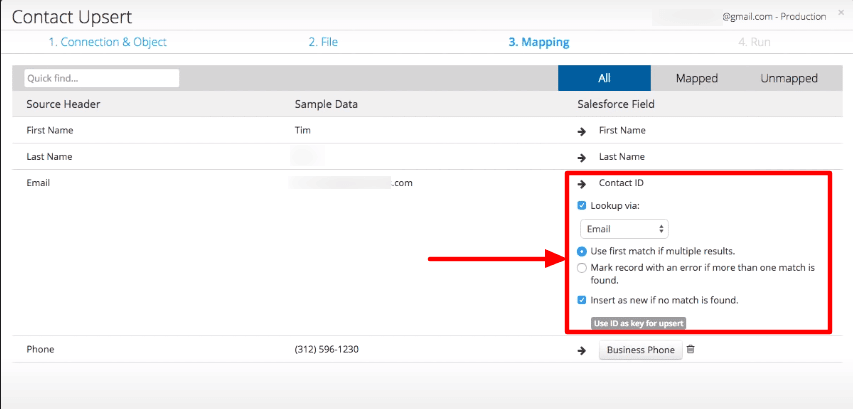
Image source: dataloader.io.
Step 4: Schedule importing task
Set a schedule in the Summary page so Dataloader.io automatically performs the import task into Salesforce with your defined mapping configurations daily (or hourly, weekly, monthly).
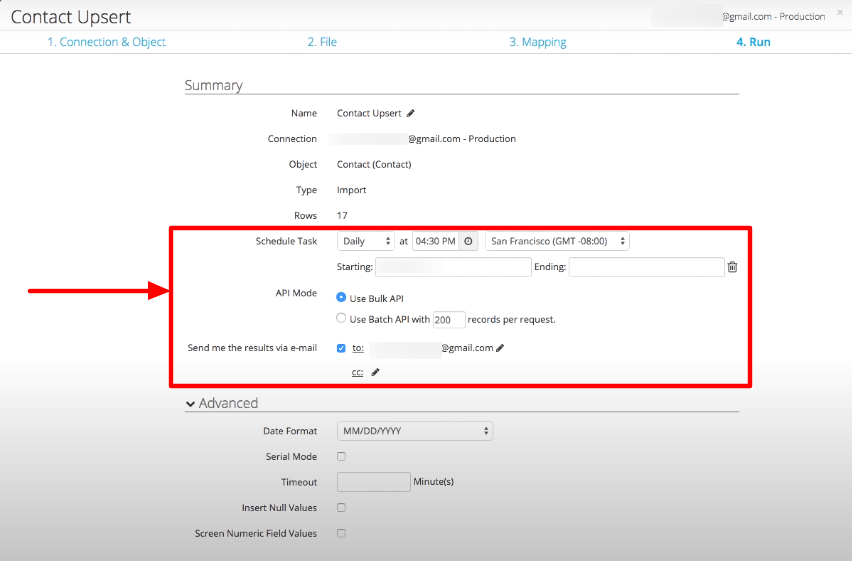
Image source: dataloader.io.
Select bulk API for faster importing and enable the Send me the results via email option to get automatic email reports every time the task runs. You can also configure the advanced settings based on your preferences.
Click Save and Run once you’re done. Your new records should be uploaded instantly to Salesforce and existing records should be updated.
The general steps to export data from Salesforce using Dataloader.io include creating an export task, selecting your connection and object, building your custom query, then saving and running your task.
The tricky part is the custom query building aspect of the process since you need to understand SOQL well to review and ensure you’re asking your query properly.
The Dataloader.io data exporting feature also lets you use its SOQL Query editor to write your custom queries.
Pros
- The app’s interface is easy to navigate and understand.
- It automatically translates the query into SOQL as you select your preferred object fields to build your query.
- Cons
- While Dataloader.io offers essential automation features for exporting and importing, setting these up can still take up your time.
- You need to build your query when exporting, which can be complicated and confusing if you don’t know a lot about object fields and types and what they are specifically, including SOQL.
- You can access basic Salesforce data importing and exporting features with Dataloader.io’s free version. However, you need the paid plans to get a bigger file size limit and schedule more than one task and email notifications (among others).
Method 4: Manual CSV Export/Import
Salesforce provides built-in CSV functionality for quick data exports and imports, perfect for one-time data transfers or small datasets.
CSV Export Process
Step 1: Navigate to the object or report
Go to any list view in Salesforce (Leads, Accounts, Contacts, Opportunities, etc.) or open a saved report containing the data you want to export.
Step 2: Export the data
For list views, click the gear icon and select “Export”. For reports, click the dropdown arrow next to “Edit” and select “Export”.
Step 3: Choose export format
Select your preferred format (CSV or Excel) and choose whether to export all records or just those currently visible.
CSV Import Process
Step 1: Prepare your CSV file
Ensure your CSV file has column headers that match Salesforce field names. Clean your data by removing duplicates and correcting formatting issues.
Step 2: Use Data Import Wizard
Navigate to Setup > Data Import Wizard and select “Launch Wizard”. Choose your object type and upload your CSV file.
Step 3: Map fields and import
Map your CSV columns to Salesforce fields, review your settings, and start the import process.
Pros
- Quick and simple for small datasets
- No third-party tools required
- Built into Salesforce natively
- Works well for one-time data transfers
Cons
- Manual process requires repetition for ongoing needs
- Limited to 50,000 records per import via Data Import Wizard
- No automation or scheduling capabilities
- Basic error handling and validation
Method 5: Salesforce API
For developers and organizations with complex integration needs, Salesforce provides comprehensive APIs for programmatic data access.
REST API
The REST API uses standard HTTP methods and supports JSON and XML data formats. It’s ideal for web applications and mobile apps.
Key capabilities:
- Create, read, update, and delete records
- Execute SOQL queries
- Access metadata
- Perform bulk operations
Bulk API
The Bulk API is designed for large data sets and long-running operations. It processes data asynchronously in batches.
Key capabilities:
- Handle millions of records
- Asynchronous processing
- CSV and JSON support
- Insert, update, upsert, and delete operations
SOAP API
The SOAP API provides programmatic access to Salesforce functionality using standard SOAP protocols.
Key capabilities:
- Strongly typed
- Extensive metadata support
- Transaction control
- Client library support
Pros
- Maximum flexibility and customization
- Can handle very large datasets
- Integrates with existing systems
- Full programmatic control
- Supports real-time and batch processing
Cons
- Requires development expertise
- Complex setup and maintenance
- API limits based on Salesforce edition
- Ongoing management and monitoring needed
How to bulk update records in Salesforce?
Salesforce offers a Writeback Object node feature to update, create, or upsert your Salesforce org records with transformed data.
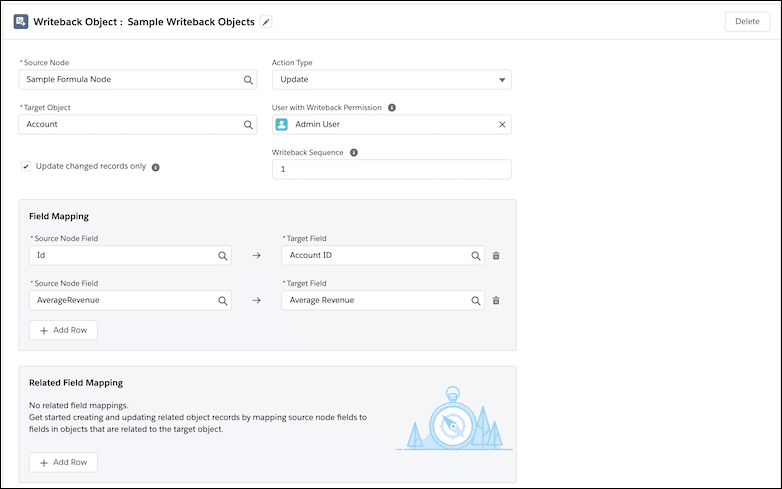
Image source: Salesforce.com.
Salesforce lets you create a maximum of five Writeback Object nodes within a Data Processing Engine definition. This allows you to write back your transformed data to custom or standard objects, updating them in bulk. There are a few tools out there that can help with writing back to Salesforce, however, Coefficient takes the cake with its writeback feature for Salesforce.
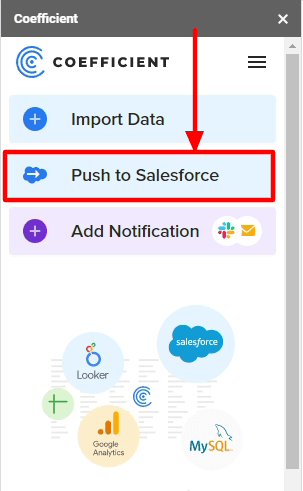
Open your Spreadsheet file, and from the Coefficient window, select Push to Salesforce, select your preferred action, and you can update bulk Salesforce from Google Sheets quickly and easily.
This is a huge time- and energy-saver since it only takes a few clicks (and seconds) to do bulk Salesforce record updating.
Conclusion
We hope you feel enabled to choose the best-suited Salesforce export and import option to leverage the right tools for your organization that automate and streamline data handling, sharing, and analysis.
The more efficiently you can move and sync your data, the better its quality. This can help revolutionize your company’s Salesforce adoption, boosting your ability to generate accurate dashboards and reports.
Ultimately, seamless Salesforce data importing and exporting amplifies your data flow, allowing you to derive insights effectively and efficiently.
Try Coefficient for free today!