Table of Contents
![]()
- 1. How to integrate Google Forms with Salesforce: Top 2 methods
- 2. How to Automate Salesforce Data Imports from Any System (Even Without an API)
- 3. Common Methods to Export and Import Salesforce Data
- 4. How to Connect Salesforce to Google Sheets
- 5. How to Connect Salesforce to Excel
- 6. How Can I Open a Large Salesforce Export
- 7. How to Set Up Salesforce Reporting Snapshots
- 8. How to Export Data from Salesforce into Excel
- 9. How to Import Leads in Salesforce Like a Pro
- 10. How to Install Coefficient on Salesforce
- 11. Top 5 Alternatives to Google’s Salesforce Connector (2026 Comparison)
- 12. A Simpler Way to Use Salesforce Change Data Capture
- 13. How The Pros Are Setting Up Salesforce Lead Scoring in 2026
- 14. Salesforce Data Management for Teams Who Need Real Answers

TL;DR
Capturing historical Salesforce data for trend analysis doesn’t require complex manual setup. You can automate snapshots or create them manually in Salesforce.
- Automated snapshots: Use Coefficient to automatically capture and store historical data in Google Sheets/Excel
- Manual setup: Create Salesforce reporting snapshots with custom scheduling and field mapping
- Best practices: Consistent field mapping, regular reviews, and optimized scheduling for performance
Salesforce Reporting Snapshots are an essential tool for capturing and analyzing historical data, enabling you to understand trends and make informed decisions. Today, we’ll walk you through the straightforward steps to set up Salesforce Reporting Snapshots efficiently.
Prerequisites
Before diving in, ensure you have Salesforce access, and a basic grasp of reports and dashboards. Ready? Let’s jump in!
The Automated Way: Smart Snapshots with Coefficient
Skip the manual snapshot configuration. Coefficient automatically captures historical data from your Salesforce reports and stores it in organized snapshots within your spreadsheet.
Step 1: Connect and Import Your Source Data
Open Coefficient in Google Sheets or Excel. Import the Salesforce report you want to snapshot – whether it’s opportunities, leads, or any custom report.
Choose “From Existing Report” and select your target report. Your live data flows into the spreadsheet instantly.
Step 2: Set Up Automated Snapshots
Click on your imported data and select “Snapshots” from the automation menu.
Choose your snapshot type:
- Entire Tab: Copies your full report to a new tab with timestamp
- Specific Cells: Appends new data to a designated location for running history
Set your schedule – hourly, daily, weekly, or monthly. Each snapshot preserves the exact data state at that moment.
Step 3: Configure Retention and Organization
Set retention rules to manage how many snapshots you keep. Want the last 12 months of weekly data? Configure it once and forget it.
Your snapshots automatically organize with timestamps. Compare this week’s pipeline to last quarter’s. Track lead quality trends over time. All without manual exports or complex Salesforce configurations.
Why this works: Your historical data builds automatically. No missed snapshots because someone forgot to run a report. No storage limits. Just clean, organized historical data ready for analysis.
Step-by-Step Guide for Salesforce Reporting Snapshots
Step 1: Understanding Reporting Snapshots
First off, reporting snapshots allow you to preserve historical data from standard objects, providing insight into past performances, trends, and patterns.
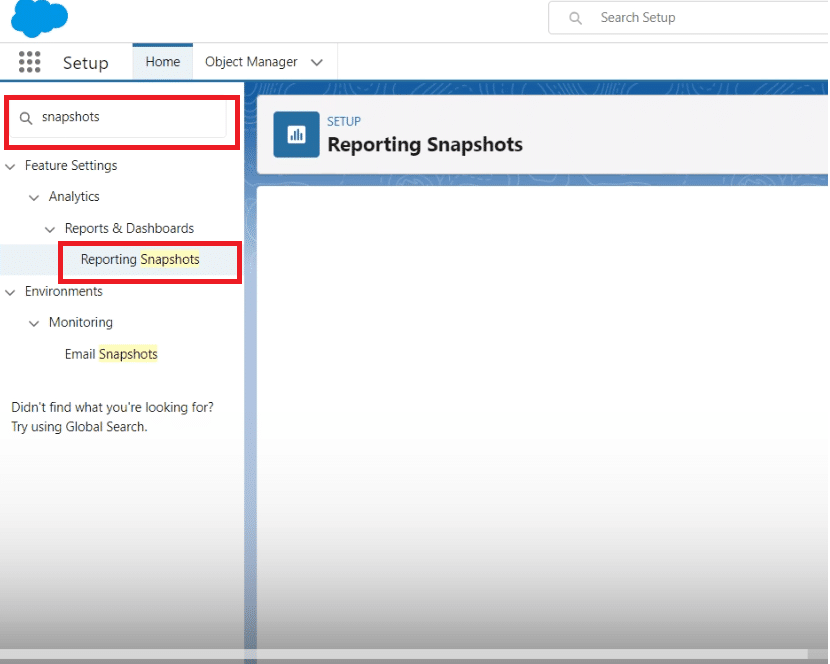
Step 2: Navigate to the Setup Menu
Head to the setup menu and use the Quick Find box to search for “snapshots.” This is your gateway to creating new reporting snapshot.
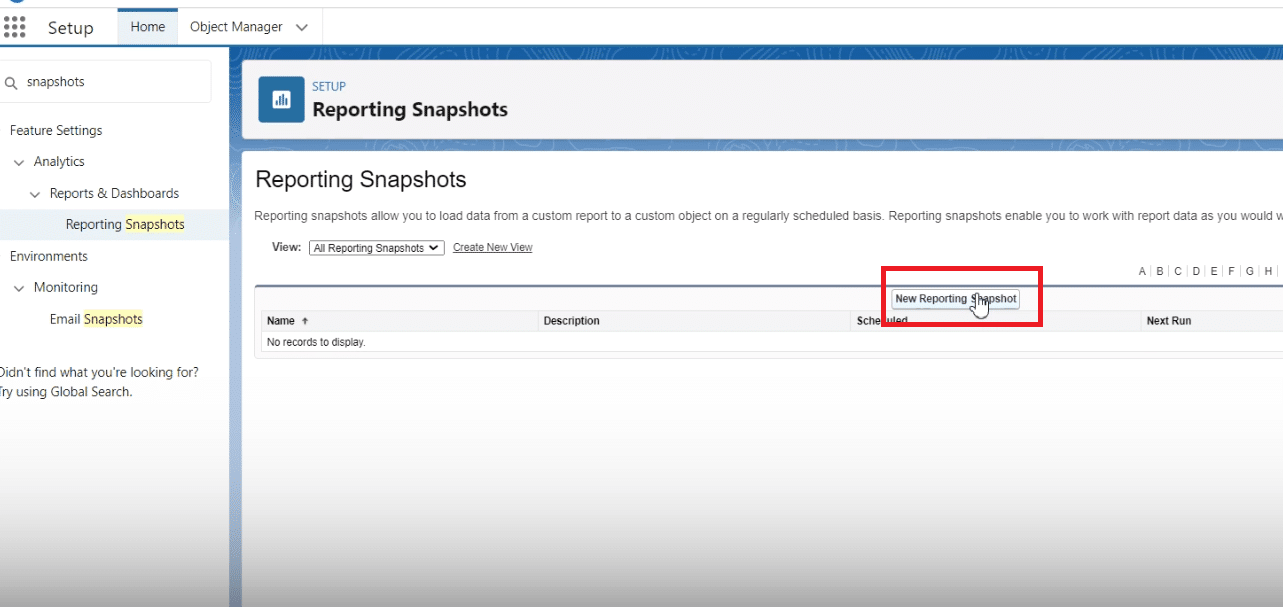
Step 3: Create a New Reporting Snapshot
Click on “New Re porting Snapshot.” Here, you’ll base the snapshot on an existing report, like one detailing opportunities above $50,000 without a sales team.
Step 4: Configure the Reporting Snapshot
Name your snapshot, which will auto-generate a unique name. Assign a running user—this will be you, especially crucial if you’re managing these decisions strategically, as a CEO, for instance.
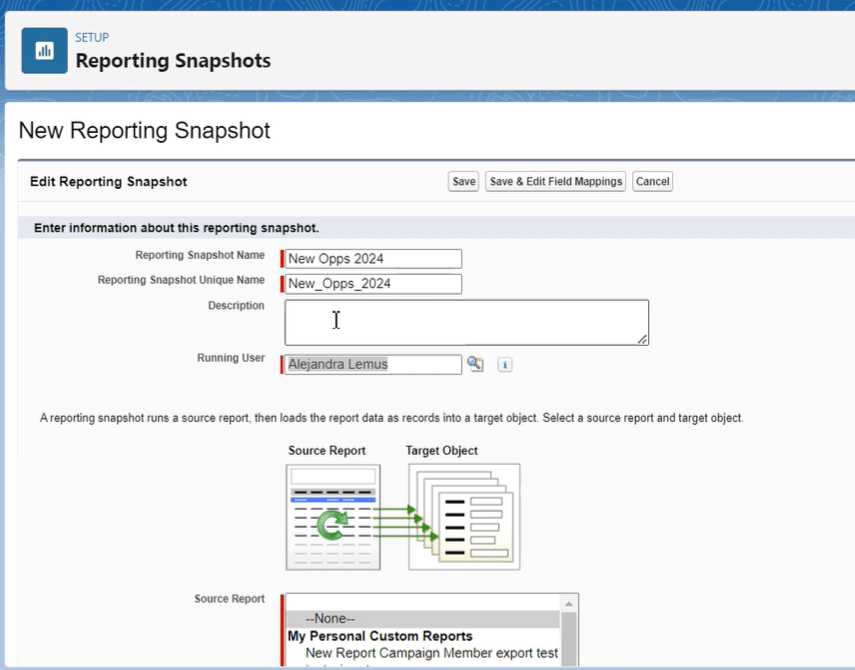
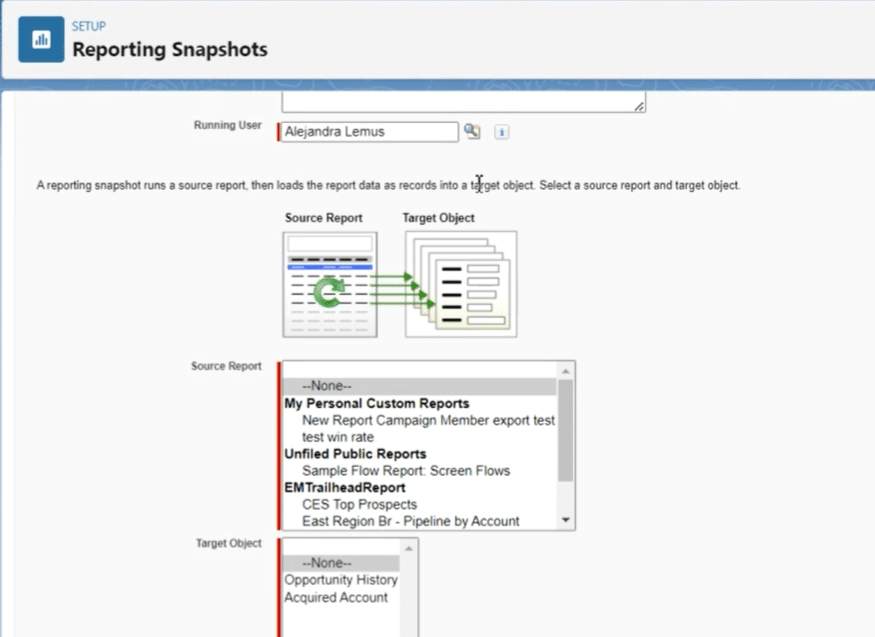
Choose your source report and target object, ensuring the report is either tabular or summary to use in a snapshot.
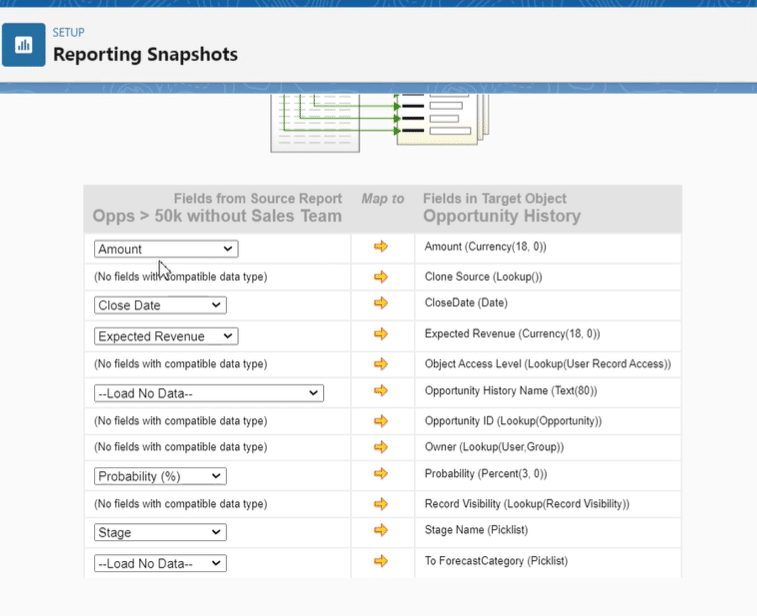
Step 5: Map Fields Between Source and Target
Select “Save and Edit Field Mappings.” Map the fields you wish to capture in your snapshot, like aligning “Amount” with “Amount” and “Close Date” with “Close Date.”
Step 6: Schedule the Reporting Snapshot
Decide on the snapshot’s frequency—daily, weekly, or monthly. Set up the specific day for weekly runs, the start date, and the preferred start time (say, 2 am for minimal disruption)

Best Practices and Tips
Consistency in Data Fields
Ensure consistency in the field mappings between the source report and the target object. This consistency is crucial for accurate trend analysis and tracking success metrics over time.
Regular Reviews and Adjustments
Reporting requirements may evolve as business goals change. Regularly review and adjust the reporting snapshots to ensure they stay aligned with your current business objectives.
Optimize Snapshot Scheduling
When setting the frequency of snapshots, consider the impact on system performance and the relevance of the data. For example, a snapshot related to quarterly revenue might only need a monthly schedule, whereas daily sales performance might benefit from daily snapshots.
Leverage High-Quality Reports as Sources
Quality in, quality out. Ensure the source reports are well-constructed and accurate. A snapshot is only as good as the report it’s based on.
Security and Privacy Considerations
When selecting the running user and mapping fields, be mindful of data security and privacy considerations. Ensure that sensitive data is handled according to your organization’s compliance standards.
Expanding Capabilities with Coefficient
Integrate Salesforce with Coefficient for an elevated analytics experience. Coefficient, with its robust integration capabilities, streamlines the process of merging Salesforce data with Google Sheets or Excel, offering unparalleled flexibility in customizing reports.
This tool not only augments the power of Salesforce Reporting Snapshots but also ensures your team, regardless of Salesforce licensing, stays informed with real-time updates through Slack and email notifications.
Benefits of Implementation
Implementing Salesforce reporting snapshots empowers your organization to keep a pulse on historical data, identifying trends and making data-driven decisions.
We hope this guide has illuminated the path to mastering Salesforce Reporting Snapshots in six simple steps. Don’t stop here; take action by exploring Coefficient’s solutions to elevate your Salesforce experience even further.
Get started here and unlock the potential of enhanced data analysis and reporting.