How to create a matrix report for month-over-month churn rate in Salesforce

Salesforce matrix reports can’t perform the complex calculations needed for month-over-month churn rate analysis. They simply can’t compare customer counts across different time periods or calculate percentage changes between matrix cells.

You’ll learn how to build dynamic month-over-month churn analysis using pivot tables and automated formulas that actually work.

Build dynamic churn matrices using Coefficient

SalesforceCoefficientSalesforcematrix reports hit a wall when you need sophisticated churn analysis.gives you the calculation power by moving yourdata into spreadsheets where complex formulas and pivot tables actually function.

How to make it work

Step 1. Import your Salesforce account and opportunity data.

Use Coefficient to pull both Account and Opportunity records into your spreadsheet. This gives you the complete dataset needed for comprehensive churn analysis across multiple time periods.

Step 2. Create dynamic pivot tables.

Build pivot tables with months as columns and churn metrics as values. Set up rows for customer segments or acquisition cohorts to get granular insights into churn patterns.

Step 3. Calculate month-over-month changes.

Use spreadsheet formulas to calculate percentage changes:. This shows you exactly how churn rates are trending over time.

Step 4. Apply automated formatting.

Set up conditional formatting to highlight churn rate increases and decreases. Red cells for rising churn, green for improvements – visual cues that make trends obvious at a glance.

Step 5. Schedule real-time updates.

Configure automatic refreshes to keep your matrix current as new data enters Salesforce. Your month-over-month analysis stays accurate without manual intervention.

Get the churn analysis Salesforce can’t deliver

Start buildingThis approach provides the flexibility and calculation power that Salesforce matrix reports simply cannot handle. You can track customer counts, revenue churn, and churn velocity all in one dynamic view.your automated churn matrix today.

How to create cross-object report combining opportunity fields with task details in Salesforce

SalesforceCreating comprehensive cross-object reports that combine opportunity fields with task details is challenging indue to reporting limitations around object relationships and field access restrictions. Native report types either focus on opportunities (limiting task visibility) or tasks (restricting opportunity field access).

Here’s how to build the complete opportunity-task analysis that Salesforce’s standard reporting can’t deliver.

Build comprehensive cross-object reports using Coefficient

CoefficientSalesforce’sexcels at cross-object reporting by letting you import from multiple objects and create exactly the relationships you need. This gives you complete field access from both opportunities and tasks withoutreporting constraints.

How to make it work

Step 1. Import opportunity data with all required fields.

Pull all opportunity fields you need including Name, Amount, Stage, CloseDate, Owner, and any custom fields. Use Coefficient’s “From Objects & Fields” method to select exactly what you want without report type limitations.

Step 2. Import task details in a separate import.

Import task data including Subject, Status, ActivityDate, Description, and the WhatId field for linking to opportunities. You can also apply filters here to focus on specific task types or date ranges.

Step 3. Join the data using spreadsheet functions.

Use VLOOKUP, XLOOKUP, or INDEX/MATCH to combine data using the WhatId/OpportunityId relationship. For example:to pull multiple opportunity fields into your task report.

Step 4. Create enhanced analysis with pivot tables and formulas.

Build pivot tables showing task activity patterns by opportunity characteristics. Calculate metrics like “Days Since Last Activity” using formulas likefor new insights impossible in Salesforce reports.

Step 5. Set up automated refresh and dynamic filtering.

Schedule regular data updates and use dynamic filters to analyze by opportunity stage, amount, or task subject without losing data. Filter by opportunity stage to see task patterns, or by task subject to analyze activity across different deal sizes.

Get insights Salesforce reports can’t provide

Start buildingThis approach enables analysis like activity velocity by deal size, task completion rates by opportunity stage, and sales rep engagement patterns across your pipeline. You get the comprehensive opportunity-task reporting that standard Salesforce reports simply can’t deliver.cross-object reports that reveal the full story of your sales process.

How to create custom field mapping templates for Salesforce migration

Field mapping templates eliminate guesswork from CRM migrations by creating reusable transformation rules. Without templates, you’re rebuilding mapping logic for every data transfer, wasting time and introducing inconsistencies that cause migration errors.

Here’s how to build sophisticated mapping templates that handle complex field transformations and scale across multiple migration projects.

Build reusable transformation templates with persistent mapping logic using Coefficient

Coefficientprovides an excellent framework for creating reusable field mapping templates through spreadsheet integration and export capabilities. This creates a much more manageable approach than hard-coded mapping scripts, giving you clear visibility into transformation logic and easy template reuse.

How to make it work

Step 1. Create comprehensive mapping tables in spreadsheets.

SalesforceSalesforceBuild mapping tables in Google Sheets or Excel with columns for source field names,orfield names, and transformation rules. Include data type conversions, validation requirements, and conditional logic rules that handle complex field relationships.

Step 2. Apply mappings automatically with lookup formulas.

Use VLOOKUP, INDEX/MATCH, or XLOOKUP formulas to apply your mapping tables automatically to large datasets. This eliminates manual field-by-field mapping and ensures consistent transformation rules across all records in your migration.

Step 3. Build conditional logic for complex transformations.

Create nested IF statements and formula combinations that handle complex field transformations like currency code conversions, picklist value mapping, or multi-field concatenations. Document these transformation rules in your template for future reference and troubleshooting.

Step 4. Save reusable export configurations in Coefficient.

Configure your field mappings once in Coefficient, then save them as reusable export templates. These persistent configurations can be applied to additional data batches or future migrations, eliminating the need to rebuild mapping logic from scratch.

Step 5. Test and refine mappings with preview functionality.

Use Coefficient’s preview features to test your mapping templates on small data batches before full migration. Refine your transformation logic based on preview results, then save the improved template for consistent future use.

Scale your migration expertise

Start buildingField mapping templates turn migration expertise into reusable assets that improve with each project. Instead of starting from scratch every time, you can build on proven mapping logic that scales across multiple migrations and team members.your mapping templates today.

How to create dynamic rolling 3-month column headers that auto-update each month in Salesforce

You can create dynamic rolling 3-month column headers that automatically update each month by combining automated data imports with spreadsheet formulas that calculate date ranges based on today’s date.

This approach eliminates the manual work of updating static field names and creates true sliding window dates that shift forward automatically each period.

Build self-updating date columns using Coefficient

CoefficientSalesforceSalesforcesolves this challenge by combining automateddata imports with dynamic formula capabilities inspreadsheets. While native Salesforce reports use static column structures that require manual updates, this solution creates headers that automatically shift forward each month.

How to make it work

Step 1. Set up dynamic date headers in your spreadsheet.

Create formulas that automatically calculate rolling month columns. Usefor the current month header,for next month, andfor the third month. These formulas automatically calculate rolling month columns based on today’s date.

Step 2. Configure Coefficient data import with dynamic filters.

Import from Salesforce using dynamic date filters that point to your calculated date ranges. Set up dynamic filters in Coefficient that reference the date cells from your headers, so the data automatically adjusts to match your rolling date formulas.

Step 3. Schedule automated refreshes.

Configure automatic refreshes (daily or weekly) to keep both headers and data current. This ensures your sliding window dates refresh monthly without any manual intervention, creating a true rolling 3-month view.

Start building dynamic date columns today

Get startedThis solution transforms rigid static reporting into flexible, self-updating systems that maintain consistent time horizons without manual maintenance.with automated rolling date columns that eliminate monthly update tasks.

How to create dynamic dashboard filters based on multiple owner lookup fields in Salesforce

SalesforceNativedashboards can’t handle OR logic between standard Owner fields and custom user lookup fields like “AE Opportunity Owner.” This creates incomplete visibility when you need to filter opportunities across multiple owner field types.

Here’s how to build dynamic dashboard filters that work across all your owner fields, automatically adapting to user context without manual selection.

Build multi-field owner filtering using Coefficient

CoefficientSalesforce’sbypassesnative filtering limitations by creating advanced filter logic in your spreadsheet. You can combine standard Owner fields with custom owner fields using OR conditions that automatically filter based on the viewing user’s context.

How to make it work

Step 1. Import comprehensive opportunity data with all owner fields.

Use Coefficient’s “From Objects & Fields” method to import opportunities including both standard Owner and custom owner fields (AE Opportunity Owner, Sales Engineer, etc.). Also import user hierarchy data to enable role-based filtering. Select all relevant owner-related fields from the extensive field list.

Step 2. Set up dynamic user context cells.

Create cells that automatically populate with the current user’s Salesforce ID using spreadsheet functions like USER() in Google Sheets. These cells will serve as the reference point for your dynamic filters, eliminating the need for manual filter selection.

Step 3. Implement OR filter logic across multiple owner fields.

Configure Coefficient’s AND/OR filter logic to create conditions like “Opportunity Owner = Current User OR AE Opportunity Owner = Current User OR Account Executive = Current User.” Point these filters to your user context cells using Coefficient’s dynamic filters feature.

Step 4. Add role hierarchy expansion for manager views.

Import user role hierarchy data and create formulas that automatically identify subordinate users. Expand your filter logic to include “OR subordinate users” across all owner field types, providing complete team visibility that adapts to organizational changes.

Step 5. Configure automatic refresh scheduling.

Set up hourly or daily refreshes to keep your dashboard current as opportunity assignments change. This ensures your multi-field owner filtering stays accurate without manual intervention.

Get complete owner field visibility

Start buildingDynamic dashboard filters across multiple owner fields give you the complete opportunity visibility that native Salesforce dashboards can’t provide.your advanced filtering system today.

How to create forecast accuracy dashboard with historical trending in Salesforce

Forecast accuracy tracking with historical trending is one of Salesforce’s most challenging dashboard requirements. Native forecasting reports lack historical comparison capabilities and the advanced accuracy calculations needed for meaningful analysis.

Here’s how to build comprehensive forecast accuracy dashboards that track performance over time and provide the insights your sales leadership needs.

Build sophisticated forecast accuracy tracking using Coefficient

CoefficientSalesforceexcels at forecast accuracy analysis through its snapshot capabilities and advanced calculation features. By preserving historical forecast data and comparing it against actual results, you can create accuracy dashboards that far exceed what nativereporting can deliver.

SalesforceThe key advantage is automatic historical data preservation combined with sophisticated accuracy calculations. Whilestruggles with forecast accuracy trending, Coefficient handles this automatically through scheduled snapshots and formula calculations.

How to make it work

Step 1. Import current forecast and opportunity data.

Set up imports for forecast data and related opportunity pipeline information. Include fields like forecast amount, category, period, and submission date. This gives you the baseline data needed for accuracy calculations.

Step 2. Configure weekly forecast snapshots.

Set up automated snapshots to capture forecast submissions weekly or monthly. This preserves historical forecast data that Salesforce doesn’t retain long-term. Schedule snapshots to run automatically after forecast submission deadlines.

Step 3. Create accuracy calculation formulas.

Build formulas that compare forecasted revenue against actual closed revenue for each period. Use percentage calculations like =(Actual/Forecasted)*100 to determine accuracy rates. Apply these calculations across different forecast categories and time periods.

Step 4. Build historical trending analysis.

Create charts showing forecast accuracy patterns over time, accuracy improvement or decline trends, and comparative performance across quarters or years. Use conditional formatting to highlight periods with significant accuracy variations.

Step 5. Set up rep-level accuracy tracking.

Break down forecast accuracy by individual sales reps and territories. Create comparative analysis showing which reps consistently forecast accurately and which need coaching. Build accuracy scorecards for performance reviews.

Step 6. Implement automated monitoring and alerts.

Configure alerts when forecast accuracy changes significantly or when certain reps or territories show concerning accuracy trends. Set up scheduled exports to push accuracy metrics back to Salesforce custom objects for broader visibility.

Master forecast accuracy analysis

Start trackingThis comprehensive approach provides the forecast accuracy insights that sales leadership needs but can’t get from standard Salesforce forecasting reports. You’ll identify accuracy patterns and improve forecasting discipline across your team.forecast accuracy today.

How to create mobile-friendly HubSpot dashboards from internal Excel files with SQL queries

You can transform your SQL-based Excel data into mobile-friendly HubSpot dashboards by creating a direct pipeline from your databases to HubSpot’s reporting tools.

This approach gives your field teams native mobile access to live data instead of trying to view Excel files on small screens.

Build a SQL to HubSpot dashboard pipeline using Coefficient

CoefficientHubSpotconnects directly to the SQL databases that power your Excel reports, then automatically populateswith fresh data for dashboard creation. This eliminates static Excel files while maintaining your SQL refresh functionality.

How to make it work

Step 1. Connect to your SQL database.

Configure Coefficient to connect to your SQL database using the same queries that populate your Excel reports. This creates the foundation for your mobile dashboard data pipeline.

Step 2. Map SQL results to HubSpot properties.

Set up field mapping between your SQL query results and HubSpot properties or custom objects. You can handle complex calculations and multiple joins just like your Excel reports do.

Step 3. Schedule automated data refresh.

Set up scheduled imports to ensure dashboard data stays current. Choose from hourly, daily, or weekly refresh schedules based on how often your field teams need updated information.

Step 4. Apply filters for focused dashboards.

Use Coefficient’s filtering capabilities (up to 25 filters with AND/OR logic) to focus dashboard data on specific criteria. This ensures your mobile dashboards show only relevant information for each team or role.

Step 5. Build native HubSpot dashboards.

Create HubSpot reports and dashboards using your imported SQL data. These automatically display properly on mobile devices with touch-optimized navigation and offline access to recently viewed data.

Step 6. Set up automated alerts.

Configure Slack or email notifications when key metrics change. This keeps field teams informed of important updates even when they’re not actively checking dashboards.

Transform your Excel reports into mobile-optimized dashboards

Start buildingThis approach provides superior mobile accessibility compared to Excel files while maintaining your SQL refresh functionality.your mobile-friendly HubSpot dashboards today.

How to create multi-chart dashboard reports with different visualization types in Salesforce

Salesforce’snative dashboard functionality restricts you to predefined component types in a rigid 3-column grid layout, making it difficult to create truly integrated multi-chart visualizations.

Here’s how to build comprehensive dashboards that combine different chart types with complete layout flexibility and automatic data updates.

Transform spreadsheets into powerful multi-chart dashboards using Coefficient

CoefficientSalesforcetransforms your spreadsheet into a multi-chart dashboard platform by providing livedata feeds. You can create custom layouts with any combination of visualization types that native Salesforce reporting simply can’t achieve.

How to make it work

Step 1. Set up your data foundation.

Import multiple Salesforce reports or objects into separate sheets or ranges using Coefficient. Pull Opportunities for sales charts, Leads for conversion analysis, and Campaigns for marketing performance. Schedule coordinated refreshes to keep all data current.

Step 2. Create your visualization strategy.

Build bar charts for sales performance and lead sources, line charts for trend analysis using date-based data, pie charts for market share distribution, and gauge charts for quota progress. Use your imported Salesforce data as the source for each chart type.

Step 3. Design integrated metric displays.

Create KPI cards using large-format cells that calculate metrics from multiple Salesforce objects. Display revenue totals, conversion rates, and growth percentages with conditional formatting for performance indicators.

Step 4. Implement advanced dashboard features.

Use cross-sheet references to link charts to different Coefficient imports for comprehensive views. Set up dynamic date ranges with cell-based filters so users can control time periods across all visualizations.

Step 5. Add calculated metrics and automation.

Leverage your spreadsheet’s formulas with Coefficient’s auto-fill feature for computed KPIs that update automatically. Create metrics that span multiple objects like win rates, pipeline velocity, and customer acquisition costs.

Build executive-level dashboards with complete customization

Get startedUnlike Salesforce’s static dashboard components, this approach enables truly customizable layouts where you can position charts, metrics, and data tables in any configuration.building your multi-chart dashboard today.

How to Import Landing Page View Data from Google Ads into Excel

Importing your Google Ads Landing Page View data into Excel enables deeper analysis of destination page performance, conversion path efficiency, and user experience metrics beyond what Google Ads’ standard reporting provides.

With Coefficient, you can create a live connection that keeps your landing page data current in Excel without manual exports, helping you optimize the critical final step in your paid search funnel.

TLDR

  • Step 1:

    Install Coefficient from the Office Add-ins store

  • Step 2:

    Connect to your Google Ads account

  • Step 3:

    Select and import Landing Page View data

  • Step 4:

    Set up auto-refresh to keep data current

Step-by-Step Guide to Importing Google Ads Landing Page View into Excel

Step 1: Install Coefficient in Excel

First, add the Coefficient add-in to Excel:

  1. Open Excel
  2. Click on the “Insert” tab in the ribbon
  3. Select “Get Add-ins”
  4. Search for “Coefficient” in the Office Add-ins store
  5. Click “Add” to install the Coefficient add-in
Coefficient sidebar menu with import, export, automations, and AI Sheet Assistant options.

Step 2: Connect to Google Ads and Import Landing Page View Data

After installing Coefficient, follow these steps to import your Landing Page View data:

  1. Open the Coefficient sidebar in Excel
  2. Click “Import” to see available data sources
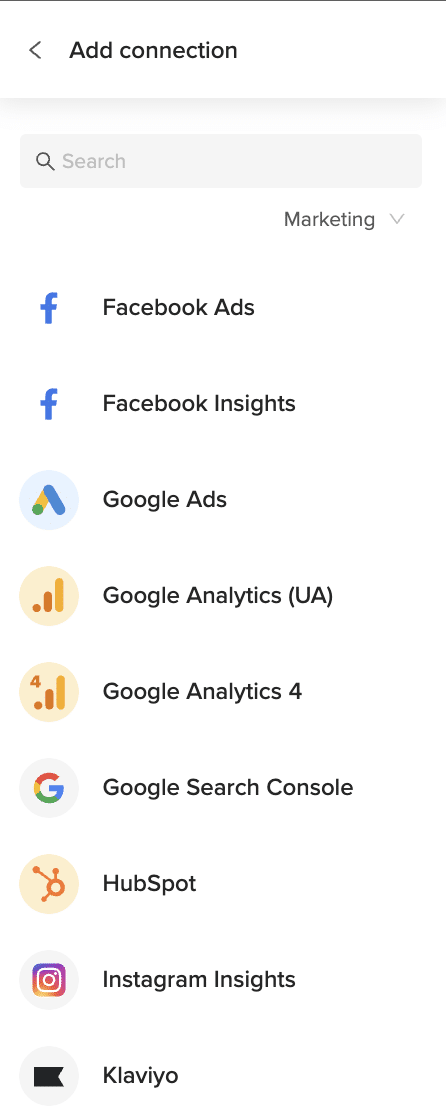
  3. Select “Google Ads” from the marketing connectors list
  4. Log in with your Google Ads credentials when prompted
  5. From the object list, select “Landing Page View”
  6. Choose which landing page metrics you want to import (e.g., clicks, bounce rate, conversion rate, average session duration)
  7. Apply any filters if needed (e.g., date range, campaign, performance thresholds)
  8. Click “Import” to bring the data into your spreadsheet
Marketing integrations such as Google Ads, Facebook Ads, HubSpot, and Klaviyo listed.

Step 3: Set Up Auto-Refresh (Optional)

To ensure your Landing Page View data remains up-to-date:

  1. Select your imported Landing Page View data in Excel
  2. In the Coefficient sidebar, click “Refresh”
  3. Choose “Set up auto-refresh”
  4. Select your preferred refresh schedule (hourly, daily, or weekly)
  5. Configure any notification settings
  6. Click “Save” to enable automatic updates
Auto-refresh options for imported data with daily, hourly, and weekly scheduling.

Available Google Ads Data

Available Objects

  • Campaign
  • Ad Group
  • Conversion Action
  • Keyword View
  • Landing Page View

How to Import Call Data from Outreach into Excel

Importing your Outreach Call records into Excel helps you track call volume, analyze outcomes, and optimize team performance. This step-by-step guide shows you how to set up Coefficient, pull in Call data, and automate updates.

TLDR

  • Step 1:

    Step 1. In Excel, go to Insert → Get Add-ins → My Add-ins, find “Coefficient”, and install it.

  • Step 2:

    Step 2. Open Coefficient, select “Import from Objects”, then choose “Call” under Outreach.

  • Step 3:

    Step 3. Set filters on date range or disposition, then click “Import”.

  • Step 4:

    Step 4. (Optional) Enable scheduled auto-refresh to keep call metrics current.

Coefficient sidebar menu with import, export, automations, and AI Sheet Assistant options.
CRM and sales connectors like Salesforce, HubSpot, Pipedrive, and Gong shown in list view.
Auto-refresh options for imported data with daily, hourly, and weekly scheduling.

What Outreach Objects Are Available?

Account

  • Opportunity
  • Sequence
  • Call Disposition
  • Call Purpose
  • Compliance Request
  • Content Category
  • Content Category Membership
  • Content Category Ownership
  • Duty
  • Email Address
  • Event
  • Favorite
+21 more