How to resolve Salesforce report sync failures showing only column headers in Google Sheets

Salesforce report sync failures showing only column headers happen when your connector retrieves report structure but can’t access the actual data due to permission changes or report modifications.

This leaves you with empty spreadsheets and no clear path to resolution. Here’s how to get reliable report data every time.

Import any Salesforce report using Coefficient

Coefficient provides direct integration with all Salesforce reports in your org, automatically handling field mapping and permission inheritance. When report changes cause issues, you get clear feedback and alternative solutions.

How to make it work

Step 1. Access all your Salesforce reports.

Install Coefficient in Google Sheets and connect to Salesforce. Browse and select from any report in your org, including Pipeline, Leads, Opportunities, Forecasts, and Campaign Performance reports.

Step 2. Validate report accessibility before import.

Coefficient checks report existence, accessibility, and data availability before import. You’ll know immediately if permission or data issues would cause header-only imports.

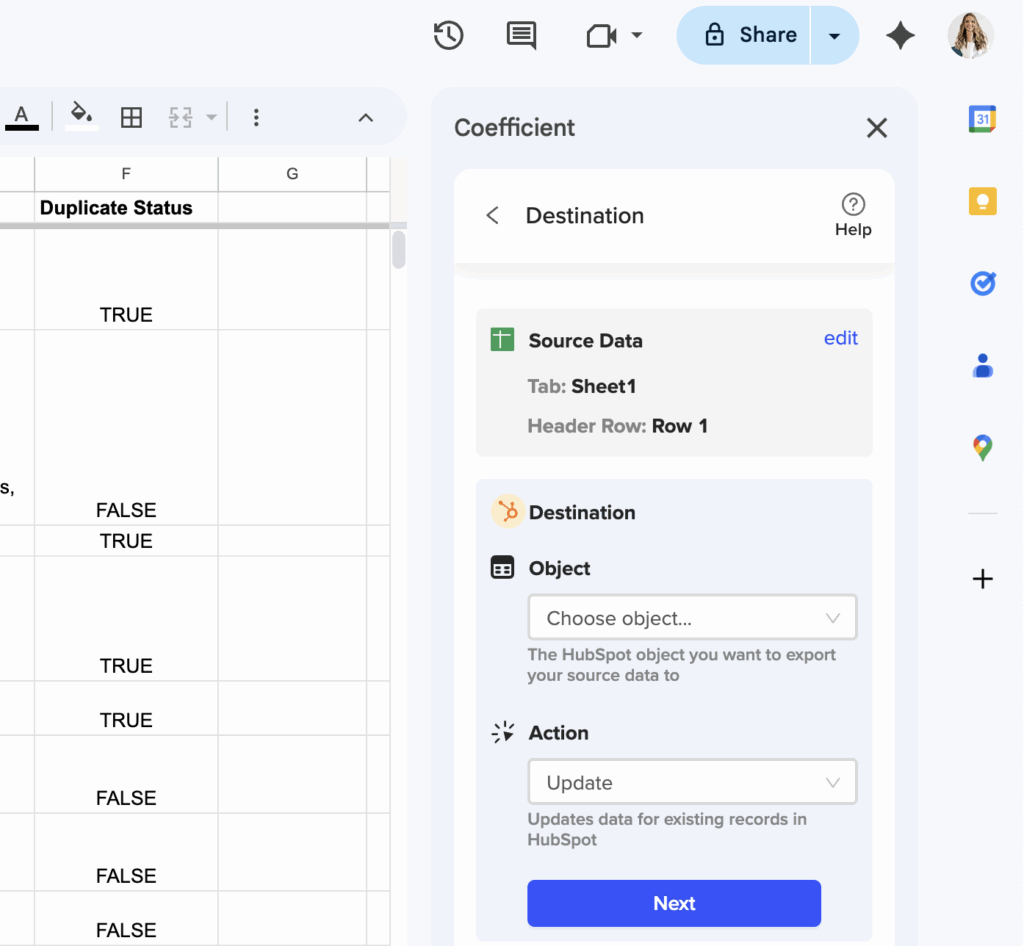
Step 3. Set up alternative import methods when needed.

If report-based import fails, switch to objects and fields selection to recreate the same data set with custom filtering. This bypasses report-specific permission or structural issues.

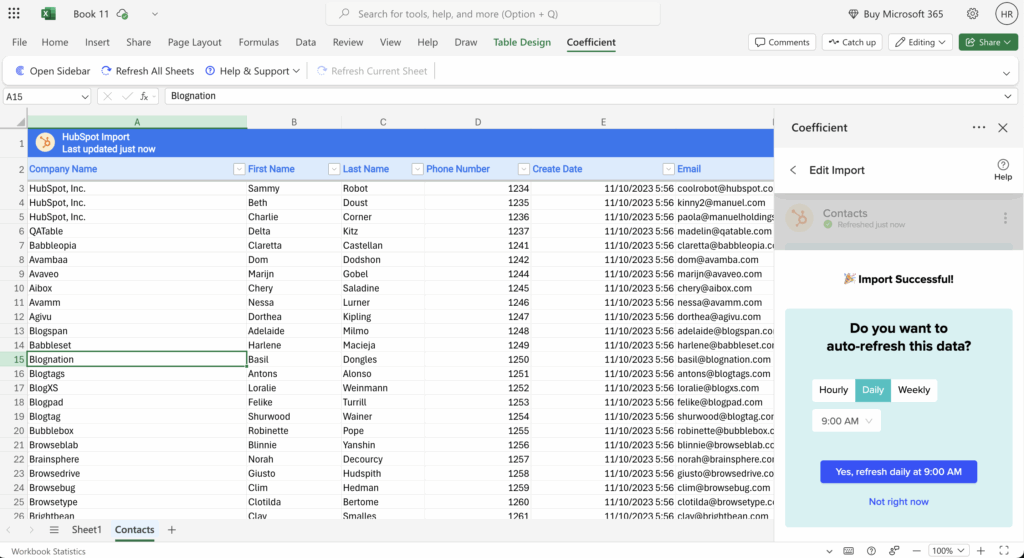
Step 4. Configure reliable automated refreshes.

Schedule hourly, daily, or weekly refreshes with built-in error detection and retry logic. When report changes cause sync failures, Coefficient provides clear feedback about what changed and offers solutions.

Keep your reports flowing reliably

Coefficient ensures consistent data flow from Salesforce reports without the header-only failures that disrupt other integrations. Connect your reports and get complete data every time.

How to restrict edit access but allow save as functionality on shared Salesforce reports

Salesforce’s shared report functionality has a critical limitation: there’s no way to restrict edit access while preserving save-as capabilities. Users with folder access can typically both view and modify reports, creating risks for master template integrity.

Here’s how to separate these permissions by moving your shared reports to Google Sheets while maintaining live Salesforce data connections.

Separate edit and save-as permissions using Coefficient

Coefficient addresses this limitation by moving report sharing to Google Sheets. You can share master reports with “View” permissions only while enabling “Make a Copy” functionality, and copied reports retain live Salesforce data connections.

How to make it work

Step 1. Migrate your shared reports to Google Sheets.

Convert your Salesforce shared reports to Google Sheets using Coefficient imports. This maintains all your Salesforce data while gaining superior permission control over the original reports.

Step 2. Configure granular access control.

Share master reports with “View” permissions only and enable “Viewers and commenters can see the option to download, print, and copy.” Users can save copies via “Make a Copy” without edit access to originals.

Step 3. Set up enhanced save-as features.

Copied reports retain Coefficient’s Salesforce data connections and users can modify their copies without affecting the master. Configure automatic data refresh so copies stay current with Salesforce.

Step 4. Create bulk template sharing structure.

Build shared folders containing multiple report templates that users can browse and copy as needed. This scales your save-as functionality across teams.

Step 5. Enable advanced functionality in copied reports.

Copied reports inherit Coefficient features like filtered imports, scheduled refreshes, and formula auto-fill, providing users with more powerful reporting capabilities than native Salesforce.

Implement your permission-separated reporting system

This approach eliminates the edit-access bundling issue in Salesforce while providing users with full save-as functionality and enhanced reporting capabilities. Get started with your permission-separated reporting system today.

How to schedule automatic exports of Salesforce list view data to Excel

Salesforce provides no native functionality for scheduling automatic list view exports, leaving you stuck with manual exports every time you need updated data in Excel.

Here’s how to set up completely automated scheduling that keeps your Excel data current with flexible timing options and advanced automation features.

Automate your data exports with comprehensive scheduling using Coefficient

Coefficient directly addresses Salesforce’s scheduling gap with flexible automated refresh options. You can schedule hourly, daily, or weekly updates with timezone-based timing and get notifications when your data refreshes.

How to make it work

Step 1. Create your Salesforce import with list view filters

Set up your import using “From Objects & Fields” and apply the same filters from your original list view. This becomes your automated data source that replicates your list view criteria.

Step 2. Configure your refresh schedule

Click the refresh schedule icon in Coefficient and choose your timing: hourly intervals (1, 2, 4, or 8 hours), daily at specific times, or weekly on selected days. All schedules respect your timezone settings.

Step 3. Set up Append New Data for historical tracking

Enable “Append New Data” to add new rows without overwriting existing data. This maintains historical records while incorporating updates, perfect for tracking changes over time.

Step 4. Configure notifications and alerts

Set up Slack and email alerts to notify stakeholders when data refreshes, new rows are added, or specific cell values change. Customize messages with charts, screenshots, and dynamic variables.

Step 5. Enable snapshots for automated backups

Schedule automatic copies of your data to new tabs (hourly, daily, weekly, or monthly). This creates timestamped snapshots while your main data stays current.

Never manually export again

This automated approach eliminates the manual export cycle entirely while providing stakeholders with always-current information and historical tracking. Start automating your Salesforce data exports today.

How to set up automated contact deletion workflows in HubSpot for unresponsive outbound prospects

HubSpot’s native contact deletion workflows have significant limitations. You can’t automatically delete contacts based on inactivity alone, and bulk deletion requires manual list management or complex configurations that may violate data retention policies.

A more sophisticated approach uses preventive staging rather than reactive deletion, giving you granular control over cleanup criteria while maintaining audit trails and compliance.

Build preventive staging and automated cleanup using Coefficient

Coefficient provides a better approach by creating engagement scoring systems that identify truly unresponsive prospects before implementing cleanup actions. This prevents the need for mass deletion by managing prospect flow more intelligently.

How to make it work

Step 1. Import and analyze existing contact engagement patterns.

Use Coefficient to import your existing HubSpot contacts into Google Sheets with engagement data like email opens, website visits, and form submissions. Create engagement scoring formulas that identify contacts with zero activity over 90+ days across multiple criteria.

Step 2. Set up automated engagement scoring and classification.

Build formulas that automatically classify contacts as “Active,” “Dormant,” or “Removal Candidate” based on engagement patterns. Include criteria like no email opens, no website visits, no form submissions, and number of outreach attempts without response. This creates a systematic approach to identifying truly unresponsive prospects.

Step 3. Create conditional cleanup workflows with audit trails.

Schedule weekly imports of contact engagement data from HubSpot and apply your scoring formulas. Use Coefficient’s conditional exports to move contacts that meet specific removal criteria. Set up the DELETE export action for contacts with zero engagement over your threshold period while maintaining complete audit trails in Sheets.

Step 4. Implement safeguards and recovery options.

Before any deletion, check for recent deal associations, upcoming scheduled activities, custom “do not remove” flags, or high-value company indicators. Create automated snapshots to preserve historical data before cleanup actions, allowing for easy reversal if needed.

Clean your database without losing valuable data

This approach provides much more sophisticated contact management than HubSpot’s basic workflows, with granular control over deletion criteria and built-in safeguards. You can maintain database hygiene while preserving compliance and audit capabilities. Set up your automated cleanup system today.

How to set up automated data validation rules in Salesforce without installing apps

Automated data validation in Salesforce doesn’t require installing additional apps. You can create real-time field-level quality monitoring that functions like validation rules while providing continuous oversight of existing data.

This approach gives you automated validation monitoring without impacting user workflows or blocking productivity.

Monitor data validation continuously using Coefficient

Coefficient enables automated data quality monitoring that works like validation rules by providing real-time field-level quality checking. Unlike native Salesforce validation rules that only trigger during saves, this approach monitors all existing data continuously.

How to make it work

Step 1. Import your key validation fields.

Use Coefficient’s object imports to pull fields requiring validation like email formats, phone numbers, and required custom fields. Focus on the fields most critical to your business processes and data integrity.

Step 2. Build automated quality checks with native formulas.

Create email validation using =IF(AND(FIND(“@”,A2)>0,FIND(“.”,A2)>FIND(“@”,A2)),”Valid”,”Invalid”). For phone format checking, use =IF(LEN(SUBSTITUTE(A2,”-“,””))=10,”Valid”,”Invalid”). Add required field checks with =IF(ISBLANK(A2),”Missing”,”Complete”).

Step 3. Set up exception alerting.

Configure Coefficient’s Slack and Email Alerts to notify you when new rows are added that fail validation checks. This creates an automated monitoring system that alerts you to quality issues as they occur.

Step 4. Track validation trends over time.

Use Coefficient’s Snapshots feature to capture validation failure rates at regular intervals. This creates historical data quality metrics that help you measure improvement and identify patterns in validation failures.

Start continuous validation monitoring

Automated validation monitoring provides the benefits of validation rules without blocking user productivity, while also identifying existing data quality issues. Begin monitoring your data validation today.

How to set up master Salesforce reports with clone-only permissions

Salesforce doesn’t provide true clone-only permissions for individual reports. The platform’s folder-level sharing means users either have broad access to modify reports within a folder or they’re restricted from accessing reports entirely.

You can create genuine clone-only permissions by moving your master reports to Google Sheets while maintaining live Salesforce data connections.

Enable genuine clone-only permissions using Coefficient

Coefficient enables genuine clone-only permissions through Google Sheets integration. Users can clone reports via “Make a Copy” but cannot edit originals, and cloned reports maintain live Salesforce data connections with automated refresh schedules.

How to make it work

Step 1. Build master reports with Salesforce connectivity.

Create master reports using Coefficient’s Salesforce connectivity to import data from any reports, objects, or custom SOQL queries in your org. This forms the foundation for your clone-only system.

Step 2. Configure clone-only permission settings.

Set Google Sheet sharing to “Viewer” for target users and enable “Viewers can copy” option in sharing settings. Users can clone reports via “Make a Copy” but cannot edit originals.

Step 3. Preserve data connectivity in cloned reports.

Cloned reports maintain Coefficient’s Salesforce import configuration, including automated refresh schedules (hourly, daily, weekly), applied filters and field selections, and formula auto-fill capabilities for calculations.

Step 4. Create standardized master templates.

Build standardized master reports for common use cases like pipeline analysis, lead reporting, and campaign performance that teams can clone and customize for their specific needs.

Step 5. Maintain administrative control.

Keep full control over master template updates while users operate independently with their cloned versions. This ensures consistency while enabling customization.

Deploy your clone-only reporting system

This provides the clone-only functionality that Salesforce lacks natively, enabling controlled self-service reporting with protected master templates. Start building your clone-only permission system today.

How to set up real-time duplicate detection for HubSpot records using subscription IDs

Real-time duplicate monitoring requires continuous data synchronization that HubSpot’s native tools can’t provide for custom fields like subscription IDs.

Here’s how to create a true real-time duplicate monitoring solution with automated alerts and cross-object validation.

Create real-time subscription ID duplicate monitoring using Coefficient

Coefficient’s scheduled refresh and alert system creates near real-time duplicate monitoring for HubSpot subscription IDs. You can set up hourly monitoring, multi-layer detection, and automated alerts that trigger within minutes of duplicate creation in HubSpot.

Feel free to jump to the walkthrough below or get a full video walkthrough of Coefficient’s HubSpot connector.

Get Started with Coefficient's HubSpot Connector for Free

How to make it work

Step 1. Configure real-time data import architecture.

Import relevant HubSpot objects (contacts, companies, or deals) with subscription ID custom fields leveraging Coefficient for Google Sheets or Excel. Set refresh schedule to hourly for near real-time monitoring. Apply dynamic filters to monitor only active subscriptions, reducing processing time and focusing on relevant data.

real time duplicate detection for hubspot in spreadsheets

Step 2. Set up multi-layer duplicate detection.

Create immediate detection with: =COUNTIF($B$2:$B$1000,B2) for exact subscription ID matches. If you need help with formulas, leverage Coefficient’s AI Sheets Assistant. Then, use Coefficient’s snapshots to compare current vs. previous hour’s data for historical tracking. Import multiple objects to detect subscription IDs appearing across contacts and companies simultaneously.

Step 3. Configure advanced alert system.

Set trigger conditions for new rows added OR cell value changes in duplicate status column. Configure Slack for immediate team alerts and email for management reporting. Include subscription ID, record type, and HubSpot record URL in alert notifications using Coefficient’s variable customization.

hubspot duplicate detection alerts via slack or email

Step 4. Implement prevention integration.

Export validation results back to HubSpot using a custom “Duplicate Status” field. Create HubSpot workflows that reference this field for automated follow-up. Set up threshold-based alerts that only trigger when duplicate count exceeds defined limits.

preventative hubspot duplicate detection updates

Transform reactive duplicate management into proactive prevention

This real-time monitoring system ensures subscription ID integrity across your entire HubSpot database. Get started with Coefficient for free and start monitoring your subscription IDs before duplicates impact your business operations.

How to set up scheduled Salesforce data refreshes in Excel without force.com connector

Coefficient provides comprehensive automated refresh scheduling that replaces force.com connector’s macro-driven timing with enterprise-grade automation. You get cloud-based scheduling with timezone support that runs independently of your computer availability.

Here’s how to set up reliable Salesforce data refreshes in Excel with better automation than the deprecated connector provided.

Set up automated Salesforce data refreshes using Coefficient

Coefficient’s scheduling system offers hourly, daily, and weekly refresh options with timezone support and automatic error recovery. Unlike force.com connector’s VBA macro dependency, this cloud-based solution runs reliably without requiring your local machine to be available.

How to make it work

Step 1. Configure your initial Salesforce data import.

Set up your data import using Coefficient’s Objects & Fields method, Custom SOQL queries, or existing Salesforce reports. This establishes the data connection that will be refreshed automatically on your chosen schedule.

Step 2. Access scheduling settings through the sidebar.

Open the Coefficient sidebar in Excel and navigate to your import’s scheduling settings. You’ll see options for different refresh frequencies and timing configurations.

Step 3. Select your refresh frequency and timing.

Choose from hourly refreshes (1, 2, 4, or 8-hour intervals), daily refreshes at specific times, or weekly refreshes on selected days (like Monday, Wednesday, Friday). Set timezone preferences based on your location.

Step 4. Configure advanced refresh features.

Enable Formula Auto Fill Down to automatically apply Excel formulas to new rows during refreshes. Set up Refresh All functionality to update multiple Salesforce imports simultaneously across different worksheets.

Step 5. Set up notifications and monitoring.

Configure Slack and Email alerts for refresh completion, failures, or specific data changes. Enable manual refresh buttons for on-demand updates alongside your automated schedule.

Enterprise advantages over macro-driven scheduling

Unlike force.com connector’s dependency on local machine availability and VBA macro scheduling, Coefficient’s cloud-based scheduling runs independently with automatic error recovery, detailed logging, and administrative controls. You get reliable automation without IT intervention or computer uptime requirements.

Automate your Salesforce data refreshes

Stop relying on manual updates and unreliable macro scheduling. Set up Coefficient for automated Salesforce data refreshes that run reliably in the cloud.

How to sync Amplitude user event data to HubSpot custom objects without duplicating contact records

Syncing Amplitude user event data to HubSpot often creates duplicate contact records because native integrations lack sophisticated deduplication logic when importing external product data.

Here’s how to create a controlled data pipeline that prevents duplicates while maintaining clean contact records.

Create a deduplication layer using Coefficient

Coefficient solves this by letting you apply deduplication logic in spreadsheets before data reaches HubSpot . You can match against existing contact records and filter user events to ensure only unique records get processed.

How to make it work

Step 1. Import your existing HubSpot contacts to establish a master list.

Connect to HubSpot through Coefficient and pull all contact records with their email addresses and any unique identifiers. This creates your baseline for matching logic.

Step 2. Import Amplitude user data with email matching logic.

Pull your Amplitude user event data into the same spreadsheet. Use Coefficient’s filtering capabilities (up to 25 filters with AND/OR logic) to segment user events before they reach HubSpot.

Step 3. Apply deduplication formulas to identify new vs existing users.

Use VLOOKUP or INDEX/MATCH functions to compare Amplitude emails against your HubSpot contact list. Create a column that flags whether each user already exists: =IF(ISERROR(VLOOKUP(B2,HubSpot_Contacts!A:A,1,FALSE)),”New”,”Existing”)

Step 4. Export only new user events to HubSpot custom objects.

Filter your data to show only “New” users, then use Coefficient’s scheduled exports to push clean data to HubSpot custom objects. For existing contacts, update their records with behavioral data instead of creating duplicates.

Step 5. Automate the process with scheduled imports and exports.

Set up Coefficient to run this deduplication workflow automatically on your preferred schedule. This maintains data integrity through the spreadsheet transformation layer without manual intervention.

Keep your HubSpot data clean and actionable

This approach prevents the contact record chaos that comes with direct API connections. Try Coefficient to build your own deduplication pipeline and keep your CRM organized.

How to sync HubSpot anonymous form submissions to Google Sheets without workflows

HubSpot workflows can’t trigger from anonymous form submissions because they require contact associations to function. When forms don’t collect email addresses or other identifying information, no contact record gets created, leaving these valuable submissions stuck in HubSpot.

Here’s how to automatically capture all anonymous form data in Google Sheets, even when workflows won’t work.

Pull anonymous form data directly using Coefficient

Coefficient connects directly to HubSpot’s Forms API, completely bypassing the workflow limitation. Instead of relying on contact associations, it pulls form submission data at the source level, capturing every response regardless of whether a contact record was created.

How to make it work

Step 1. Connect to HubSpot Forms in Coefficient.

Open Coefficient’s sidebar in Google Sheets and select HubSpot as your data source. Choose “Form Submissions” from the available options. This connects directly to your form submission database, not your contact records.

Step 2. Select your specific form and configure the import.

Choose the form you want to track from the dropdown menu. Select all relevant fields including custom properties, submission timestamps, and any hidden fields. Coefficient will import all submissions from this form, including anonymous ones.

Step 3. Set up automatic refresh scheduling.

Configure your import to refresh hourly or daily to capture new anonymous submissions automatically. This creates a continuous data flow without requiring any workflow triggers or contact properties.

Step 4. Filter for anonymous submissions only.

Use Coefficient’s filtering capabilities to isolate submissions where contact email is blank or null. This ensures you’re only seeing the anonymous feedback data you need for analysis.

Step 5. Enable automatic formula processing.

Set up Formula Auto Fill Down for any calculated columns like submission categorization or timestamp formatting. These formulas will automatically apply to new anonymous submissions as they’re imported.

Start capturing anonymous form data automatically

This approach gives you complete visibility into anonymous form submissions without the limitations of contact-based workflows. Try Coefficient to start syncing all your HubSpot form data automatically.