When Salesforce exports show dots instead of commas for decimals, it’s because the platform forces US number formatting regardless of your regional settings.
Here’s how to get properly formatted decimal separators that match your locale without manual corrections after each export.
Import Salesforce data with correct decimal formatting using Coefficient
Coefficient bypasses Salesforce’s problematic CSV export system by connecting directly through the API. This eliminates formatting conflicts and automatically applies your Excel regional settings during import.
How to make it work
Step 1. Connect Coefficient to your Salesforce account.
Install Coefficient from Excel’s add-ins store and authenticate with Salesforce. The connection automatically detects your Excel locale settings for proper decimal formatting.
Step 2. Import your desired report or create a custom query.
Select any existing Salesforce report or build custom queries from objects like Opportunities, Accounts, or Leads. All numeric fields will display with comma decimal separators automatically.
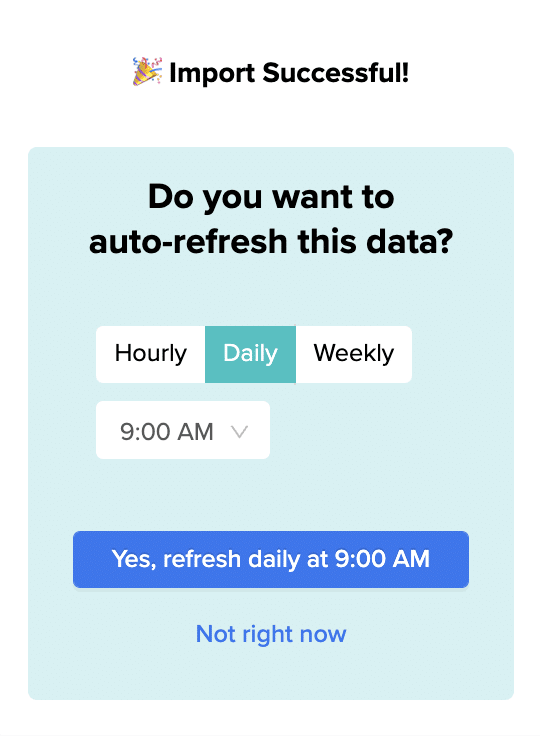
Step 3. Schedule automatic refreshes.
Set up hourly, daily, or weekly refreshes to keep your data current. Each refresh maintains consistent comma decimal formatting without requiring post-import corrections.
Get reliable decimal formatting every time
This approach eliminates the frustration of fixing decimal separators after each Salesforce export. Start using Coefficient to get properly formatted data that respects your regional preferences from the beginning.
The import error happens because HubSpot expects a one-to-one relationship between records and property values, but your CSV has multiple rows with the same contact identifier pointing to different values.
You can fix this by aggregating your data before import, combining multiple record values into single fields that HubSpot can process without errors.
Eliminate import errors with data aggregation using Coefficient
Coefficient provides the perfect workaround by letting you pull HubSpot data into spreadsheets, identify duplicate contact records, and aggregate multiple values before pushing clean data back to HubSpot .
How to make it work
Step 1. Import and diagnose your data.
Pull your HubSpot data into sheets using Coefficient and identify duplicate contact records with different associated values. Use conditional formatting with =COUNTIF($A:$A,$A2)>1 to highlight duplicates and see exactly which contacts have multiple records causing the import error.
Step 2. Aggregate duplicate records.
Create a helper column with TEXTJOIN formula: =TEXTJOIN(“; “, TRUE, FILTER($B$2:$B$1000, $A$2:$A$1000=$A2)). This combines all values for each unique contact into a single field. In Google Sheets, you can also use the QUERY function to group and concatenate values automatically.
Step 3. Prepare clean data for import.
Create a deduplicated list using =UNIQUE(A2:A1000) and add your aggregated values next to unique contacts. Validate no duplicates remain with COUNTIF to ensure your import will be error-free.
Step 4. Execute error-free import.
Use Coefficient’s Export to HubSpot feature with UPDATE action to modify existing contacts. Map your aggregated field to the target property and set up scheduled exports to maintain data freshness as new records are added.
Get your data imported without errors
This approach eliminates the duplicate record errors that plague standard CSV imports while preserving all your valuable data in a format HubSpot can handle. Start using Coefficient to fix your import issues today.
You’re staring at that cryptic error message again: “Cannot read property ‘length’ of undefined”
Your Salesforce data refresh just failed. No explanation. No diagnostic info. Just another morning ruined by Google’s native Salesforce connector.
Here’s the truth: These errors aren’t random glitches. They’re symptoms of fundamental flaws in Google’s Salesforce connector that make failures inevitable.
Why Google’s Salesforce Connector Keeps Failing You
Hidden Row Limits That Kill Your Reports
Google’s connector has a sneaky 10,000 row limit you can’t override, even with custom SOQL queries. One frustrated user put it perfectly: “I hate one thing: the addon applies a hidden 10,000 row limit that you can’t bypass… this really bothers me.”
When your sales team grows or you need historical data? Too bad. You’re stuck.
Silent Failures That Cost You Hours
When things break (and they will), you get no error notifications. The system fails silently, leaving you to discover problems hours or days later—usually when your boss asks for that critical report.
Authentication Nightmares
Constant timeout issues and IP restriction problems require complex workarounds. Users regularly report being locked out with no clear solution. Every manual refresh becomes a prayer that your authentication still works.
Inflexible Scheduling
You’re stuck with 4, 8, 12, or 24-hour refresh intervals. That’s it. No flexibility for real business needs. Need data every 30 minutes for that board meeting? Not happening.
Why 500,000+ Users Choose Coefficient Instead
“Not really sure what I did in spreadsheets without Coefficient at this point. The work I used to do manually now makes me sweat just thinking about it!” – Hannah R.
“I bring Coefficient to every organization I join. It’s the tool that levels up my ability to access Salesforce data.” – RevOps Professional
With a 4.8/5 star rating on Google Workspace and consistent 5-star reviews on G2, Coefficient has become the go-to solution for teams tired of fighting with native connectors.
How to Fix Your Refresh Errors with Coefficient (5 Simple Steps)
Step 1: Install Coefficient in Google Sheets
Open Google Sheets and install the Coefficient add-on. Connect to Salesforce with enterprise-grade authentication that actually stays connected—no more random logouts or IP restrictions.
Step 2: Create Your Salesforce Import
Select your Salesforce objects and reports directly from Coefficient’s intuitive interface. Pull unlimited rows of data—no hidden caps, no surprises.
Step 3: Set Up Smart Refreshes
Click the refresh button for instant updates with built-in validation. Schedule refreshes on any interval you need—hourly, daily, weekly, or custom. Watch real progress indicators instead of wondering if anything’s happening.
Step 4: Configure Intelligent Monitoring
Get instant Slack or email alerts when refreshes complete or encounter issues. No more silent failures. And if you need help? Their responsive support team typically responds within hours, not days.
Step 5: Scale Without Limits
Refresh multiple Salesforce imports simultaneously. Update thousands of records. Coefficient handles the complexity while you focus on insights.
Beyond Fixing Errors: Why Teams Love Coefficient
Built-in AI Sheets Assistant
Coefficient’s AI Assistant creates actual dashboards, charts, and pivots from your Salesforce data with natural language commands. It understands your sheet context and delivers real, editable output.
Two-Way Sync That Actually Works
Update Salesforce directly from your sheets. Change opportunity stages, update contact info, or bulk edit records—all from the comfort of Google Sheets.
Native Salesforce Formulas
Use formulas like =COEFFICIENT_SALESFORCE() to query live data directly. No exports, no manual refreshes, just real-time data when you need it.
Flexible Scheduling That Matches Your Business
Set refreshes every 15 minutes, every 3 hours, or any custom interval. Your data updates on your schedule, not Google’s arbitrary limitations.
Real-Time Monitoring and Alerts
Know instantly when important data changes. Set up sophisticated alerts based on any criteria—deal size, stage changes, or custom fields.
What Real Users Say
“Coefficient eliminates errors from manual transfers and gives me real-time insights at my fingertips. It’s a game-changer for faster decision-making.” – Finance Director, SaaS Company
“We tried every Salesforce connector available. Coefficient is the only one that doesn’t make me want to throw my laptop out the window.” – Sales Ops Manager
“The support team is incredible. They helped us set up complex workflows that we thought were impossible.” – Revenue Operations Lead
[IMAGE PLACEHOLDER: Customer testimonial cards with star ratings]
The Hidden Cost of Sticking with Google’s Native Connector
Every failed refresh costs you:
30 minutes troubleshooting mysterious errors
2 hours rebuilding corrupted data imports
Countless hours explaining to stakeholders why reports are delayed
One RevOps manager calculated they were losing 15 hours per month to connector issues. That’s almost two full workdays spent fighting with a tool that should just work.
Make the Switch Today
Stop accepting “undefined length property” as part of your workflow. Join 500,000+ users who’ve upgraded to reliable Salesforce syncing.
The “Download in Excel format” button in CRM Analytics is designed for data portability, not format preservation. This button extracts underlying data records without maintaining visual grouping structure, which is why your organized grouped data becomes flat rows in Excel.
Here’s how to eliminate dependence on that problematic download button while getting properly structured data.
Replace the download button with live data connections using Coefficient
Rather than relying on CRM Analytics’ flawed export functionality, Coefficient provides a complete alternative. You’ll connect directly to your source Salesforce data and apply proper Excel grouping that won’t disappear, eliminating the need for manual downloads entirely.
How to make it work
Step 1. Identify your dashboard’s data sources.
Determine which Salesforce objects feed your CRM Analytics dashboard. This might include standard objects like Accounts, Opportunities, or Leads, plus any custom objects specific to your organization.
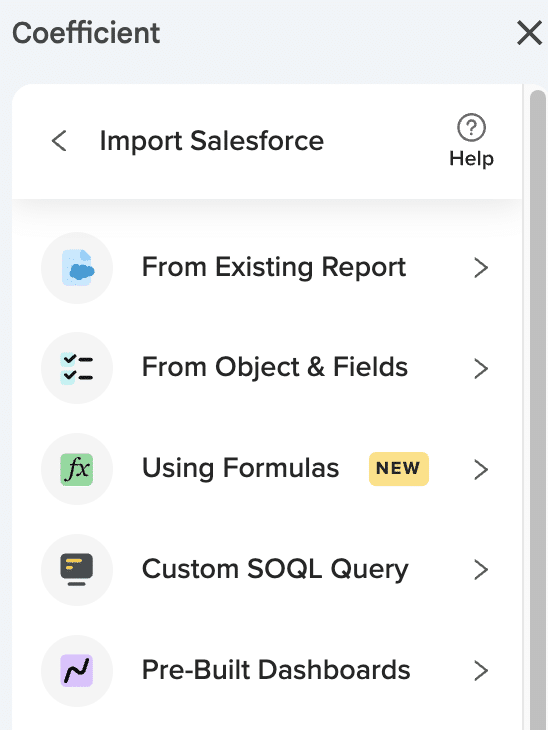
Step 2. Import identical data using Coefficient.
Use Coefficient’s “From Objects & Fields” feature to import the same data that appears in your CRM Analytics dashboard. Select the exact fields and apply the same filtering criteria for consistency.
Create grouping, subtotals, and formatting using Excel’s built-in features. This grouping structure remains intact indefinitely, unlike the flattened data from CRM Analytics downloads.
Step 4. Set up automated refresh schedules.
Configure automatic data updates (hourly, daily, or weekly) to replace manual downloads. Your data stays current and your grouping structure is preserved through every refresh.
Eliminate manual downloads with automated data management
This approach eliminates dependence on CRM Analytics’ flawed export functionality while providing superior data management capabilities. Start building automated data workflows that preserve your structure exactly how you need it.
Uneven goal line distribution in weekly reports occurs because monthly goal configurations can’t be evenly divided across weeks – months contain 4.33 weeks on average, and week boundaries don’t align with month boundaries.
Here’s how to fix this distribution problem by eliminating dependence on monthly goal configuration and building proper weekly goal calculations.
Fix distribution problems using Coefficient
Monthly goal configurations create goal lines that jump between different weekly values (15 companies in some weeks, 25 in others) instead of consistent targets. Coefficient fixes this by eliminating dependence on monthly goal distribution logic entirely.
How to make it work
Step 1. Import raw data without goal distribution logic.
Use Coefficient to pull sequence enrollment data from HubSpot or HubSpot without relying on the platform’s problematic goal distribution calculations.
Step 2. Calculate even distribution using multiple methods.
Create properly calculated weekly goals using static weekly targets (20 companies every week), smooth monthly distribution (monthly goal ÷ 4.33 weeks), or business-day weighted distribution that accounts for varying business days per week.
Step 3. Build consistent visualization with smooth goal lines.
Create charts where goal lines appear as smooth, consistent values rather than the jagged lines created by monthly distribution. This eliminates the “February problem” (shorter month creating artificially high weekly goals) and fixes month-boundary weeks that get split goal allocations.
Step 4. Solve specific distribution problems.
Remove holiday week goal distortions and provide consistent goal baselines for week-over-week performance comparison. This gives you goal lines that display as true horizontal references at your target level.
Step 5. Maintain consistent distribution automatically.
Set up automated updates through Coefficient scheduling that maintain consistent distribution. Use historical goal tracking to show actual vs intended weekly targets, enabling accurate performance trending.
Get the smooth goal distribution you need
This approach replaces mathematically flawed monthly-to-weekly goal distribution with purpose-built weekly goal calculations that stay consistent. Start fixing your uneven goal distribution today.
Salesforce CSV exports have inherent limitations with decimal separator formatting, often ignoring regional preferences and creating delimiter conflicts when commas serve as both field separators and decimal separators.
Instead of fighting with CSV export configurations, there’s a direct approach that eliminates these formatting issues entirely.
Skip CSV exports and connect directly to Salesforce using Coefficient
Coefficient establishes direct API connections to Salesforce, bypassing CSV limitations completely. This approach provides real-time data access with automatic regional formatting based on your Excel locale.
How to make it work
Step 1. Install Coefficient and authenticate with Salesforce.
Add Coefficient to Excel through the Microsoft AppSource. Connect your Salesforce account through the sidebar – the platform automatically handles decimal separator formatting based on your regional settings.
Step 2. Import reports or build custom queries.
Access any Salesforce report directly or create custom queries from objects and fields. All numeric data imports with proper comma decimal separators without CSV delimiter conflicts.
Step 3. Set up scheduled refreshes.
Configure automatic updates on hourly, daily, or weekly schedules. Each refresh maintains consistent formatting and eliminates the need for CSV manipulation or export setting adjustments.
Eliminate CSV formatting headaches
Direct API connections provide superior data formatting compared to problematic CSV exports. Try Coefficient to get properly formatted Salesforce data with comma decimals applied automatically.
Traditional timestamp formulas in Google Sheets for new record detection typically involve complex combinations of NOW(), IF(), and ARRAYFORMULA() functions that can break when sheets are edited and don’t integrate well with CRM automation workflows.
Here’s how to eliminate manual timestamp formulas while getting more reliable new record detection for your CRM automation.
Replace complex formulas with automatic tracking using Coefficient
Coefficient eliminates the need for manual timestamp formulas through its built-in Append New Data feature, which automatically tracks when new rows are added with system-generated timestamps that integrate seamlessly with CRM workflows.
How to make it work
Step 1. Enable automatic new data tracking.
Turn on Coefficient’s Append New Data feature to automatically timestamp new rows added to your dataset. This provides more reliable new record detection than formula-based approaches that can break during sheet modifications.
Step 2. Set up automatic formula propagation.
If you need custom timestamp logic alongside automatic tracking, enable Formula Auto Fill Down. When new rows are added during data refresh, Coefficient automatically copies formulas from adjacent columns without manual intervention.
Step 3. Configure conditional CRM exports.
Set up Conditional Exports in HubSpot that reference your timestamps to process only new records. For example, create an export condition that only pushes records where the timestamp is within the last 24 hours.
Step 4. Implement incremental sync logic.
Use timestamp-based conditions to create automated incremental sync without complex webhook-based detection. Your CRM automation processes only new or changed records, maintaining efficiency while ensuring data consistency.
Step 5. Add custom timestamp formulas if needed.
For specific business requirements, you can still use custom timestamp formulas like `=IF(A2<>“”,IF(B2=””,NOW(),B2),””)` in column B to timestamp when column A gets data. Formula Auto Fill Down ensures these propagate correctly to new rows.
Step 6. Monitor automation performance.
Set up alerts to notify you when timestamp-based automation runs, ensuring your new record detection works reliably without manual monitoring of formula integrity.
Automate with confidence, not complexity
This approach provides more robust automation capabilities than relying solely on Google Sheets formulas, while maintaining flexibility for custom timestamp logic when needed for specific business requirements. You get reliable new record detection without formula maintenance headaches. Start automating your CRM workflows with confidence.
Duplicate deal names create serious risks during bulk updates because HubSpot’s native import tool can unpredictably update the wrong records. You need sophisticated detection and resolution strategies to ensure updates hit the intended deals.
Here’s how to identify duplicate deal names before updating and implement multi-field matching strategies that eliminate the risk of modifying wrong records.
Detect and resolve duplicate deal names safely using Coefficient
Coefficient provides advanced tools for handling duplicate deal names through enhanced matching criteria and filtering capabilities. You can visualize and resolve duplicate scenarios with full transparency before any updates occur.
How to make it work
Step 1. Import deal data and detect duplicates before updating.
Pull all relevant deals and useto identify duplicate deal names. Create a filter to isolate duplicates for separate handling before attempting any bulk updates.
Step 2. Implement multi-field matching for unique identification.
Combine deal names with additional fields to create unique identifiers. Use formulas liketo match on multiple criteria simultaneously.
Step 3. Use advanced filtering to reduce duplicate risks.
Apply Coefficient’s filtering capabilities (up to 25 filters with AND/OR logic) to isolate specific deal subsets. Filter by Deal Stage, Deal Owner, Company Name, or date ranges to minimize the chance of duplicate matches.
Step 4. Create staged update processes for different scenarios.
Process unique deal names first using standard matching, then handle duplicates separately with enhanced matching criteria. Use date-based logic like Close Date or Create Date to distinguish between similarly named deals when needed.
Step 5. Build validation specifically for duplicate scenarios.
After updates, verify that only intended records were modified usingto catch any duplicate-related errors.
Step 6. Implement manual review workflows for complex duplicates.
Filter duplicates that can’t be resolved through multi-field matching into separate tabs for individual review. This ensures 100% accuracy for edge cases while maintaining efficiency for the bulk of your updates.
Update with confidence despite duplicates
This approach eliminates the guesswork around which duplicate record will be updated while providing complete visibility into your matching logic. Start handling duplicate deal names safely with Coefficient’s advanced matching capabilities.
You can handle Salesforce validation rules during Google Sheets imports through preview functionality and comprehensive error management. This significantly reduces import failures compared to native Salesforce import tools.
Here’s how to set up validation rule handling with preview testing, detailed error reporting, and batch retry logic for efficient troubleshooting.
Manage validation rules with preview and error tracking using Coefficient
Coefficient provides robust validation rule handling through preview functionality that tests imports before execution and detailed error columns that show specific validation failures. Unlike Salesforce Data Import Wizard which fails entire batches on validation errors, this approach isolates failures for granular correction.
How to make it work
Step 1. Use preview functionality to test validation rules before import.
Run preview changes to see exactly what will be imported and test against validation rules without committing data. This allows validation rule testing and correction before making actual API calls to Salesforce.
Step 2. Set up pre-export validation for required fields and data types.
The system identifies missing required fields before API calls and performs data type checking to prevent format-related validation failures. This catches date, number, and email format issues early in the process.
Step 3. Configure detailed error status tracking for validation failures.
Enable error columns that show specific validation failures with Salesforce error messages. This provides detailed information for troubleshooting custom validation rules and dependency issues.
Step 4. Use batch retry logic for failed records.
Process valid records while isolating validation failures for separate correction. Failed records due to validation rules can be corrected and re-exported without affecting records that processed successfully.
Step 5. Handle complex custom validation rules with field mapping validation.
The field mapping interface validates against Salesforce schema to prevent incompatible data types. This manages validation rules that depend on related object data through proper lookup field population.
Step 6. Set up conditional exports to exclude problematic records.
Use TRUE/FALSE columns to exclude records that might fail validation rules before attempting import. This prevents validation failures by filtering out records that don’t meet validation criteria.
Step 7. Configure API settings for validation rule compatibility.
Adjust settings to handle validation rules triggered by Apex code and optimize between Bulk vs REST API for validation rule performance. The system maintains authentication through validation processes without interruption.
Streamline your validation rule handling
Comprehensive validation rule management with preview testing and granular error reporting eliminates the frustration of failed batch imports. Start importing with confidence using advanced validation rule handling and detailed error tracking.
Salesforce governor limits including API call limits, concurrent request restrictions, bulk operation timeouts, and query complexity limitations become critical during large data syncs, often causing failures or incomplete transfers.
Here’s how these limits impact connector performance and how to optimize large-scale data operations while staying within platform constraints.
Optimize performance within governor limits using Coefficient
Coefficient manages Salesforce governor limits through configurable batch processing, parallel execution control, REST and Bulk API support, and intelligent API management that ensures reliable large-scale operations.
How to make it work
Step 1. Configure batch processing for optimal performance.
Set up configurable batch sizes with default 1000 records per batch and maximum 10,000 records, allowing optimization based on your org’s limits. Configure parallel batch execution control to manage concurrent API calls within daily and concurrent limits.
Step 2. Implement API optimization and selection.
Configure automatic selection between REST API and Bulk API based on data volume and operation type. Set up custom SOQL query support that enables efficient data retrieval with proper indexing and query optimization for complex joins.
Step 3. Set up scheduled operations for limit management.
Configure scheduled operations that distribute large syncs across multiple time windows to manage daily API quotas. Use timezone-based scheduling to optimize API usage across global teams and implement Refresh All capability for multiple imports.
Step 4. Handle MFA considerations and row limits.
Configure the 2K row limit with MFA enabled (bypassed when unique ID field included) and set up automatic throttling with retry logic when approaching daily API limits. Implement incremental updates through Append New Data functionality to reduce full dataset refreshes.
Step 5. Monitor performance and error handling.
Set up intelligent query splitting for complex joins and large datasets to prevent query timeouts. Configure queue management that prevents overwhelming Salesforce APIs and implement failed batch handling that doesn’t prevent successful records from processing.
Governor limit constraints can disrupt your data workflows and prevent successful large-scale synchronization between Salesforce and Google Sheets. Optimize your data operations with Coefficient’s comprehensive approach to ensure reliable performance while maintaining optimal Salesforce org health.