How to sync HubSpot contact updates bidirectionally with Google Sheets without workflow limitations

HubSpot workflows create significant limitations for bidirectional sync: they only trigger on initial property assignments, lack real-time capabilities, and provide no reliable way to push spreadsheet changes back to HubSpot.

You need complete bidirectional synchronization that eliminates workflow dependencies. Here’s how to get reliable two-way data flow between HubSpot and Google Sheets.

Get complete bidirectional sync using Coefficient

Coefficient provides a complete bidirectional synchronization between HubSpot and Google Sheets or Excel by establishing direct API connections that bypass HubSpot’s trigger-based system entirely. This enables reliable inbound sync fromto Sheets and outbound sync from Sheets back to HubSpot.

The system captures every property modification through scheduled imports while pushing spreadsheet changes back to HubSpot through automated exports, creating seamless two-way data flow.

Coefficient is a certified HubSpot App Partner on HubSpot’s app marketplace. Here’s a full walkthrough of how it works.

How to make it work

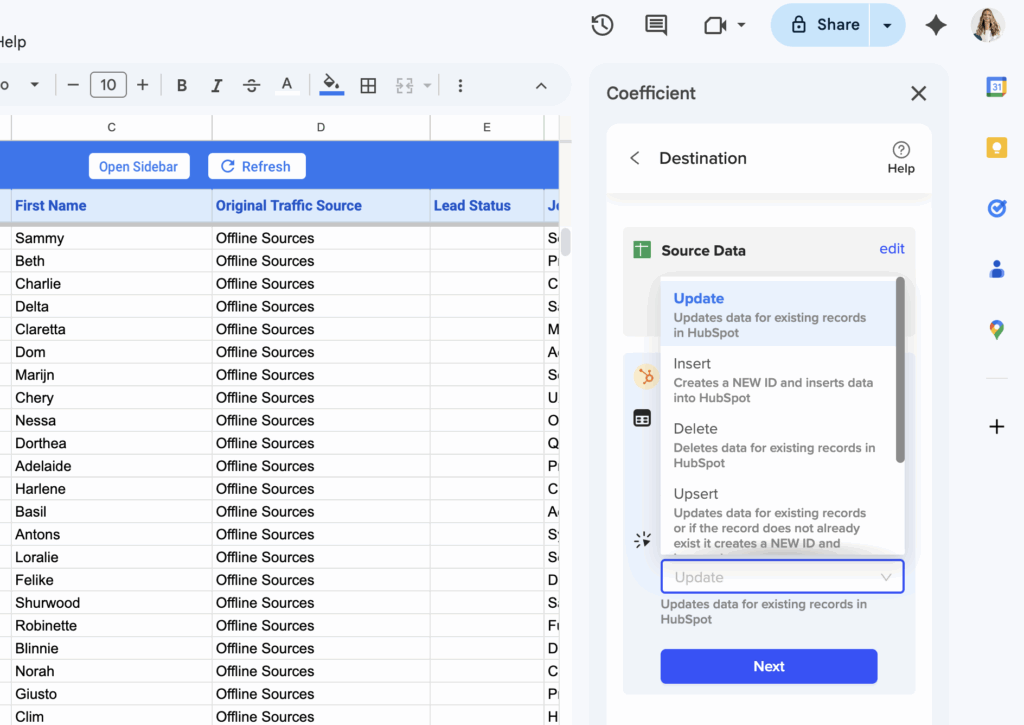
Step 1. Set up comprehensive HubSpot contact import with all required properties.

Connect to HubSpot and select contact properties, custom fields, and association data from related deals, companies, and tickets. Use dynamic filtering to create flexible import criteria that adjust automatically.

hubspot contact updates in google sheets

Step 2. Configure scheduled refresh for inbound sync.

Set up automated imports every hour to capture all contact property changes from HubSpot. This detects every modification, not just “unknown to known” transitions that limit workflows.

schedule refreshes for hubspot contacts in google sheets

Step 3. Create export configuration for outbound sync to HubSpot.

Set up scheduled exports to push spreadsheet changes back to HubSpot using UPDATE, INSERT, UPSERT, or DELETE actions. Use conditional exports to only sync rows that meet specific criteria, like Status = “Updated”.

export configuration for hubspot to google sheets

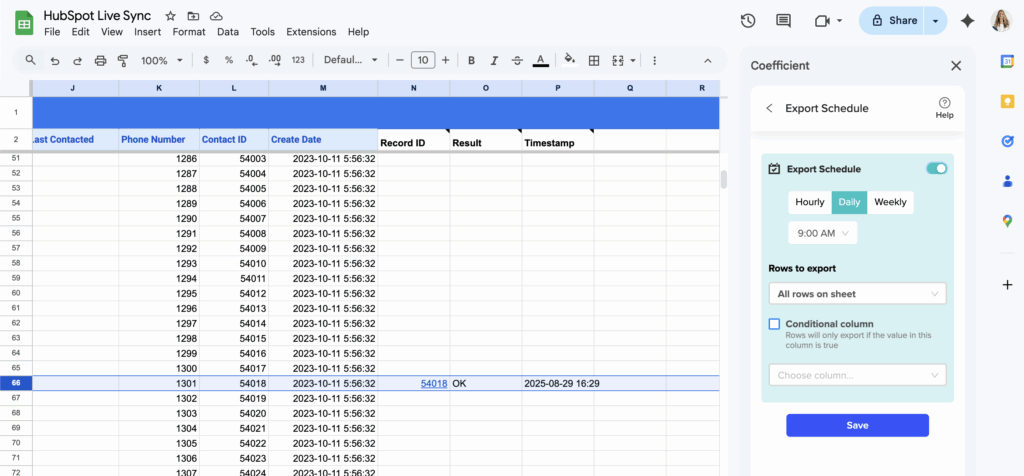
Step 4. Schedule bidirectional sync timing for optimal data flow.

Configure inbound sync every hour and outbound sync daily to maintain current data flow. Adjust timing based on your business needs and data change frequency.

schedule hubspot contact data refreshes to and from google sheets

Step 5. Enable contact list management for advanced HubSpot operations.

Add or remove contacts from HubSpot lists directly from spreadsheet data. Manage contact list memberships and object associations without workflow dependencies.

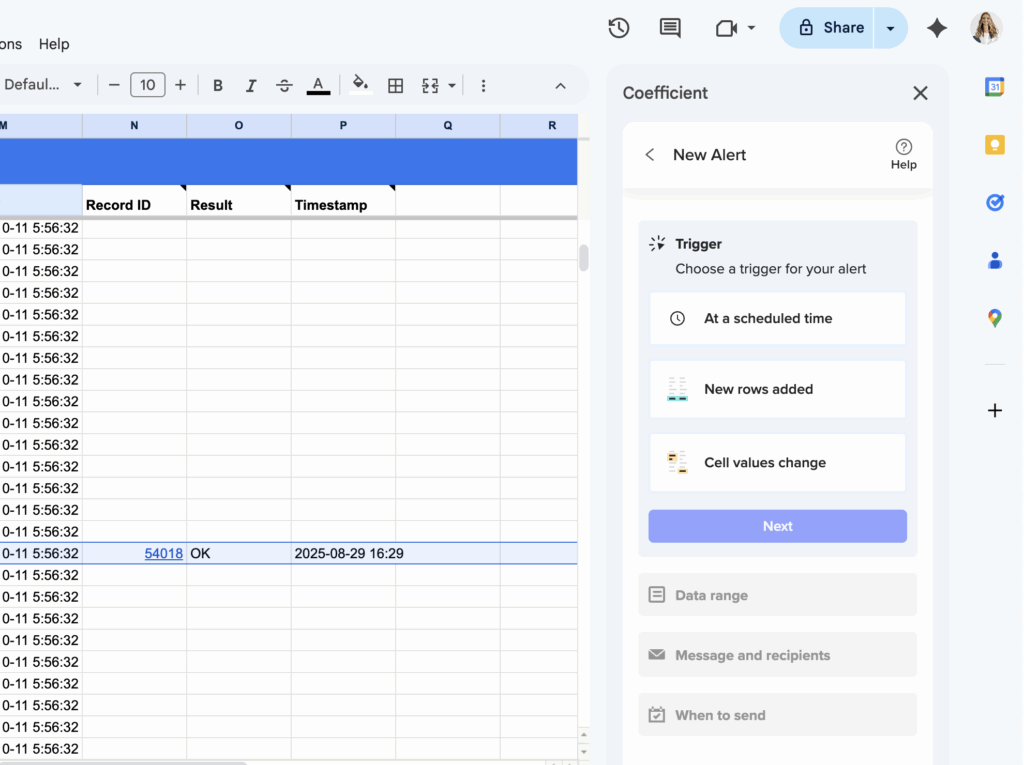
Step 6. Set up monitoring alerts for bidirectional sync health.

Configure Slack and email alerts for both import and export activities. Monitor connection status and get error logging with specific details for troubleshooting sync issues.

trigger slack email alerts on hubspot contact data in google sheets

Start reliable two-way sync

Coefficient for HubSpot eliminates all workflow trigger limitations while providing automated bidirectional synchronization with complete transparency. You’ll get reliable data flow in both directions with comprehensive monitoring and error reporting.with bidirectional sync today.

Get Started with Coefficient for HubSpot

How to sync specific HubSpot contact fields to Google Sheets columns with live updates

Syncing specific HubSpot contact fields to designated Google Sheets columns with live updates requires precise field mapping and reliable refresh mechanisms that HubSpot’s native integration cannot consistently deliver.

You need superior field-specific synchronization with near real-time updates. Here’s how to get precise control over which fields sync to which columns with automated live updates.

Get precise field sync with live updates using Coefficient

CoefficientHubSpotprovides superior field-specific synchronization through advanced import and mapping capabilities. It offers granular field control for custom selection of exactly whichcontact properties to import, automatic column mapping with clear labeling, and data type preservation for proper formatting.

The system enables near real-time field synchronization through scheduled refresh systems, complete field monitoring, and automated field management that maintains data integrity as fields update.

How to make it work

Step 1. Select specific contact properties during import setup.

Connect to HubSpot through Coefficient sidebar and choose exactly which contact properties to import. Access both standard HubSpot fields and custom properties, plus association fields from related companies, deals, and tickets.

Step 2. Configure automatic column mapping with clear field identification.

Let Coefficient automatically map HubSpot property names to Google Sheets column headers for easy identification. The system preserves proper formatting for dates, numbers, and boolean values while maintaining clear column organization.

Step 3. Set up hourly refreshes for near real-time field synchronization.

Configure scheduled imports to run every hour for live field updates and enable manual refresh buttons for immediate synchronization when critical changes occur. Each refresh captures current state of all selected fields.

Step 4. Enable dynamic field filtering for targeted synchronization.

Use spreadsheet cell references to dynamically filter which contacts to sync and create multiple imports for different contact segments with different field requirements. Apply up to 25 filters across 5 groups for precise control.

Step 5. Configure automated field management and monitoring.

Use formula auto-fill to extend calculations automatically when new contacts are added and set up data validation to maintain integrity as fields update from HubSpot. Enable historical tracking with snapshots to preserve field value history.

Step 6. Set up field change alerts for live monitoring.

Configure Slack or email notifications for field value changes, new contacts added, or specific property modifications. Use variables in alerts for personalized field change notifications.

Start syncing specific fields with live updates

Get startedThis approach ensures specific HubSpot contact fields remain synchronized with designated spreadsheet columns through reliable, automated live updates. You’ll get precise field control with near real-time synchronization and comprehensive monitoring.with live field sync today.

How to track original HubSpot record IDs during Excel deduplication process

Losing track of original HubSpot record IDs during deduplication creates audit nightmares and prevents rollback if something goes wrong. Manual ID tracking with formulas is error-prone and breaks easily during complex merge processes.

Here’s how to maintain complete ID tracking automatically with hyperlinked references and full audit trails throughout your deduplication workflow.

Automatic ID preservation with hyperlinked audit trails using Coefficient

CoefficientHubSpotmaintainsObject IDs automatically throughout the deduplication process, providing hyperlinked references and complete audit trails without manual tracking formulas.

How to make it work

Step 1. Import records with automatic ID preservation.

All imported HubSpot records include their original Record ID in a dedicated column with direct hyperlinks to the HubSpot records. These IDs remain intact and clickable throughout your entire deduplication process, providing instant verification access.

Step 2. Create comprehensive ID tracking columns.

Set up tracking columns for Original IDs (automatically imported), Duplicate Group (useto group related records), Master Record (flag which ID becomes primary), and Action Taken (track UPDATE, DELETE, or MERGE actions per ID).

Step 3. Build duplicate ID consolidation mapping.

Create formulas to concatenate all duplicate IDs in each group:where column C contains your duplicate group numbers. This creates merged ID strings showing all original records in each consolidation.

Step 4. Implement cross-reference validation.

Validate all Object IDs against current HubSpot data during the deduplication process. Coefficient’s live connection alerts you if referenced IDs become invalid, preventing broken references in your tracking system.

Step 5. Execute updates with preserved ID references.

Use UPDATE actions with original Object IDs to modify master records, DELETE actions with tracked duplicate IDs for removal, and maintain association updates with proper ID relationships across all objects.

Step 6. Create rollback capability with ID mapping.

The preserved Object ID tracking enables complete process reversal if needed. All original record identifiers remain intact and traceable, allowing you to undo consolidations and restore individual records exactly as they were.

Never lose track of your data changes

Start your free trialAutomatic ID preservation with hyperlinked references provides bulletproof audit trails and rollback capability for enterprise-grade deduplication processes. Ready to implement professional ID tracking?and maintain complete data lineage automatically.

How to trigger HubSpot workflows on every property value change not just unknown to known

HubSpot workflows only trigger when properties change from empty to having a value. If a contact’s job title changes from “Manager” to “Director,” no workflow fires.

This limitation creates blind spots in your automation. Here’s how to capture every property change, including subsequent value modifications.

Monitor all property changes using Coefficient

CoefficientHubSpotHubSpot’s workflow system has a fundamental flaw: it only detects the first time a property gets a value.bypasses this limitation entirely by connecting directly to yourdata and monitoring changes through scheduled imports.

Instead of waiting for triggers that may never fire, Coefficient pulls fresh data on your schedule and compares it against previous states. This catches every modification, whether it’s the first assignment or the hundredth change.

How to make it work

Step 1. Connect your HubSpot account through Coefficient’s sidebar.

HubSpotInstall Coefficient in your spreadsheet application and authenticate yourconnection. This creates a direct API link that doesn’t depend on workflow triggers.

Step 2. Import contact data with the properties you want to monitor.

Select specific contact fields during import setup. Include all properties where you need to track changes, not just initial value assignments.

Step 3. Schedule automatic refreshes for continuous monitoring.

Set up hourly imports to capture changes throughout the day. Each refresh pulls current property states and effectively detects any modifications since the last check.

Step 4. Configure alerts for property change notifications.

Use Coefficient’s alert system to notify you via Slack or email when specific properties change. Set up alerts for new rows added or cell value changes to catch modifications in real-time.

Step 5. Create historical snapshots for change tracking.

Schedule daily or weekly snapshots to preserve property value history. This creates an audit trail showing exactly when and how properties changed over time.

Start monitoring every property change

Get startedThis approach eliminates the “unknown to known” limitation that restricts HubSpot workflows. You’ll capture every property modification automatically without missing critical changes.with comprehensive property monitoring today.

How to troubleshoot Google Sheets API connection timeout errors in reporting

API connection timeouts occur when custom scripts attempt large data pulls without proper pagination or when Google Apps Script hits its 6-minute execution limit. Native Google Sheets can’t handle complex API error scenarios or substantial datasets effectively.

Here’s how to eliminate timeout errors and successfully import large datasets without the technical complexity of managing API connections manually.

Avoid timeout errors using Coefficient

CoefficientHubSpoteliminates API timeout issues through optimized data retrieval infrastructure that handles pagination, retry logic, and connection pooling automatically. The platform can import unlimited rows fromand other sources without the memory and execution limits that cause Google Sheets timeouts.

How to make it work

Step 1. Migrate large data imports to Coefficient’s managed infrastructure.

Set up your data imports through the platform instead of custom scripts. Coefficient automatically handles pagination for large datasets and implements intelligent retry logic for temporary failures.

Step 2. Import substantial datasets without size limitations.

Pull unlimited rows (minimum 50,000 guaranteed) without worrying about Google Apps Script memory limits or execution timeouts. The platform manages large data retrieval behind the scenes.

Step 3. Use detailed error reporting for troubleshooting.

When API issues occur, view specific error codes and retry attempts in the sidebar instead of generic timeout messages. This provides clear visibility into what’s happening during data retrieval.

Step 4. Benefit from partial import recovery.

If timeouts occur during large imports, Coefficient can import available data and retry failed portions instead of failing completely like custom scripts do.

Handle large datasets reliably

Move toStop fighting timeout errors and failed imports when working with substantial datasets.Coefficient for API connections that handle complexity automatically.

How to troubleshoot data aggregation errors in merged dashboards

Data aggregation errors in merged HubSpot dashboards stem from inconsistent data relationships, conflicting filter logic, duplicate record counting, or mismatched object associations. HubSpot’s limited error reporting makes troubleshooting difficult without direct access to underlying data and calculation logic.

The solution is implementing comprehensive troubleshooting through transparent data access and systematic debugging approaches.

Implement systematic debugging with complete data visibility

CoefficientHubSpot’sHubSpotprovides comprehensive troubleshooting capabilities by importing raw data from all objects feeding your merged dashboard using multi-object import capability. You can create diagnostic columns, build comparison tables, and implement automated data quality checks with complete visibility into calculation logic, unlikeblack-box aggregation process that makes error diagnosis difficult. This approach works across bothintegrations.

How to make it work

Step 1. Import raw data and create diagnostic tracking.

Use Coefficient’s multi-object import to pull raw data from all HubSpot objects feeding your merged dashboard. Create diagnostic columns showing record counts, unique identifiers, and data quality indicators for each import, then build comparison tables contrasting aggregated totals from merged dashboards against individual dashboard totals.

Step 2. Identify and resolve common error patterns.

Address duplicate counting using Coefficient’s association handling with “Primary Association” settings to avoid counting records multiple times across related objects. For missing records, apply identical filtering logic using advanced filtering to ensure complete data capture. Fix date range mismatches by creating standardized date filtering with dynamic cell references.

Step 3. Build systematic debugging tools.

Create data lineage tracking showing exactly which records contribute to each aggregated metric and build validation formulas that identify orphaned records or broken associations. Use Coefficient’s snapshot feature to capture data states before and after troubleshooting changes for comparison analysis.

Step 4. Implement ongoing error prevention.

Set up automated data quality checks using spreadsheet functions to flag aggregation anomalies as they occur. Create reconciliation reports comparing your calculations against HubSpot’s native aggregations, and establish Coefficient alerts to notify you immediately when aggregation errors reoccur or new issues arise.

Resolve aggregation errors with complete diagnostic visibility

Start buildingHaving complete visibility into data and calculation logic enables effective troubleshooting that’s impossible with HubSpot’s limited error reporting.merged dashboards with comprehensive error detection and resolution capabilities.

How to update HubSpot contacts from Google Sheets using Contact ID instead of email

HubSpotYes, you can updatecontacts from Google Sheets using Contact ID instead of email addresses. This approach eliminates email dependency issues and provides more reliable data synchronization for your CRM updates.

We’ll show you exactly how to set up Contact ID-based updates and why this method works better than email matching for most organizations.

Skip email matching with Contact ID updates using Coefficient

CoefficientUnlike native HubSpot-Google Sheets integrations that rely on email matching,supports Contact ID as the unique identifier for updates. Contact IDs are always unique in HubSpot, making them perfect for organizations dealing with duplicate emails, shared addresses, or missing email data.

The key advantage is reliability. Email addresses can change, get duplicated, or be missing entirely. Contact IDs never change once created, ensuring your updates hit the right records every time.

How to make it work

Step 1. Set up your Google Sheets data structure.

Create columns for HubSpot Contact IDs and the properties you want to update. If you don’t have Contact IDs yet, use Coefficient to import your HubSpot contacts first – this automatically includes Contact ID data alongside other contact properties.

Step 2. Configure Coefficient’s export feature with Contact ID mapping.

In Coefficient’s export setup, select UPDATE as your action and map your Contact ID column to HubSpot’s Contact ID field as the unique identifier. The field mapping is automatic when your data originates from previous Coefficient imports, or you can manually map external data fields to HubSpot contact properties.

Step 3. Set up automated synchronization schedules.

Configure scheduled exports to run hourly, daily, or weekly depending on your needs. This keeps HubSpot contacts synchronized with your Google Sheets changes without manual intervention. You can also use conditional export capabilities to update only specific records based on formula results or cell values.

Start using Contact ID for reliable HubSpot updates

Try CoefficientContact ID-based updates solve the email dependency problem while providing better control over your data synchronization.to set up reliable, automated HubSpot contact updates from Google Sheets.

How to verify HubSpot Google Sheets integration API connection when workflows show success

Verifying HubSpot-Google Sheets API connections is challenging when workflows report false success. HubSpot only confirms the API call was initiated, not whether Google Sheets received and processed the data.

You need real-time connection monitoring and transparent verification. Here’s how to get complete visibility into your API connection status and data transfer process.

Get transparent connection verification using Coefficient

CoefficientHubSpot’s native integration provides no direct API connection monitoring, workflow logs only show “action sent” status, and Google Sheets offers no HubSpot-specific diagnostics.provides superior connection verification through real-time monitoring, visual data confirmation, and comprehensive error reporting.

HubSpot’sThe system offers live connection status displays, immediate data transfer verification, and detailed error logging that eliminates the guesswork inherent inworkflow-based system.

How to make it work

Step 1. Check real-time connection status through Connected Sources dashboard.

Open Coefficient sidebar in Google Sheets and navigate to Connected Sources menu. Verify HubSpot connection shows “Connected” status with green indicator for live API authentication confirmation.

Step 2. Test data access with manual import verification.

Create a test import with a small subset of contact data and use manual refresh to confirm data populates correctly. This verifies access to specific HubSpot properties and objects with immediate visual confirmation.

Step 3. Validate scheduled import consistency with monitoring cycles.

Set up hourly scheduled imports and monitor several refresh cycles to confirm consistent data retrieval. Check alert notifications to ensure monitoring systems are working and providing reliable execution.

Step 4. Test error handling with connection validation.

Temporarily modify HubSpot permissions to trigger authentication errors and verify Coefficient properly reports connection issues with actionable troubleshooting information and specific error codes.

Step 5. Confirm data transfer reliability with row count validation.

Verify exactly how many records were retrieved from HubSpot during each import. Use detailed error logging to identify specific issues when API calls fail, including connection timeouts or permission problems.

Get connection verification you can trust

Start verifyingThis comprehensive verification approach eliminates the guesswork inherent in HubSpot’s workflow-based integration system. You’ll get transparent connection monitoring, immediate error reporting, and reliable data transfer confirmation.your connections with complete visibility today.

How to verify if HubSpot app truly works with Free plan before installing

Verifying true Free plan compatibility requires examining setup requirements beyond marketplace compatibility badges, which often mislead users about actual workflow dependencies and paid feature requirements.

Here’s a systematic verification process to avoid compatibility issues and find apps that deliver genuine Free plan functionality.

Use systematic verification to find genuinely compatible apps like Coefficient

Pre-installation verification involves documentation review for terms like “workflows,” “automation,” “sequences,” or “Professional plan recommended,” direct vendor inquiry about specific Free plan limitations, checking HubSpot Community forums for Free plan user experiences, and testing setup processes in Free plan environments before committing.

CoefficientHubSpotdemonstrates transparent Free plan compatibility through identical setup processes regardless of plan type, clear documentation with no workflow requirements or plan restrictions, upfront capabilities where all features work on Free plans, and direct API connection with no dependency on plan-restrictedfeatures.

How to make it work

Step 1. Review complete setup documentation for red flags.

Search setup guides for mentions of workflow creation, automation triggers, sequence enrollment, or references to “marketing features” and “sales automation.” Look for different setup paths for different plans.

Step 2. Ask vendors specific verification questions.

Contact support directly asking: Does setup require creating workflows or automation? Are all advertised features available on HubSpot Free plans? Do any operations require workflow triggers? Is there a different setup process for Free vs. paid plans?

Step 3. Test installation in Free plan environment first.

Install only in test environments, attempt complete setup following documentation, and verify all advertised functionality works before implementing in production environments.

Step 4. Verify Coefficient’s transparent compatibility as benchmark.

HubSpotInstall Coefficient from Google Sheets or Excel marketplaces. Connect tousing OAuth authentication only and test all features (import, export, scheduling) to confirm they work identically across plan types.

Step 5. Compare other apps against Coefficient’s standard.

Use Coefficient’s workflow-free setup process as a comparison point. Any app requiring more complex setup or mentioning workflow dependencies likely has hidden compatibility issues.

Choose verified compatibility over marketplace claims

StartThis verification process helps avoid compatibility mismatch issues where apps connect but can’t function properly due to hidden workflow dependencies.with an app that delivers verified Free plan compatibility from day one.

HubSpot marketplace shows Free plan compatible but setup requires paid features

HubSpot marketplace compatibility badges create misleading expectations because they focus on basic API connection capability rather than complete functional requirements, leading to setup failures when plugins need paid features.

Here’s why marketplace badges don’t match actual setup requirements and how to find integrations with genuine Free plan compatibility.

Avoid compatibility mismatches with transparent integrations like Coefficient

Marketplace listings focus on connection capability rather than full functionality requirements. Plugins can technically connect to Free plans but often need workflow automation, sequences, or other paid features to operate properly. This creates a compatibility mismatch where plugins connect but can’t function without plan-restricted features.

CoefficientHubSpottakes a transparent approach with no hidden requirements. The setup process is identical across allplan types, uses direct API integration that bypasses plan-restricted automation features, and provides clear documentation about actual capabilities versus claimed limitations.

How to make it work

Step 1. Read complete setup documentation before installing any integration.

Search for mentions of workflows, automation, or sequences in setup guides. Check for requirements like “Professional plan recommended” in fine print or documentation.

Step 2. Contact vendors directly about Free plan limitations.

Ask specific questions about workflow dependencies, automation requirements, and whether all advertised features work on HubSpot Free plans without upgrade pressure.

Step 3. Test integrations in Free plan environments first.

Install and test complete setup processes in test environments before production implementation. Verify all advertised functionality works without paid feature dependencies.

Step 4. Choose Coefficient for guaranteed Free plan compatibility.

HubSpotInstall Coefficient from Google Sheets or Excel marketplaces. Connect tousing OAuth authentication only – no workflow configuration or paid feature dependencies required.

Step 5. Verify consistent functionality across plan types.

Test import, export, scheduling, and filtering capabilities. Coefficient provides identical functionality regardless of your HubSpot plan type with no feature degradation.

Skip misleading compatibility claims for proven solutions

ChooseCoefficient delivers genuine Free plan compatibility with transparent requirements and predictable setup processes. No more discovering incompatible requirements after installation.an integration that delivers on its compatibility promises.