Are you looking to unlock the full potential of your data stored in Snowflake? Downloading data from Snowflake opens up a world of possibilities for further analysis, reporting, and integration with other business intelligence tools.
In this guide, we’ll walk you through various methods to export data from Snowflake, ensuring you have the flexibility and knowledge to use your data in the ways that best support your business objectives. From built-in Snowflake features to third-party solutions, we’ve got you covered.
How to Download Data from Snowflake: 3 Methods
Method 1. From Your Spreadsheet with Coefficient
Coefficient is a data connector for your spreadsheet. It allows you to pull live data from sources like CRMs, BI solutions, and Snowflake, into Excel or Google Sheets in just a few clicks.
With Coefficient, you can upload data into Snowflake without leaving your spreadsheet. Here’s how:
Step 1. Install Coefficeint
Before getting started, install Coefficient for your spreadsheet. It only takes a few seconds, and you only have to do it once.
Step 2: Connect to Snowflake
Open the Coefficient Sidebar. Click on the menu icon and select “Connected Sources.”
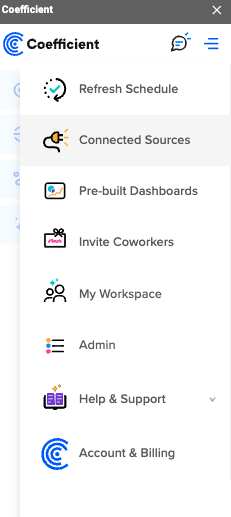
Search for Snowflake and click “Connect”.

Authenticate your Snowflake connection by providing your account details.
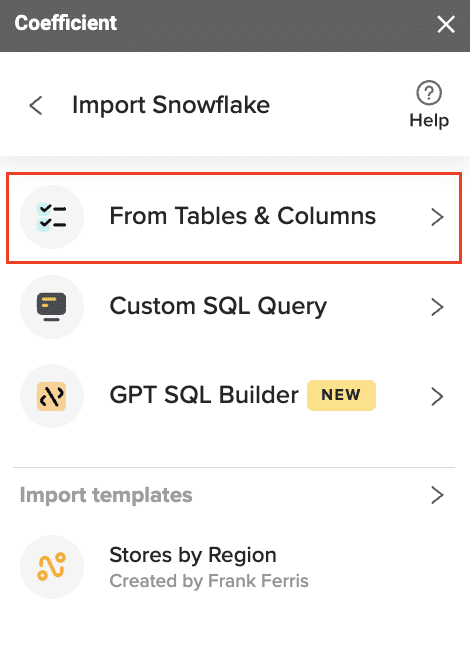
Coefficient offers three options to import your data from Snowflake: Tables and Columns, Custom SQL Query, and GPT SQL Builder.
Step 3: Import from Tables & Columns
Select ‘From Tables and Columns’ to proceed.
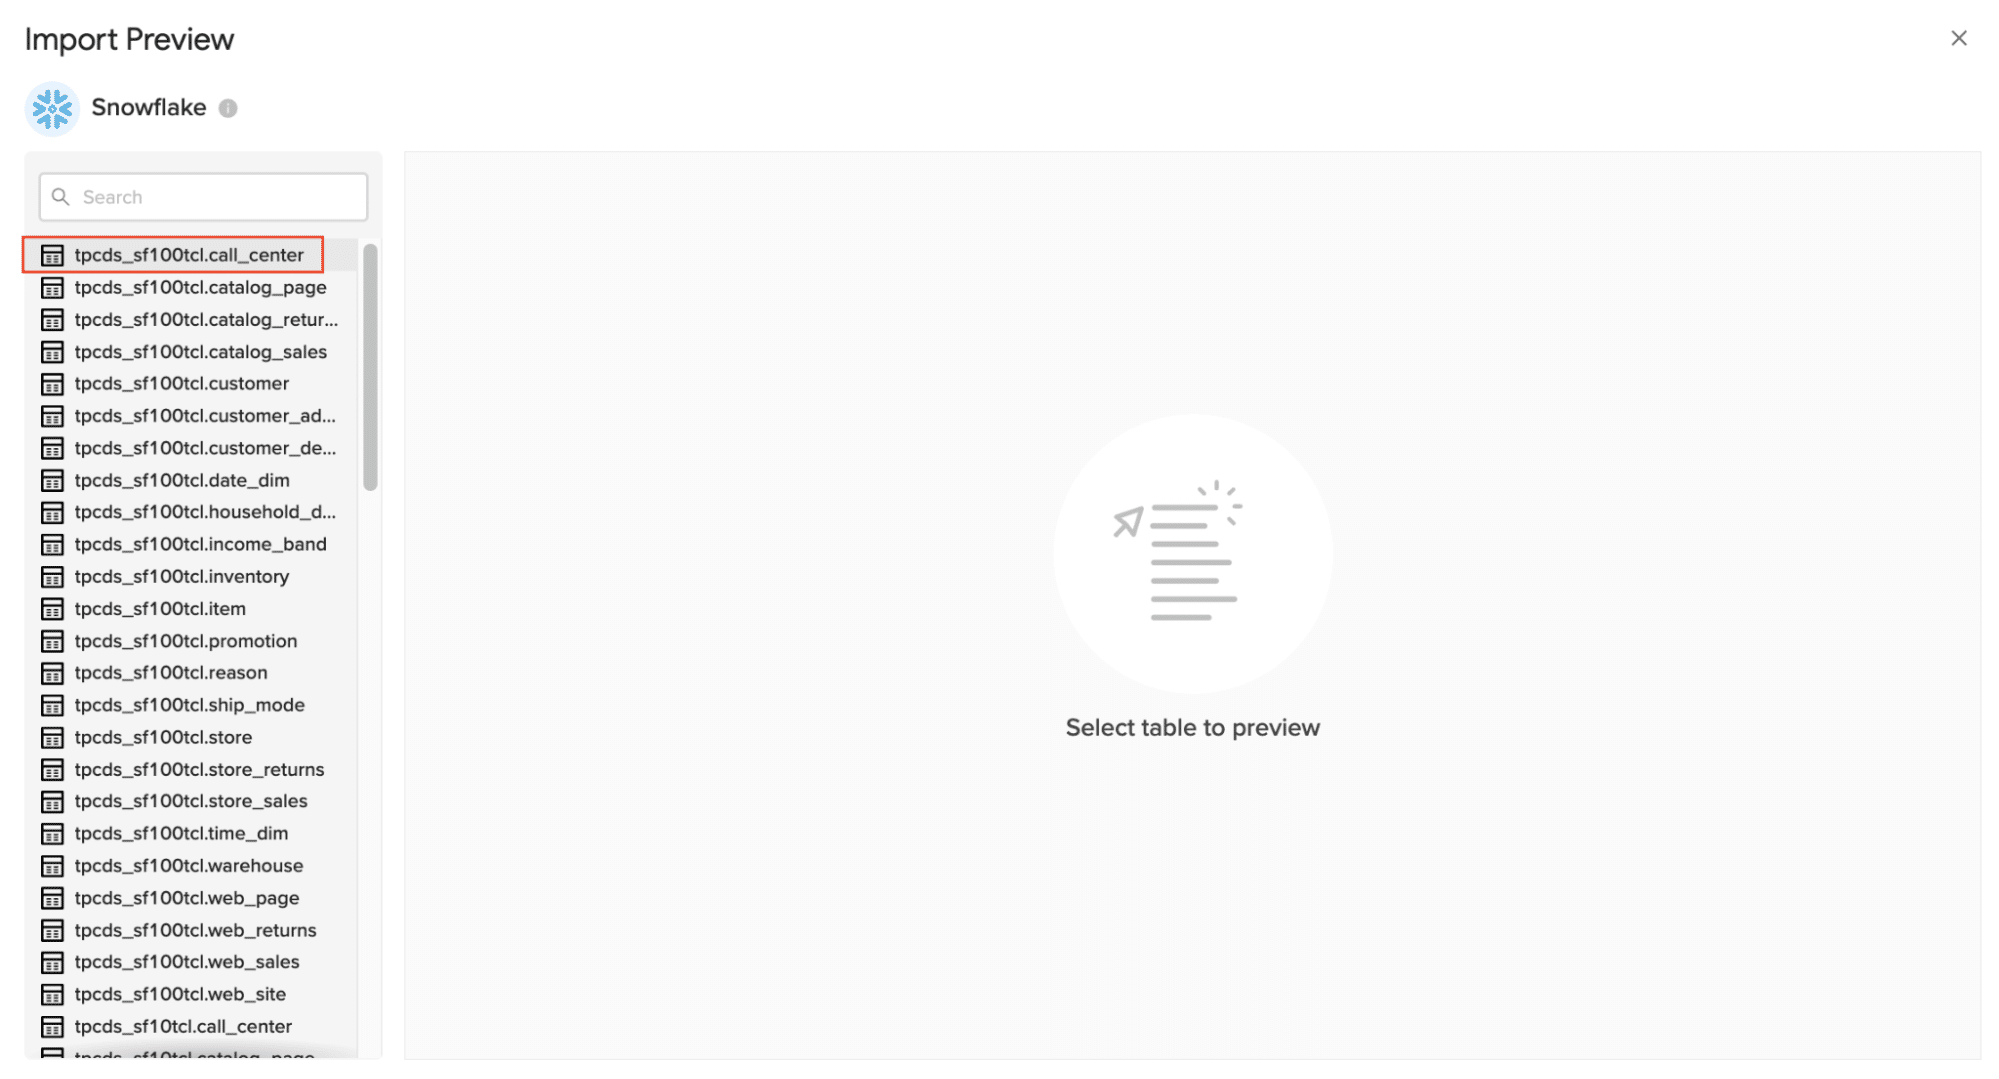
Step 4. Preview and Select Data
The Import Preview window will display the schemas of the tables available. Select the table you wish to import and choose the necessary columns
Step 4. Download Data from Snowflake
Customize your import by adding filters, and row limits as needed. When done click “Import”.
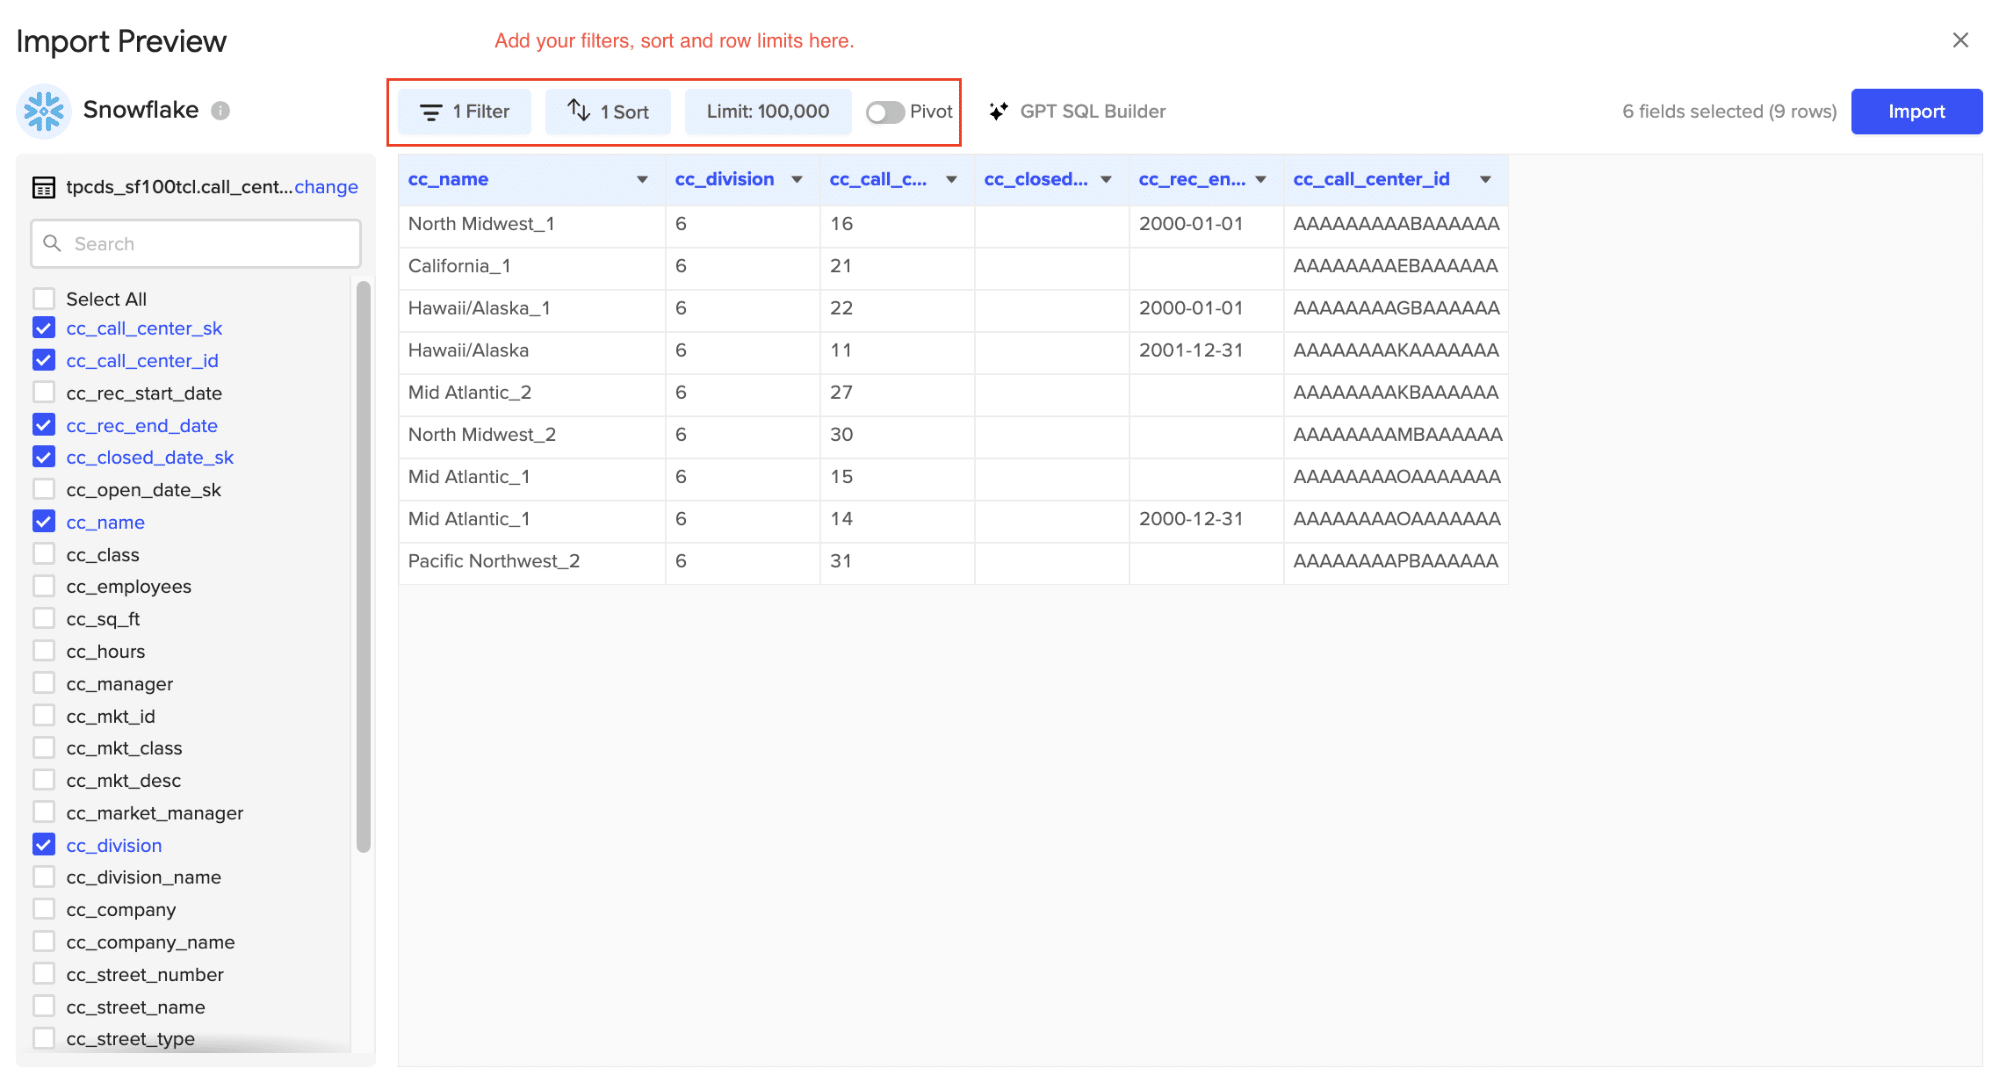
In just a few seconds, your data will populate your spreadsheet!
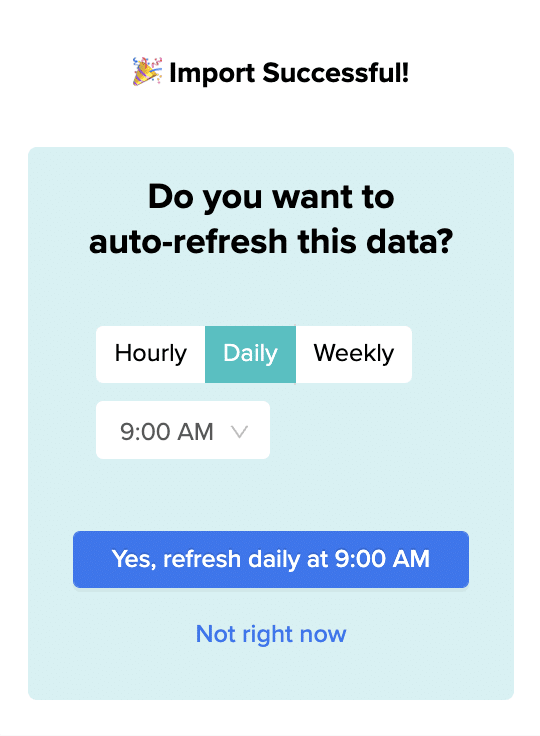
Step 5. Set Up Auto-Refresh
Keep your data up to date, set up an auto-refresh schedule in Coefficient. Choose an update frequency (hourly, daily, or weekly) and specify a time for the data to refresh automatically.
Method 2. The COPY INTO command
The COPY INTO command in Snowflake allows you to export data from a table or query result into a staging area. This method is particularly useful when dealing with large datasets. To use COPY INTO, follow these steps:
- Create a staging area using the CREATE STAGE command.
- Use the COPY INTO command to export data from a table or query result into the staging area.
- Finally, use the GET command to download the exported files from the staging area.
Method 3. Snowflake Web UI
For smaller datasets or one-off exports, using the Snowflake Web UI can be a quick and easy option. Simply follow these steps:
- Run a SELECT query to retrieve the desired data.
- Click on the “Download” button in the results pane.
- Choose your preferred file format (CSV, JSON, or XML) and click “Download”.
Keep in mind that the Web UI method is best suited for ad-hoc exports and may not be ideal for large datasets or automated processes.
Automating Data Exports
Python Connector for Snowflake
The Snowflake Python Connector allows you to interact with Snowflake programmatically. Here’s a simple code example to get you started:
import snowflake.connector
conn = snowflake.connector.connect(
account=’your_account’,
user=’your_username’,
password=’your_password’,
warehouse=’your_warehouse’,
database=’your_database’,
schema=’your_schema’
)
cur = conn.cursor()
cur.execute(“SELECT * FROM your_table”)
results = cur.fetchall()
# Process or save the results as needed
Using APIs and Scheduling Tools
Snowflake’s REST API enables automation of various tasks, including data exports. By leveraging the API along with scheduling tools like Apache Airflow or Snowflake Tasks, you can set up recurring data exports to keep your downstream systems up to date.
Best Practices for Downloading Data from Snowflake
Downloading data from Snowflake can involve numerous considerations. This guide will take you through the key factors to ensure that your data downloads are efficient, secure, and reliable.
Choosing the Right File Format
When downloading data from Snowflake, you have multiple file format options: CSV, TSV, JSON, Avro, or Parquet. Here are some factors to consider when selecting the file format:
- Compatibility with your target system or application.
- File size and compression ratio for efficient storage and transfer.
- Support for complex data types and nested structures.
- Query performance and ease of use for downstream processing.
For example, if you need fast query performance for structured data, Parquet might be a good choice. For compatibility with a wide range of systems, CSV or JSON might be more suitable.
Partitioning and Clustering
To optimize query performance and reduce costs when downloading large datasets, consider leveraging Snowflake’s partitioning and clustering features:
- Partition your data based on frequently used columns or date ranges to enable faster filtering and retrieval.
- Use clustering to co-locate similar data together, improving compression and query efficiency.
- Regularly monitor and maintain your partitions and clusters to ensure optimal performance.
Partitioning and clustering your data can significantly reduce the amount of data scanned during downloads, leading to faster and more cost-effective data retrieval.
Security and Access Control
When downloading sensitive data, enforcing proper security measures and access controls is crucial:
- Use Snowflake’s role-based access control (RBAC) to grant appropriate permissions to users and applications.
- Encrypt data in transit using secure protocols like SSL/TLS.
- Implement multi-factor authentication (MFA) for enhanced security.
- Regularly audit and monitor access logs to detect any unauthorized activities.
Adhering to these security best practices ensures your data remains protected during the download process.
Monitoring and Alerting
Set up monitoring and alerting mechanisms to proactively identify and resolve issues during data downloads:
- Utilize Snowflake’s built-in monitoring tools to track resource utilization, query performance, and data transfer metrics.
- Set up alerts and notifications for critical events such as failed downloads, long-running queries, or unusual activity.
- Integrate with external monitoring and logging solutions for centralized visibility and troubleshooting.
By monitoring your data downloads closely, you can quickly detect and resolve any issues, ensuring timely and reliable delivery of your data.
Testing and Validation
Before relying on downloaded data for critical business processes or analytics, thoroughly test and validate the data:
- Perform data quality checks to ensure accuracy, completeness, and consistency.
- Verify that the downloaded data matches the source data in Snowflake.
- Conduct performance tests to measure download speed and identify any bottlenecks.
- Validate that the downloaded data can be loaded and processed by downstream systems.
Download Data from Snowflake Securely with Coefficient
Coefficient eliminates the need for extensive coding or command-line tools, allowing you to download data from Snowflake quickly and efficiently. Sign up for Coefficient today and discover how it can transform the way you work with data from Snowflake and other sources.


