Overview
Jira is one of the leading platforms for issue tracking and project management.
While its use case is far-reaching—from HR, marketing, and legal to other fields—it remains the top of mind for agile teams and savvy software developers.
For non-techy users, however, handling volumes of data within Jira can be challenging. Especially for those who prefer the familiarity and simplicity of spreadsheets.
And so this question arises…
Video Tutorial: How to Connect Jira to Google Sheets (Step-by-Step Guide)
Can you connect Jira to Google Sheets?
The short answer is “yes.”
In fact, you can set up a Jira to Google Sheets connection in many ways.
However, not all methods of connecting Jira to Google Sheets are created equal. Some are more tedious and time-consuming, let alone prone to error, while some are unbelievably easy and convenient to pull off.
In this post, we’ll share several ways to establish a Jira Google Sheets integration. We’ll cover how to query, integrate, export, and pull up data from Jira to Google Sheets.
TL;DR: Coefficient provides the easiest method to connect Jira to Google Sheets
Manually doing the whole Google Sheets Jira integration can take a huge amount of your time, energy, and resources.
The process can also be confusing, which leaves plenty of room for errors. This can take more of your work hours and energy since your team has to pour time and effort into learning the process and correcting mistakes.
Using Coefficient provides a simpler and more streamlined solution.
The app lets you configure a Google Sheets Jira connection once, and the application automates the rest for you.
Set up your Jira connection with Google Sheets in a few easy steps and import or export your table or thousands of columns and rows of data within minutes.
You can create custom imports by specifying the data you want to pull up from Jira to Google Sheets. This way, you won’t need to export all your data from Jira, then manually pick them out after importing them to a spreadsheet.
The app can also auto-refresh your datasets so when your linked Jira data changes, Coefficient automatically syncs everything to keep your Google spreadsheet updated.
Coefficient is a huge time-saver and requires little to no coding (besides using the custom SQL query for importing).
How do I query Jira in Google Sheets?
Jira Cloud for Sheets allows you to import your Jira data into spreadsheets via existing (Jira) filters or using a custom Jira Query Language (JQL).
Follow these steps. Step 1: Click Add-ons on the Google Sheets top menu, then Get add-ons.

Type in Jira Cloud for Sheets on the Google Workspace Marketplace search bar and select the app.

Follow the prompts to install and allow access to your Google spreadsheet.
Step 2: Connect your cloud instance or site by opening the app from the Add-ons dropdown menu.
Click Connect on the Jira Cloud for Sheets sidebar and select your preferred site to add from the list.
Click Accept to authorize access to your Atlassian account.
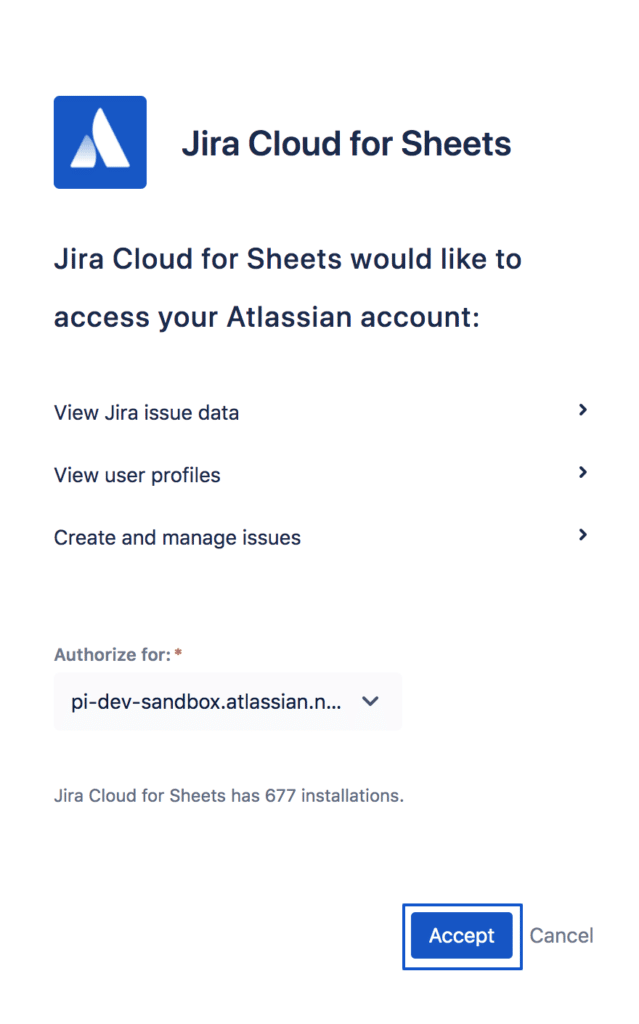
You’ll get redirected to your Google spreadsheet and see these options on the Jira Cloud for Sheets app’s menu.
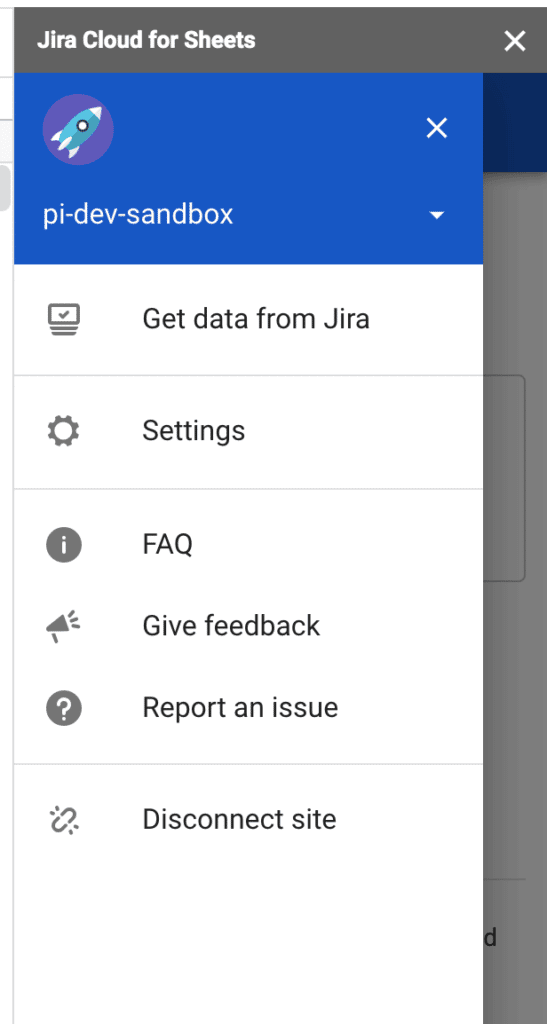
Step 3: Click Get data from Jira to import your Jira issues to Google Sheets.
Specify the JQL query you wish to run (if you use JQL). Click the OPEN IN JIRA link to open and test the query.
Select GET DATA, and Jira will run the query, returning all the matching issues in your active spreadsheet.

Step 4: Query Jira from a cell in your spreadsheet using the custom Google Sheets function =JIRA()
Click Settings from the Jira Cloud for Sheets sidebar menu. Click Enable =JIRA() function for users of this sheet. You must be an owner of the spreadsheet document to enable the function.
You can also use the function from a spreadsheet cell.

Querying Jira in your spreadsheet is highly useful, especially when you’re linking data between multiple Google Sheets.
How does Jira integrate with Google Sheets?
One way of integrating Jira with Google Sheets is to use Zapier.
Zapier lets you connect Google Sheets to the Jira Software Cloud to send information between them automatically and without coding.
You can create automated workflows (or Zaps) by setting specific triggers and corresponding actions.
For instance, if you want to analyze your JIRA issues in a spreadsheet, configure a Zap that automatically adds Jira issues to your specified Google spreadsheet row upon creating the sheet.
After setting up the integration, any new issues get individually added as new Google spreadsheet rows.
Note: You can use Zapier to connect your Jira Software Cloud, Jira Service Desk, or Jira Software Server to Google, but we’ll focus on connecting your Jira Software Cloud in this guide.
The steps below outline how to set up a Jira Google Sheets integration using Zapier.
Step 1: After logging into your Zapier account, click Create Zap.

Type in Jira Software Cloud in the App Event search bar, and click the corresponding result from the list.

Step 2: Configure your Zap by choosing a Trigger Event. For this example, let’s choose New Issue. Click Continue.

Zapier will ask you to sign in to your Jira Software Cloud account. You’ll be directed to a pop-up window to verify your account.
Review the information and click Accept to authorize Zapier access to your (Atlassian) Jira Software Cloud account.

Step 3: Set up your trigger by choosing the project value.

You can test your trigger first before proceeding or you can skip it.

Step 4: Add an action or app event by searching for and selecting Google Sheets from the list of available apps.

Choose an Action Event (Create Spreadsheet Row for this example), then click Continue.

Step 5: Click Sign in to Google Sheets and follow the steps to log into your account.

Select your preferred account, review the information, and click Allow to authorize Zapier access to your Google account.

Step 6: Set up the action or the automated event. Choose the specific drive, spreadsheet, and worksheet, then click Continue.

You can test the action, and after it runs successfully, you should be good to go.
Every time you add a new issue to Jira, the Zap will automatically add a new row to your Google spreadsheet. This eliminates the manual exporting of Jira issues to Google Sheets and simplifies the updating of your data.
If you’re using Jira for marketing, it’s a useful integration if you want to learn how to build a live marketing dashboard in Google Sheets.
Can Jira export to Google Sheets?
One method of exporting Jira to Google Sheets is to use the Google Sheets integration available on the Atlassian Marketplace.
Step 1: After logging into your Jira instance, select the Apps dropdown and click Find new apps.

Image source: atlassian.net.
Type in Google Sheets Integration on the search bar, then click the app.

Image source: atlassian.net.
Select Try it free, then Start free trial to install the Google Sheets Integration app.
Step 2: Click Select a project, then New Project on the dialog box to start configuring your Google API project.
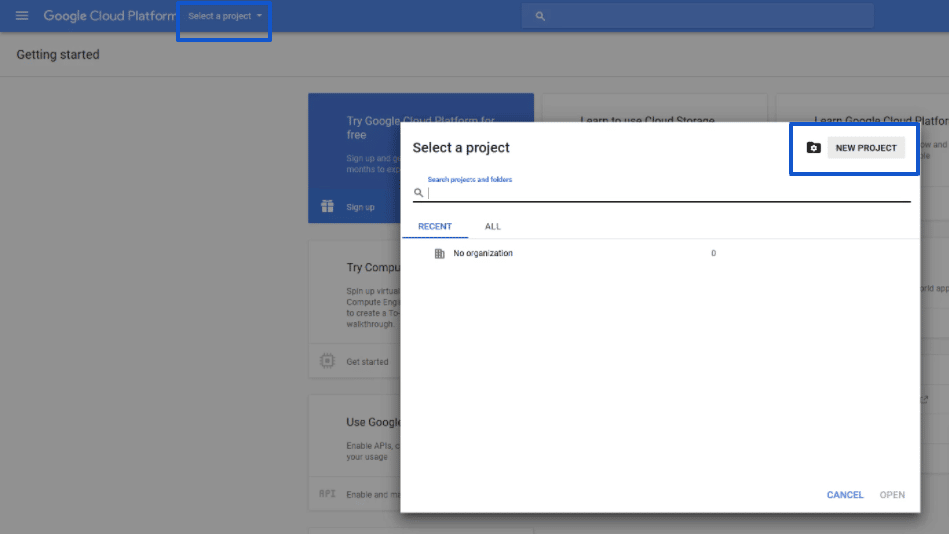
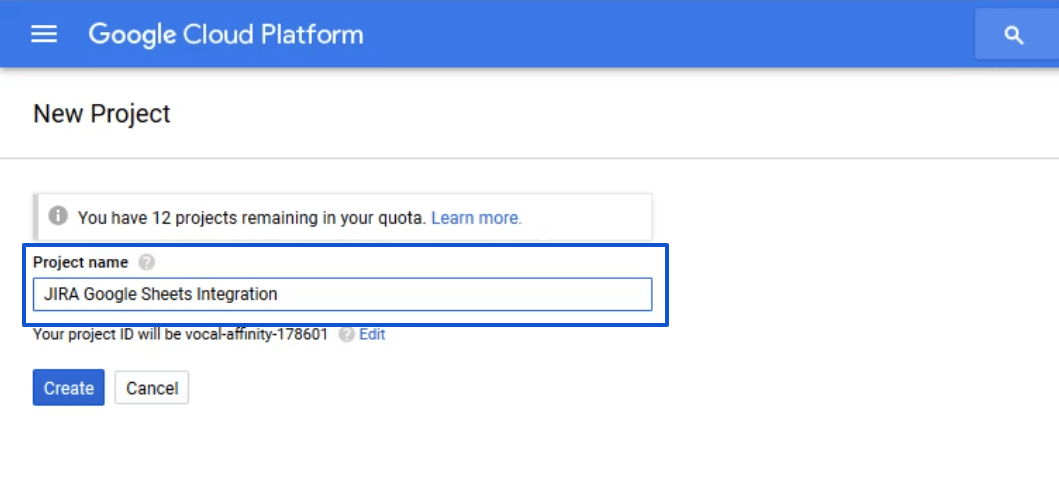
In this example, we’ll name the API project JIRA Google Sheets Integration. Ensure you’re logged into the Google account you want to associate with Google Sheets.
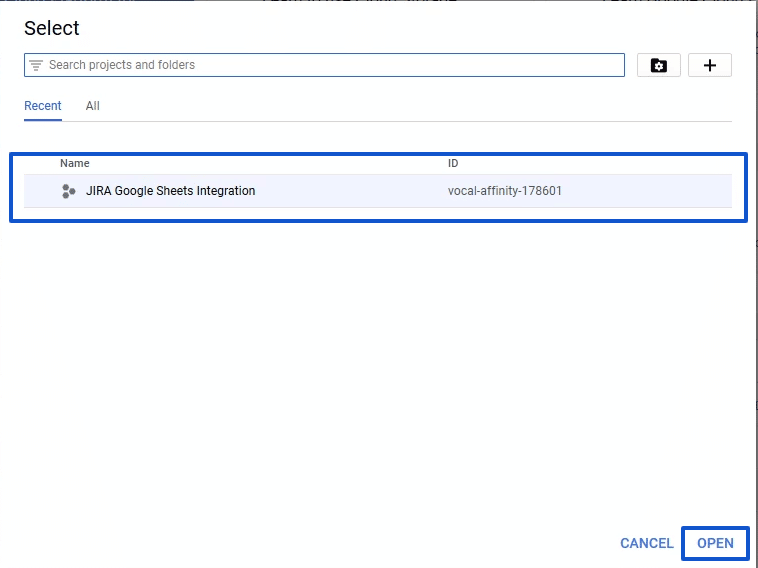
Step 3: Select your newly created project and click Open.
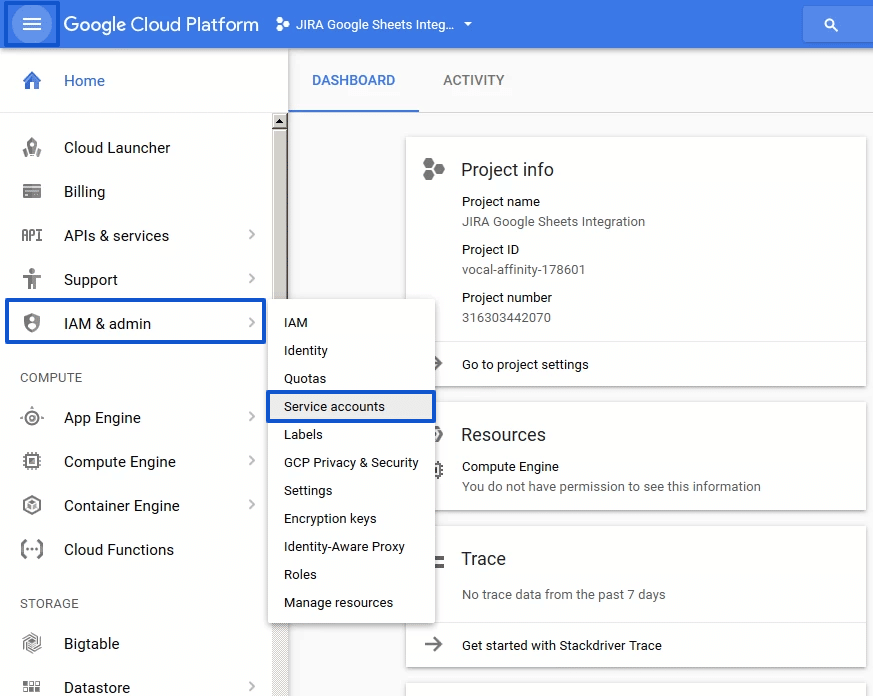
Click the navigation drawer icon shown at the top left corner of the project dashboard display. Select IAM & admin > Service Accounts.
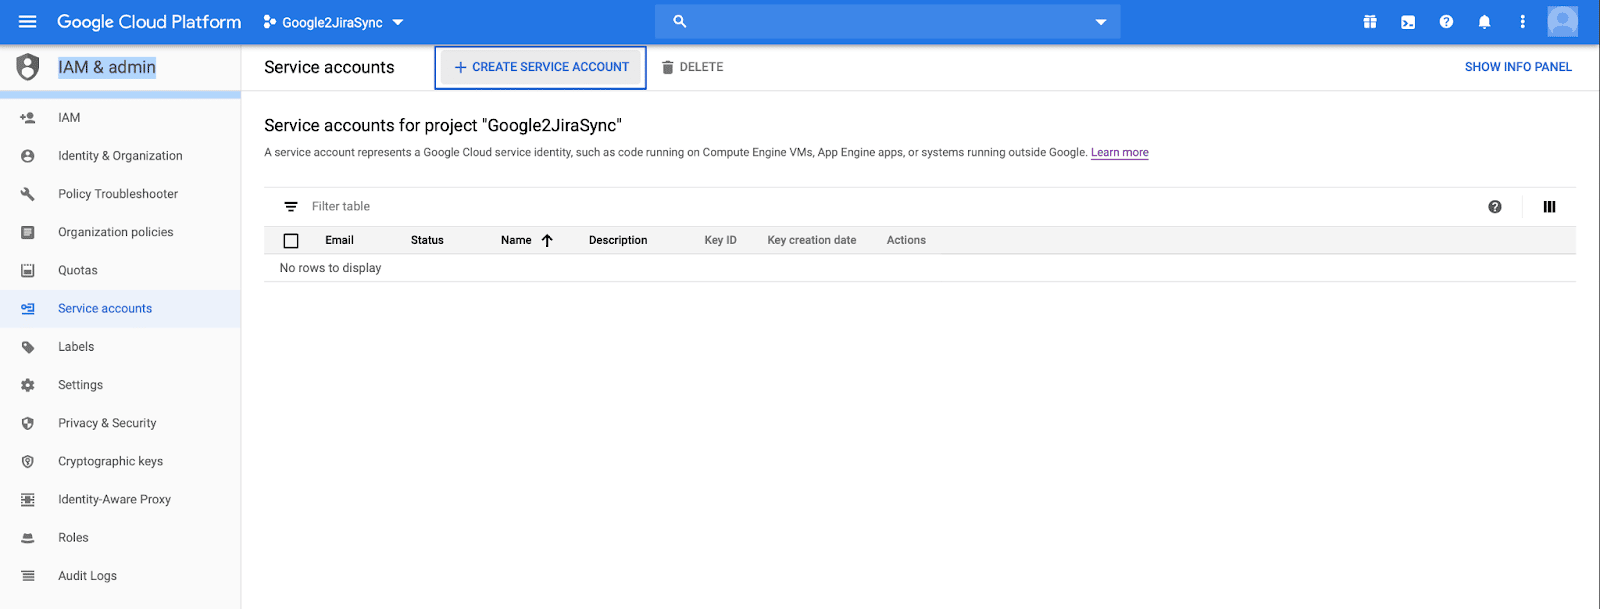
Step 4: Click Create Service Account at the top of the interface to make a Google API Service Account and associate it with the project you created.
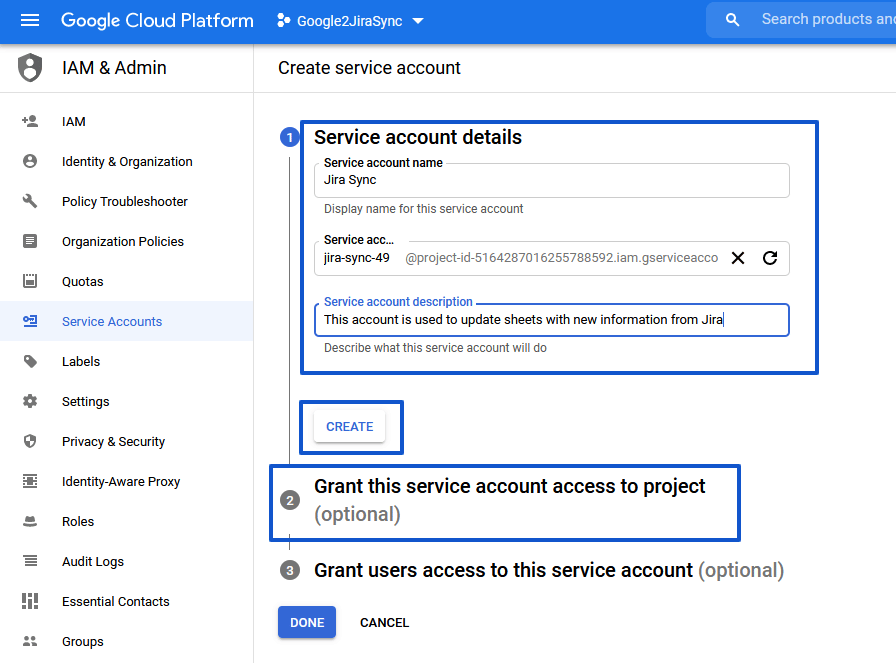
Name your service account and add a description. Click the Create button to grant the service access to the project (Step 2).
Click the Select a role field and choose Project > Owner.
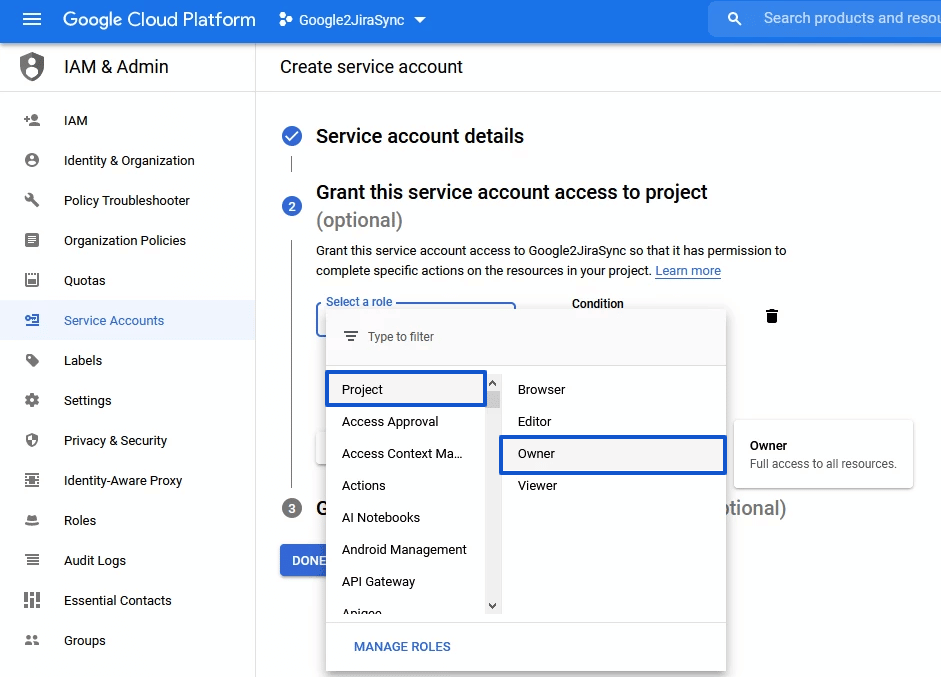
You can set up user access or skip, then click Done.
You’ll be directed back to the Service accounts listings page, where you’ll see your created account.
Step 5: Click the actions icon on the far right of your service account’s row, and choose Create key.
Tick off the JSON key type radio button on the key creation dialog box and select Create.
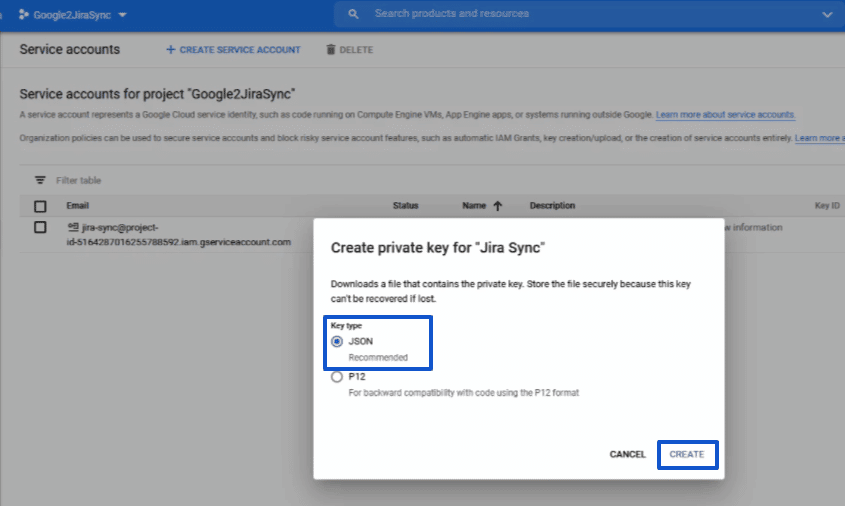
You’ll get a prompt notifying you that the private key has been saved to your computer. Accept the file and note its location in your drive for later.
This will be the file for upload in the next step.

Stop exporting data manually. Sync data from your business systems into Google Sheets or Excel with Coefficient and set it on a refresh schedule.

You’ll now see your new service account and its key ID showing a green checkmark under the Status column.

Step 6: Configure the add-on to use for the integration. Upload the Google credentials you created in the previous steps.
Click the administration gear icon on your Jira account’s interface, then select Add-ons.
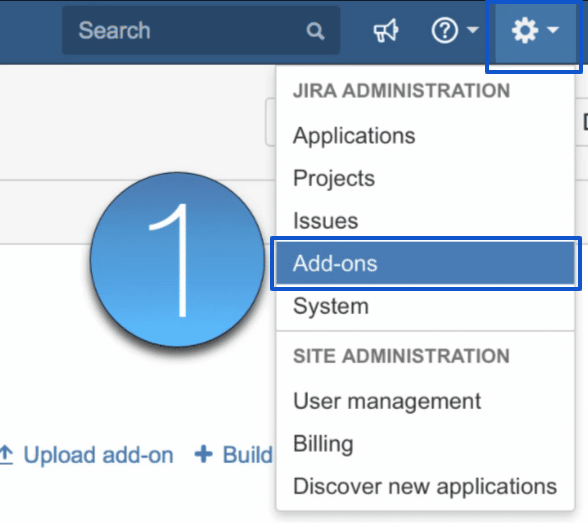
Navigate to Manage add-ons and find Google Sheets Integration from the list. Click Configure.
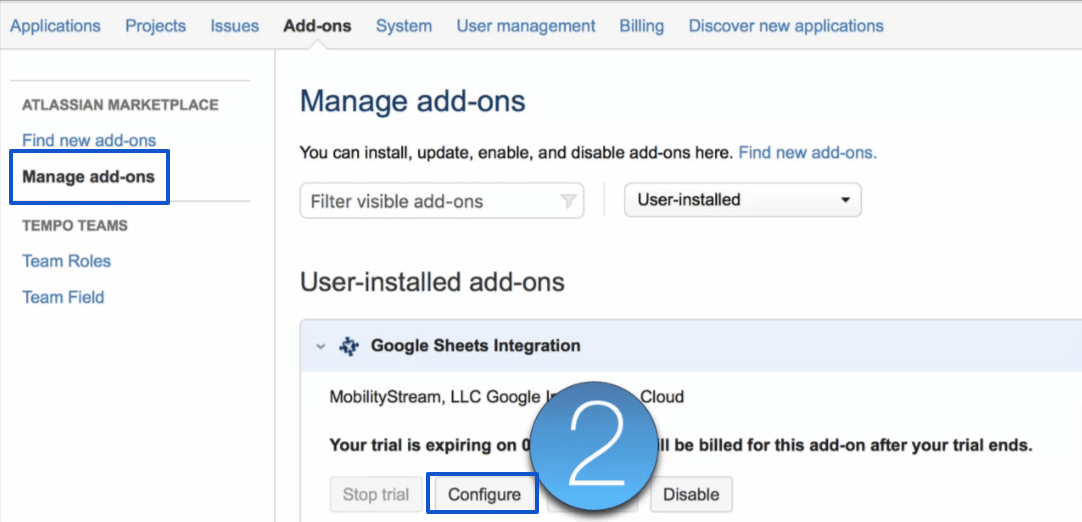
Step 7: Upload the .json file in Step 5 by clicking Upload. Select the file to upload, then click Save.

Step 8: Navigate to the Google Sheets Integration configuration screen.
Under Webhooks, you’ll see administrator options that allow you to toggle Jira events to trigger and update Google Sheets in real-time.
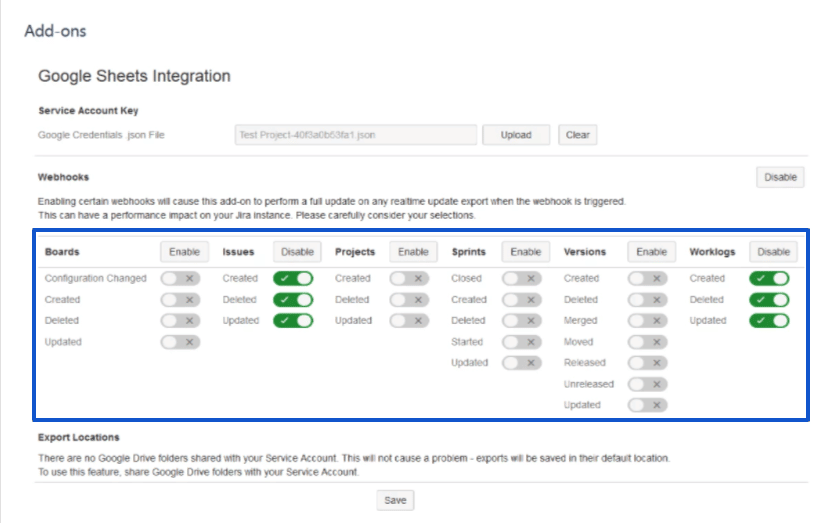
Enable or disable webhooks accordingly depending on your data integration goals and workflows. Click Save, and your selections will immediately take effect on all your sheets.
While this Jira to Google Sheets integration process can be long and tedious, the future of Google Sheets and connected spreadsheets might offer easier, faster, and better methods soon.
How do I pull up data from Jira to Google Sheets?
One of the easiest and fastest ways to pull up your Jira data into Google Sheets is through the Coefficient app.
The entire process is easy and over within a few clicks (and in a few minutes).
Follow these steps.
Step 1: On your active Google spreadsheet’s top menu, click Add-ons > Get add-ons.
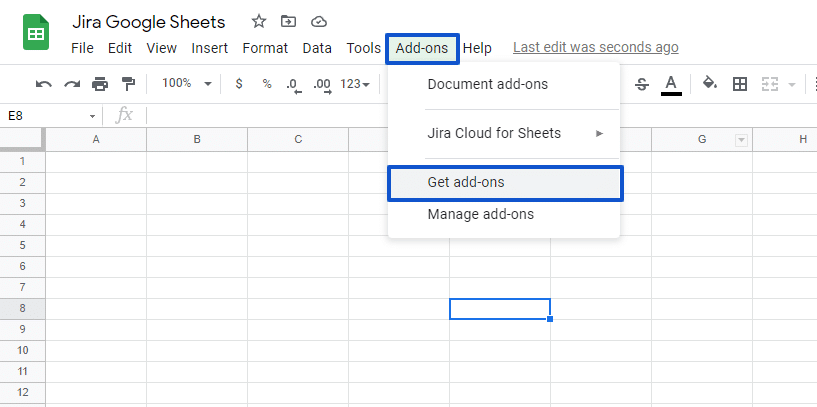
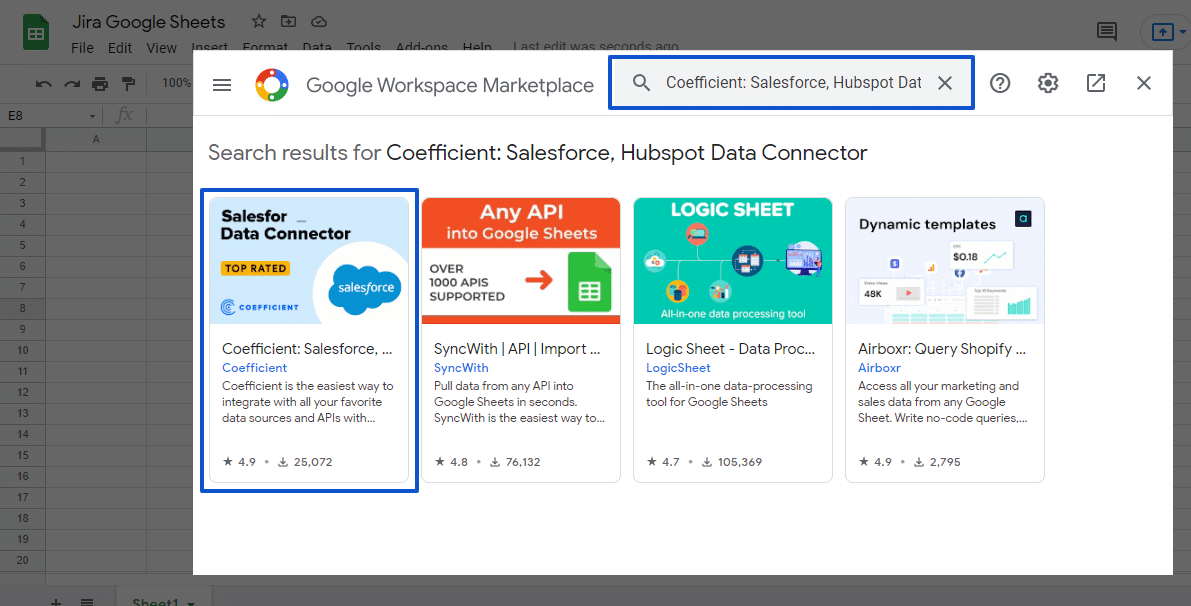
Find the Coefficient: Salesforce, HubSpot Data Connector add-on using the Google Workspace Marketplace’s search bar.
Click and follow the prompts to install the app.
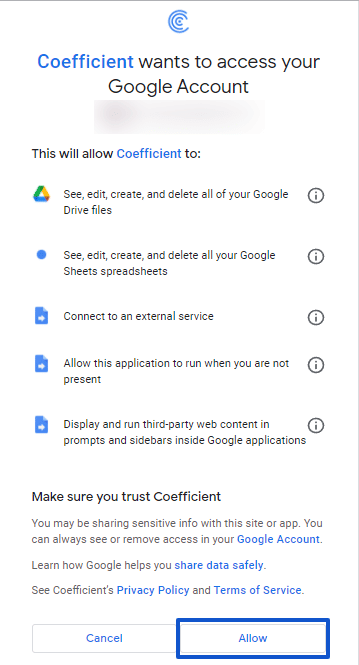
Choose your preferred Google account and authorize access by clicking Allow.
Once installed, launch Coefficient from the Google Sheets top menu. Click Add-ons > Coefficient: Salesforce, HubSpot Data Connector > Launch.
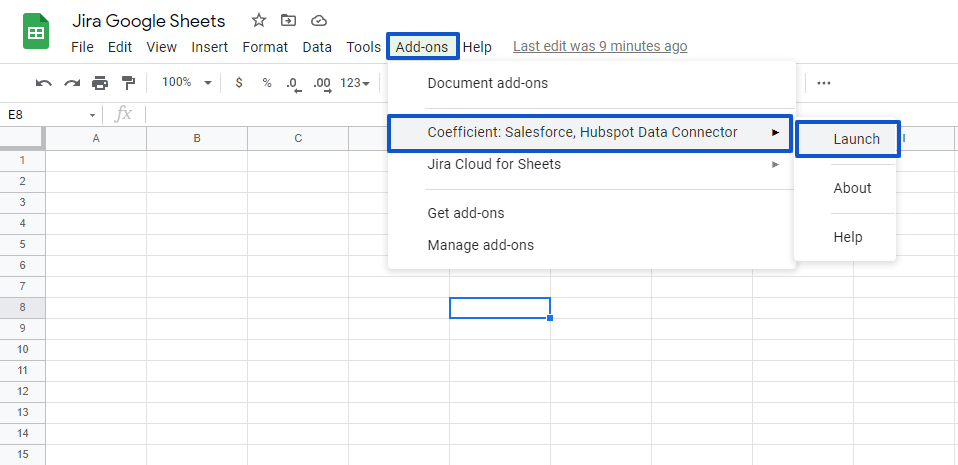
The Coefficient add-on runs from a sidebar within Google Sheets.
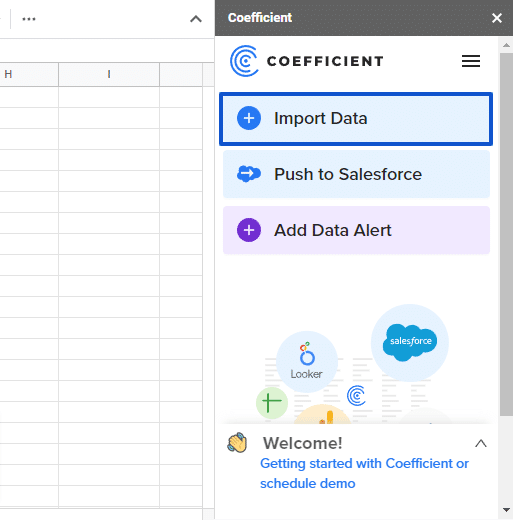
Step 2: Click the Import Data option on the Coefficient sidebar.
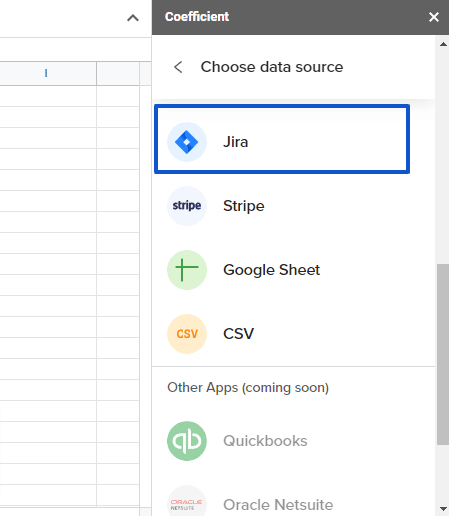
Choose Jira as your data source.
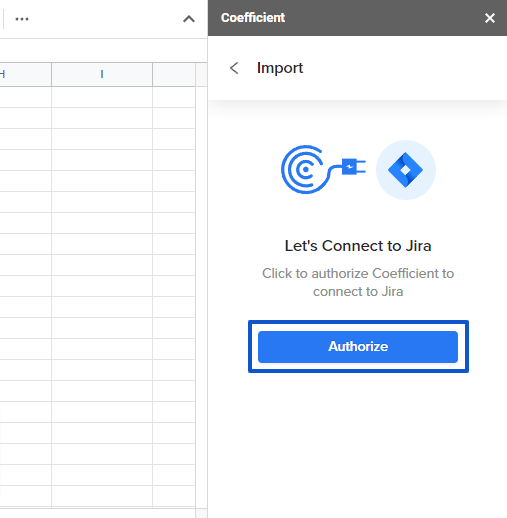
Click Authorize to allow Coefficient to connect to your (Atlassian) Jira account.
On the pop-up window, review the details and click Accept.
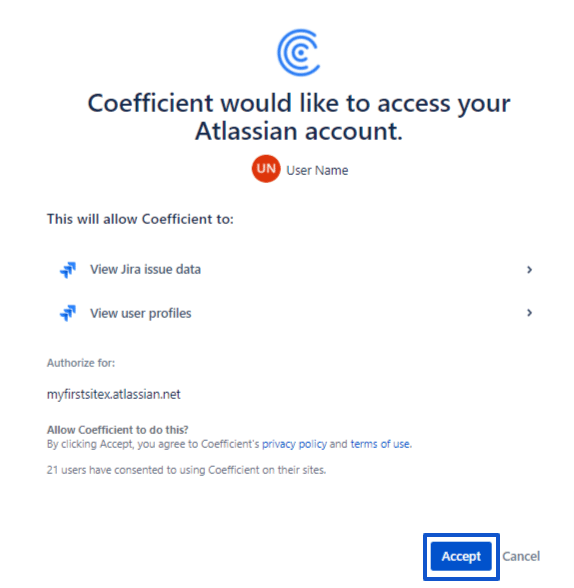
Step 3: After successfully connecting Coefficient to Jira, you can import your data from scratch or use a custom JQL Query.
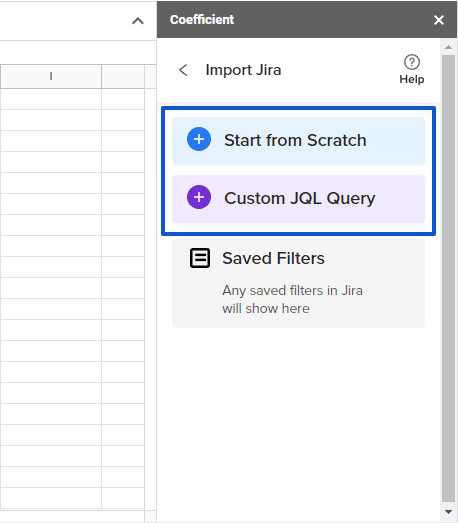
For this example, let’s import your Jira data from scratch.
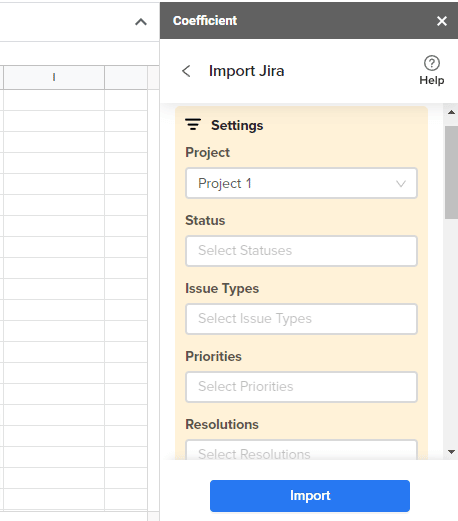
Provide the required information in the fields under Settings. This includes selecting your project and adding the status, issue types, priorities, resolutions, assignee, and other details.
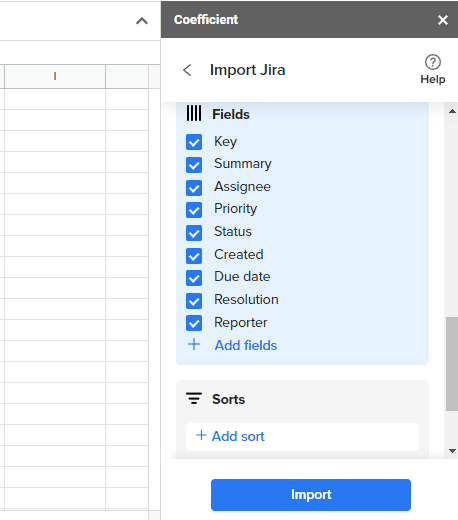
Step 4: Specify your import fields, add sorts, and name your import. Click Import when you’re done.
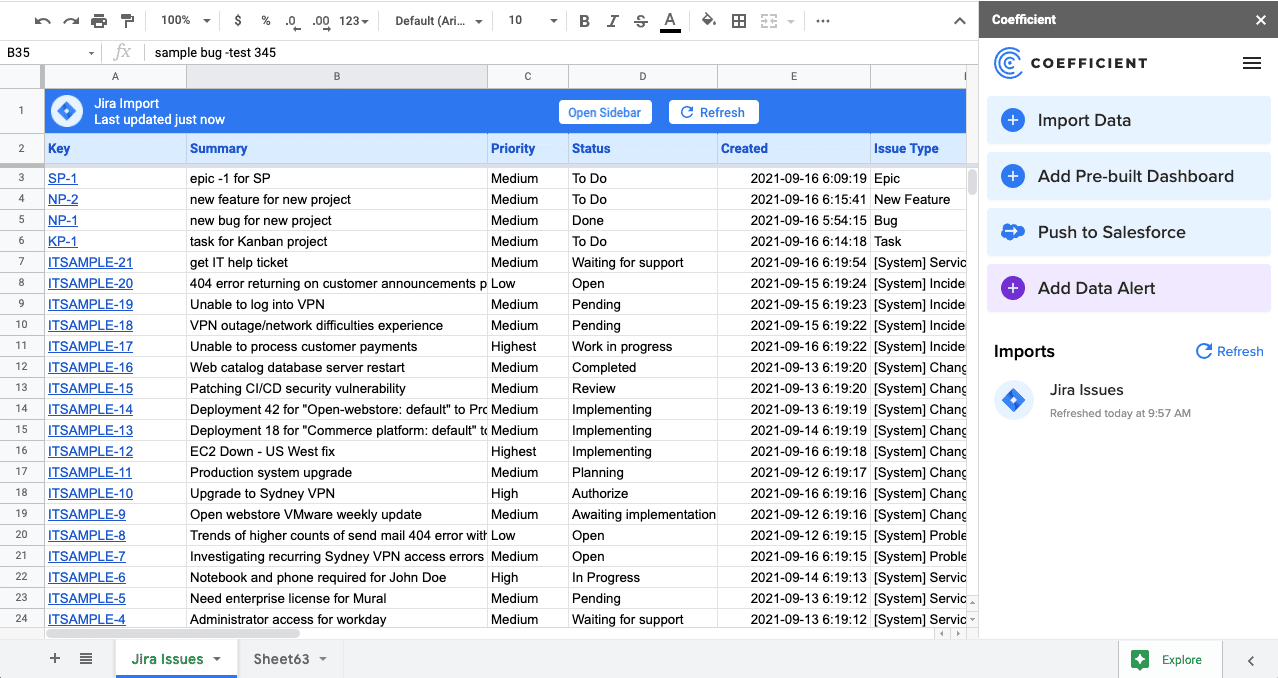
Your Jira issues should automatically populate your Google spreadsheet within seconds (or minutes). Here’s an example of a Jira Import showing only the headings (filters we added earlier).
Step 5: Set up an auto-refresh schedule that allows Coefficient to sync your data automatically, keeping it updated at all times.
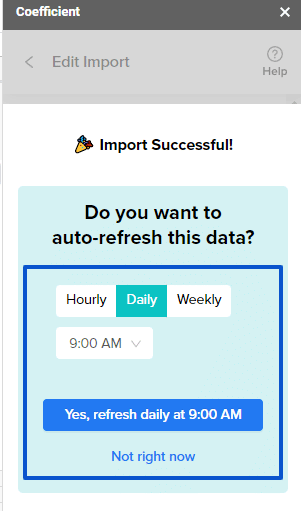
With the auto-refresh feature, you won’t need to manually update your Google Sheets data when your Jira issues and other datasets change.
The auto-refresh option is available for all other data importing and exporting through Coefficient, such as when you connect Looker to Google Sheets.
Coefficient allows you to pull your Jira data to Google Sheets hassle-free and seamlessly.
You won’t need to deal with complex steps, and since the app automates the rest of the process, there are zero to minimal chances of errors and potential costly mistakes.
Connect Jira to Google Sheets with ease
Speeding up data flows between your Jira to Google Sheets can significantly improve the efficiency of your processes and, in turn, your operations.
In just a few minutes and with minimal effort, you can reduce potential errors, improve your adoption processes, and generate the necessary insights to grow your business efficiently.
Out of the many methods available, opt for the easiest to use and the quickest-working solution.
Try Coefficient for free now to enjoy its benefits.


