Modern Business Intelligence (BI) tools have transformed the way companies process massive volumes of structured data from external and internal systems.
One such tool is Looker, a powerful data visualization platform based entirely on your browser, eliminating the need for deploying and supporting desktop software.
Looker lets you create interactive, dynamic dashboards and schedule and automate reports (among others). It’s also highly collaborative and intuitive, allowing multiple people to work on the same dashboard concurrently with the parallel publishing function.
However, while Looker offers extensive visualizations, real-time analysis, and tons of customizability, the tool might not be easy to use for everyone across your company or allows you to work as quickly as you would prefer.
The solution? A Google Sheets integration!
Establish a Looker Google Sheets integration to simplify and streamline the processing of volumes of business-critical data to avoid missing growth and success opportunities.
This guide demonstrates the best ways to connect Looker to Google Sheets. Also, check out our video tutorial below for a step-by-step walkthrough on how to connect Looker to Google Sheets in one click.
Video Tutorial: How to Connect Looker to Google Sheets in One Click
Can you connect Looker to Google Sheets?
There are several methods of establishing a Looker Google Sheets integration, but the most suitable way is through a solution that best addresses your unique business needs.
In this article, we’ll outline the main methods of connecting Looker to Google Sheets, complete with short tutorials of each process, to help you assess which one works best for your team and company and weigh the pros and cons.
Why connect Looker to Google Sheets?
Users want to connected Looker to Google Sheets for a number of reasons. First of all, the spreadsheet is often the interface that many users feel most comfortable in. Looker is a powerful tool, but requires users to be something of a systems expert, with proficiency in SQL and data warehouses.
Google Sheets enables users to apply similar programmatic analysis to data, without requiring them to code or maintain data pipelines. Users also want to gain access to the BI-rich data in Looker. Much of this data has already been transformed by SQL and contains critical KPIs that users cannot access elsewhere.
Since Looker’s acquisition by Google, the platform grew and became well integrated with other Google Workspace and Google Cloud products. This simplifies using datasets from Looker with the data manipulation tools of spreadsheets, optimizing your reporting and analytics.
Also, most business users are already familiar with the standard spreadsheet data processing tools, so bringing Looker’s powerful findings into Google Sheets lends more accuracy and can help with seamless user adoption.
Looker to Google Sheets: Top Use Cases
Our users connect Looker to Google Sheets for several different use cases. In our experience, here are some of the most popular use cases for connecting Looker to Google Sheets.
Faster modeling
Many users connect Looker to Google Sheets because they demand faster speed-to-insight. They cannot continuously update their Looker models as they grow. They can’t ask the data team to make changes to the models or export data frequently. Connecting Looker to Google Sheets enables them to export Looker data quickly and efficiently.
No-code analysis
Many users simply do not know SQL, and cannot leverage Looker independently. Connecting Looker to Google Sheets enables them to manipulate Looker data using their analytical engine of choice: the spreadsheet. This also allows users to bypass LookML, the language that Looker uses to construct SQL queries.
Testing “what if” scenarios
Looker is a powerful tool, but it is often difficult to experiment with data and prototype models. The ease and flexibility of Google Sheets enables users to test “what if” scenarios with data sets and then undergo the process of implementing them in Looker. This saves time and makes data analysis easier.
Enriching data
Looker’s BI-rich data is often filled with powerful KPIs, transformed from raw data to populate key reports and dashboards. This data is powerful enough on its own, but many users also combine it with data from other systems, such as Salesforce, HubSpot, and mySQL. These blended datasets allow users to take data analysis to the next level.
Top Three ways to Connect Looker to Google Sheets
- Coefficient – Plug and play with automation and one-click setup.
- Looker Native Export – Limited capabilities and requires manual work
- Google Apps Script – Requires coding knowledge to setup and maintain.
Option 1: Coefficient
If you want to try an integrated, managed solution to connect Looker to Google Sheets automatically with no-code, your best bet is to use Coefficient.
After setting up your Looker connection with Google Sheets, you can link your data in a few steps, whether you’re importing (or exporting) a single table of data or thousands of rows and columns of datasets.
Specify the data you want to pull up from Looker into Google Sheets by creating custom imports. This eliminates the manual selection of specific columns and rows of your datasets after importing them to a spreadsheet.

Let’s go through the step-by-step process of connecting Looker to Google Sheets using Coefficient:
Step 1: Get the Coefficient plugin from the Google Workspace Marketplace by navigating to the top menu, selecting Add-ons, then Get add-ons.

Type Coefficient in the search bar and select the app to install it.

After reading the terms of access from the popup, click Allow.

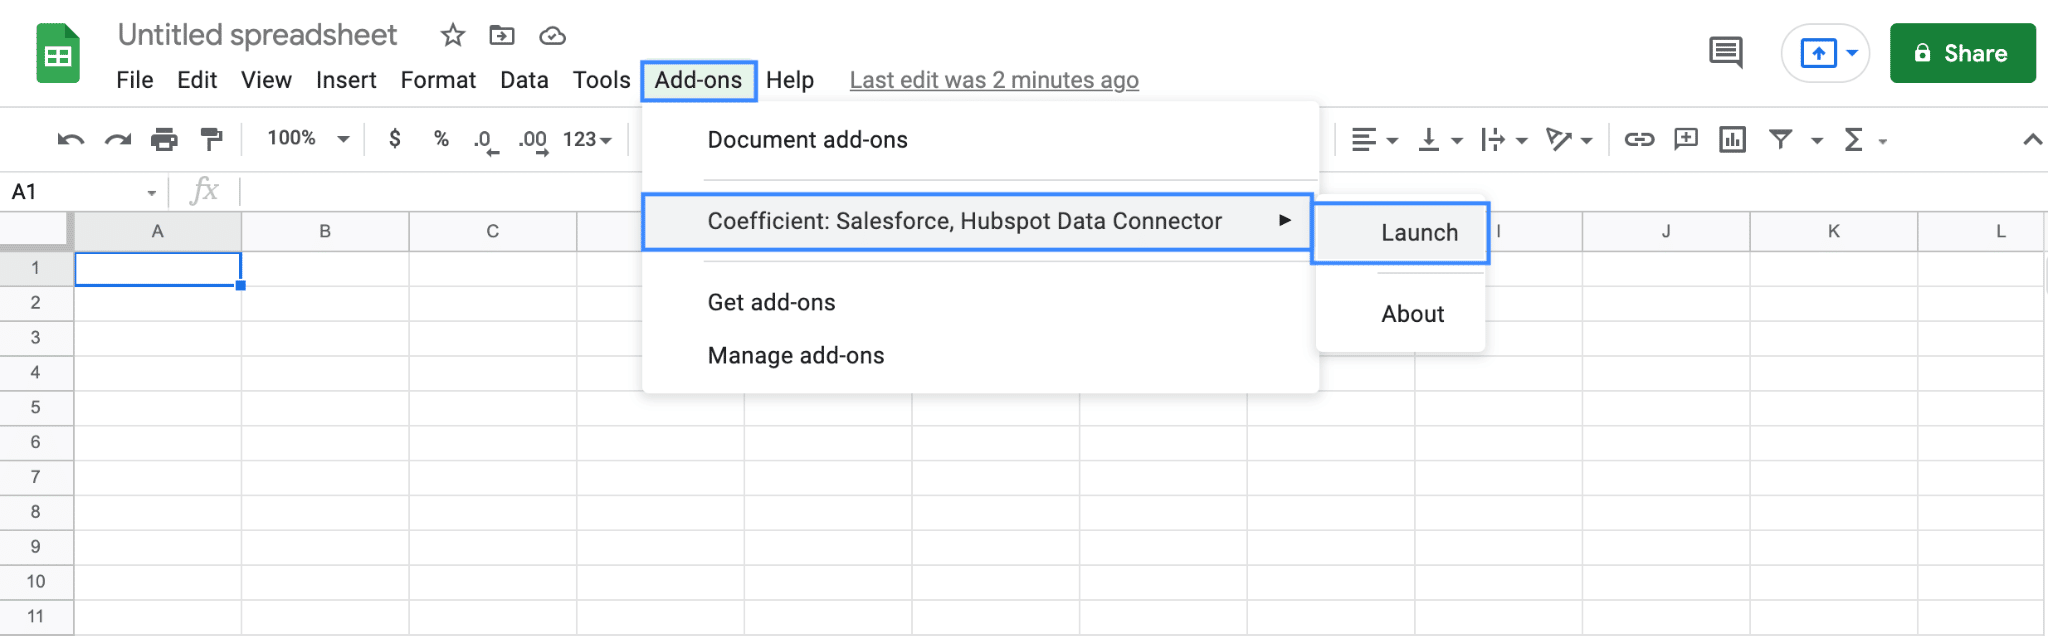
Once installed, return to the Add-ons option on Google Sheets’ top menu, click Coefficient from thedropdown, and select Launch.
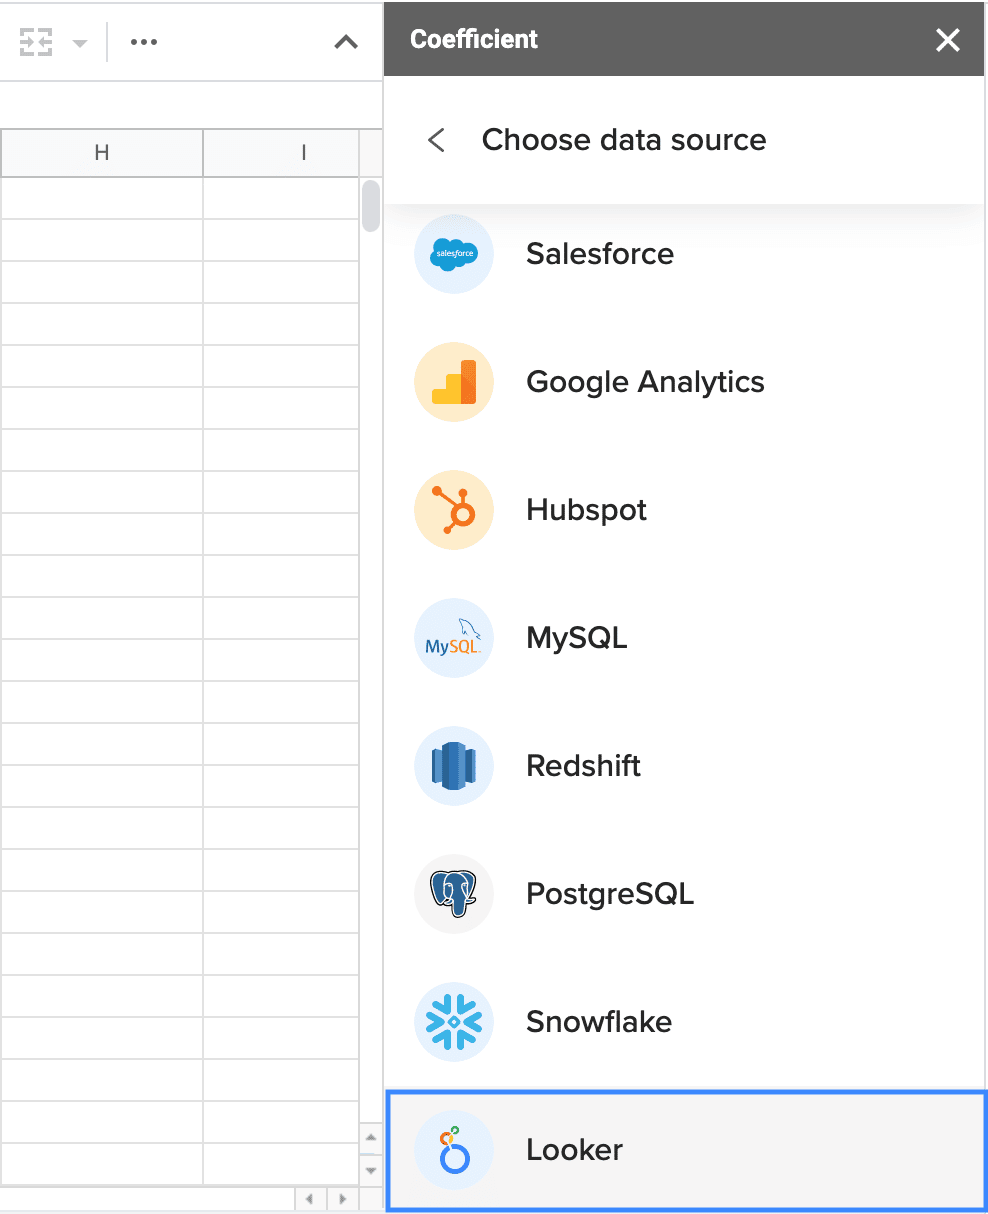
Step 2: Click Import data on the Coefficient sidebar on the right side of the interface.

Select Looker from the list of data sources.
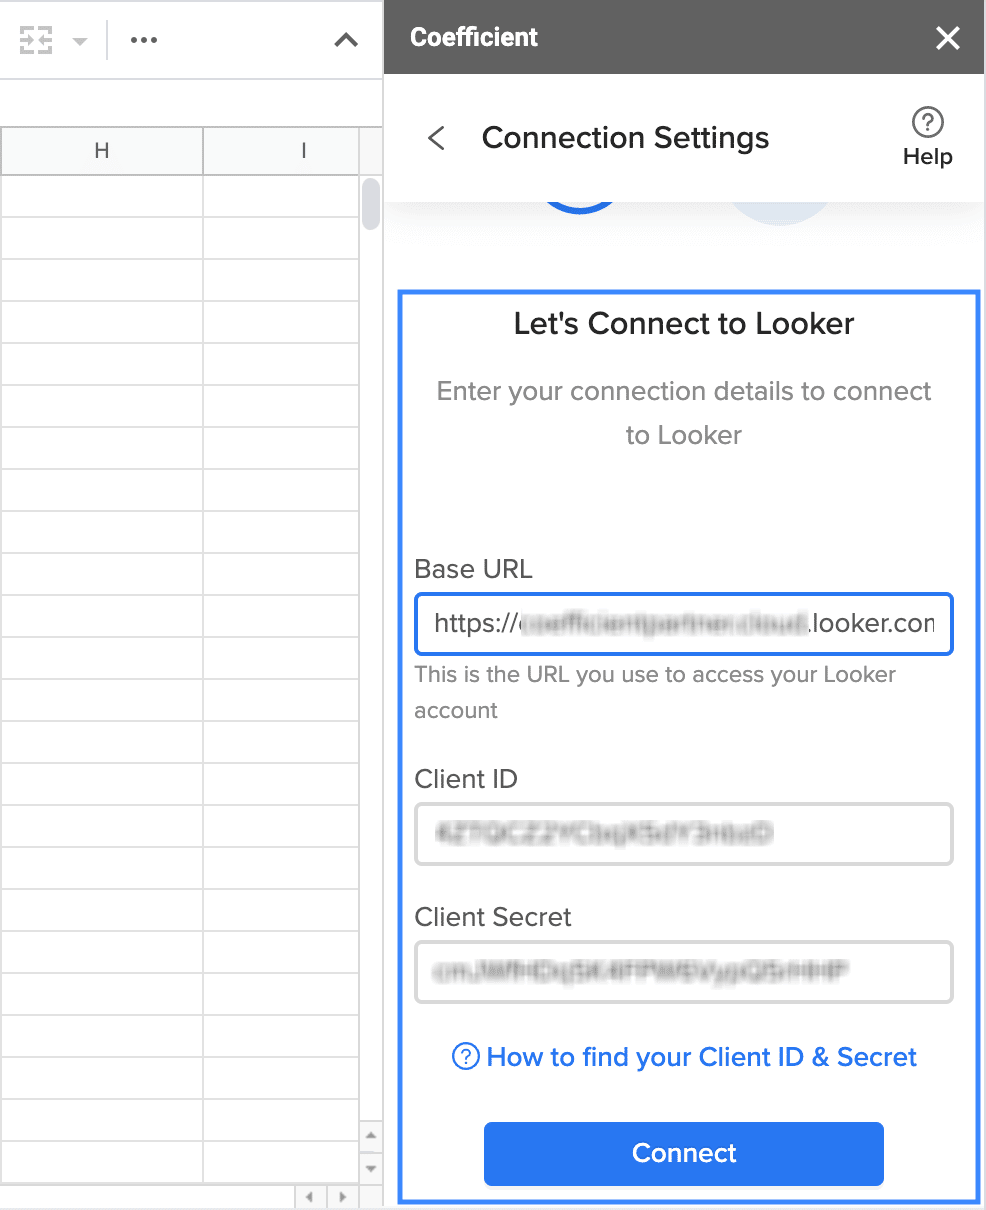
Step 3: Link your Looker API and Google Sheets with Coefficient by entering the URL in the first block.
You can do this by copying the web address of the Looker login page for your organization.
You can find the Client ID and Client Secret in the admin panel (as long as you have admin rights). If you don’t have those rights, request these details from your admin.
Step 4: Head over to the Admin dropdown, then click Users.

Click on the appropriate user.

Navigate to the bottom of the user detail page and click on Edit API3 Keys.

You can copy the Client ID and Client Secret from this page and paste them on the designated fields in the Coefficient sidebar menu.

You should see a popup window containing the folder structure of your available dashboards. It includes a navigation bar at the top and a search bar at the right to help you find everything with ease.

Step 5: Select the dashboard you want to bring into Google Sheets and click Import.

And just like that, you’ve completed importing a Looker dashboard into Google Sheets.

Step 6: You can use Coefficient’s auto-refresh function to automate the syncing of your data in case of changes and updates. You can set up the auto-refresh schedule right after the import or adjust it later.
You can set a daily, weekly, or hourly refresh to keep your data up-to-date without additional coding or more apps.
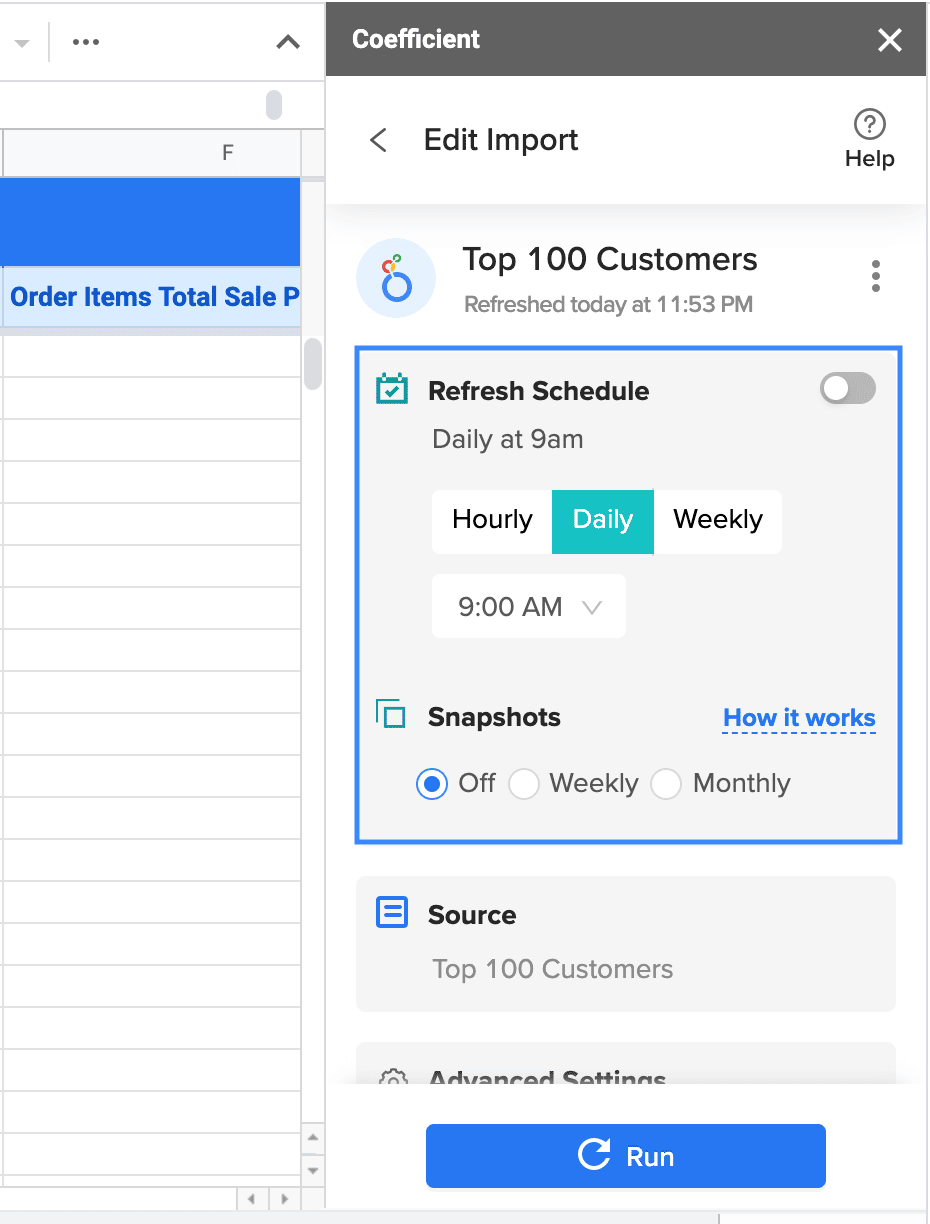
Another great advantage of using Coefficient is the app’s ability to take snapshots so you can stay on top of data changes and updates with auto-captured reports.

Pros
- The Coefficient app is a simple, user-friendly tool that allows you to pull up and sync your Looker data to Google Sheets easily.
- Coefficient is secure and will not allow insight into your credentials or reports, and setting it up is quick and easy.
- The app works great out of the box and offers an intuitive design for seamless user experience and adoption.
- In a nutshell, Coefficient simplifies and automates the pulling up and the syncing of your Looker data on Google Sheets with minimal to no effort on your part.
Cons
- The only “disadvantage” so far with Coefficient is it’s not completely free, but the benefits of investing in the app, simplifying and automating the process of connecting Looker to Google Sheets, can far outweigh the costs.
Option 2: Looker’s native export feature
Looker’s Action Hub is where you can enable various integrations, including Google Sheets.
The following steps outline how you can use the feature to set up a Looker export to Google Sheets.
Step 1: Enable the Google Sheets export option in the Looker settings.
Navigate to the Admin dropdown at the top navigation bar, scroll down to Platform, and select Actions.

Stop exporting data manually. Sync data from your business systems into Google Sheets or Excel with Coefficient and set it on a refresh schedule.


Select Google Sheets from the list of available apps that can integrate with Looker, then click Enable.

Click Accept on the acknowledgment popup to proceed.

Step 2: Create or select a dataset to start your export. Then, navigate to the small gear icon in the top right-hand corner of the interface and choose Send… from the dropdown menu.

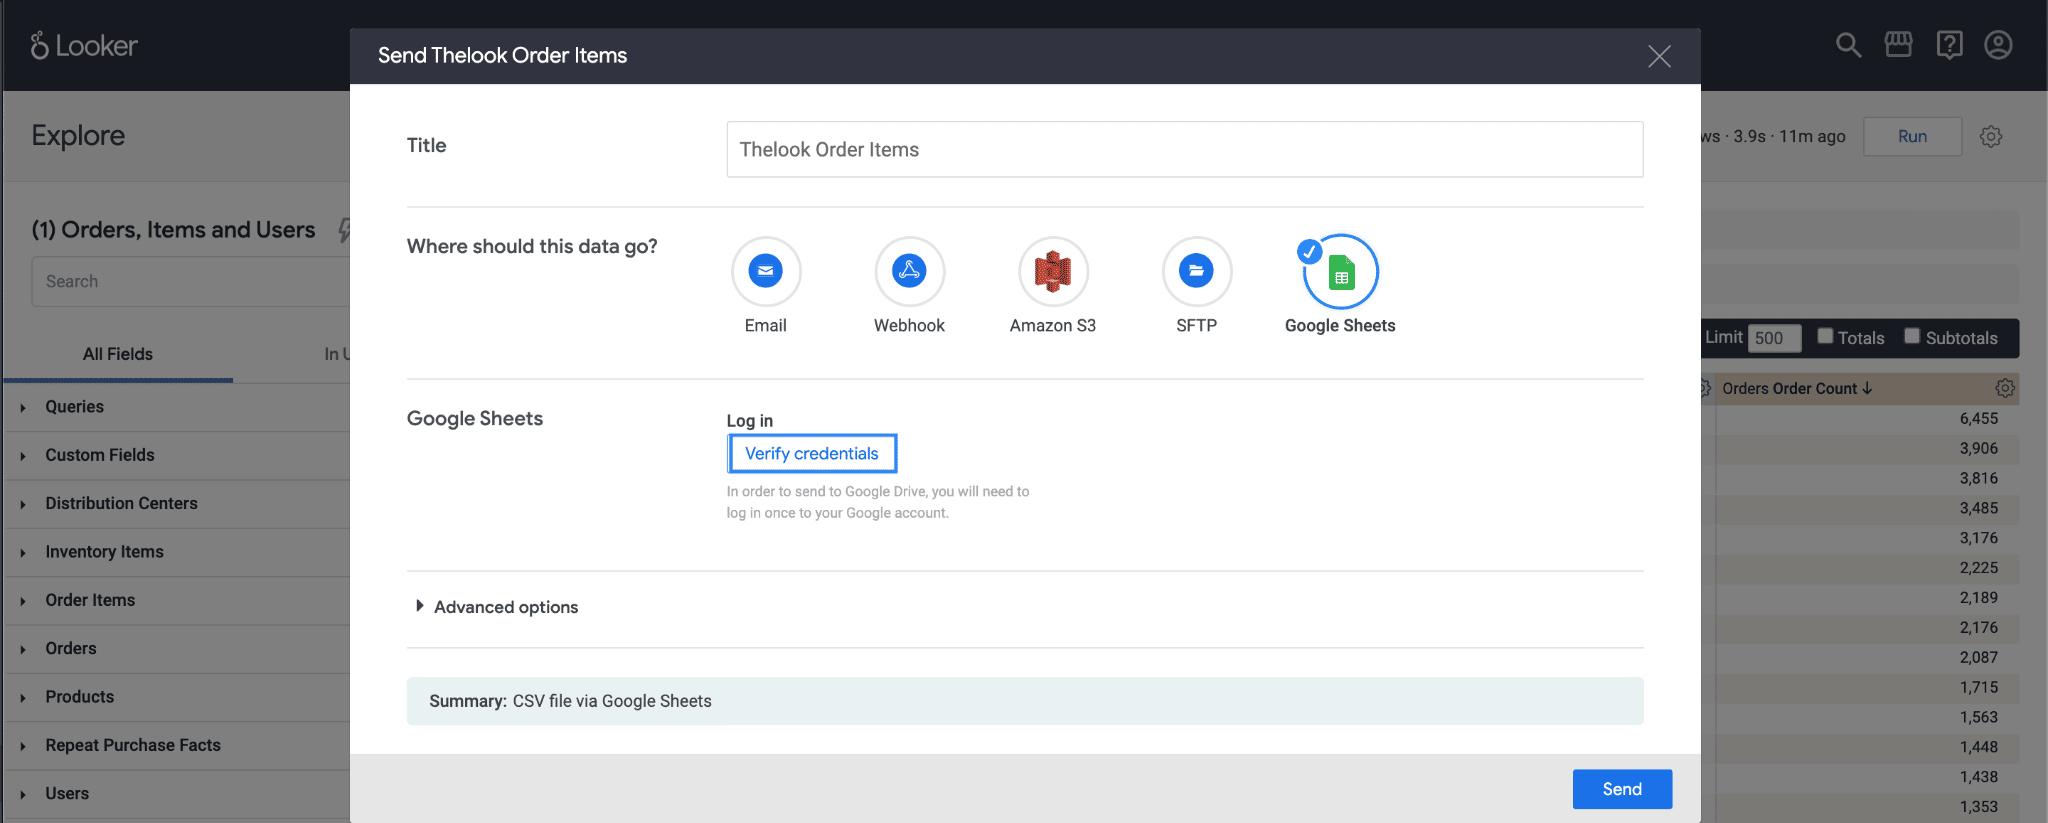
A window will appear asking you to select a destination application. Since we already enabled Google Sheets inside Looker, we can see it at the top as an option.
Step 3: Click Sign in with Google, and this will prompt you to log in with your Google credentials.

After logging in, you will see the same window where you’ll be prompted to verify your credentials. Click Verify credentials to move forward.
Step 4: Once verification is complete, select a destination folder, name your sheet, and then choose if you want to overwrite existing files.
Click Send after selecting your preferred options.

And there you have it — your exported Looker data on Google Sheets.
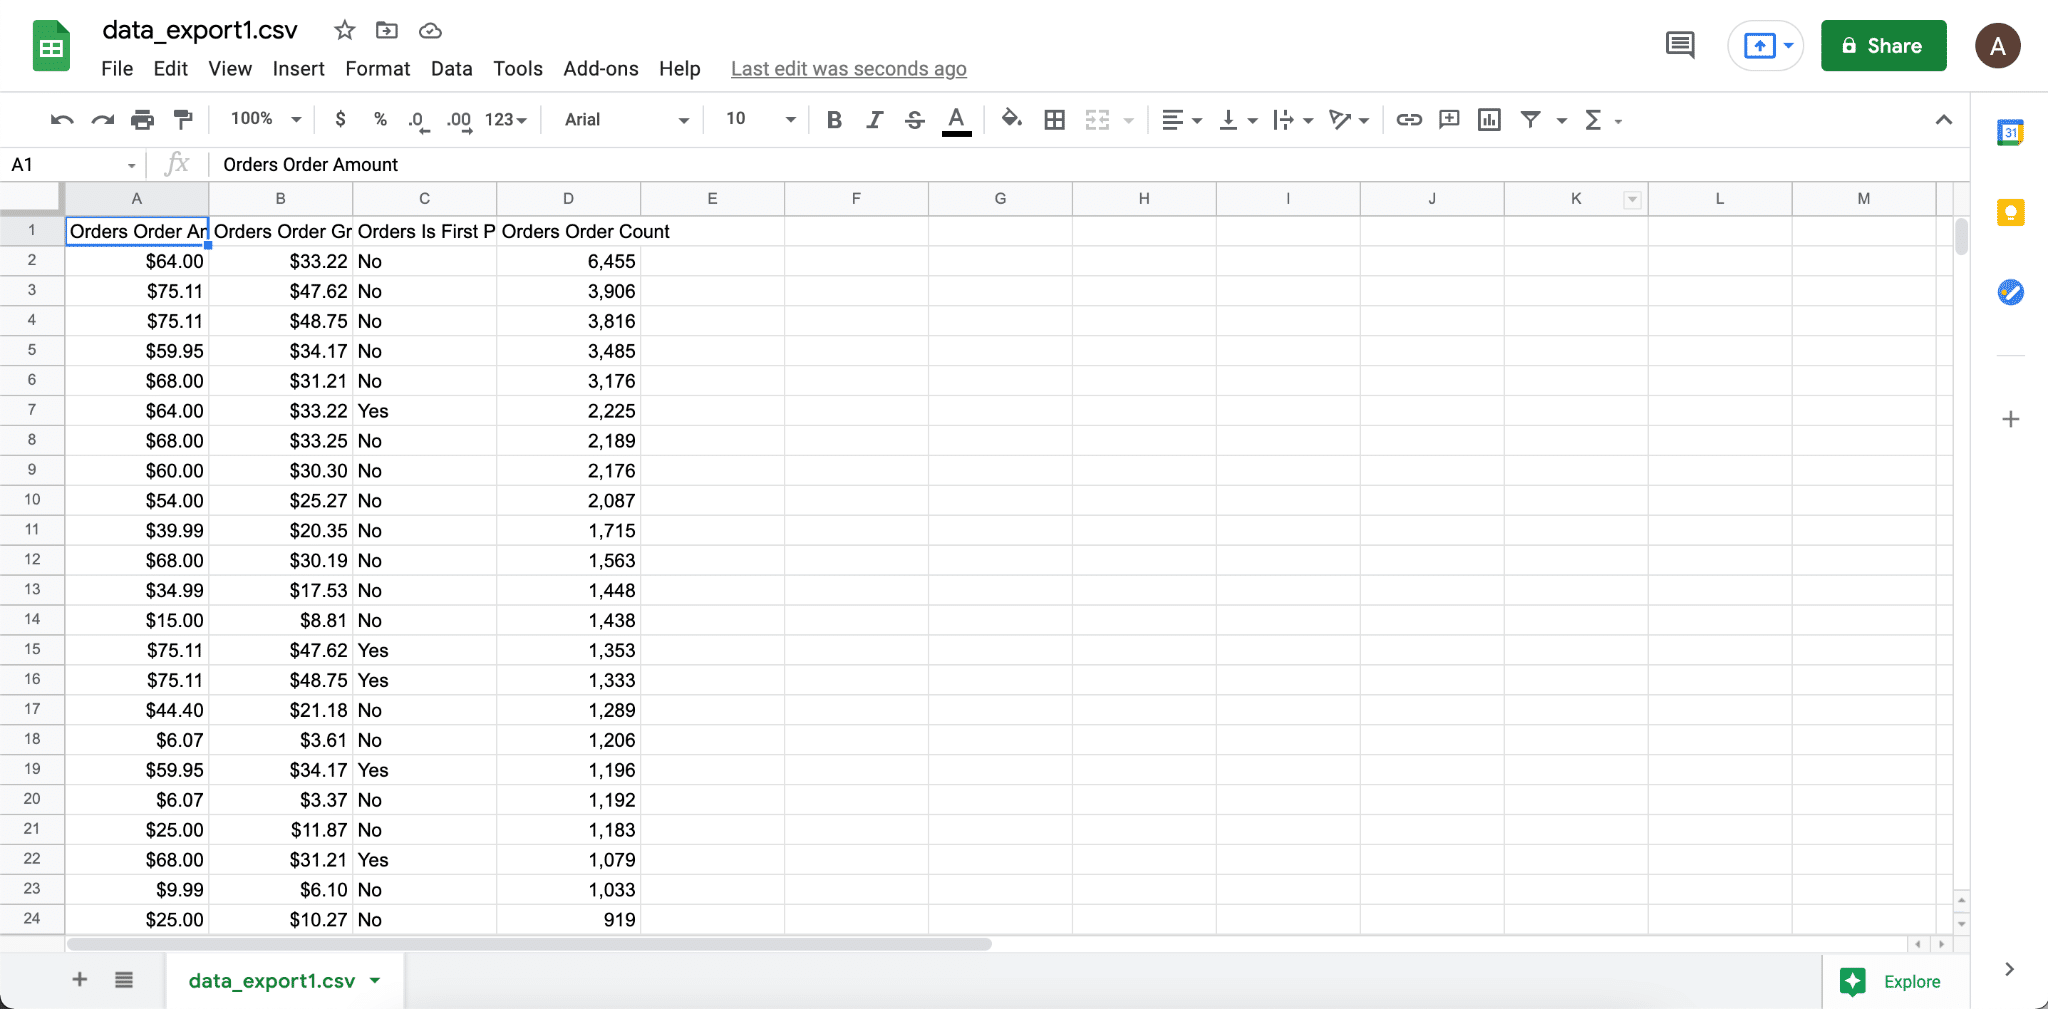
It can take several minutes for the file to appear in your selected destination (Google Drive for this example) and to populate the spreadsheet.
Pros
- The advantage of using Looker’s native export feature is that it’s simple and requires only a few steps. All the options you need to export your data to Google Sheets are in your Looker panel.
Cons
While the Looker native export feature offers a pretty straightforward process, it also comes with a few downsides, including the following.
- To complete the operation, you must grant public access to your Look, which isn’t ideal if you don’t want to share access for the security of your data.
- The native export option is only a partial integration as it only works one way. This means you can’t send any data back into Looker from Google Sheets.
- Data exporting is often slow, with an export often taking a couple of minutes to populate the spreadsheet.
Option 3: Script Editor in Google Sheets
The Script Editor functionality allows you to create custom scripting to perform automated functions within Google Sheets.
For this example, we’ll use JavaScript (JS) through the Script Editor in Google Sheets to automate the retrieval of data from Looker.
Let’s take a look at the process of writing a basic integration script.
Step 1: On Google Sheet, navigate to the top menu, select Tools, and then Script editor from the dropdown.

Google Apps Script will open in another tab and open a project where you can code your custom functions.

Step 2: Enter or copy and paste your JS code.
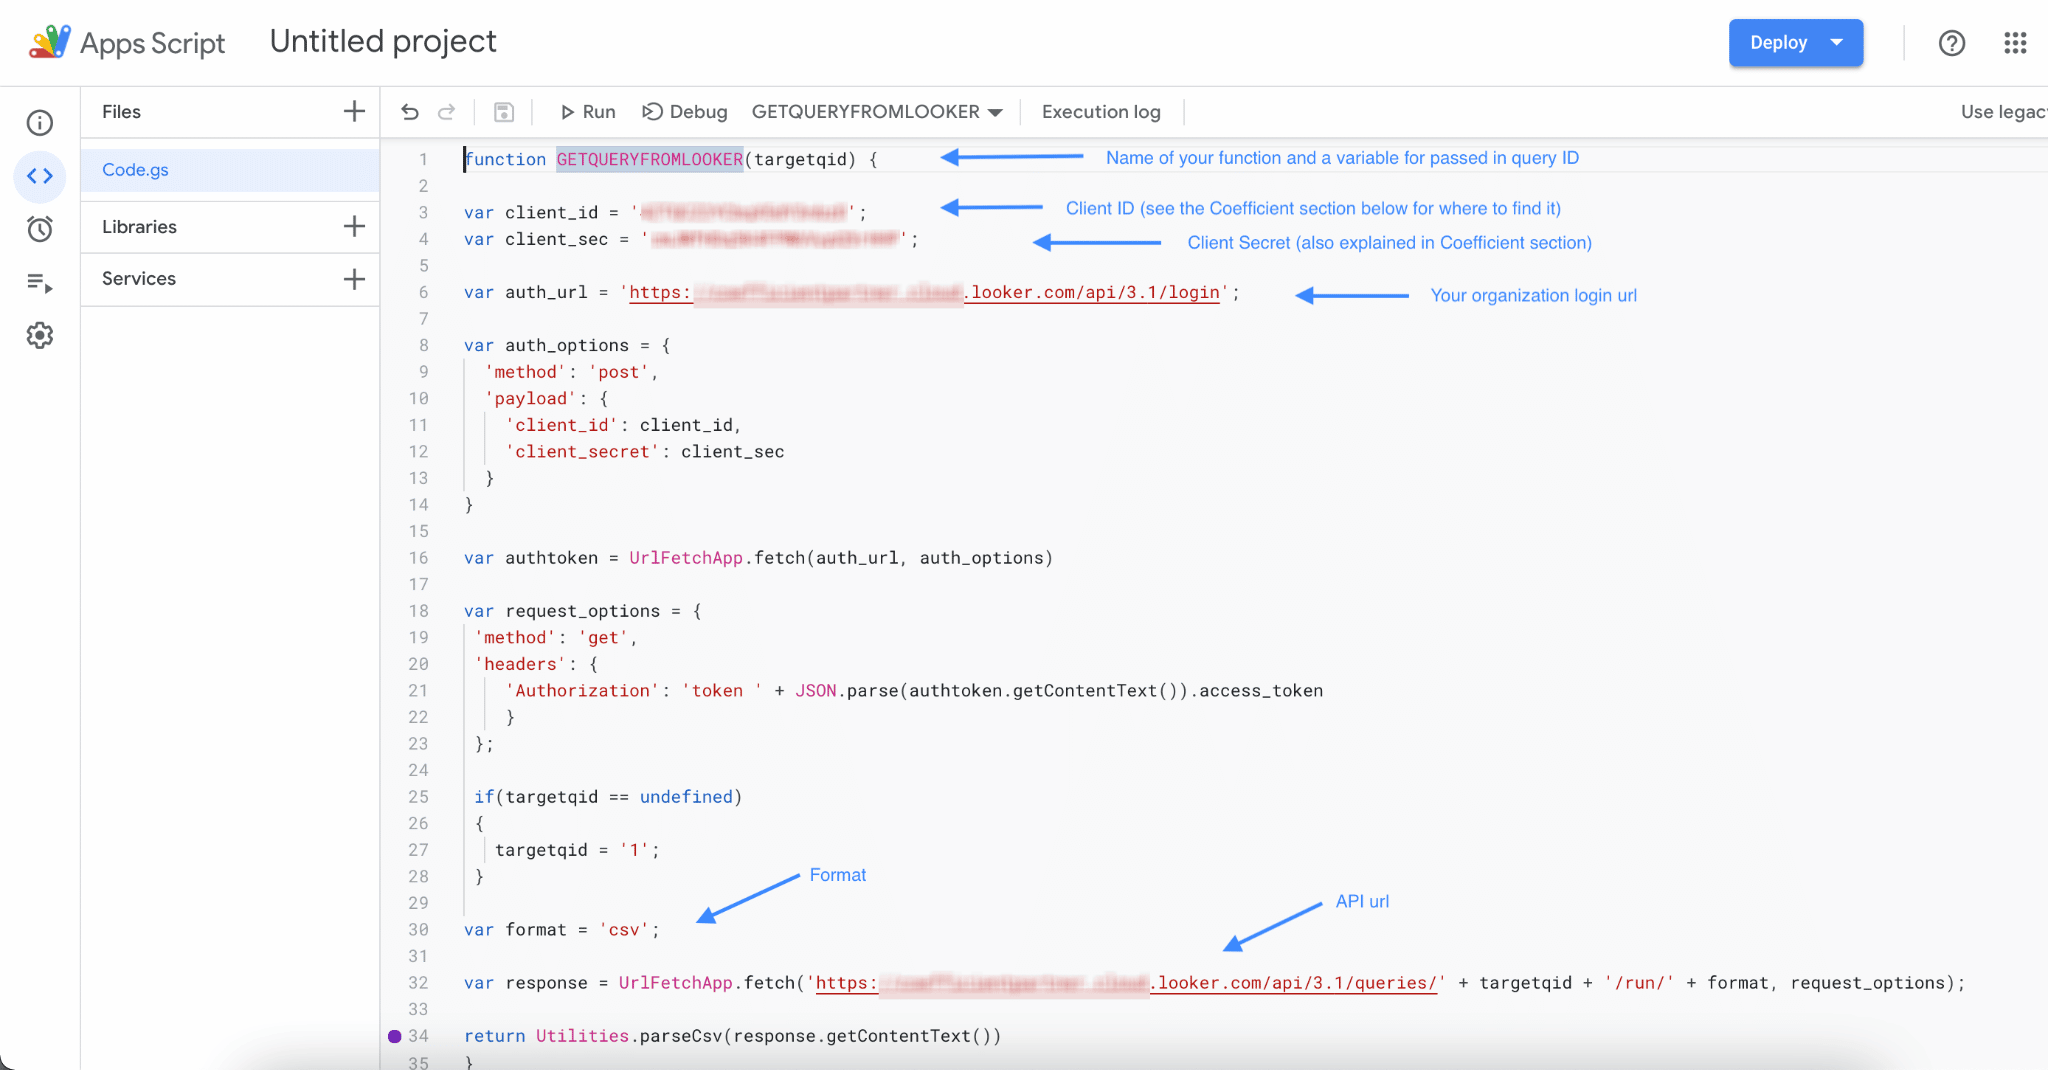
We have one ready for you to copy and paste.
[spb_codesnippet language=”markup” width=”1/1″ el_position=”first last”] function ENTER YOUR NAME HERE (targetqid) { var client_id = ‘ENTER YOUR CLIENT ID HERE’; var client_sec = ‘ENTER YOUR CLIENT SECRET HERE’; var auth_url = ‘ENTER YOUR LOGIN URL HERE’; var auth_options = { ‘method’: ‘post’, ‘payload’: { ‘client_id’: client_id, ‘client_secret’: client_sec } } var authtoken = UrlFetchApp.fetch(auth_url, auth_options) var request_options = { ‘method’: ‘get’, ‘headers’: { ‘Authorization’: ‘token ‘ + JSON.parse(authtoken.getContentText()).access_token } }; if(targetqid == undefined) { targetqid = ‘1’; } var format = ‘csv’; var response = UrlFetchApp.fetch(‘ENTER YOUR API URL HERE’ + targetqid + ‘/run/’ + format, request_options); return Utilities.parseCsv(response.getContentText()) } [/spb_codesnippet]
Step 3: If everything looks good, click Deploy.

This code will pull up a default query unless you specify what you want it to import. Let’s now learn where to find query IDs inside Looker.
Note: You could write more code that runs at the start of the function. This allows you to use the name of the query instead of its ID, but that’s another lookup and API call that you’ll need to maintain.
Step 4: Click Admin on the top panel and select Queries from the dropdown.

You should see the identification number for each query immediately.
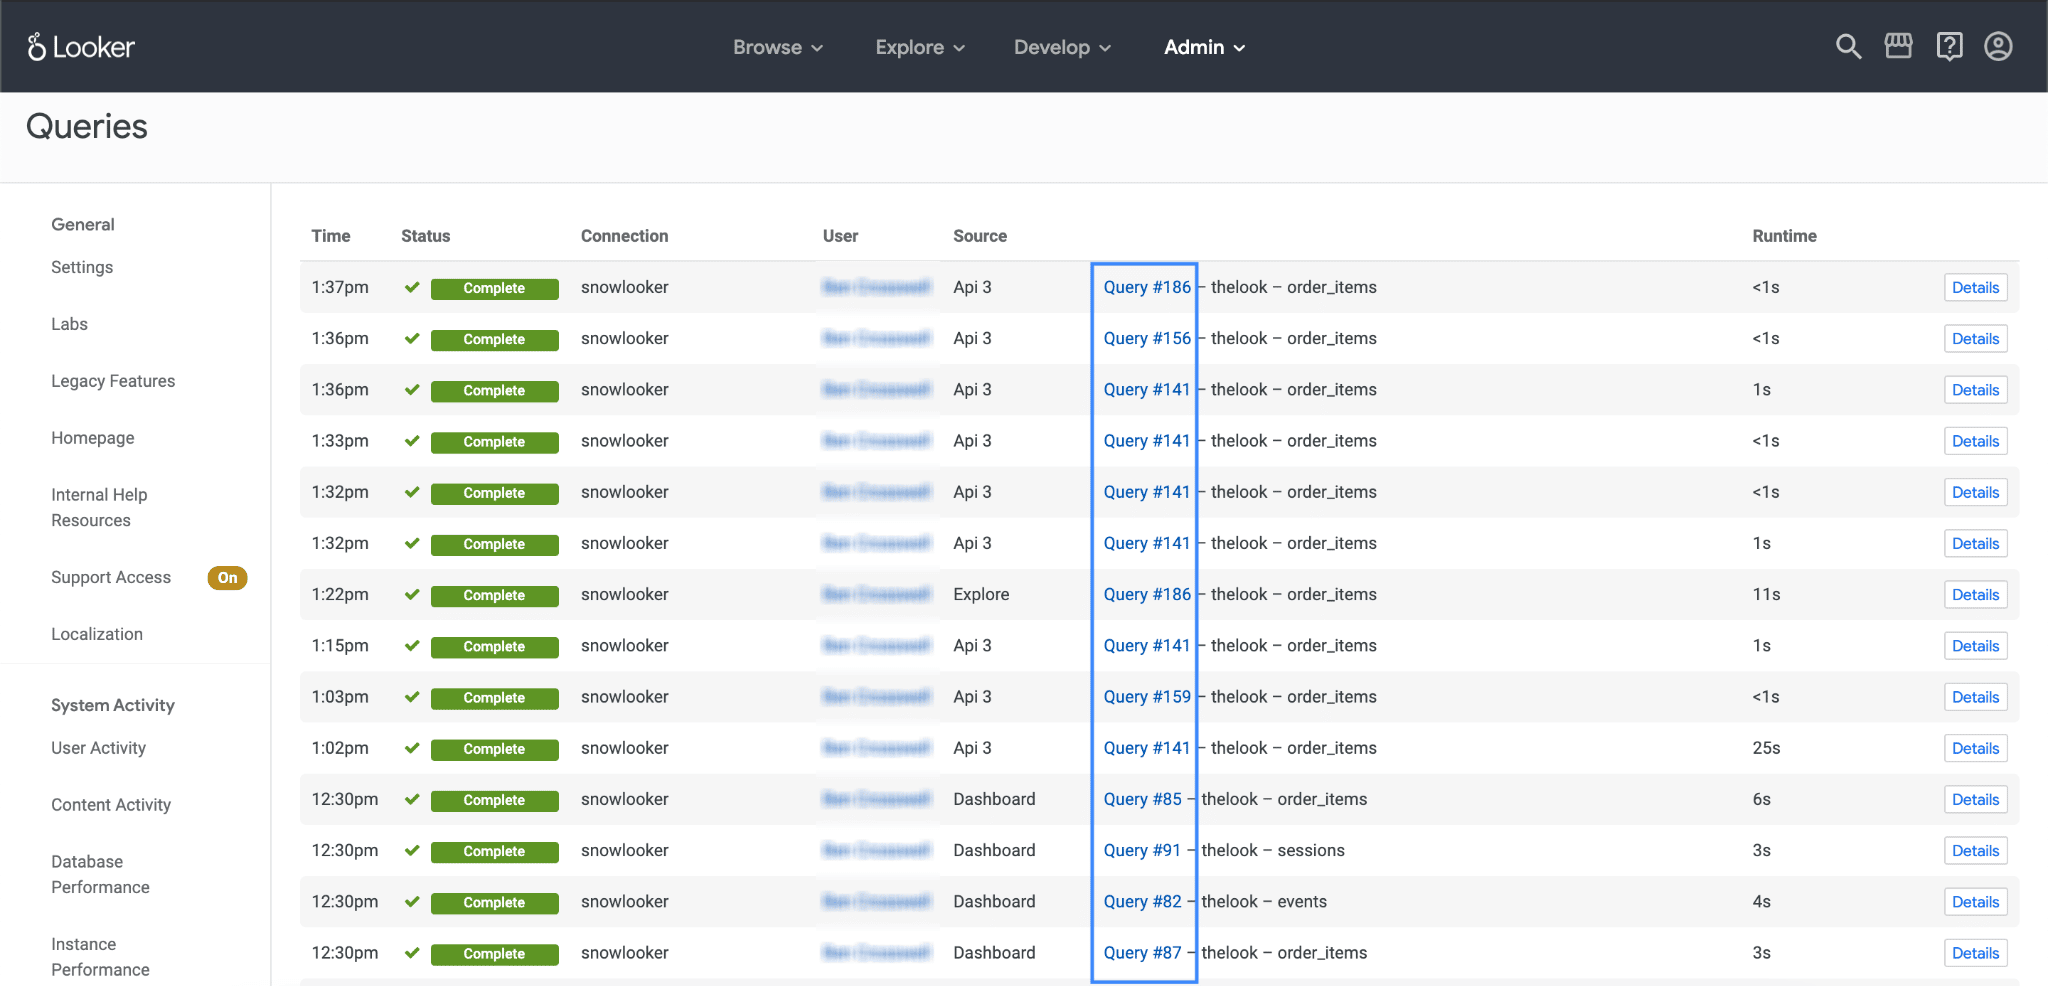
You can also click to see more details and fields.

Step 5: Now, all you need to do to run this custom function is enter the function name defined in your code (in our case, it’s GETQUERYFROMLOOKER) followed by the query ID.
You can also leave it blank, and the script will retrieve a default query instead.

Pros
- The advantage of using the Script editor is it does not require introducing new integrations for extensive customization according to your unique needs.
Cons
- The obvious downside of the Script editor option is that it’s geared strongly towards technical users. There’s a decent amount of JavaScript involved, and troubleshooting a plethora of potential errors can be frustrating even to a programmer.
- Also, one of the biggest drawbacks to this method is that your database credentials (password and username) would be visible inside the script source.
- There are ways around this, such as putting the encrypted credentials into a file and then importing and decrypting the credentials upon running the script, but that’s another thing you need to code, which needs much more know-how, and can take up more time and energy.
Connect Looker to Google Sheets now
Streamlining the flow of your Looker data to Google Sheets can provide excellent benefits for your enterprise.
In a matter of minutes, you can help increase adoption, decrease the number of errors, and bring further clarity to your Business Intelligence processes and tasks.
While there are several great ways to achieve this, you can try the fastest, most user-friendly solution for free!
Sign up with Coefficient today to see for yourself.