Ready to take your email marketing analytics to the next level? Combining the power of Mailchimp and Google Sheets allows you to do just that.
Mailchimp is a world leader in email marketing and offers a wealth of data. But what if you could organize and analyze that data more effectively?
This is where Google Sheets comes in. Known for its superior data organization and management capabilities, Google Sheets can turn your Mailchimp data into actionable insights.
Combining these two tools not only improves workflow efficiency and data reporting. It also enables a whole new level of automation, analytics, and more.
This guide will show you how to export your Mailchimp data to Google Sheets. Whether you’re a spreadsheet expert or prefer a neophyte, you’re in the right place.
Ready to optimize your data analysis? Let’s jump right in!
6 Reasons To Export Mailchimp Data Into Google Sheets
Exporting Mailchimp data into Google Sheets offers several benefits:
- Streamlined Data Consolidation. You can centralize data from different sources by exporting your Mailchimp into Google Sheets. This gives you a comprehensive view of your marketing efforts, enabling you to compare it with other datasets like sales or website analytics.
- Enhanced Data Analysis. Google Sheets provides formulas, charts, and pivot tables that simplify data analysis. Exporting your Mailchimp data allows you to use these tools to gain deeper insights into your email marketing campaigns, track performance metrics, and identify trends or patterns.
- Seamless Process Automation. Google Sheets integrates with other Google services and third-party tools through add-ons or scripts. This allows you to automate various processes related to your data, such as importing Mailchimp data regularly, generating reports, or triggering actions based on specific conditions.
- Customization and Flexibility. Google Sheets offers a flexible and customizable environment for your data. Organize your Mailchimp data to suit your needs, create custom formulas or calculations, build tailored reports or dashboards, or manipulate your data however you see fit. This flexibility allows you to analyze and present data to align with your unique requirements and preferences.
- Integration with Multiple Data Sources. Google Sheets is a central hub for data integration, allowing you to combine Mailchimp data with other sources. For example, you can export data from Zendesk, CRM systems, and social media platforms. The integration allows a more comprehensive analysis of your marketing efforts and gives you a holistic view of your business.
- Reliable Data Backup and Security. Exporting Mail Chimp data to Google Sheets has an additional benefit: it ensures you have a backup in case of any issues with your Mailchimp account or data loss. All data exported is kept safely in Google Cloud. Google Sheets also offers built-in security measures like access controls, version history, and encryption.
How to Export Mailchimp Data into Google Sheets: 3 Methods
1. Coefficient
If you’re looking for a more straightforward way to export your Mailchimp data to Google Sheets, Coefficient is your safest bet.
Coefficient connects Mailchimp to Google Sheets in a single click and instantly imports the data into your spreadsheet.
Let’s walk through how it’s done.
First, install the Coefficient Google Sheets add-on.
Open a new spreadsheet in Google Sheets. Click on the Extensions menu tab, select Add-ons from the drop-down list, and Get add-ons.

Enter Coefficient in the search box at the top of the Google Marketplace pop-up window.
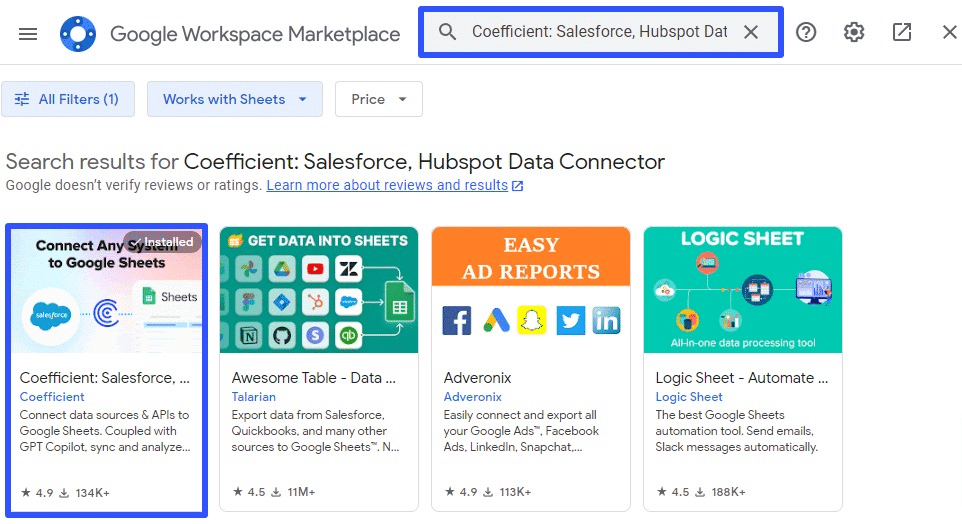
Click and follow the prompts to install the Coefficient add-on to Google Sheets.
Return to the Extensions menu tab and click Coefficient from the dropdown to launch the add-on.
After set up, you’ll see the Coefficient app running as a side panel on the right side of your screen.

Click on Import from… to connect to your data source.
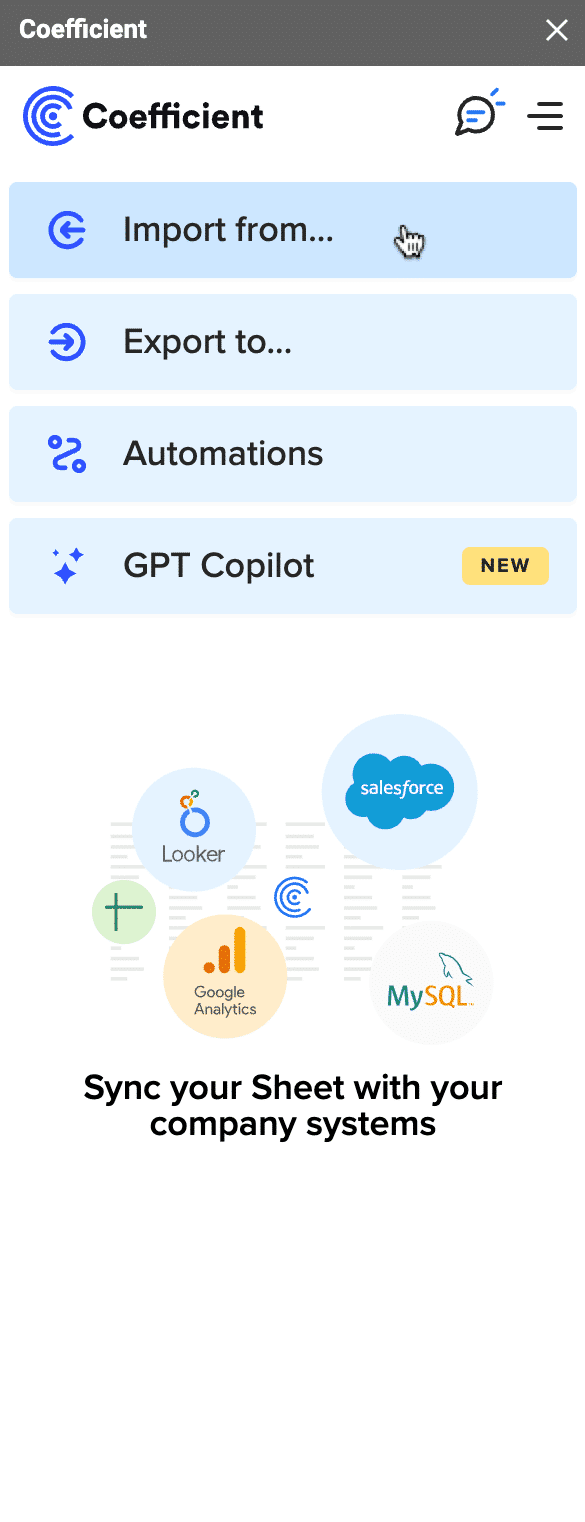
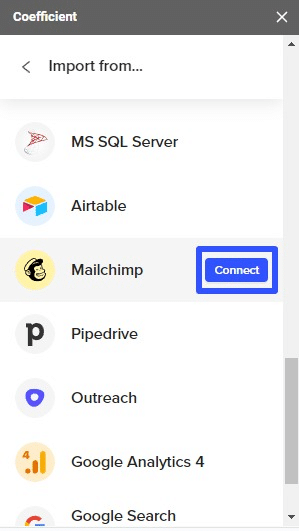
Select Mailchimp from the list of data sources and click Connect.
Click the Authorize button to allow Coefficient to integrate Mailchimp to Google Sheets.
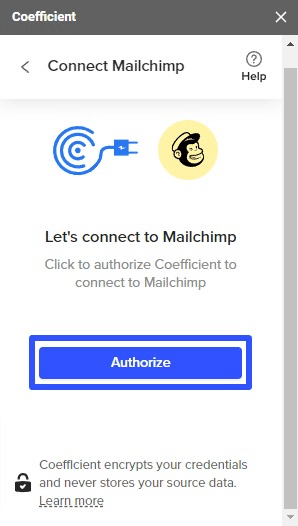
Once successfully connected, choose your preferred importing option: From Objects & Fields or From Library (your previously saved imports).
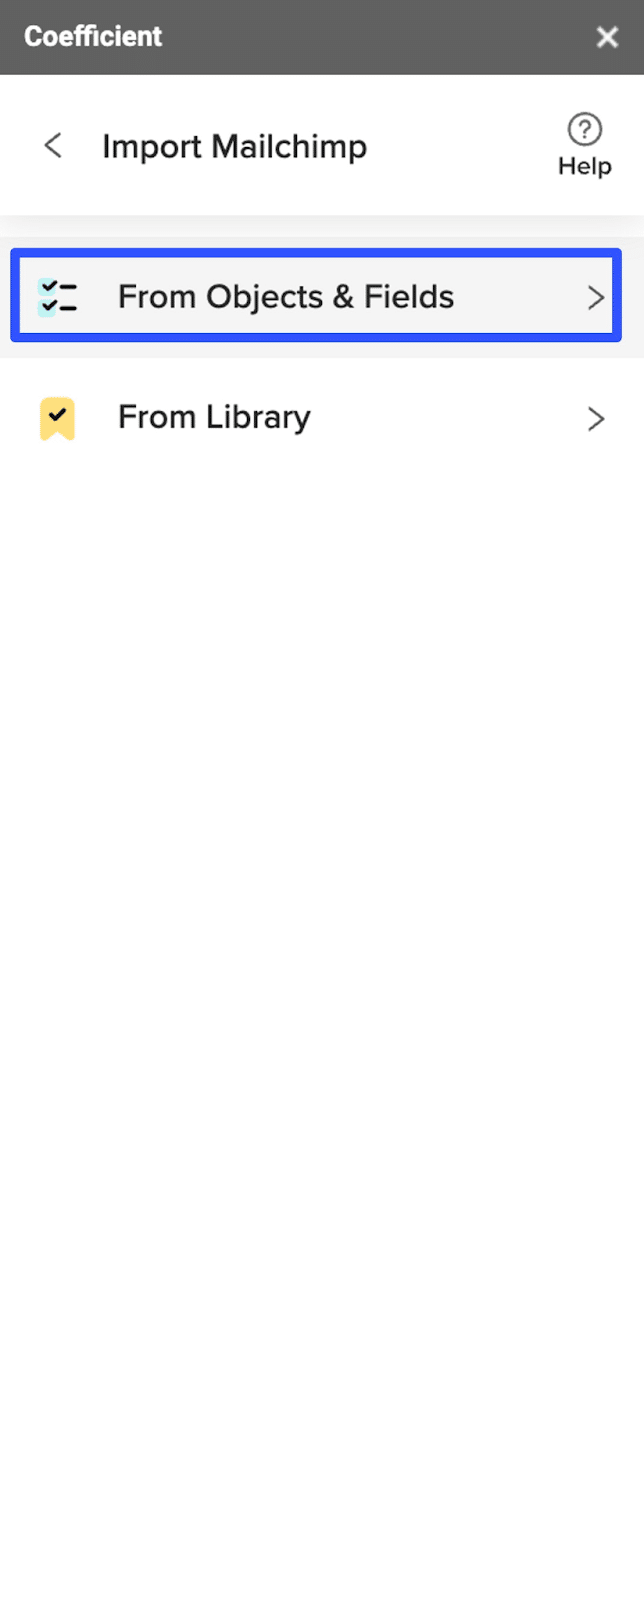
Let’s choose From Objects & Fields for this example.
Select an Object on the Data Previewer and click Next.
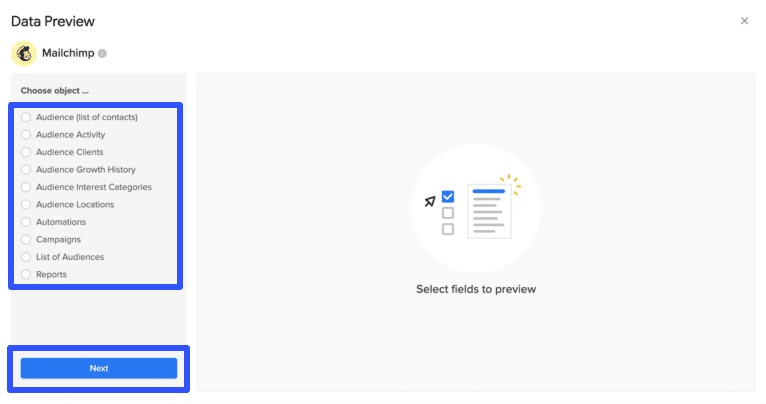
Tick the boxes corresponding to the fields you want to include in your import. You’ll see a preview of your selected fields on the right side of your screen.
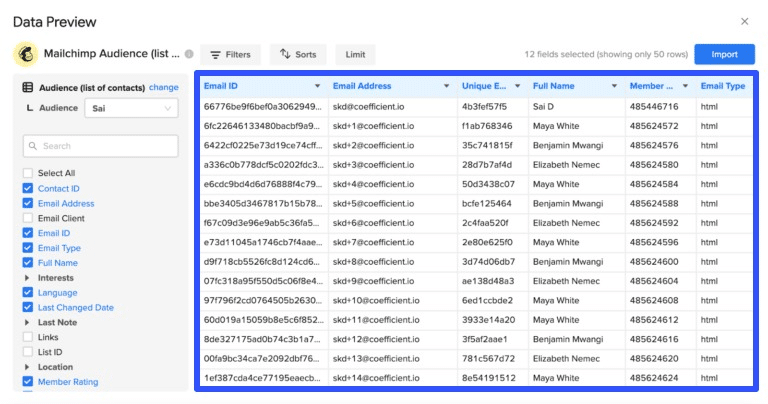
Add sorts, filters, and limits to customize your import Mailchimp data and click on the Import button.
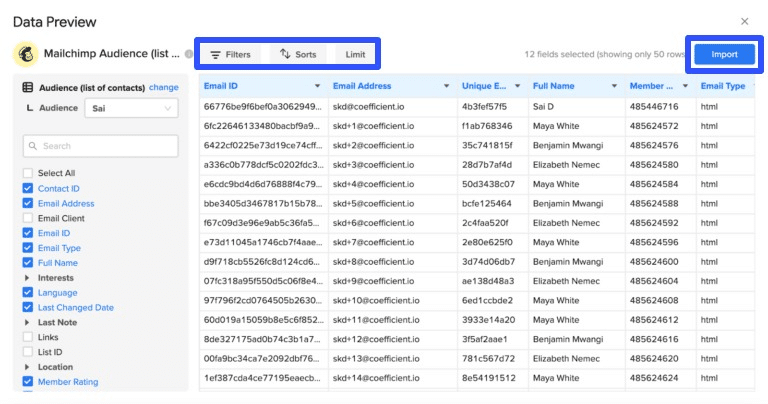
Your import data should automatically populate your Google spreadsheet in seconds.
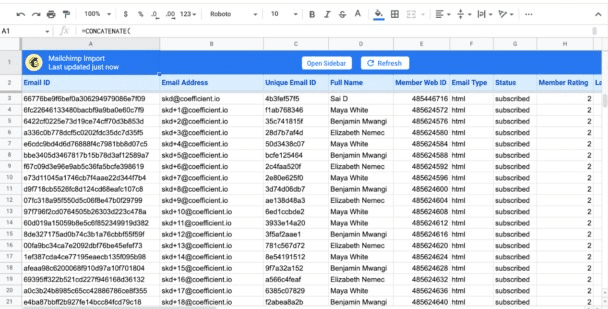
You did it. Pretty easy, right?
You can set an auto-refresh schedule daily, weekly, or monthly, and Coefficient will automatically update your Mailchimp data in your spreadsheet, keeping it always up-to-date for you.
This way, you won’t need to repeat your imports or manually update your Mailchimp data in Google Sheets, saving you time while keeping your data fresh and accurate.

Outside of Mailchimp, Coefficient allows you to export data directly into Google Sheets from Salesforce, HubSpot, Redshift, Snowflake, Jira, and other platforms and systems.
It simplifies consolidating your data from various sources into one place, making your reporting and analysis more efficient.
2. Google Apps Script
Are you comfortable with coding? If yes, Google Apps Script is a powerful tool to pull Mailchimp data into Google Sheets. Here’s how to do it:
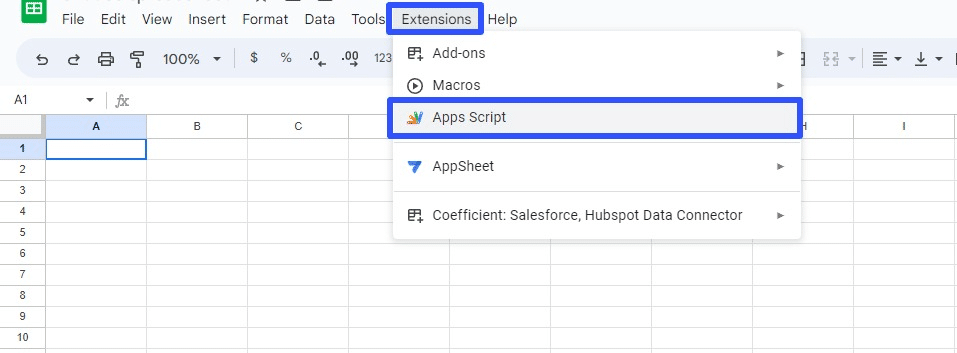
Click Extensions on the Google Sheets top menu and select Apps Script.
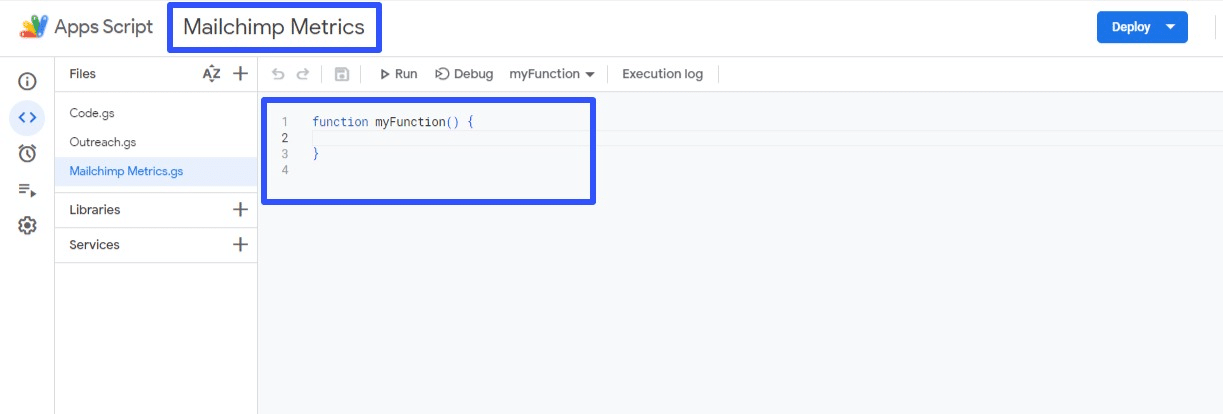
Name your Project and remove the default code or existing text within the code area.
Create the API Key and Audience ID required to run your code:
var API_KEY = ‘ ‘;
var AUDIENCE_ID = ‘ ‘;
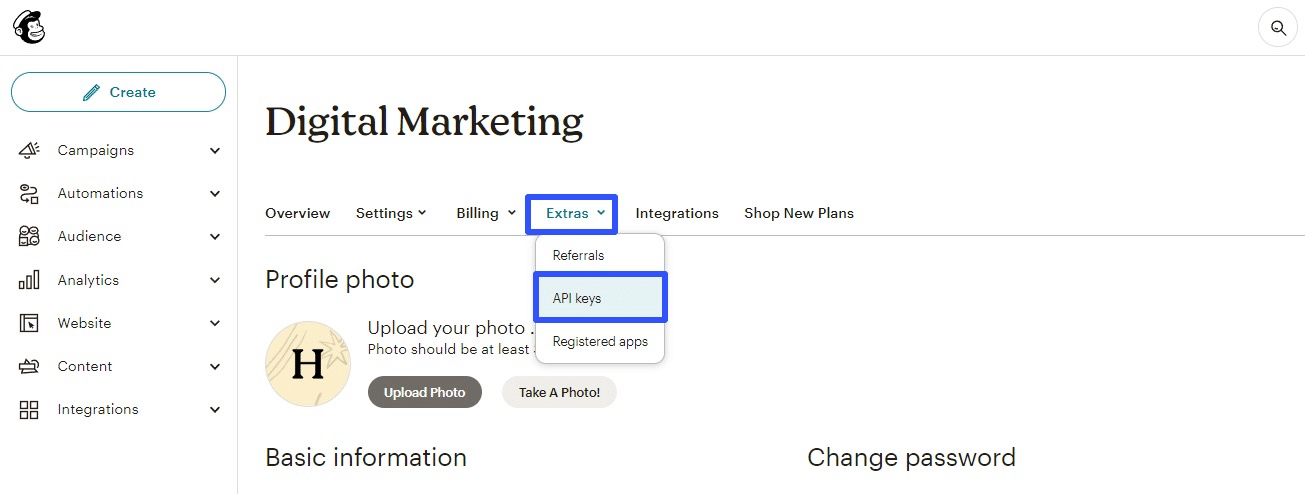
To get these from your Mailchimp account, navigate to your Profile, select the Extras tab, and click on API keys.
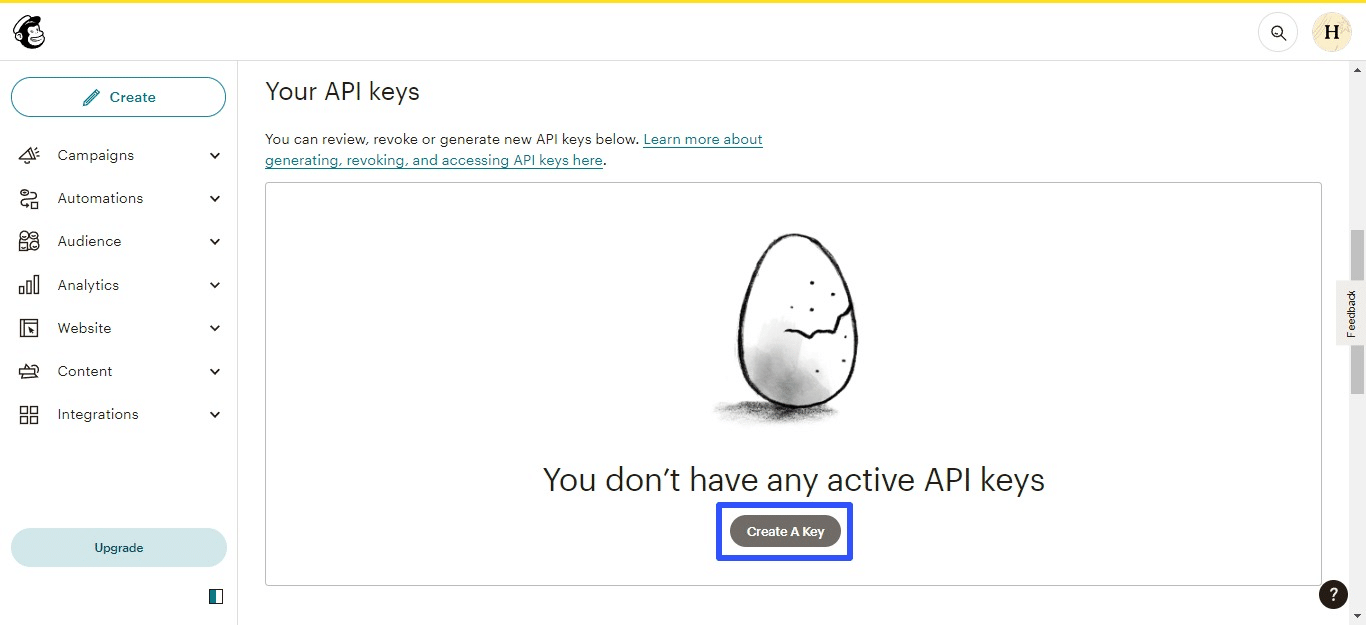
Scroll down and click on Create A Key under Your API keys.
Name your API key and click on the Generate Key button.
Copy the generated API key and paste it into the Google Apps Script editor between the two single quotes after API_KEY.

Next, retrieve your Audience ID.
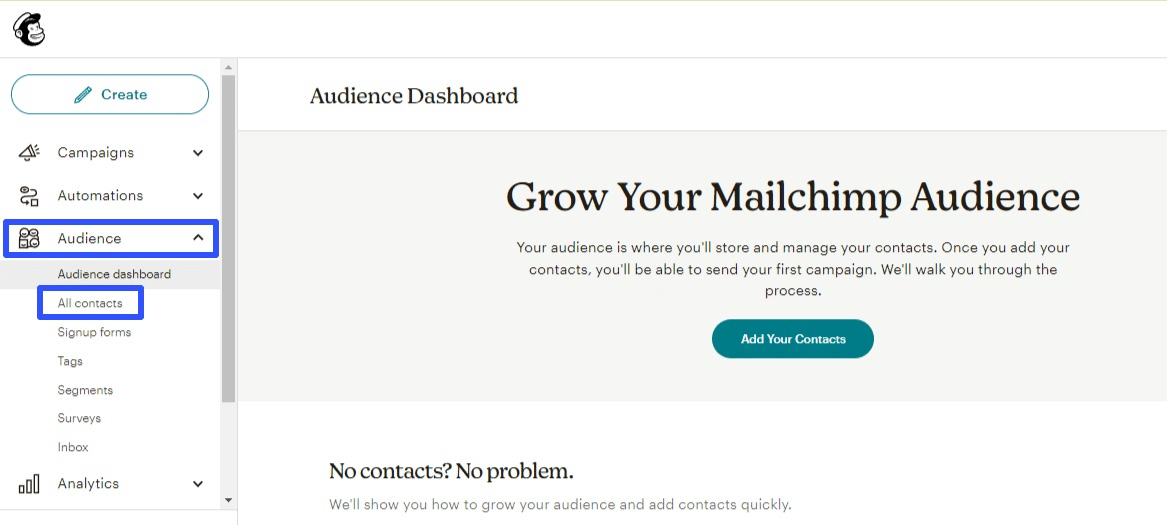
Go back to your Mailchimp account and click on the Audience tab on the navigation menu (left side of the screen).
Then, select All contacts.
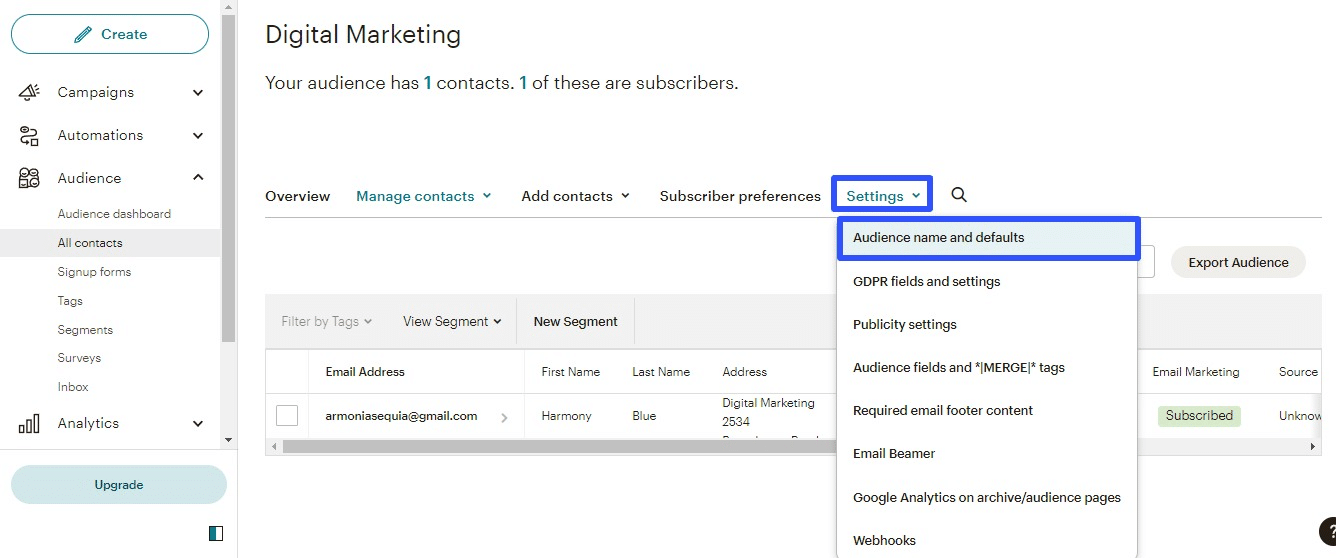
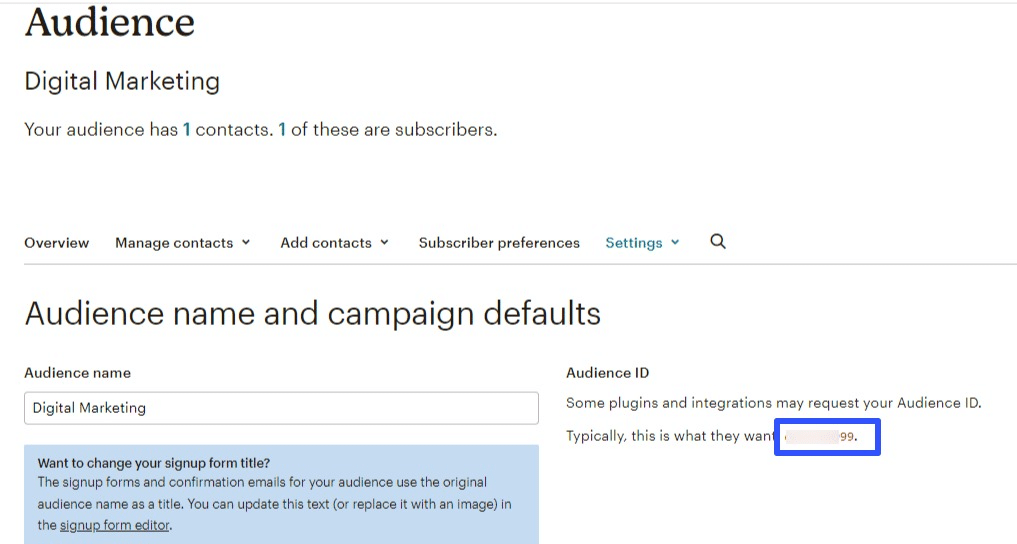
Click on Settings and select Audience name and defaults on the drop-down list.
Find and copy the Audience ID.
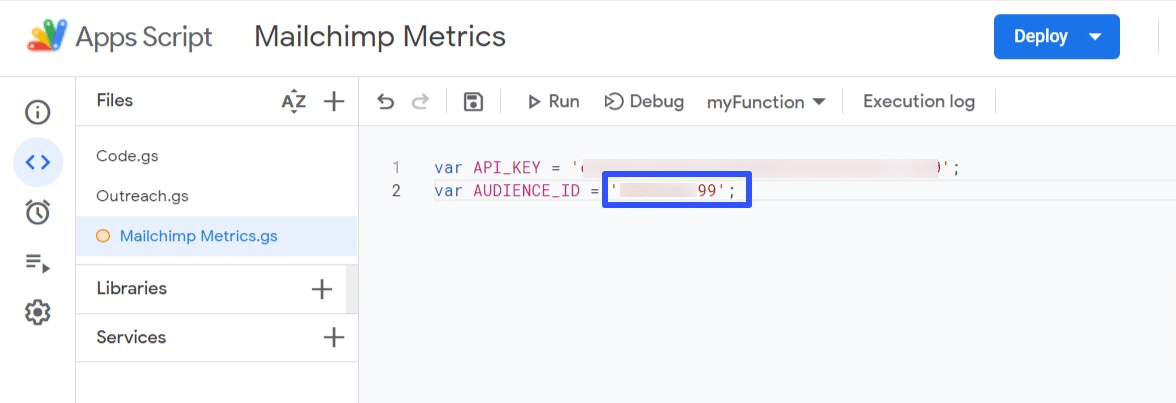
Paste the Audience ID in the Script editor like this:
Your variables are ready, so the next step is to write a function to pull data from the API.

Stop exporting data manually. Sync data from your business systems into Google Sheets or Excel with Coefficient and set it on a refresh schedule.

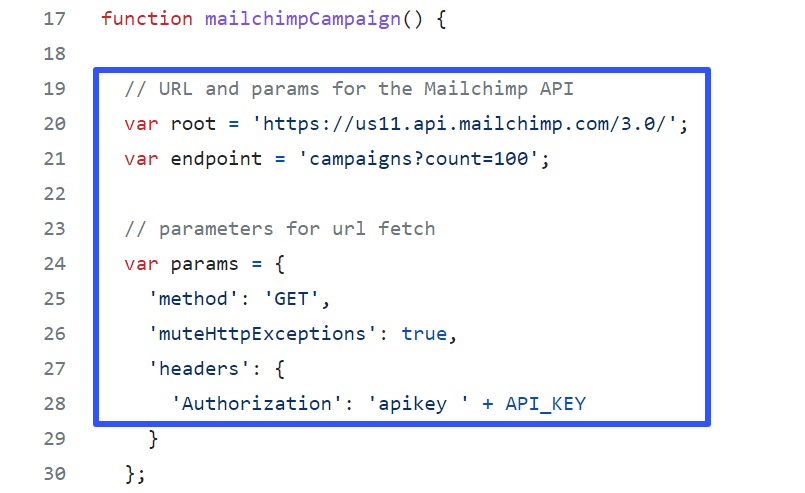
Let’s add code to create a function named mailchimpCamapaign(). The code includes specific endpoints and roots of the API that you want to access.
You can reference the complete code in this GitHub repository.
Next, write a code to call the Mailchimp API so it passes the received data. The Logger function displays this data:

Click Save at the top of the Script editor and select Run.
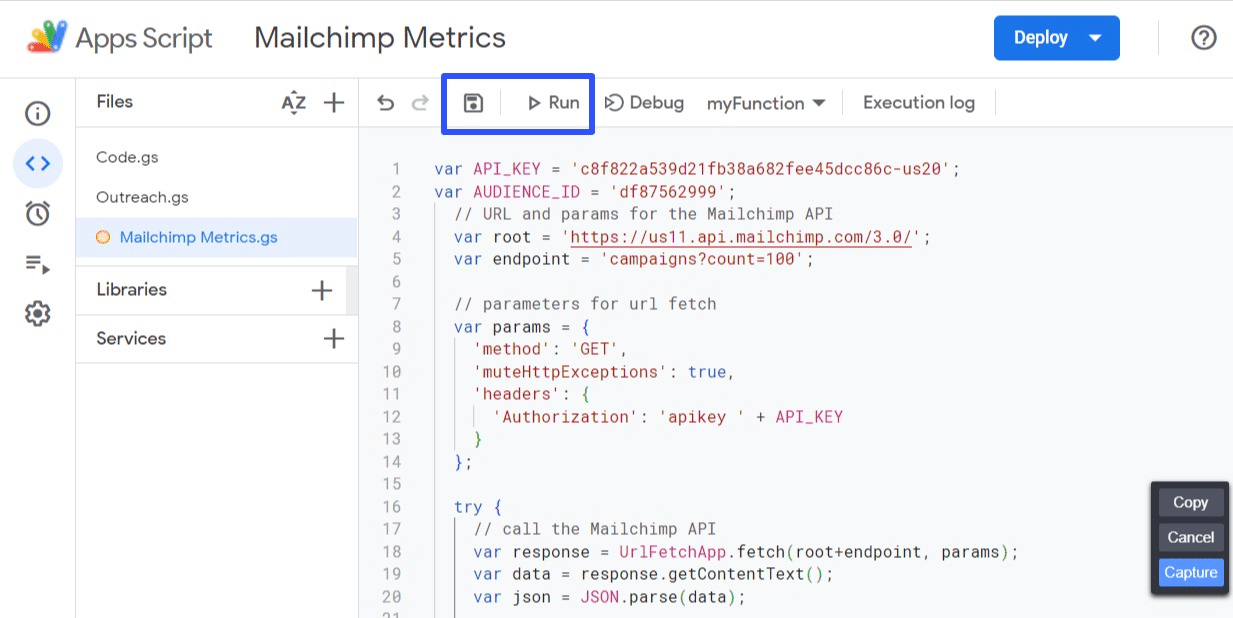
Review the permissions and authorize Google Apps Script to connect and deploy the script.
The Execution log will show if the script is deployed successfully.
Now, it’s time to retrieve your campaign data.
Create a code to log the number of campaigns and fetch all the subject lines within these campaigns.
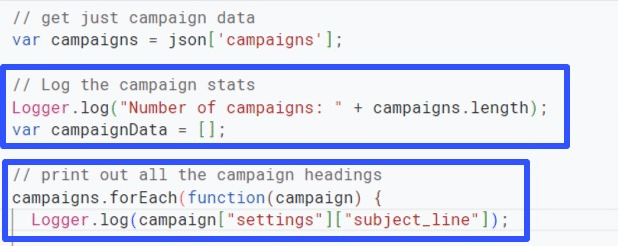
Run the campaign.
If your script works, you should see all the data in your logs, including the subject lines and the number of campaigns.
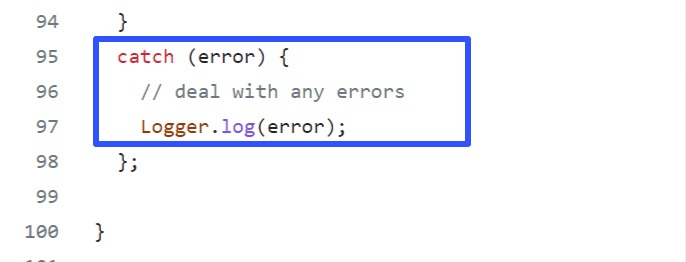
The final step is to put the entire code in a try function and create a function to spot and display errors.
This way, you’ll know the specific error if you fail to fetch the API.
While this data exporting method can get the job done, it can be complex and impractical for non-technical users.
Maintaining and debugging code can be challenging for even the most experienced programmers.
3. Export CSV
Mailchimp lets you export data in the Comma-Separated Values (CSV) file format. Let’s explore how to do it.
Keep the following things in mind before exporting data from Mailchimp:
- GDPR. The General Data Protection Regulation (GDPR) is a privacy law in the European Union (EU) that grants EU citizens certain rights regarding their personal data. If a contact requests personal data from you, export it directly from their contact profile instead of using the method below.
- Campaign Report Data. The resulting export file won’t include campaign report data such as open and click rates. Export a campaign report separately to get this data.
- ZIP File and CSVs. Your export can be in a ZIP file that contains separate CSV files for various contact types (subscribed, unsubscribed, non-subscribed, and cleaned). You’ll need to extract the ZIP file to access the CSV files before opening them in Google Sheets.
- Expiration. Contact exports and their corresponding CSV files are available in your account for 30 days.
Now, onto the step-by-step walkthrough.
Configure your contact table’s columns by clicking on Audience on the main navigation menu on the left side of the screen.
Select All contacts and click on the Current Audience drop-down menu (if you have more than one audience) to choose the specific audience you wish to export.
Click on the Toggle Columns drop-down menu and check or uncheck the boxes of the fields you want to view or hide.
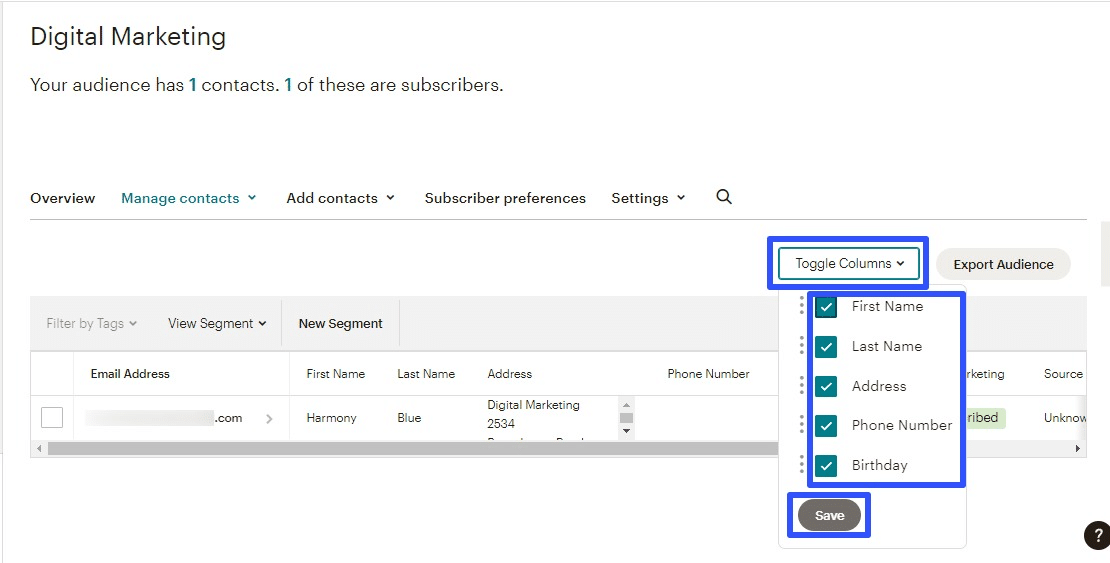
Re-order the columns by clicking and dragging the three dots beside the name fields. Change their order accordingly and select Save.
Click on the Export Audience button beside Toggle Columns.
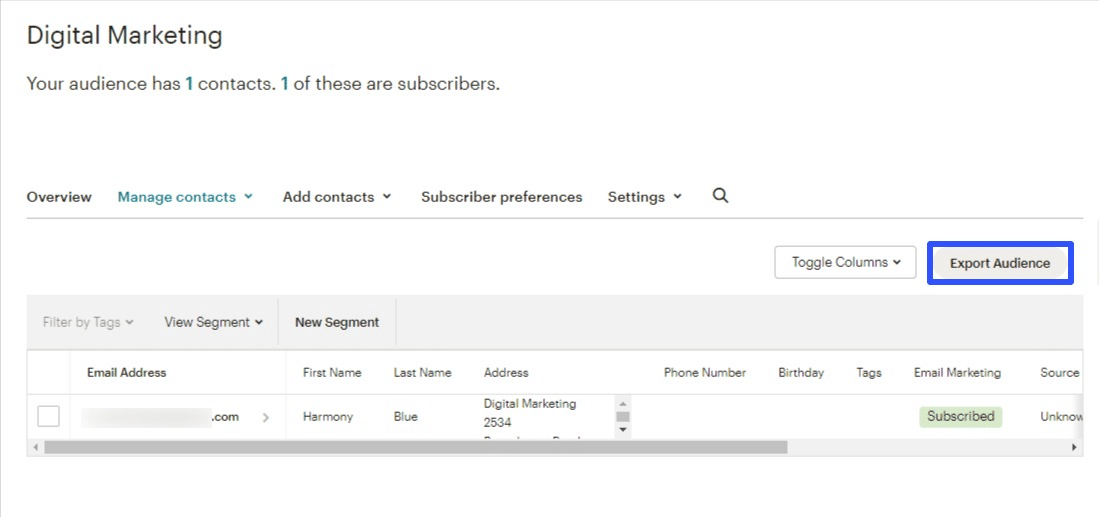
Select Export As CSV after your export loads to download the file to your local drive.
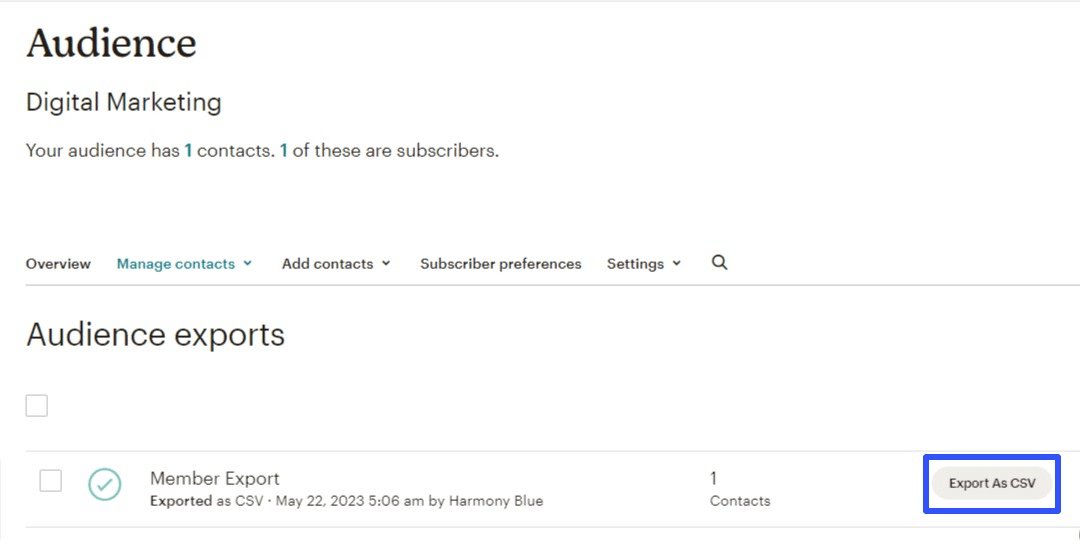
Once downloaded, you should see the CSV file in your Download folder, and you can now import it to Google Sheets.
Other Mailchimp Contacts data you can export include your Segments, Tagged Contacts, and Groups.
While exporting your Mailchimp data as CSV files is straightforward, it has limitations. For instance, CSV files can have formatting issues after importing to Google Sheets, and you’ll need to sort out everything to maintain your data’s integrity and formatting.
Updating your imported data can also mean repeating your exporting process or manually adding new data, compounding the issues noted above.
Resources you will also love
- How to Export Data from Airtable
- How to Export Jira Data into Google Sheets
- How to Export Redshift Data into Google Sheets
- How to Export MySQL Data Into Google Sheets
- How to Export Snowflake Data into Google Sheets
Export Mailchimp Data into Google Sheets Instantly
Exporting your Mailchimp data into Google Sheets allows you to analyze your email marketing campaign data with more flexibility.
Among all the methods, Coefficient stands out as the most user-friendly and efficient way to export your Mailchimp data into Google Sheets.
Simply connect your Mailchimp data once, configure your import settings, and you’re ready to extract your data within seconds.
Try Coefficient for free and see how the solution can import Mailchimp data into Google Sheets in seconds.
