Want to unlock cells in Excel? This guide covers multiple techniques to give you full control over your spreadsheet data.
Unlocking Cells in Excel: Step-by-Step Guide
Method 1: Unlocking Specific Cells
When you need to unlock particular cells while keeping others protected, follow these steps:
Step 1: Select the cells you want to unlock.
- Click and drag your mouse to highlight the desired cells.
- For non-adjacent cells, hold the Ctrl key while clicking each cell.
Step 2: Right-click and choose “Format Cells.”
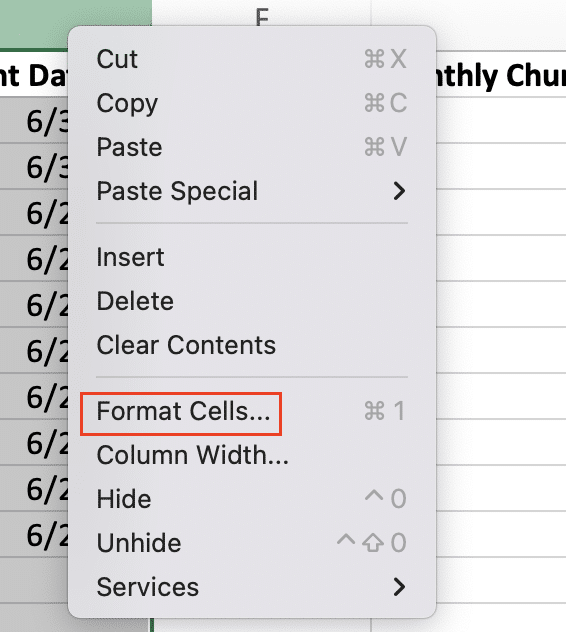
- Alternatively, use the keyboard shortcut Ctrl + 1 to open the Format Cells dialog box.
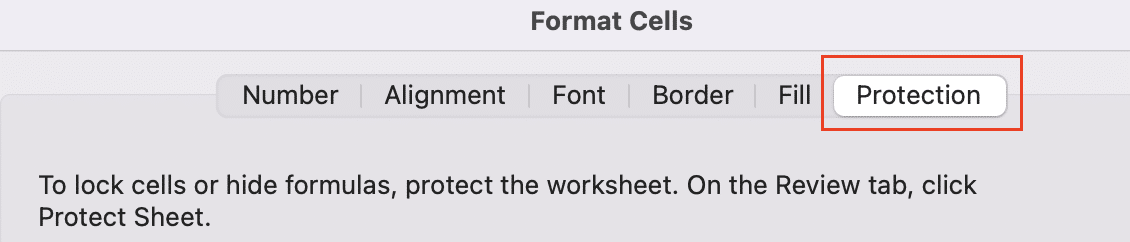
Step 3: Navigate to the Protection tab.
- In the Format Cells dialog box, click on the “Protection” tab at the far right.
Step 4: Uncheck “Locked” and click “OK”.
- Remove the checkmark from the “Locked” box.
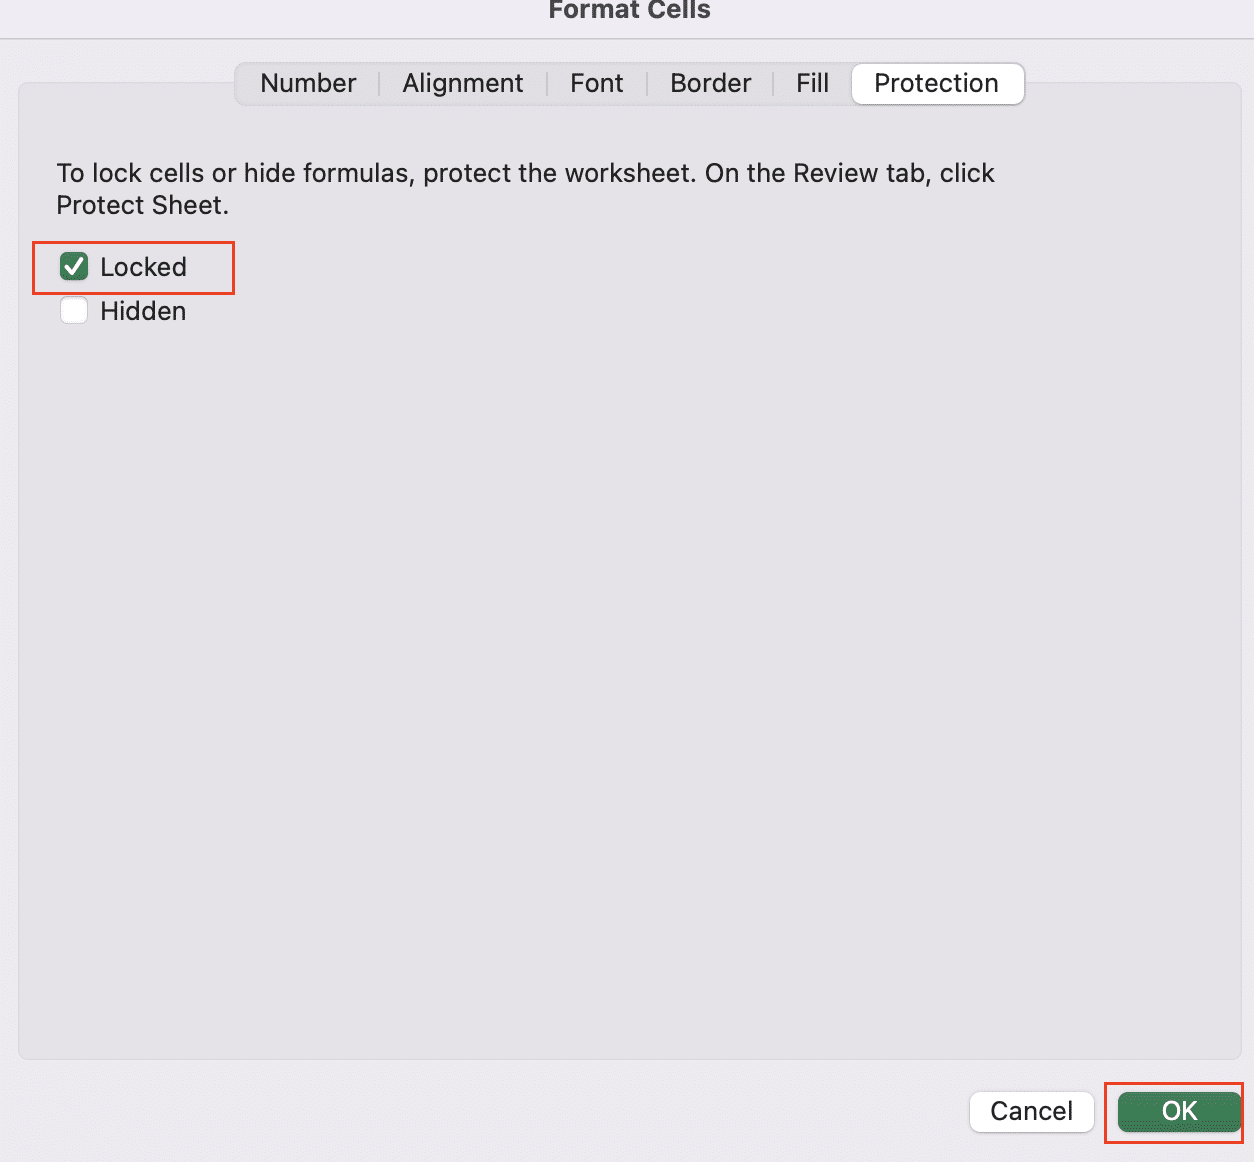
- Click “OK” to apply the changes and close the dialog box.
Remember, these changes won’t take effect until you protect the sheet. To do so, go to the “Review” tab and click “Protect Sheet.”
Method 2: Unlocking All Cells on a Sheet
If you need to unlock every cell in your worksheet, use this efficient method:
Step 1: Press Ctrl + A to select all cells.
- This keyboard shortcut selects the entire worksheet instantly.
Step 2: Open the Format Cells dialog (Ctrl + 1).
- The Format Cells dialog box will appear with options for the selected cells.
Step 3: Navigate to the Protection tab.
- Click on the “Protection” tab in the Format Cells dialog box.
Step 4: Uncheck “Locked” and click “OK”.
- Remove the checkmark from the “Locked” box.
- Click “OK” to apply the changes to all cells in the worksheet.
As with Method 1, remember to protect the sheet afterward for these changes to take effect.
Method 3: Using the Ribbon to Unlock Cells
Excel’s ribbon interface offers a quick way to toggle cell locking:
Step 1: Select target cells or entire sheet.
- Highlight the cells you want to unlock, or press Ctrl + A for the whole sheet.
Step 2: Go to the Home tab on the Excel ribbon.

- Look for the “Cells” group in the Home tab.
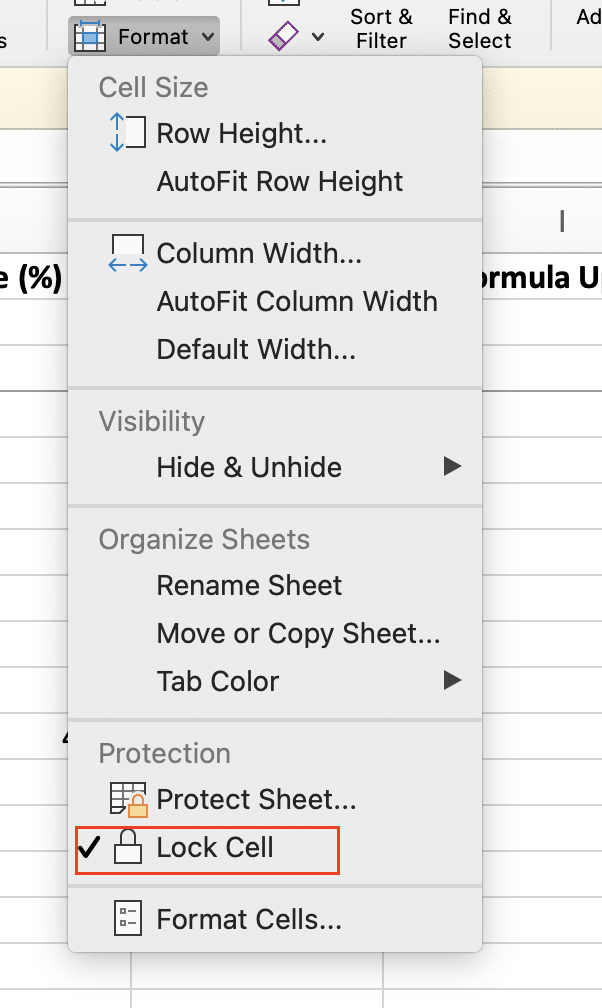
Step 3: Click “Format” in the Cells group.

- A dropdown menu will appear with various formatting options.
Step 4: Choose “Lock Cell” to toggle lock status.
- If the cells are currently locked, this action will unlock them.
- The “Lock Cell” option acts as a toggle, so clicking it again will re-lock the cells.
This method provides a visual way to manage cell locking without diving into dialog boxes.
How Do I Unlock Certain Cells in Excel?
Unlocking Cells Within a Protected Sheet
Sometimes you need to make changes to a protected sheet. Here’s how to unlock specific cells:
Step 1: Unprotect the sheet.
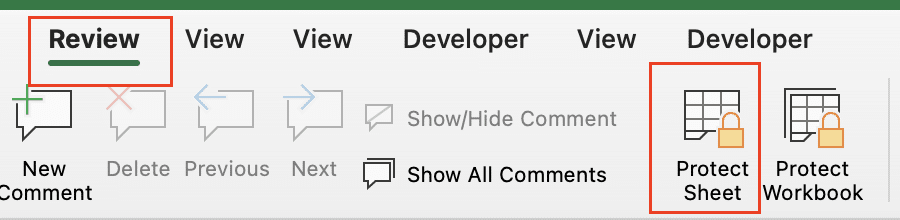
- Go to the “Review” tab and click “Unprotect Sheet.”

- If prompted, enter the password (if one was set).
Step 2: Select cells to unlock.
- Highlight the cells you want to make editable.
Step 3: Format Cells and uncheck “Locked”.
- Right-click and choose “Format Cells” or use Ctrl + 1.
Step 4: Reapply sheet protection if needed.
- Return to the “Review” tab and click “Protect Sheet.”
- Set a new password if desired, and choose which actions to allow.
This method allows you to fine-tune which cells users can edit while maintaining protection on others.
Creating Editable Ranges in Protected Sheets
For more granular control over editable areas in a protected sheet:
Step 1: Use “Allow Edit Ranges” feature.
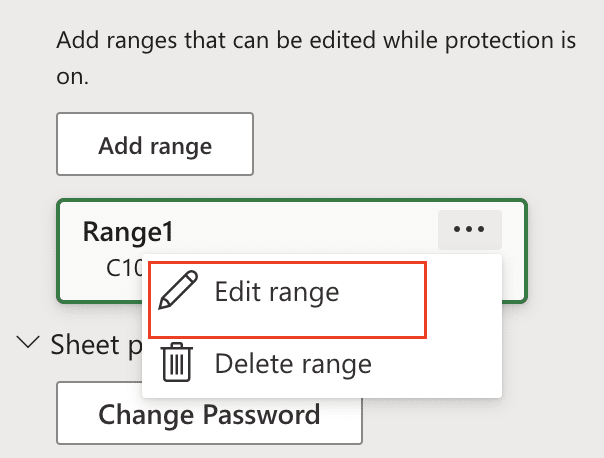
- Go to the “Review” tab and click “Edit Ranges.”
Step 2: Specify cell ranges users can modify.
- In the dialog box, click “Add Ranges” to create an editable range.

- Name the range and select the cells to include.
Step 3: Set permissions for each editable range.
- Choose whether to restrict editing to specific users or groups.
- Set a password for the range if desired.
Step 4: Apply sheet protection with allowed edits.
- Click “Protect Sheet” in the Review tab.
- Ensure “Select unlocked cells” is checked in the dialog box.

This method creates a secure environment where specific ranges remain editable within an otherwise protected sheet.
How to Unlock Excel Cells Without a Password
Bypassing Protection on Unprotected Cells
When you can’t unlock a protected sheet, you may still be able to work with unprotected cells:
Step 1: Identify unprotected cells within a sheet.
- Look for cells that allow editing—these are typically left unlocked intentionally.
Step 2: Use these cells to enter and manipulate data.
- Enter data or formulas in the unlocked cells as needed.
Step 3: Leverage unprotected cells for calculations.
- Use formulas in unlocked cells to reference and process data from locked cells.
While this method doesn’t unlock protected cells, it allows you to work within the constraints of the sheet’s security settings.
Using VBA to Remove Sheet Protection
For advanced users, VBA offers a way to programmatically unprotect a sheet:
Step 1: Open the Visual Basic Editor (Alt + F11).
- This opens the VBA environment where you can write and run macros.
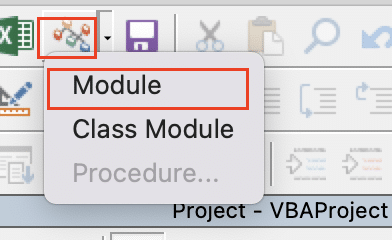
Step 2: Insert a new module and add unprotection code.
- Click “Insert” > “Module” to create a new module.
- Enter the following VBA code:
Sub UnprotectSheet()
Dim ws As Worksheet
For Each ws In ThisWorkbook.Worksheets
ws.Protect Password:=””
ws.Unprotect
Next ws
End Sub
Step 3: Run the macro to remove sheet protection.
- Press F5 or click the “Run” button to execute the macro.
- This will attempt to unprotect all sheets in the workbook.
Important: Use this method cautiously and ethically. It’s designed for recovering your own work, not bypassing security on others’ files.
Unlocking Frozen Panes in Excel
How to Unfreeze Locked Panes
Frozen panes can restrict movement in your worksheet. Here’s how to unlock them:
Step 1: Navigate to the View tab on the ribbon.

- Look for the “Window” group in the View tab.
Step 2: Locate the “Freeze Panes” option.
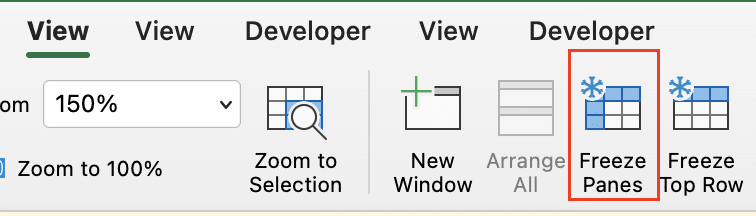
- You’ll find this in the Window group.
Step 3: Select “Unfreeze Panes” to remove locks.
- Click on “Unfreeze Panes” to remove all frozen areas.

Step 4: Scroll freely through your worksheet.

Stop exporting data manually. Sync data from your business systems into Google Sheets or Excel with Coefficient and set it on a refresh schedule.
Get Started
- You should now be able to scroll vertically and horizontally without restrictions.
Unfreezing panes doesn’t affect cell protection—it only changes how you can view and navigate the worksheet.
Advanced Cell Unlocking Techniques
Using Named Ranges for Selective Unlocking
Named ranges offer a powerful way to manage unlocked areas in a protected sheet:
Step 1: Create named ranges for cells to unlock.
- Select the cells you want to keep editable.
- Go to Formulas > Define Name to create a named range.

Step 2: Apply protection to the sheet.
- Go to Review > Protect Sheet.
- Enter a password if desired.
Step 3: Allow editing for specific named ranges.
- In the Protect Sheet dialog, check “Select unlocked cells.”
- Click “Format” next to “Allow Edit Ranges.”
- Add your named ranges to the allowed areas.
Step 4: Maintain security while enabling targeted edits.
- Users can now edit the named ranges while the rest of the sheet remains protected.
This method provides a flexible way to manage editable areas without constantly adjusting cell-level permissions.
Conditional Unlocking Based on User Roles
For complex spreadsheets with multiple users, you can dynamically unlock cells based on user permissions:
Step 1: Implement user authentication in your workbook.
- Create a login sheet or use Windows authentication.
- Store user roles in a hidden sheet or workbook-level name.
Step 2: Use VBA to check user credentials.
- Write a macro that runs when the workbook opens:
Private Sub Workbook_Open()
Dim userRole As String
userRole = GetUserRole() ‘ Custom function to retrieve user role
Call UnlockCellsForRole(userRole)
End Sub
Step 3: Dynamically unlock cells based on user permissions.
- Create a function to unlock specific ranges based on the user’s role:
Sub UnlockCellsForRole(role As String)
Dim ws As Worksheet
Set ws = ThisWorkbook.Worksheets(“Sheet1”)
ws.Protect Password:=”YourPassword”
Select Case role
Case “Manager”
ws.Range(“A1:Z100”).Locked = False
Case “Analyst”
ws.Range(“A1:M50”).Locked = False
Case “Viewer”
‘ All cells remain locked
End Select
ws.Protect Password:=”YourPassword”
End Sub
Step 4: Enhance spreadsheet security and flexibility.
- This system allows for granular access control without compromising overall sheet protection.
Remember to thoroughly test this system and implement proper error handling in your VBA code.
Wrapping Up: Mastering Cell Unlocking in Excel
Unlocking cells in Excel is a crucial skill for managing spreadsheet accessibility and security. We’ve covered various methods, from basic cell unlocking to advanced techniques using VBA and conditional permissions. Here’s a quick recap:
- Use the Format Cells dialog to unlock specific cells or entire sheets.
- Leverage the Excel ribbon for quick toggling of cell lock status.
- Create editable ranges within protected sheets for controlled access.
- Utilize VBA for programmatic unprotection when necessary.
- Implement named ranges and user-based permissions for advanced control.
Remember, the key is balancing accessibility with security. Always consider the needs of your users and the sensitivity of your data when deciding how to manage cell locking in your Excel workbooks.
As you continue to work with Excel, consider how real-time data could enhance your spreadsheets. Coefficient offers seamless integration with various data sources, allowing you to build dynamic reports and dashboards. Get started with Coefficient to take your Excel skills to the next level and unlock the full potential of your data.