Table of Contents
![]()
- 1. Metric Inconsistency – Your Snowflake Data Is Clean. So Why Does Every Team Have a Different Number?
- 2. How to Connect Snowflake to Google Sheets
- 3. How to Connect Excel and Snowflake?
- 4. How to Export Snowflake Data into Google Sheets
- 5. How to Upload CSV to Snowflake: Top 3 Methods
- 6. How to Upload Data to Snowflake
- 7. How to Download Data from Snowflake
- 8. How to Export Data from Snowflake to CSV

Wondering how to connect Excel to Snowflake? We’ve got your covered.
With the right steps and tools, you’d be surprised how straightforward the process can be. In this guide, we’ll cover several methods of connecting your Snowflake data with Excel.
Advantages of Using Excel to Analyze Snowflake Data
Integrating Excel with Snowflake offers numerous benefits, blending the familiarity of Excel with the power of Snowflake:
Familiar Interface and Workflows:
Excel’s interface and your established workflows, from financial models to reporting systems, remain consistent. Integrating with Snowflake enhances these processes with its advanced data processing capabilities, ensuring a smooth transition for teams with minimal disruption.
Live Data Analysis:
The combination of Excel and Snowflake amplifies your analytical capabilities. Excel’s comprehensive tools, coupled with Snowflake’s extensive data warehousing, enable more comprehensive analyses with live data directly from your spreadsheet.
Versatility in Reporting:
Leverage the dynamic reporting features of Excel, fueled by real-time data from Snowflake. From monthly sales reports to intricate data visualizations, the integration allows for customized reporting that meets the changing needs of your business, all while benefiting from the efficiency of cloud-based storage and processing.
How to Connect Excel to Snowflake: Top Methods
Method 1. Coefficient: Your Gateway to Simplified Snowflake Integration
Coefficient streamlines the Excel to Snowflake connection process, offering an automated 2-way connector between Snowflake and Excel without the need for coding or manual data transfer. Over 2,500 Snowflake-powered orgs like Miro use pre-built Snowflake Excel connectors to make their spreadsheet feel like an instance of Snowflake.
This method not only saves time but ensures your data remains updated in real-time, providing a robust foundation for analysis and decision-making.
Pros:
- No Coding Required: Install Coefficient, link it to Snowflake, and start importing data directly into your Excel spreadsheets with ease.
- Time Efficiency: Automate the data import process to focus more on analysis rather than data management.
- Live Data Sync: Maintain up-to-date data in your spreadsheets, reflecting any changes in Snowflake immediately for accurate reporting and analysis.
- Cloud-based Advantage: Leverage the full capability of Snowflake’s cloud data warehouse directly within Excel.
- Snowflake Technology Select Partner – Coefficient is the one of the only Excel connectors with Snowflake Partner Status. With over 60 Excel connectors, blending data that resides outside of Snowflake is even simple.
- 2-way sync – Coefficient offers a bi-directional sync with Snowflake, meaning you can even update Snowflake data from Excel manually or on a schedule. Of course, there are admin controls to ensure this is only available for the right stakeholders within your organization.
Cons:
- Limited Free Features: Scheduled automations and some advanced features may require a subscription, but this investment is minimal compared to the time and resources saved.
Steps to Connect Excel Using Coefficient:
Coefficient is by far the fastest and easiest way to connect Excel to Snowflake.
Let’s walk through how it works. You can get started here or open Excel from your desktop or in Office Online.
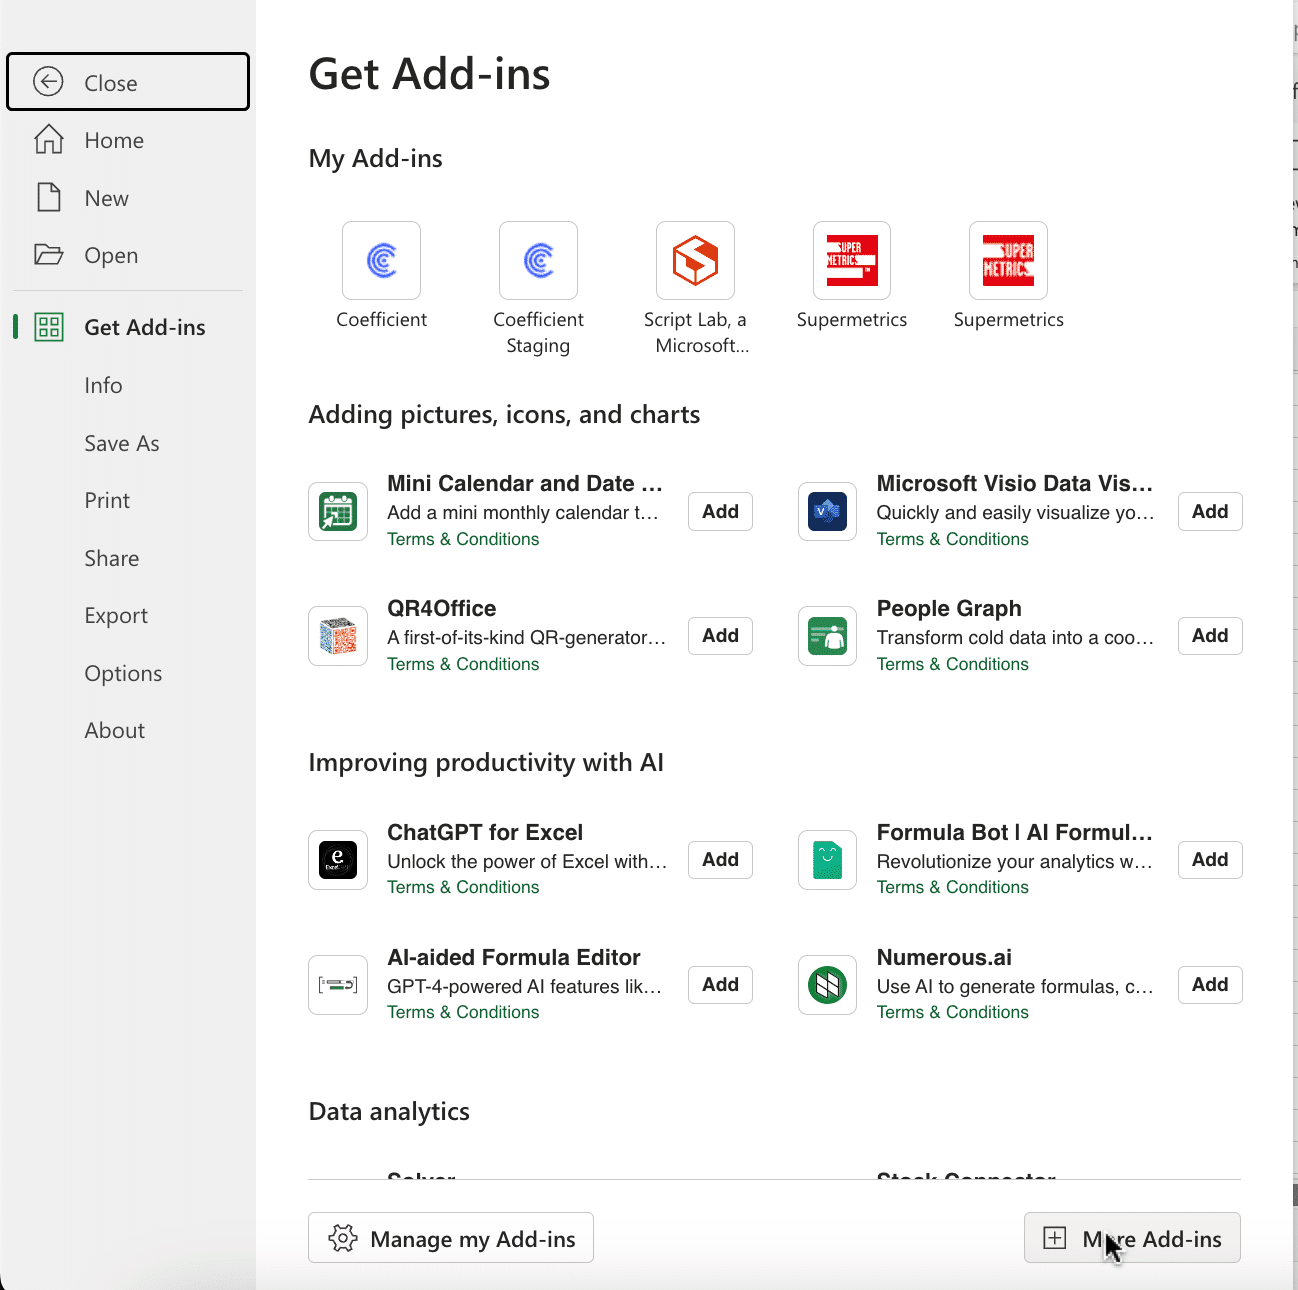
Click ‘File’ > ‘Get Add-ins’ > ‘More Add-Ins.’
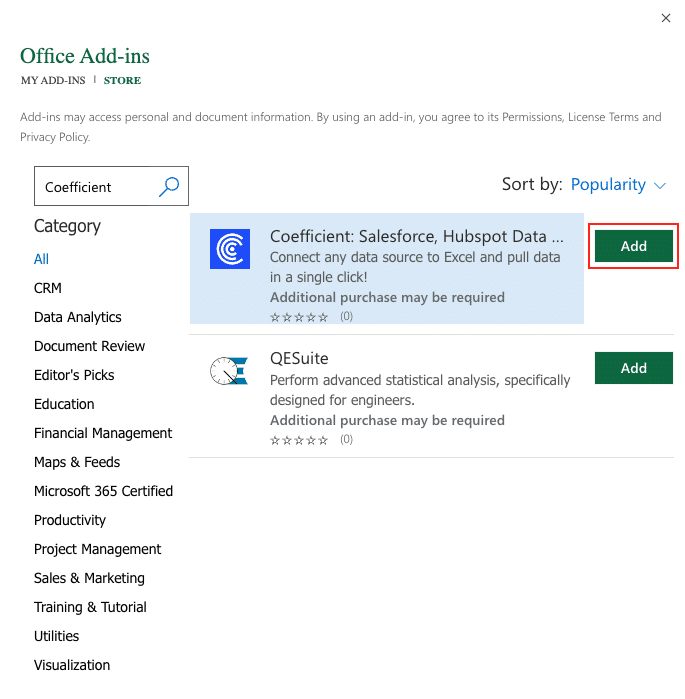
Type “Coefficient” in the search bar and click ‘Add.’
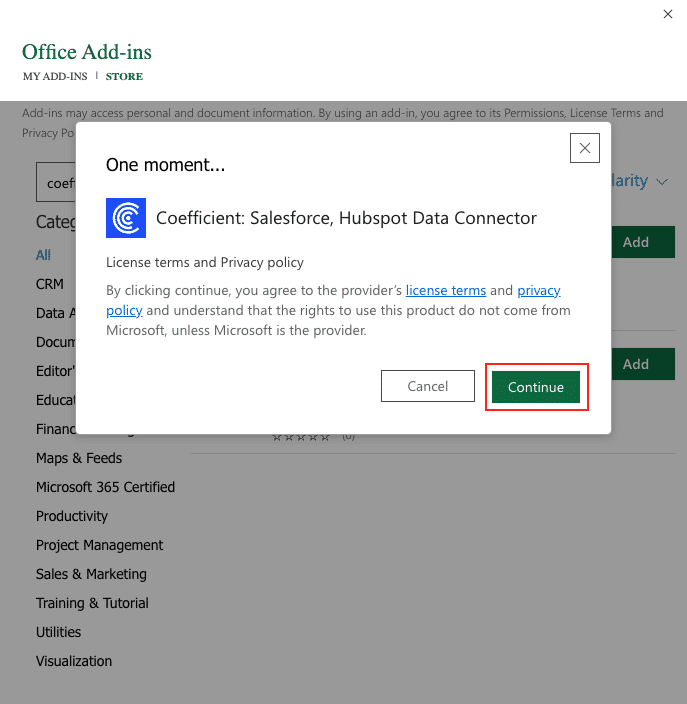
A pop-up will open up. Follow the prompts to complete the installation.
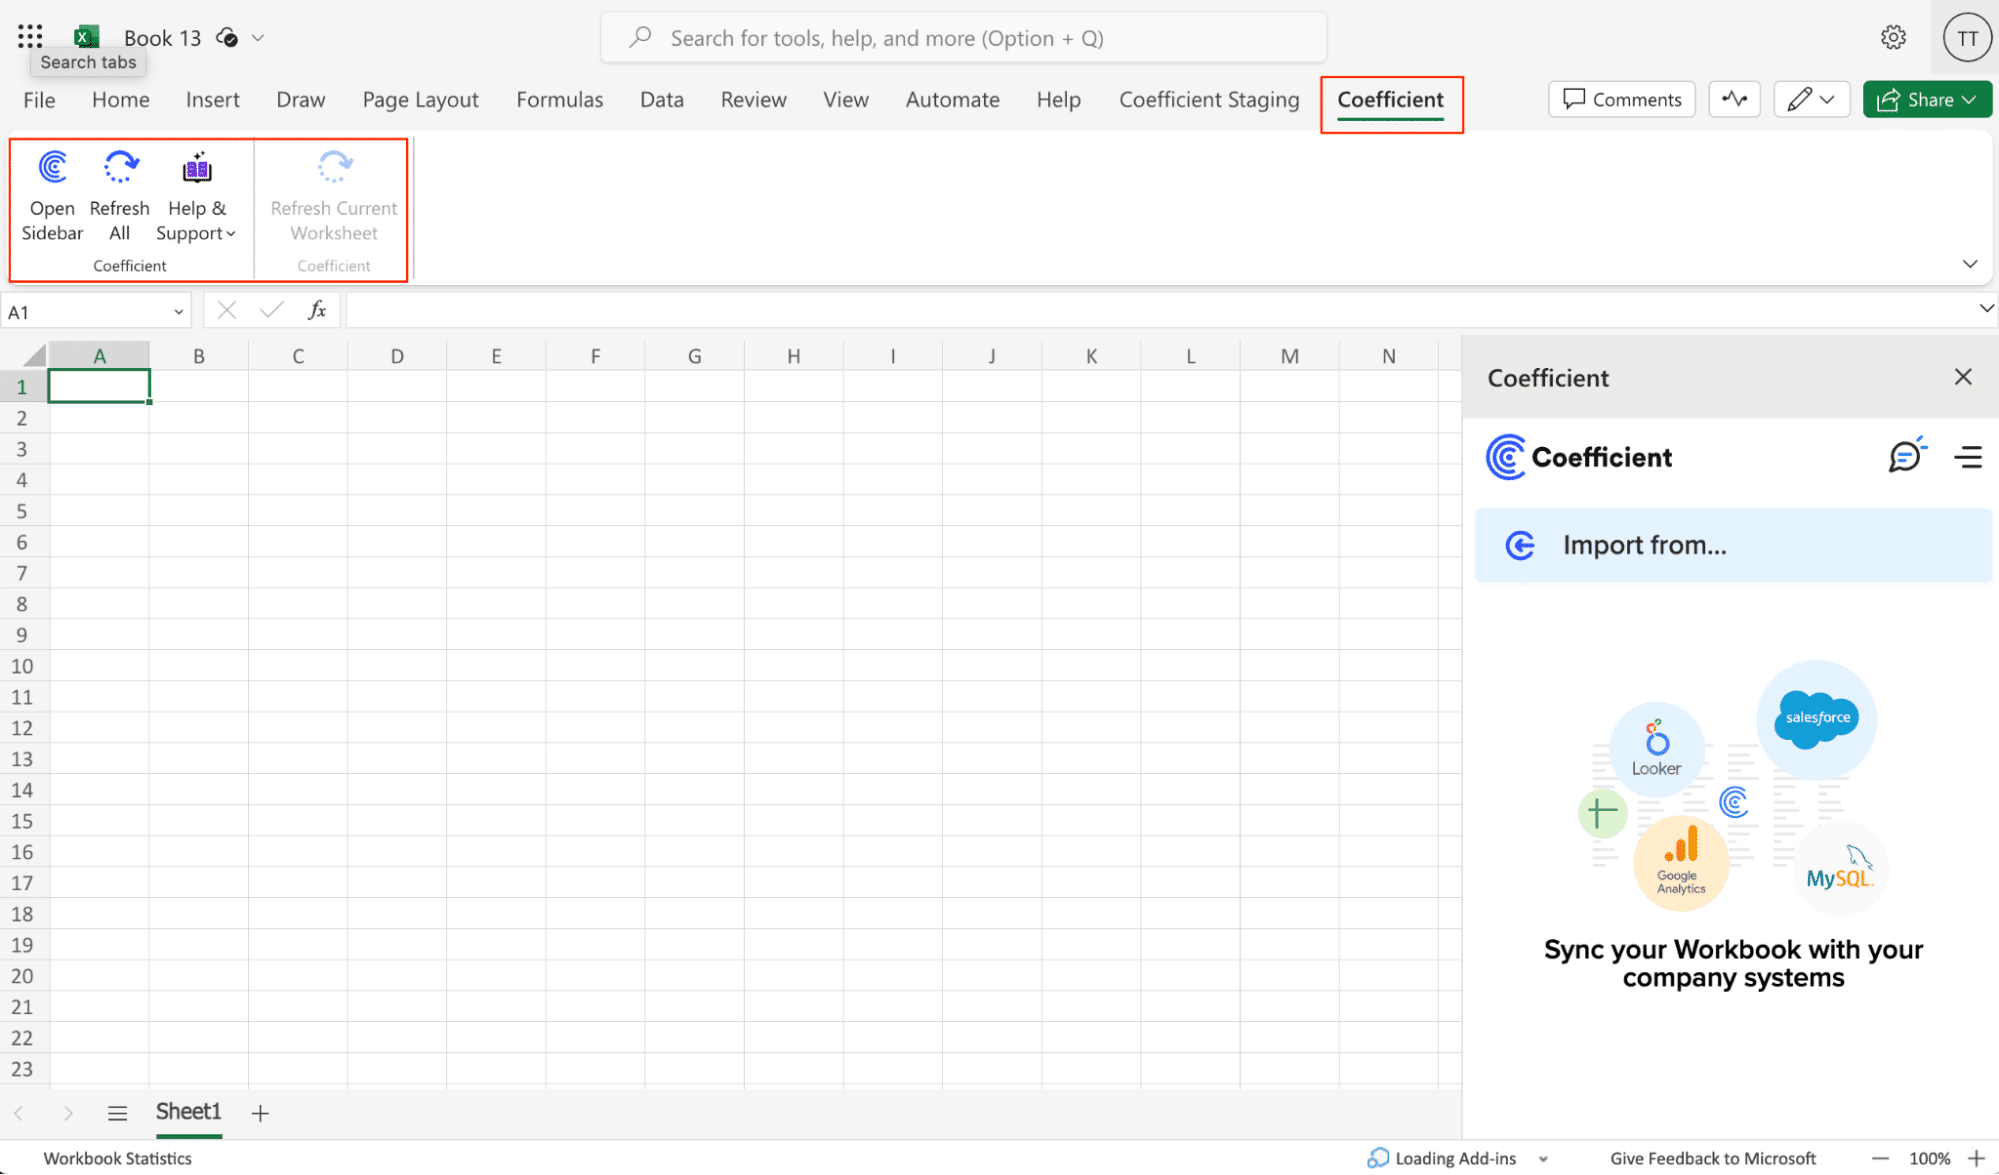
Once finished, you will see a “Coefficient” tab at the top navigation bar.
Click ‘Open Sidebar’ to launch Coefficient.
Now, let’s connect Excel to Snowflake.
Select ‘Import from…’ and scroll down to Snowflake. Click ‘Connect.’
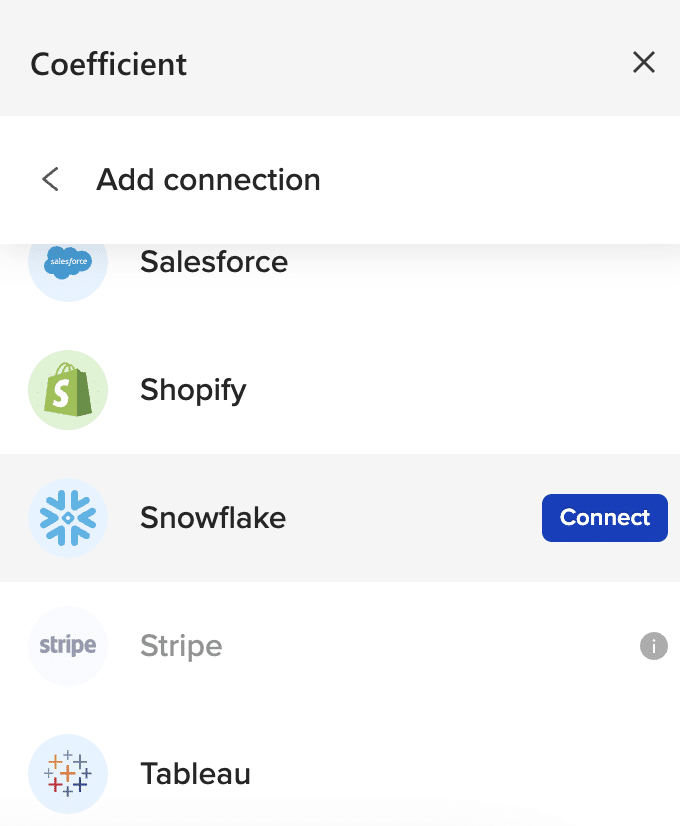
Note: For initial Snowflake imports, choose between account credentials or Snowflake OAuth (used in this example). Ensure your Snowflake Admin has configured OAuth for your domain before using this feature.
If your domain’s Snowflake OAuth is properly configured, the Account is automatically populated and you only need to enter the Database name and/or Warehouse name (Optional).
Click ‘Authorize’ to proceed.
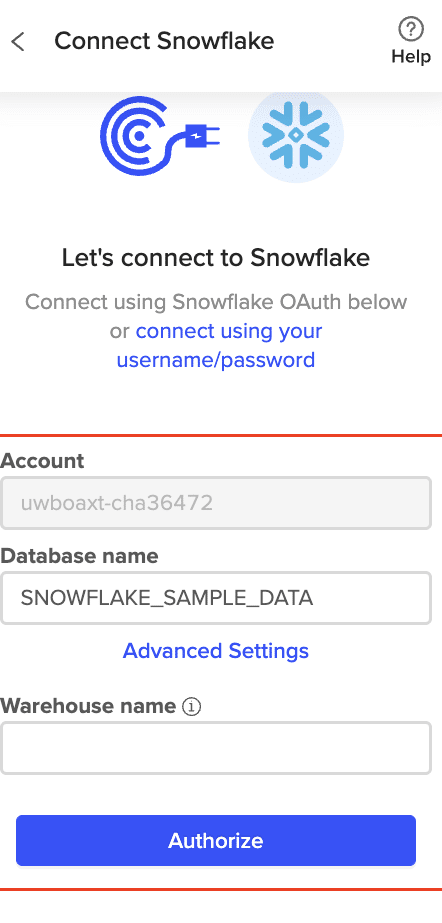
Sign in to your Snowflake account. If successful, you can now proceed with creating Snowflake imports using Coefficient.

After connecting to Snowflake, select your preferred method for importing data.
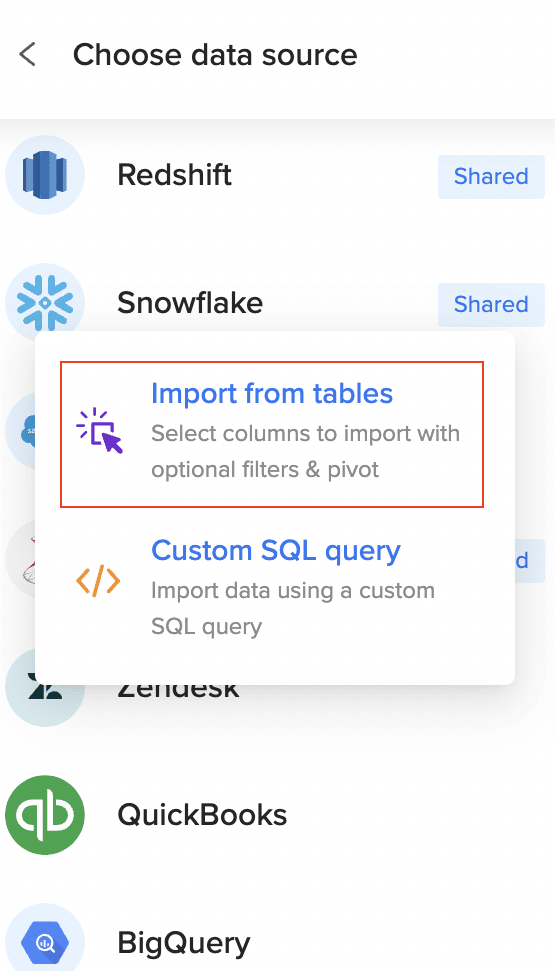
Select ‘Import from Tables,’ to configure your Snowflake import using Coefficient’s visual Import Preview Window.
Start by selecting the table you would like to pull data from.
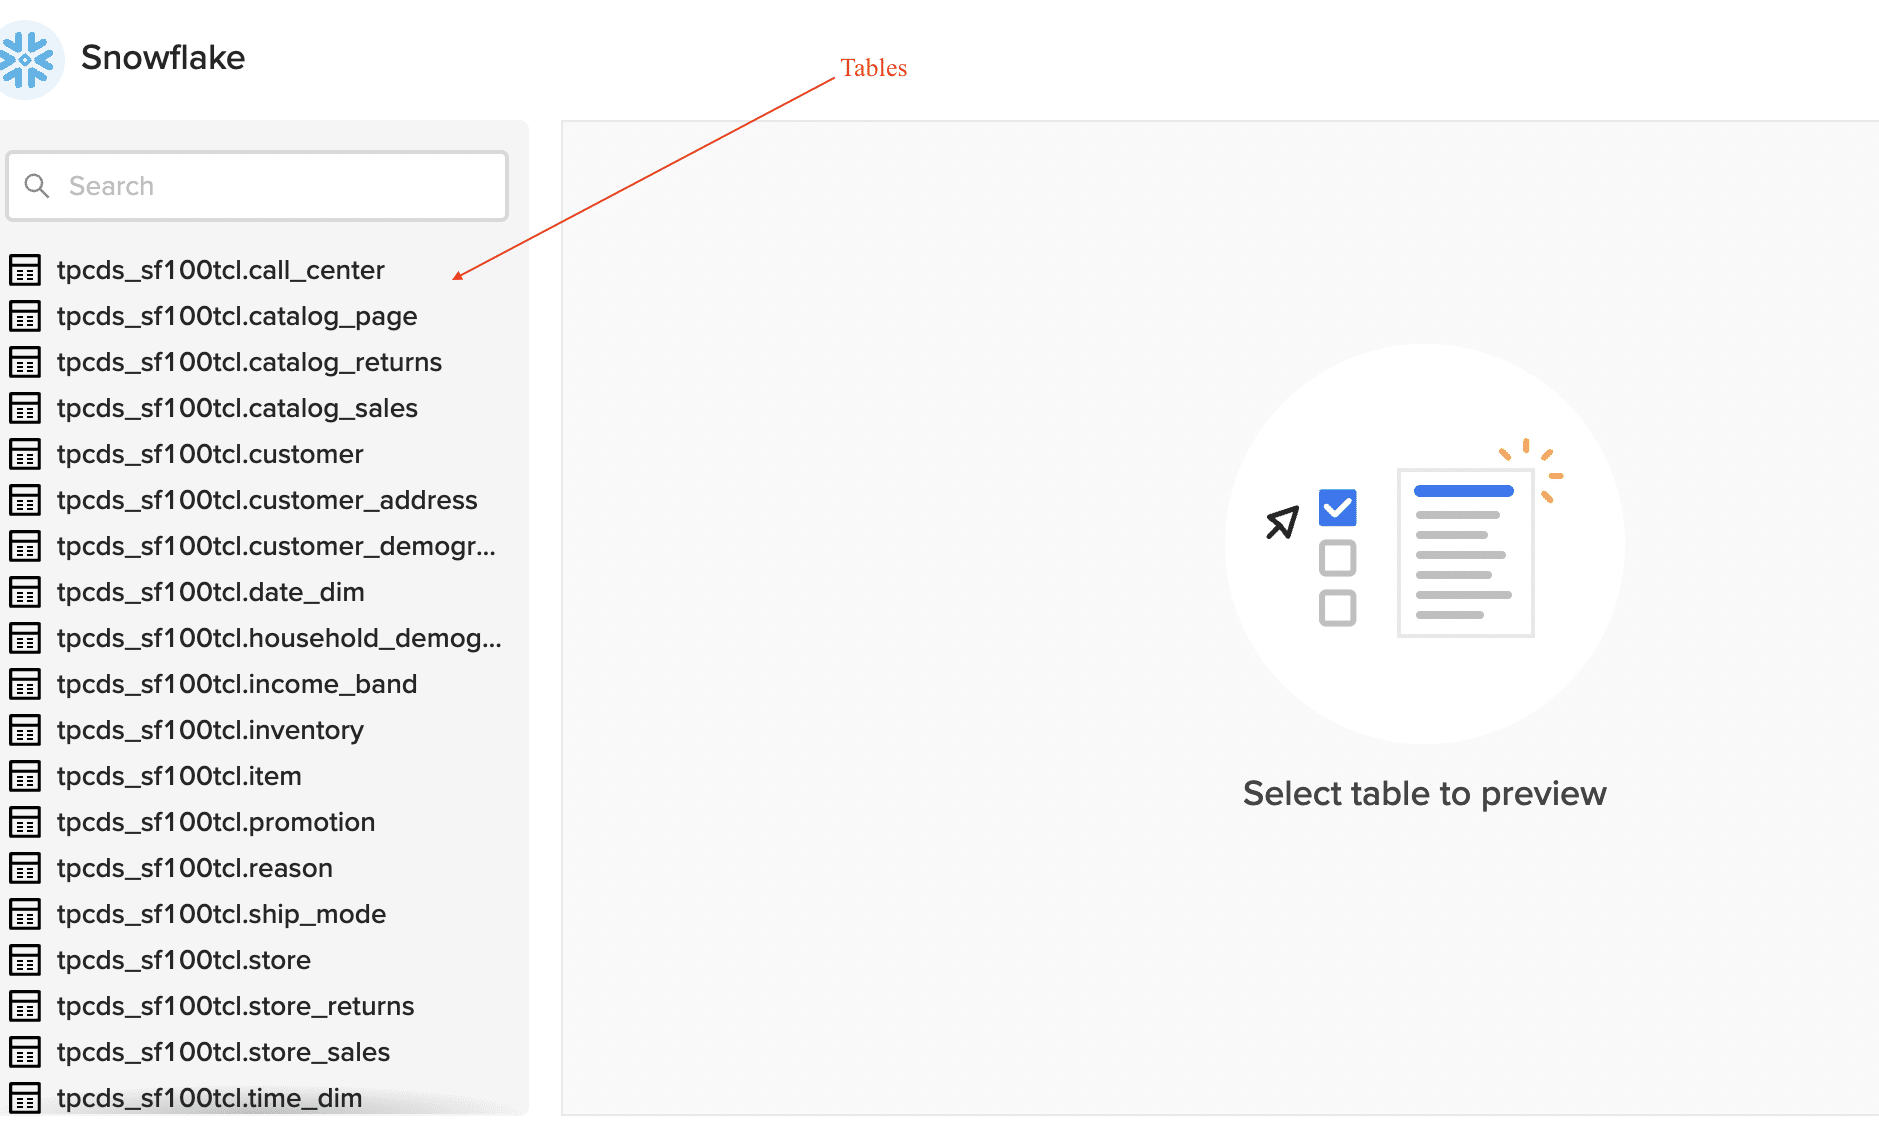
After selecting your table, the Data Preview will display a sample (first 50 rows) and list available fields/columns for import.
To include or exclude values, select or deselect them on the left. You can rearrange column order by dragging and dropping headers. Use the options at the top for filtering, sorting, setting limits, and creating pivots.
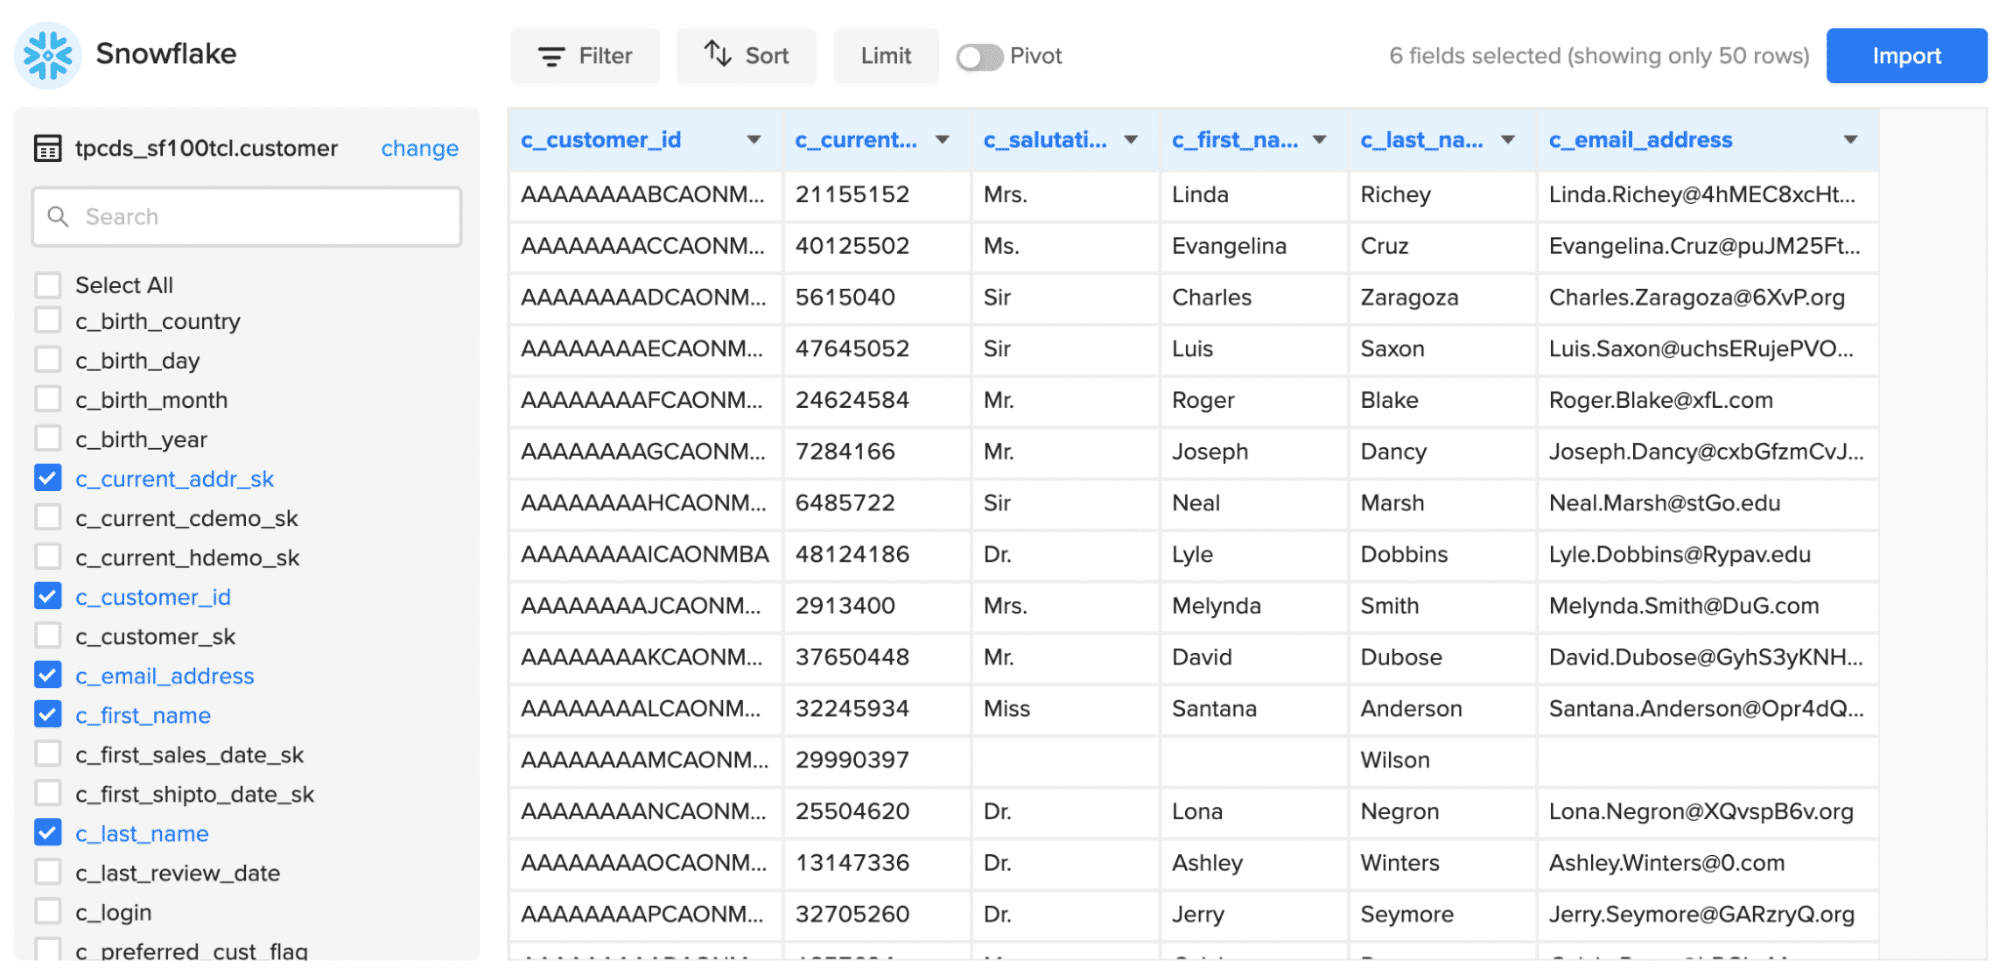
Once ready, click ‘Import.’
Congratulations on your successful import from a Snowflake table!
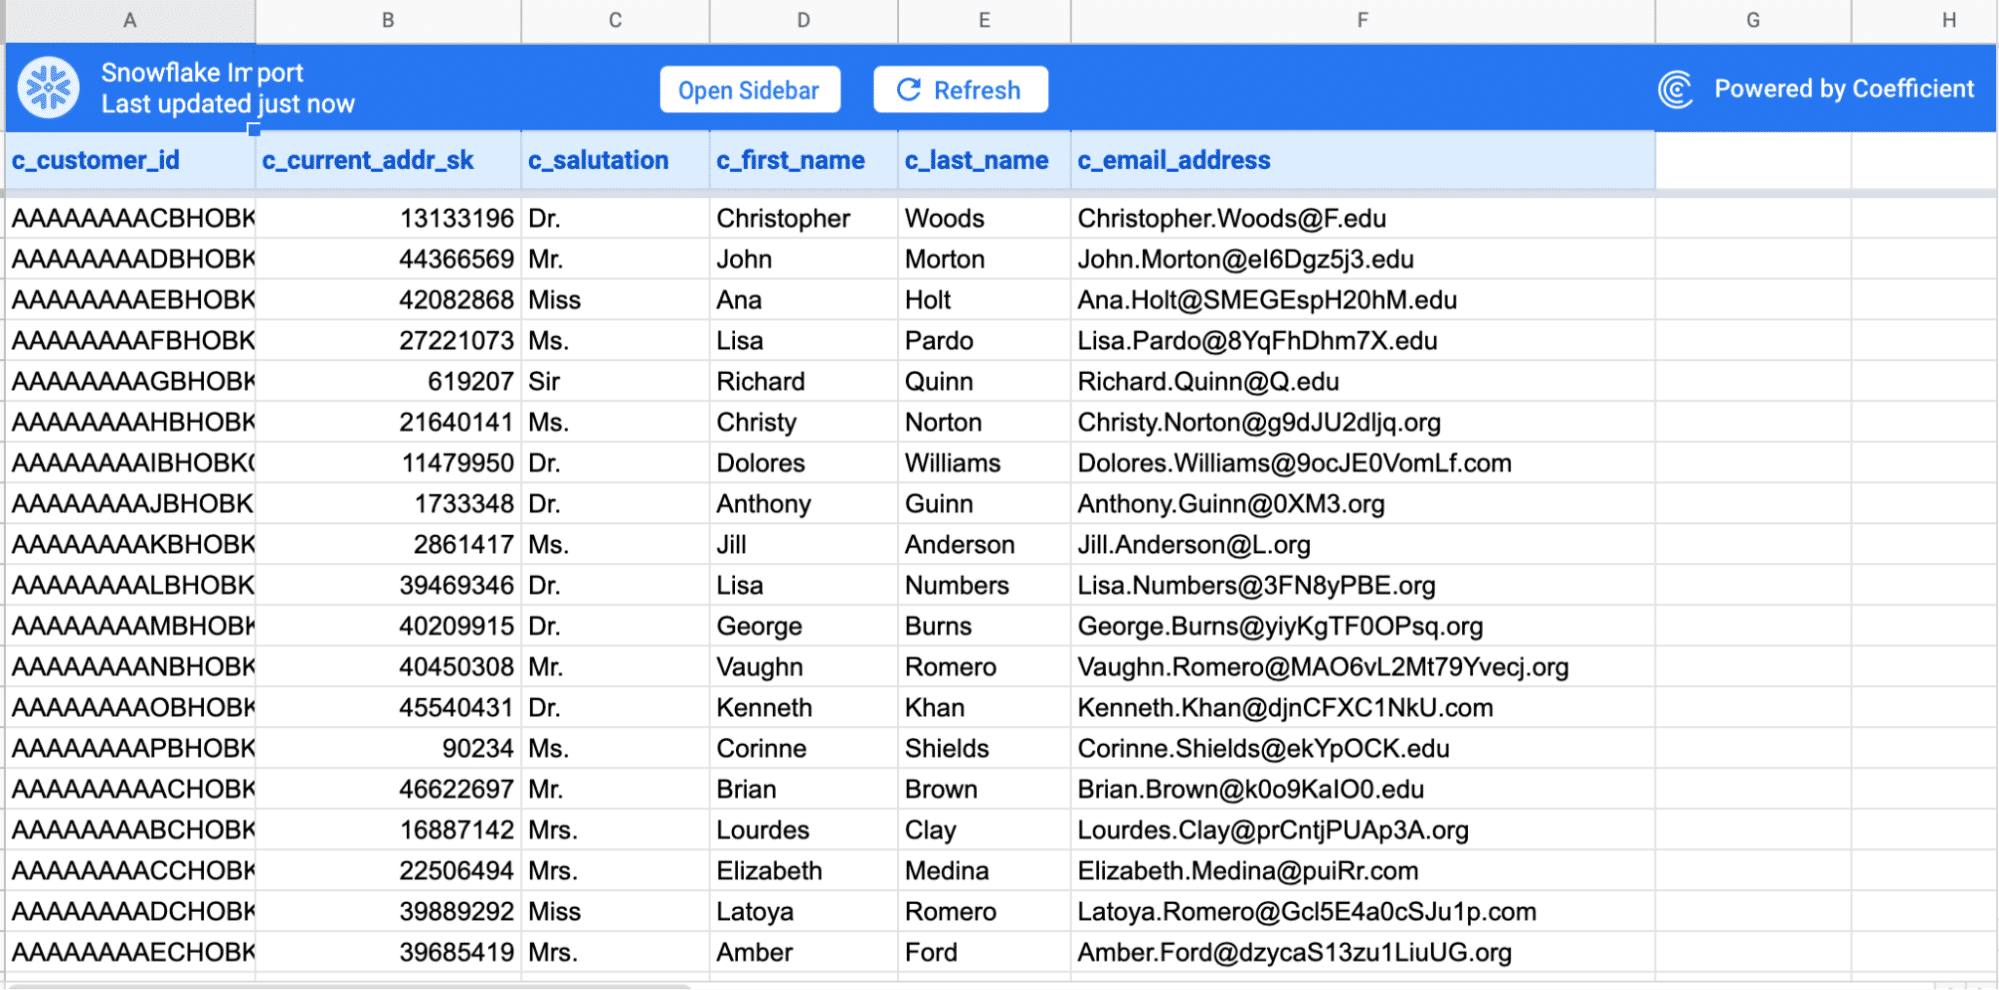
What happens if you update your Snowflake database and tables?
Coefficient has you covered, so you won’t need to import your tables every time your Snowflake data changes.
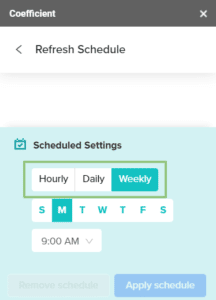
Use the app’s auto-refresh feature to schedule automatic data syncing hourly, daily, or weekly.
Method 2. Connecting Through ODBC
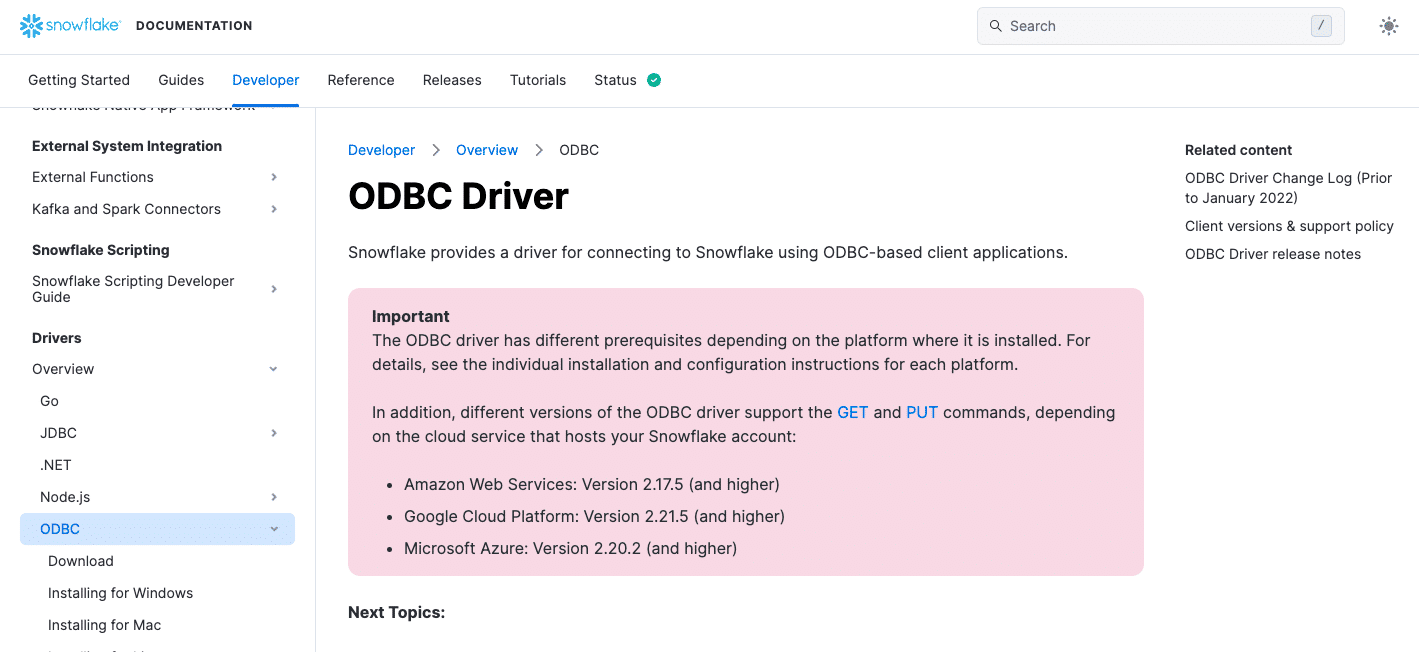
For users who prefer manual control and customization of their data connections, Excel’s desktop version offers ODBC capabilities for direct setup.
This approach requires configuring the Snowflake ODBC driver and setting up a Data Source Name (DSN) specifically for Excel to utilize.
Limitations of Connecting Excel to Snowflake through ODBC:
- Complex Setup: Requires a deeper understanding of ODBC configurations and might involve a steep learning curve for some users.
- Maintenance Effort: Manual updates and checks may be necessary to ensure the stability of the connection.
Steps to Connect:
- Download and configure the Snowflake ODBC driver.
- Set up a DSN within your system preferences.
- Connect Excel to Snowflake using the ODBC connection, allowing for direct data import and analysis.
Method 3. Export Snowflake Table Data to Local CSV Format
Exporting data from Snowflake to a local CSV format offers another pathway for data analysis in Excel, especially when dealing with simpler data extraction needs.
Pros:
- This method is fairly straightforward for exporting data into a format readily compatible with Excel.
- SnowSQL supports a variety of command line options to customize your data output as needed.
Cons:
- Requires knowledge of SnowSQL commands and configurations, presenting a learning curve for those not familiar with SQL.
- Exporting large datasets or multiple reports frequently can become labor-intensive.
Steps to Connect:
Exporting table data from Snowflake to local CSV format and connecting Snowflake with Excel is a pretty straightforward process.
Start by installing and setting up a Snowsql command line option that lets you format and redirect the table output to the local CSV file.
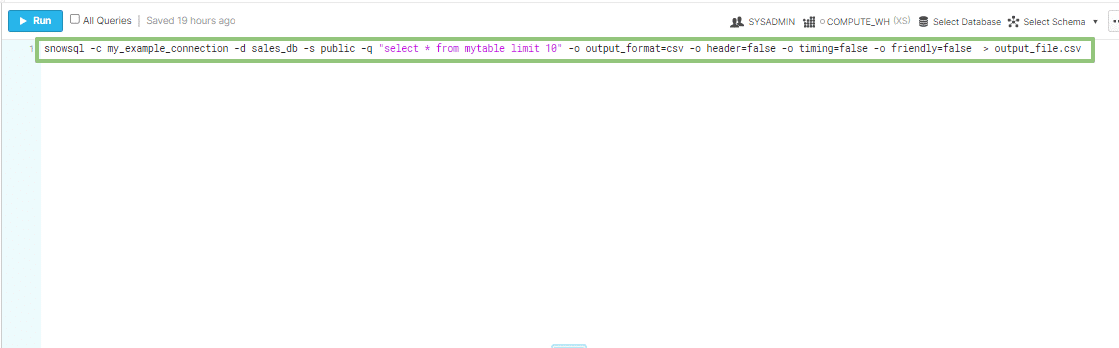
For this example, let’s use the Snowsql command below.
snowsql -c my_example_connection -d sales_db -s public -q “select * from mytable limit 10” -o output_format=csv -o header=false -o timing=false -o friendly=false > output_file.csv
For enhanced security, utilize a connection file when exporting Snowflake data to avoid repeatedly entering passwords. After setting up SQL environment variables and installing the Snowsql command line tool, use your connection file and SQL query for exports.
For instance, to export a simple table, you could use:
snowsql -c myconnection -q “select * from E_DEPT” -o output_format=csv -o header=false -o timing=false -o friendly=false -o output_file=D:Snowflakeexportdept_file.csv
Or, alternatively:
snowsql -c myconnection -q “select * from E_DEPT” -o output_format=csv -o header=false -o timing=false -o friendly=false > dept_file.csv
Your connection file should contain all necessary login details. The duration for Snowsql to complete the export depends on the size and complexity of your data.
To view the contents of dept_file.csv, use the following command:
D:Snowflakeexport>more dept_file.csv
This will display the data in a double-quoted format by default, such as:
“1”,”Engineering”
“2”,”Support”
Next Steps: Connect Excel to Snowflake the Easy Way
While several methods exist to link Snowflake data with Excel, Coefficient provides an accessible, time-efficient solution ideal for teams transitioning to Snowflake.
By automating critical aspects of data import and synchronization, Coefficient optimizes workflows, thereby boosting productivity and analysis precision.
Try Coefficient for free today! Simplify your Snowflake to Excel connection and unlock powerful data analysis capabilities with minimal effort.