Connecting NetSuite to Snowflake helps businesses make better use of their financial data.
This guide explains three ways to link these systems, suitable for different skill levels. You’ll learn how each method works and how to choose the best one for your needs.
Advantages of Connecting NetSuite to Snowflake
- Streamline financial reporting: Pull NetSuite financial data into Snowflake to create comprehensive reports that combine financial metrics with operational data from other sources.
- Enhance customer analytics: Merge NetSuite customer data with web analytics in Snowflake to gain deeper insights into customer behavior and purchasing patterns.
- Optimize inventory management: Combine NetSuite inventory data with sales forecasts stored in Snowflake to improve stock levels and reduce carrying costs.
Connect NetSuite to Snowflake: Top 3 Methods
| Solution | Best For |
| Coefficient | Non-technical users seeking a no-code solution for connecting NetSuite to Snowflake via Google Sheets |
| Fivetran | Organizations requiring automated, continuous data replication from NetSuite to Snowflake |
| Estuary | Companies needing real-time data integration with customizable transformation capabilities |
Method 1: Coefficient

Coefficient is a Google Sheets and Excel add-on that connects spreadsheets to NetSuite and Snowflake. It lets you import data from NetSuite, work with it in your spreadsheet, and then export it to Snowflake.
Step 1. Install Coefficient
For Google Sheets
- Open a new or existing Google Sheet, navigate to the Extensions tab, and select Add-ons > Get add-ons.
- In the Google Workspace Marketplace, search for “Coefficient.”
- Follow the prompts to grant necessary permissions.
- Launch Coefficient from Extensions > Coefficient > Launch.
- Coefficient will open on the right-hand side of your spreadsheet.

For Microsoft Excel
- Open Excel from your desktop or in Office Online. Click ‘File’ > ‘Get Add-ins’ > ‘More Add-Ins.’
- Type “Coefficient” in the search bar and click ‘Add.’
- Follow the prompts in the pop-up to complete the installation.
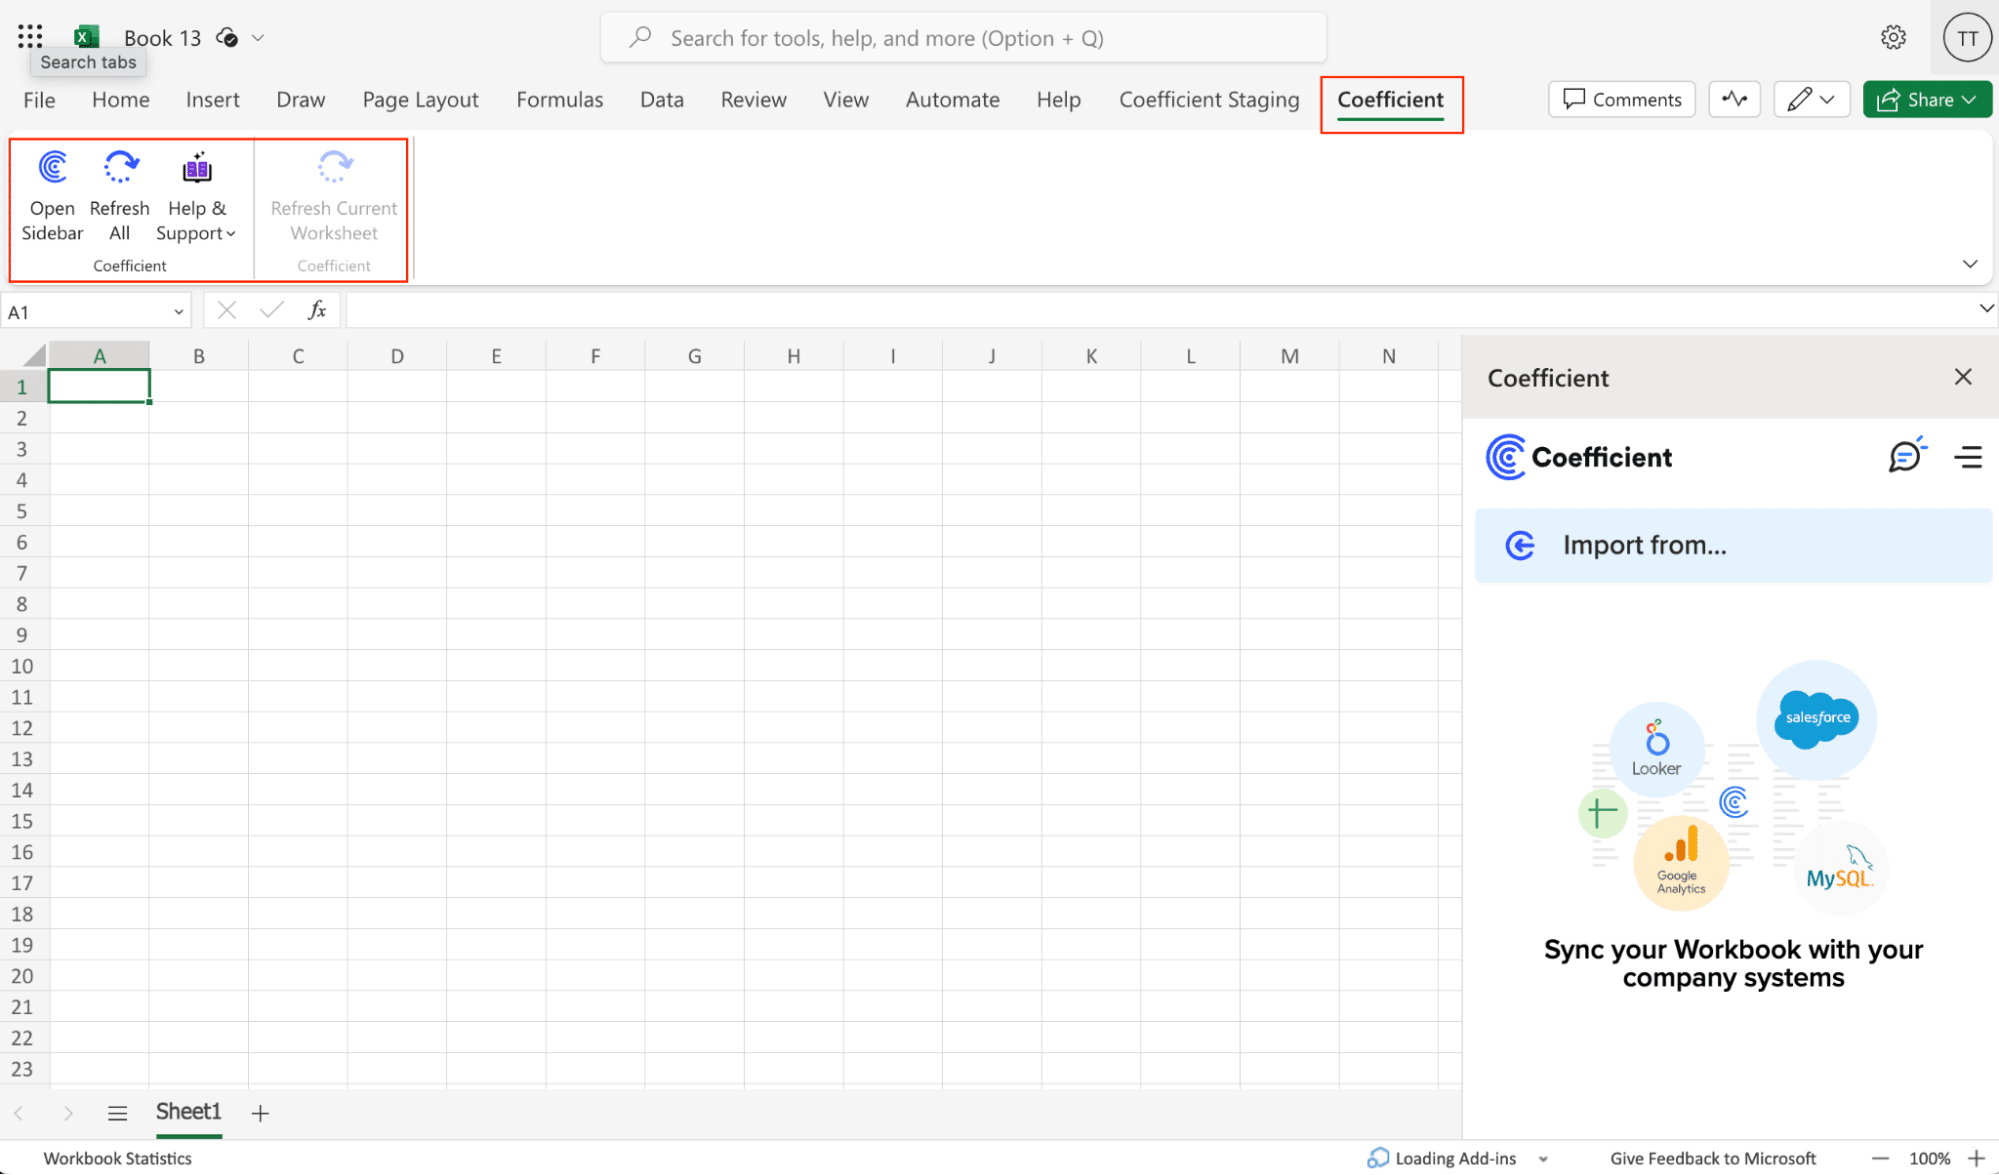
- Once finished, you will see a “Coefficient” tab in the top navigation bar. Click ‘Open Sidebar’ to launch Coefficient.
Step 2. Connect and Import Data from NetSuite
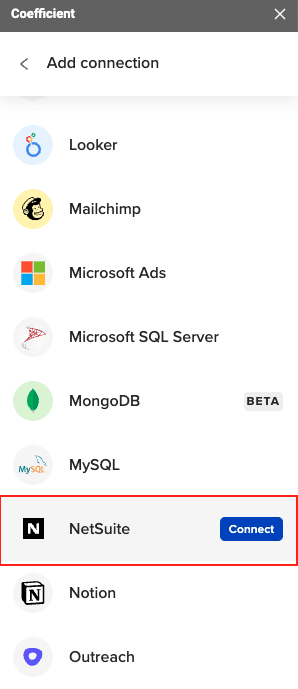
- Open Coefficient Sidebar: In the Coefficient sidebar, click Import from…, then select NetSuite.
- Authenticate NetSuite: Follow the prompts to authenticate and connect your NetSuite account.
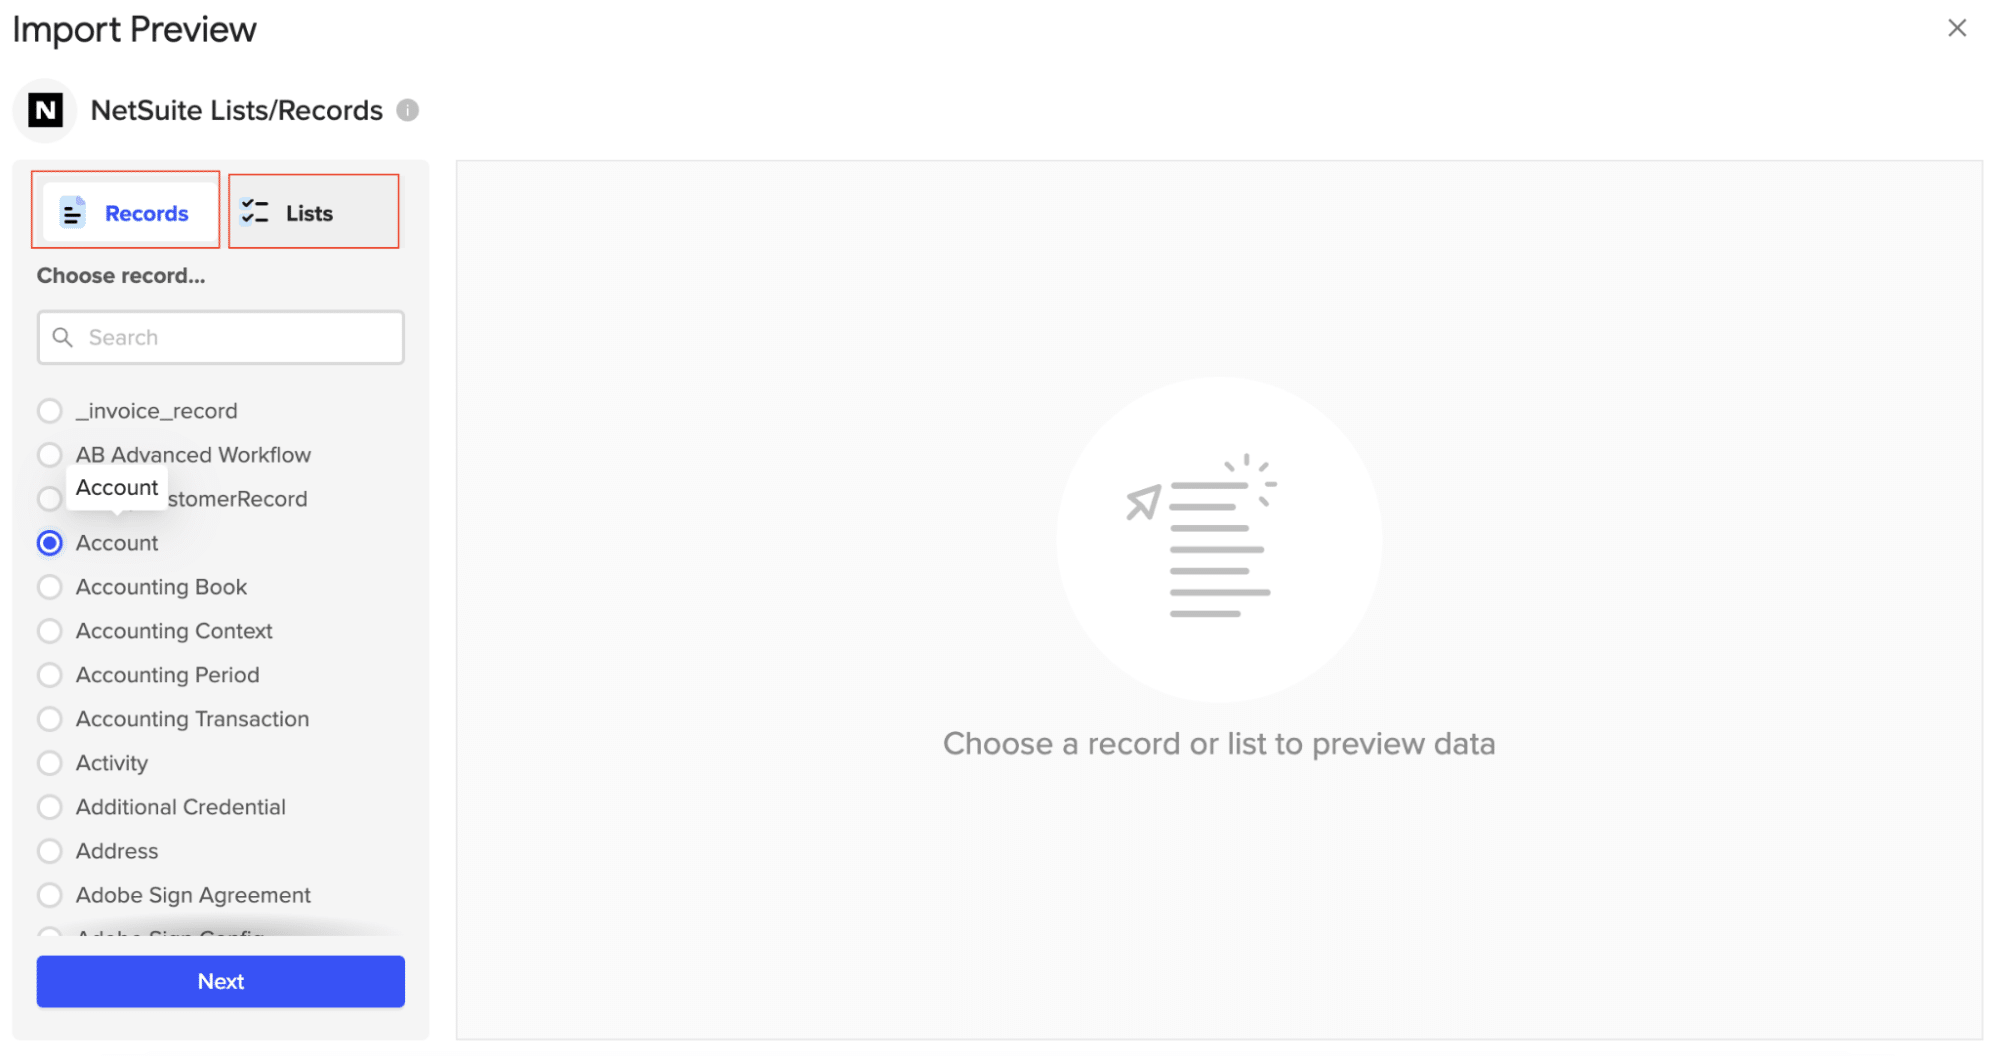
- Select Data: Choose the data you need from NetSuite. Configure any necessary filters and click
Import. Your NetSuite data will populate in your spreadsheet.
Step 3. Export NetSuite Data to Snowflake
Open Coefficient’s menu and click “Export to…”
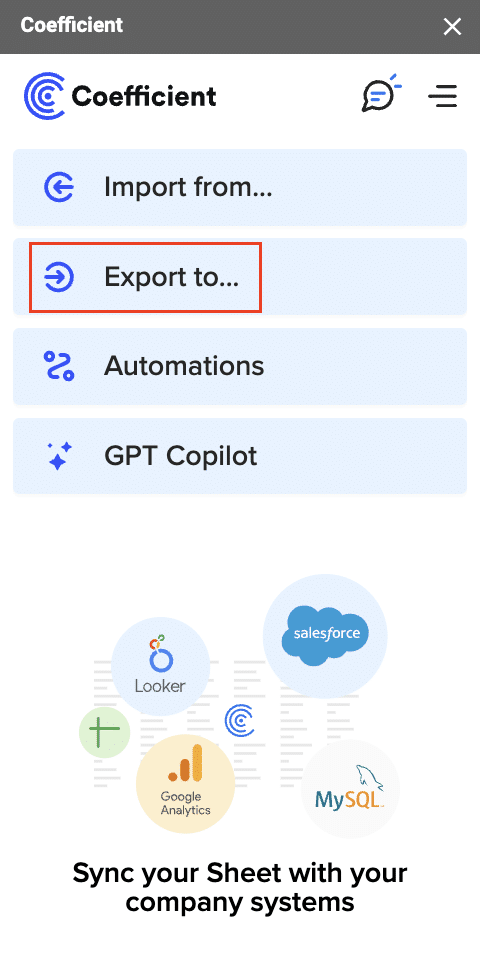
Choose Snowflake from the list.
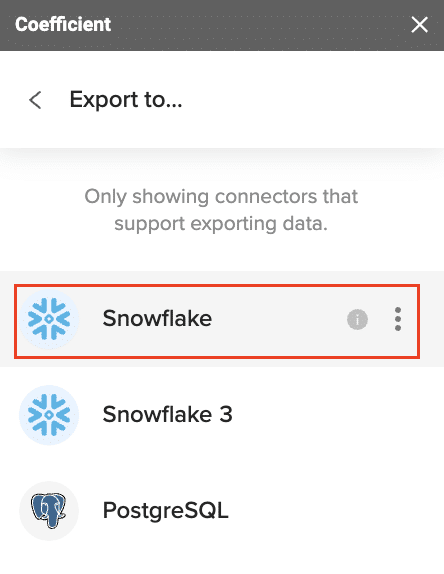
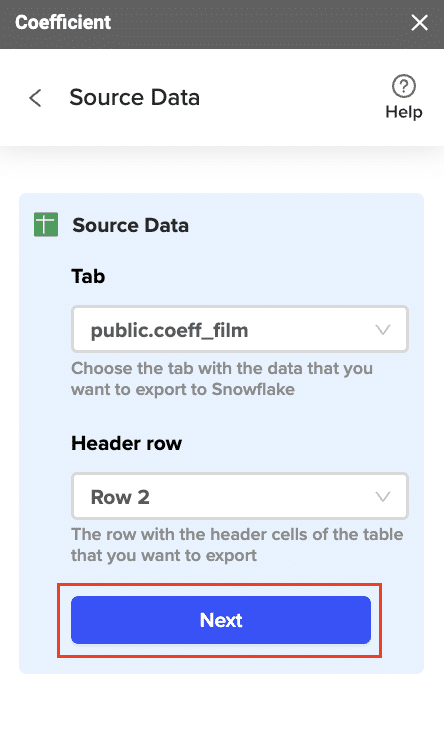
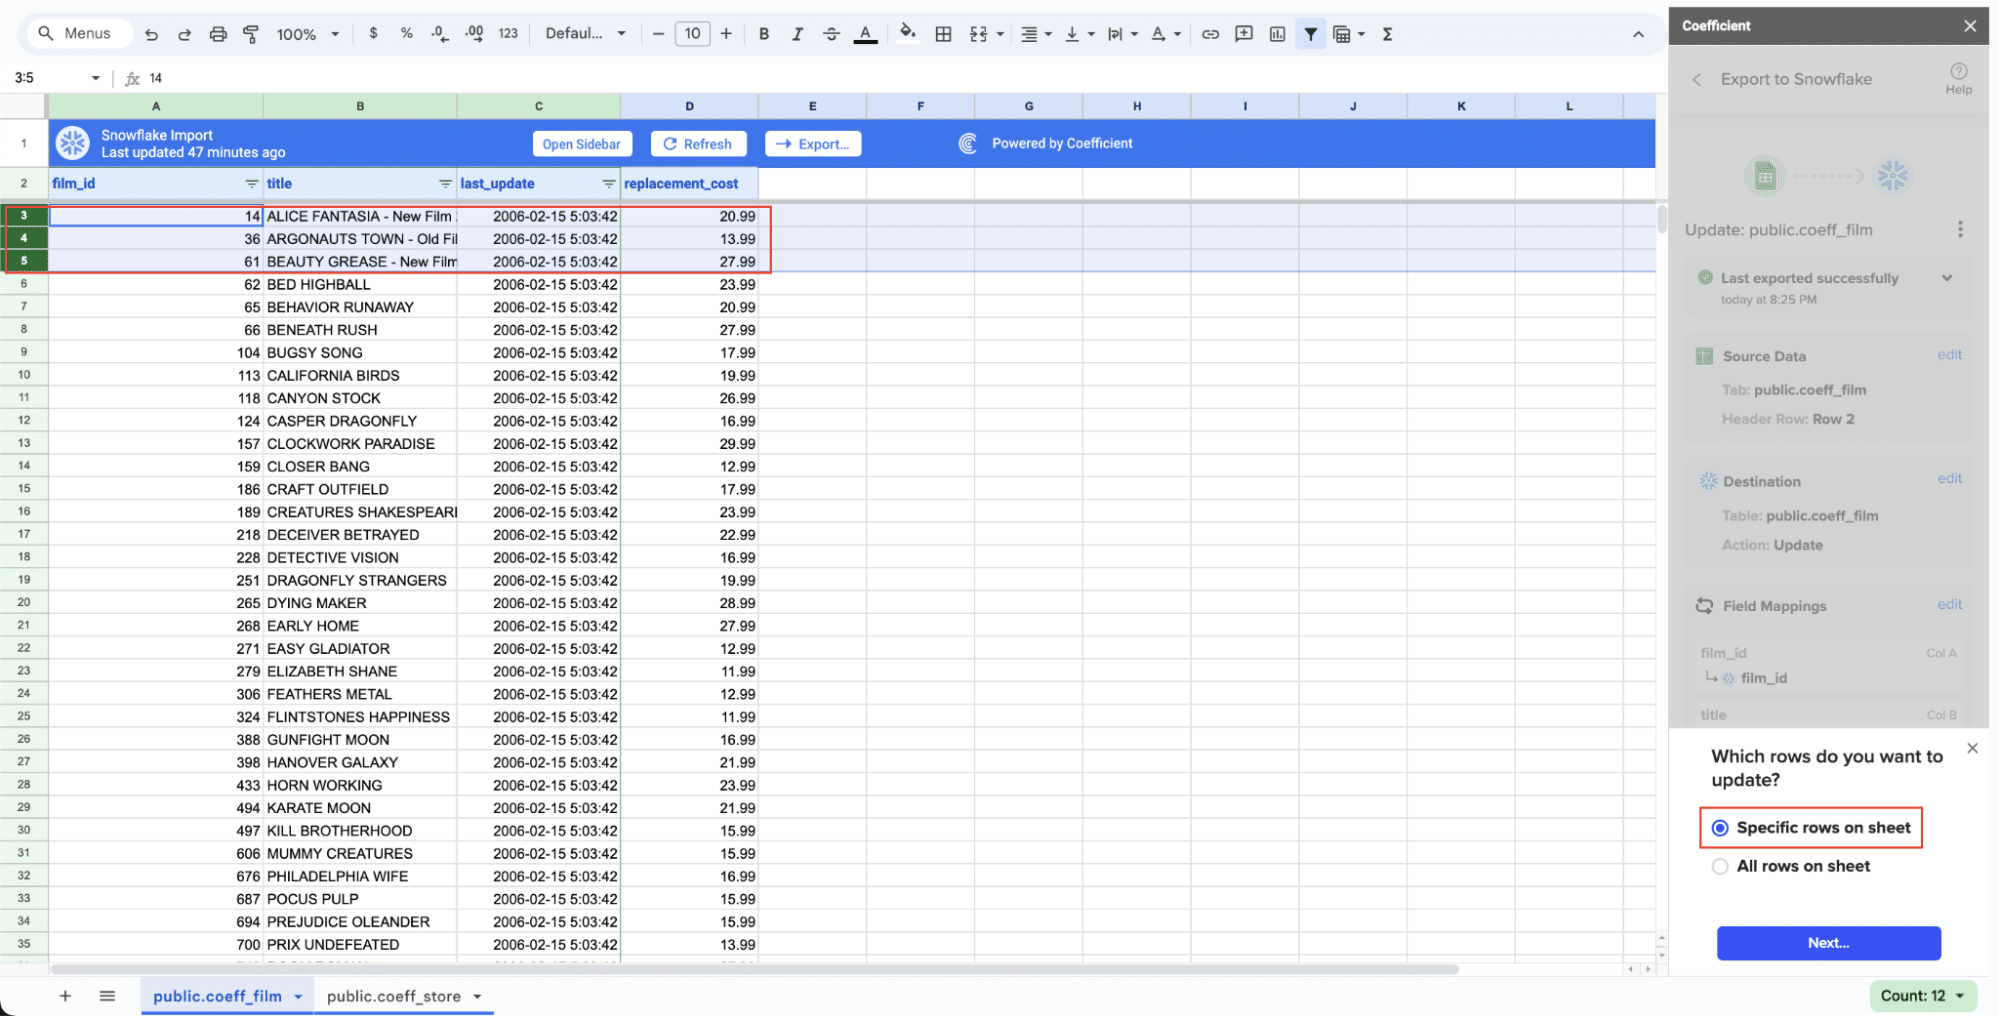
Select the data in your spreadsheet to export.
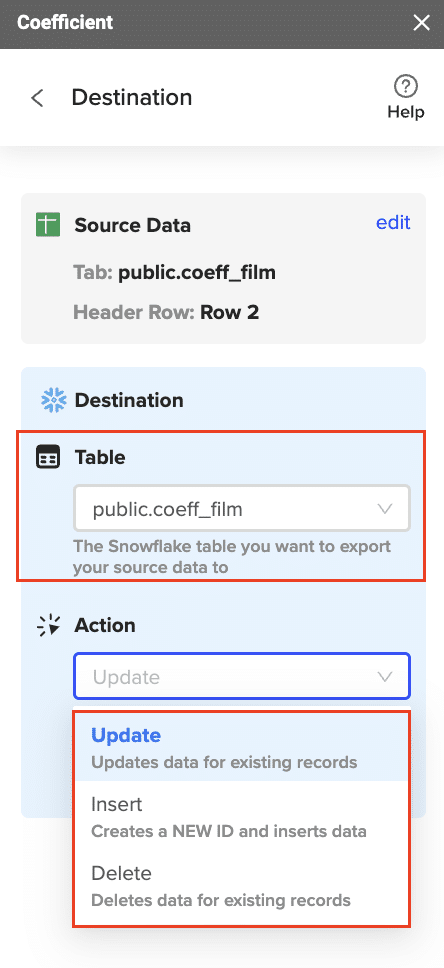
Pick the Snowflake table to update and choose the action: Update, Insert, Upsert, or Delete.
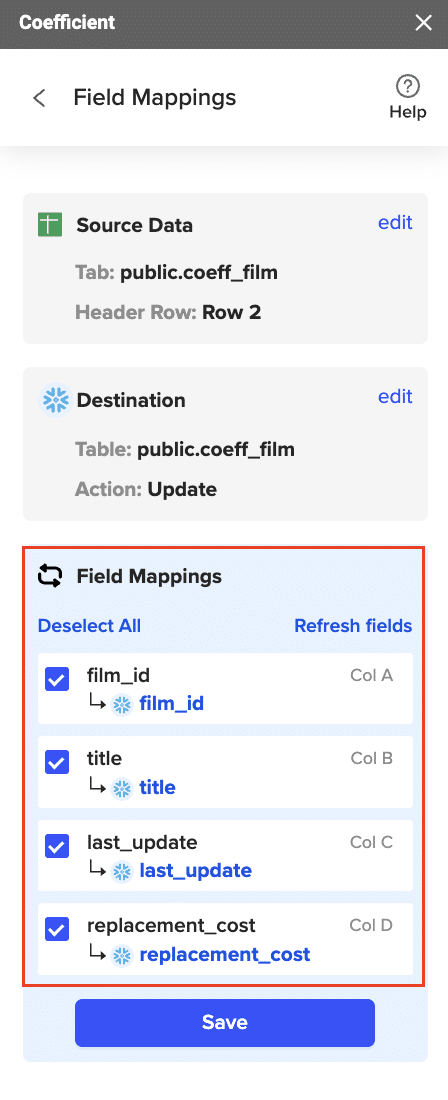
Map spreadsheet fields to Snowflake fields.
Set any additional options like batch size.
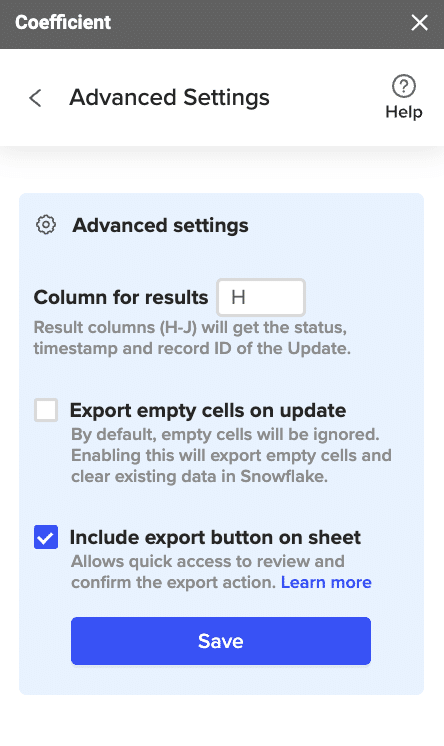
Review your settings and click “Export.”
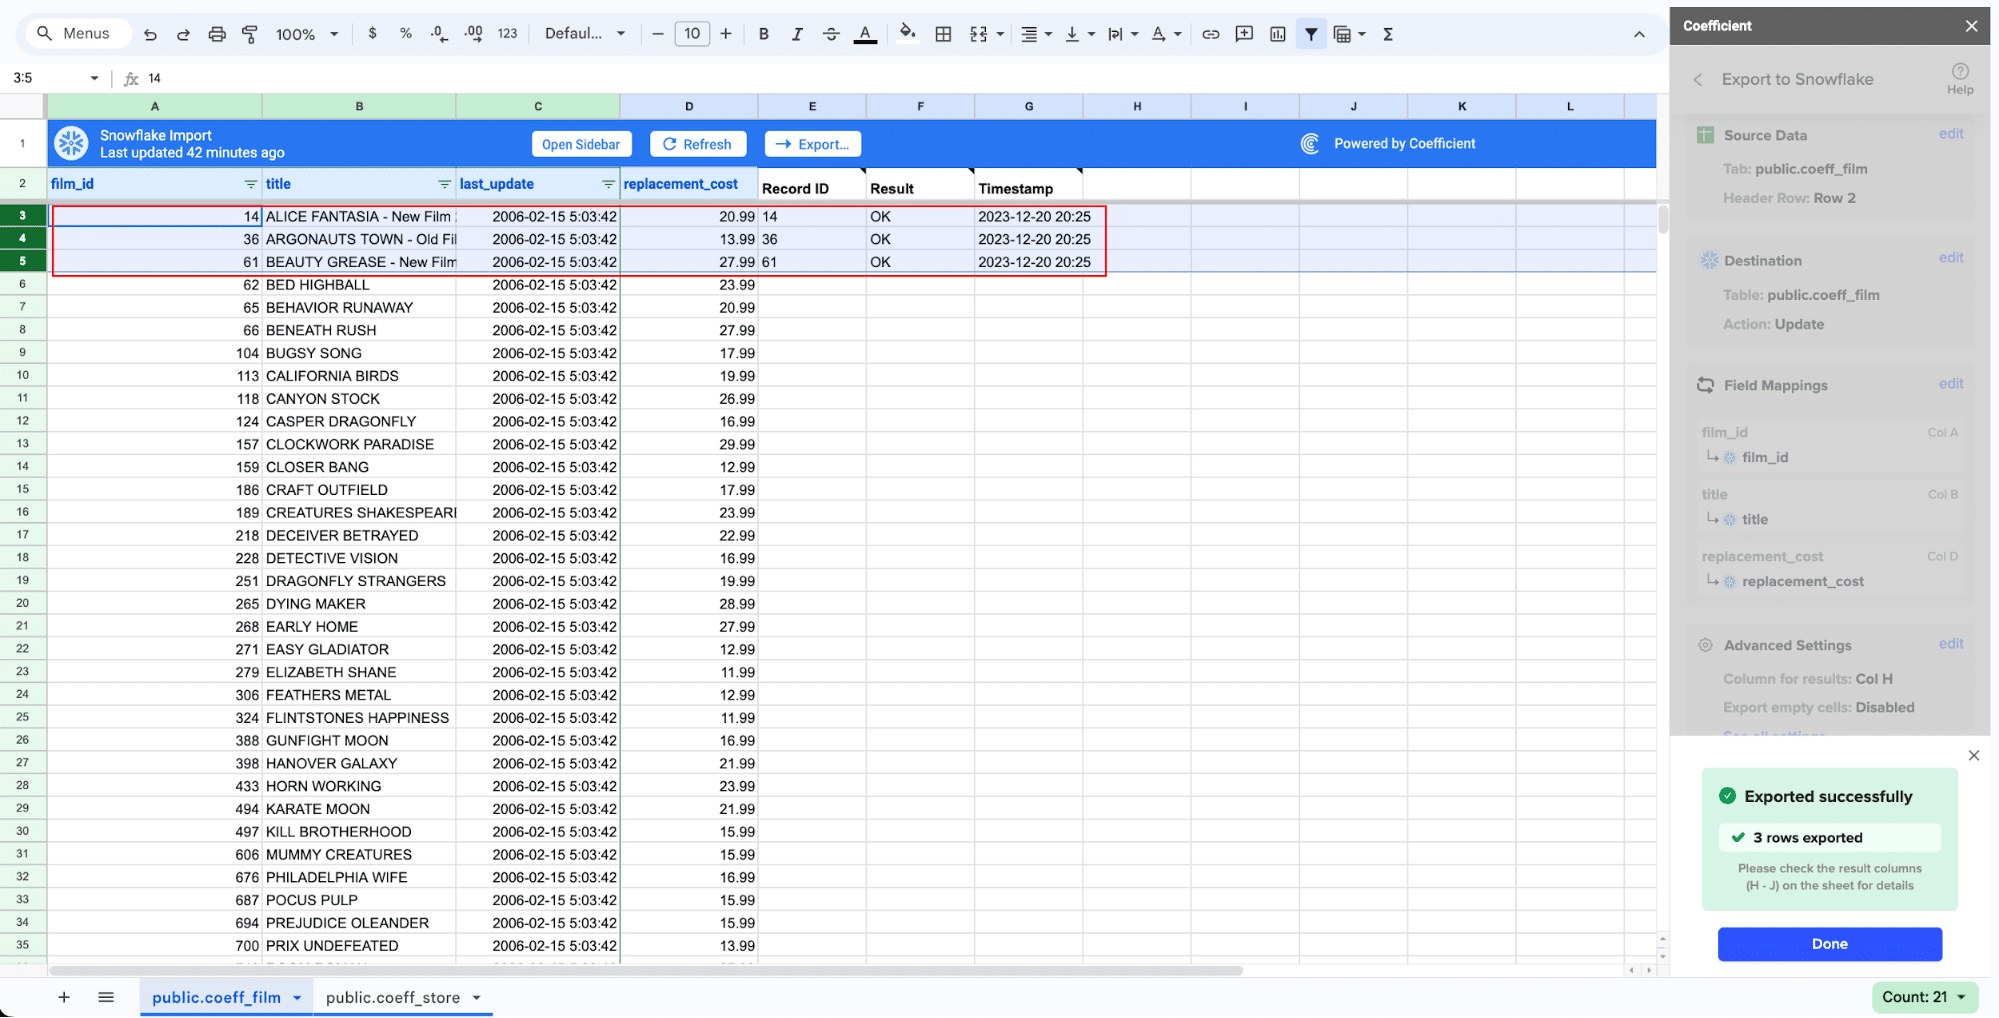
Confirm your changes when prompted.

Coefficient will update Snowflake and show the results in your spreadsheet.
Pros and Cons:
Pros:
- No coding required: Perfect for non-technical users.
- User-friendly interface: If you can use a spreadsheet, you can use Coefficient.
- Flexible data transformation: Use your spreadsheet to clean and transform your data before sending it to Snowflake.
Cons:
Want to learn more about connecting NetSuite to Google Sheets? Check out our detailed guide here.
Method 2: Fivetran
Fivetran is a data integration service. It automatically copies data from NetSuite to Snowflake at set intervals.
Here is how you can connect NetSuite to Snowflake with Fivetran
Step 1. Sign up for Fivetran
- Visit the Fivetran website.
- Click on “Start Free Trial” or “Sign Up.”
- Provide your business email and other required information.
- Complete the registration process.
Step 2. Set up Snowflake connection
- Log in to your Snowflake account.
- Navigate to “Partner Connect.”
- Search for and select Fivetran.
- Click “Connect” to set up the integration.
- Specify the desired Snowflake warehouse and database.
- Ensure that the necessary Snowflake objects and permissions are automatically or manually configured.
Step 3. Add NetSuite connector
- In your Fivetran dashboard, click “Add Connector.”
- Search for and select “NetSuite” (it may be listed as “NetSuite Suite Analytics”).
- Click “Set up connector.”
Step 4. Configure NetSuite connection

Stop exporting data manually. Sync data from your business systems into Google Sheets or Excel with Coefficient and set it on a refresh schedule.

- Provide your NetSuite account ID.
- Enter your NetSuite credentials (username and password).
- Ensure that the necessary roles and permissions are set up in NetSuite to allow API access (this may involve creating or assigning a custom role).
- Select the data you want to sync (e.g., transactions, customers, items).
- Choose your sync frequency.
Step 5. Start the sync
- Review your configuration settings.
- Ensure that all necessary fields and objects are correctly mapped.
- Click “Save & Test” to verify the connection.
- Once successful, click “Start Initial Sync.”
- Be mindful of the data volume to ensure it aligns with your Snowflake setup.
Step 6. Monitor and manage
- Use Fivetran’s dashboard to monitor sync status and data flow.
- Set up alerts for any sync issues or failures.
- Adjust sync settings as needed.
- Take advantage of Fivetran’s automated schema maintenance to ensure your data pipelines adapt to any changes in your NetSuite schema.
Pros and Cons:
Pros:
- The solution provides automated, continuous replication of data from NetSuite to Snowflake, ensuring up-to-date information.
- Fivetran offers pre-built connectors and optimized schemas for NetSuite data in Snowflake, simplifying the setup process.
- Once configured, the integration requires minimal ongoing maintenance, freeing up IT resources.
Cons:
- The initial configuration process may require some technical expertise to set up correctly.
- For organizations with large data volumes, Fivetran’s pricing model can become expensive.
Method 3: Estuary
Estuary is a real-time data pipeline platform. It moves and transforms data between NetSuite and Snowflake as changes occur.
Step 1. Sign up for Estuary
- Visit the Estuary website.
- Click on “Get Started” or “Sign Up.”
- Provide your business email and other required information.
- Complete the registration process.
Step 2. Set up NetSuite as a data source
- In the Estuary dashboard, click “Add Source.”
- Select NetSuite from the list of available connectors.
- Provide your NetSuite account credentials.
- Ensure that the necessary roles and permissions are configured in NetSuite to allow API access (this may involve creating or assigning a custom role).
- Configure the connection settings, such as API endpoints and the scope of the data you want to integrate (e.g., specific modules or data sets).
Step 3. Configure Snowflake as the destination
- In the Estuary dashboard, click “Add Destination.”
- Choose Snowflake from the list of available destinations.
- Enter your Snowflake connection details, including account name, username, password, warehouse, database, and schema.
- Test the connection to ensure it’s properly configured and that the necessary Snowflake objects and permissions are in place.
Step 4. Define data transformations (if needed)
- Click on “Add Transformation” in your data flow.
- Use Estuary’s transformation language or interface to define any data manipulations required (e.g., data filtering, aggregation, or format changes).
- Test your transformations to ensure they produce the desired output and align with your Snowflake schema.
Step 5. Set up the data flow
- In the Estuary dashboard, create a new data flow.
- Select your NetSuite source and Snowflake destination.
- Add any transformations you’ve defined earlier.
- Configure flow settings such as batch size, frequency, and error handling protocols to ensure smooth data integration.
Step 6. Start and monitor the real-time data flow
- Review your data flow configuration to ensure everything is set up correctly.
- Click “Start Flow” to initiate the real-time data integration process between NetSuite and Snowflake.
- Use Estuary’s monitoring tools to track data flow, monitor performance, and address any issues or errors that arise during the integration.
Pros and Cons:
Pros:
- Estuary enables real-time data integration between NetSuite and Snowflake, providing the most up-to-date information possible.
- The platform offers customizable transformations, allowing users to tailor the data pipeline to specific business needs.
- Estuary’s architecture can handle large data volumes, making it suitable for scaling businesses.
Cons:
- Implementing and managing Estuary requires a higher level of technical knowledge compared to no-code solutions.
- The platform’s advanced features may present a steeper learning curve for new users.
Get Started with NetSuite-Snowflake Integration Today
Connecting NetSuite to Snowflake can significantly improve your business operations by providing a unified view of your data across both platforms. Whether you choose the flexibility of Coefficient, the automated replication of Fivetran, or the real-time capabilities of Estuary, integrating these powerful systems will streamline your processes and enhance decision-making.
Ready to take the next step? Get started with Coefficient to experience a seamless, no-code integration between NetSuite and Snowflake
For more insights on NetSuite integrations, check out these helpful resources:

