How to Export MSSQL Data to CSV: A Comprehensive Step-by-Step Guide
Looking to export your MSSQL data to CSV format? You’ve come to the right place. In this guide, we’ll walk you through three proven methods to export MSSQL data to CSV, from no-code solutions to technical approaches. By the end, you’ll have the knowledge to choose the best method for your needs and confidently execute the export process.
Advantages of Using CSV Files for MSSQL Data Export
Before diving into the export methods, let’s explore why CSV (Comma-Separated Values) is an excellent choice for exporting MSSQL data:
- Easy to read and edit in spreadsheet applications: CSV files open seamlessly in popular spreadsheet software like Microsoft Excel and Google Sheets. This allows for quick data viewing and editing without specialized tools.
- Universal compatibility across different systems and platforms: CSV is a simple, text-based format that can be read by virtually any system or application. This makes it ideal for sharing data between different platforms or with users who may not have access to MSSQL.
- Efficient for transferring large datasets: CSV files are lightweight and don’t include formatting or complex structures, making them ideal for transferring large amounts of data quickly and efficiently.
- Simplifies data migration and backup processes: The simplicity of CSV files makes them an excellent choice for data migration between systems or creating backups that can be easily restored or imported into other databases.
How to Export MSSQL Data to CSV (Video Walkthrough)
For those who prefer visual learning, we’ve prepared a comprehensive video tutorial demonstrating the process of exporting MSSQL data to CSV:
[Embed relevant YouTube video if available]
Top 3 Methods to Export MSSQL Data to CSV
We’ll explore three distinct methods to export MSSQL data to CSV, catering to different skill levels and requirements:
- No-code solution using Coefficient
- Technical setup using SQL Server Management Studio (SSMS)
- Manual method using T-SQL commands
Let’s dive into each method in detail.
#1 No-code Solution (Coefficient)

Coefficient is a powerful data integration tool that simplifies the process of exporting MSSQL data to CSV.
It offers a user-friendly interface and automated scheduling capabilities, making it an excellent choice for users who prefer a no-code approach.
Step 1. Install Coefficient
For Google Sheets: Open Google Sheets, go to the Extensions tab, select Add-ons, then Get add-ons. Search for “Coefficient” and follow the prompts to install it.
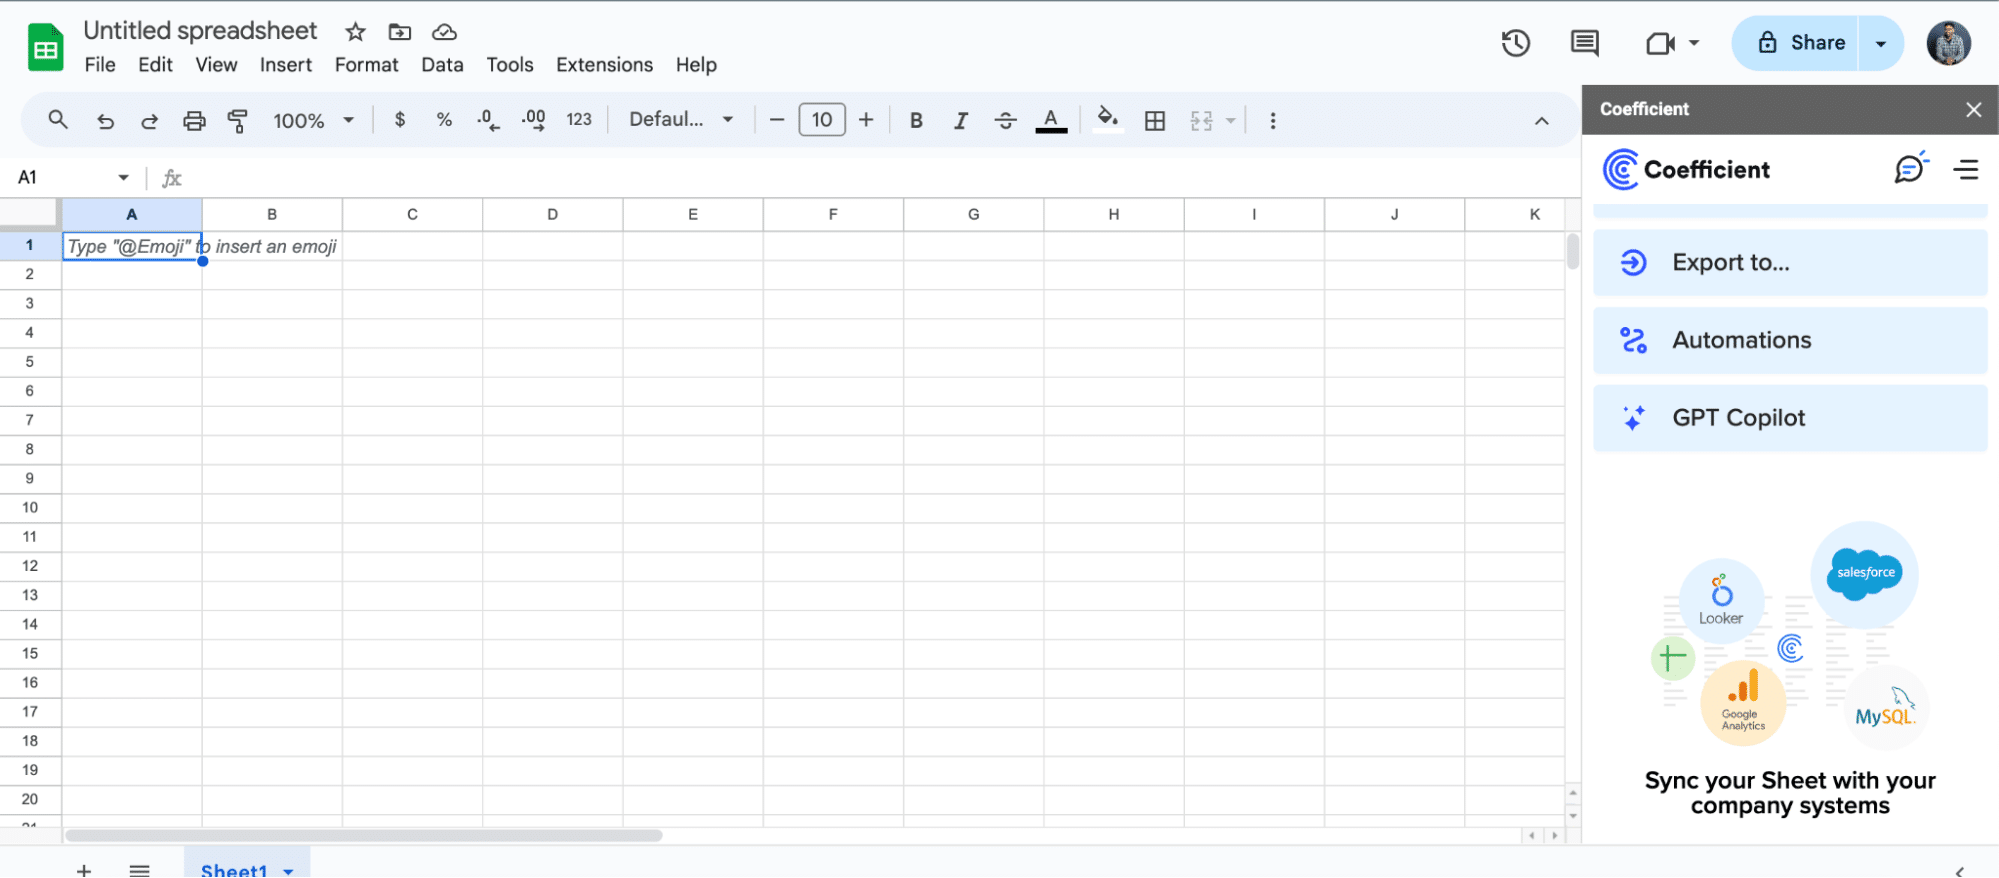
For Excel: Open Excel (desktop or Office Online), click ‘File’, then ‘Get Add-ins’, and select ‘More Add-Ins’. Search for “Coefficient” and click ‘Add.’

Step 2: Connect your SQL Server database.
Launch Coefficient from the sidebar. Select ‘Import from…’
Choose MS SQL Server from the data sources list, and fill in your connection details (Host, Database Name, Username, Password). Click ‘Connect’ to continue.
Step 3: Export data from SQL Server
Once connected, select ‘From Tables & Columns.’
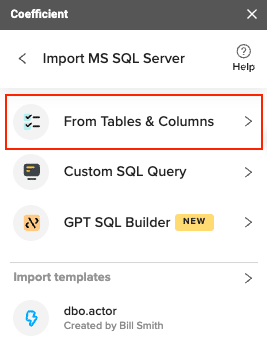
Use Coefficient’s data preview to select the tables and columns from SQL Server you wish to import.
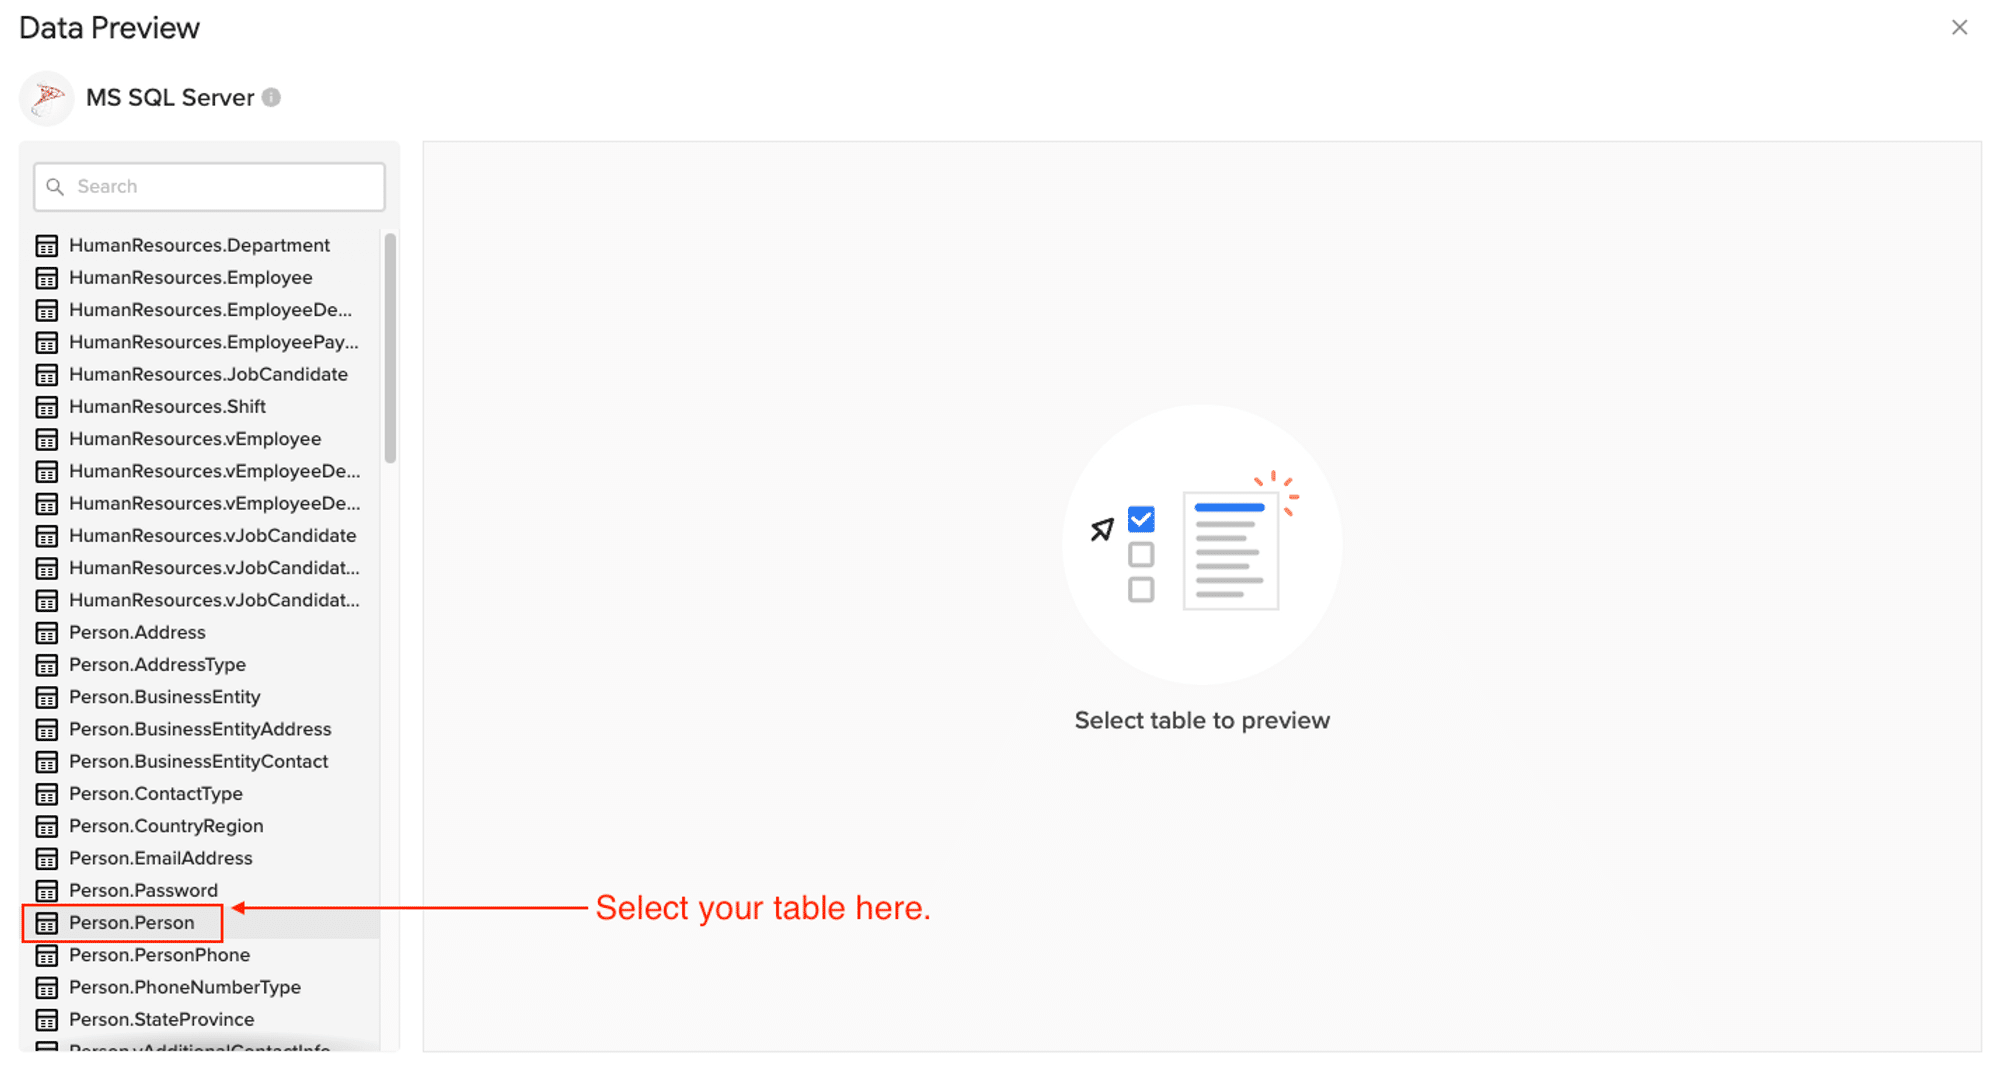
Apply any filters or limits, then click ‘Import’.

Your selected data will populate in the spreadsheet in seconds
Step 4: Set up auto-refresh (optional)
- Configure how often you want the data to be automatically refreshed.
- Options typically include hourly, daily, weekly, or custom intervals.
- This ensures your spreadsheet always contains the most recent data from your SQL Server database.
Pros and Cons of Using Coefficient
Pros:
- Eliminates manual data entry and reduces errors
- Creates live, auto-updating reports and dashboards
- Provides version history and collaboration features
- Offers data governance and access controls
- Includes alerting and notification capabilities for data changes
Cons: The only downside to Coefficient is that any scheduled automations are not free forever.However, its pricing plans are affordable, and its benefits far outweigh its costs.
For more information on connecting Microsoft SQL Server to Google Sheets, check out our detailed guide here.
For more information on integrating databases with popular spreadsheet applications, check out these helpful guides:
#2 SQL Server Management Studio (SSMS)
SQL Server Management Studio (SSMS) is Microsoft’s official tool for managing SQL Server databases. It provides a graphical interface for exporting MSSQL data to CSV, making it a good option for users with some technical knowledge.
Step 1. Open SSMS and connect to your database
Launch SQL Server Management Studio and connect to your MSSQL server using your credentials. In the Object Explorer, locate and expand your target database.
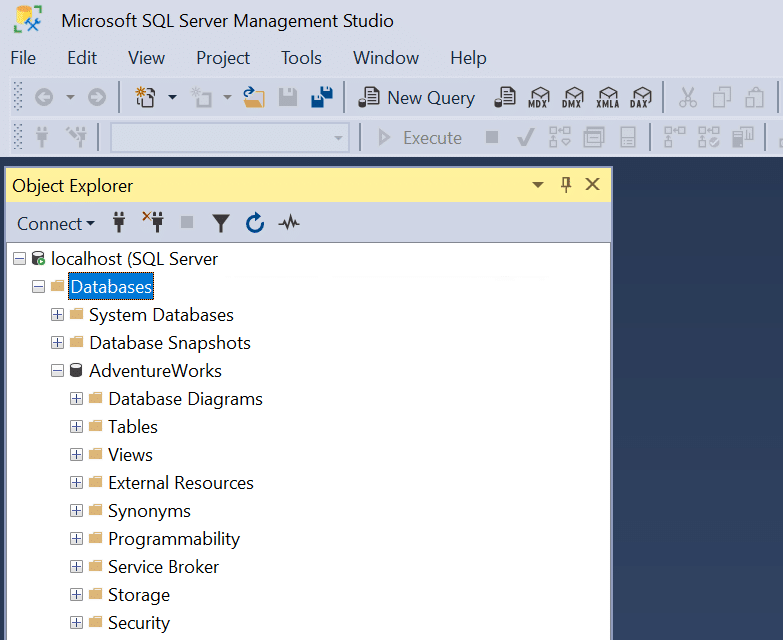
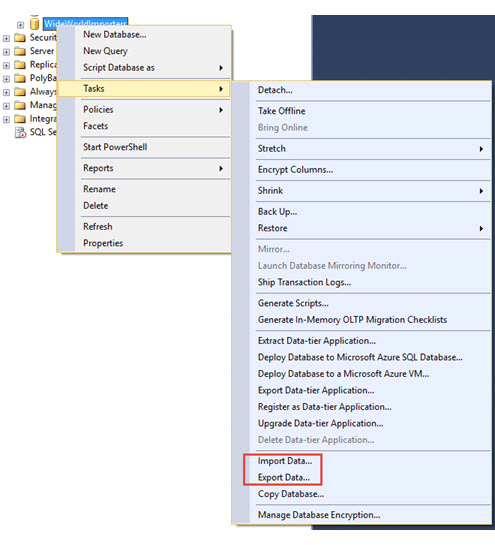
Step 2. Right-click on the database and select “Tasks” > “Export Data”
Find your database in the Object Explorer, right-click on it, and navigate to “Tasks” > “Export Data”. This will launch the SQL Server Import and Export Wizard.
Step 3. Choose CSV as the destination format
In the wizard, select your source database and table(s). For the destination, choose “Flat File Destination” and specify the CSV file path and name. Ensure the file extension is “.csv”.
Step 4. Configure export settings and execute
Click through the wizard, configuring options such as column delimiters (comma for CSV) and text qualifiers. On the final screen, review your settings and click “Finish” to start the export process.
Pros of using SQL Server Management Studio:
- SSMS is a native SQL Server tool, ensuring compatibility and reliability.
- The export wizard offers customizable options to fine-tune your CSV output.
Cons of using SQL Server Management Studio:
- This method requires some technical knowledge of database management and SQL Server tools.
- The export process is manual and needs to be repeated for each export, which can be time-consuming for frequent updates.
#3 T-SQL Commands
For users comfortable with SQL programming, using T-SQL commands provides the most flexibility and control over the MSSQL to CSV export process. This method involves writing SQL queries and using command-line tools to generate CSV files.
Step 1. Write T-SQL query to select data

Stop exporting data manually. Sync data from your business systems into Google Sheets or Excel with Coefficient and set it on a refresh schedule.

Open a new query window in SSMS or your preferred SQL editor. Write a T-SQL query to select the data you want to export. For example:
SELECT column1, column2, column3
FROM your_table
WHERE condition = ‘value’;
Step 2. Use BCP utility or SQLCMD with query results
You have two options for exporting the query results to CSV:
a. BCP (Bulk Copy Program) utility: Open a command prompt and use the following syntax:
bcp “SELECT column1, column2, column3 FROM your_table WHERE condition = ‘value'” queryout “C:pathtooutput.csv” -c -t, -T -S your_server_name -d your_database_name
b. SQLCMD utility: Use SQLCMD to execute your query and output the results to a CSV file:
sqlcmd -S your_server_name -d your_database_name -E -Q “SELECT column1, column2, column3 FROM your_table WHERE condition = ‘value'” -o “C:pathtooutput.csv” -s”,” -W
Step 3. Specify CSV output file and format In both BCP and SQLCMD commands, ensure you specify the correct output file path and use the appropriate flags to set the CSV format (e.g., -t, for comma-separated values in BCP, -s”,” for SQLCMD).
Pros of using T-SQL commands:
- This method offers the highest level of customization for your exports.
- You can easily automate the process by incorporating these commands into scripts or scheduled tasks.
Cons of using T-SQL commands:
- Requires SQL programming skills and familiarity with command-line tools.
- The setup process is more complex compared to graphical interfaces or no-code solutions.
Wrapping Up: Choosing the Right MSSQL to CSV Export Method for You
Exporting MSSQL data to CSV doesn’t have to be a daunting task. With the methods we’ve explored in this guide, you have a range of options to suit your technical expertise and specific needs. Whether you opt for the user-friendly Coefficient solution, the native SSMS approach, or the customizable T-SQL method, you’re now equipped with the knowledge to efficiently export your MSSQL data to CSV format.
Remember, the key to successful data management is choosing the right tool for your specific use case. Consider factors like the frequency of exports, the volume of data, and your team’s technical skills when selecting your preferred method.
Ready to streamline your MSSQL data exports? Get started with Coefficient today and experience the power of effortless data integration and export!
Further Reading
To expand your knowledge on database management and reporting, check out these related articles:
- Top 5 MySQL Reporting Tools to Boost Your Data Analysis in 2024
- How to Connect MySQL to Excel in 2024?
Frequently Asked Questions
Q: How do I save SQL query results to CSV?
A: You can save SQL query results to CSV using SQL Server Management Studio by right-clicking on the results grid and selecting “Save Results As.” For a more automated approach, consider using Coefficient to streamline the process and schedule regular exports.
Q: How to convert data from database to CSV?
A: To convert data from a database to CSV, you can use SQL Server Management Studio’s export wizard, write T-SQL commands with BCP utility, or use a no-code solution like Coefficient for seamless integration and automated exports.
Q: Can you convert SQL to CSV?
A: Yes, you can convert SQL data to CSV format. While there are manual methods using SQL Server tools, Coefficient offers a user-friendly solution to convert and export SQL data to CSV without coding, making the process more efficient and accessible.
Q: How to export data from MSSQL to CSV?
A: To export data from MSSQL to CSV, you can use SQL Server Management Studio’s export wizard, T-SQL commands with BCP utility, or a no-code platform like Coefficient. Coefficient simplifies the process by providing an intuitive interface and automated export capabilities.

