Sharing reports in Salesforce is crucial for driving team collaboration and informed decision-making. This guide will walk you through the essential steps to share reports in Salesforce, ensuring your team can effectively utilize and benefit from shared data insights.
You’ll also learn how you can share Salesforce reports successfully with anyone internal or external, with or without a Salesforce license.
Step-by-Step Guide to Sharing a Report in Salesforce Internally
TLDR
-
Step 1:
Navigate to the Reports tab in your Salesforce dashboard
-
Step 2:
Locate the folder containing the report you want to share
-
Step 3:
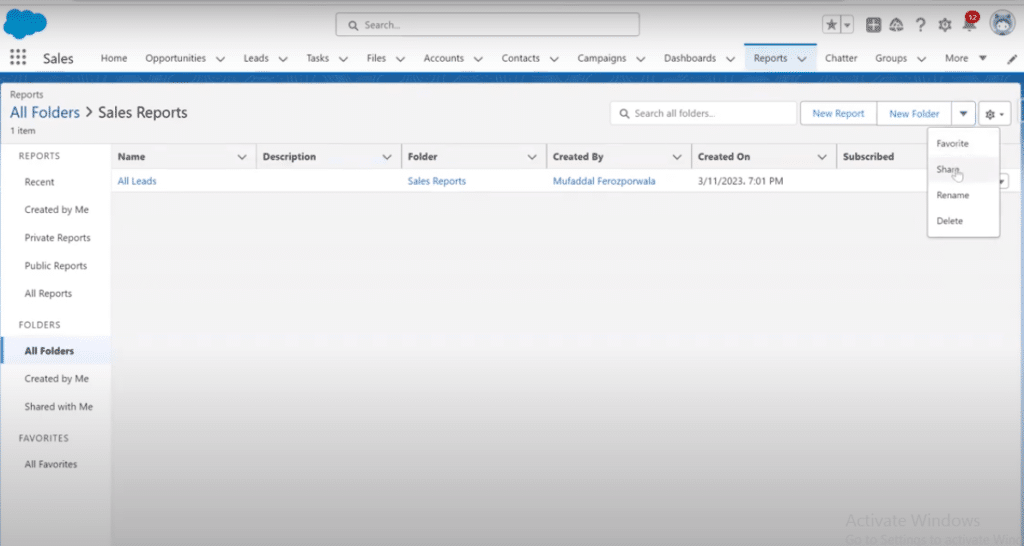
Click the dropdown arrow next to “New Folder” and select “Share”
-
Step 4:
Select the target folder you want to share
-
Step 5:
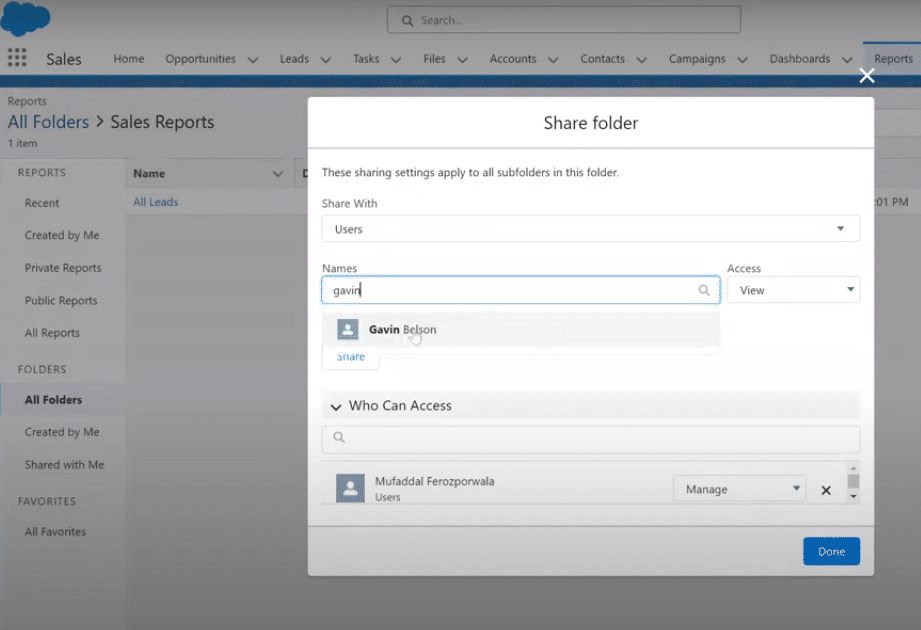
Enter the names of individuals you wish to share with
-
Step 6:
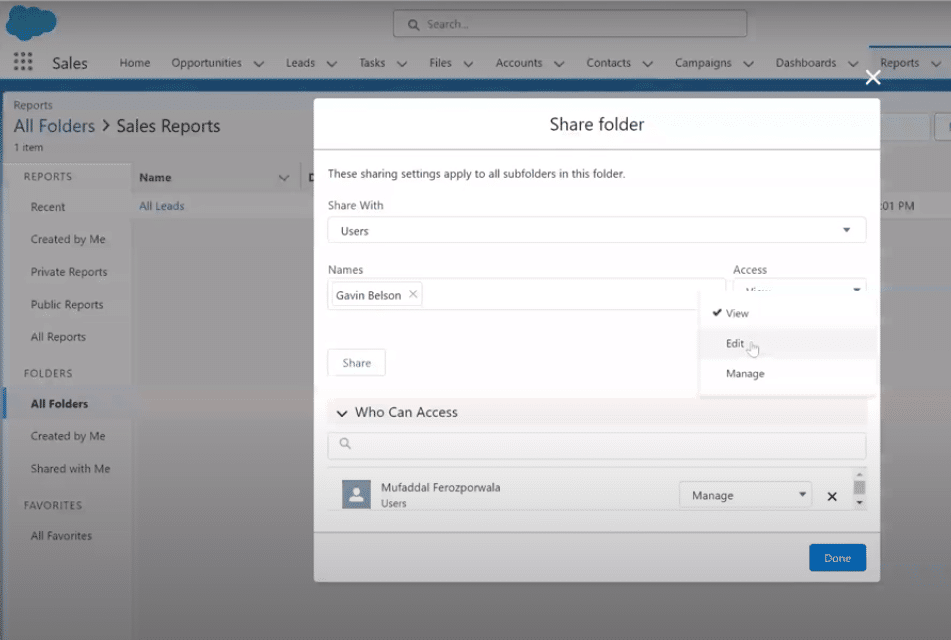
Define access levels: choose view, edit, or manage permissions
-
Step 7:
Click “Share” and then “Done” to finalize the process
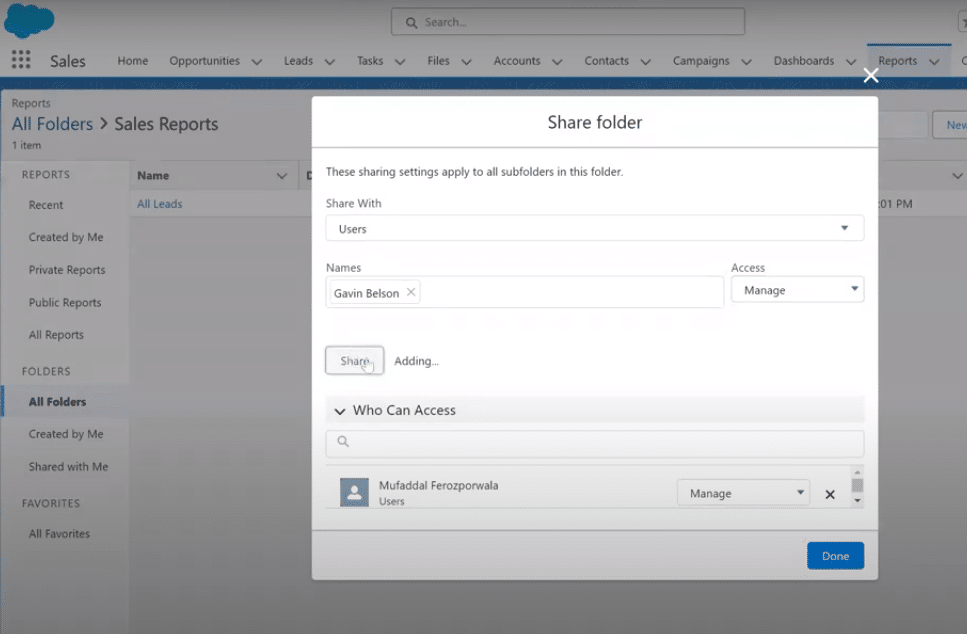
Knowing how to share a report in Salesforce is a game-changer for effective collaboration and informed decision-making. Whether you’re diving into the Classic interface or exploring the Lightning Experience, this step-by-step guide will illuminate the process.
- Log in to Salesforce: Head to the reports tab on the top right of the dashboard.
- Navigate to the Desired Folder: Identify the folder containing the report you want to share.
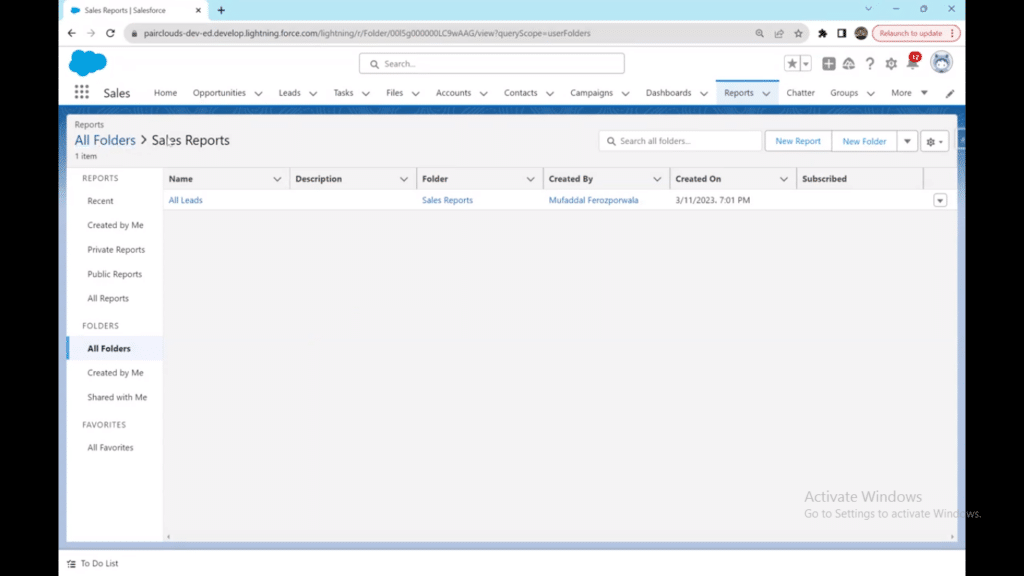
- Access Sharing Options: Click on the dropdown arrow next to the “New Folder” button on the top right and select “Share.”
- Select the Target Folder: Locate and click on the folder you want to share.
- Specify Recipients: Enter the names of individuals you wish to share the folder with.
- Define Access Levels: Choose between view, edit, or manage access levels according to the recipient’s role.
- Share and Completion: Confirm your choices by clicking the “Share” button. Once shared, click “Done” to finalize the process.
For a detailed video walk-through, check out our YouTube Tutorial.
Scenario Specifics
- Public Reports: To make a report public in Salesforce, ensure the report is saved in a public folder, and then follow the sharing steps.
- Private Reports: For private reports, select the appropriate folder and customize access levels based on team roles.
- Lightning Experience: Navigating through Salesforce report sharing in Lightning follows the same intuitive process, providing a seamless experience.
Share Salesforce Reports Externally With Non-Licensed Team Members
If you’re struggling to share reports with your team or clients, you’ve probably tried CSVs, manual screenshots, or even manual data entry.
Coefficient offers a 2-way sync between Salesforce and your spreadsheet. You’ll have the ability to sync live Salesforce data or reports with your spreadsheet and share with anyone who needs access – whether they have a Salesforce license or not.
TLDR
-
Step 1:
Install Coefficient from coefficient.io or from Excel or Google Sheets Plugin Marketplace
-
Step 2:
Connect Coefficient to your Salesforce account and import report data
-
Step 3:
Set up live data sync to keep reports automatically updated
-
Step 4:
Use native Excel or Google Sheets sharing features to share with anyone
-
Step 5:
Recipients can view, edit, and collaborate without needing Salesforce licenses
-
Step 6:
Maintain data security through spreadsheet permission settings
In the one-minute tutorial below, learn how to share Salesforce reports with your native Google Sheets or Excel share and permissions settings. Now others can view, edit, and collaborate seamlessly. Of course, keep the data security measures we mentioned above in mind.
How Coefficient + Spreadsheets excels in External Salesforce Report Sharing
Using Coefficient with Excel or Google Sheets transforms how you share Salesforce reports externally, offering significant advantages over traditional methods.
- Cost Efficiency: Eliminate the need for additional Salesforce licenses when sharing with clients, contractors, or external stakeholders. Recipients access live data through familiar spreadsheet interfaces they already use daily.
- Leadership-Friendly Access: Executives and senior stakeholders can quickly review key metrics and performance data without navigating complex Salesforce interfaces. The familiar spreadsheet format enables faster decision-making and strategic discussions.
- Real-Time Collaboration: Unlike static CSV exports or screenshots, Coefficient maintains live data connections. Your external partners always see current information while being able to add comments, create charts, and perform their own analysis.
- Enhanced Usability: Spreadsheets provide intuitive filtering, sorting, and visualization tools that many users find more accessible than Salesforce’s native interface. This reduces training time and increases adoption among external collaborators.
- Flexible Permissions: Leverage spreadsheet sharing controls to grant view-only access, editing rights, or collaborative permissions without compromising your Salesforce security. You maintain full control over who sees what data.
- Seamless Integration: External teams can easily incorporate your Salesforce data into their own workflows, reports, and presentations without complex data imports or manual copying.
Best Practices for Sharing Reports
When it comes to sharing a report in Salesforce, implementing best practices is crucial for seamless collaboration while maintaining data security.
- Precision in Permissions: Tailor access levels diligently. Assign view, edit, or manage permissions based on user roles to prevent unauthorized alterations.
- Regular Audits: Conduct routine checks on shared reports and folders. Remove access for users who no longer require it, ensuring data integrity.
- Consider Public vs. Private: Understand the nuances of how to make a report public in Salesforce. Reserve public visibility for non-sensitive data and keep confidential reports in private folders.
- Educate Users: Clearly communicate sharing protocols to users. Avoid common mistakes by ensuring everyone comprehends the implications of their access.
- Mindful Dashboard Sharing: Similar to reports, when sharing a dashboard in Salesforce, be cautious of the data it contains. Apply access controls to maintain confidentiality.
Sharing Dashboards in Salesforce
Effective report sharing drives better decisions across your organization. While Salesforce handles internal sharing well, external collaboration remains challenging. Coefficient solves this by creating live, collaborative spreadsheets that sync automatically with Salesforce—no additional licenses required. Try Coefficient for free and transform how you share data.


