Salesforce API field name discovery methods for custom SQL queries

Custom SQL query development requires accurate Salesforce API field names, but discovering these names traditionally involves switching between multiple tools and documentation. Modern connectors provide comprehensive discovery methods within the query interface.

You’ll learn how to use built-in discovery tools, smart search, and contextual autocomplete to find exact API field names for your custom queries.

Discover Salesforce API field names efficiently with Coefficient

Coefficientprovides comprehensive field name discovery methods specifically designed for custom SQL query development. You never have to leave the query interface to find field API names.

How to make it work

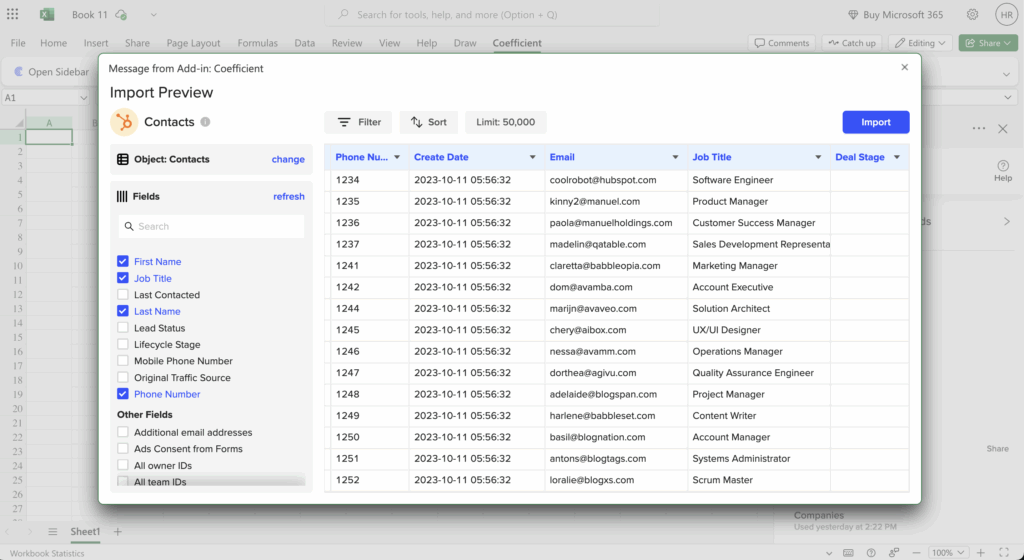
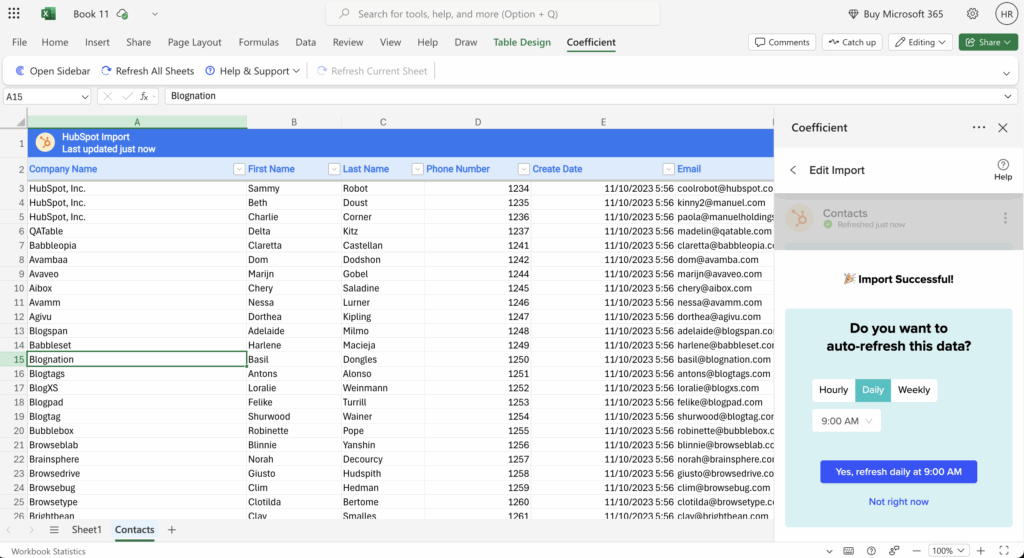
Step 1. Use the Object Inspector to browse all fields with API names.

Navigate through your Salesforce objects visually in Coefficient’s sidebar where all custom fields are listed with their API names, data types, and descriptions including custom fields ending in __c.

Step 2. Search across objects and fields with Smart Search.

Use field search functionality to quickly find custom fields by API name, label, or partial match. Filter by data type and navigate object relationships to discover related field API names.

Step 3. Build queries with contextual autocomplete assistance.

As you type in the query editor, Coefficient suggests valid field API names based on your selected object. Hover over any field to see its API name, type, and description with one-click copying.

Step 4. Explore the Metadata Explorer for detailed field properties.

View comprehensive field properties including data types, picklist values, validation rules, and relationship mappings. Visualize object relationships with their API names for complex queries.

Step 5. Use advanced discovery methods for complex scenarios.

Find fields matching patterns using wildcard search (e.g., all fields ending in “__c”), discover all fields of specific types, and access recently used field API names for quick reference.

Build better custom queries with accurate field names

Start buildingComprehensive field discovery ensures you never have to guess API names or leave your query interface to find field information.custom queries with complete field visibility today.

Salesforce connector field name guessing alternatives for selective data import

Field name guessing is frustrating and inefficient when setting up selective Salesforce imports. Modern data connectors provide visual interfaces and intelligent suggestions that eliminate trial-and-error completely.

You’ll learn how to use guided field selection, pre-built templates, and smart mapping to set up accurate imports without guessing a single field name.

Eliminate field name guessing with Coefficient

Coefficientprovides intelligent alternatives that transform the frustrating process of field name guessing into a guided, visual experience. You can see exact API names, preview data, and build imports with confidence.

How to make it work

Step 1. Use the Visual Field Selector interface.

Access Coefficient’s checkbox interface that displays all available fields with exact API names visible before importing. Search fields by partial name or label and filter by field type.

Step 2. Start with pre-built report templates.

Choose from Coefficient’s template library that includes commonly used field combinations for sales pipeline reports, contact management, and opportunity analysis. These templates eliminate field selection guesswork entirely.

Step 3. Navigate relationships with the Relationship Browser.

Explore object relationships visually to discover related fields without memorizing Salesforce’s relationship syntax. For example, easily access Account fields from Opportunity records through the visual interface.

Step 4. Leverage Field Mapping Intelligence.

Coefficient automatically suggests field mappings based on common naming patterns, data type matching, and previous import configurations. This reduces setup time and prevents mapping errors.

Step 5. Clone and modify existing import configurations.

Copy successful import setups and modify them for new use cases. This approach lets you quickly create variations without re-discovering field names from scratch.

Set up accurate imports without the guesswork

Start buildingVisual field selection and intelligent suggestions accelerate Salesforce import setup while eliminating errors.accurate imports with guided field discovery instead of frustrating guesswork.

Salesforce connector importing all fields vs custom query performance impact

The performance difference between importing all fields versus selective imports can be massive, especially with large Salesforce objects containing hundreds of custom fields. Importing 10 specific fields vs 200+ fields can reduce import time by 90% or more.

Here’s how to optimize your Salesforce imports for speed, efficiency, and better resource management.

Optimize Salesforce import performance with Coefficient

Coefficientoptimizes this process by allowing granular field selection before any data transfer occurs. You can dramatically improve performance while staying within Salesforce API limits and reducing spreadsheet complexity.

How to make it work

Step 1. Select only essential fields before importing.

Use Coefficient’s field selector to choose specific fields instead of importing everything. Focus on the 5-10 fields you actually need rather than all 150+ available fields.

Step 2. Apply filters to reduce record volume.

Set up filters to import only relevant records. For example, import only active contacts from the last 30 days instead of your entire contact database.

Step 3. Configure smart caching for incremental updates.

Enable Coefficient’s smart caching feature that refreshes only changed data instead of re-importing everything. This reduces API consumption and speeds up refresh cycles significantly.

Step 4. Set different refresh schedules for different datasets.

Configure more frequent refreshes for critical fields and less frequent updates for static reference data. This approach balances data freshness with performance efficiency.

Step 5. Use preview functionality to test query performance.

Test your import configuration with a small sample before running the full import. Coefficient’s preview feature helps you optimize field selection and filtering for maximum efficiency.

Start optimizing your Salesforce imports

Optimize your importsSmart field selection transforms resource-intensive full-table imports into surgical, efficient processes that get exactly the data you need.and see the performance difference immediately.

Salesforce email reporting limitations and workarounds for individual email metrics

Salesforcelacks standard report types for individual email sends to Contacts and Leads, and the Email Messages object captures incomplete data—often missing 80% or more of actual emails sent.

Here’s how to overcome these fundamental limitations and create comprehensive individual email metrics without requiring High Velocity Sales licensing or expensive add-ons.

Extract email data that standard Salesforce reports miss

CoefficientSalesforcedirectly addresses multipleemail reporting limitations by accessing data that native reports simply can’t reach. You can pull from all available email-related objects simultaneously and create calculations that Salesforce dashboards cannot perform.

How to make it work

Step 1. Use custom SOQL queries for comprehensive data extraction.

Pull email data that standard Salesforce reports miss by using custom SOQL queries through Coefficient. Access related object fields through lookups to connect email activity with Contact and Lead data, and import from Tasks, Events, Activities, and Email Messages objects simultaneously for complete coverage.

Step 2. Create advanced email metrics calculations.

Build calculated email open rates, response rates, and engagement metrics in Google Sheets or Excel using the imported data. Create email sequence tracking by connecting multiple email touchpoints and generate email activity trends that Salesforce’s native reports cannot produce.

Step 3. Set up automated email activity reporting.

Schedule hourly or daily imports to capture email data as it’s created in Salesforce. Set up email alerts when email metrics change or new patterns emerge, and create email send reporting dashboards with real-time updates that refresh automatically.

Step 4. Build comprehensive email performance dashboards.

Combine all email data sources into dynamic dashboards that show email activity by rep, campaign, or time period. Use Formula Auto Fill Down to maintain calculations as new data arrives and create historical email tracking that reveals long-term engagement trends.

Get complete email visibility without platform limitations

Start buildingThis approach provides comprehensive individual email metrics without High Velocity Sales licensing, directly overcoming Salesforce’s fundamental email tracking and reporting limitations.your advanced email metrics dashboard today.

Salesforce object field mapping without downloading complete schema

Downloading complete Salesforce schemas is impractical for organizations with complex setups containing hundreds of custom objects and thousands of fields. Modern connectors use lightweight, on-demand schema discovery instead.

You’ll learn how to map fields efficiently using dynamic schema loading, intelligent auto-mapping, and cross-object relationships without downloading massive datasets.

Map Salesforce fields efficiently with Coefficient

Coefficientenables efficient field mapping through its lightweight schema discovery approach that loads object schemas dynamically as you navigate. This means minimal API consumption with instant access to field information.

How to make it work

Step 1. Connect and browse objects with on-demand schema loading.

Access Coefficient’s Salesforce connector that loads object schemas dynamically as you navigate. No upfront download of your entire org schema is required, and you get real-time updates when custom fields are added.

Step 2. Use intelligent auto-mapping for aligned data structures.

Coefficient automatically maps fields when data structures align between source and destination. The system recognizes common field patterns and suggests appropriate mappings based on field names and data types.

Step 3. Create visual drag-and-drop field mappings.

Use the visual interface to connect Salesforce fields to spreadsheet columns. Apply transformation rules or conversions during mapping without importing raw data first.

Step 4. Map fields across related objects without intermediate imports.

Map Opportunity fields to Account fields using relationships, create composite fields combining multiple Salesforce fields, and build calculated fields using Salesforce data without full imports.

Step 5. Validate mappings before import with compatibility checking.

Coefficient validates mappings by checking data type compatibility, verifying field permissions, testing sample records, and highlighting potential mapping conflicts before any data transfer.

Start mapping fields the efficient way

Start mappingOn-demand schema discovery and intelligent mapping eliminate the need for massive schema downloads while providing complete field visibility.your Salesforce fields efficiently today.

Salesforce omni channel work item lifecycle timestamp tracking methods

SalesforceWhileprovides basic timestamp fields for omni channel work items, comprehensive lifecycle tracking often requires custom development or has significant limitations in standard reporting.

Here’s how to implement complete lifecycle timestamp tracking that captures every stage of your work item journey without custom Salesforce development.

Comprehensive lifecycle tracking without custom development

CoefficientSalesforce’sprovides an alternative omni channel work item lifecycle timestamp tracking method that offers significant advantages overnative tracking capabilities without requiring custom fields or automation.

How to make it work

Step 1. Import comprehensive timestamp data.

Use Coefficient to import all available timestamp fields from work item objects, including system timestamps like CreatedDate, RouteDate, AcceptDate, and any custom milestone timestamps you’ve configured.

Step 2. Pull related lifecycle context.

Import related data from associated objects like Cases, Agents, and Queues to provide complete lifecycle context. This gives you visibility into every stage of the work item journey with full relational data.

Step 3. Set up real-time lifecycle monitoring.

Configure automated refreshes to track work items through their complete lifecycle in real-time. Use Coefficient’s Snapshots feature to maintain point-in-time lifecycle data for historical trend analysis.

Step 4. Create lifecycle stage calculations.

Build calculated fields showing time spent in each lifecycle stage, identify bottlenecks, and track performance metrics like average time per stage using spreadsheet formulas that update automatically.

Trackable lifecycle stages

This method enables comprehensive tracking of:

  • Work item creation and routing – capture initial timestamps and routing decisions
  • Agent assignment and acceptance – track handoff timing and acceptance patterns
  • Status changes throughout lifecycle – monitor every status transition with timestamps
  • Completion or transfer events – capture final resolution or escalation timing
  • Custom milestone timestamps – include any custom lifecycle markers you’ve defined

Key advantages over native methods

This approach provides several benefits:

  • No custom development required – avoid the complexity of custom fields and automation
  • Flexible reporting and analysis – use advanced spreadsheet capabilities for lifecycle analysis
  • Complex lifecycle metrics – calculate sophisticated metrics like bottleneck identification
  • Automated alerting – get notified when lifecycle stages exceed defined thresholds

Get complete lifecycle visibility today

Start trackingThis method provides comprehensive lifecycle visibility without the complexity of custom Salesforce development while offering superior analytical capabilities.your complete work item lifecycle today.

Selective field import from Salesforce without knowing exact field names

You can import specific Salesforce fields even when you don’t know exact field names using intelligent discovery and suggestion features. Modern connectors provide fuzzy search, visual selection, and guided assistance that makes selective imports accessible to non-technical users.

Here’s how to use smart field discovery, category browsing, and template recommendations to build targeted imports without technical field knowledge.

Import specific fields easily with Coefficient

Coefficientexcels at enabling selective field imports even when you don’t know exact field names. The platform uses intelligent discovery and suggestion features that transform technical field selection into an intuitive process.

How to make it work

Step 1. Use fuzzy search to find fields by keywords or partial names.

Type partial field names or keywords in Coefficient’s search function to find matching fields across objects. Search using friendly field labels instead of technical API names for easier discovery.

Step 2. Browse fields organized by categories and types.

Navigate through fields grouped by categories like contact info, sales data, and custom fields. Use the checkbox-based field selector with built-in search functionality to explore options visually.

Step 3. Get intelligent suggestions based on your object selection.

When you select an object like Contact, Coefficient automatically suggests commonly used fields like Email, Phone, and Name. The system shows which fields are most frequently imported by other users.

Step 4. Use template recommendations for common use cases.

Choose from pre-built templates based on your object choice. Coefficient suggests common field combinations for customer contact data, sales pipeline analysis, and other typical scenarios.

Step 5. Preview field data and relationships before importing.

View sample values, data types, and related fields before confirming your import. The system automatically suggests related fields when you select primary fields to ensure complete data sets.

Start importing the data you need without technical barriers

Start buildingIntelligent field discovery transforms selective imports from a technical challenge into an intuitive, guided process.your targeted Salesforce imports today.

Setting up HubSpot to PowerBI connection without API programming

PowerBI’s native HubSpot connector requires API endpoint configuration and technical knowledge that most users don’t possess, plus it doesn’t support automated refresh scheduling without additional programming.

Below you’ll find detailed instructions on how to create a seamless HubSpot PowerBI connection using a no-code approach that anyone can set up.

Connect HubSpot to PowerBI using Excel as a bridge

Coefficient’s HubSpot connector for Excel provides a no-code alternative to PowerBI’s complex native connector, using Excel as an intermediary for seamless data flow. Essentially, Coefficient acts as middleware to keep your PowerBI dashboards synced with your HubSpot data on any schedule you need.

And here’s why operators are using it as a simple bridge between PowerBI and Excel or Google Sheets. Pro tip: It also makes your HubSpot PowerBI connection completely free since Excel is a core data source for PowerBI.

Here’s how to make it work

Step 1. Set up Excel bridge with one-click OAuth.

Install Coefficient in Excel and connect to HubSpot using simple OAuth authentication. No API tokens, endpoints, or technical configuration required.

Get Started Free

Step 2. Configure data through point-and-click interface.

Select HubSpot objects and fields through visual menus in the Excel sidebar. All configuration happens through user-friendly dropdown menus and checkboxes.

connect hubspot to excel for a bridge to power bi

Step 3. Schedule automated refresh without code.

Set up hourly, daily, or weekly data updates using built-in scheduling. No programming needed – just select your preferred refresh frequency from dropdown options.

schedule automated hubspot refreshes for powerbi

Step 4. Connect PowerBI to the Excel file as data source.

Link PowerBI to your Excel workbook containing live HubSpot data. PowerBI treats this as a standard Excel data source with automatic field detection and mapping.

pull hubspot data from excel into powerbi

Step 5. Enable automatic PowerBI updates.

When PowerBI refreshes, it automatically pulls the latest HubSpot data that Coefficient has synced on your scheduled cadence to Excel. The entire process runs without manual intervention.

Bypass technical barriers with visual setup

This approach delivers automated HubSpot reporting capabilities without the technical complexity of direct PowerBI integration. You get the same end result – live HubSpot data in PowerBI – through a user-friendly setup process that requires no coding knowledge. Get started building your HubSpot PowerBI connection today for free.

Setting up user-specific visibility for employee performance reports in Salesforce

Salesforce’srow-level security for reports requires complex sharing rules, criteria-based sharing, or territory management setup that impacts system performance and demands admin expertise.

Here’s how to create personalized employee performance dashboards with user-specific visibility without touching Salesforce’s security configuration.

Create personalized performance dashboards with automatic user filtering using Coefficient

CoefficientSalesforceoffers a straightforward approach by creating personalized spreadsheet dashboards with user-specific data imports. Instead of configuring complexsharing mechanisms, each employee gets their own performance dashboard with data filtered at import time.

How to make it work

Step 1. Import performance data from multiple Salesforce objects.

Set up imports from Opportunities, Tasks, Leads, and Cases with user-specific filtering applied at the import level. For each employee, create filters that pull only their records using their User ID as the filter criteria across all relevant objects.

Step 2. Create individual employee dashboards.

Build separate Google Sheets or Excel files for each employee that automatically populate with their performance metrics. Each dashboard pulls data filtered by that specific employee’s User ID, ensuring they only see their own performance data.

Step 3. Set up automated refreshes and alerts.

Configure scheduled imports (hourly, daily, or weekly) so each employee’s dashboard stays current automatically. Add Slack or email alerts to notify employees when their performance metrics change, keeping them engaged with their KPIs.

Step 4. Enable self-service customization.

Let employees add their own calculations and visualizations to their personal dashboards without affecting others. They can create custom KPIs, charts, and analysis while the underlying data remains securely filtered to their records only.

Get secure performance reporting without the complexity

Build your firstThis approach provides better security than complex sharing rules while giving employees personalized dashboards they can actually use and customize.user-specific performance dashboard today.

How to work around Salesforce reporting limitations for opportunity and activity data

Salesforce’snative reporting has fundamental architectural limitations when combining opportunity and activity data. These include data loss during filtering, incomplete cross-object field access, and unreliable lookup field population. These aren’t bugs to be fixed, but inherent platform constraints that require workarounds.

Here’s how to bypass these limitations entirely and build the comprehensive opportunity-activity analysis your sales team needs.

Bypass Salesforce reporting constraints using Coefficient

CoefficientSalesforce’sprovides comprehensive workarounds by eliminating the need to work withinconstrained reporting framework. Instead of fighting platform limitations, you get direct access to source data with unlimited flexibility.

How to make it work

Step 1. Import data directly from source objects.

Pull Opportunities and Activities (Tasks/Events) as separate imports using Coefficient’s Salesforce connector. Access ANY fields from both objects without the restrictions of predefined report types. Include all opportunity fields like Name, Amount, Stage, and all activity fields like Subject, Status, ActivityDate.

Step 2. Create reliable data relationships.

Use spreadsheet functions to join data that work consistently, unlike Salesforce’s problematic cross-object reports. Use formulas liketo bring opportunity details into your activity analysis.

Step 3. Set up dynamic filtering without data loss.

Use Coefficient’s dynamic filters that point to spreadsheet cells. Filter activities by subject, date, or status without losing opportunity records. Change filter criteria by updating cell values rather than rebuilding entire reports.

Step 4. Build advanced analytics impossible in Salesforce.

Calculate time between activities and opportunity progression using formulas like. Analyze activity patterns by opportunity characteristics and create predictive scoring based on task completion rates.

Step 5. Automate refresh workflows for real-time insights.

Schedule regular data updates (hourly, daily, weekly) and set up alerts when key metrics change. Maintain real-time visibility without manual report regeneration, something Salesforce’s native reports struggle with.

Transform reporting limitations into powerful analytics

Start buildingThis approach transforms the frustrating limitations of Salesforce cross-object reporting into a flexible analytics platform. You get the comprehensive opportunity-activity insights your sales team needs without fighting platform constraints.reports that actually deliver the analysis you’ve been trying to get from Salesforce.