Looking to export data from Jira to Excel? This guide is for you!
Jira excels in project planning and tracking, it often falls short in providing the depth of insights some teams need. This gap leads many project managers to Excel.
Moving data from Jira to Excel, however, is easier said than done.
This guide shows you easier ways to get your Jira data into Excel. Never copy and paste again!
Why Export Jira Data to Excel?
While Jira offers native dashboarding and reporting options, they often lack the level of customization that teams require.
Exporting Jira to Excel allows for more agile and familiar data analyses. It also allows non-technical users to easily visualize and generate insights in the interface they prefer.
Here are some of the top benefits of exporting Jira data into Excel:
- Better data management. Spreadsheets are easier to use, especially for those who are not familiar with Jira’s reporting tools.
- Custom reporting. Excel helps improve decision-making by making it easy to create custom reports, charts, and pivot tables for more insightful analyses.
- Easier data manipulation: With Excel, you can easily sort, filter, and group your data, which can help you identify trends and patterns in your Jira data.
Export Jira to Excel: Top 3 Methods
Method 1: Coefficient
Coefficient is a no-code add-in that connects Jira to Excel in a single click.
Once connected, it automatically exports Jira data to Excel so you don’t have to.
To install Coefficient, navigate to the Office Add-ins store from Excel Web or Desktop.
Type “Coefficient” in the search and click ‘Add.’

A pop-up will open up. Follow the prompts to complete the installation.

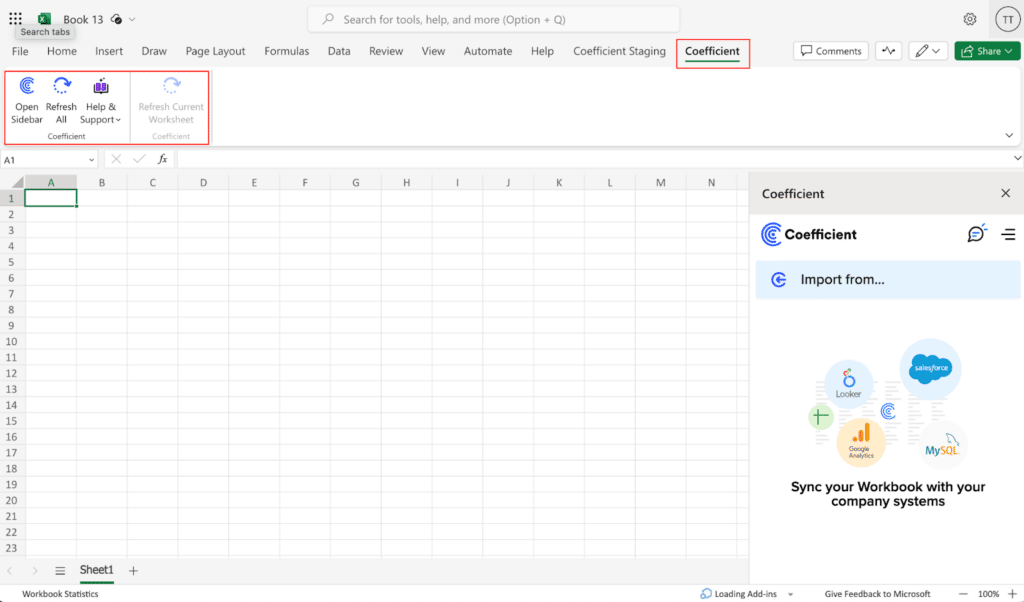
Once finished, you will see a “Coefficient” tab at the top navigation bar.
Click ‘Open Sidebar’ to launch Coefficient.

Now, you’re ready to export your data from Jira to Excel.
Click ‘Import from…’

Scroll down until you find Jira in the menu.

Click ‘Connect’ to continue.

Follow the prompts to install Authorize Coefficient to your account.

Once authenticated, you can choose from three options to export Jira data to Excel: start from scratch, import from saved filters, or by custom Jira Query Language (JQL) query.
Click ‘Start from Scratch.’

Select your project from the dropdown menu.

Select the necessary settings and add your fields.

Click ‘Import’ to proceed.
And just like that, you’ve exported your data from Jira to Excel!

The last step is to use Coefficient’s auto-refresh scheduler to automatically update your data.
Simply choose your cadence (Hourly, Daily, or Weekly) and time – Coefficient will take care of the rest.

Method 2: Export Jira Issues to CSV
To export Jira issues into Excel (XLSX) or CSV, start in the issue navigator to find the issues you want to export.
Go to the top navigation bar in the Jira Server or Data Center and select ‘Issues’ > ‘Search for Issues.’

Stop exporting data manually. Sync data from your business systems into Google Sheets or Excel with Coefficient and set it on a refresh schedule.


Click the Filters tab and select Advanced issue search.

Use the Filters tab for an Advanced issue search. The URL for this page is: https://[$yoursiteURL]/issues/
Perform an Advanced Search with JQL, like project=XYZ for project-specific issues or ORDER BY created for a chronological list, then click Search.
Ensure you have the necessary permissions to view the issues you’re searching for.
Once you’ve located the issues, use the Export button on the Issue navigator page to select CSV format for download.

After downloading, upload the CSV file to Excel.
Method 3: Zapier
Zapier facilitates automatic data transfer between Jira and Google Sheets, setting up Zaps for streamlined workflows.
Note: While Zapier gets the job done, it’s limited to predefined data types and actions.
Here’s how to set up a workflow that automatically updates your Excel sheets with Jira issues:
Start by connecting your Jira and Microsoft 365 accounts to Zapier. This step requires authentication to ensure secure access to both platforms.
Initiate a new Zap, setting Jira as the trigger application.
Choose a trigger event, such as “New Issue in Jira,” which activates the Zap whenever a new issue is created in your specified Jira project.

With Jira as your trigger, set Excel (specifically, Excel for Microsoft 365) as the action application. Select an action like “Add a Row” to your Excel sheet, which corresponds to the creation of a new issue in Jira.
Zapier will prompt you to map out which specific Jira issue details you want to transfer to each column in your Excel sheet. This step ensures that the right Jira data populates the correct columns in Excel.
Once your data mapping is set, review your Zap configuration to ensure all details are correct.
Run a test to confirm that the Zap properly transfers data from Jira to Excel as intended.
If the test is successful, activate your Zap. Your Excel sheet will now automatically update with new Jira issue data as specified in your workflow.
Seamlessly Export from Jira to Excel with Coefficient
Coefficient is the easiest and fastest way to export data from Jira to Excel.
Try it for free today to make exporting your Jira data to Excel vastly less annoying, letting you focus on what’s important.

