Here’s a step-by-step guide on how to connect Zendesk to Google Sheets without breaking a sweat.
Zendesk offers a suite of products that enhance customer support, sales, and customer communications. The Zendesk platform is designed to ensure excellent customer experiences in all company channels, from support tickets, to social media.
While the platform is robust, customer success and operations teams frequently import Zendesk data into Google Sheets. This allows them to build summaries, reports, dashboards, and more with the flexibility of spreadsheets. But many of these users must manually copy-and-paste Zendesk data into Sheets from CSVs, wasting countless hours.
Now you can directly import Zendesk data into Google Sheets using the three methods in this blog. Here’s a full walkthrough for each method, including a video tutorial below.
Video Tutorial: How to Connect Zendesk to Google Sheets
TL;DR: Coefficient provides the quickest method for connecting Zendesk to Google Sheets
Coefficient is the easiest way to connect Zendesk to Google Sheets. You can link Zendesk to Sheets in one click using Coefficient’s pre-built connector. Then you can start pulling Zendesk data into your Google spreadsheet instantly.
Coefficient allows you to import real-time Zendesk data into Google Sheets. It keeps your imported dataset on Sheets automatically updated, meaning you’re always working with the latest version of your data.
Coefficient’s Zendesk connector helps busy customer success and operations teams eliminate manual work, save time, and streamline processes. Additionally, Coefficient comes with integrations for other popular data sources, allowing you to consolidate your data from multiple business systems in one Google spreadsheet.
Top 3 Methods to Connect Zendesk to Google Sheets
There are many ways to set up a Zendesk to Google Sheets integration. We’ll focus on the top methods below.
1. Coefficient
Start by installing the Coefficient add-on in Google Sheets.
Open a new Google Sheet. Click Extensions on the top menu bar, then Add-ons from the dropdown list, then Get add-ons on the submenu.

On the Google Workspace Marketplace’s search bar, type “Coefficient,” and click on the highlighted app.

Choose the Google account you want to pair with Coefficient. Click Allow to give the app access permissions.

After completing the installation, return to Google Sheets and launch the Coefficient Add-on from the Extensions menu.

Launch Coefficient, and you’ll see the app as a sidebar on the right-hand side of your Google spreadsheet.
Now you’re ready to connect Zendesk to Google Sheets. Click Import from… on the Coefficient app sidebar.

Find Zendesk on the list of data sources. Click the Connect button.

Allow Coefficient to connect to your Zendesk account by providing your Account URL. Click Authorize.

You can import your Zendesk data from Scratch, allowing you to create new imports with Coefficient’s intuitive point-and-click UI.
You can also import data using a Saved View, which lets you build an import from an existing View in Zendesk.
Then click the Import button. Your Zendesk data will auto-populate on your Google Sheet, like the example below.

Set up auto-refresh schedules daily, hourly, or weekly to keep your data fresh. Now Coefficient will automatically refresh your Zendesk data in your spreadsheet.

If you need to update your spreadsheet data instantly, click the Refresh button on the header.
Ensure your team members have access to the latest reports, key metrics, and KPIs by setting up automatic Slack and email alerts.

Set up a trigger event to push crucial data and reports at predefined times, from your customer satisfaction scores to support tickets in the queue.
You can also snapshot data to get point-in-time copies of your object fields within reports at specific intervals.
The whole process — from connecting Zendesk to Google Sheets, to pulling Zendesk data into your spreadsheet — takes less than 60 seconds.
2. Google’s Data Connector for Zendesk
You can also connect Zendesk to Google Sheets using Google’s data connector for Zendesk. The Google connector allows you to import Zendesk tickets (with custom queries) or metrics into your Google spreadsheet.
Google’s data connector for Zendesk allows you to:
- Pull Zendesk metrics into Google Sheets
- List tickets (including an existing ticket) from Zendesk in Google Sheets
- Refresh queries in Zendesk based on data that exists in your spreadsheet
Here’s how to install Google’s data connector for Zendesk. Open your Google spreadsheet. Navigate to Extensions>Add-ons>Get add-ons.
Find Data Connector for Zendesk using the Google Marketplace search bar. Select the add-on and follow the prompts to install.

Once installed, go back to your Google Sheet and open the add-on from Extensions on the top menu.

Type in your Zendesk subdomain to authorize the connection. Then click the Authorize button.

Now you can start importing data from Zendesk to Google Sheets. Select your preferred operation from the listed options:
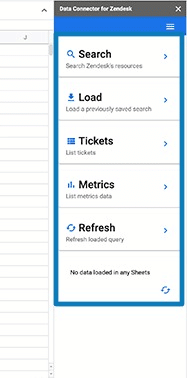
However, Google’s connector has several limitations. Unlike Coefficient, Google’s Zendesk connector cannot sync data between Zendesk and Google Sheets. So if you make changes to your Zendesk data in Google Sheets, those changes will not be reflected in the Zendesk platform.
Google’s Zendesk connector only allows for five basic operations, limiting what you can do with your data. Also, it doesn’t offer the automation functionalities that robust data connector apps such as Coefficient do.
Google’s Zendesk connector will create a lot of manual, tedious work, leading to significant bottlenecks in your data analysis and reporting.
3. Google Apps Script
Google Apps Script allows more technical users to pull Zendesk data into Google Sheets with its built-in Script Editor.
To launch Google Apps Script, go to Extensions on the top menu of Google Sheets.
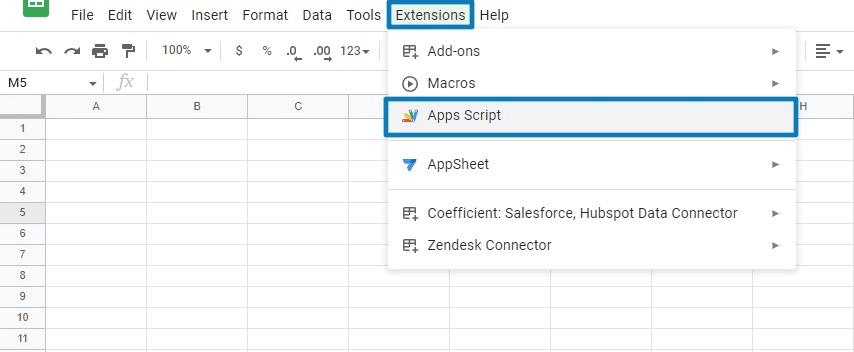
Click Apps Script from the dropdown. This will launch the Google Apps Script interface. You can rename your project now, or do it later.

Review Zendesk’s API documentation to identify the data you can pull into Google Sheets. You can use Zendesk tools, such as Postman collection or an API explorer, to map out what data is accessible.
First, write code to create your data’s header spreadsheet columns.
Let’s say you want to create a sheet containing all the users from the API, featuring Name and Email columns.
You can achieve this by using the code below:
function updateData() {
const HEADERS = [‘Name’, ‘Email’]
const spreadsheet = SpreadsheetApp.getActive();
const sheet = spreadsheet.getSheetByName(‘Sheet1’);

Stop exporting data manually. Sync data from your business systems into Google Sheets or Excel with Coefficient and set it on a refresh schedule.

sheet.clear();
sheet.appendRow(HEADERS);
}
Click the Save icon on the top menu. Then click Run.

Click Review permissions and follow the prompts. The Execution log will show the status of your deployed code.

Go back to your Google spreadsheet. It will show Name and Email as your new column headers.

Next, you’ll need to write an authentication code to hit the API “readData.”
Find the section on authentication within the Zendesk API documentation. You’ll want to reference Node.js or JavaScript (JS) documentation since Apps Script code is written in JS.
Write code that performs an OAuth authentication process or uses a personal access token. Use the code below as a new function (below the “updateData” function we created).
function readData() {
const PERSONAL_ACCESS_TOKEN = “94e3c3fb-9570-48d2-bd44-028100b97879”;
const API_URL = “https://app.asana.com/api/1.0”;
const DATA_ENDPOINT = “/users?opt_fields=name,email&workspace=38823”;
const response = UrlFetchApp.fetch(API_URL + DATA_ENDPOINT, {
headers: {
“Authorization”: “Bearer ” + PERSONAL_ACCESS_TOKEN
}
});
const content = JSON.parse(response.getContentText());
console.log(content);
}

Save and run the “readData” function.
Now let’s connect “readData” to “updateData.”
In this example, we want to create a new row of data for every result from “readData” using the function below:

Run your “updateData” function. Check your Google Sheet to see the updated data. If your function didn’t work, consider using console.log() statements for debugging.
In terms of connecting Zendesk to Google Sheets, technical users can write code in Apps Script as a stop-gap measure. But debugging and maintaining the code is tedious, time-consuming, and often frustrating.
That’s why non-technical and technical users should leverage pre-built data connector apps, such as Coefficient. You don’t have to worry about any backend maintenance or technical issues — that’s all taken off your plate. Focus instead on analyzing and visualizing data in Google Sheets.
Connect Zendesk to Google Sheets: What’s the Best Method for Your Team
There are a number of ways to connect Zendesk to Google Sheets. Coefficient and Google’s data connector allow you pull Zendesk data into Google Sheets without coding. More technical users also have the option of using Google Apps Script.
But only Coefficient offers the speed and reliability that teams need to integrate Zendesk data into their Google Sheets workflows. Try Coefficient for free right now to start pulling Zendesk data into Google Sheets instantly.
