Are you struggling to sync your NetSuite and HubSpot data? This comprehensive guide will show you exactly how to connect these two powerful platforms, streamlining your business operations and enhancing your customer insights. You’ll learn three proven methods to integrate NetSuite with HubSpot, each tailored to different user needs and technical skill levels.
Advantages of NetSuite-Salesforce Integration
Before we dive into the nitty-gritty of integration methods, let’s explore why connecting NetSuite to Salesforce is a game-changer for businesses of all sizes:
- Unified Customer View: Imagine having a complete 360-degree view of your customers at your fingertips. By syncing customer information, orders, and financial data between NetSuite and Salesforce, you’ll have a holistic understanding of each client’s journey, enabling more personalized interactions and informed decision-making.
- Streamlined Order Processing: Say goodbye to manual data entry and the errors that come with it. When you connect NetSuite to Salesforce, you can automatically create sales orders in NetSuite from Salesforce opportunities. This seamless flow not only saves time but also reduces the risk of costly mistakes.
- Real-Time Inventory Insights: Empower your sales team with up-to-the-minute inventory data. By accessing NetSuite’s inventory information directly within Salesforce, your team can provide accurate product availability details to customers, improving satisfaction and reducing the likelihood of overselling.
These advantages are just the tip of the iceberg. As we explore the integration methods, you’ll discover even more ways this powerful connection can transform your business operations.
Top 3 Methods to Connect NetSuite to Salesforce: Choose Your Path
When it comes to integrating these two robust platforms, one size doesn’t fit all. Let’s explore three top-notch methods to connect NetSuite to Salesforce, each catering to different business needs and technical expertise levels.
| Solution | Best For |
| Coefficient | Teams needing flexibility in data transformation and analysis |
| Celigo | Businesses seeking comprehensive, scalable integration |
| Salesforce Connect with NetSuite Connector | Organizations heavily invested in the Salesforce ecosystem |
Method 1: Coefficient

Coefficient is a powerful no-code integration tool that allows users to connect NetSuite and Salesforce through Google Sheets or Excel. This method is ideal for teams that need flexibility in data transformation and analysis.
Step-by-Step Walkthrough:
Step 1. Install Coefficient
For Google Sheets
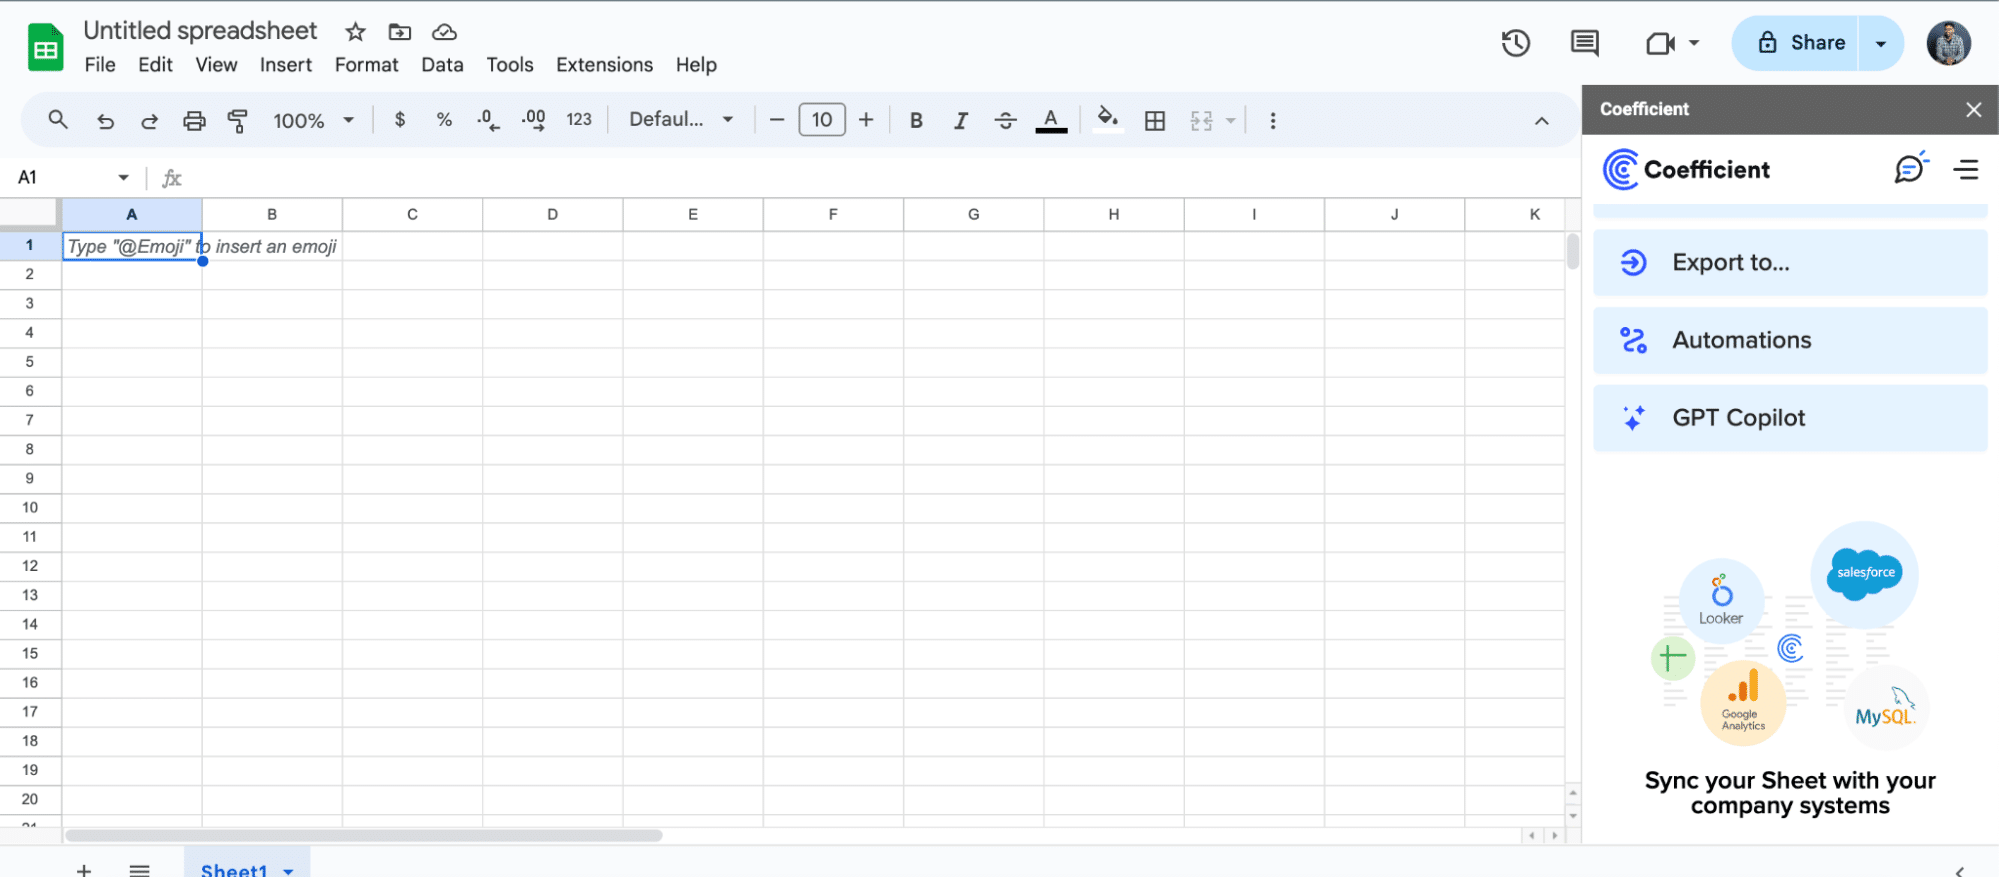
- Open a new or existing Google Sheet, navigate to the Extensions tab, and select Add-ons > Get add-ons.
- In the Google Workspace Marketplace, search for “Coefficient.”
- Follow the prompts to grant necessary permissions.
- Launch Coefficient from Extensions > Coefficient > Launch.
- Coefficient will open on the right-hand side of your spreadsheet.
For Microsoft Excel
- Open Excel from your desktop or in Office Online. Click ‘File’ > ‘Get Add-ins’ > ‘More Add-Ins.’
- Type “Coefficient” in the search bar and click ‘Add.’
- Follow the prompts in the pop-up to complete the installation.
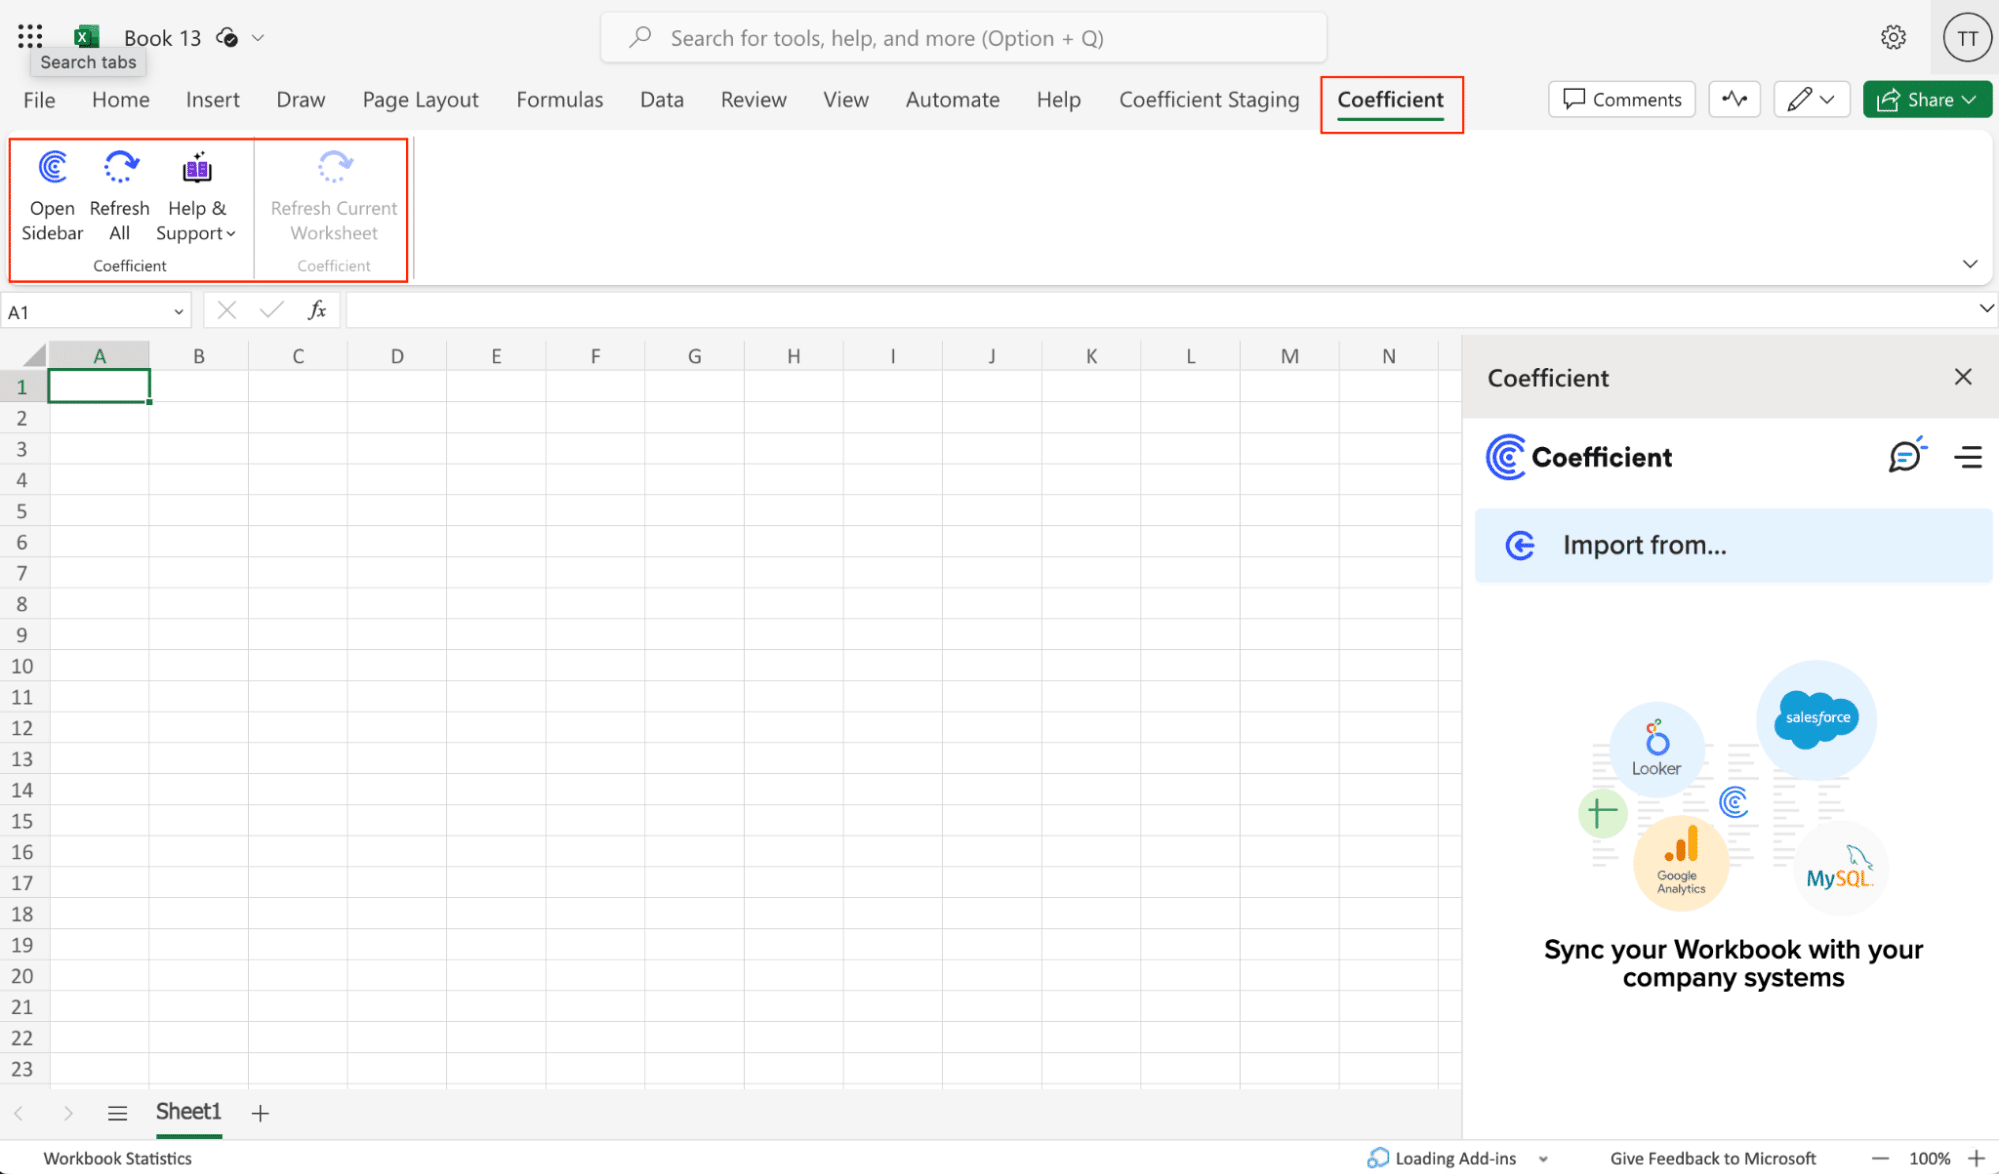
- Once finished, you will see a “Coefficient” tab in the top navigation bar. Click ‘Open Sidebar’ to launch Coefficient.
Step 2. Connect and Import Data from NetSuite
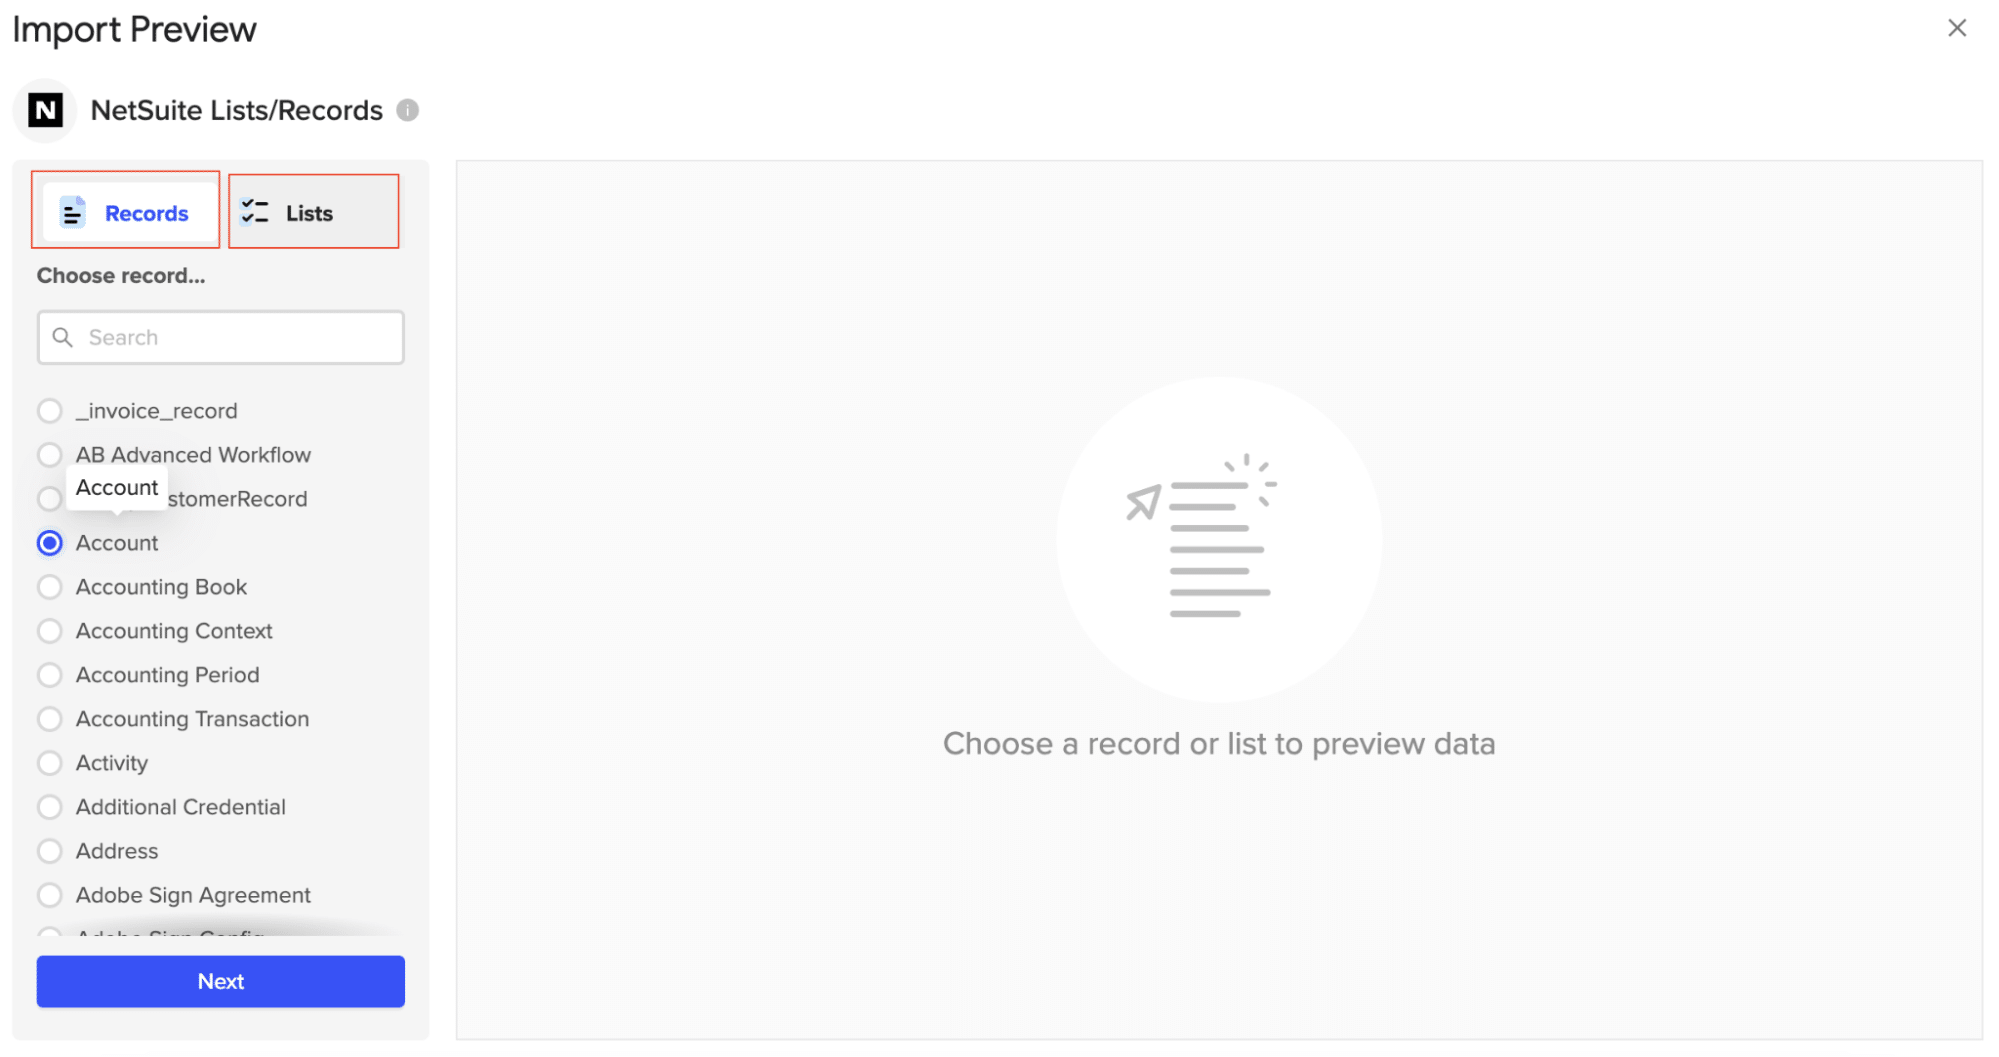
- Open Coefficient Sidebar: In the Coefficient sidebar, click Import from…, then select NetSuite.
- Authenticate NetSuite: Follow the prompts to authenticate and connect your NetSuite account.

- Select Data: Choose the data you need from NetSuite. Configure any necessary filters and click
Import. Your NetSuite data will populate in your spreadsheet.
Step 3. Push Your Data to Salesforce
- Navigate to Export: In Coefficient’s menu, click Export to…, then select Salesforce from the list of available data sources .
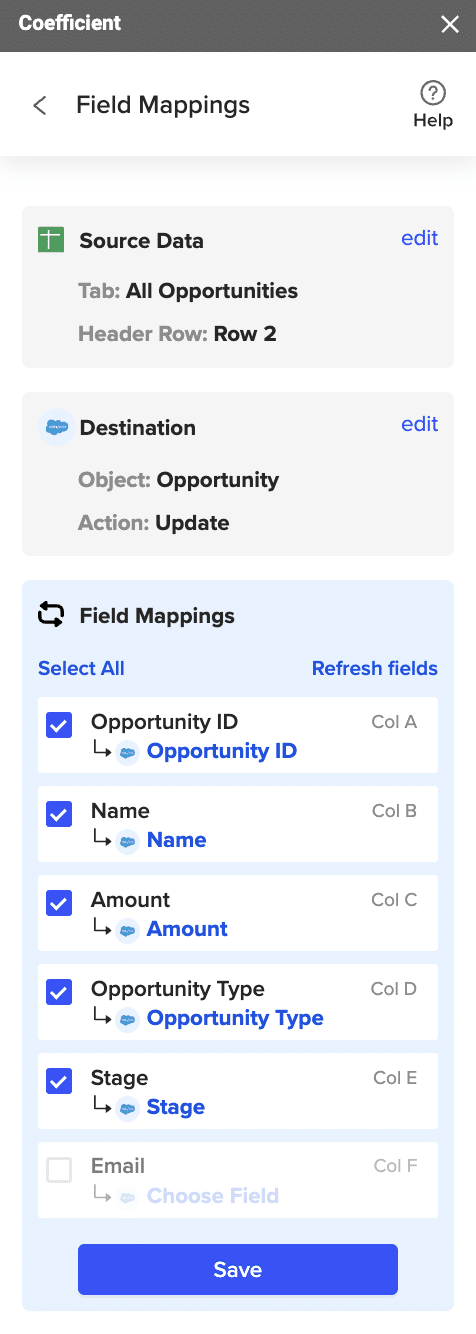
- Select Data and Action: Choose the tab and header rows in your spreadsheet that contain the data you want to export. Define your tab and header row. Select the Salesforce Object (e.g., “Opportunity”, “Contacts”), and choose the type of action—Update, Insert, Upsert, or Delete .
- Map Fields: Map the fields from your spreadsheet to the corresponding Salesforce fields. Coefficient will automatically map these fields if the data originated from Salesforce .
- Customize and Export: Specify additional settings like batch size, whether to export empty cells on an update, and the column for results. Confirm your settings, highlight the rows to export, and click Export .

Your spreadsheet will display updated records, along with their export status and the date/time stamp of the update.
Pros:
- No coding required, making it accessible to non-technical users
- Flexible data transformation options for customized reporting
- Familiar spreadsheet interface reduces learning curve
Cons:
- Requires Google Sheets or Excel as an intermediary
- May not be suitable for real-time, high-volume data syncing
Want to dive deeper? Learn more about connecting NetSuite to Google Sheets with Coefficient.
Pros:
- Users can integrate NetSuite and Salesforce without writing code, making it accessible to non-technical team members.
- The solution offers flexible data transformation options using familiar spreadsheet tools.
- Teams can leverage the familiar interface of Google Sheets or Excel for data manipulation and analysis.
Cons:
- The integration requires Google Sheets or Excel as an intermediary, which may add an extra step in the data flow.
- This method may not be suitable for real-time, high-volume data syncing scenarios that require immediate updates.
Learn more about connecting NetSuite to Google Sheets with Coefficient.
Method 2: Celigo
Celigo is a cloud-based integration platform that offers a pre-built connector for NetSuite and Salesforce. This solution is designed for businesses seeking a comprehensive, scalable integration between the two systems.
Step-by-Step Guide
Step 1. Sign up for Celigo
- Visit the Celigo website
- Click on “Get Started” or “Sign Up”
- Provide your business email and other required information
- Complete the registration process
Step 2. Select the NetSuite-Salesforce integration
- Log into Celigo
- Navigate to the marketplace or integration catalog
- Search for “NetSuite-Salesforce integration”
- Select the pre-built integration package
Step 3. Authenticate your NetSuite and Salesforce accounts
- Click on “Configure Integration”
- Select NetSuite as the first connection
- Enter your NetSuite credentials and authorize the connection
- Repeat the process for Salesforce
- Ensure you have the necessary permissions in both systems
Step 4. Configure data mappings and sync settings

Stop exporting data manually. Sync data from your business systems into Google Sheets or Excel with Coefficient and set it on a refresh schedule.

- In the integration setup wizard, review the pre-built data mappings
- Customize the field mappings as needed for your specific use case
- Define which records should be synced (e.g., all customers, only active accounts)
- Set up filters to control which data is transferred between systems
Step 5. Set up data flow rules and schedules
- Configure the direction of data flow (one-way or bi-directional)
- Define trigger events for data synchronization (e.g., record creation, updates)
- Set up sync schedules for batch processing (hourly, daily, etc.)
- Configure error handling and notification settings
Step 6. Test and deploy the integration
- Run a test sync with a small data set
- Review the results in both NetSuite and Salesforce
- Troubleshoot any errors or discrepancies
- Once satisfied, activate the full integration
- Monitor the initial data sync to ensure proper functionality
Pros:
- The solution provides a pre-built integration with extensive customization options to fit specific business needs.
- Users can set up bi-directional data synchronization for real-time updates across both systems.
- The platform offers robust error handling and monitoring capabilities to ensure data integrity.
Cons:
- Implementing advanced configurations may require technical expertise or assistance from Celigo’s support team.
- The pricing structure for Celigo can be higher compared to simpler solutions, which may impact budget considerations.
Method 3: Salesforce Connect with NetSuite Connector
Salesforce Connect is a native Salesforce feature that allows you to integrate external data sources, including NetSuite, directly into Salesforce without copying the data. This method is best for organizations already invested in the Salesforce ecosystem.
Step 1. Enable Salesforce Connect in your Salesforce org
- Log in to your Salesforce org as an administrator
- Go to Setup
- In the Quick Find box, search for “Salesforce Connect”
- Click “Enable Salesforce Connect”
- Review and accept the terms and conditions
Step 2. Install the NetSuite Connector from the Salesforce AppExchange
- Visit the Salesforce AppExchange
- Search for “NetSuite Connector”
- Select the official NetSuite Connector app
- Click “Get It Now” and follow the installation prompts
- Choose the Salesforce org where you want to install the connector
Step 3. Configure the NetSuite connection in Salesforce
- In Salesforce Setup, go to “External Data Sources”
- Click “New External Data Source”
- Set the data source type to “NetSuite”
- Enter your NetSuite credentials and endpoint URL
- Test and save the connection
Step 4. Set up external objects to represent NetSuite data
- In Salesforce Setup, go to “External Objects”
- Click “New External Object”
- Define the object name and label (e.g., “NetSuite Customer”)
- Map the fields from NetSuite to Salesforce
- Set up any necessary relationships with standard Salesforce objects
Step 5. Create relationships between Salesforce and NetSuite objects
- Edit the page layouts of relevant Salesforce objects
- Add related lists to display NetSuite data
- Create lookup fields to link Salesforce records with NetSuite records
- Configure field-level security and sharing settings
Step 6. Configure data sync and refresh settings
- Set up batch jobs to periodically refresh NetSuite data in Salesforce
- Configure real-time callouts for critical data updates
- Set up error logging and monitoring
- Test the integration thoroughly with sample data
Pros:
- The integration leverages native Salesforce functionality, providing a seamless user experience within the Salesforce interface.
- Users can access real-time NetSuite data without replicating it in Salesforce, saving storage and ensuring up-to-date information.
- The solution offers tight integration with Salesforce’s security model and user interface.
Cons:
- Implementing Salesforce Connect requires a separate license, which may increase overall costs.
- Most use cases are limited to read-only access to NetSuite data, restricting bi-directional updates.
- Large data volumes may experience performance limitations due to real-time API calls.
Get Started with NetSuite-Salesforce Integration Today
Connecting NetSuite to Salesforce can significantly improve your business operations by providing a unified view of your data across both platforms. Whether you choose the flexibility of Coefficient, the comprehensive features of Celigo or the native capabilities of Salesforce Connect, integrating these powerful systems will streamline your processes and enhance decision-making.
Ready to take the next step? Get started with Coefficient to experience a seamless, no-code integration between NetSuite and Salesforce. For more information on leveraging NetSuite data, check out our guide on NetSuite integration with Google Sheets.

