Are you ready to supercharge your marketing efforts? Discover how to seamlessly connect Google Ads to HubSpot and unlock a world of possibilities for your campaigns. In this comprehensive guide, we’ll explore three powerful methods to integrate these platforms, enabling better data synchronization and campaign management. Whether you’re a seasoned marketer or just getting started, we’ve got you covered with step-by-step instructions and valuable insights.
Why Connect Google Ads to HubSpot?
Before we dive into the nitty-gritty of integration methods, let’s explore why connecting Google Ads to HubSpot is such a powerful move for your marketing strategy:
- Unified Customer Data: By syncing Google Ads click and conversion data with HubSpot CRM, you’ll gain a complete view of your customers’ journeys. This holistic perspective allows you to make more informed decisions and create targeted campaigns that resonate with your audience.
- Enhanced Targeting: Leverage HubSpot’s rich audience data to create laser-focused Google Ads campaigns. By tapping into the wealth of information stored in your CRM, you can craft highly personalized ads that speak directly to your prospects’ needs and interests.
- Improved ROI Tracking: Accurately attribute conversions and revenue to specific Google Ads campaigns within HubSpot. This level of granular tracking enables you to optimize your ad spend and focus on the strategies that deliver the best results for your business.
Now that we’ve established the benefits, let’s explore the top three methods to connect Google Ads to HubSpot.
Top 3 Methods to Connect Google Ads to HubSpot
Each method offers unique advantages, catering to different user needs and technical expertise levels. Here’s a quick overview of the options we’ll cover:
| Solution | Best For |
| Coefficient | Non-technical users who want to sync Google Ads data with HubSpot using Google Sheets as an intermediary for data transformation and analysis |
| Native Integration | Marketers looking for a direct, out-of-the-box connection between Google Ads and HubSpot for basic data syncing |
| Zapier | Users who need customizable automation workflows to connect Google Ads and HubSpot with other apps in their tech stack |
Let’s dive into each method and explore how to implement them effectively.
Method #1: Coefficient
Coefficient is a powerful spreadsheet add-on that allows you to sync data between Google Ads and HubSpot using Google Sheets as an intermediary. This method is ideal for users who want flexibility in data manipulation and reporting.
Step-by-Step Walkthrough:
Step 1. Install Coefficient
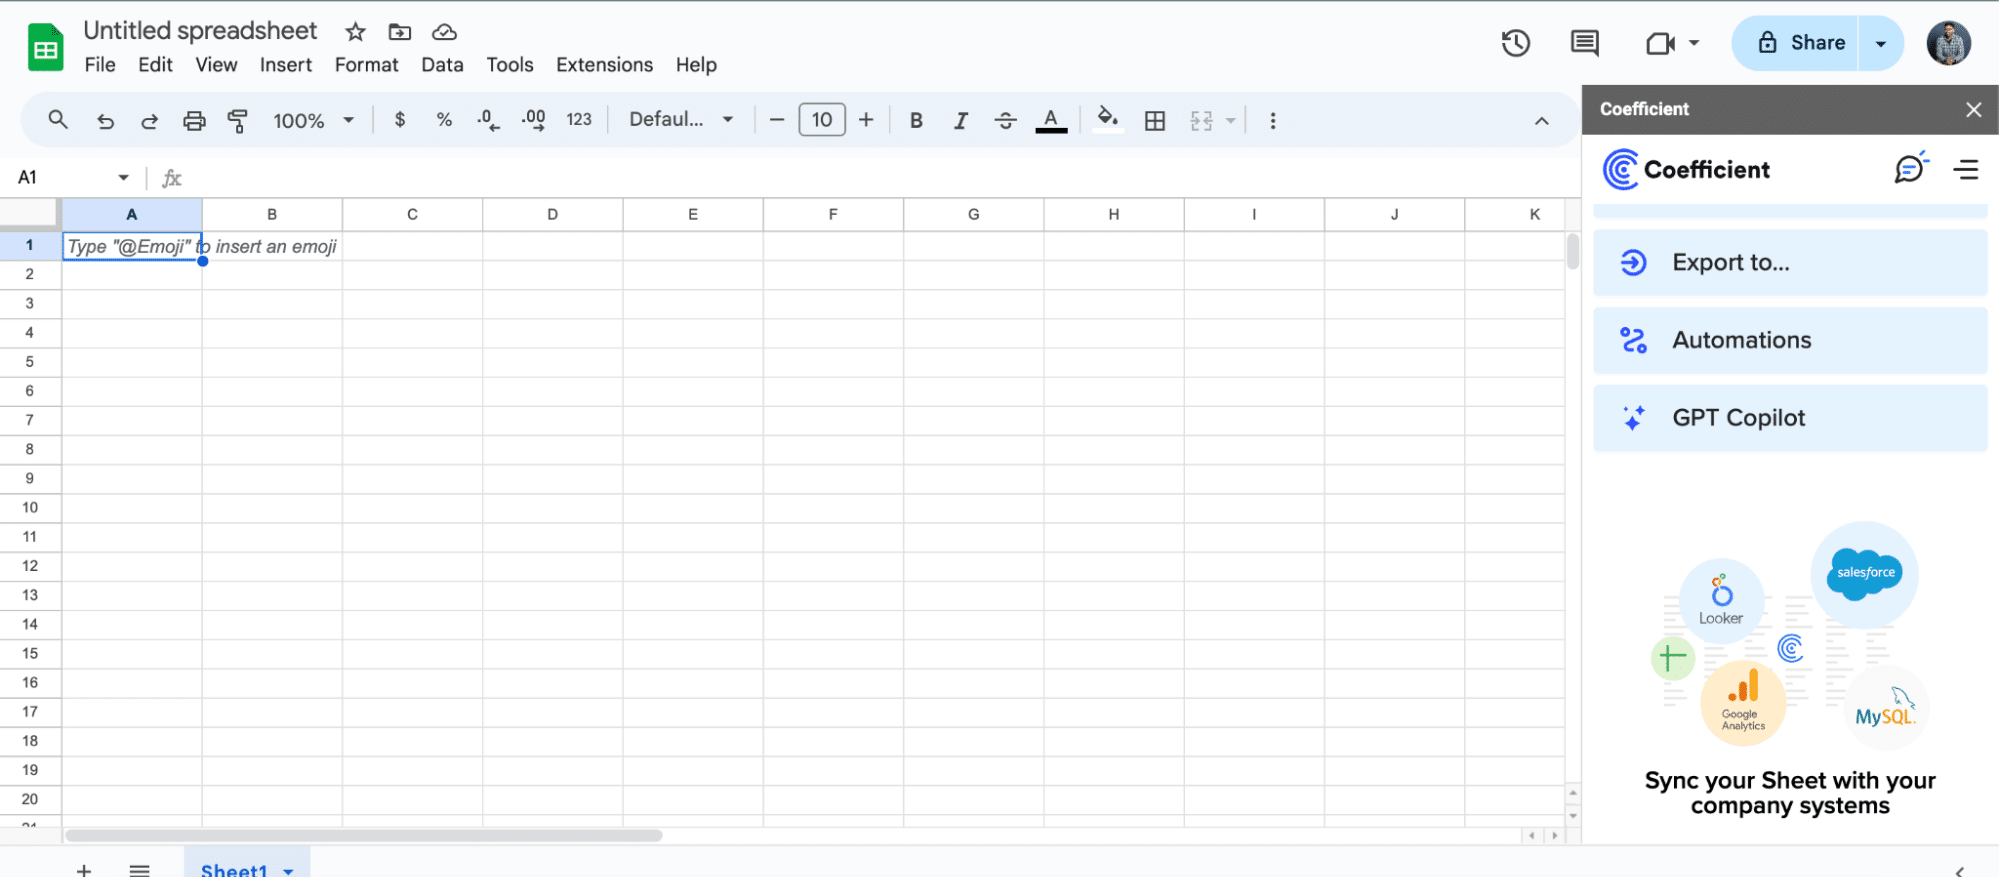
For Google Sheets
- Open a new or existing Google Sheet, navigate to the Extensions tab, and select Add-ons > Get add-ons.
- In the Google Workspace Marketplace, search for “Coefficient.”
- Follow the prompts to grant necessary permissions.
- Launch Coefficient from Extensions > Coefficient > Launch.
- Coefficient will open on the right-hand side of your spreadsheet.
For Microsoft Excel
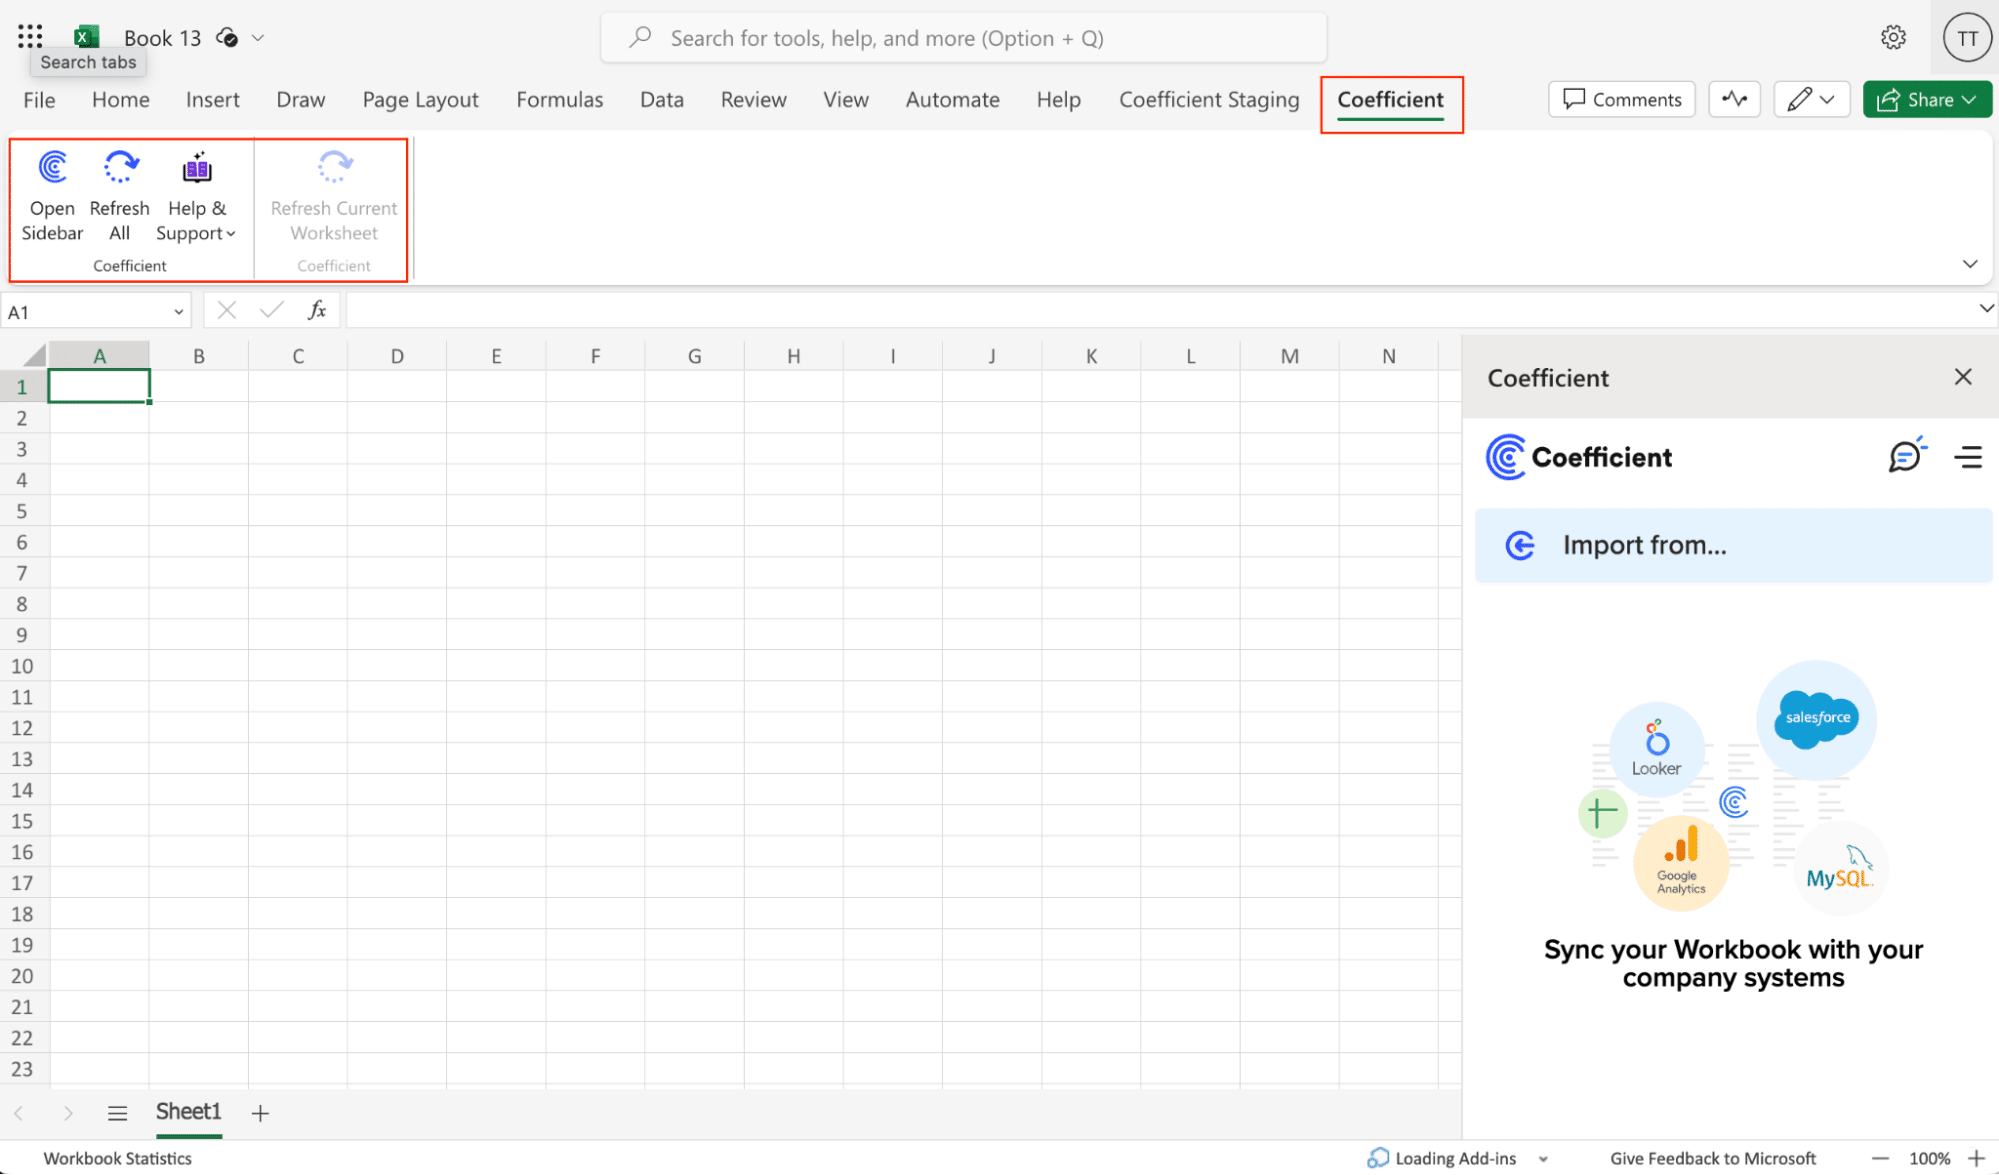
- Open Excel from your desktop or in Office Online. Click ‘File’ > ‘Get Add-ins’ > ‘More Add-Ins.’
- Type “Coefficient” in the search bar and click ‘Add.’
- Follow the prompts in the pop-up to complete the installation.
- Once finished, you will see a “Coefficient” tab in the top navigation bar. Click ‘Open Sidebar’ to launch Coefficient.
Step 2. Connect and Import Data from Google Ads
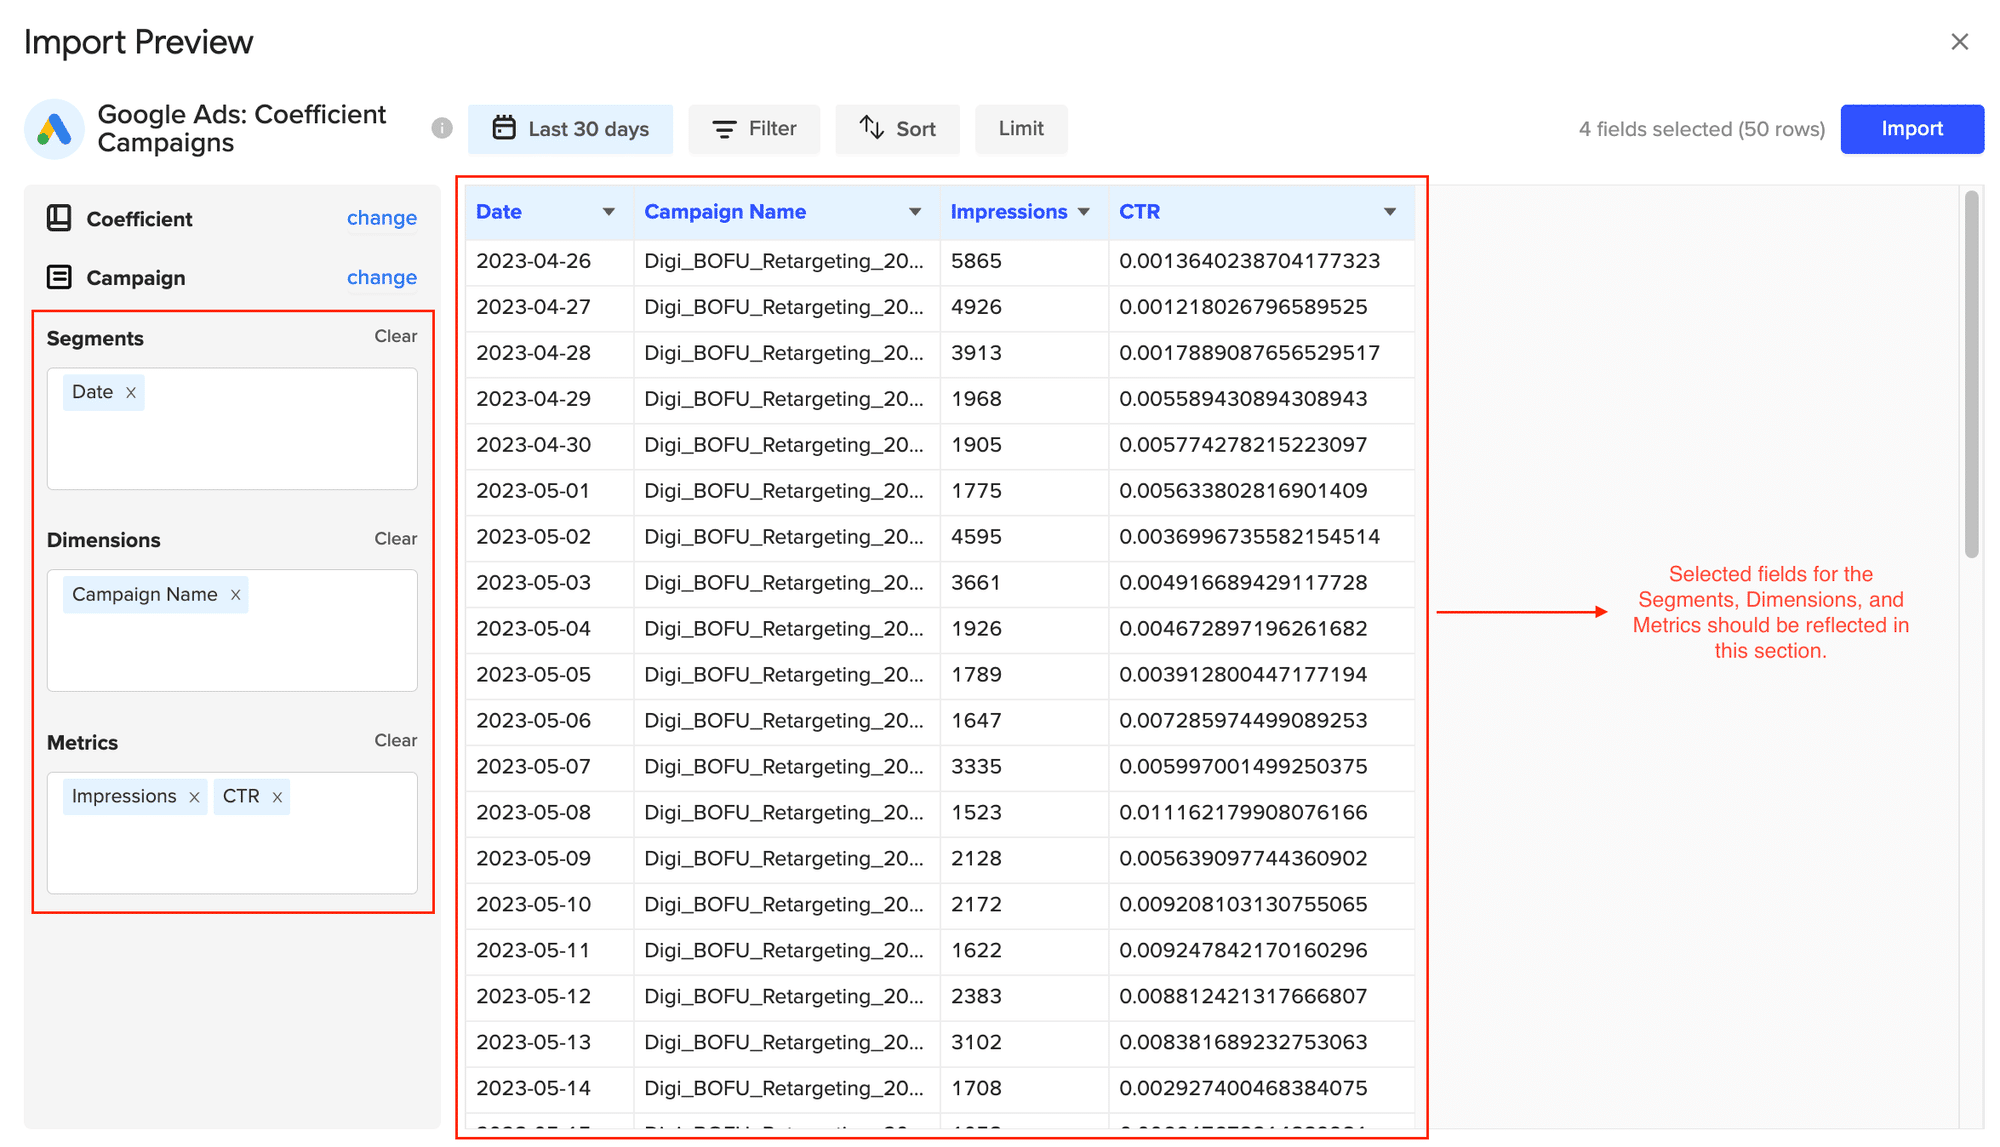
- Open Coefficient Sidebar: In the Coefficient sidebar, click Import from…, then choose Google Ads.
- Authenticate Google Ads: Follow the prompts to connect your Google Ads account to Coefficient.

- Select Data: Choose the metrics and dimensions you need from Google Ads, such as Campaign Performance, Clicks, Impressions, etc. Configure any necessary filters and click Import. Your Google Ads data will populate in Google Sheets .
Step 3. Export Data to HubSpot
- Navigate to Export: In Coefficient’s sidebar, click Export to…, then select HubSpot.
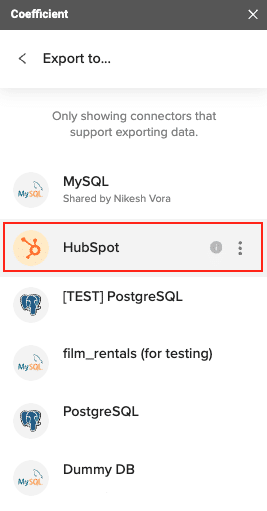
- Select Data and Action: Choose the tab and header row in your sheet that contains the data you want to export. Define your tab and header row. Select the HubSpot Object (e.g., Contacts, Deals) and choose the type of action: Update, Insert, Upsert, or Delete
- Map Fields: Map the fields from your Google Sheets data to the corresponding fields in HubSpot. If your data came from a HubSpot import, fields would be auto-mapped by Coefficient. Otherwise, you’ll need to manually map your data
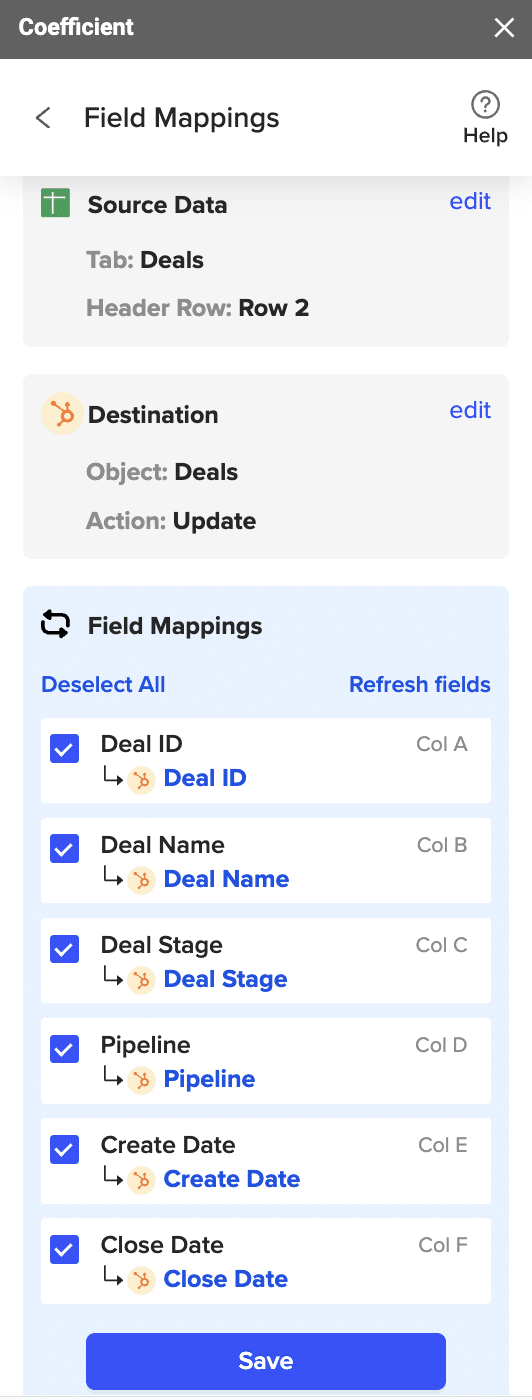
- Customize and Export: Specify additional settings like batch size and export options. Confirm your settings and click Export. Coefficient will process the request and update HubSpot accordingly

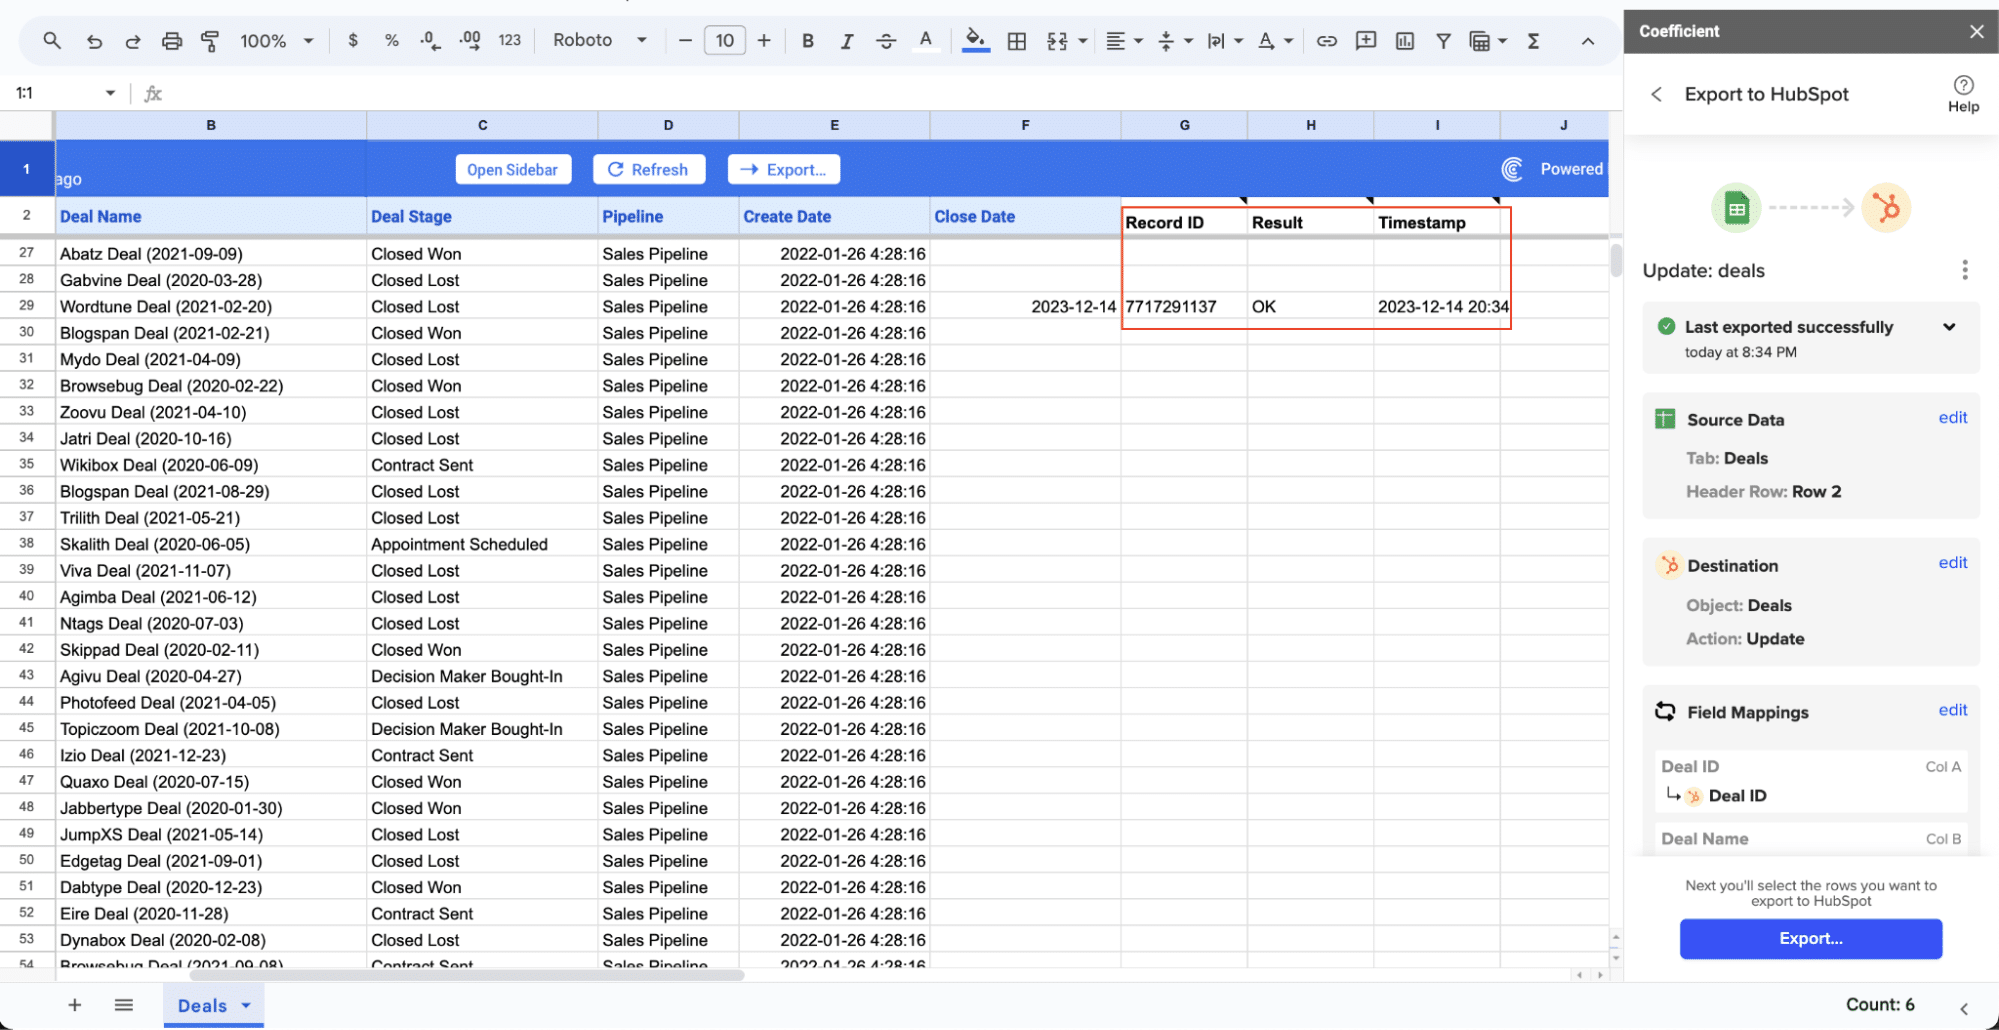
Check your spreadsheet to confirm. The records will have the record ID, result status, and timestamp of the update.
Pros of using Coefficient:
- You can leverage flexible data transformation capabilities within Google Sheets.
- The interface is designed for non-technical users, making it easy to use without coding knowledge.
- Coefficient allows you to combine data from multiple sources, providing a comprehensive view of your marketing efforts.
Cons of using Coefficient:
- This method requires Google Sheets as an intermediary, which may add an extra step to your workflow.
- Real-time data syncing may have limitations compared to direct integrations.
Learn more about Coefficient’s Google Ads integration for Google Sheets
Method 2: Native Integration
HubSpot offers a native integration with Google Ads, allowing for a direct connection between the two platforms without the need for third-party tools.
Step 1. Navigate to the HubSpot Ads settings.
Log in to your HubSpot account and click on the settings icon in the main navigation bar. In the left sidebar, go to Marketing > Ads.
Step 2. Initiate the Google Ads connection.
On the Ads page, click the “Connect accounts” button and select Google Ads from the list of available ad platforms.
Step 3. Authenticate your Google Ads account.
You’ll be prompted to sign in to your Google Ads account.
Enter your credentials and grant the necessary permissions for HubSpot to access your Google Ads data.
Step 4. Select the Google Ads account to connect.
If you have multiple Google Ads accounts, choose the specific account you want to connect to HubSpot.
Step 5. Configure tracking settings.
Set up conversion tracking by selecting which HubSpot forms and CTAs you want to track as conversions in Google Ads. This step ensures that your Google Ads campaigns are properly attributed to conversions in HubSpot.
Step 6. Apply the tracking pixel.
HubSpot will provide a tracking pixel that needs to be added to your website. This pixel allows HubSpot to track user interactions and attribute them to your Google Ads campaigns. Follow HubSpot’s instructions to implement the pixel correctly.
Pros of using the native integration:
- You can enjoy direct integration without the need for additional tools or platforms.
- The native integration provides automatic syncing of data between Google Ads and HubSpot.
- Both Google Ads and HubSpot offer native support for this integration, ensuring compatibility and reliability.
Cons of using the native integration:
- The native integration may offer limited customization options for data mapping and transformation.
- Advanced data transformation needs may not be fully supported without additional tools or manual intervention.
Method 3: Zapier
Zapier is a popular automation platform that can connect Google Ads and HubSpot, along with thousands of other apps, allowing for customizable workflows.
Step 1. Sign up for a Zapier account. Visit Zapier’s website and create an account if you don’t already have one. Choose a plan that suits your automation needs.
Step 2. Create a new Zap. In your Zapier dashboard, click on ” + Create” > “New Zap” to start setting up your automation workflow.

Step 3. Choose Google Ads as the trigger app. In the trigger section, search for and select Google Ads as your trigger app.
Step 4. Select the trigger event. Choose the specific Google Ads event that will initiate your workflow.
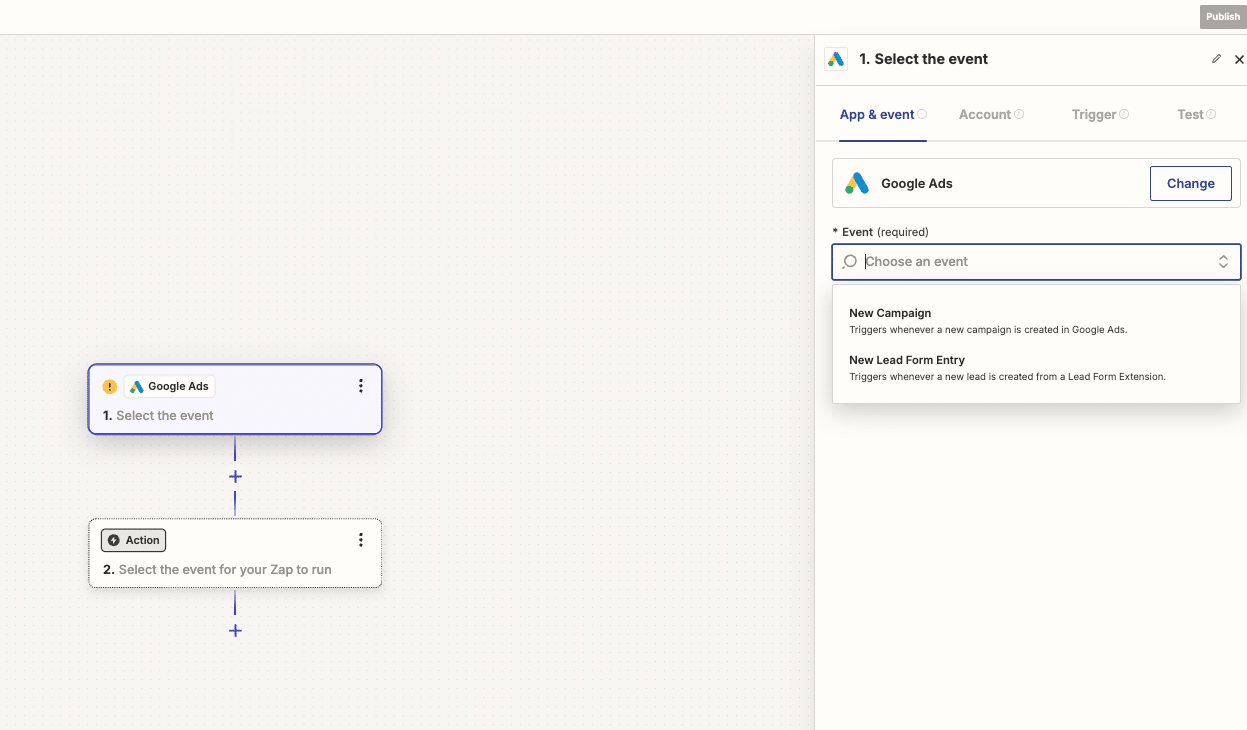
Step 5. Connect your Google Ads account. Follow Zapier’s prompts to authenticate your Google Ads account and grant the necessary permissions.
Step 6. Choose HubSpot as the action app. In the action section of your Zap, search for and select HubSpot as your action app.
Step 7. Select the action event. Choose the specific action you want to occur in HubSpot when the Google Ads trigger event happens. For example, you might select “Create or Update Contact” to update HubSpot contact records with Google Ads data.

Step 8. Connect your HubSpot account.
Authenticate your HubSpot account by following Zapier’s prompts and granting the required permissions.
Step 9. Map the data fields.
Use Zapier’s field mapping interface to connect the relevant data points from Google Ads to the appropriate fields in HubSpot. This step ensures that the right information is transferred between the two platforms.
Step 10. Test and activate your Zap.
Run a test to ensure your Zap is working correctly. If the test is successful, activate your Zap to start the automated workflow between Google Ads and HubSpot.
Pros of using Zapier:
- Zapier offers highly customizable automation workflows to suit your specific needs.
- You can connect multiple apps beyond Google Ads and HubSpot, creating complex multi-step automations.
- Basic integrations can be set up without any coding knowledge.
Cons of using Zapier:
- Advanced features and higher usage limits may require a paid Zapier plan.
- Setting up intricate workflows can become complex and may require some technical understanding.
Supercharge Your Marketing with Coefficient
Connecting Google Ads to HubSpot can significantly enhance your marketing efforts by providing a unified view of your customer data and improving campaign performance. Whether you choose Coefficient for flexible data manipulation, the native integration for simplicity, or Zapier for customizable workflows, you’ll be able to leverage the power of both platforms more effectively.
By integrating these powerful tools, you can:
- Create more targeted and personalized ad campaigns
- Track the full customer journey from ad click to conversion
- Optimize your ad spend based on accurate attribution data
- Streamline your reporting and decision-making processes
Ready to take your marketing to the next level? Get started with Coefficient today and experience the benefits of seamless data integration between Google Ads and HubSpot.
Explore more Google Ads integration options
Frequently Asked Questions
Q: Can you integrate Google Ads with HubSpot?
Yes, you can integrate Google Ads with HubSpot. There are multiple methods available, including using Coefficient for flexible data syncing, leveraging the native integration provided by HubSpot, or using automation tools like Zapier. Each method offers different benefits depending on your specific needs and technical expertise.
Q: Can HubSpot integrate with Google?
Yes, HubSpot can integrate with various Google products, including Google Ads. This integration allows you to import customer match data, offline conversions, and export leads from Google Ads to HubSpot, providing a more comprehensive view of your marketing funnel.
Q: How do I link my ad account to HubSpot?
To link your Google Ads account to HubSpot:
- In your HubSpot account, click the settings icon in the top navigation bar
- Navigate to Marketing > Ads in the left sidebar menu
- In the Accounts tab, click “Connect account”
- Follow the prompts to authorize the connection between HubSpot and Google Ads
For a more flexible integration with additional data transformation capabilities, consider using Coefficient to connect Google Ads and HubSpot through Google Sheets.


