
Get Started by installing Coefficient Add-on for Google Sheets
Launch Coefficient from Google Sheets Extensions Menu.
Click Import Data from the Coefficient sidebar, then select Stripe as your data source.
Select the Stripe account you want to connect and click Connect.
Specify your import’s Object fields by clicking Select Fields.
Set an auto-refresh schedule hourly, daily, or weekly. This automates updating your Stripe data on Google Sheets when your source data changes.
Overview
Stripe is one of the most popular and reliable payment processors for online businesses.
The platform’s payment processor and credit card payment gateway are easy to navigate and set up, Stripe provides robust security for sellers and customers, and they offer services globally.
However, one challenging area of using Stripe is how to efficiently move data from their platform into a spreadsheet for your bookkeeping and accounting processes.
After all, manually transferring payment information isn’t ideal if you’re dealing with hundreds or thousands of rows and columns of data. Plus, manual methods can lead to costly errors that can cause a myriad of issues for your company.
The good news is, there are ways to connect Stripe to Google Sheets automatically and without typing in or copying and pasting data to a spreadsheet.
Video Walkthrough: How to Connect Stripe to Google Sheets
Why connect Stripe to Google Sheets
Connecting Stripe to Google Sheets can eliminate manual data entry work, streamlining your bookkeeping and accounting processes. It can simplify and automate critical parts of your sales tracking and reconciliation for more efficient reporting.
Top Three Ways to Connect Stripe to Google Sheets
- Coefficient – Seamless Plug and Play Data Connector
- Zapier – Limited features and high setup effort
- Google Apps Script – Requires Coding Knowledge to setup and maintain
Method 1: Coefficient
Coefficient’s no-code data connector app allows you to sync Google Sheets to Stripe within minutes. You get easy access and update your Stripe data on Google Sheets in real-time, ensuring you always work with accurate and up-to-date information.
Advantages of using Coefficient to connect Stripe to Google Sheets –
- Coefficient is easy to set up and requires little to no coding, so even non-technical users can use it with ease. This helps speed up and simplify deploying the app since it requires a short learning curve.
- You can customize the data you want to import by selecting the specific fields from your Stripe dashboard and sorting and filtering them before syncing to Google Sheets.
- You can also automate syncing your Stripe data in Google Sheets by setting an auto-refresh schedule so you won’t have to update anything manually. This allows your team to work more efficiently and shift your time and resources to more critical tasks.
- It ensures all your data is secure to prevent unauthorized users from accessing or viewing your credentials and data.
Using Coefficient to connect Stripe to Google Sheets is straightforward and effortless.
Step 1: Install the Coefficient Add-on from the Google Workspace Marketplace or Signup with Google here. Navigate to the top menu of your Google spreadsheet and click Extensions > Add-ons > Get add-ons.

Type in Coefficient in the search box and click Install.

Choose the Google Account you want to use, review the information required to grant access to Coefficient, then click Allow.

After successfully installing the app, navigate back to Extensions from the top menu, hover over Coefficient: Salesforce HubSpot Data Connector from the dropdown, and click Launch.
Step 2: Click Import Data from the Coefficient sidebar, then select Stripe as your data source.
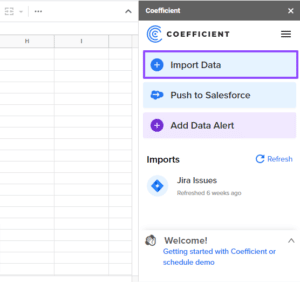
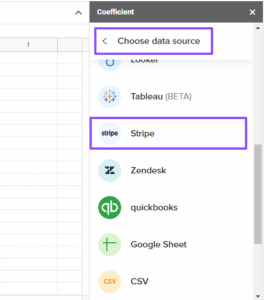
Click Authorize to Stripe to allow Coefficient to connect Google Sheets to your Stripe account.

If you don’t have a Stripe account yet, you’ll be asked to create one. You can follow the steps for creating a Stripe account since it’s pretty straightforward.
Step 3: Select the Stripe account you want to connect and click Connect.

Once connected, you’ll be redirected back to the Google spreadsheet with the Coefficient sidebar. Select the Object you want to import, such as the charges, customers, subscriptions, invoices, and refunds.

Step 4: Specify your import’s Object fields by clicking Select Fields.
For this example, we’ll select the fields under Charges.
Check off the boxes on the left side of each field you want to include in the Data Preview window. Click Done.

After you’ve added all the fields, click Import on the Coefficient sidebar. Your import data should populate your Google spreadsheet within a few seconds or minutes. It should look something like this.

Step 5: Set an auto-refresh schedule hourly, daily, or weekly. This automates updating your Stripe data on Google Sheets when your source data changes.

Out of all the tools available in the market, Coefficient by far is the only tool that allows this level of ease and convenience when connecting and automatically syncing data from Stripe to Google Sheets. Essentially, Coefficient’s solution streamlines pulling and syncing your Stripe data to Google Sheets, saving you tons of time and effort and allowing you to work more efficiently.
Cons:
- The only current “downside” of using Coefficient is that it’s not totally free. You can try out the app for free but with limited imports and access to features. However, the benefits and convenience of investing in the Coefficient app can more than make up for the costs. It can significantly cut down on the time and resources spent pulling and syncing your Stripe data on Google Sheets.
Method 2: Integrations via Zapier
Zapier allows a no-code and automated method to send information between Google Sheets and Stripe.
Pros
- Setting up a Stripe to Google Sheets integration does not require coding and is pretty easy to set up.
- It’s useful for non-technical users since you can follow the step-by-step process to configure and test your automated workflows.
Cons
- While you can configure automated workflows, you need to set up the specific data you want to pull and track from Stripe to Google Sheets individually, which can take time and effort.
- Zapier does not provide an interface within Google sheets or Stripe. So, you’d have to manage a third platform which adds to the budget, operational efficiency and maintenance.
- Plus, using Zapier to connect Stripe to Google Sheets can offer less control over your information and actions since you’ll be limited to the available integrations.
Follow these steps to configure your Stripe Google Sheets connection. For this example, let’s set up an automated workflow or Zap that automatically adds new Stripe sales as new rows in Google Sheets.
Step 1: Before setting up the Stripe to Google Sheets integration, configure the Google spreadsheet where you want to pull in your data first.
Create a blank Google spreadsheet and create a header row for your columns to make setting up your Zaps later easier.
For this example, your column labels or headers should look like this:

Step 2: After logging into Zapier, connect your Stripe account.

Click Connect, and you should see a popup window where you can input your API key. You can find your API key on your Stripe account’s dashboard. Copy and paste the API key, then click “Yes, continue.”
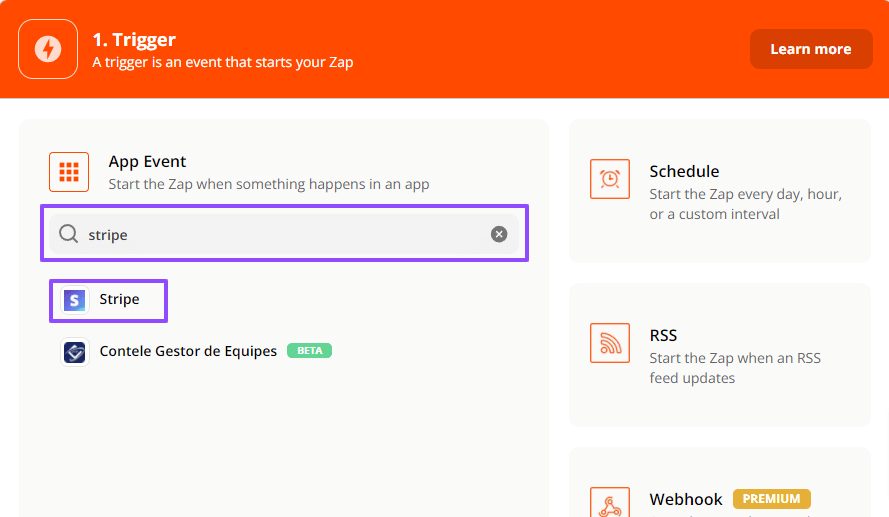
Step 3: Configure your Stripe trigger step or event in Zapier. Type in Stripe in the app event search box, then select the app.
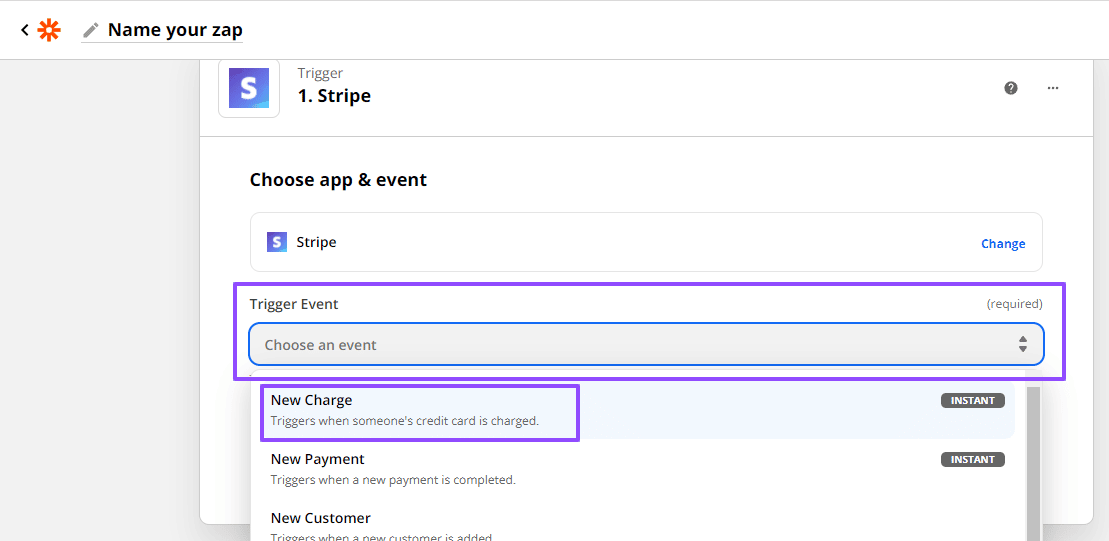
In the Zap Editor, click Choose an event, select New Charge from the dropdown, then Continue.
You’ll be asked to sign in to your Stripe account (if you haven’t yet).
You can also pull in sample data from Stripe, which is good practice when setting up Zaps. It helps ensure you configure your workflows properly and spot issues easily when you test them later.
Step 4: Set up your Google Sheets Action step or the event a Zap performs after it starts.
Type in Google Sheets in the search bar (or click the app if it’s already visible in the list).
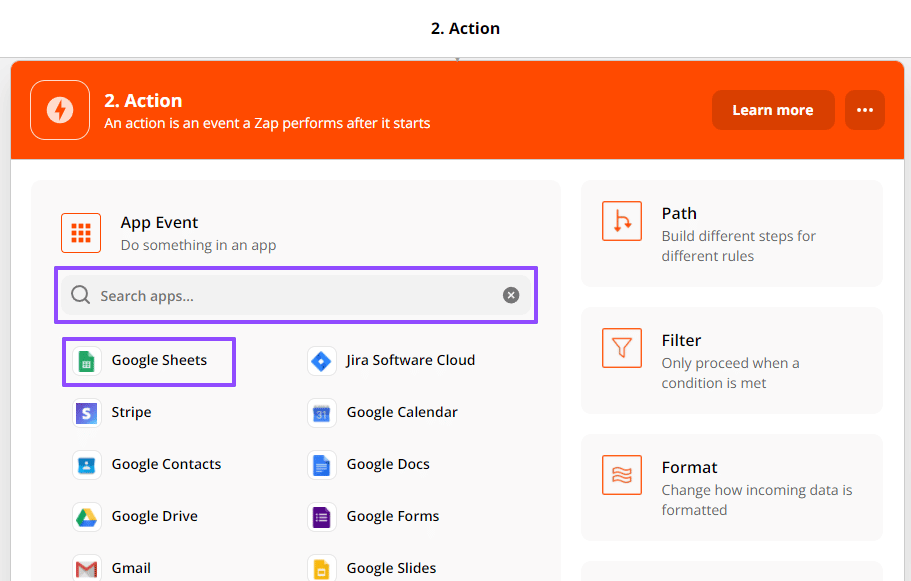
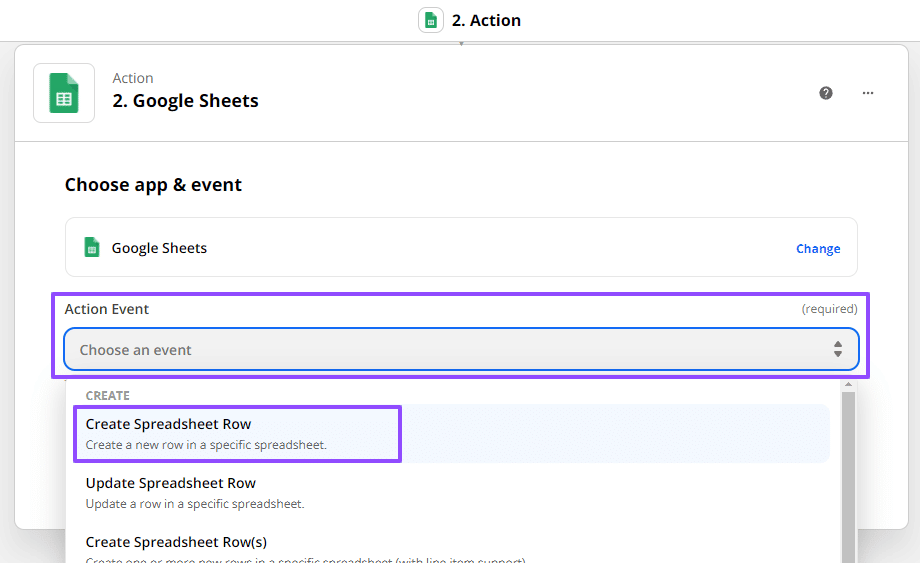
Click Choose an event and select Create a spreadsheet row from the dropdown.
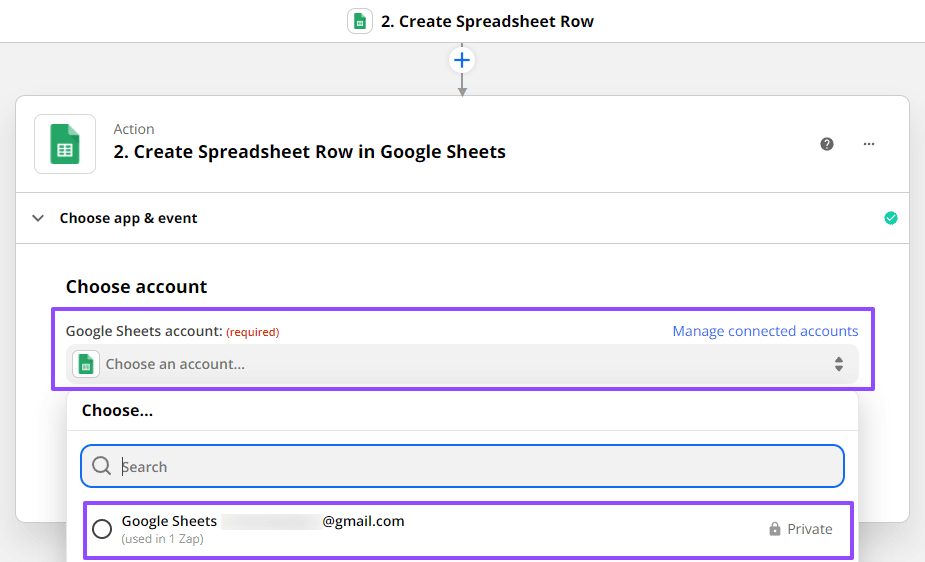
After clicking Continue, you’ll be asked to sign in to your Google Sheets account. Click Choose an account, the Google account you want to use, and Continue.
Step 5: After signing in to your Google Sheets account, specify the Google Drive where your spreadsheet is located, the spreadsheet, and the worksheet for the integration.
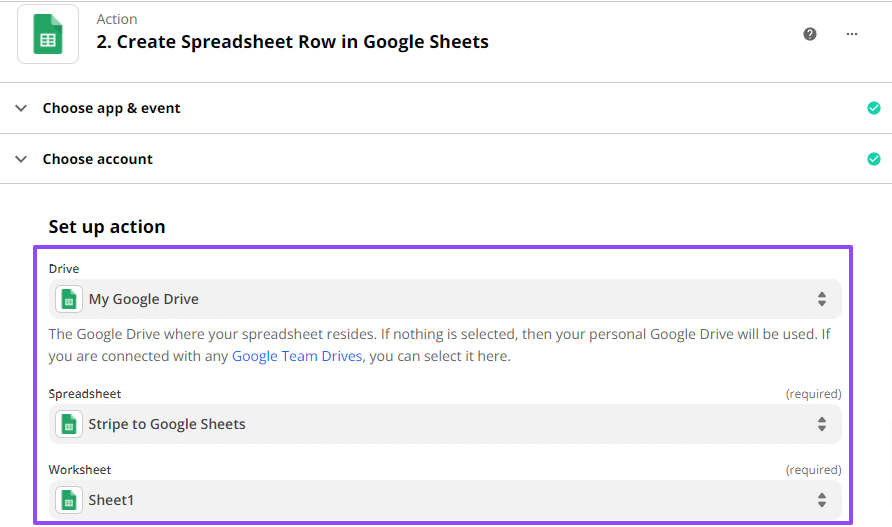
Choose the spreadsheet and worksheet we created in Step 1, and you’ll see the column headings.
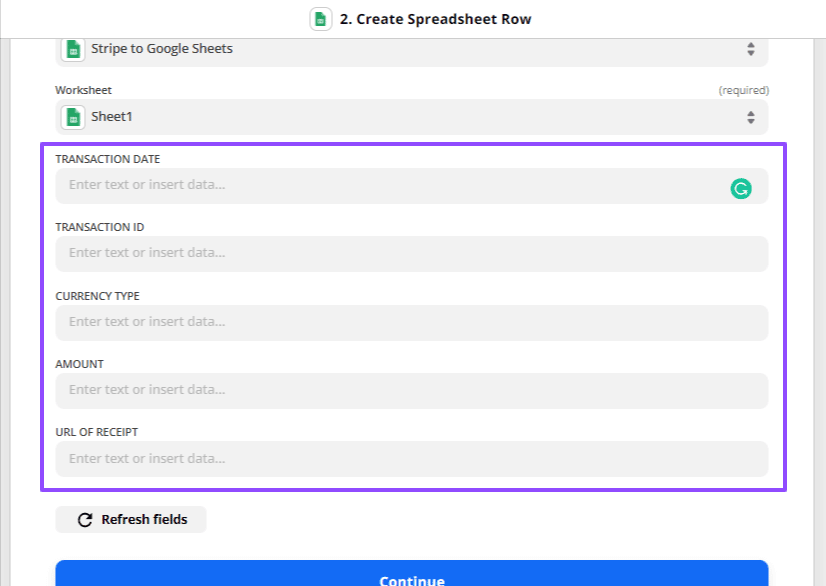
If you need to make changes to your spreadsheet and the column headers, you can go to your spreadsheet and do so.
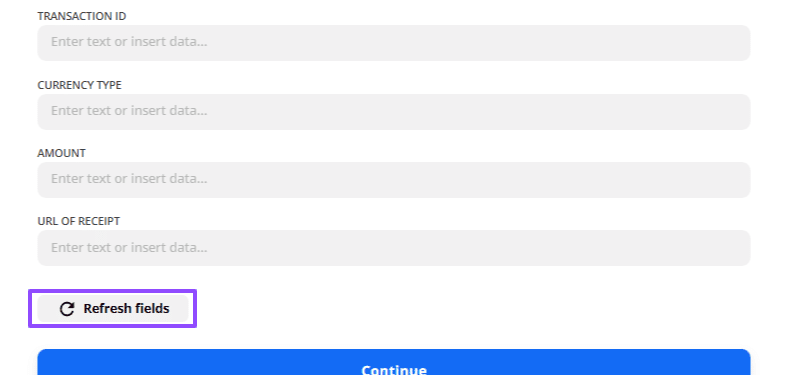
Click Refresh fields to update and include the changes in the Zap editor.
Step 6: Populate your spreadsheet by selecting your Stripe trigger’s payload values.
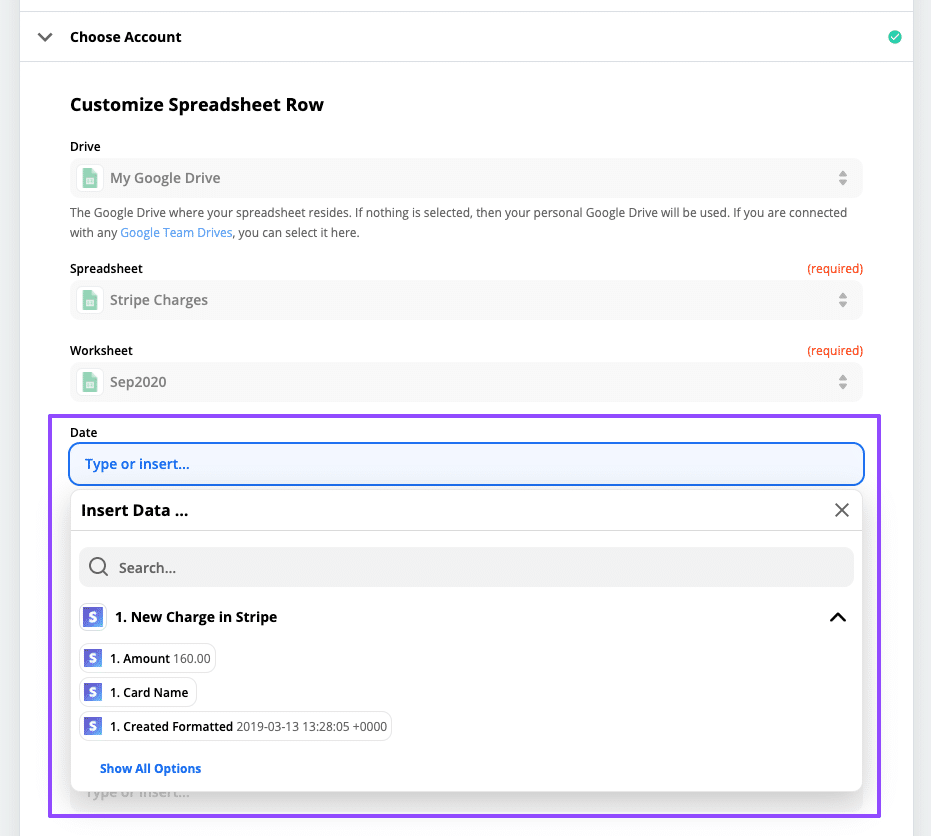
You can set up your Google spreadsheet to track and log the Stripe data you want. For this example, the data includes the date, currency, ID, amount, and URL.

After selecting all the fields, click Continue and test your Zap.
Once the test is done, you should see the Stripe data as a row in your Google spreadsheet.

Turn on your Zap, and you should be good to go.
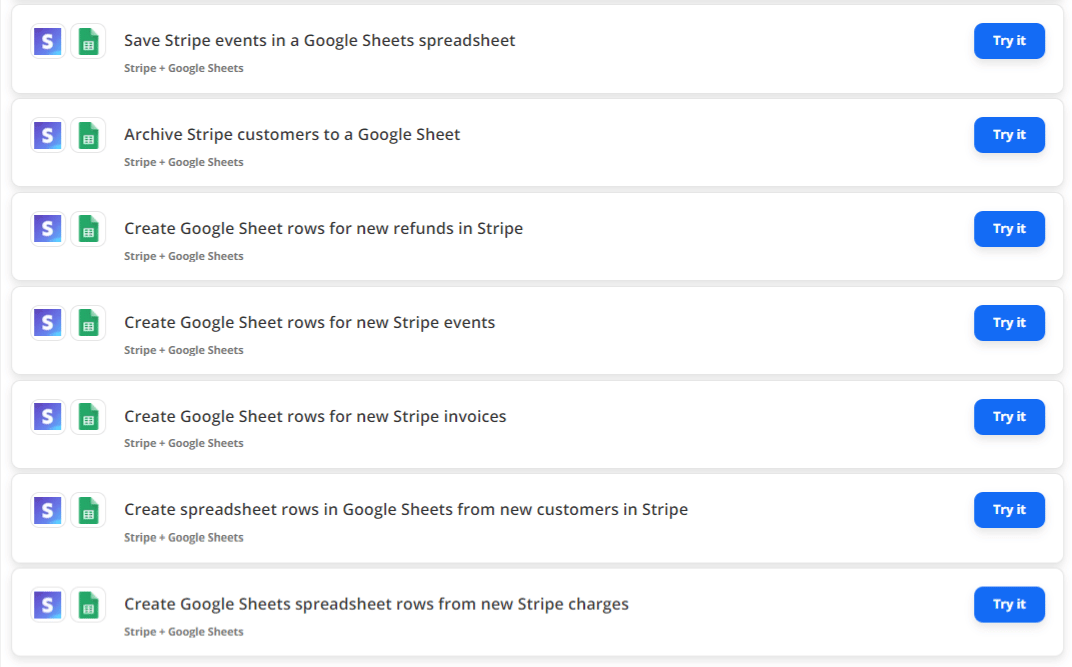
You can also set up other automated workflows and use Zapier’s data-logging Zap coeff-templates to connect your Stripe data with Google Sheets.
Method 3: Google Apps Script in Google Sheets
Google Apps Script lets you create custom functionalities in Google Sheets, Google Docs, etc.
Pros
- The process doesn’t look too complicated if you have some coding knowledge and experience.
Cons
- Using Google Apps Script to connect Stripe to Google Sheets requires coding knowledge and technical skills.
- This can require a high learning curve and take too much time and effort before adoption and deployment, adding to your team’s workload. You’ll also need to do a few pre-configuration work before setting up the Stripe to Google Sheets connection, which can be too complex for non-technical users.
- The sample script used above only reads data from a table you specify. You’ll need to extend the script to incorporate other functionalities such as data updating.
In this example, we’ll cover how to connect to the Stripe Open Database Connectivity (ODBC) Driver from Google Apps Script. This includes the steps and a sample script to connect Stripe data to your Google spreadsheet.
Step 1: Before connecting your Stripe data to Google Sheets, you’ll need to set up a few things.
Create a new MySQL remoting service within the SQL Gateway for the Stripe ODBC Driver. Also, ensure the SQL Gateway is installed on a web-facing machine or connected to a hosted SSH server.
Next, provide values for the necessary connection properties in the Data Source Name or DSN (if you haven’t yet).
Use the built-in Microsoft ODBC Data Source Administrator to set up the DSN and use the OAuth authentication standard to connect to Stripe.
You’ll need to register an app to get the OAuthClientSecret, OAuthClientID, and CallbackURL connection properties to authenticate OAuth.
Step2: Create an empty script
After configuring the SQL Gateway for Stripe data, use Google Apps Script to access the MySQL remoting service.
Click Extensions > Apps Script on the Google Sheets top menu to create your script.

Step 2: Make several class variables available for any functions created within the script.

Step 3: Include a menu option function in Google Sheets. This allows you to use the User Interface (UI) to call your function.


Step 4: Create a helper function. This lets you find the first empty row within your spreadsheet.

Step 5: Create a function to write Stripe data into a Google spreadsheet.
The function below uses the Google Apps Script JDBC functionality to connect to the MySQL remoting service to write and select Stripe data and populate a spreadsheet.
/*
* Reads data from a specified Stripe ‘table’ and writes it to the specified sheet.
* (If the specified sheet does not exist, it is created.)
*/
function connectToStripeData() {
var thisWorkbook = SpreadsheetApp.getActive();
//select a sheet and create it if it does not exist
var selectedSheet = Browser.inputBox(‘Which sheet would you like the data to post to?’,Browser.Buttons.OK_CANCEL);
if (selectedSheet == ‘cancel’)
return;
if (thisWorkbook.getSheetByName(selectedSheet) == null)
thisWorkbook.insertSheet(selectedSheet);
var resultSheet = thisWorkbook.getSheetByName(selectedSheet);
var rowNum = 2;
//select a Stripe ‘table’
var table = Browser.inputBox(‘Which table would you like to pull data from?’,Browser.Buttons.OK_CANCEL);
if (table == ‘cancel’)
return;
var conn = Jdbc.getConnection(dbUrl, user, userPwd);
//confirm that var table is a valid table/view
var dbMetaData = conn.getMetaData();
var tableSet = dbMetaData.getTables(null, null, table, null);
var validTable = false;
while (tableSet.next()) {
var tempTable = tableSet.getString(3);
if (table.toUpperCase() == tempTable.toUpperCase()){
table = tempTable;
validTable = true;
break;
}
}
tableSet.close();
if (!validTable) {
Browser.msgBox(“Invalid table name: ” + table, Browser.Buttons.OK);
return;
}
var stmt = conn.createStatement();
var results = stmt.executeQuery(‘SELECT * FROM ‘ + table);
var rsmd = results.getMetaData();
var numCols = rsmd.getColumnCount();
//if the sheet is empty, populate the first row with the headers
var firstEmptyRow = getFirstEmptyRowByColumnArray(resultSheet, “A”);
if (firstEmptyRow == 1) {
//collect column names
var headers = new Array(new Array(numCols));
for (var col = 0; col < numCols; col++){
headers[0][col] = rsmd.getColumnName(col+1);
}
resultSheet.getRange(1, 1, headers.length, headers[0].length).setValues(headers);
} else {
rowNum = firstEmptyRow;
}
//write rows of Stripe data to the sheet
var values = new Array(new Array(numCols));
while (results.next()) {
for (var col = 0; col < numCols; col++) {
values[0][col] = results.getString(col + 1);
}
resultSheet.getRange(rowNum, 1, 1, numCols).setValues(values);
rowNum++;
}
results.close();
stmt.close();
}
Run the script, and you’ll see two input boxes. Name the sheet that holds the data. If the spreadsheet doesn’t exist, the function will automatically create it.
Type in the name of a Stripe table for the function to read. You’ll get an error message if you choose an invalid table and automatically exit the function.
While the function is designed as a menu option, you can extend it to use as a formula within a spreadsheet.
After going through all the steps and completing the function, you should have a Google spreadsheet with your Stripe data.
Connect Stripe to Google Sheets with ease
Streamline your accounting and bookkeeping tasks by connecting Stripe to Google Sheets for seamless data flows.
Eliminate inefficiencies and errors that come with manual data logging. Speed up adopting a Stripe to Google Sheets integration and gain a clearer picture of your sales and transaction data to simplify your reporting.
Try Coefficient now to see its potential benefits for you and your team.


