
Navigate to the “Report” section in Salesforce for the data type you want to filter
Click “Edit” for existing reports or “Create New” to start a fresh report
Locate the “Filter” section in your List View or Report setup interface
Click “Add Filter” to begin creating your filter logic conditions
Set conditions by choosing a field, filtering method, and entering your criteria
Use operators like AND, OR, and NOT to combine multiple rules for refined searches
Click “Preview” or “Run” to test your filter rules and verify they return correct results
Save your changes and give your new List View a descriptive name if creating new
Salesforce is an invaluable tool for managing customer information and interactions. At the heart of its utility for Salesforce admins and report builders is filter logic, a powerful feature that organizes and simplifies data access.
This guide aims to transform you into a Salesforce filter logic expert, showing you how to efficiently sift through and comprehend data. We also provide an alternative to constant filtering if you find yourself using the same set of filters often.
Teams like Mutiny find peace of mind with alternatives to constant filtering to drive faster, better-informed decision making.
What is Salesforce Filter Logic?
Filter logic in Salesforce is a dynamic tool for precise data retrieval. It allows you to set specific conditions, or rules, to view desired records. For instance, you might want to see records from a particular date or related to a specific project.
By using operators like AND, OR, and NOT, you can combine these conditions for more refined searches. This functionality is crucial when dealing with extensive data, as it streamlines the process of focusing on relevant information.
While Salesforce’s filter logic is powerful, we’ll also introduce a complementary tool later in this guide that can make these tasks even more efficient.
Examples of Salesforce Filter Logic:
- Filtering by Date: Field: Close Date; Rule: “This Month”
- Combining Rules: Rule 1: Opportunity Stage is “Prospecting”; AND; Rule 2: Amount is over $5,000
- Excluding Records: Field: Lead Source; Rule: NOT EQUALS; Value: “Referral”
- Dynamic Filtering: Field: Close Date; Rule: “NEXT 30 DAYS”
With Coefficient, you can automate these filtering tasks, ensuring your reports in Excel or Google Sheets always reflect the most current data without manually adjusting filters in Salesforce.
Step-by-Step Guide: How to Use Filter Logic in Salesforce
Filter logic is a superhero tool in Salesforce that helps you find exactly what you need. Follow these easy steps to use filter logic:
Step 1: Go to “Report”
Start by going to a place where you want to find specific information, like Leads, Opportunities, or Accounts.
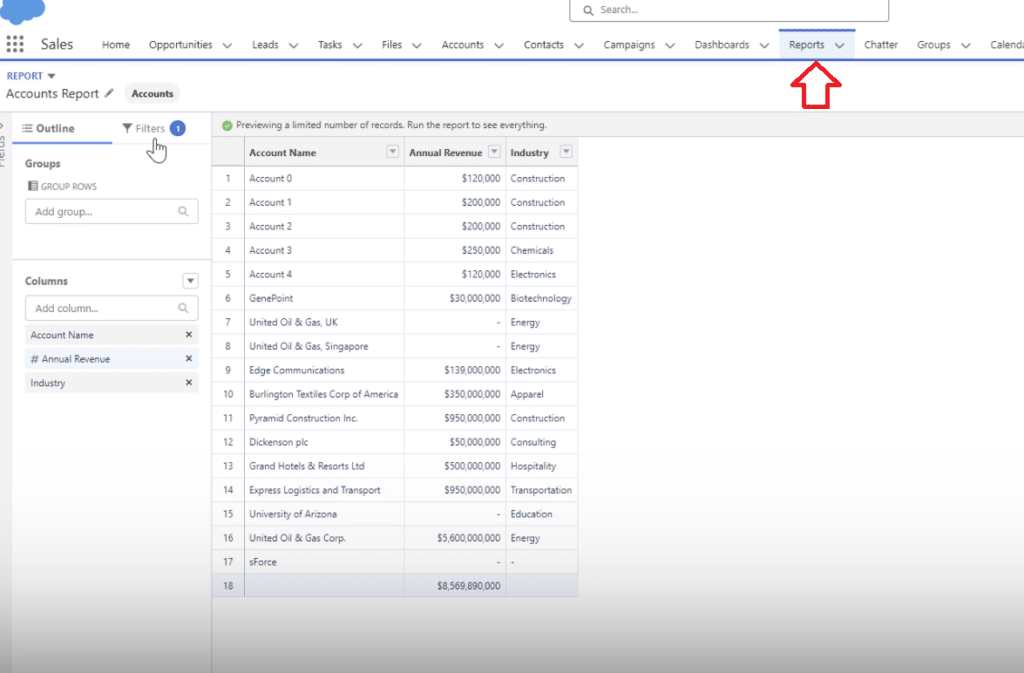
Step 2: Click “Edit” or “Create New”
If you’re changing an existing List View or Report, click “Edit.” To make a new one, choose “Create New.”
Step 3: Find “Filter”
Look for the “Filter” section in the List View or Report setup.
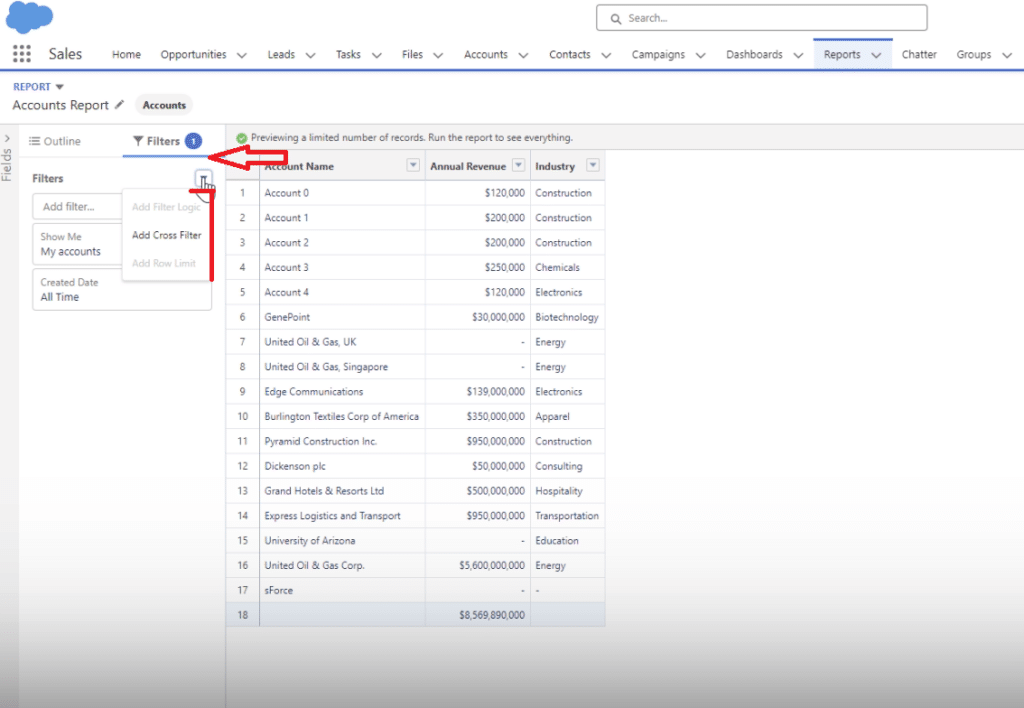
Step 4: Click “Add Filter”
Choose “Add Filter” to start making your filter logic.
Explore 8 cutting-edge techniques that are revolutionizing how Salesforce admins manage their daily tasks. Contribute more significantly to business outcomes and become a key driver of efficiency and innovation.
See the Techniques
Step 5: Set Conditions
Choose a field (e.g., ‘Stage’ for Opportunities), select a filtering method (like equals, not equals, contains), and enter your criteria. Repeat this step for additional rules.
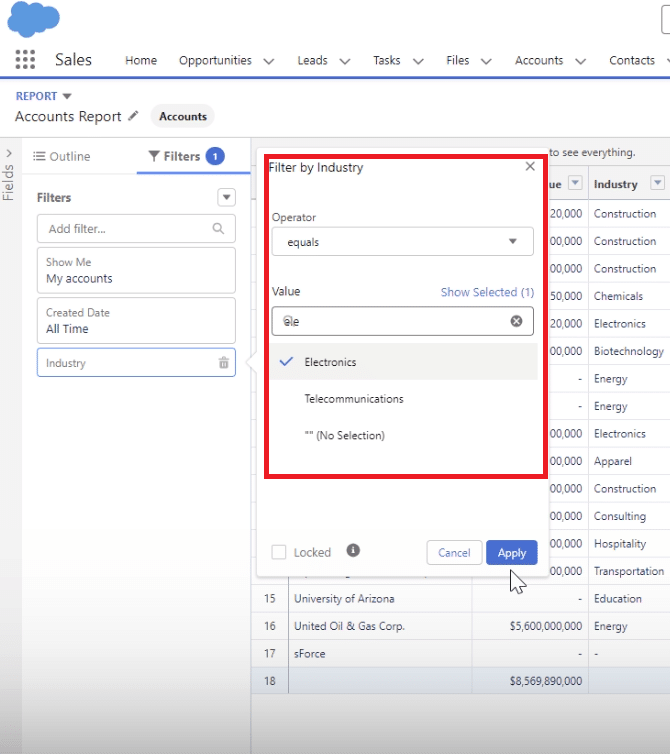
Step 6: Combine with Operators
Use operators like AND, OR, and NOT to combine rules and make things more specific.
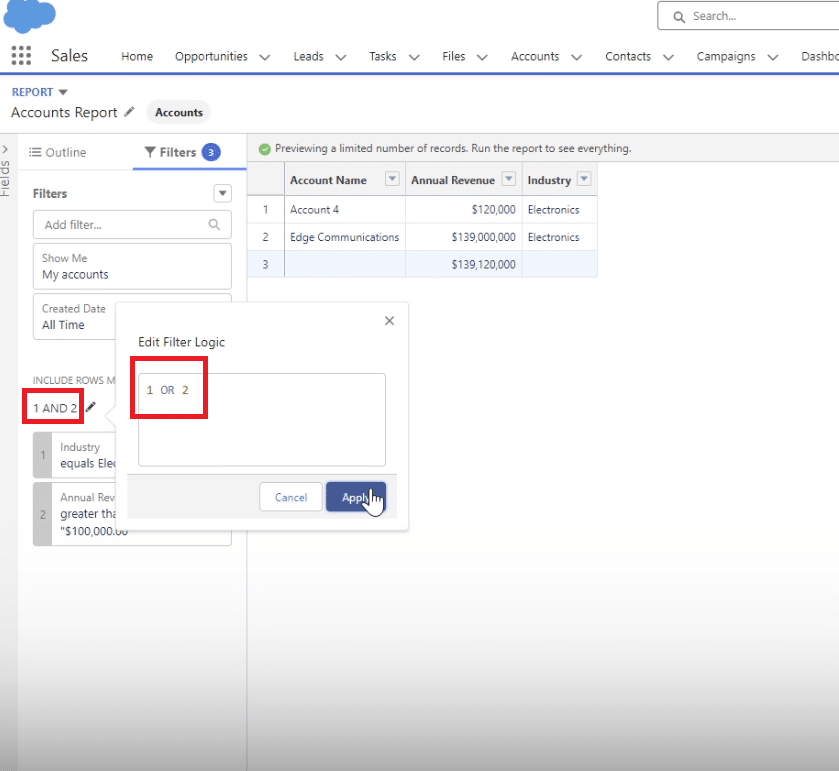
Step 7: Test Your Rules
Before saving, click “Preview” or “Run” to make sure your rules find the right stuff.
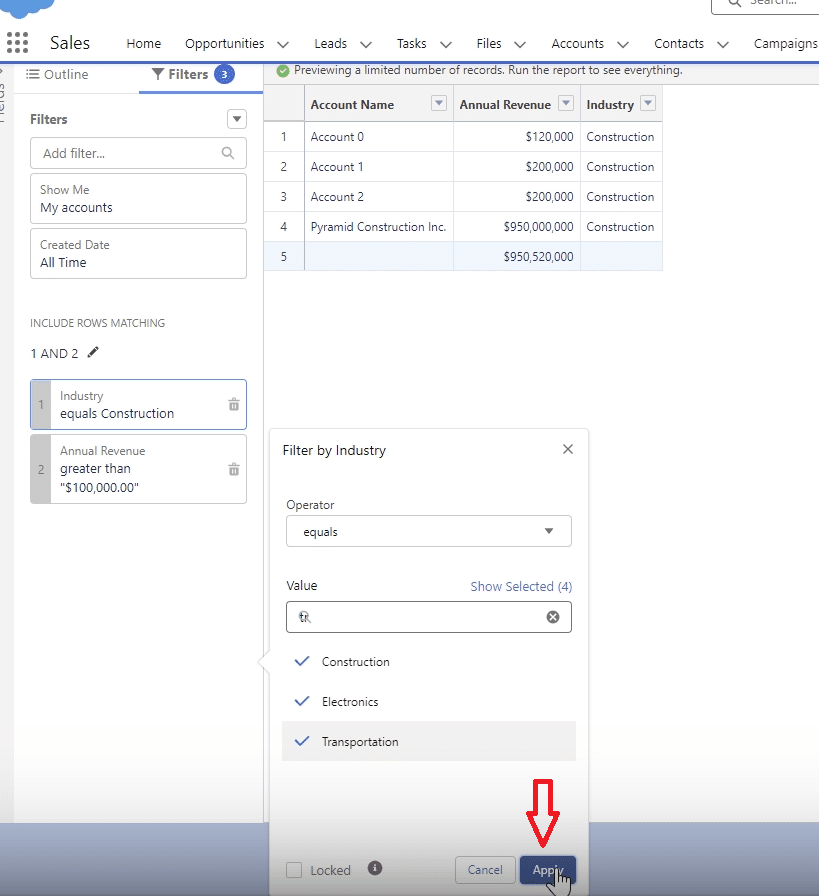
Step 8: Save Your Changes
If everything looks good, save your changes. If it’s a new List View, give it a name that makes sense.

For those who require frequent access to specific Salesforce data sets, Coefficient can streamline this process. You can use Coefficient to create import templates into your spreadsheet that you and your team can access at any time in just a few clicks, making your data analysis even more efficient and less prone to manual error.
An Alternative to Constant Filtering
If you find yourself filtering and filtering often, especially if using the same filters, this process can become cumbersome and slow within your Salesforce environment.
That’s why Salesforce Trailblazers use Coefficient, rated 5-stars on AppExchange, for ad-hoc filtering and reporting.
Coefficient’s 2-way Salesforce spreadsheet connector bridges Salesforce data and your spreadsheet environment, whether you use Google Sheets or Excel, offering a quick path to pull the data or report you need, when you need it, and set it on a refresh schedule if it’s a set of filters you need visibility on often. See it in action below.
Advanced Tips: Using Filter Logic Effectively
- Understand Data Relationships: Familiarize yourself with how data elements are interconnected for accurate filtering.
- Prioritize Conditions: Order your conditions by importance for more effective filtering.
- Use AND and OR Judiciously: AND narrows, OR broadens your search. Combine them wisely.
- Leverage Formula Fields: Create formula fields for more complex and versatile filtering.
- Regularly Update Your Logic: Adapt your filters to align with evolving business needs.
Coefficient’s advanced data syncing capabilities can complement these strategies by bringing Salesforce data directly into your spreadsheets, enabling more dynamic and complex analyses without constant manual filtering.
Common Mistakes to Avoid
- Overusing OR Conditions: Be specific with criteria to avoid overwhelming results.
- Ignoring Indexed Fields: Utilize indexed fields in large datasets for faster searches.
- Overlooking Data Types: Ensure compatibility in data types to prevent errors.
- Misjudging Time Elements: Pay attention to time zones and date formats.
- Complicating Logic Unnecessarily: Simplify complex filters and document their workings for clarity.
Leveraging Coefficient can also help avoid some common filtering mistakes by ensuring your spreadsheet data remains consistent and up-to-date, reducing the risk of errors associated with manual data handling.
Conclusion
Mastering Salesforce filter logic is essential for optimizing your CRM experience. This guide provides a comprehensive overview of using filter logic, accompanied by practical examples and tips.
Implementing filter logic in Salesforce can significantly improve data management, and pairing it with Coefficient takes this to a new level.


