Not all alerts and notifications from Salesforce and Slack are relevant to your role.
Some alerts are critical, while others are better received and handled by your teammates.
That’s why you must set up and customize the notifications and alerts you get from Salesforce and Slack.
Doing so gives you only relevant updates, making your interaction with both platforms less overwhelming and more meaningful.
Common Types of Salesforce Alerts
Let’s review the Salesforce alert types you can set up.
- Workflow Rules. Workflow alerts let you set up notifications based on specific actions within Salesforce. When a particular workflow rule triggers, it sends a template email to the designated recipients or custom message destinations within the organization.
- Process Builder. Send automated email alerts with the list of recipients, standard text, and template from a process. You can also send a custom notification type to notify recipients when crucial events occur.
- Approval Processes. Link email templates you set up to the action within the approval process, including the Initial Submission, Final Approval, Final Rejection, and Recall actions.
- Validation Rules. Validation Rules alerts appear as error messages when the set rule returns a True value because of an invalid value.
- Lightning Components. Lightning Component notifications, such as info, warning, and error alerts, trigger based on the events you set within the User Interface UI framework.
- Visualforce Components. VF Components alerts are notifications you can set through the Visualforce page.
- Apex Triggers. Salesforce lets you send push notifications to mobile client apps via Apex triggers. These push notification triggers use methods within the Apex Messaging.PushNotificationPayload and Messaging.PushNotification classes.
- Third-Party Apps. External or third-party app alerts are custom notifications you can set through Salesforce’s Notification Builder Platform. As an app owner, you can link connected apps to custom notifications to receive and show in-app and push notifications.
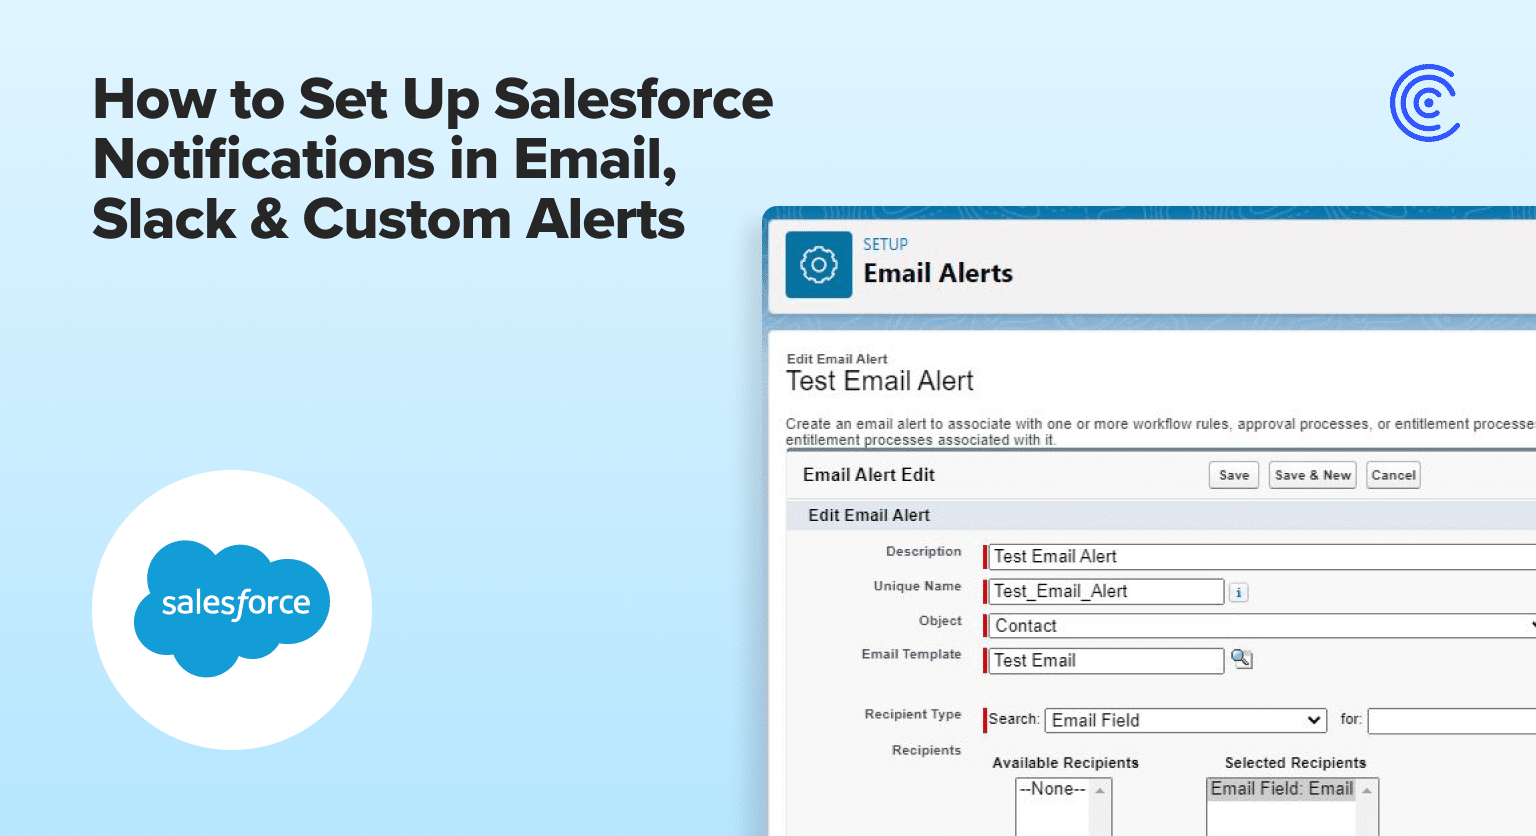
How to Create Email Alerts in Salesforce?
Check out the steps to create Salesforce email alerts below.
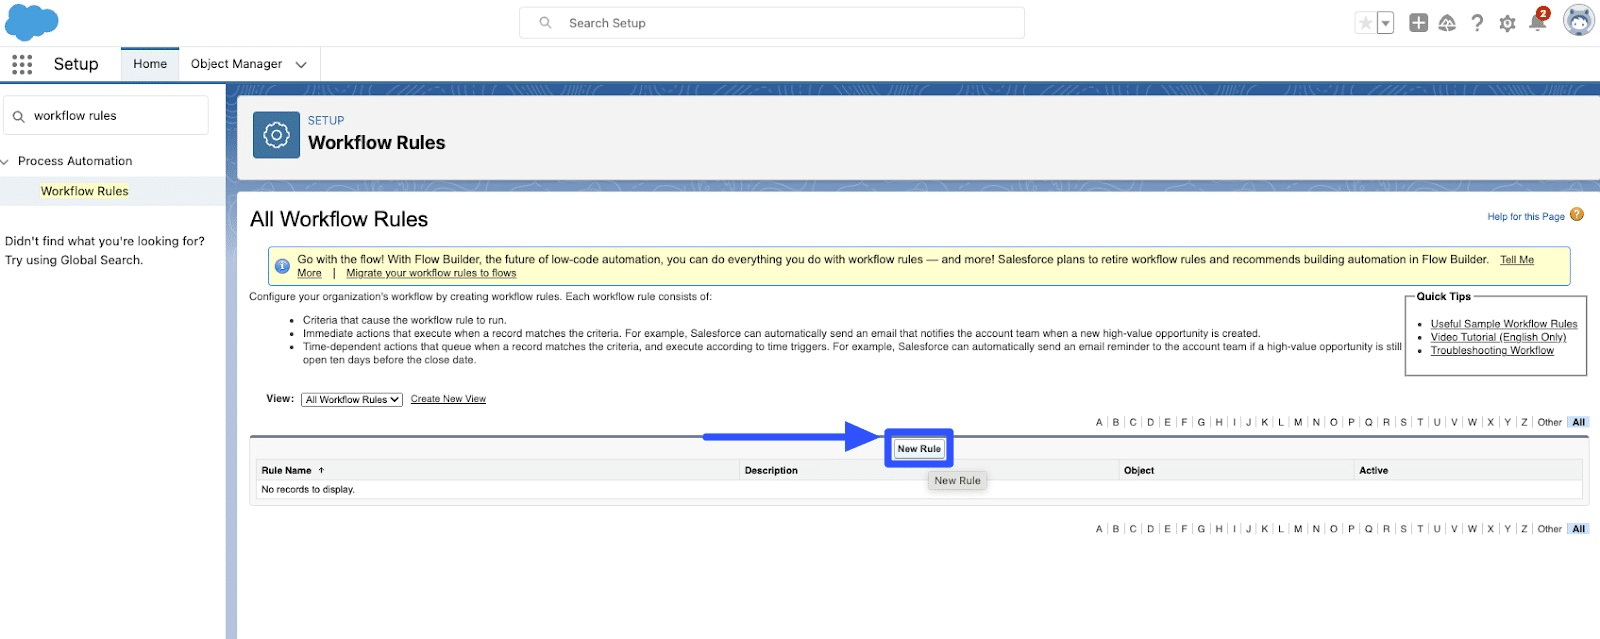
1. Workflow Rules
Navigate to settings and Workflow Rules. Click on the New Rule button.
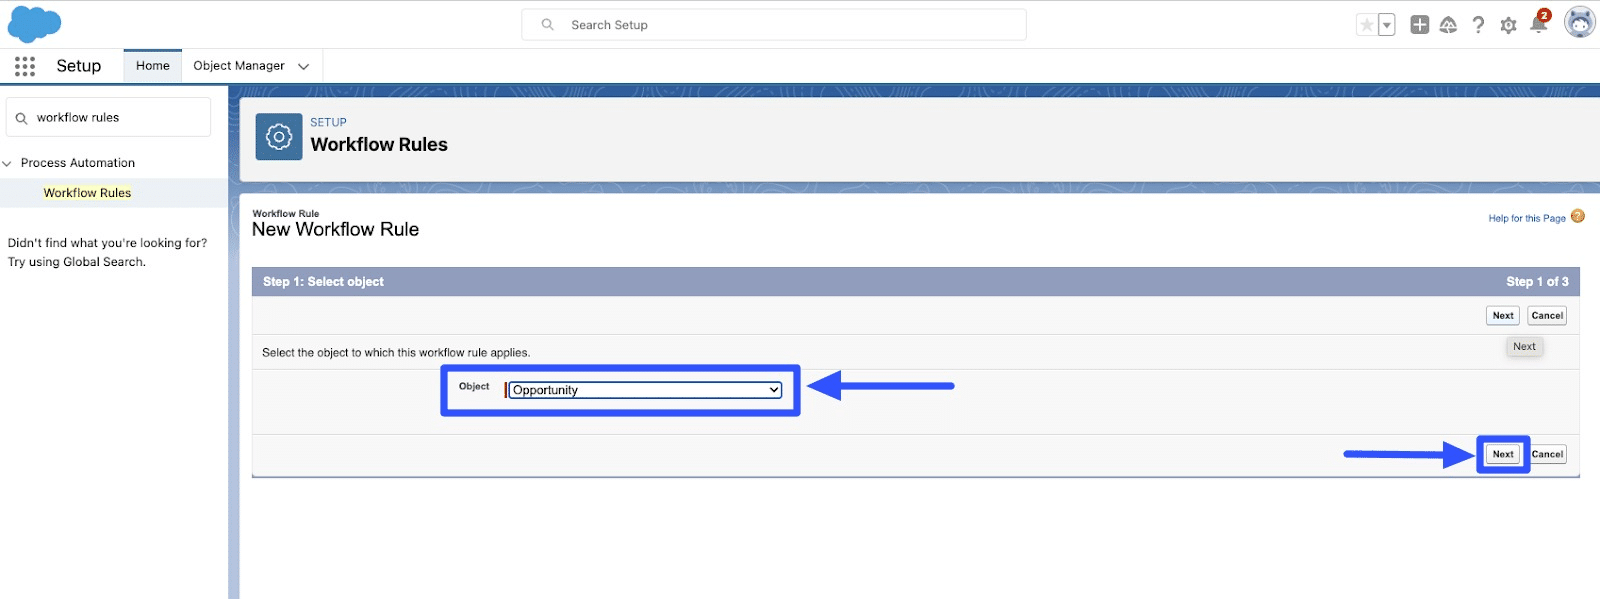
Select Object (Opportunity in this example) and click Next.
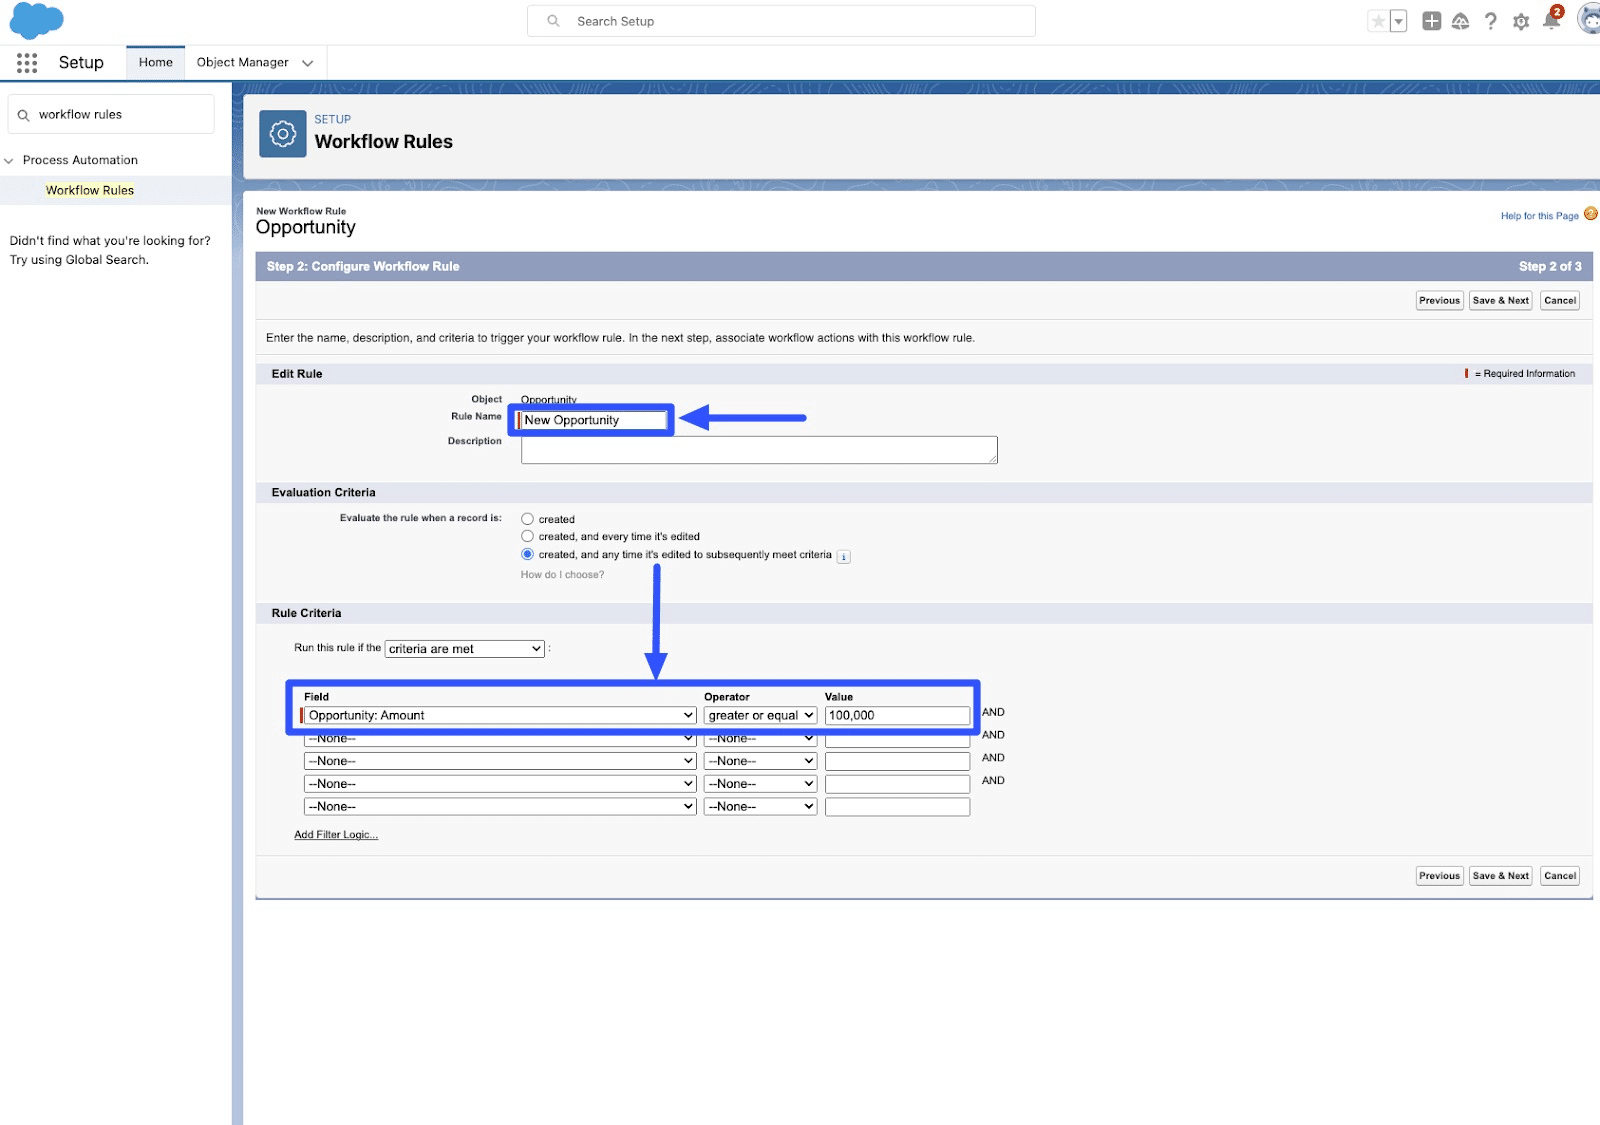
Enter the information in the Workflow Rule fields.
For example, you can set the Workflow Rule to create or edit a new Opportunity when the amount exceeds or equals $100,000.
Select Save and Next.
Click on Add Workflow Action and select the New Email Alert option from the dropdown list.
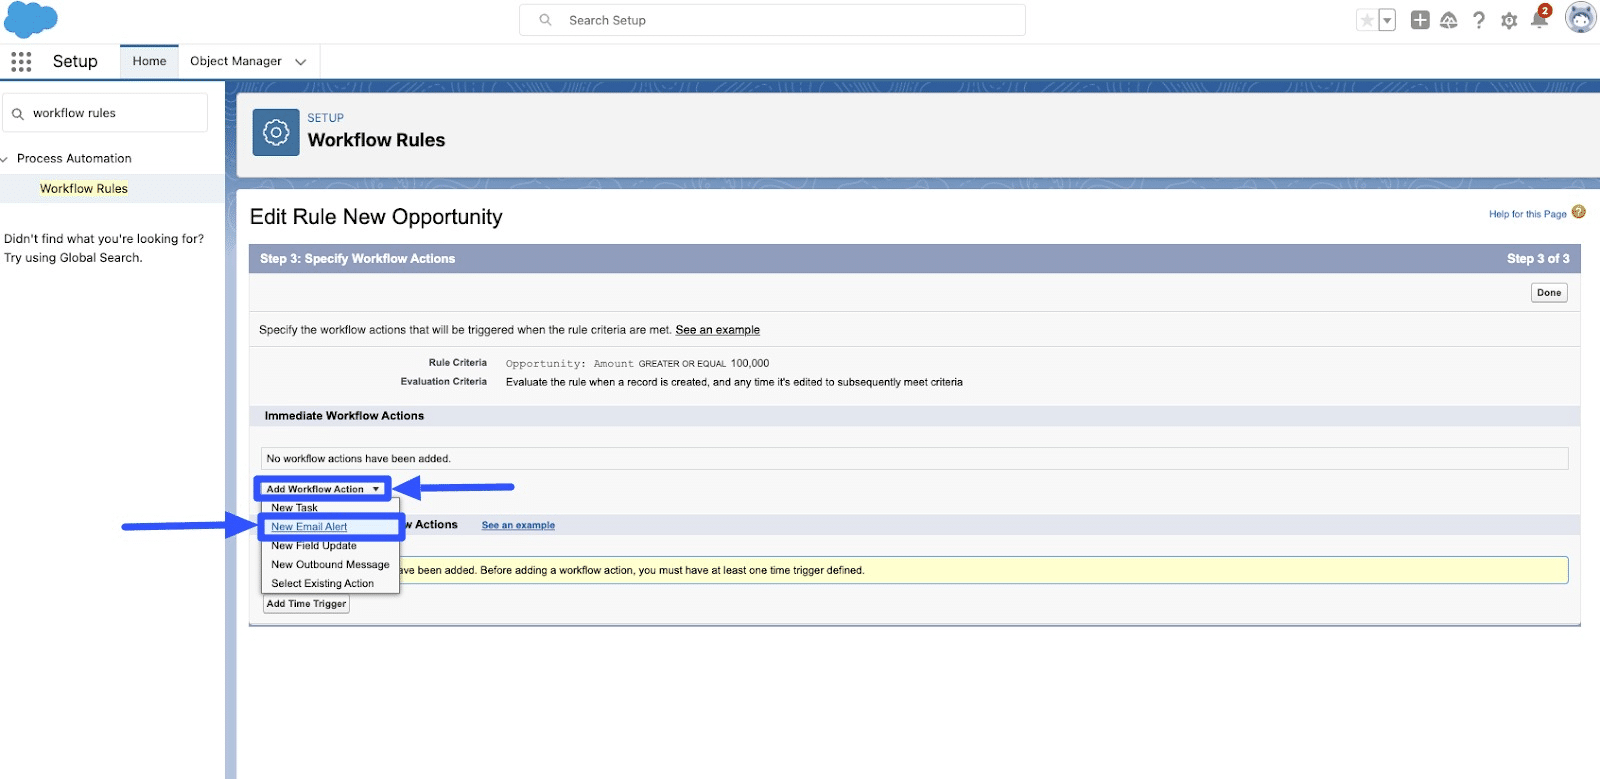
Enter the Name and Description.
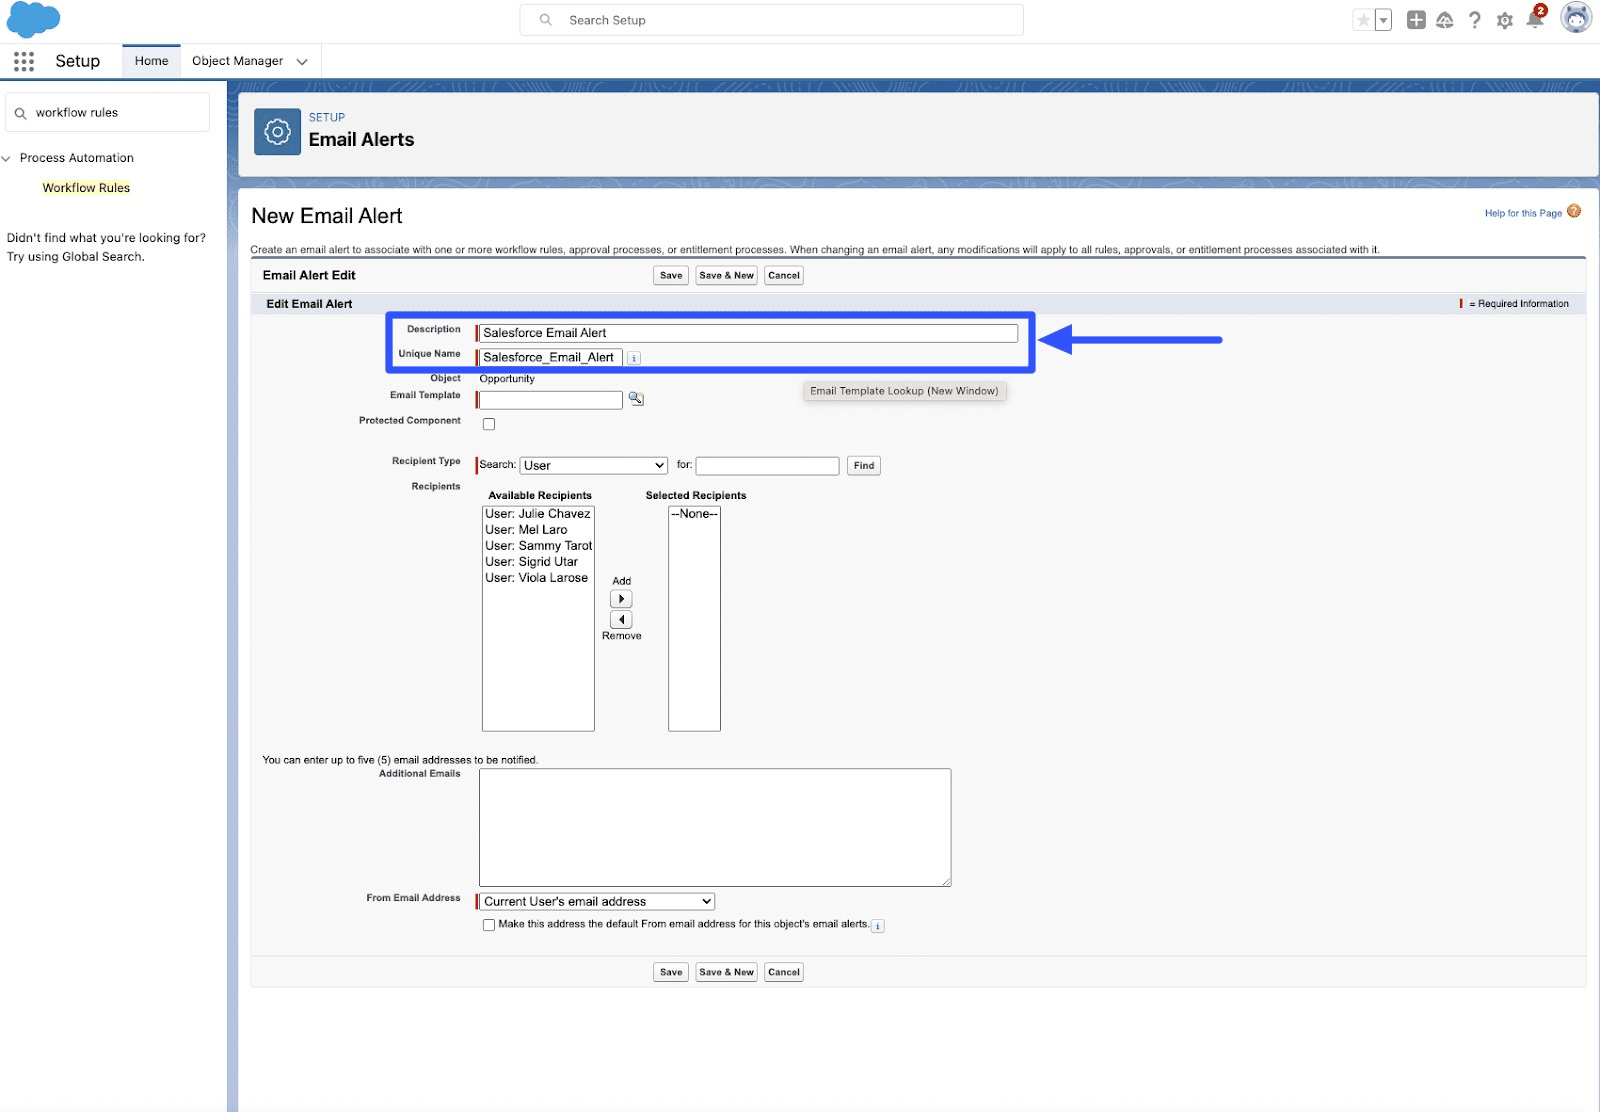
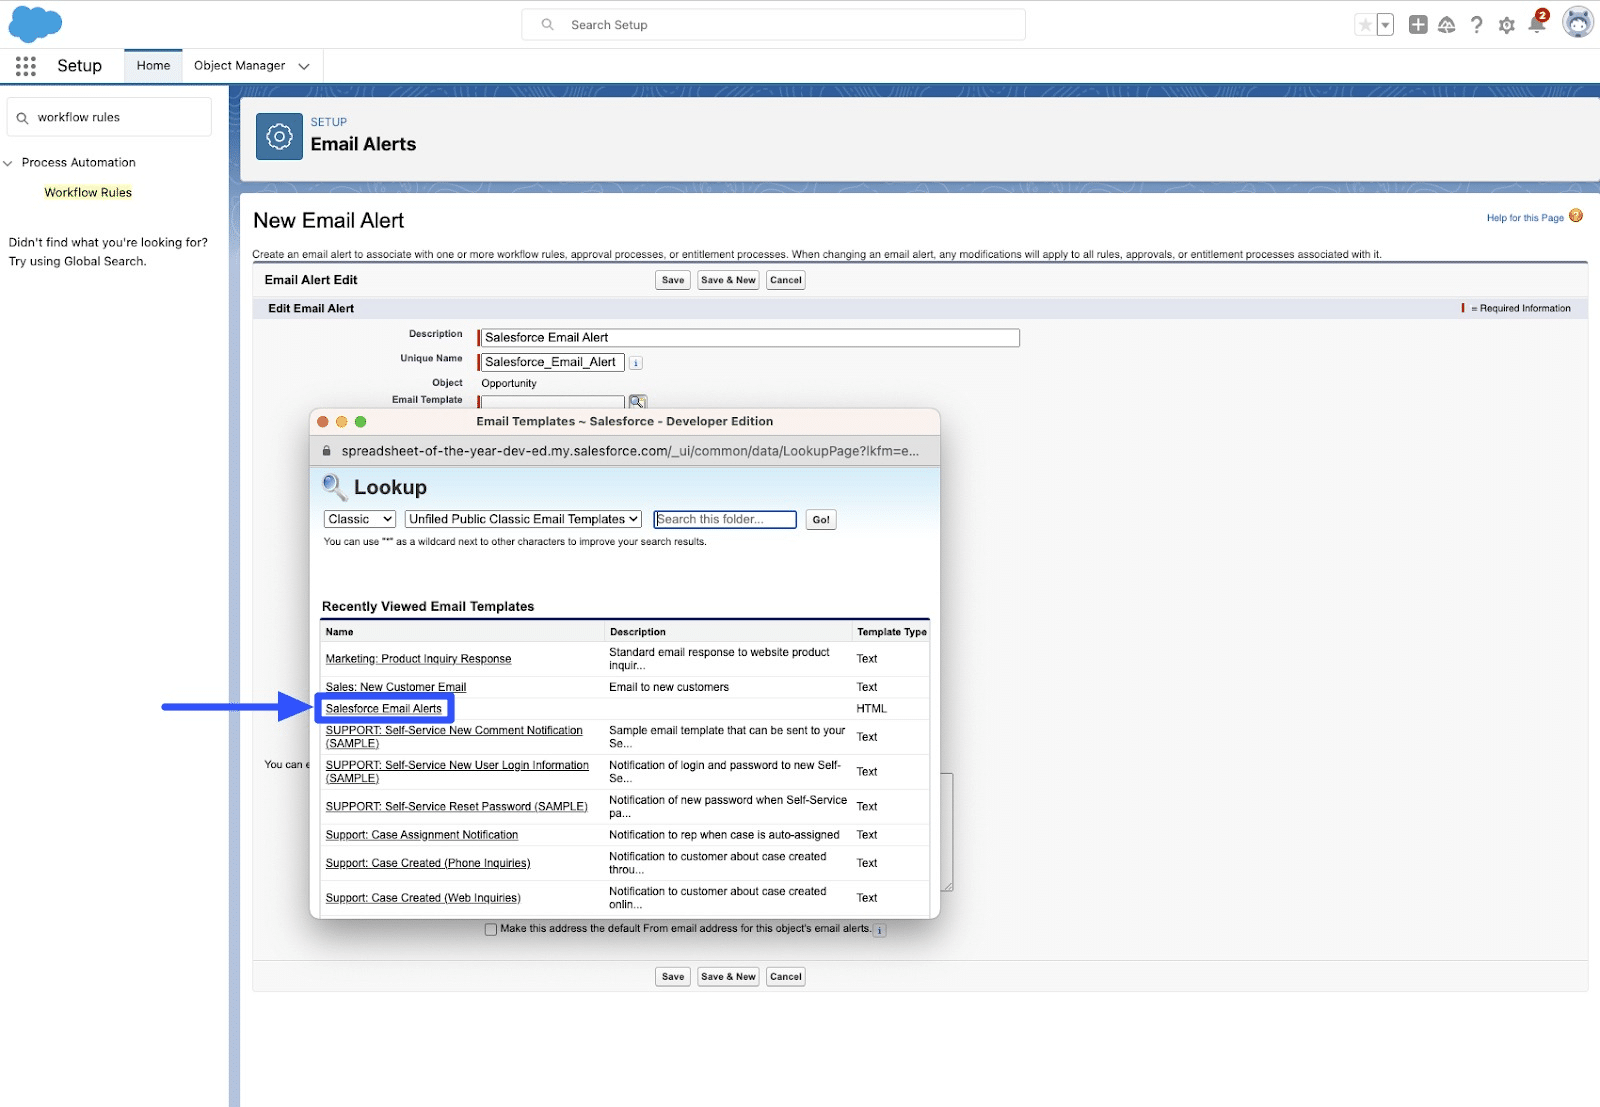
Choose your email template.
Select the recipient types and recipients for the email field.

Select Email Field in the Search field for Recipient type. Your Selected Recipients should be Email Field: Sales Notifications Email.

Click Save and Done.
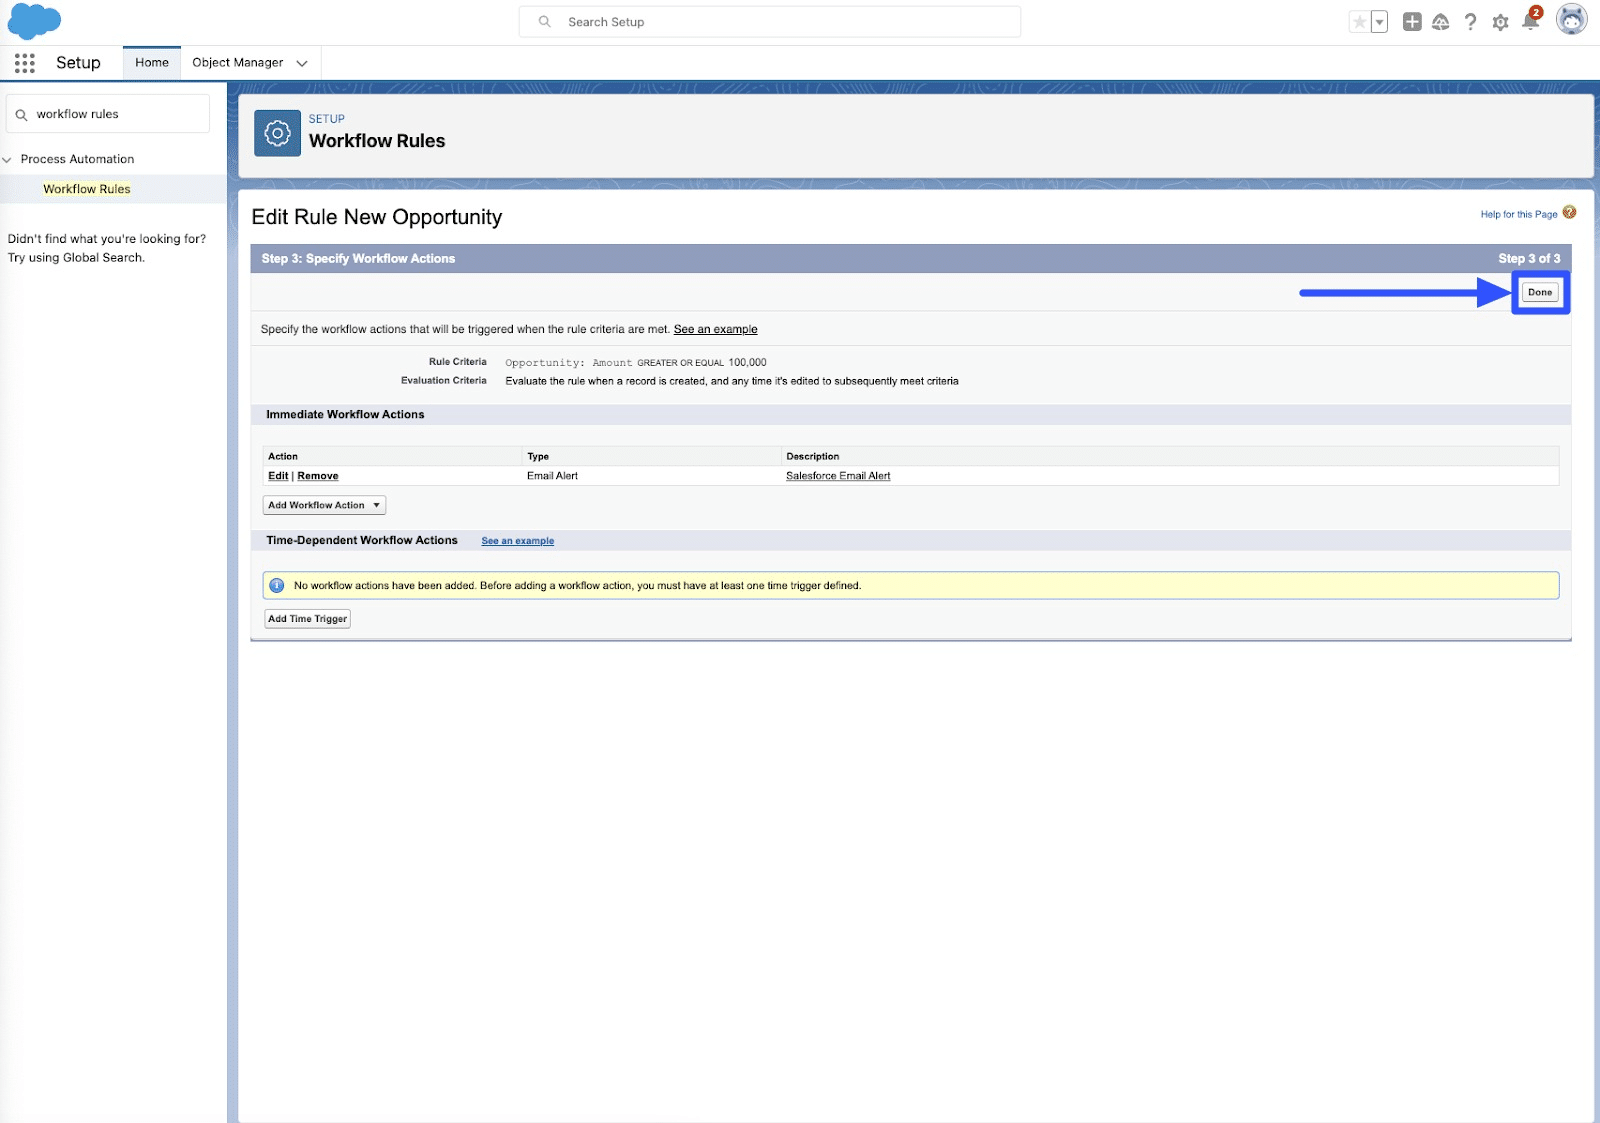
Click Activate, and you’re good to go.
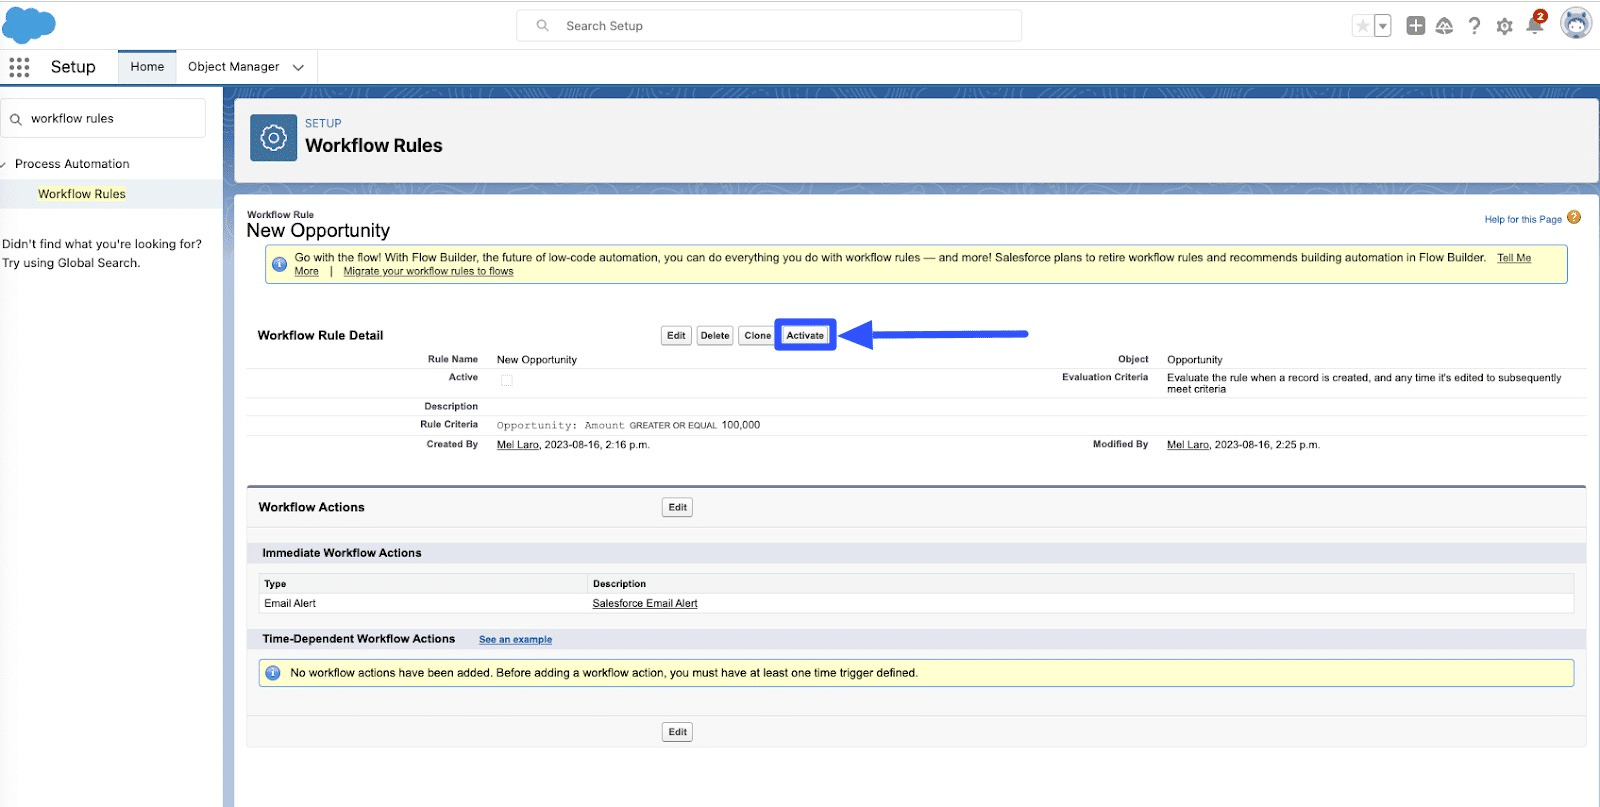
Your Salesforce email alert via Workflow Rules should look something like this:

2. Approval Processes
Salesforce lets you link the email templates you previously created to the action within the approval process.
Adding email alerts to the Approval Process is easy. Follow these steps:
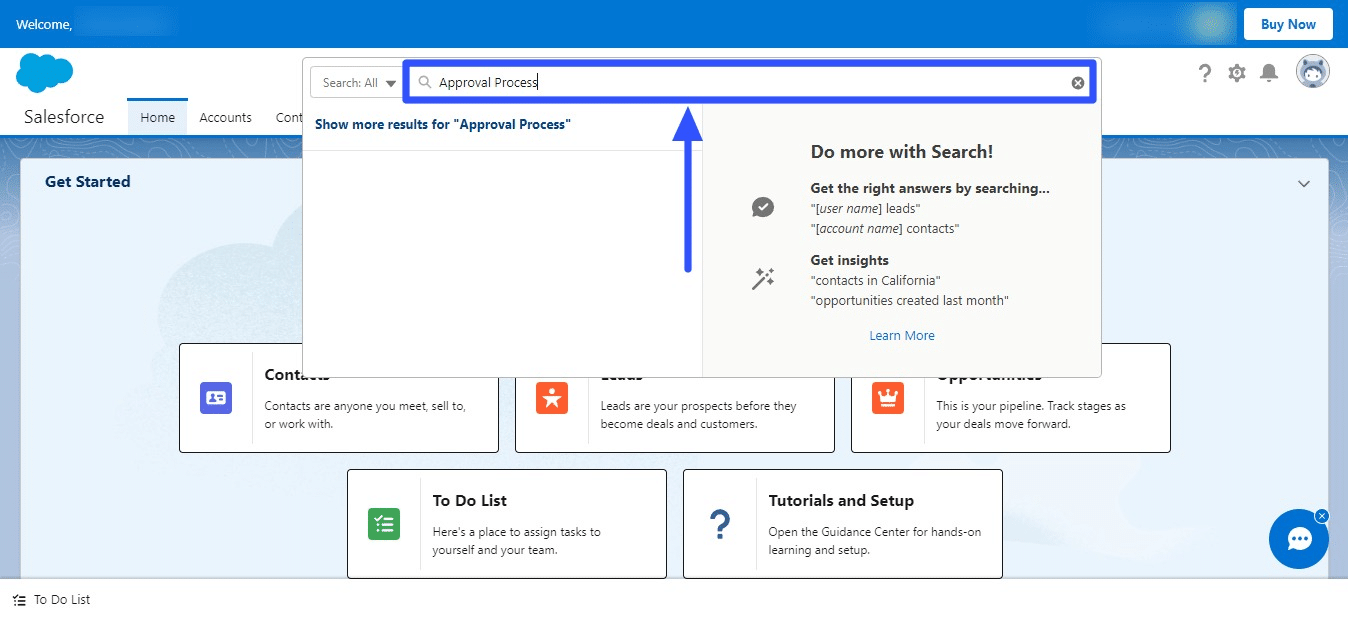
- Enter Approval Process in the Quick Find box at the top.
- Choose the approval process where you want to add your email alerts.
- Click Add New under the selected action and choose Email Alert.

- Provide a description of your email alert.
- Choose an email template for your chosen approval process.
- Select User from the Search dropdown menu for the Recipient Type field.
- Choose your preferred recipients for your email alert under the Available Recipients list.
- Click Add to move your chosen recipients to the Selected Recipients list.
- Save, and you’re done.
3. Reports & Dashboards
Set up email alerts to notify internal and community users you specified of reports and dashboard updates, such as your sales KPIs dashboard.
On the Setup page, enter Email Notifications in the Quick Search box and click on the option.
Select the Allow Community Users to Receive Reports and Dashboards by Email option to turn on email notifications for your organization.
Click Save, and you’re done.
If you’re new to building dashboards, get inspiration from these Salesforce dashboard examples.
How to Query Email Alerts in Salesforce?
Querying email alerts in Salesforce requires using the platform’s Metadata API to retrieve related information.
The general steps to query email alerts in Salesforce include the following:
- Configure Salesforce API access. If you have the right permissions to access your Salesforce instance’s Metadata, you can create or obtain a Salesforce Connected App to get the necessary credentials (Consumer Secret and Consumer Key) for API access.
- Use the Metadata API. Use Salesforce Workbench, custom scripts, or Postman to make API requests.
- Pull Email Alert Metadata. Create a Metadata API request specifying the metadata type you want to pull (EmailAlert).
- Process the Response. Extract and process the information on email alerts in the response from the Metadata API.
How to Create Custom Alerts in Salesforce
Set up custom notifications in the following Salesforce components.
1. Lightning Components
You can use the ‘lightning:notificationsLibrary’ component in Salesforce to show various notification types, such as standard and toast notifications.
Start by creating a new Lightning component or using an existing one where you want to show the alert.
Next, add the ‘lightning:notificationsLibrary’ component in your Lightning Component markup. The component gives the methods to display notifications.
Use the ‘lightning:notificationsLibrary’ component’s ‘showToast’ method to display the toast notification.
You can call the appropriate method from your component’s helper or controller to display the alert.
2. Visualforce Components
Create simple custom notifications for Salesforce Visualforce components using HTML or JavaScript.
Make or select the Visualforce page where you want to use your custom alerts.
Include a JS code to handle the custom alerts, such as the ‘alert’ function to create your custom-styled alert div.

Stop exporting data manually. Sync data from your business systems into Google Sheets or Excel with Coefficient and set it on a refresh schedule.
Get Started
Use CSS to style a hidden div when it becomes visible as the alert triggers. Tweak the JSS behavior and CSS styles accordingly.
Test your custom alert by saving and accessing the Visualforce page through the Salesforce interface. Click the button to trigger your alert and check if it works.
3. Apex Triggers
Apex triggers focus primarily on backend operations instead of user interfaces.
However, you can set up custom alerts by adding custom fields to your Salesforce record objects to indicate specific conditions or use email notifications.
The general steps to configure custom alerts via Apex triggers include the following:
- Determine the condition for your alert, such as sending an email notification when specific criteria are met in the trigger logic.
- When using email alerts, create email templates with your preferred layout and content for your notifications.
- After writing the trigger, activate it within your Salesforce organization by associating it with the corresponding standard and custom objects and events.
- Test your alert by creating or updating the condition you set in the trigger. The trigger logic should execute and send the email or perform the custom notification action when the condition is met.
Can Salesforce Integrate with Slack?
You can integrate Salesforce and Slack to access tools, services, and apps within the Slack workspace.
Learn the admin procedures to enable the Salesforce for Slack integrations here.
How to create Slack alerts from Salesforce?
After enabling the Salesforce for Slack integrations, enter Notification Builder in the Quick Find box in Setup.
Follow the rest of these steps:
- Select Custom Notifications > New > Slack.
- Enter your custom notification and API name, and choose the object associated with the notification type.
- Choose the Slack app that distributes your Slack message to your recipients.
- Input your Slack message’s title and body text.
- Include merge fields and action buttons and their labels (optional).
- Save your alert.
Third-Party Apps
Slack’s app directory has third-party tools that automate Slack alerts when changes are made to your Salesforce data.
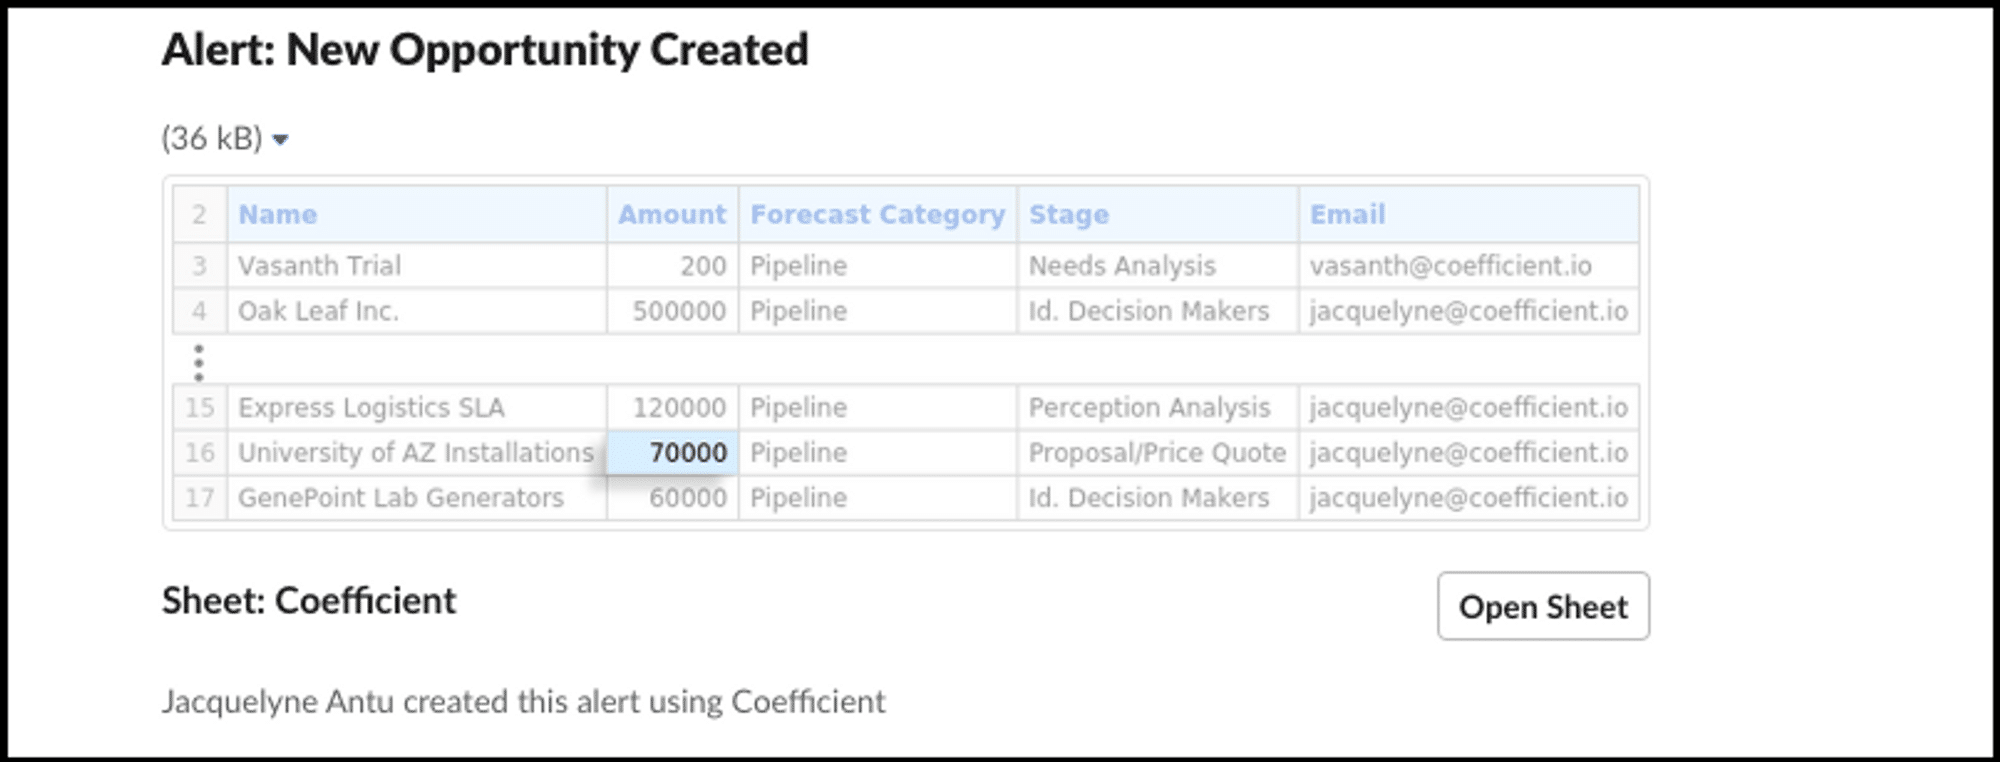
Coefficient, for one, lets you set up automations that send notifications to a specified Slack channel when your imported Salesforce data in Google Sheets changes or updates.
For example, you can set Coefficient to send auto alerts to your sales team’s Slack channel when a new opportunity is added to your pipeline.
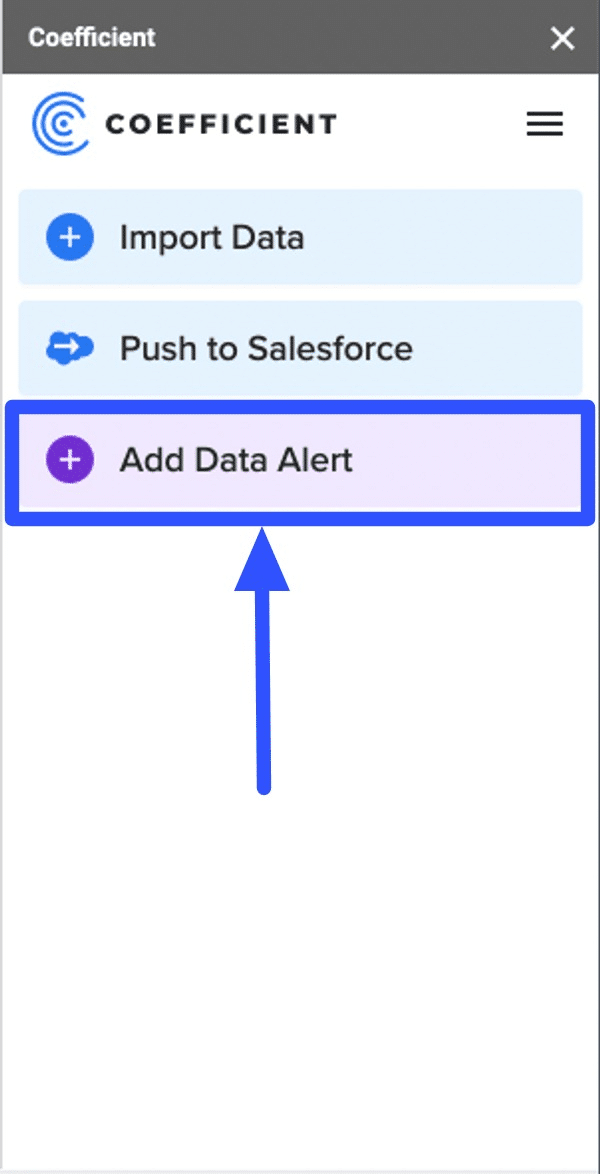
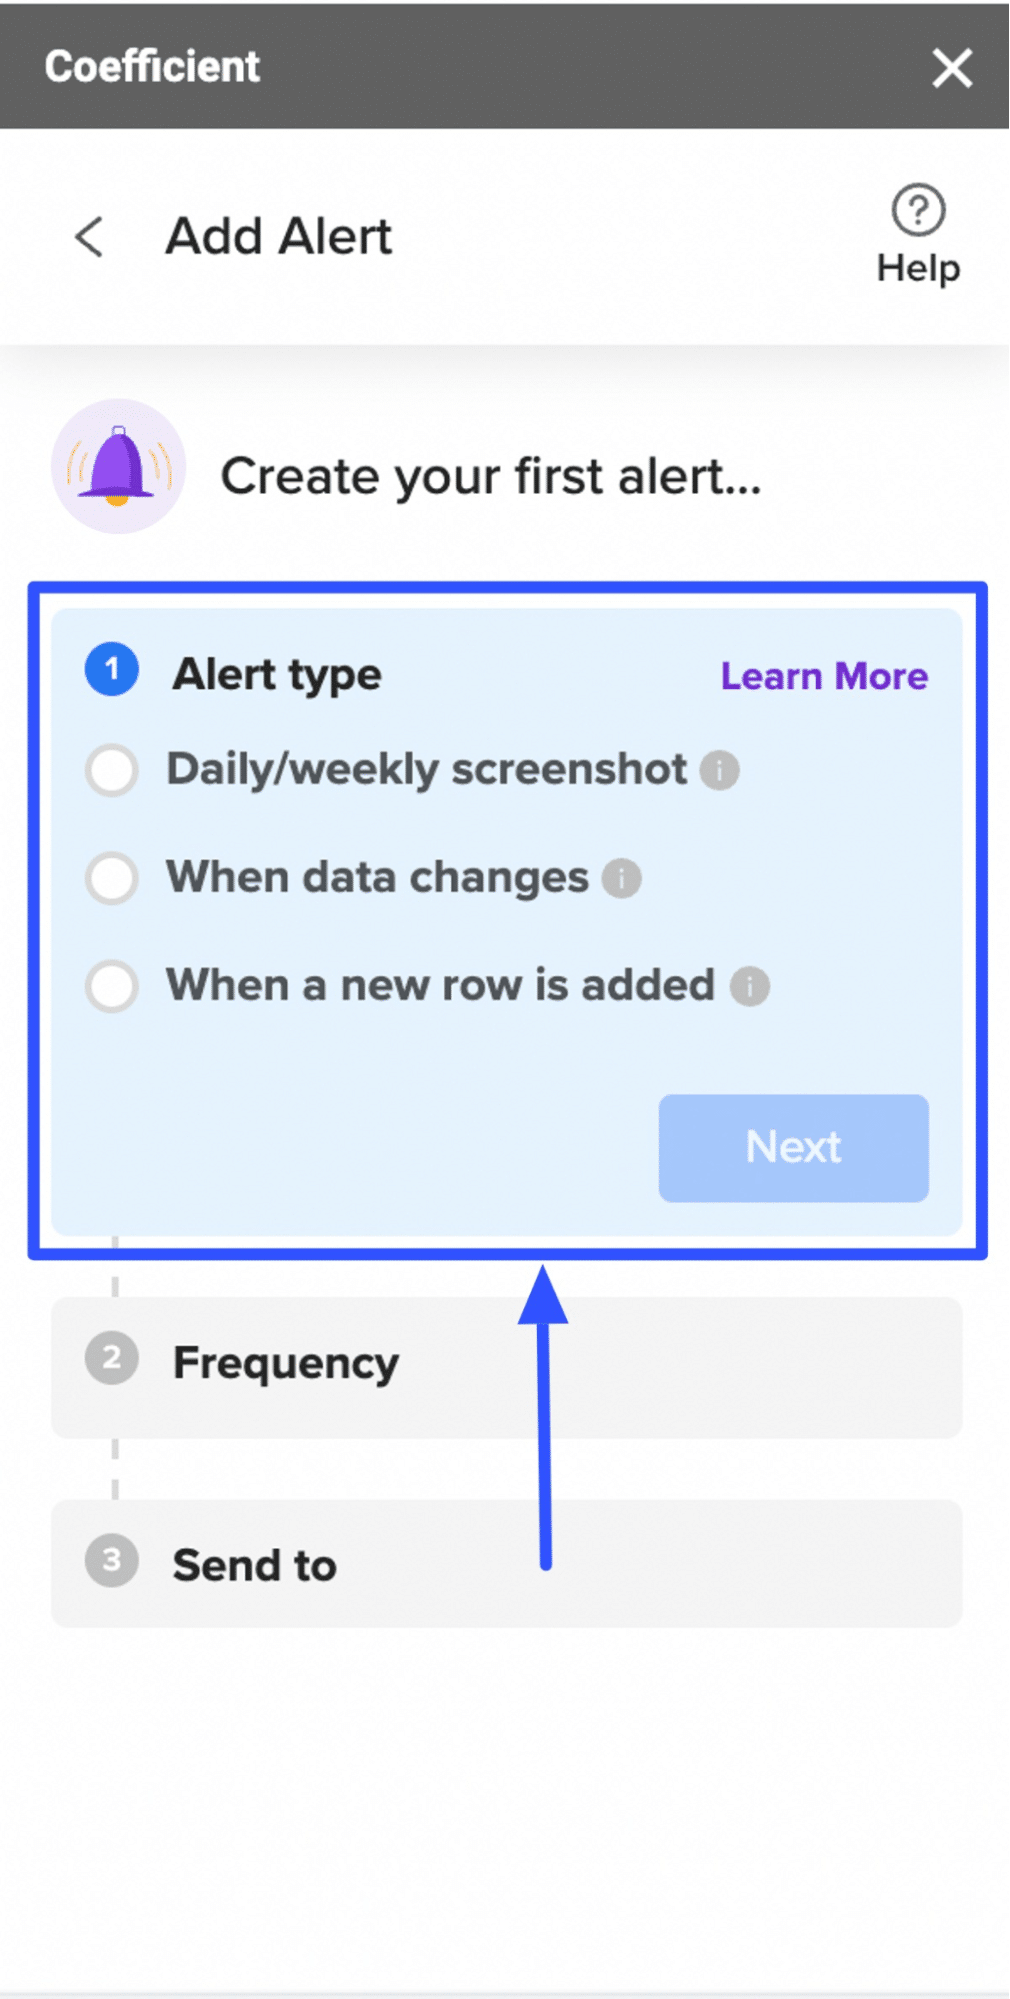
After installing Coefficient and importing your Salesforce data into Google Sheets, set up the Slack alert by clicking Add Data Alert on the Coefficient sidebar.
Choose your preferred alert type.
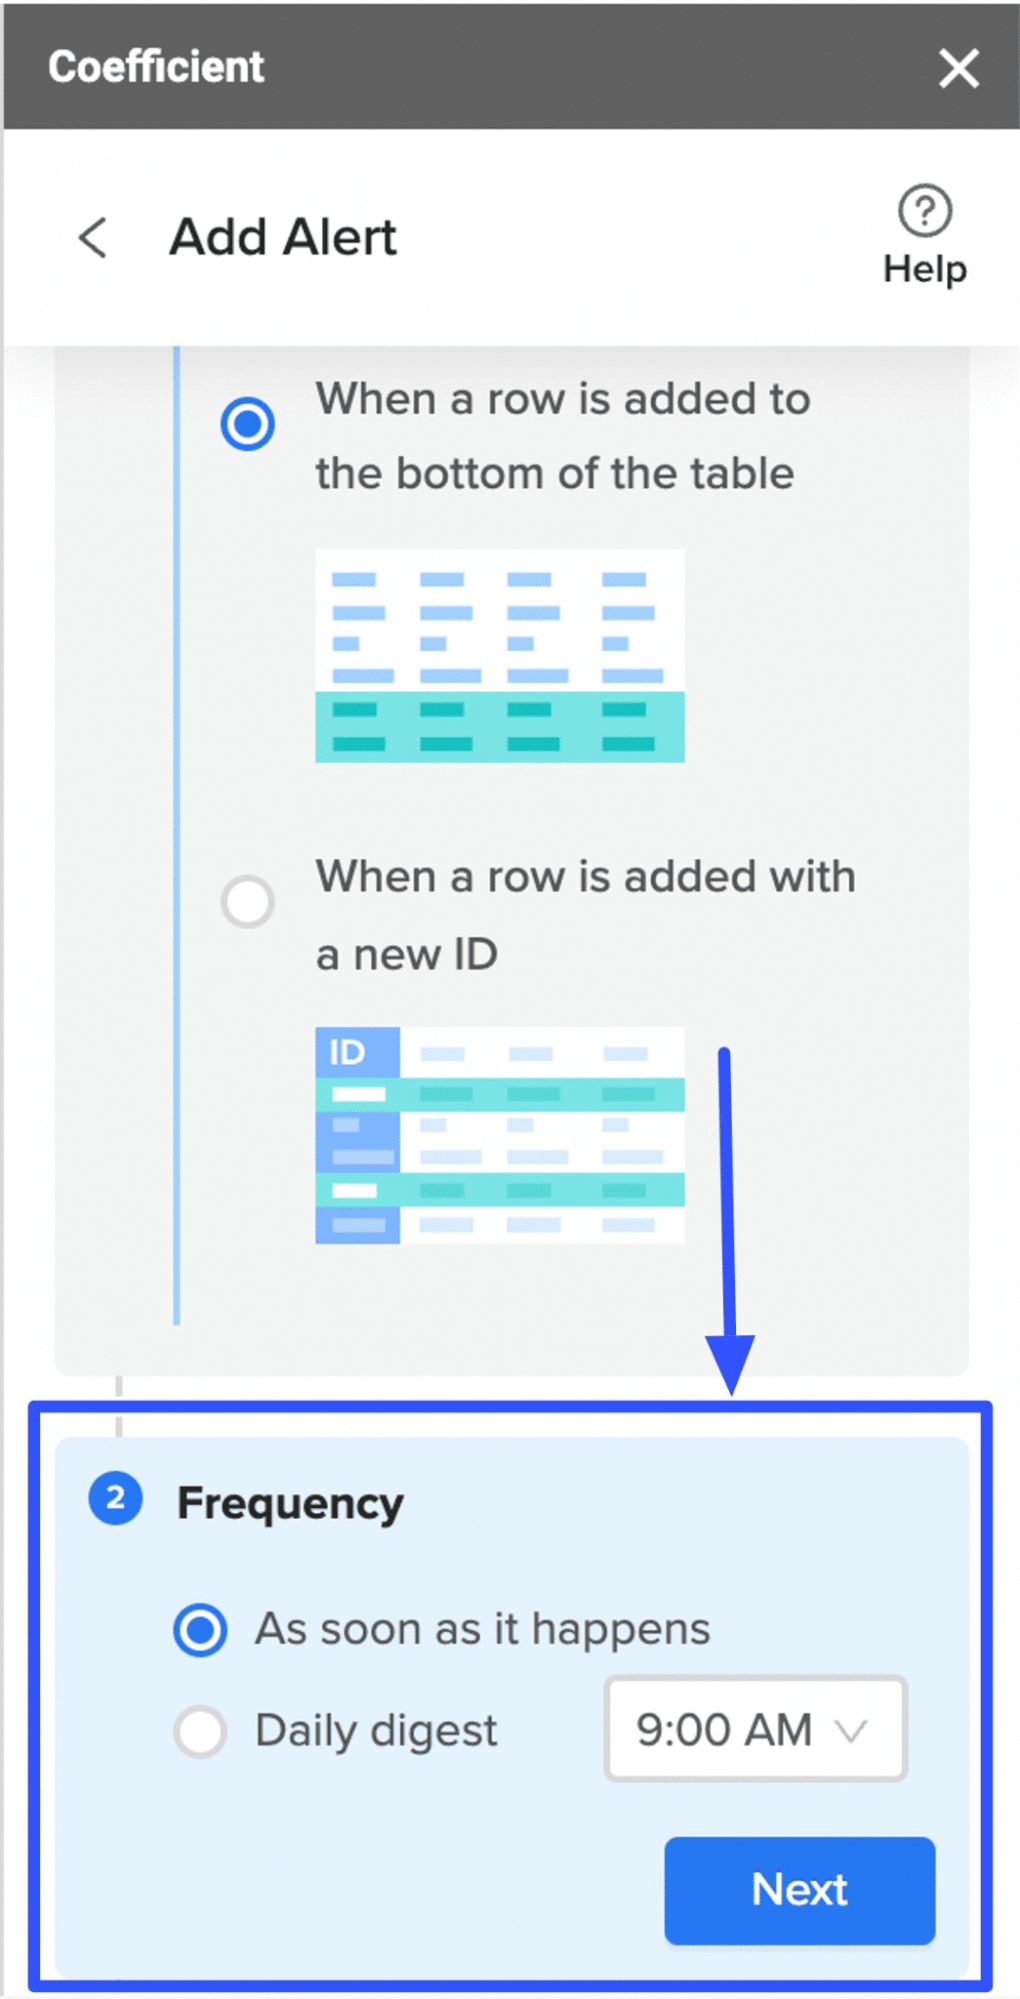
Set your automation’s frequency.
Connect and select the Slack channel where you want to send your alerts.
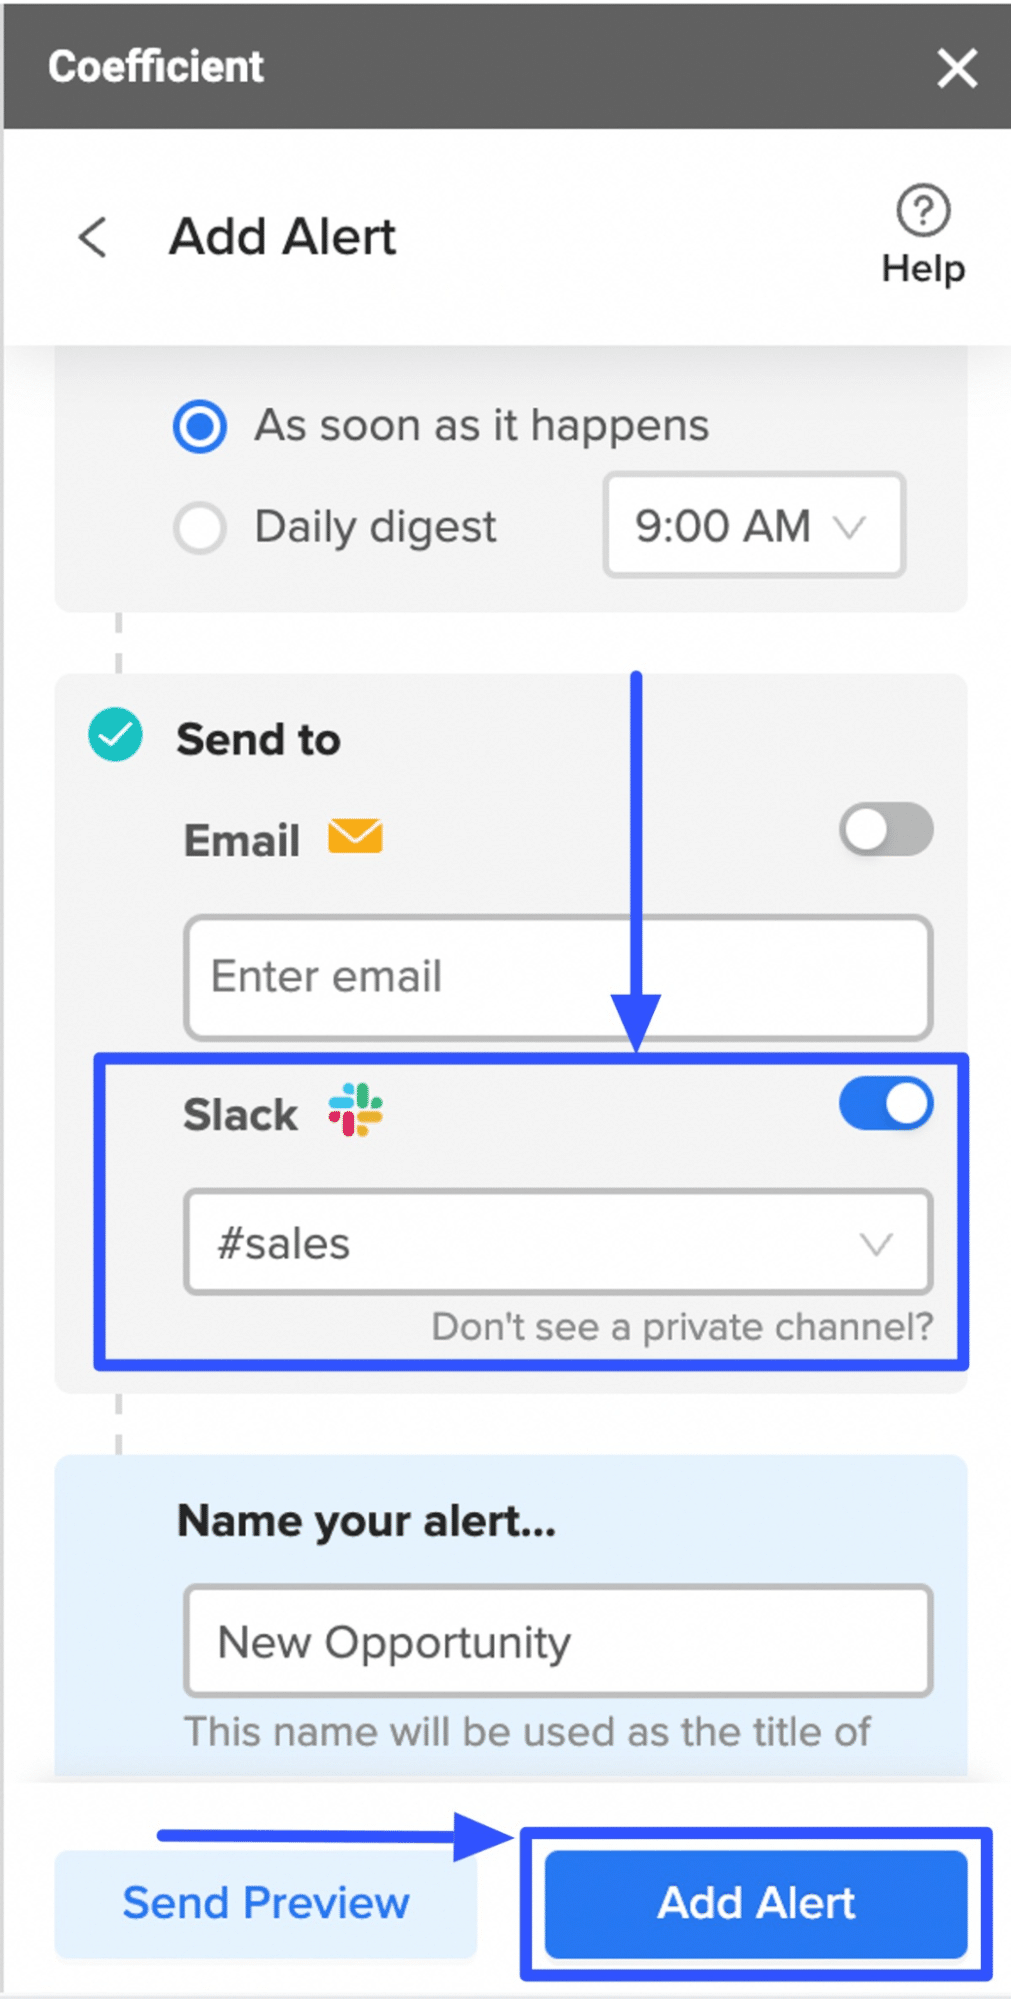
Click Add Alert, and your selected Slack channel should receive the notifications.

Coefficient lets you connect and import data from multiple sources, such as Google Analytics, Jira, Tableau, Redshift, HubSpot, and more.
The solution also has customizable dashboard templates, such as a HubSpot MRR dashboard, to help track, visualize, and extract insights from your sales and marketing data quickly.
You can customize your dashboard within Google Sheets without starting from scratch, saving you time and energy.
If you need more inspiration, check out the top Tableau dashboard examples.
Create Salesforce Alerts in a Flash
Setting up various alerts in Salesforce doesn’t have to be rocket science.
Follow the steps in this guide to create email, Slack, and custom Salesforce notifications in no time.
Explore how Coefficient can improve your Salesforce experience by installing it for free today!


