Performance comparison between HubSpot API ETL vs Snowflake Data Share architecture

Choosing between HubSpot API ETL and Snowflake Data Share depends on your data volume, technical resources, and performance requirements. Both approaches have distinct trade-offs in speed, cost, and complexity.

Here’s how each method performs and why there’s a third option that might work better for your team.

Compare all three HubSpot data access methods using Coefficient

CoefficientHubSpotTraditional HubSpot API ETL requires custom development and hits rate limits of 100-1000 requests per 10 seconds. Snowflake Data Share offers near real-time access but needs SQL expertise and variable compute costs.provides a third option with directintegration that handles up to 50,000+ rows without infrastructure costs.

Performance-wise, Coefficient excels for ad-hoc analysis, rapid prototyping, and business user self-service scenarios. You get optimized data retrieval with built-in scheduling and incremental refresh capabilities, all through a zero-code interface.

How to make it work

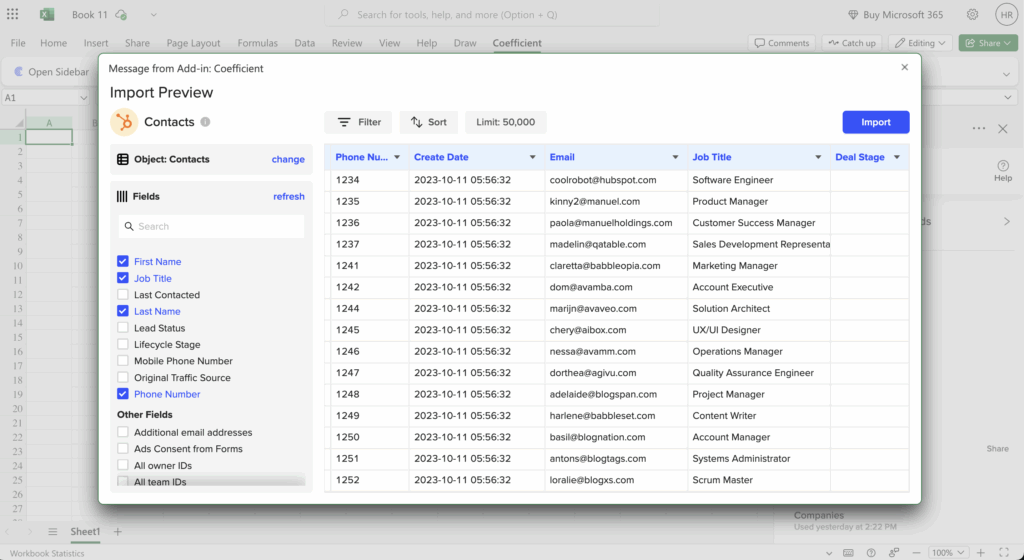
Step 1. Connect directly to HubSpot without API rate limit concerns.

HubSpot

Use Coefficient’s optimized connection to pull HubSpot data efficiently. The system handles batching and pagination automatically, eliminating the performance bottlenecks of traditional API ETL approaches.

Step 2. Configure focused datasets with advanced filtering.

Apply up to 25 filter conditions to work with specific data subsets. This approach loads data quickly while maintaining real-time connectivity, giving you the performance benefits without massive dataset overhead.

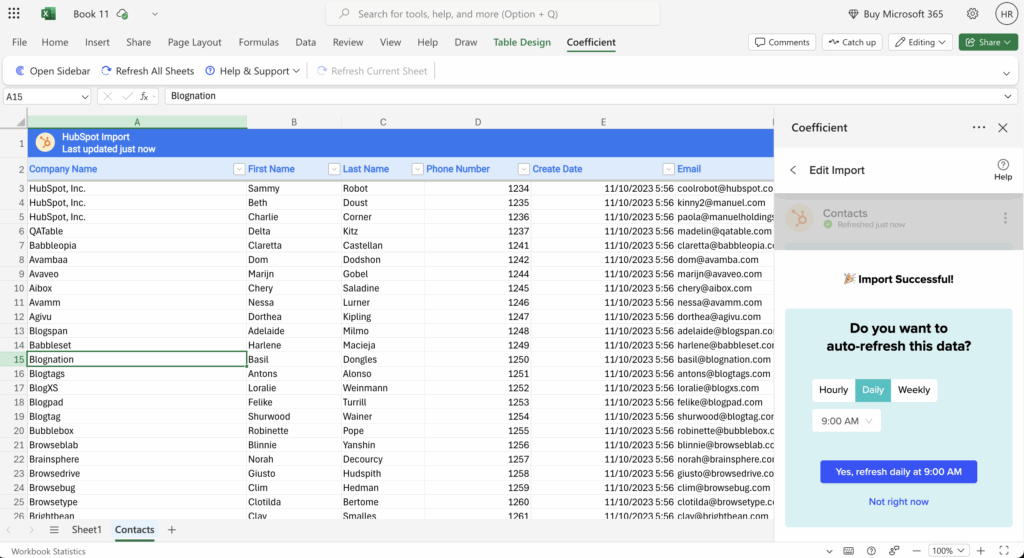
Step 3. Set up automated refreshes for consistent performance.

Schedule regular data updates that run in the background. Unlike Snowflake compute costs or API rate limit management, these refreshes operate on predictable subscription pricing regardless of data volume.

Step 4. Use incremental updates for ongoing efficiency.

Enable “Append New Data” to add only new records without full dataset refreshes. This approach maintains performance as your data grows while providing the change tracking capabilities you’d get from more complex ETL solutions.

Choose the right approach for your data needs

Start with CoefficientFor teams processing moderate data volumes with regular reporting needs, Coefficient typically provides the best performance-to-complexity ratio.to get immediate HubSpot data access without the infrastructure overhead of traditional ETL or data warehouse solutions.

Query optimization techniques for complex joins on HubSpot Data Share objects in Snowflake

Complex joins between HubSpot objects in Snowflake require careful query optimization, index tuning, and performance monitoring to maintain acceptable response times. Managing these relationships manually often leads to slow queries and maintenance overhead.

Here’s how to get the same data relationships without manual join optimization or SQL complexity.

Handle complex relationships automatically using Coefficient

CoefficientHubSpotprovides built-in association handling that automatically manages relationships betweenobjects. Instead of writing complex JOIN statements, you get three display options: Primary Association, Comma Separated, or Row Expanded. The system handles join optimization in the background with efficient API usage and automatic batching for large datasets.

You can pull multiple associated objects in a single import and configure which associations to include without SQL. The Row Expanded option creates denormalized views automatically, giving you the same result as complex joins but through a visual interface.

How to make it work

Step 1. Select your primary HubSpot object for the relationship.

HubSpot

Choose the main object you want to analyze (like Contacts) through Coefficient’s import interface. This becomes the foundation for your data relationships without writing FROM clauses or table aliases.

Step 2. Configure associated objects through checkboxes.

Select related objects like Deals and Companies using the visual interface. Choose which associations to include and how to display them – this replaces complex LEFT JOIN statements with simple checkbox selections.

Step 3. Choose your relationship display format.

Pick Row Expanded for full denormalization (equivalent to complex joins), Comma Separated for compact views, or Primary Association for the main relationship. This gives you control over data structure without query plan optimization.

Step 4. Apply filters across related objects.

Use the filter interface to apply conditions across associated objects, like filtering contacts by lifecycle stage while including their deal information. This replaces WHERE clauses with visual filter configuration.

Get complex data relationships without SQL

Try CoefficientCoefficient provides consistent performance for HubSpot object relationships regardless of data volume, eliminating the need for index tuning or query optimization.to access complex HubSpot data relationships through a more accessible interface.

Required fields Excel template for importing contacts with tags and segments

Contact segmentation and tagging requirements vary significantly across CRMs, making static Excel templates inadequate for managing tags and segments during bulk uploads. The challenge is that template headers can’t adapt to your specific segmentation logic.

Here’s how to handle contact tags and segments dynamically without the limitations of rigid template formatting.

Manage contact tags and segments using Coefficient

Coefficient’sContact List Sync functionality provides specialized capabilities for managing contact segments and list memberships directly, eliminating the need for static template headers with specific tag formats.

HubSpotFor B2B companies segmenting contacts by industry, company size, and engagement level,integration can automatically assign contacts to multiple lists based on conditional logic, while traditional templates require manual tag formatting that often results in segmentation errors.

How to make it work

Step 1. Import existing contact lists and segments to understand tagging structure.

Pull current contact lists and segments from your CRM to see exactly how tags and list memberships are structured. This shows you the available segmentation options without guessing at template requirements.

Step 2. Create segmentation logic using spreadsheet formulas.

Build formulas that automatically assign contacts to appropriate tags based on contact properties. For example, use IF statements to assign industry tags based on company information or engagement tags based on activity levels.

Step 3. Set up Contact List Sync for multi-segment assignment.

Configure Coefficient’s Contact List Sync to assign contacts to multiple segments in a single operation. This handles complex segmentation scenarios where contacts belong to multiple lists simultaneously.

Step 4. Use conditional assignment for dynamic tagging.

Set up conditional logic that assigns tags based on real-time contact data. For instance, automatically tag contacts as “High Value” if their company size exceeds certain thresholds or “Engaged” based on recent activity.

Step 5. Schedule automatic segment updates.

Use Coefficient’s scheduling features to automatically update list memberships as contact data changes. This maintains segment accuracy without manual intervention.

Automate contact segmentation and tagging

Start buildingDynamic list management provides more sophisticated segmentation capabilities than static templates while ensuring accurate tag assignment based on your specific criteria.intelligent contact segmentation today.

Setting up HubSpot to PowerBI connection without API programming

PowerBI’s native HubSpot connector requires API endpoint configuration and technical knowledge that most users don’t possess, plus it doesn’t support automated refresh scheduling without additional programming.

Below you’ll find detailed instructions on how to create a seamless HubSpot PowerBI connection using a no-code approach that anyone can set up.

Connect HubSpot to PowerBI using Excel as a bridge

Coefficient’s HubSpot connector for Excel provides a no-code alternative to PowerBI’s complex native connector, using Excel as an intermediary for seamless data flow. Essentially, Coefficient acts as middleware to keep your PowerBI dashboards synced with your HubSpot data on any schedule you need.

And here’s why operators are using it as a simple bridge between PowerBI and Excel or Google Sheets. Pro tip: It also makes your HubSpot PowerBI connection completely free since Excel is a core data source for PowerBI.

Here’s how to make it work

Step 1. Set up Excel bridge with one-click OAuth.

Install Coefficient in Excel and connect to HubSpot using simple OAuth authentication. No API tokens, endpoints, or technical configuration required.

Get Started Free

Step 2. Configure data through point-and-click interface.

Select HubSpot objects and fields through visual menus in the Excel sidebar. All configuration happens through user-friendly dropdown menus and checkboxes.

connect hubspot to excel for a bridge to power bi

Step 3. Schedule automated refresh without code.

Set up hourly, daily, or weekly data updates using built-in scheduling. No programming needed – just select your preferred refresh frequency from dropdown options.

schedule automated hubspot refreshes for powerbi

Step 4. Connect PowerBI to the Excel file as data source.

Link PowerBI to your Excel workbook containing live HubSpot data. PowerBI treats this as a standard Excel data source with automatic field detection and mapping.

pull hubspot data from excel into powerbi

Step 5. Enable automatic PowerBI updates.

When PowerBI refreshes, it automatically pulls the latest HubSpot data that Coefficient has synced on your scheduled cadence to Excel. The entire process runs without manual intervention.

Bypass technical barriers with visual setup

This approach delivers automated HubSpot reporting capabilities without the technical complexity of direct PowerBI integration. You get the same end result – live HubSpot data in PowerBI – through a user-friendly setup process that requires no coding knowledge. Get started building your HubSpot PowerBI connection today for free.

HubSpot API rate limits when syncing data to Google Data Studio

HubSpot’s API rate limits (typically 100 requests per 10 seconds) cause sync failures and incomplete data transfers when connecting to Google Data Studio. These limits become a major bottleneck for large datasets.

Here’s how to handle rate limits elegantly and ensure your Data Studio reports always have fresh data.

Handle HubSpot API rate limits with optimized batch operations using Coefficient

CoefficientHubSpotprovides an elegant solution todata connector limitations through optimized API usage, intelligent request queuing, and smart scheduling features that prevent rate limit violations.

How to make it work

Step 1. Set up optimized API usage with automatic throttling.

Coefficient uses batch operations to minimize API calls and includes built-in retry logic for temporary failures. The system automatically throttles requests when approaching limits and provides clear error messages if limits are reached, with fallback to cached data during limit periods.

Step 2. Configure smart scheduling to avoid burst limits.

Spread imports across time to avoid burst limits by configuring multiple smaller imports instead of one large request. Use off-peak scheduling for better performance and stagger refresh times for different data types to distribute API usage throughout the day.

Step 3. Segment large imports for better performance.

Break large contact lists into smaller filtered groups and import deals by pipeline or date range. Use Coefficient’s filtering capabilities to reduce data volume and focus on the most important records for your reports.

Step 4. Implement incremental updates and monitoring.

Use the “Append New Data” feature for growing datasets and sync only recently modified records to reduce API calls. Set up Slack alerts for failed refreshes, review import performance regularly, and adjust schedules based on data volume.

Eliminate rate limit frustrations today

Start buildingThis approach eliminates the frustrating “rate limit exceeded” errors common with direct API connections while ensuring your Google Data Studio reports always have fresh data. No more manual monitoring of API usage or incomplete syncs.reliable HubSpot data pipelines that respect API limits.

HubSpot Excel import error handling when contacts don’t match existing records

HubSpot’snative Excel import often provides limited visibility into contact matching failures until after import completion. When contacts don’t match existing records, you typically get cryptic error messages without clear guidance on which specific records failed or why.

Here’s how to proactively identify and resolve contact matching issues before any data touches HubSpot.

Prevent contact matching errors with proactive validation using Coefficient

CoefficientHubSpotprovides superior error handling by letting you identify and resolve contact matching issues in the spreadsheet environment before executing anyoperations. This prevents the reactive cleanup typically required after failed imports.

How to make it work

Step 1. Import existing HubSpot contacts for reference validation.

Pull all your HubSpot contacts with Contact IDs, email addresses, and any other identifiers you’ll use for matching. This creates a complete reference database for validation.

Step 2. Create match verification formulas in Google Sheets.

Use VLOOKUP or INDEX/MATCH to identify which contacts in your Excel data have existing HubSpot records: =IF(ISERROR(VLOOKUP(B2,HubSpot_Contacts!B:A,1,FALSE)),”NEW”,”EXISTING”). This flags each contact as new or existing before any import attempts.

Step 3. Build validation columns for common error sources.

Create columns that flag potential issues: invalid email formats with =IF(ISERROR(FIND(“@”,C2)),”Invalid Email”,”Valid”), missing required fields with =IF(D2=””,”Missing Data”,”Complete”), and duplicate entries within your import data.

Step 4. Separate matched and unmatched contacts into different operations.

Create separate datasets for contacts that matched existing HubSpot records (for UPDATE operations) and new contacts (for INSERT operations). This prevents the mixed-operation errors that cause many import failures.

Step 5. Execute staged processing with error tracking.

Process matched and unmatched contacts in separate Coefficient operations. This lets you resolve matching issues for one group without affecting successful updates for the other group.

Step 6. Create error resolution workflows.

For contacts that don’t match existing records, use spreadsheet formulas to suggest potential matches based on similar email domains or names, making manual review more efficient.

Stop playing import error cleanup

Start preventingProactive error prevention beats reactive cleanup every time. By identifying contact matching issues before import, you save hours of manual data cleanup and ensure higher success rates.import errors today.

HubSpot Excel import field mapping for retroactive product purchase data

HubSpot’snative Excel import struggles with complex retroactive purchase data because it can’t handle multiple product purchases per contact or properly map to custom deal properties. The standard import tool often fails when dealing with historical purchase data that needs to link to existing contact and deal records.

Here’s how to successfully map and import retroactive product purchase data with proper field mapping and association management.

Handle complex purchase data mapping using Coefficient

CoefficientHubSpot’sovercomeslimitations by providing flexible field mapping for custom properties and the ability to manage complex data relationships. You can validate and structure your purchase data in spreadsheets before pushing clean, properly mapped data to HubSpot.

How to make it work

Step 1. Structure your purchase data with proper field mapping.

Organize your Excel data with columns for purchase date, product name, quantity, value, and contact identifiers. Use Google Sheets formulas to ensure purchase dates are properly formatted (YYYY-MM-DD) and product values are calculated correctly.

Step 2. Create custom properties for purchase history in HubSpot.

Set up custom contact properties for purchase history data like “Last Purchase Date,” “Total Purchase Value,” or “Product Categories Purchased.” Make note of the internal property names for mapping.

Step 3. Import existing contacts to ensure proper associations.

Pull your current HubSpot contacts into Google Sheets to create a reference for contact matching. This prevents creating duplicate contacts when adding purchase history.

Step 4. Map purchase data to contact custom properties.

Use Coefficient’s field mapping to connect your Excel columns to HubSpot custom properties. The system handles data type validation and ensures purchase history maps to the correct contact records.

Step 5. Create associated deal records for individual purchases.

For detailed purchase tracking, use Coefficient’s association management to create deal records for each purchase and link them to the appropriate contacts. This maintains proper CRM relationship structure.

Step 6. Execute batch updates without file size restrictions.

Process your purchase data in batches using Coefficient’s support for large datasets (50,000+ rows). This avoids the file size limitations that cause HubSpot’s native import to fail with extensive historical data.

Get your purchase history into HubSpot properly

Start mappingProper field mapping for retroactive purchase data requires more flexibility than HubSpot’s native import provides. With the right approach, you can enrich your contact records with valuable purchase history.your purchase data today.

HubSpot calculated properties not showing in Google Data Studio connector

HubSpot calculated properties often fail to appear in Google Data Studio connectors due to API limitations and property type restrictions. These missing properties can break your most important reports and dashboards.

Here’s how to access all HubSpot property types, including calculated fields that other connectors miss, and even recreate calculations for more flexibility.

Access all calculated properties without restrictions using Coefficient

CoefficientHubSpotsolves this by providing complete access to allproperty types, including calculated fields that other connectors miss. You can import calculated values from HubSpot and create additional calculations in Google Sheets for enhanced flexibility.

How to make it work

Step 1. Import all calculated properties from HubSpot.

Select your HubSpot object (Contacts, Companies, Deals) and scroll through field selection to find all calculated properties. They appear alongside standard properties without restrictions. Choose specific calculated fields needed for your reports, including score properties, rolled-up properties, and equation-based fields.

Step 2. Enhance with additional spreadsheet calculations.

Import the calculated values from HubSpot, then create additional calculations in Google Sheets for more flexibility. Combine HubSpot calculations with spreadsheet formulas and build more complex calculated metrics unavailable in HubSpot itself.

Step 3. Handle calculation timing and updates.

Some calculated properties update asynchronously in HubSpot, so schedule imports after typical calculation completion times. Use Coefficient’s Snapshots feature to track calculation changes over time and monitor how calculated values evolve.

Step 4. Recreate calculations for maximum flexibility.

If a calculated property has issues, recreate it using source data in Google Sheets. Use Google Sheets formulas for more flexibility than HubSpot’s calculation engine and create new calculated fields impossible in HubSpot’s native system.

Never miss important calculated data again

Start accessingThis approach ensures all your HubSpot metrics visualization needs are met, including complex calculated properties that form the backbone of advanced reports and dashboards. You get more flexibility than HubSpot’s native calculations.all your calculated properties today.

HubSpot import Excel file size limits and row restrictions for contact updates

HubSpot’snative Excel import typically restricts file sizes to 512MB and frequently times out with large datasets. These limitations make it difficult to update thousands of contacts at once, often leaving you uncertain about which records were successfully processed.

Here’s how to handle large-scale contact updates without file size restrictions or timeout errors.

Process large contact updates without size limits using Coefficient

CoefficientHubSpot’seliminatesfile size limitations and provides reliable handling of large contact update datasets. The system supports minimum 50,000 rows and processes data through Google Sheets’ robust infrastructure for consistent performance.

How to make it work

Step 1. Upload your large Excel file to Google Sheets.

Import your Excel data into Google Sheets, which can handle much larger datasets than HubSpot’s native import. Google Sheets supports up to 10 million cells per spreadsheet, giving you plenty of room for large contact lists.

Step 2. Break large datasets into manageable batches.

If your dataset is extremely large, create separate tabs for different batches (e.g., 25,000 contacts per tab). Use formulas like =OFFSET to automatically split your data into logical chunks for processing.

Step 3. Validate contact data before processing.

Use spreadsheet functions to clean and validate your contact data – standardize email formats, check required fields, and identify any data quality issues before attempting updates.

Step 4. Execute batch UPDATE operations through Coefficient.

Process your contact updates in batches using Coefficient’s reliable export functionality. The system handles large datasets without the timeout errors that plague HubSpot’s native import.

Step 5. Monitor progress and handle any errors.

Use Coefficient’s export status features to track large update operations. If any updates fail, you can identify and reprocess only the failed records rather than restarting the entire import.

Step 6. Schedule ongoing updates for regular data maintenance.

Set up scheduled exports to handle regular large-scale contact updates automatically, ensuring your HubSpot data stays current without manual intervention.

Handle large-scale updates reliably

Process your large datasetsLarge contact updates require more robust processing than HubSpot’s native import can provide. With proper batch processing, you can update thousands of contacts without size restrictions or timeout failures.with confidence.

Import Excel spreadsheet to HubSpot and automatically create static list from imported contacts

HubSpot’sYou can automate both Excel data import and static list creation in a single workflow instead of handling them as separate manual steps.native Excel import requires you to create lists manually after import completion, but there’s a better way.

Here’s how to streamline the entire process from Excel upload to populated static lists without any manual list management.

Automate contact imports and list creation using Coefficient

CoefficientHubSpothandles both data import and list creation through its specialized Contact List sync functionality. Instead of importing toand then manually building lists, you can define list membership criteria in your spreadsheet and automate the entire process.

How to make it work

Step 1. Upload and clean your Excel data in Google Sheets.

Import your Excel file into Google Sheets and validate the data using spreadsheet functions. Clean email addresses, standardize formatting, and add any calculated fields you need for list segmentation.

Step 2. Create a list membership column.

Add a column that identifies which contacts should be added to your target static list. Use TRUE/FALSE values or create multiple columns if you want to populate several lists from the same import.

Step 3. Import or update your HubSpot contacts.

Use Coefficient’s INSERT operation for new contacts or UPDATE for existing ones. This gets your Excel data into HubSpot with proper contact matching to avoid duplicates.

Step 4. Use Contact List sync to automatically populate your static list.

Coefficient’s “Add contacts to lists” functionality reads your list membership column and automatically adds the appropriate contacts to your target static list. No manual list building required.

Step 5. Schedule ongoing updates if needed.

If your Excel data changes regularly, set up scheduled updates to maintain both contact data and list membership automatically.

Skip the manual list building step

Get startedThis automated approach eliminates the tedious process of creating lists after every import. Your contacts and lists stay in sync without manual intervention.with automated HubSpot list management today.