Excel is a powerful tool for data analysis and presentation, but many of its most useful functions can be overlooked. One such function is the TRANSPOSE function, which allows you to efficiently shift the orientation of data arrays within your spreadsheets.
In this comprehensive guide, we’ll walk you through the basics of the TRANSPOSE function, provide a step-by-step tutorial on its usage, and help you troubleshoot common issues that might arise.
TRANSPOSE Function in Excel 101: The Basics
What is the TRANSPOSE Function?
The TRANSPOSE function is a built-in Excel feature that changes the orientation of a given range or array. It converts rows to columns and columns to rows—a critical function when dealing with large datasets or when preparing data for analysis or reporting.
Primary Use
Primarily, the TRANSPOSE function is used to:
- Rearrange data to meet the requirements of various analysis tools or reports.
- Enhance data visualization and make tables more readable.
Syntax and Example
The syntax for the TRANSPOSE function is straightforward:
=TRANSPOSE(array)
Where ‘array’ refers to the range of cells that you want to transpose.
Simple Example: Imagine you have a vertical list of names in cells A1 to A5. To transpose this list into a horizontal array in cells A1 to E1, you would:
- Select cells A1 to E1.
- Enter the formula =TRANSPOSE(A1:A5) into the formula bar.
- Press Ctrl+Shift+Enter to complete the array formula.
This simple action flips the orientation of your data, showcasing the power of the TRANSPOSE function in organizing data more effectively.
Step-by-Step Guide to Using the TRANSPOSE Function
Using the TRANSPOSE function might seem daunting at first, but with these detailed instructions, you’ll be able to handle it like a pro.
Detailed Instructions
- Identify the Data: Select the data that you want to transpose.
- Select the New Range: Choose where you want the transposed data to appear. Make sure the range is empty and has enough space to accommodate the transposed data.
- Enter the Formula: Click on the first cell of the selected range, type the TRANSPOSE formula, and reference the original data range.
- Finalize the Formula: Instead of just pressing Enter, you must use Ctrl+Shift+Enter to tell Excel that this is an array formula. This step is crucial for the TRANSPOSE function to work correctly.
How to use the TRANSPOSE Function
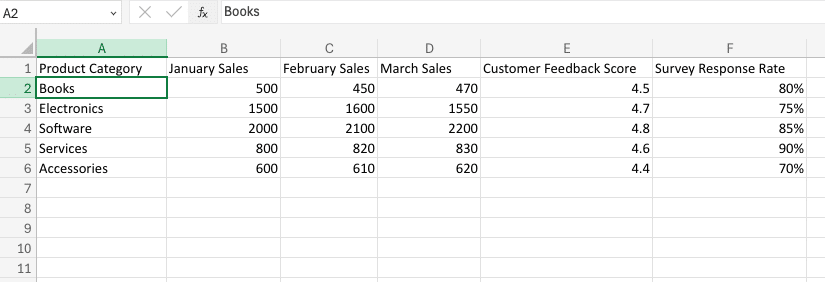
Suppose you have a list of product categories in column A and their corresponding sales figures in column B. You want to transpose this data for a presentation.

Select a new range where you want the transposed data to appear (e.g., C1:D2).
Type =TRANSPOSE(A1:B2) in the formula bar while the range C1:D2 is highlighted. Then, press Ctrl+Shift+Enter.

Stop exporting data manually. Sync data from your business systems into Google Sheets or Excel with Coefficient and set it on a refresh schedule.
Get Started

This example clearly shows how the TRANSPOSE function can be used to switch data from rows to columns, making it easier to integrate into reports or presentations.
Video Tutorial
When to Use the TRANSPOSE Function: Examples and Use Cases
The TRANSPOSE function in Excel is incredibly versatile and can be applied to a wide range of data manipulation scenarios. Let’s explore some practical examples to showcase its capabilities:
- Transposing Sales Data: Imagine you have a spreadsheet tracking monthly sales figures for different product categories. By using the TRANSPOSE function, you can quickly convert the data from a row-based format to a column-based format, making it easier to analyze trends and generate visual reports.
- Transposing Survey Results: When collecting survey responses, the data is often organized with each question as a row and the respondents as columns. Using the TRANSPOSE function, you can easily flip the data to have the questions as columns and the respondents as rows, enabling you to identify patterns and insights more effectively.
- Transposing Inventory Data: If you maintain an inventory spreadsheet with product details organized by rows, the TRANSPOSE function can help you quickly convert the data to a column-based format. This can be particularly useful when integrating the inventory data with other systems or creating custom reports.
- Transposing Financial Statements: Financial statements, such as balance sheets and income statements, are often presented in a row-based format. By using the TRANSPOSE function, you can reorganize the data to have the account names as columns and the reporting periods as rows. This can provide a more intuitive view of the financial data and facilitate comparative analysis.
Common Issues and Troubleshooting Tips for the TRANSPOSE Function
Common Errors
- #VALUE! Error: This occurs if the range where you want to place the transposed data is not the correct size. Ensure the destination range matches the dimensions of the transposed data.
Troubleshooting Tips
- Check the Array Size: Always ensure the destination range is large enough to hold the transposed data.
- Use Ctrl+Shift+Enter: Remember that the TRANSPOSE function requires you to finalize the formula with Ctrl+Shift+Enter since it’s an array function.
By understanding these basics, using detailed guides for application, and knowing how to troubleshoot common issues, you can master the TRANSPOSE function to enhance your data manipulation capabilities in Excel.
TRANSPOSE Function: Tips and Tricks
While the TRANSPOSE function is relatively straightforward, there are some advanced techniques and shortcuts that can help you use it even more efficiently:
- Dynamic Arrays: In newer versions of Excel (365 and later), the TRANSPOSE function can be used in conjunction with dynamic arrays. This allows you to dynamically update the transposed data as the source data changes, without the need for manual refreshing.
- Keyboard Shortcuts: Instead of using the mouse to access the TRANSPOSE function from the Formulas tab, you can use the keyboard shortcut Ctrl+Shift+T (Windows) or Command+Shift+T (Mac) to quickly apply the function.
- Combining with Other Functions: The TRANSPOSE function can be combined with other Excel functions, such as VLOOKUP, INDEX, and MATCH, to create more complex data manipulation workflows. This can be particularly useful when working with large datasets or integrating data from multiple sources.
- Conditional Transposing: You can use conditional logic, such as IF statements or CHOOSE functions, to selectively transpose data based on certain criteria. This can be helpful when you need to transpose only a portion of your data or handle exceptions.
- Troubleshooting Transposing Errors: If you encounter any issues with the TRANSPOSE function, such as unexpected formatting or errors, be sure to check the data types and ranges of the source and target cells. Ensuring that the data is compatible and the cell references are correct can help you avoid common pitfalls.
Transform Your Data with TRANSPOSE
The TRANSPOSE function is one tool in Excel’s toolbox. While it helps reorganize data, getting fresh information into your spreadsheets can be time-consuming.
Coefficient solves this by connecting Excel directly to live data from Salesforce, HubSpot, and 50+ other systems. Automate your reporting.


