Wondering how tracking changes works when sharing Excel workbooks? You’ve come to the right place! This guide explains the connection between Excel’s tracking features and shared workbooks. You’ll learn how these tools work together to help teams collaborate on spreadsheets. Let’s get started!
Tracking Changes in Excel 101: The Basics
The “Track Changes” feature in Excel is a game-changer when it comes to collaborative work. This powerful tool allows you to monitor and review any modifications made to a workbook, ensuring transparency and accountability throughout the editing process.
When you enable the Track Changes feature, Excel will automatically record every addition, deletion, and modification made to the workbook, along with the name of the person who made the change and the timestamp. This information is displayed in the “Changes” pane, making it easy to review and accept or reject the proposed edits.
Tracking changes is crucial for collaborative work because it:
- Ensures Accountability: By recording who made what changes and when, the Track Changes feature helps maintain a clear audit trail, making it easier to identify the source of any issues or discrepancies.
- Facilitates Feedback and Revision: The ability to review and comment on proposed changes allows team members to provide constructive feedback and make informed decisions about which edits to incorporate.
- Prevents Data Loss: With the changes tracked, you can easily revert to a previous version of the workbook if necessary, reducing the risk of accidental data loss or overwriting important information.
Sharing a Workbook in Excel: How It Works
Alongside the Track Changes feature, Excel also offers the “Share Workbook” functionality, which enables multiple users to collaborate on a single file simultaneously. This feature is particularly useful when you need to work with colleagues, clients, or stakeholders on a shared spreadsheet.
To share a workbook in Excel, you’ll need to ensure that the following prerequisites are met:
- Enable Sharing: In the Excel file, go to the “Review” tab and click on the “Share Workbook” button. This will open the “Sharing” dialog box, where you can enable the sharing feature.
- Specify Sharing Options: In the “Sharing” dialog box, you can choose the level of access you want to grant to other users, such as allowing them to view, edit, or comment on the workbook.
- Invite Collaborators: Once the sharing is enabled, you can invite other users to the workbook by entering their email addresses or sharing a link to the file.
By sharing a workbook, you can:
- Facilitate Real-Time Collaboration: Multiple users can access and edit the same file simultaneously, enabling seamless teamwork and reducing the need for version control.
- Improve Efficiency: Shared workbooks eliminate the need for manually merging changes from different versions, saving time and reducing the risk of errors.
- Enhance Transparency: The “Share Workbook” feature works in tandem with the Track Changes functionality, providing a comprehensive view of the collaborative process.
How Tracking Changes Relates to Sharing a Workbook
Tracking changes and sharing workbooks in Excel are two powerful features that work hand-in-hand to facilitate collaborative work. When you enable track changes, you can see who made what edits, when they were made, and have the ability to accept or reject those changes. This is particularly useful when multiple people are working on the same workbook, as it allows you to maintain control over the content and ensure everyone is on the same page.
Sharing a workbook, on the other hand, enables multiple users to access and edit the same file simultaneously. This streamlines the collaboration process, as team members can work on the document in real-time, without the need to constantly email versions back and forth. By combining these two features, you can effectively track and manage changes made by various contributors, while also ensuring everyone has access to the latest version of the workbook.
Step-by-Step Guide: Enabling Track Changes and Sharing a Workbook
Enabling Track Changes
- Open the Excel workbook you want to track changes for.
- Click on the “Review” tab in the ribbon.

- In the “Changes” group, click on the “Track Changes” button and select “Highlight Changes.”

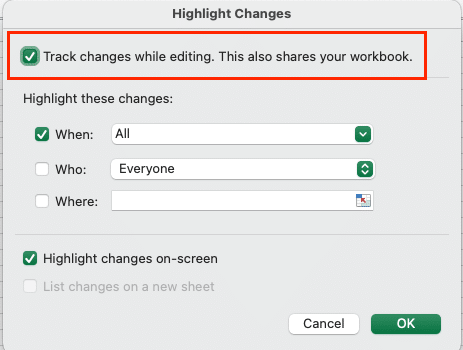
- In the “Highlight Changes” dialog box, make sure the “Track changes while editing” option is selected.
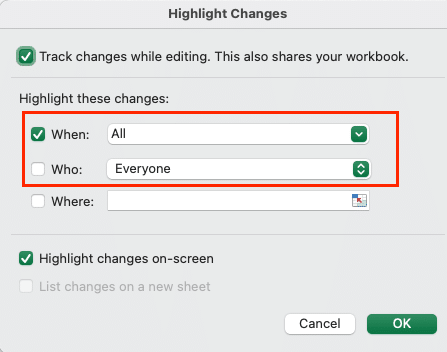
- Choose the appropriate settings for “When” and “Who” to customize the tracking preferences.
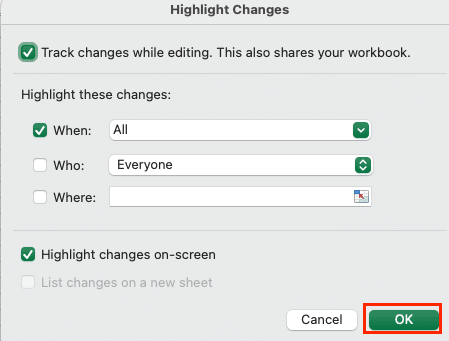
- Click “OK” to enable track changes.
Sharing a Workbook
- With the workbook open, click on the “Review” tab in the ribbon.

- In the “Changes” group, click on the “Share Workbook” button.

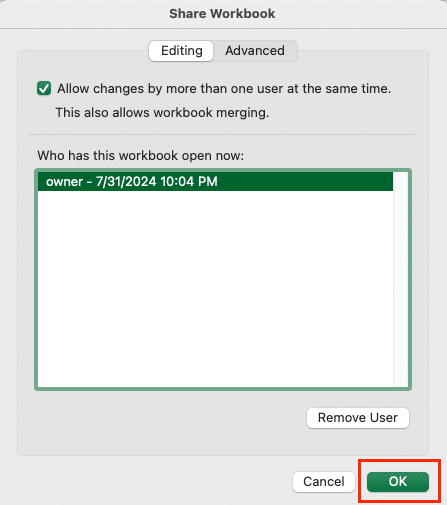
- In the “Share Workbook” dialog box, select the “Allow changes by more than one user at the same time” option.

- Customize the sharing settings, such as allowing users to see each other’s changes or locking specific cells.
- Click “OK” to share the workbook.
Benefits and Limitations of Using Track Changes and Sharing Workbooks Together
Benefits:
- Maintain a clear audit trail of all changes made to the workbook.
- Easily identify who made specific edits and when they were made.
- Collaborate more effectively by allowing multiple users to work on the same file simultaneously.
- Reduce the risk of version control issues and ensure everyone is working with the latest data.
- Streamline the review and approval process by allowing stakeholders to provide feedback and approve changes.
Limitations:
- Potential for conflicts and confusion if multiple users make changes to the same cells at the same time.
- Increased file size and potential performance issues, especially with large workbooks.
- Potential security and privacy concerns if the shared workbook contains sensitive information.
- Compatibility issues if users have different versions of Excel installed.
Using Coefficient to Track Changes in an Excel Workbook
Coefficient makes it easy to track changes in an Excel workbook. It only takes a few seconds to set up auto-alerts via Slack or email. Here’s how it works for Slack.
Sending Notifications via Slack
Open Excel and go to File > Get Add-ins > More Add-Ins. Search for Coefficient in the store, click Add, and follow the prompts to install.
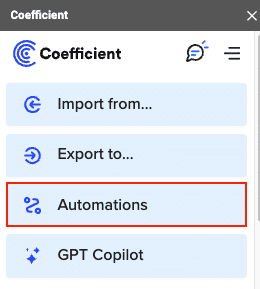
Next, launch Coefficient from the Excel ribbon and select “Automations” from the menu.
Open Coefficient

Stop exporting data manually. Sync data from your business systems into Google Sheets or Excel with Coefficient and set it on a refresh schedule.
Get Started
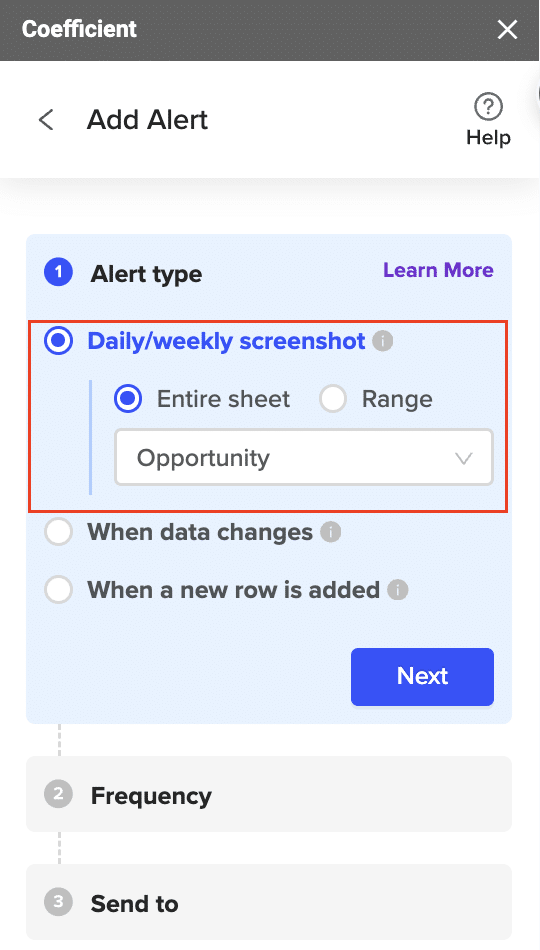
Choose the type of automation you need:
- Daily/Weekly
- When Data Changes
- When a New Row is Added
Set how often you wish to be notified and the channel (in this example, Slack).
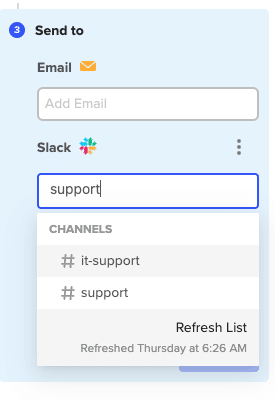
Enter the Slack channel that should receive this automation and name the automation.
Note: If you want to send to a private Slack channel, you need to invite the Coefficient bot to that channel and then refresh the channel list in the automation setup.
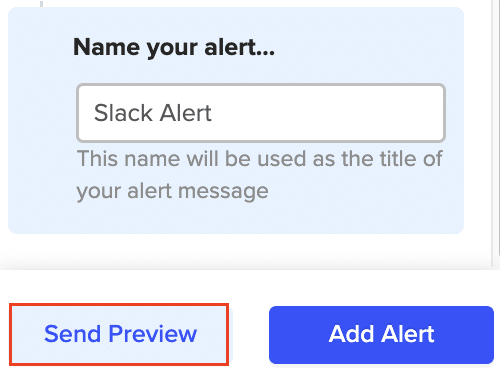
Use the “Send Preview” feature to test your alert setup before it goes live. Or, click “Add Alert” to finish.
Keep Your Team in the Loop with Coefficient
Now you understand how tracking changes fits into shared Excel workbooks. These features help teams work together more effectively on spreadsheets. Remember, Excel’s built-in sharing tools have limits.
Need a better way to collaborate on live data?
Try Coefficient to connect real-time data to your sheets and work with your team more efficiently.

