Are you looking to connect Stripe with MySQL? You’re in the right place!
This comprehensive guide will walk you through three effective methods to connect these platforms, helping you choose the best solution for your specific needs and technical expertise.
Advantages of Connecting Stripe to MySQL
- Improve cash flow forecasting: Combine Stripe’s real-time payment data with historical trends in MySQL. This allows you to create more accurate cash flow projection
- Streamline churn analysis: Sync Stripe subscription data to MySQL to track customer lifecycle. This enables you to identify at-risk customers early and implement targeted retention strategies before they churn.
- Enhance fraud detection: Integrate Stripe transaction data with customer behavior data in MySQL. This combination allows you to build more sophisticated fraud detection models, reducing financial losses and improving customer trust.
Top 3 Methods to Connect Stripe to MySQL
Choosing the right method to connect Stripe to MySQL depends on your technical expertise and specific business requirements. Here’s a quick overview of three effective solutions:
| Solution | Best For |
| Coefficient | Finance teams needing to analyze Stripe data alongside other business metrics in spreadsheets before pushing to MySQL. |
| Airbyte | Data engineers wanting a customizable, open-source solution for building data pipelines from Stripe to MySQL. |
| Zapier | Small business owners looking for a no-code solution to automate simple data transfers from Stripe to MySQL. |
Method 1. Coefficient

Coefficient is a powerful data integration tool that allows non-technical users to easily connect Stripe to MySQL to your spreadsheet of choice. This method works well for teams that frequently use spreadsheets for data analysis and reporting.
Step-by-Step Walkthrough
Step 1. Install Coefficient
For Google Sheets
- Open a new or existing Google Sheet, navigate to the Extensions tab, and select Add-ons > Get add-ons.
- In the Google Workspace Marketplace, search for “Coefficient.”
- Follow the prompts to grant necessary permissions.
- Launch Coefficient from Extensions > Coefficient > Launch.
- Coefficient will open on the right-hand side of your spreadsheet.

For Microsoft Excel
- Open Excel from your desktop or in Office Online. Click ‘File’ > ‘Get Add-ins’ > ‘More Add-Ins.’
- Type “Coefficient” in the search bar and click ‘Add.’
- Follow the prompts in the pop-up to complete the installation.
- Once finished, you will see a “Coefficient” tab in the top navigation bar. Click ‘Open Sidebar’ to launch Coefficient.
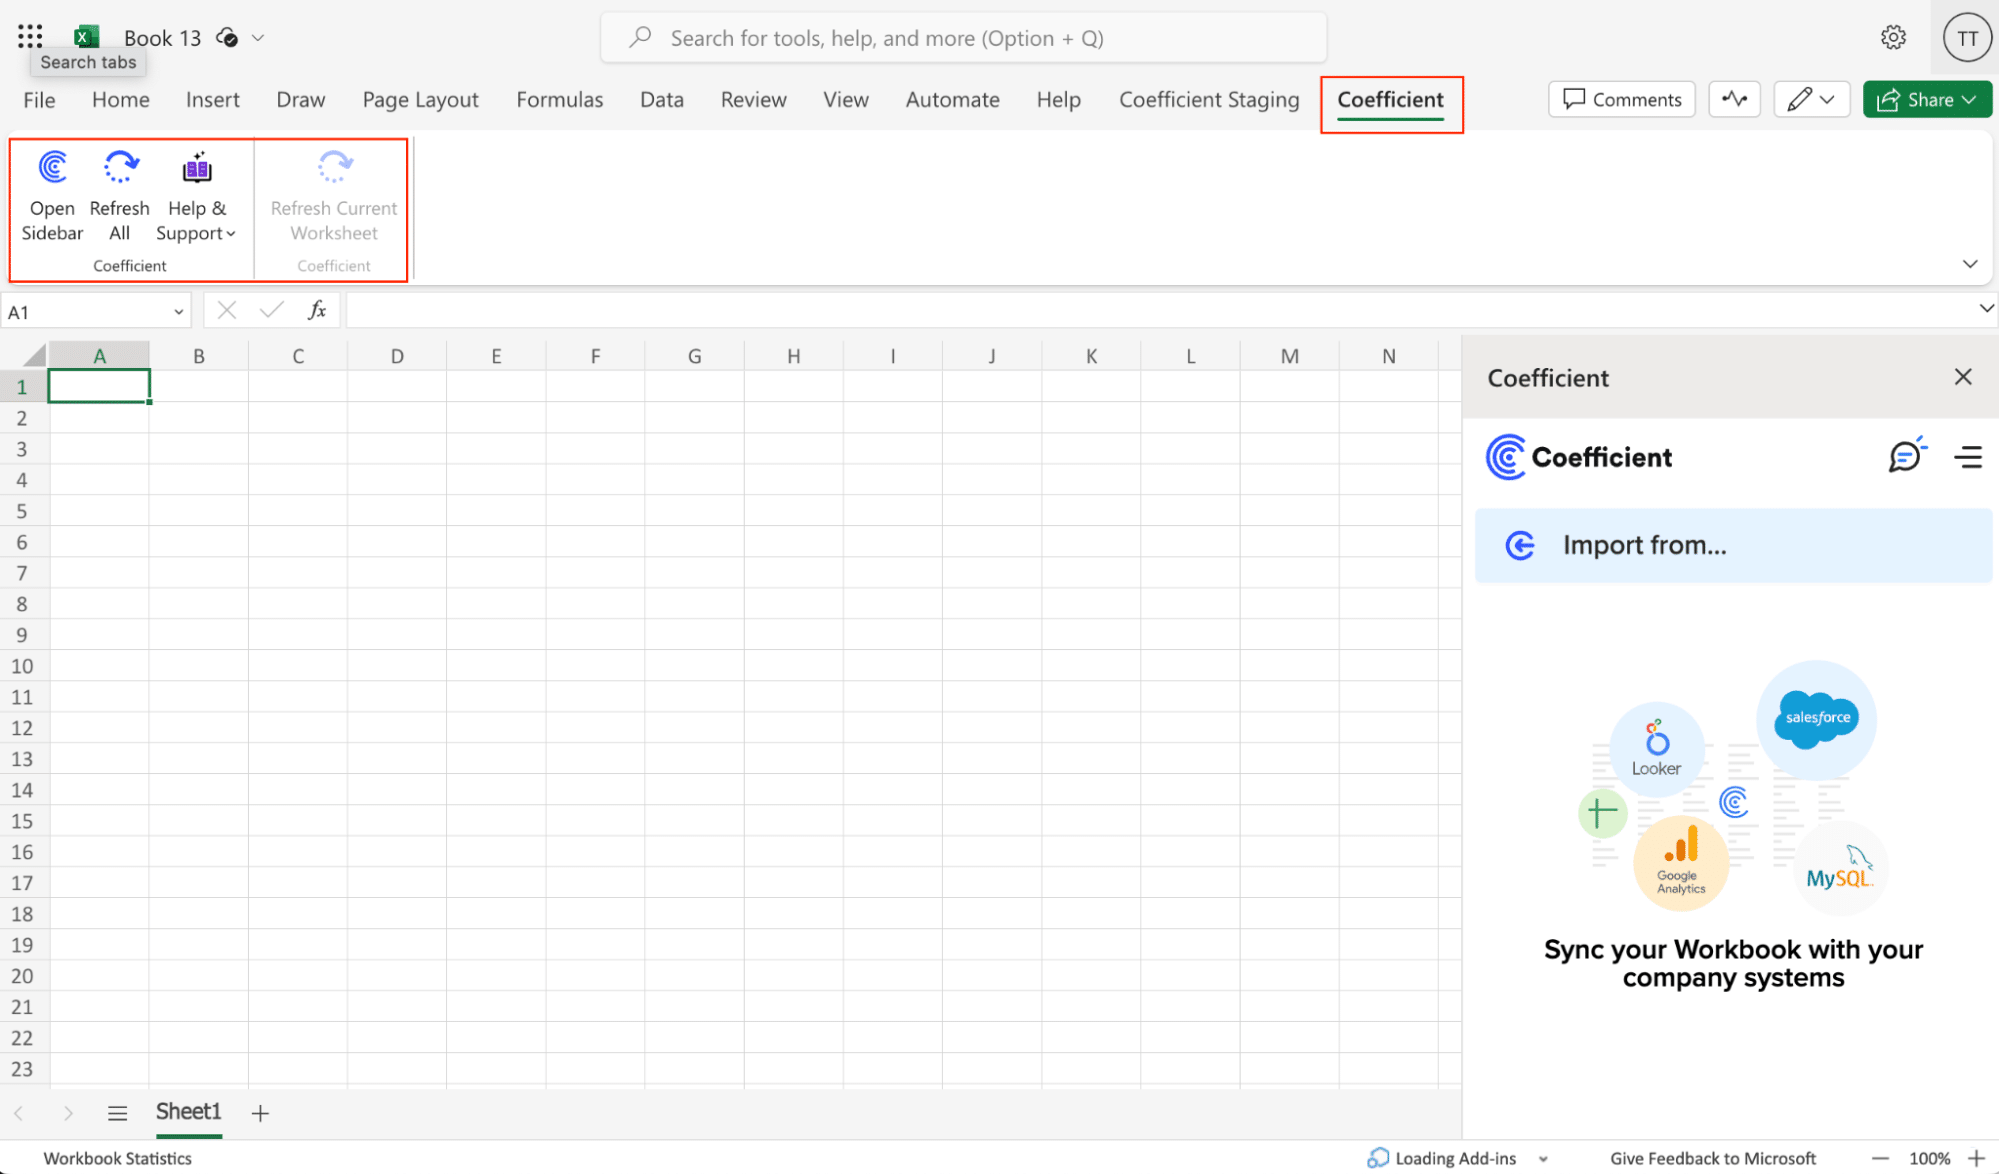
Step 2: Connect and Import Data from Stripe
- Open Coefficient Sidebar: In Google Sheets, go to Extensions > Coefficient > Launch.
- Connect Stripe: Click Import Data from the Coefficient sidebar, then select Stripe.
- Authenticate: Select the Stripe account you want to connect and click Connect.
- Select Data: Choose the object fields you want to import by clicking Select Fields. Configure any necessary filters and click Import.

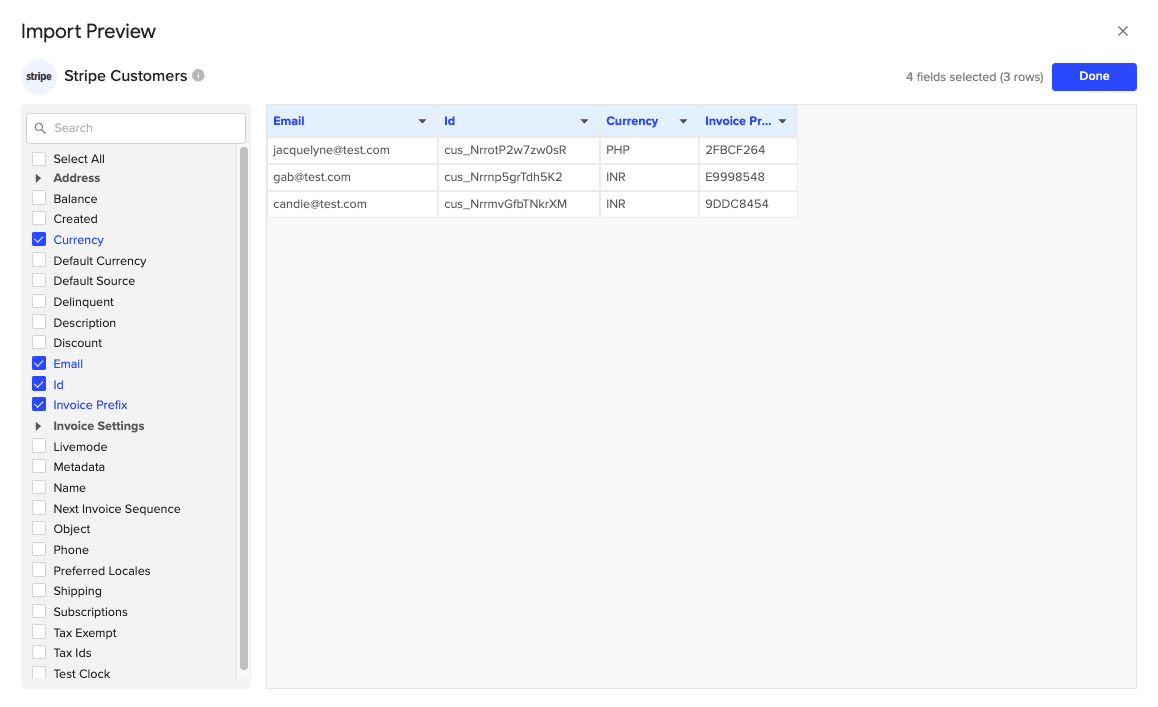
Step 3. Export Data to MySQL
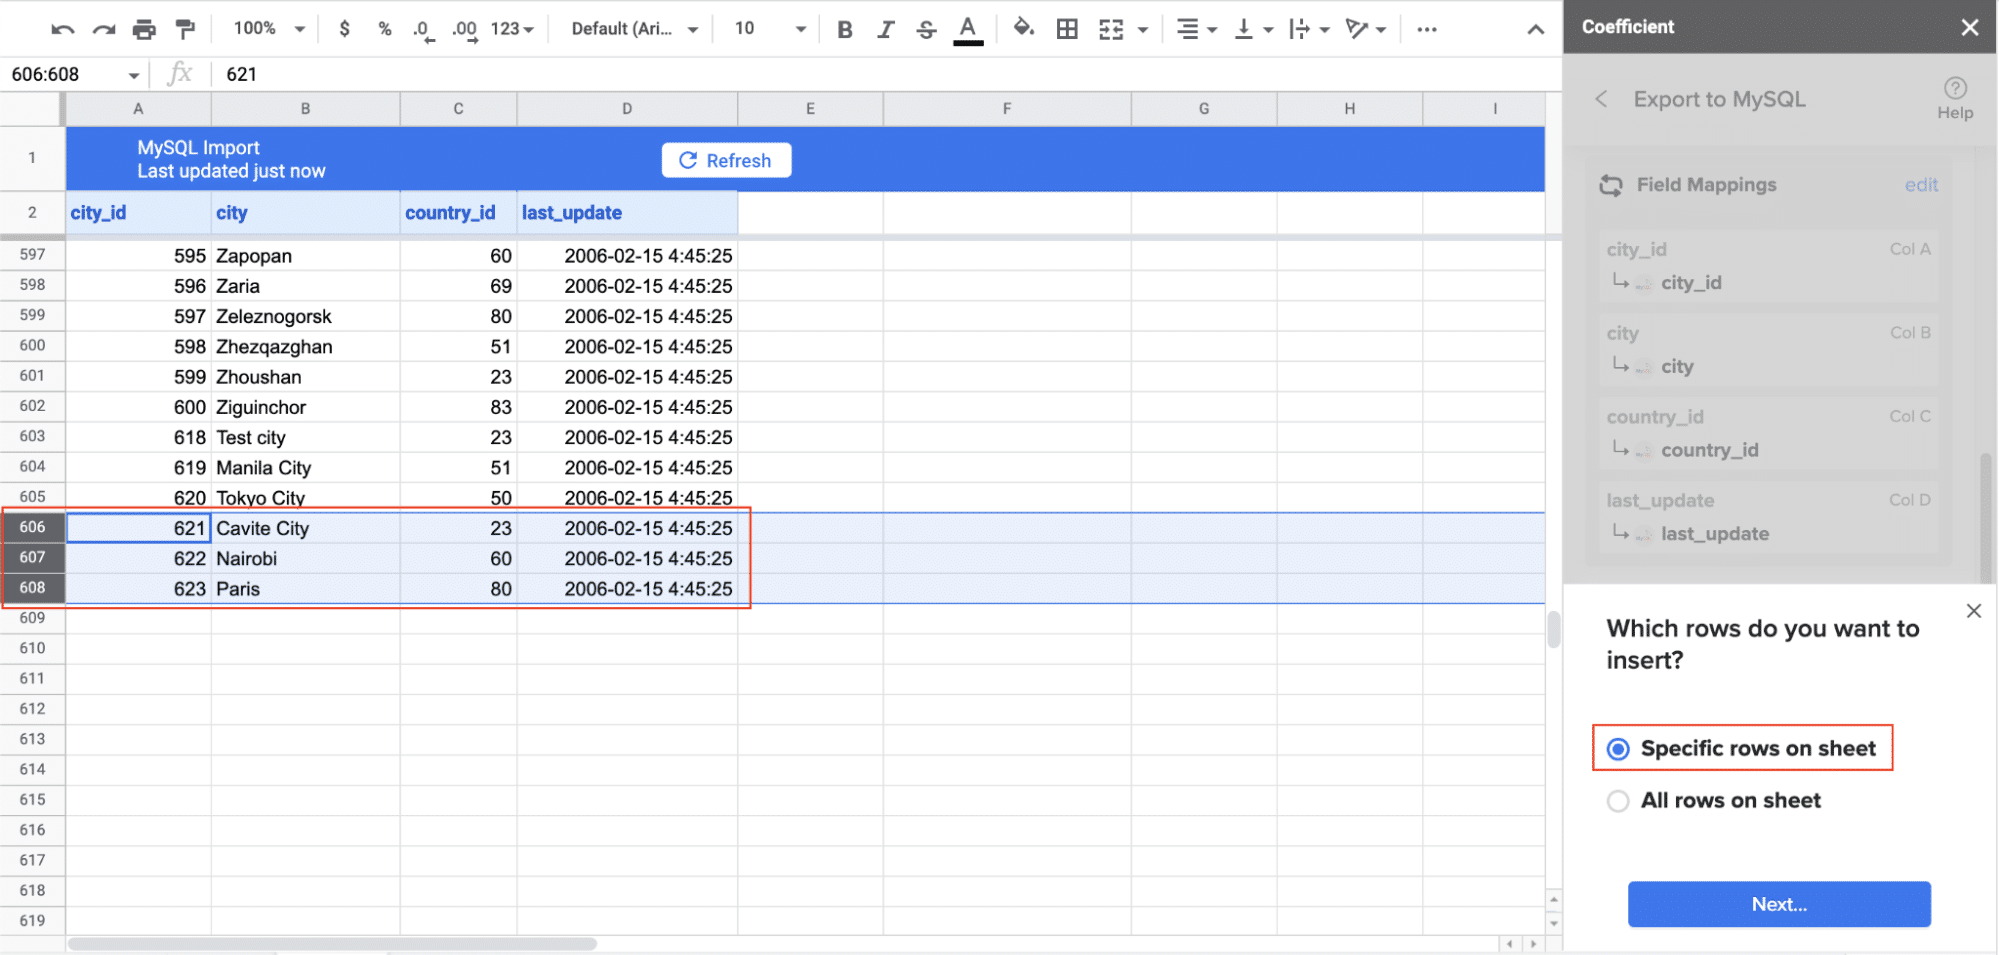
- Navigate to Export: In Coefficient’s sidebar, click Export to…, then select MySQL.

- Select Data and Action: Choose the tab and header row in your sheet that contains the data you want to export. Define your tab and header row. Specify the table in your database where you want to insert the data and choose the action type: Update, Insert, Upsert, or Delete.
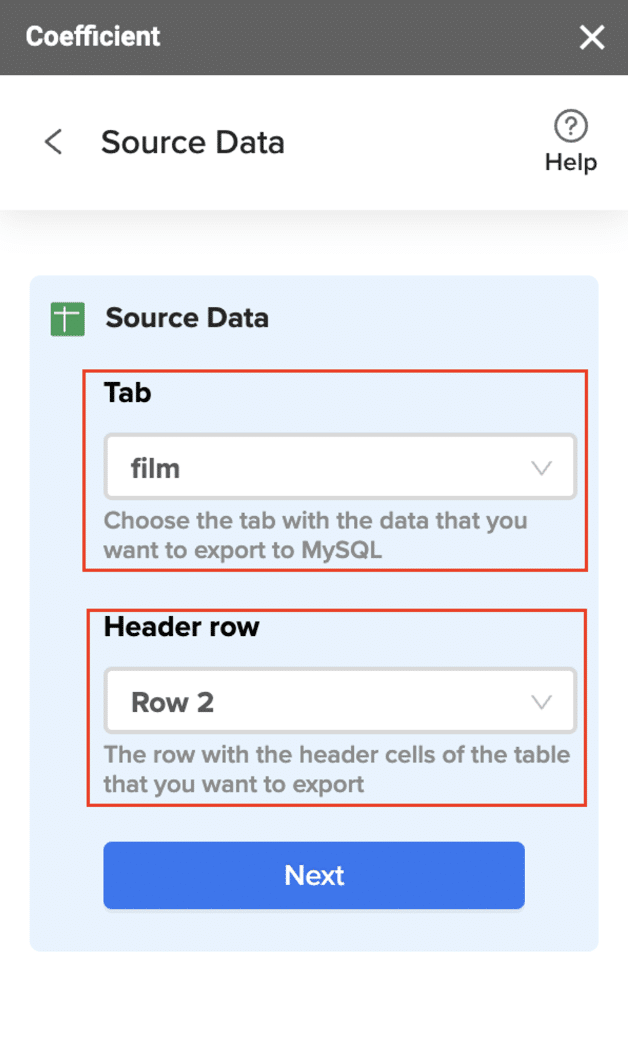
- Map Fields: Map the rows from your spreadsheet to the corresponding fields in MySQL. Manual mapping is required for first-time setups.
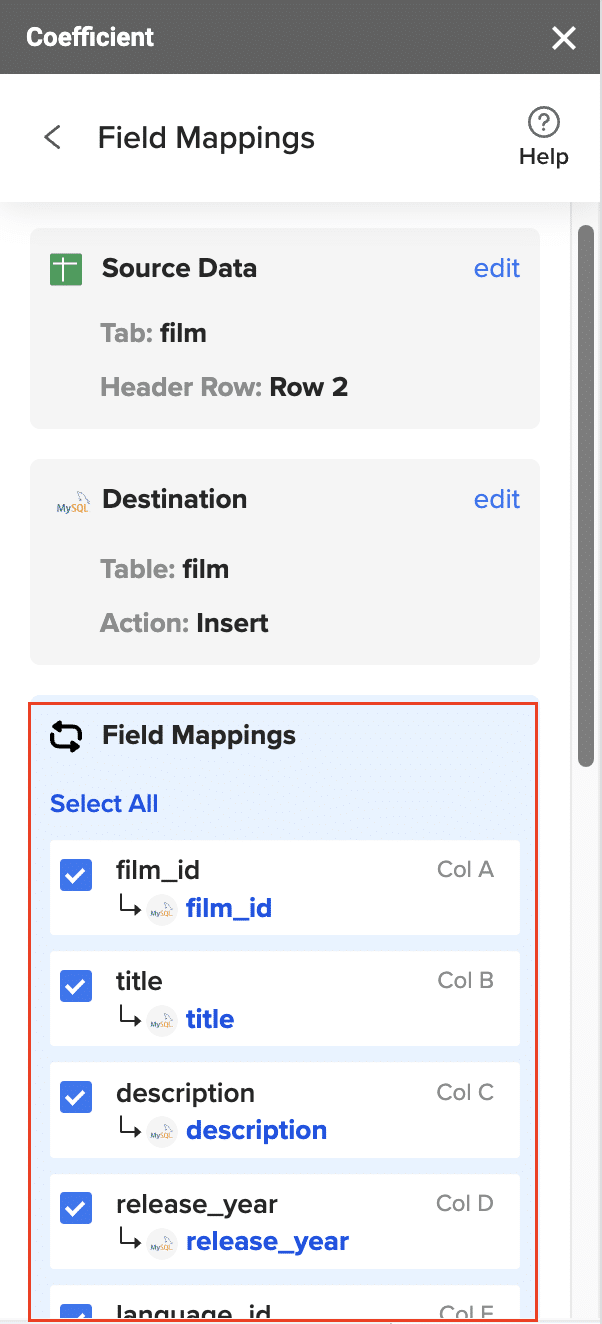
- Customize and Export: Specify batch size and any additional settings. Confirm your settings and click Export.
Pros:
- User-friendly interface with no coding required
- Utilizes the familiar Google Sheets environment
- Allows for data transformation and cleaning before MySQL import
Cons:
- Requires Google Sheets as an intermediary step
- May have limitations for very large datasets
For more information on integrating MySQL with Google Sheets, check out our guide on how to integrate MySQL with Google Sheets.
Method 2. Zapier

Zapier is a popular no-code automation platform that can connect Stripe to MySQL through its extensive library of app integrations. It’s ideal for small to medium businesses looking for a quick and easy way to automate data transfers.
Step-by-Step Walkthrough:
Step 1. Create a Zapier account
Visit the Zapier website and sign up for a new account. You can start with a free plan to explore the platform’s capabilities.
Step 2. Set up a new Zap
In your Zapier dashboard, click click on ” + Create” > “New Zap” to start setting up your automation workflow.

Step 3. Choose Stripe as the trigger app
Search for Stripe in the trigger app selection and choose it as your trigger. This will determine when data is sent from Stripe to MySQL.
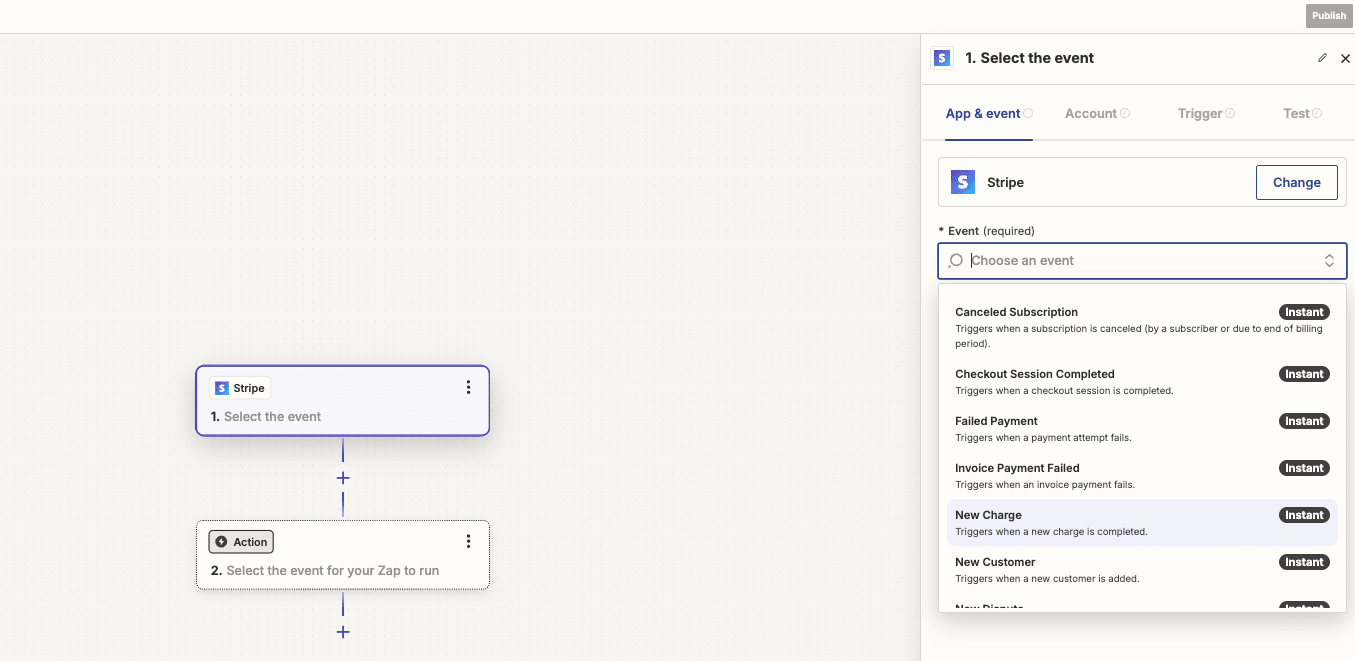
Step 4. Select the relevant Stripe event
Choose the specific Stripe event that will trigger the data transfer. For example, you might select “New Charge” to transfer payment data whenever a new charge is created in Stripe.
Step 5. Connect your Stripe account
Follow the prompts to authenticate your Stripe account and grant Zapier the necessary permissions to access your data.
Step 6. Add MySQL as the action app
In the action step, search for MySQL and select it as your action app. This will determine how data is inserted into your MySQL database.
Step 7. Connect your MySQL database
Enter your MySQL database credentials, including the host, port, database name, username, and password. Zapier will use this information to establish a connection with your database.

Step 8. Configure the data mapping between Stripe and MySQL
Map the Stripe data fields to the corresponding columns in your MySQL table. Zapier provides a user-friendly interface for this process, allowing you to easily match Stripe fields with MySQL columns.
Step 9. Test and activate your Zap

Stop exporting data manually. Sync data from your business systems into Google Sheets or Excel with Coefficient and set it on a refresh schedule.
Get Started
Run a test to ensure that data is being correctly transferred from Stripe to MySQL. If successful, activate your Zap to start the automated data transfer process.
Pros:
- Zapier requires no coding skills, making it accessible to non-technical users.
- It offers a wide range of pre-built integrations beyond Stripe and MySQL.
- Users can quickly set up and maintain automated workflows.
Cons:
- Zapier has limited customization options for complex data transformations.
- High-volume data transfers may become costly due to Zapier’s pricing structure.
Method 3. Airbyte

Airbyte is an open-source data integration platform that offers a connector for Stripe to MySQL. It’s a good fit for developers and data teams who need more control over their data pipelines and prefer a customizable solution.
Airbyte is an open-source data integration platform that offers a connector for Stripe to MySQL. It’s suitable for developers and data teams who need more control over their data pipelines and prefer a customizable solution.
Step-by-Step Walkthrough:
Step 1. Set up Airbyte on your local machine or cloud environment
Begin by installing Airbyte on your preferred environment. You can choose to run it locally using Docker or deploy it to a cloud platform like AWS, GCP, or Azure. Follow the official Airbyte documentation for detailed installation instructions.
Step 2. Configure the Stripe source connector
Once Airbyte is up and running, navigate to the Sources page and select Stripe as your source connector. You’ll need to provide your Stripe API key and configure any additional settings, such as the data replication start date.
Step 3. Set up the MySQL destination connector
Next, go to the Destinations page and choose MySQL as your destination connector. Enter your MySQL database credentials, including the host, port, database name, username, and password.
Step 4. Create a connection between Stripe and MySQL
In the Connections page, create a new connection by selecting your Stripe source and MySQL destination. Choose the Stripe data streams you want to replicate (e.g., charges, customers, or invoices) and map them to the appropriate tables in your MySQL database.
Step 5. Define your sync settings and schedule
Configure the sync frequency and any transformation rules you want to apply to the data during the transfer process. Airbyte allows you to set up incremental syncs to minimize data transfer and processing time.
Step 6. Run your first sync and verify data transfer
Initiate your first sync and monitor the process in Airbyte’s interface. Once complete, verify that the data has been successfully transferred to your MySQL database by querying the relevant tables.
Pros:
- Airbyte is open-source, allowing for extensive customization and flexibility.
- It supports a wide range of data sources and destinations beyond Stripe and MySQL.
- Airbyte enables complex data transformations during the transfer process.
Cons:
- Setting up and maintaining Airbyte requires technical expertise.
- Users may need to allocate additional resources for hosting and scaling the Airbyte infrastructure.
Connect Stripe to MySQL in Seconds with Coefficient
Connecting Stripe to MySQL can significantly enhance your business operations by providing real-time access to payment data within your database. Each method we’ve explored offers unique benefits to suit different needs:
- Coefficient is ideal for teams comfortable with spreadsheets and seeking a user-friendly solution.
- Airbyte provides open-source flexibility for developers and data teams requiring customizable pipelines.
- Zapier offers simplicity and quick setup for small to medium businesses looking for no-code automation.
By implementing one of these integration methods, you’ll be able to synchronize your payment data, gain deeper customer insights, and automate your reconciliation processes. Choose the solution that best aligns with your technical expertise and business requirements to optimize your data flow today.
Ready to get started with seamless Stripe to MySQL integration? Try Coefficient now and experience the power of efficient data management for your business.

