How much time do you spend manually updating routine tasks in Google Sheets?
It’s likely more than desired. You’re not alone.
Automating these tasks in Google Sheets can allow you to reclaim days or weeks of productivity and focus on solving business problems – not analyzing data or building dashboards or templates.
In this guide, we’ll walk through three methods to automate Google Sheets without APIs like with Zapier: Macros, third-party extensions like Coefficient, and App Scripts.
A comprehensive tutorial will accompany each method on how to set it up.
Let’s dive in!
Benefits of Automating Google Sheets
1. Time-Saving
Automating Google Sheets eliminates manual data entry and the tedious process of generating reports, freeing up a lot of time for professionals to focus on more strategic tasks.
2. Reduced Errors
“To err is human,” especially when performing repetitive tasks like copying and pasting data in spreadsheets. A missed cell in a spreadsheet or a miscalculated formula can lead to inaccuracies or worse.
For example, J.P. Morgan’s “White Whale” fiasco resulted from a spreadsheet mistake. Due to a botched copy-and-paste process, faulty equations caused the firm to gravely underestimate a portfolio’s risk, leading to around $6.5 billion in losses and fines.
Leveraging spreadsheet automation tools solves these challenges by removing people from the equation. Every automation will produce a consistent and reliable output.
3. Enhanced Collaboration
Data is most effective when it’s ‘live’ and easily accessible. Google Sheet automations provide real-time updates, ensuring every team member is working with the most recent and relevant data.
Google Sheet extensions like Coefficient further enhance collaboration by automatically sending notifications directly to platforms like Slack or team members’ Gmail with every update in real time.
Top Ways to Automate Google Sheets
Automation in Google Sheets has evolved exponentially, especially in recent years. Here are the top methods to supercharge your automation:
- Macros
- Google Sheet Add-ons
- Apps Script
Google Sheets Automation Examples
- Formatting a Dataset
- Auto-Filling Formulas
- Data Validation
- Syncing Data from Salesforce
- Automated Reporting
- Data Alerts
- GPT CoPilot
- Custom Functions
- Automated Email Notifications
- Scheduled Data Refresh
1. Google Sheets Automation with Macros
What are Macros?
Macros are automated scripts in spreadsheets designed to streamline repetitive tasks.
By recording a sequence of actions, macros serve as a “recipe” that users can later activate with a single click or a keyboard shortcut, such as Ctrl+Alt+Shift+Number (on Mac: Command+Option+Shift+Number).
Creating a macro doesn’t require any coding knowledge. Once established, you can effortlessly repeat its actions through a designated menu item or shortcut key.
If your Mac is running slow while working with macros, you might need to optimize your system. For more details on improving your Mac’s performance, you can explore various tips and tricks to speed up your device.
How to Record a Macro in Google Sheets
Open Google Sheets and navigate to the sheet you want to automate.
Click on Extensions > Macros > Record Macro.
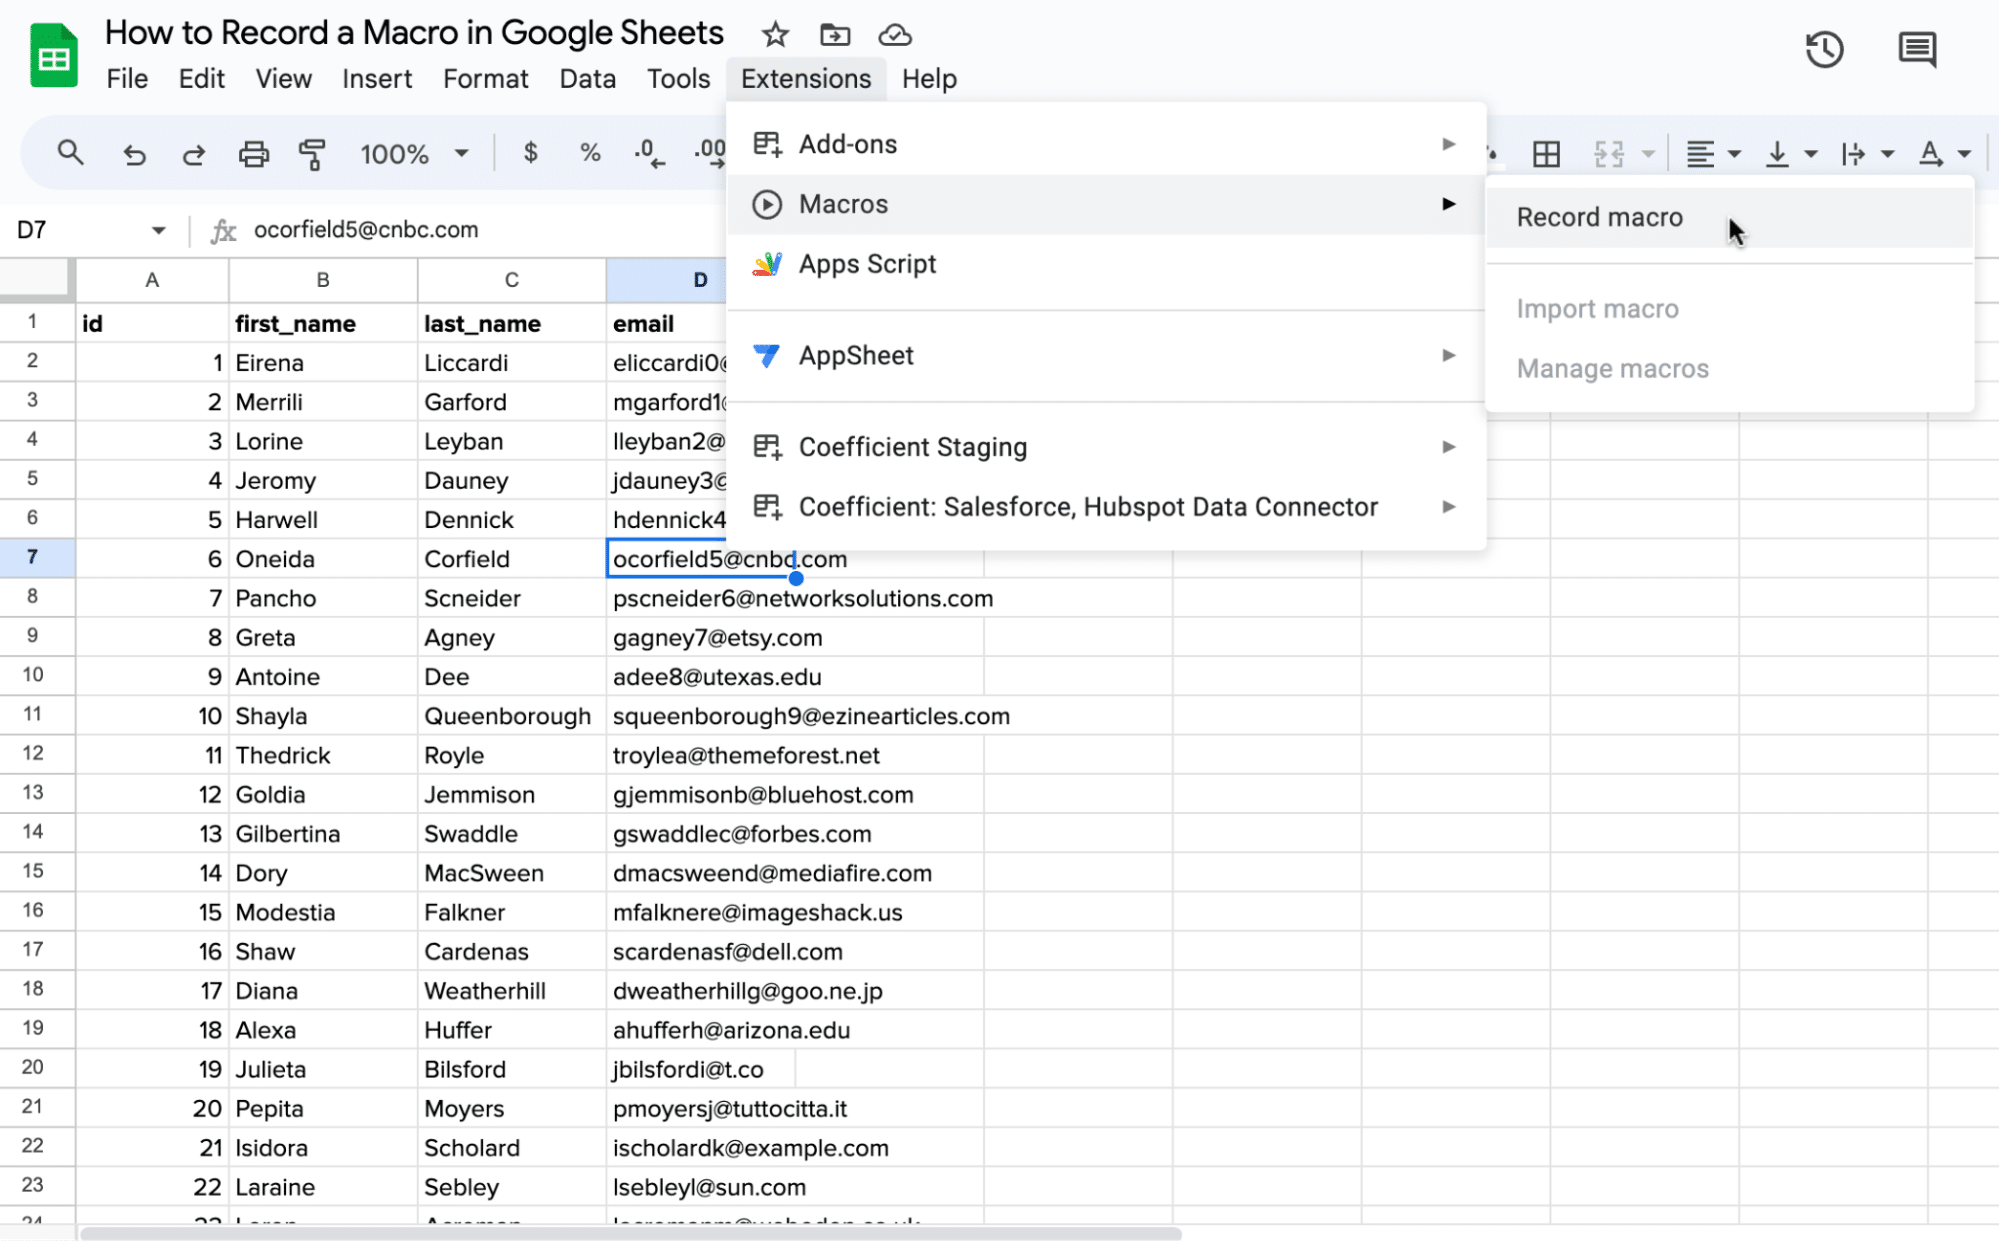
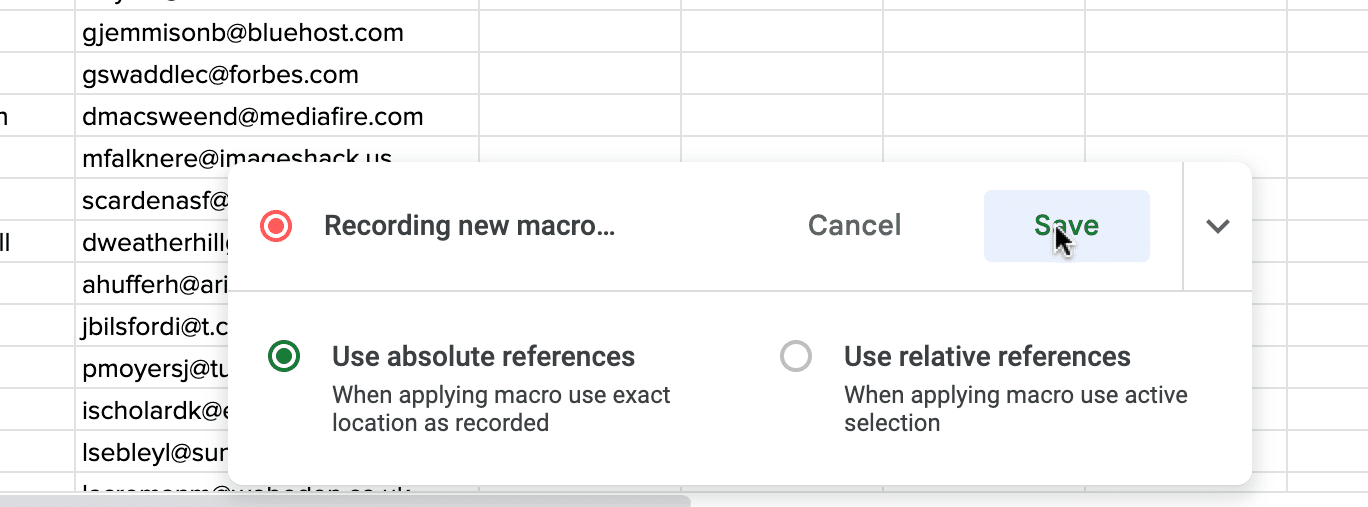
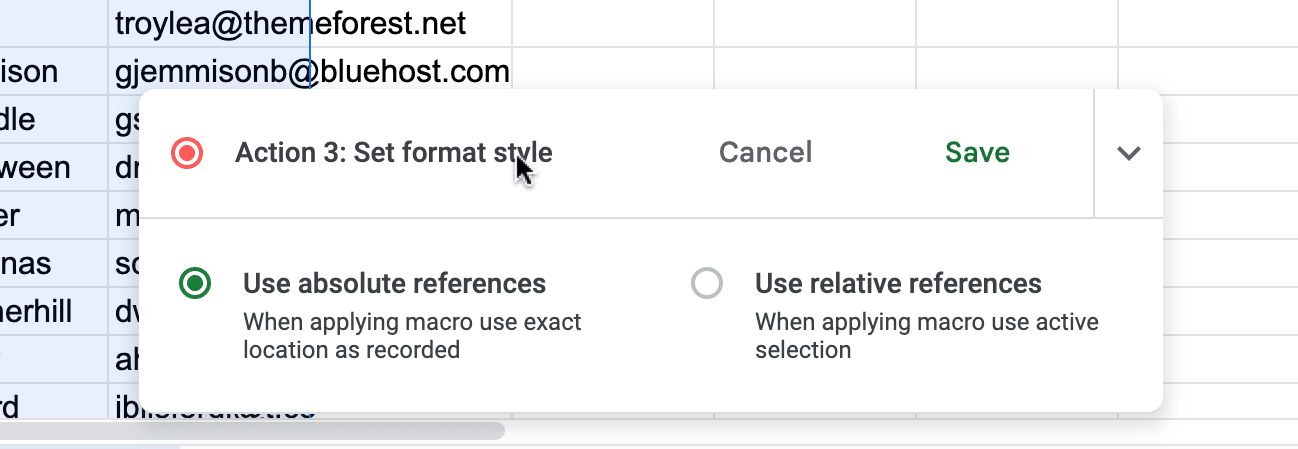
A pop-up will appear at the bottom of your spreadsheet that gives you the option of using absolute or relative references:
- Absolute references create macros that automate tasks on the exact cell(s) you record
- Relative references create macros that automate tasks on the cell you select and adjacent cells
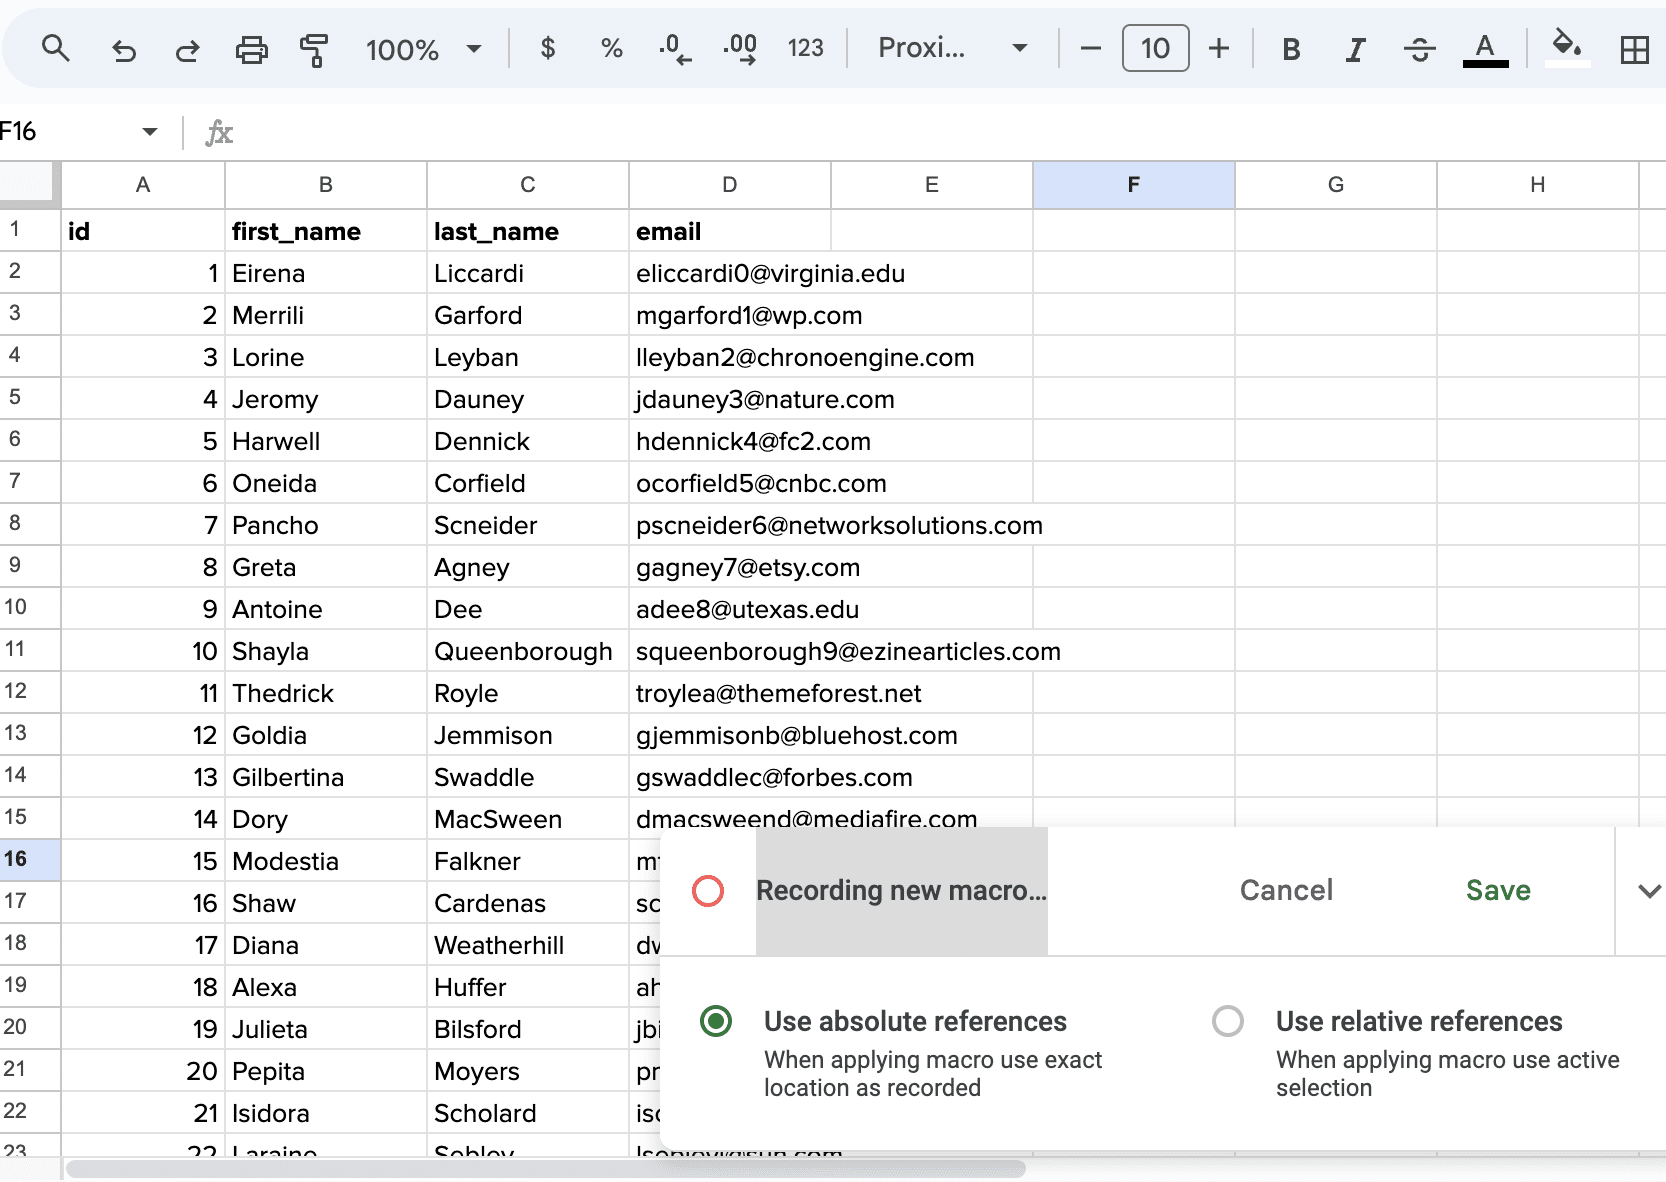
Perform the actions you want to automate and click ‘Save.’
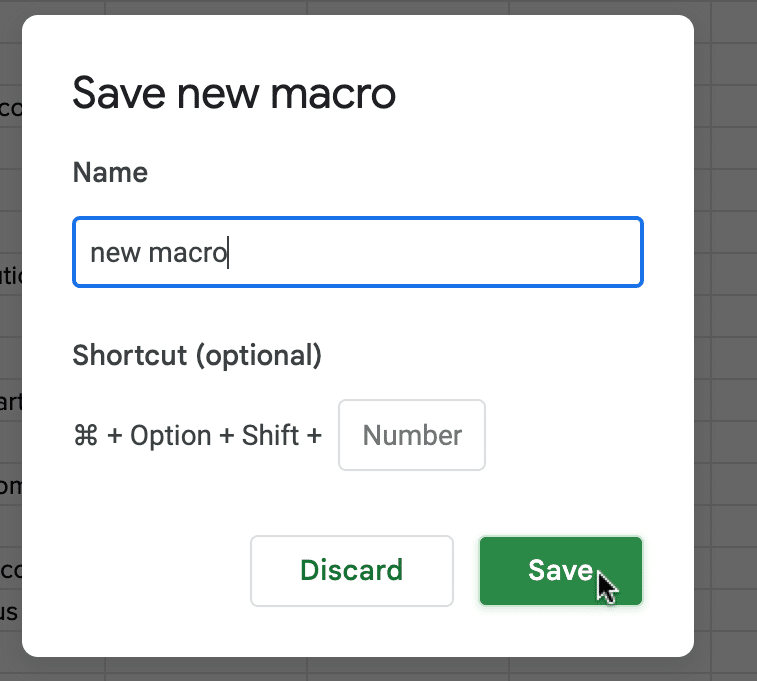
A pop-up will appear, prompting you to name your macro and assign a shortcut. Click ‘Save’ to complete the process.
Note: To update your macro, click Extensions > Macros > Manage Macros
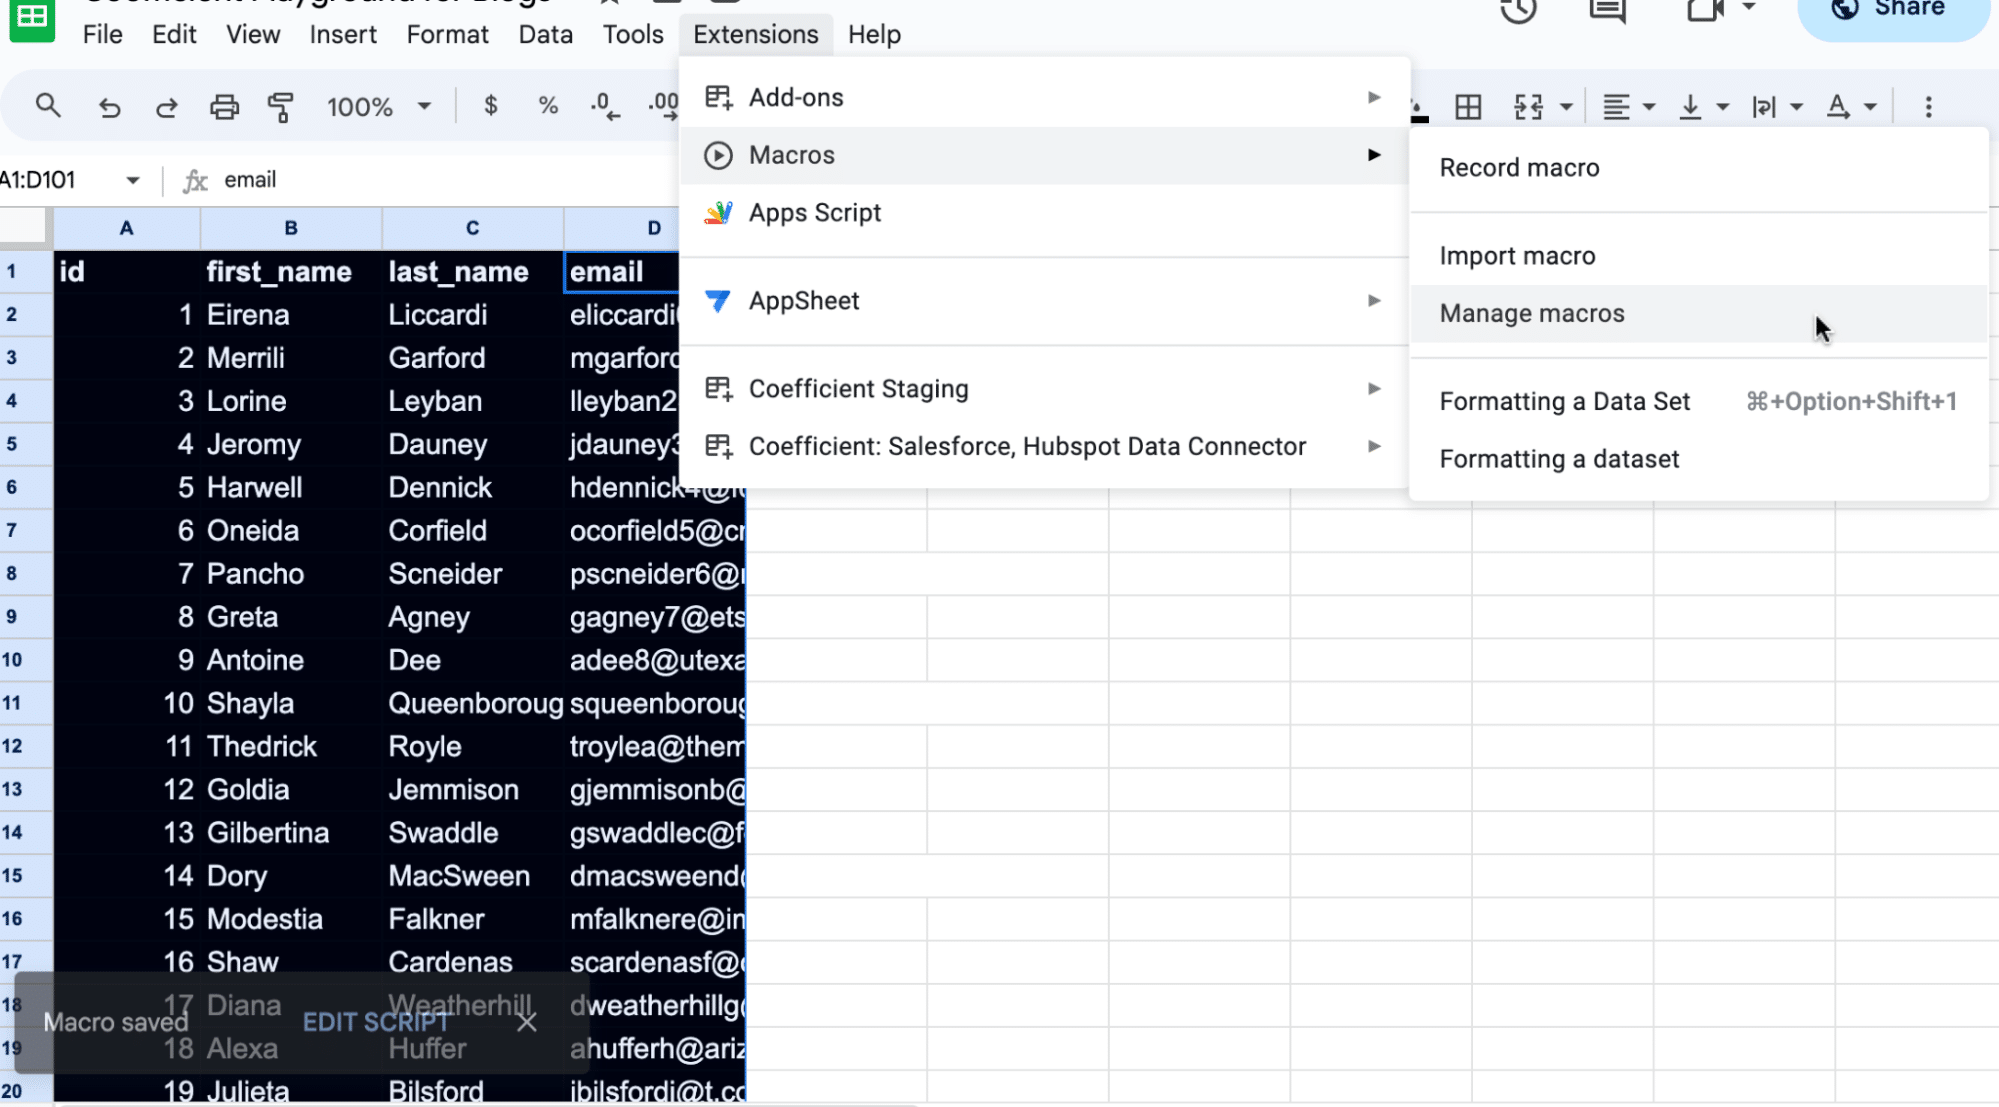
This will open the Apps Script Editor in a new window, where you can edit your macros.
Examples:
1. Formatting a Dataset
Ensure a consistent and professional appearance across your dataset by applying uniform formatting, such as font type, cell color, and number format.
In this example, we’ll build a macro that formats data consistently:
- It will set the font size to 12 for all cells.
- It will set the font to Arial for all cells.
- It will set the background color to black for all cells.
- It will set the text color to white for all cells.
Begin by navigating to Extensions > Macros > Record macro.
Note: Each action you take is automatically recorded.
Select the range of cells that you want to format.

Navigate to the toolbar and increase the font size to 12.
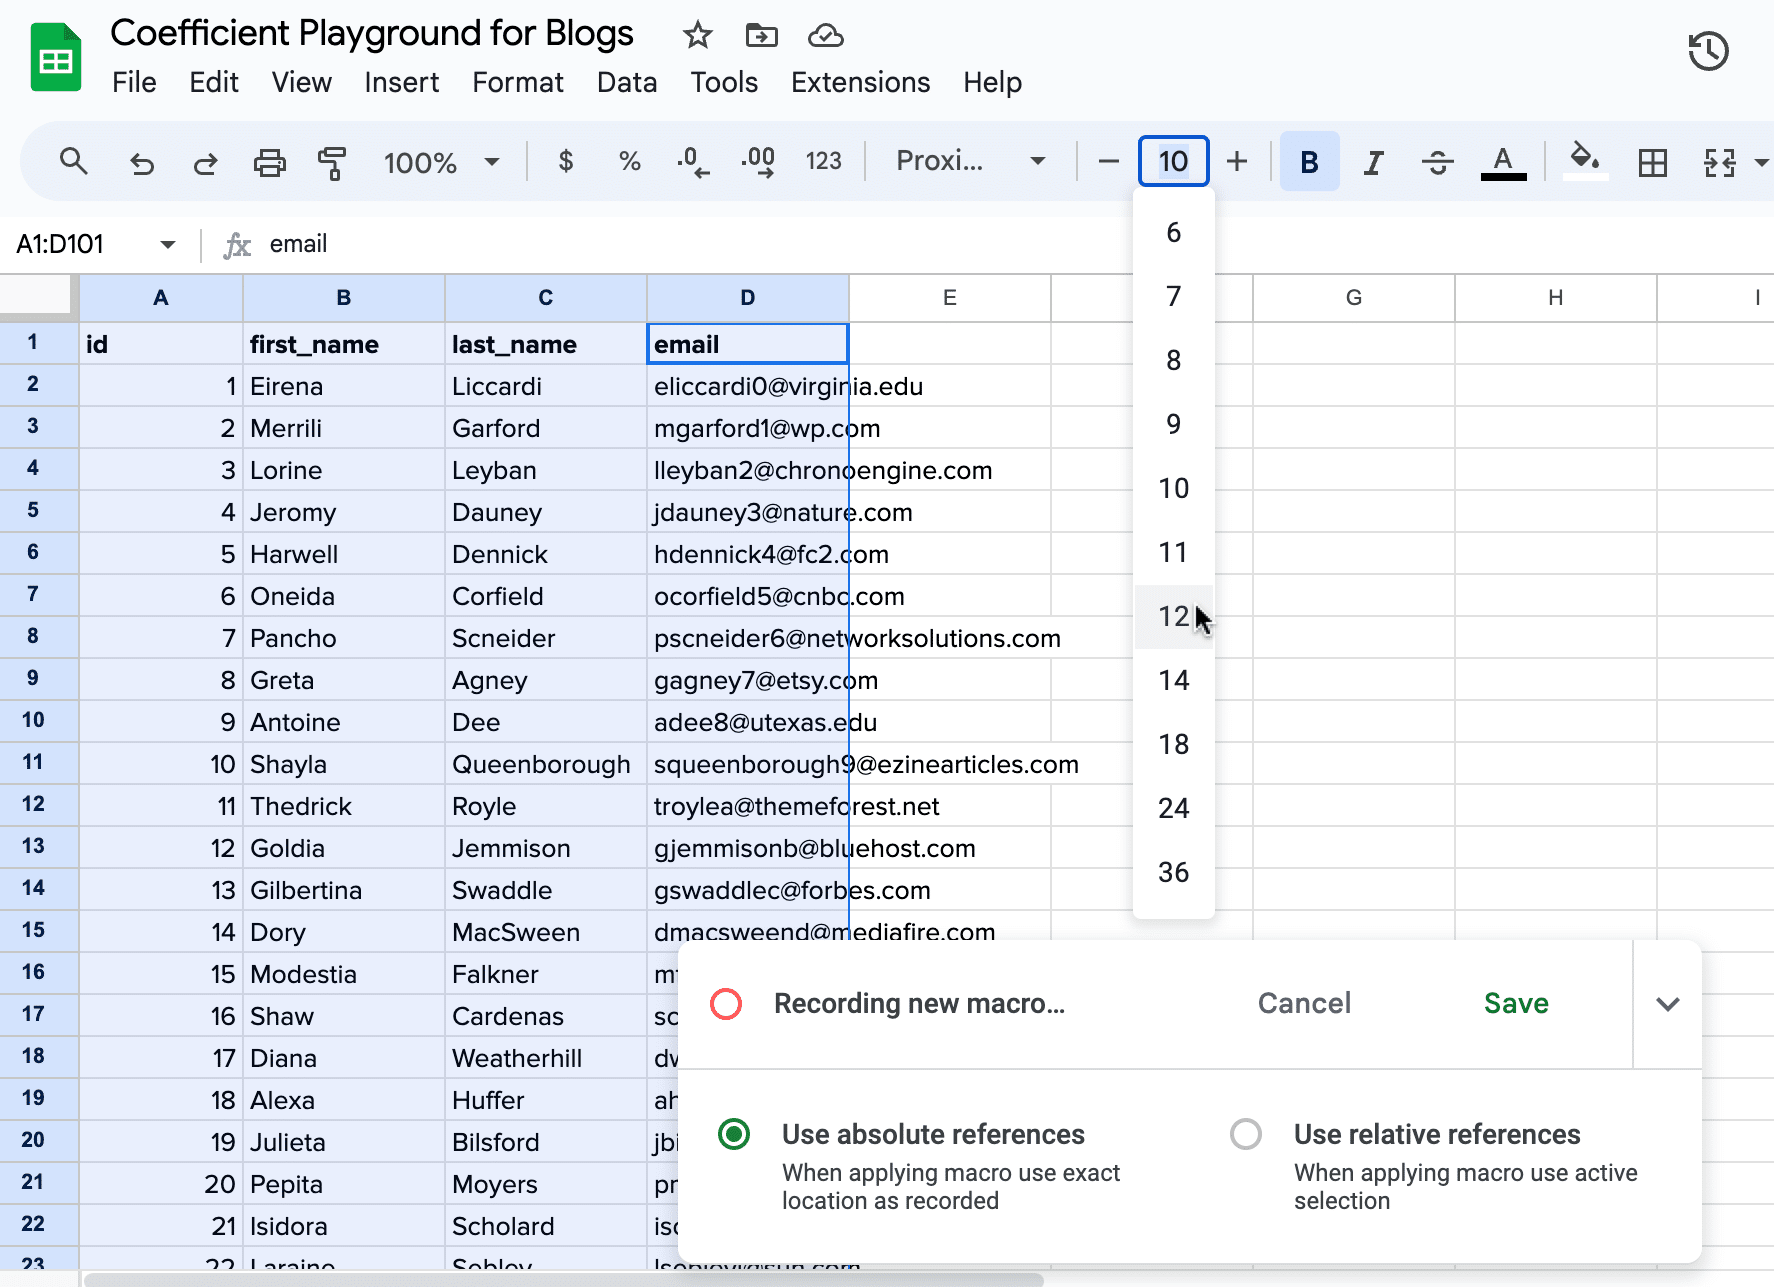
Select Arial as your font, and change the background color to black.
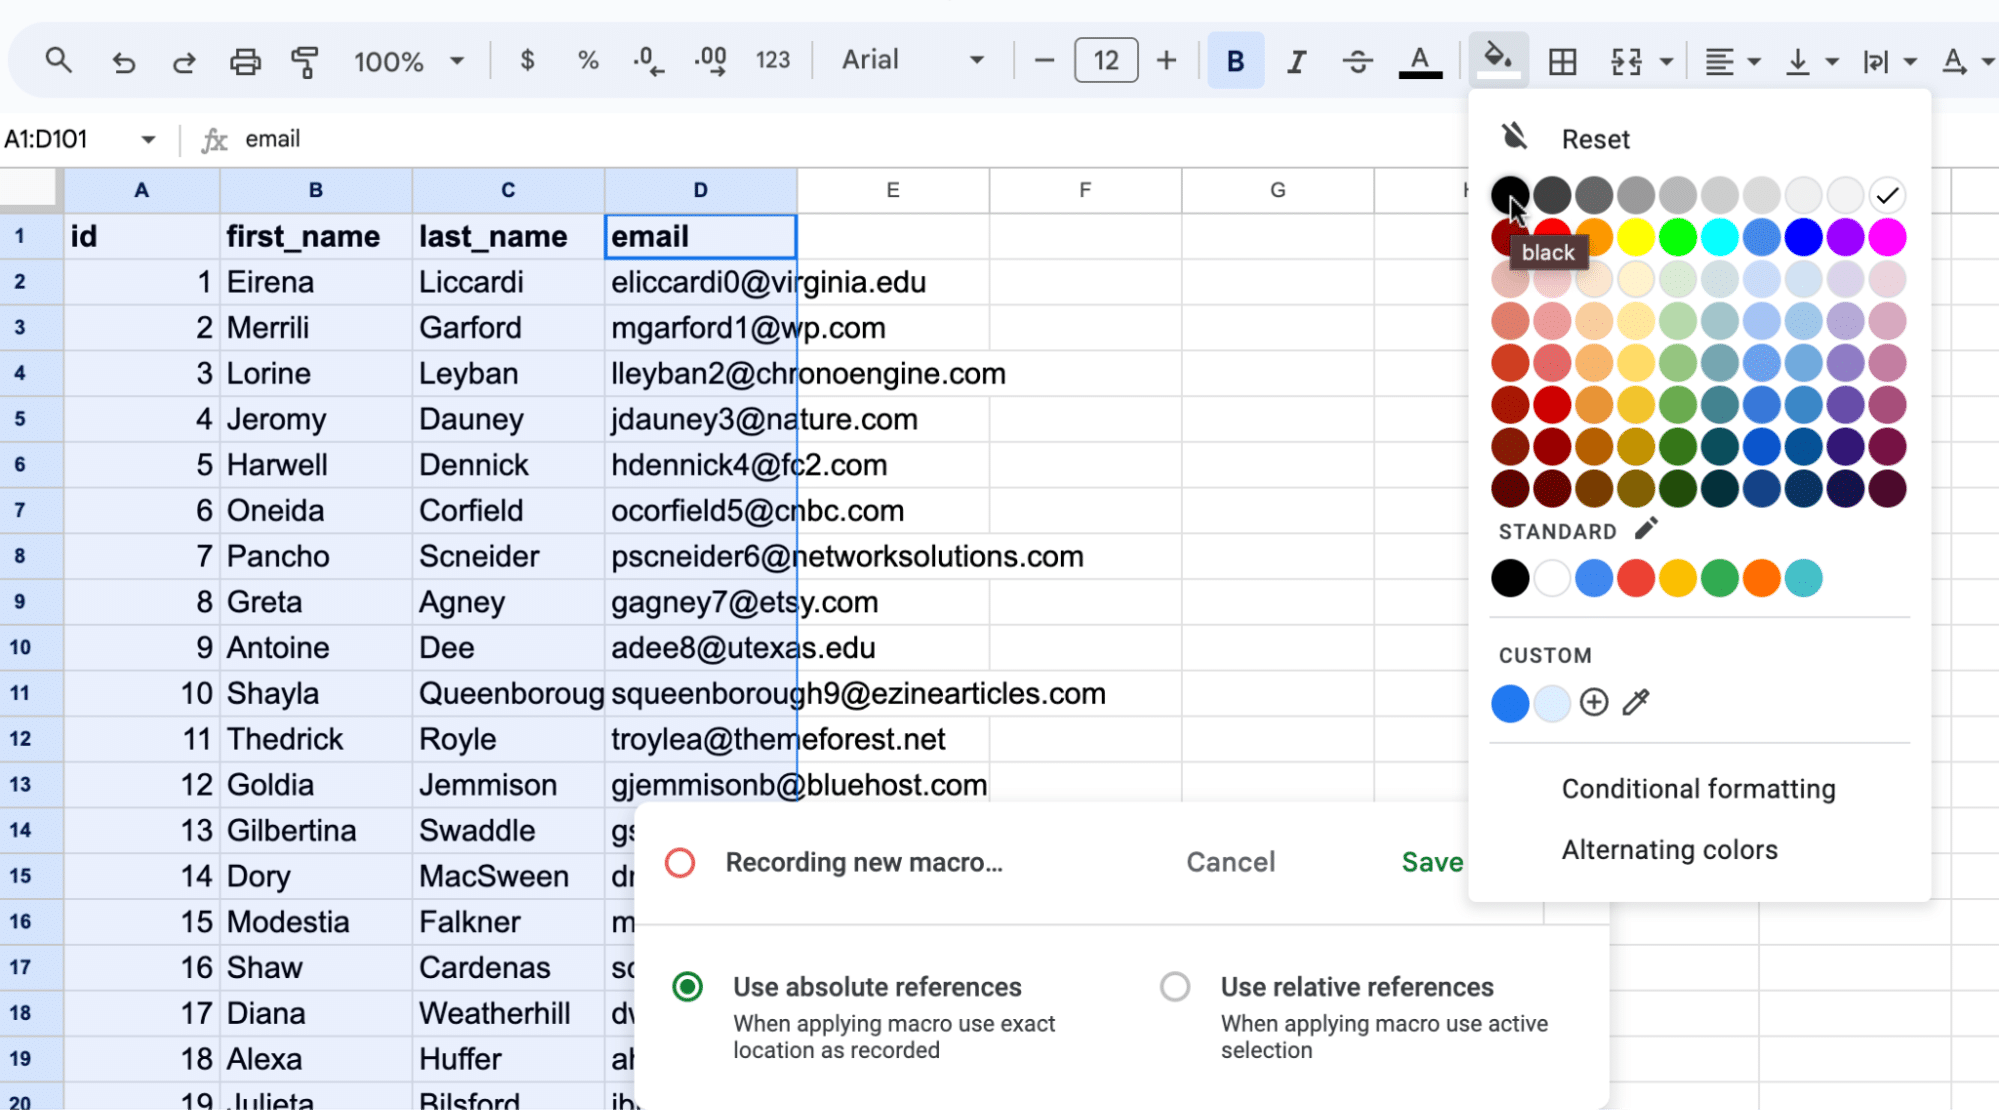
Finally, change the font color to white.
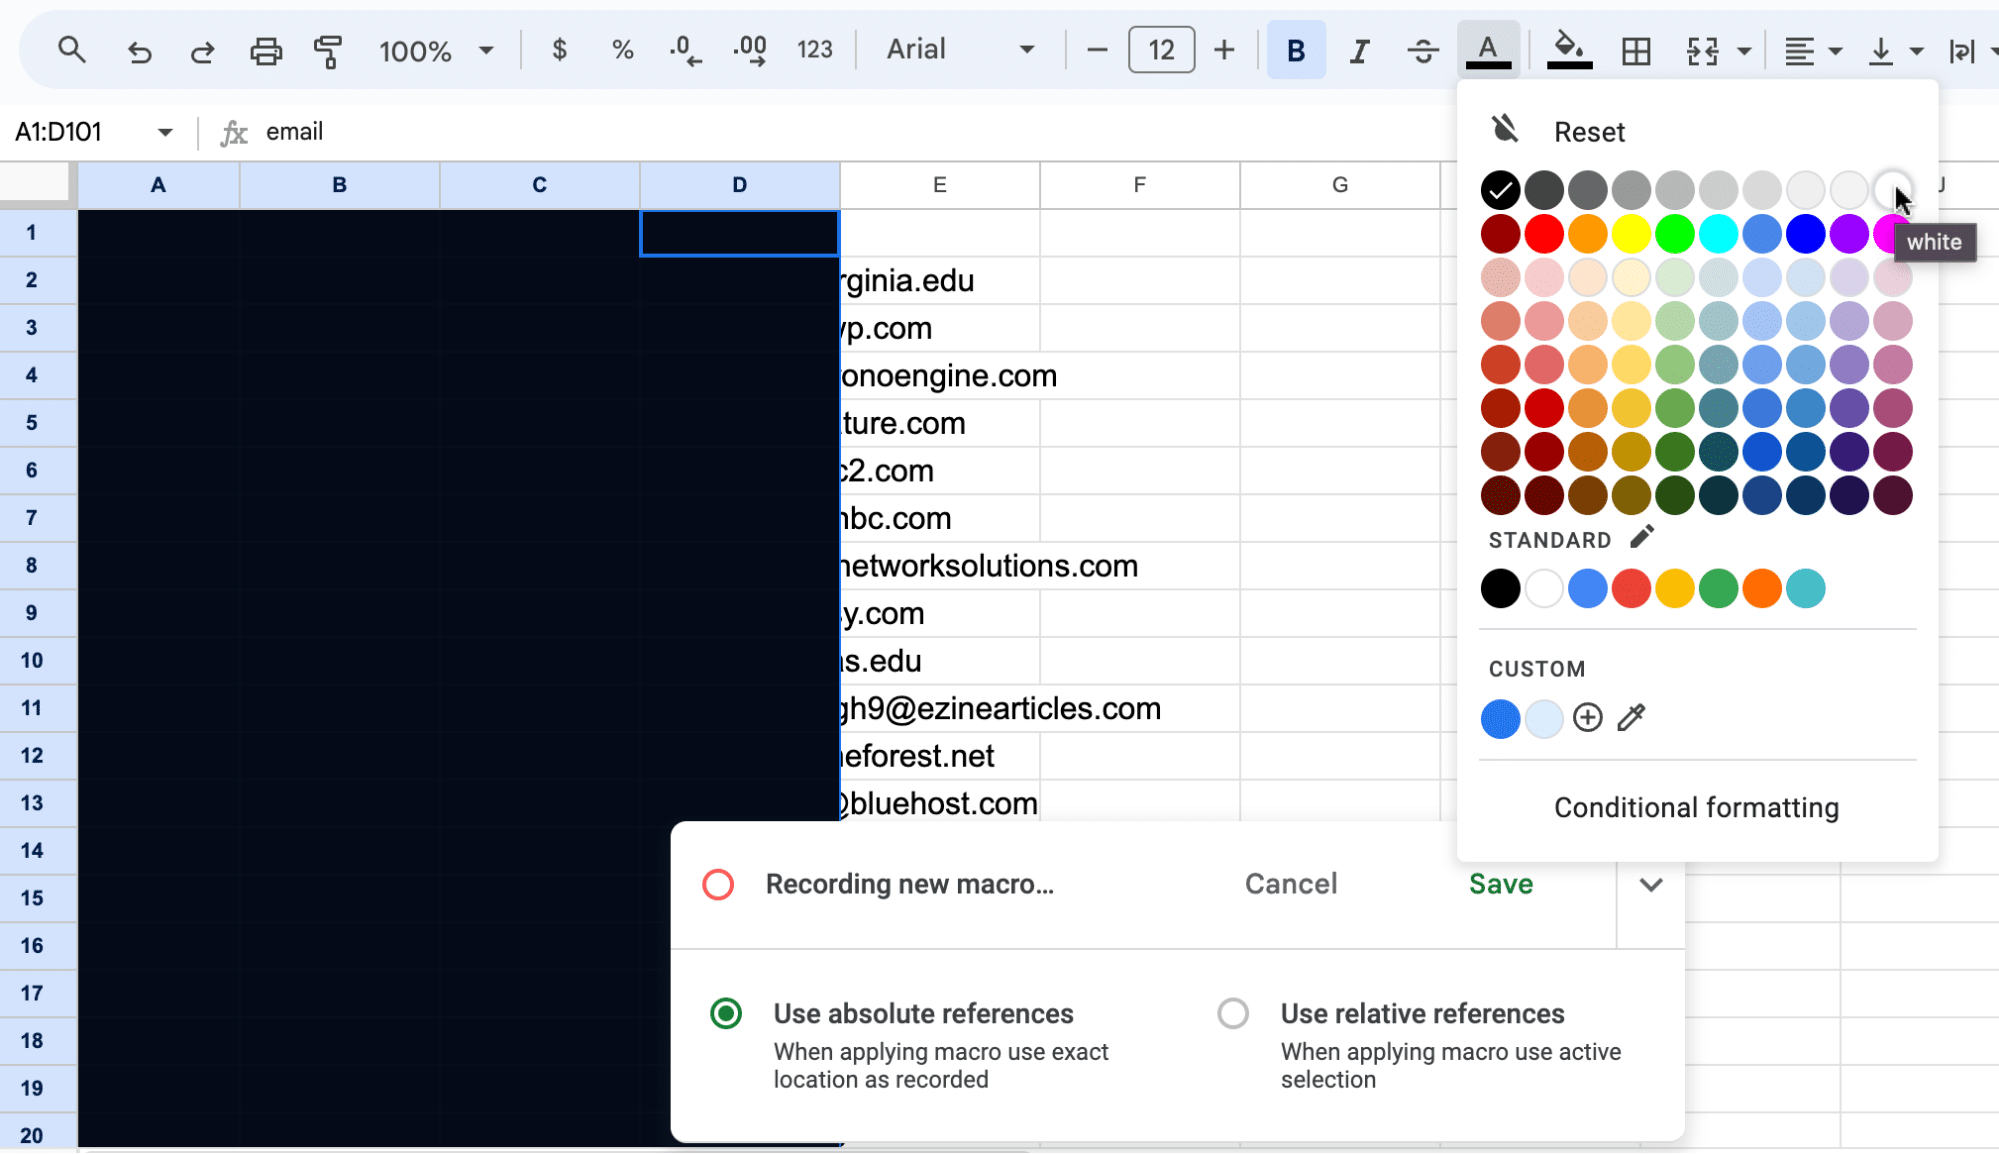
Click ‘Save,’ and name your Macro and give it a shortcut.

Click ‘Save’ to finish.
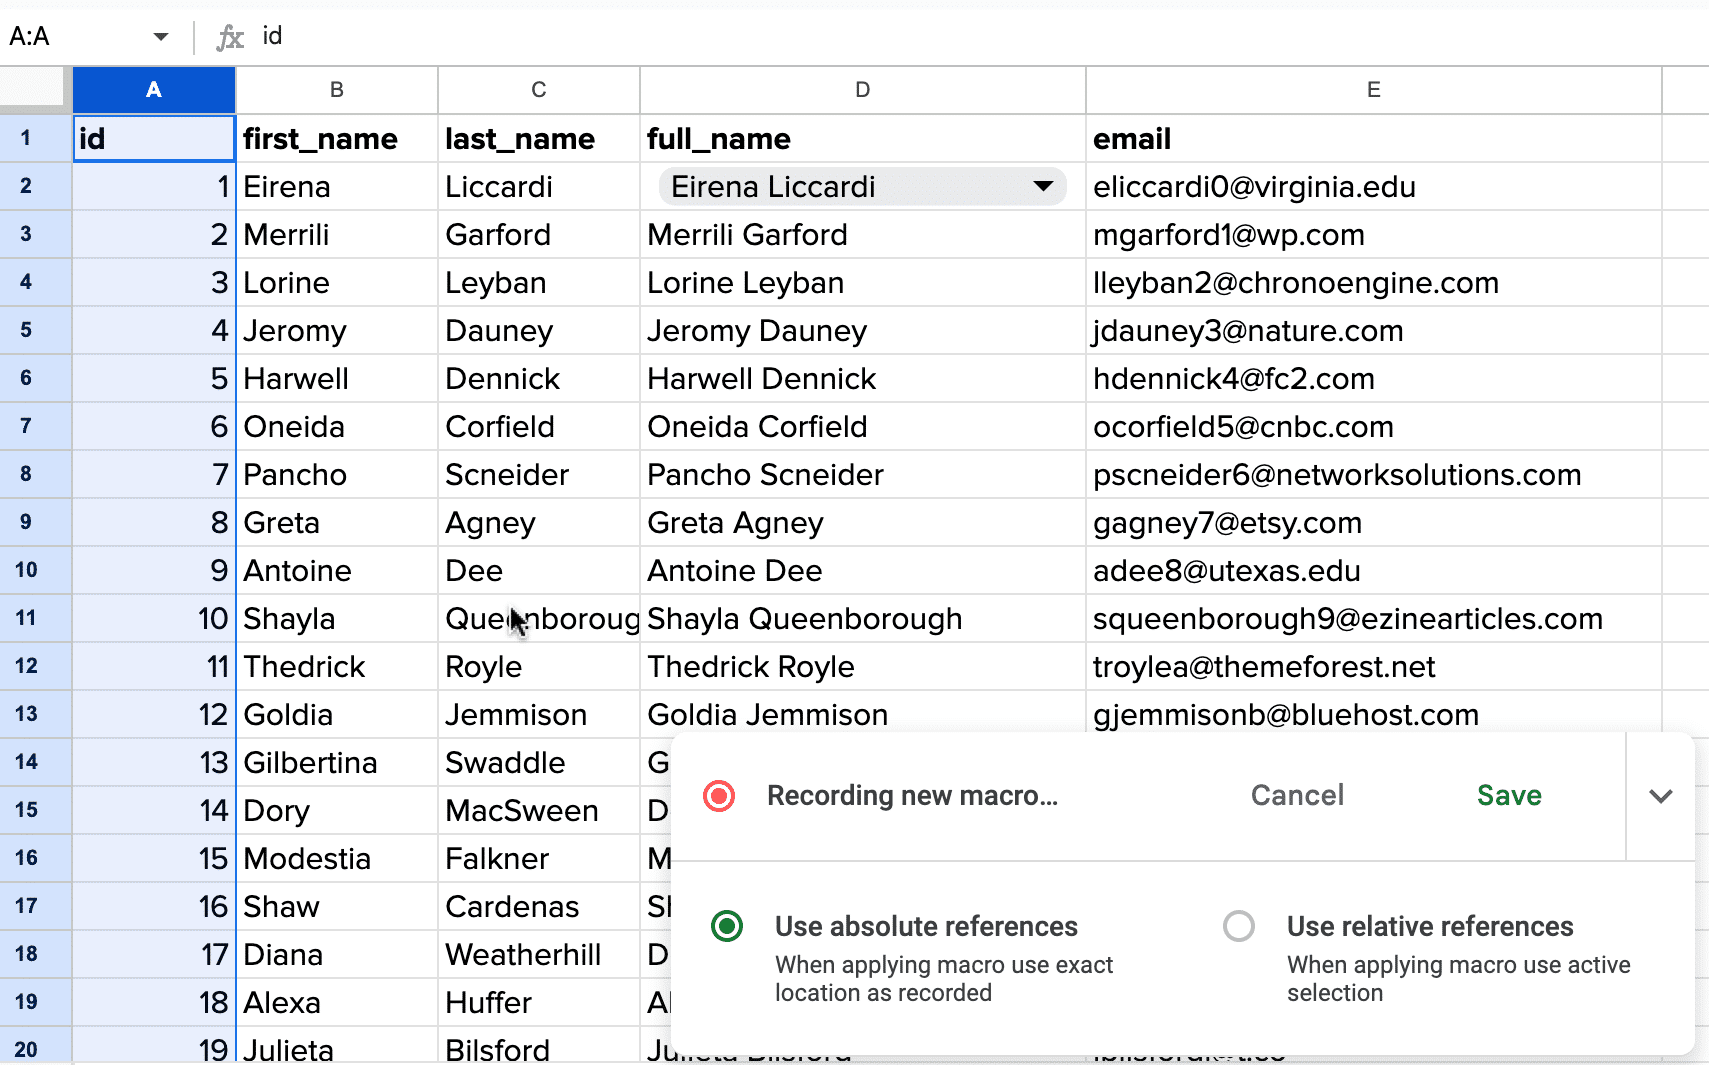
2. Auto-Filling Formulas
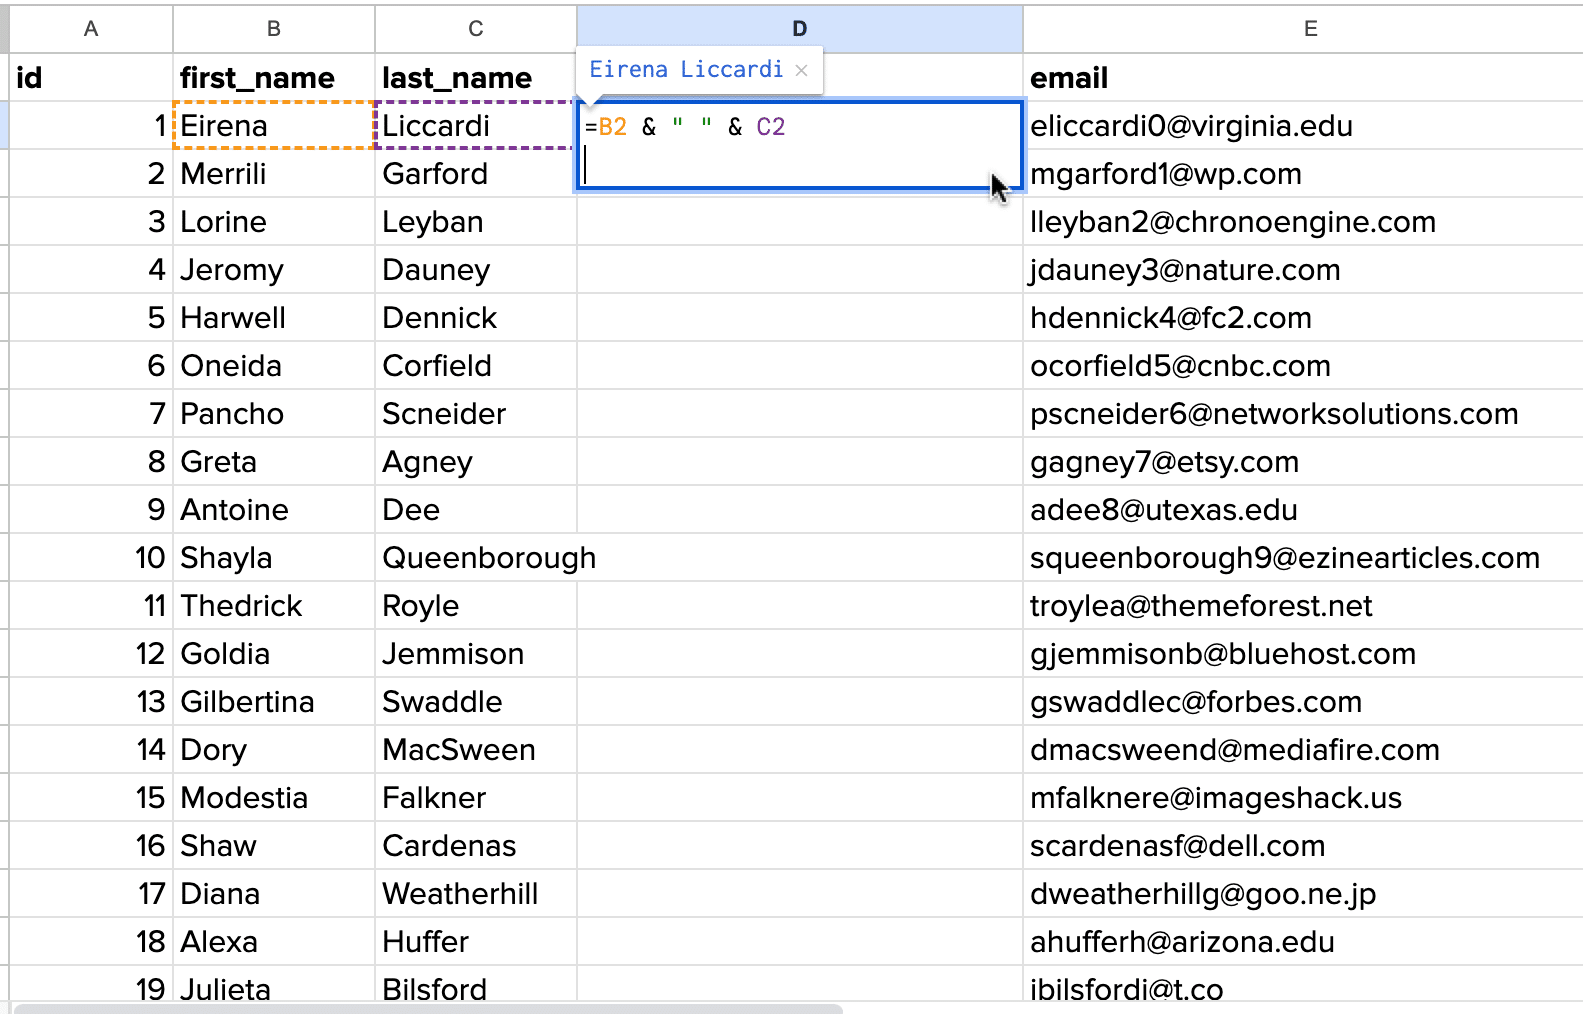
Macros can also be used to automatically apply formulas to new rows as data gets added.
For example, if we want to merge the ‘first_name’ from column B and the ‘last_name’ from Column C, we can create a ‘full_name’ in column D using this formula: =B2 & ” ” & C2.

Start recording your macro by going to Extensions > Macros > Record macro.

Next, click on the empty cell and input the formula you want applied down the column (=B2 & ” ” & C2).
Hover over the small square (fill handle) at the bottom right corner of the cell.
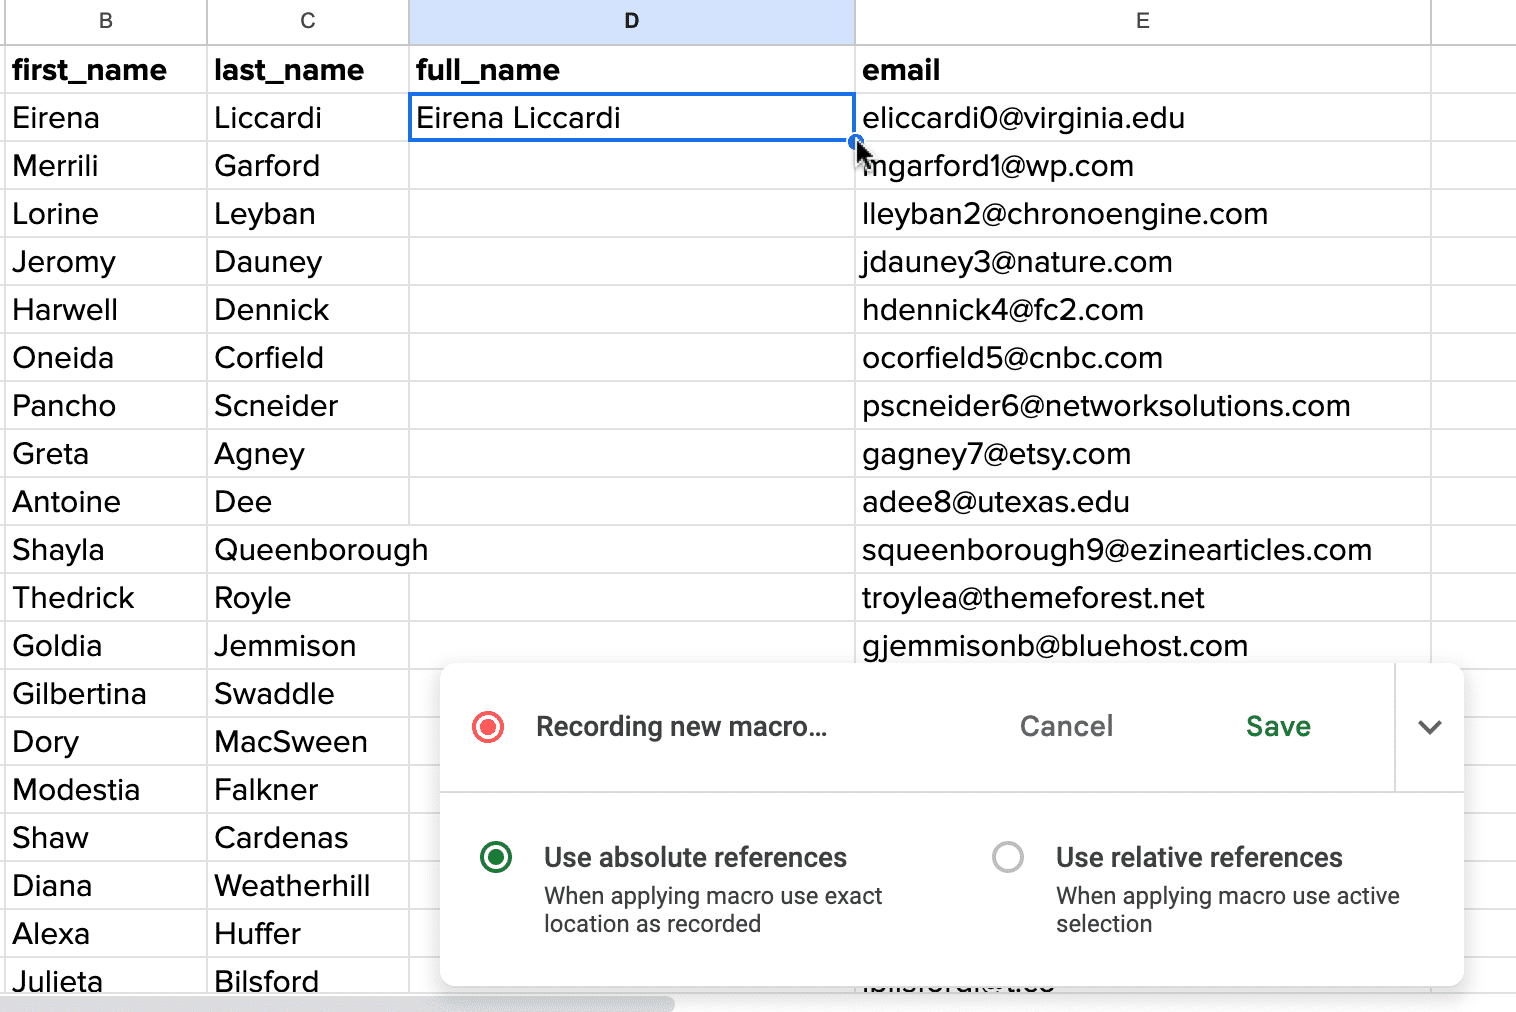
Drag the fill handle down to cover the new rows where you want the formula to be applied.

Click ‘Save’ to name your import and assign it a shortcut.
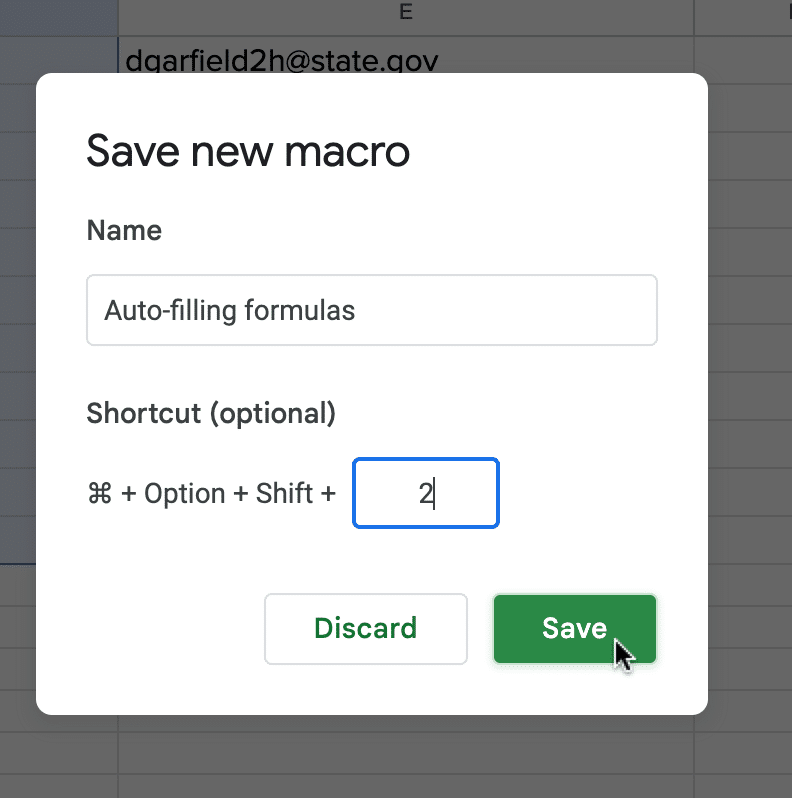
Click ‘Save’ one more time to save your macro.
3. Data Validation
You can also record a macro to validate data across a range of cells to ensure data consistency and accuracy.
Start recording your macro by going to Extensions > Macros > Record Macro.

Select the range of cells where you want to apply data validation.
Navigate to Data > Data validation in the top menu.
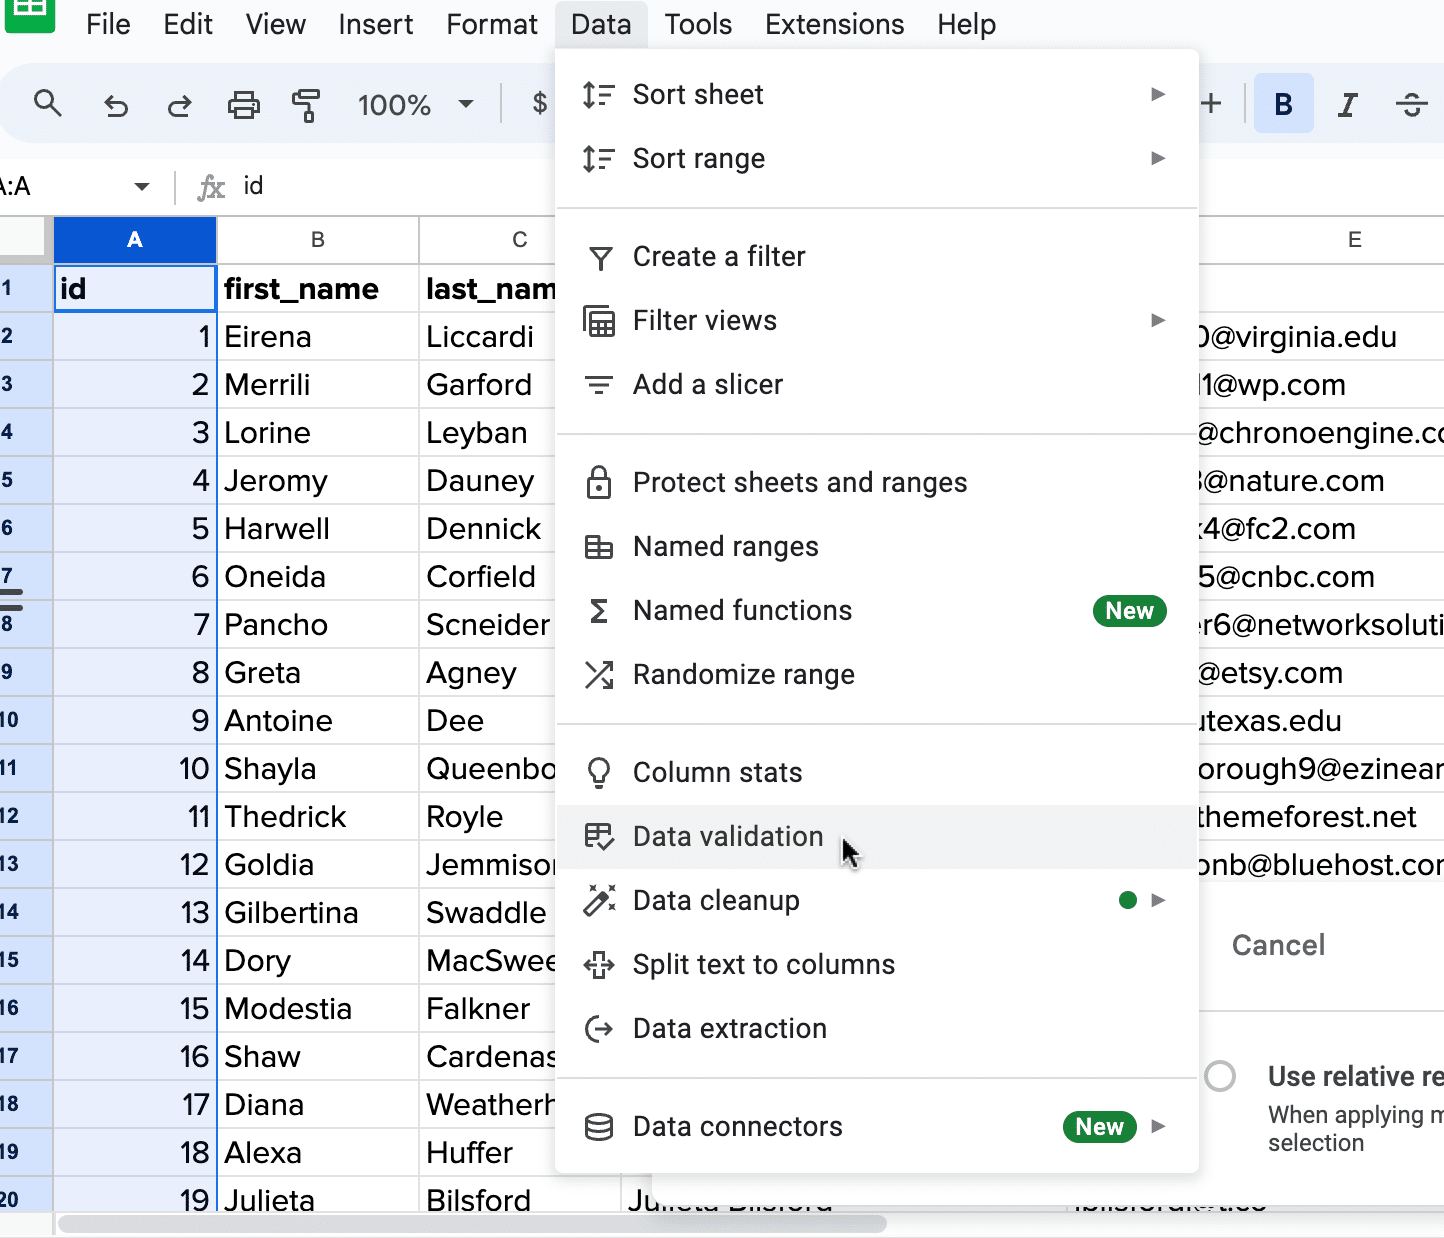
The data validation rules menu will open on the right side of the screen.
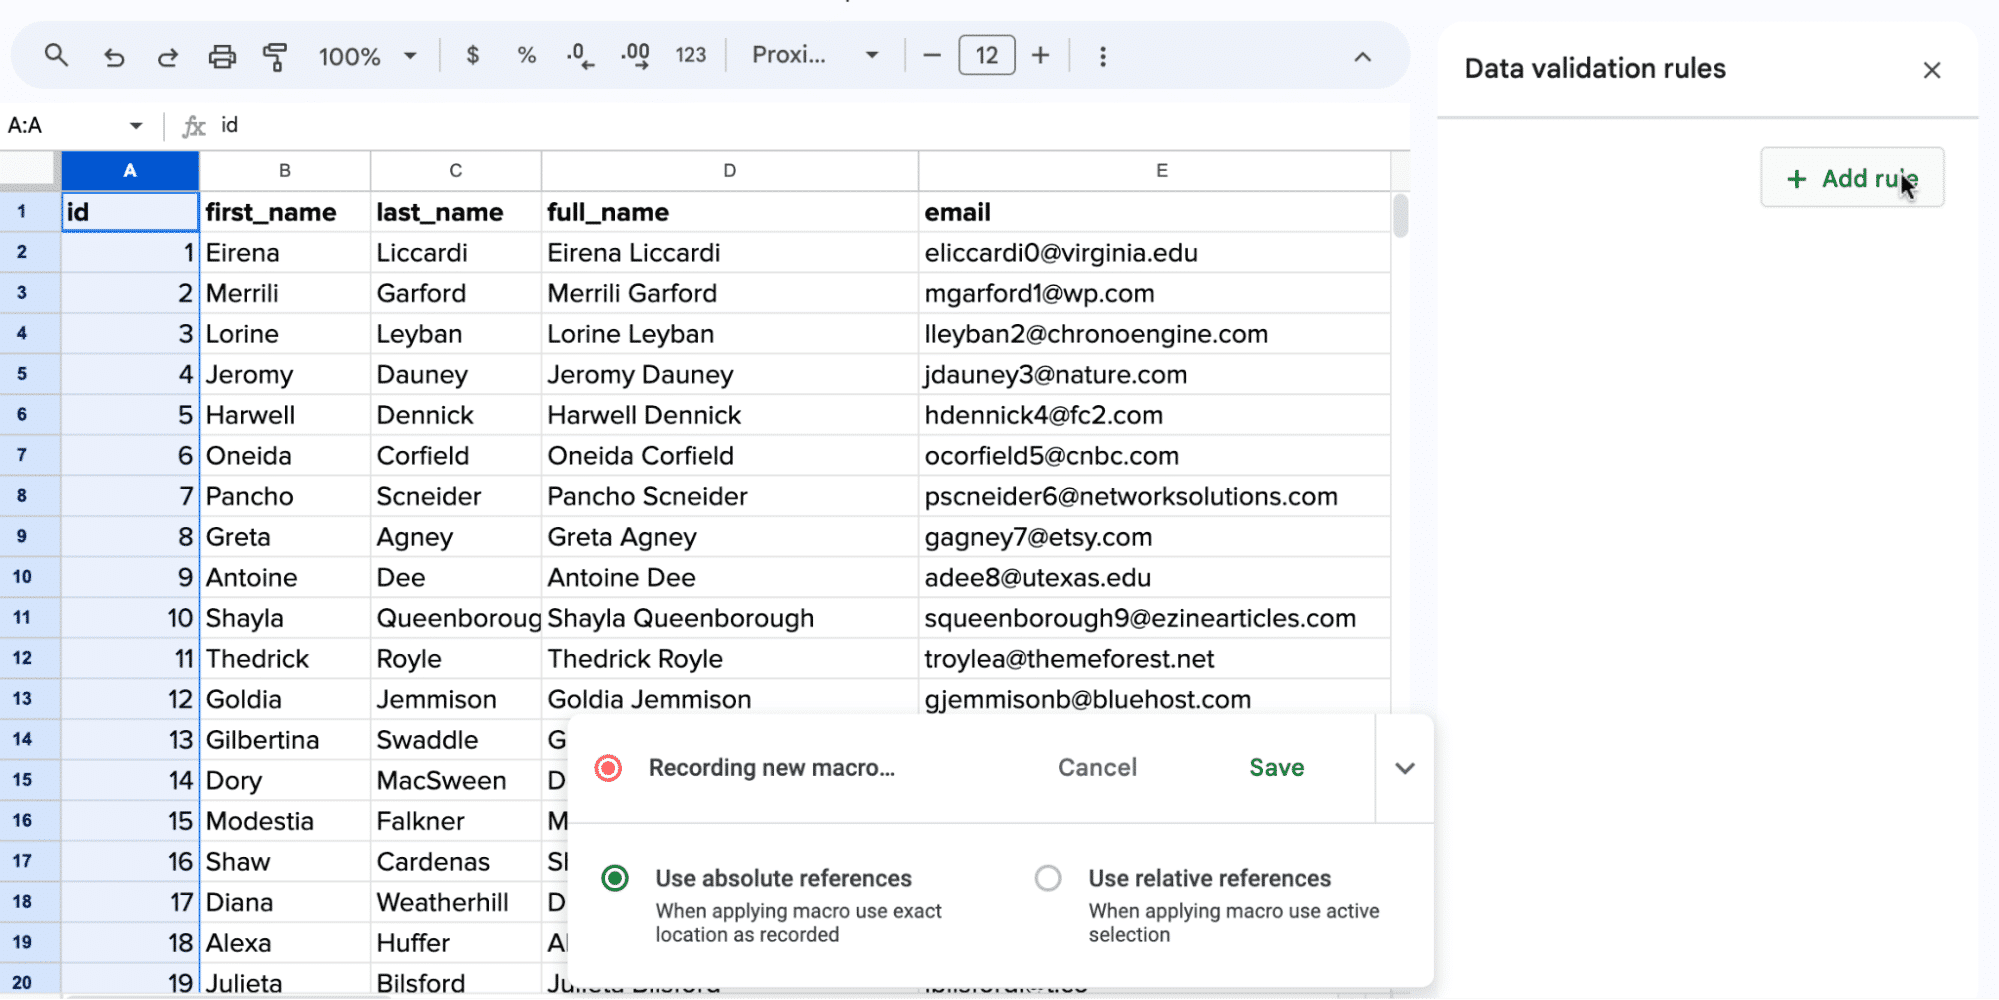
Click ‘Add rule.’
Define your validation criteria. For this example, numbers between 1 and 100.
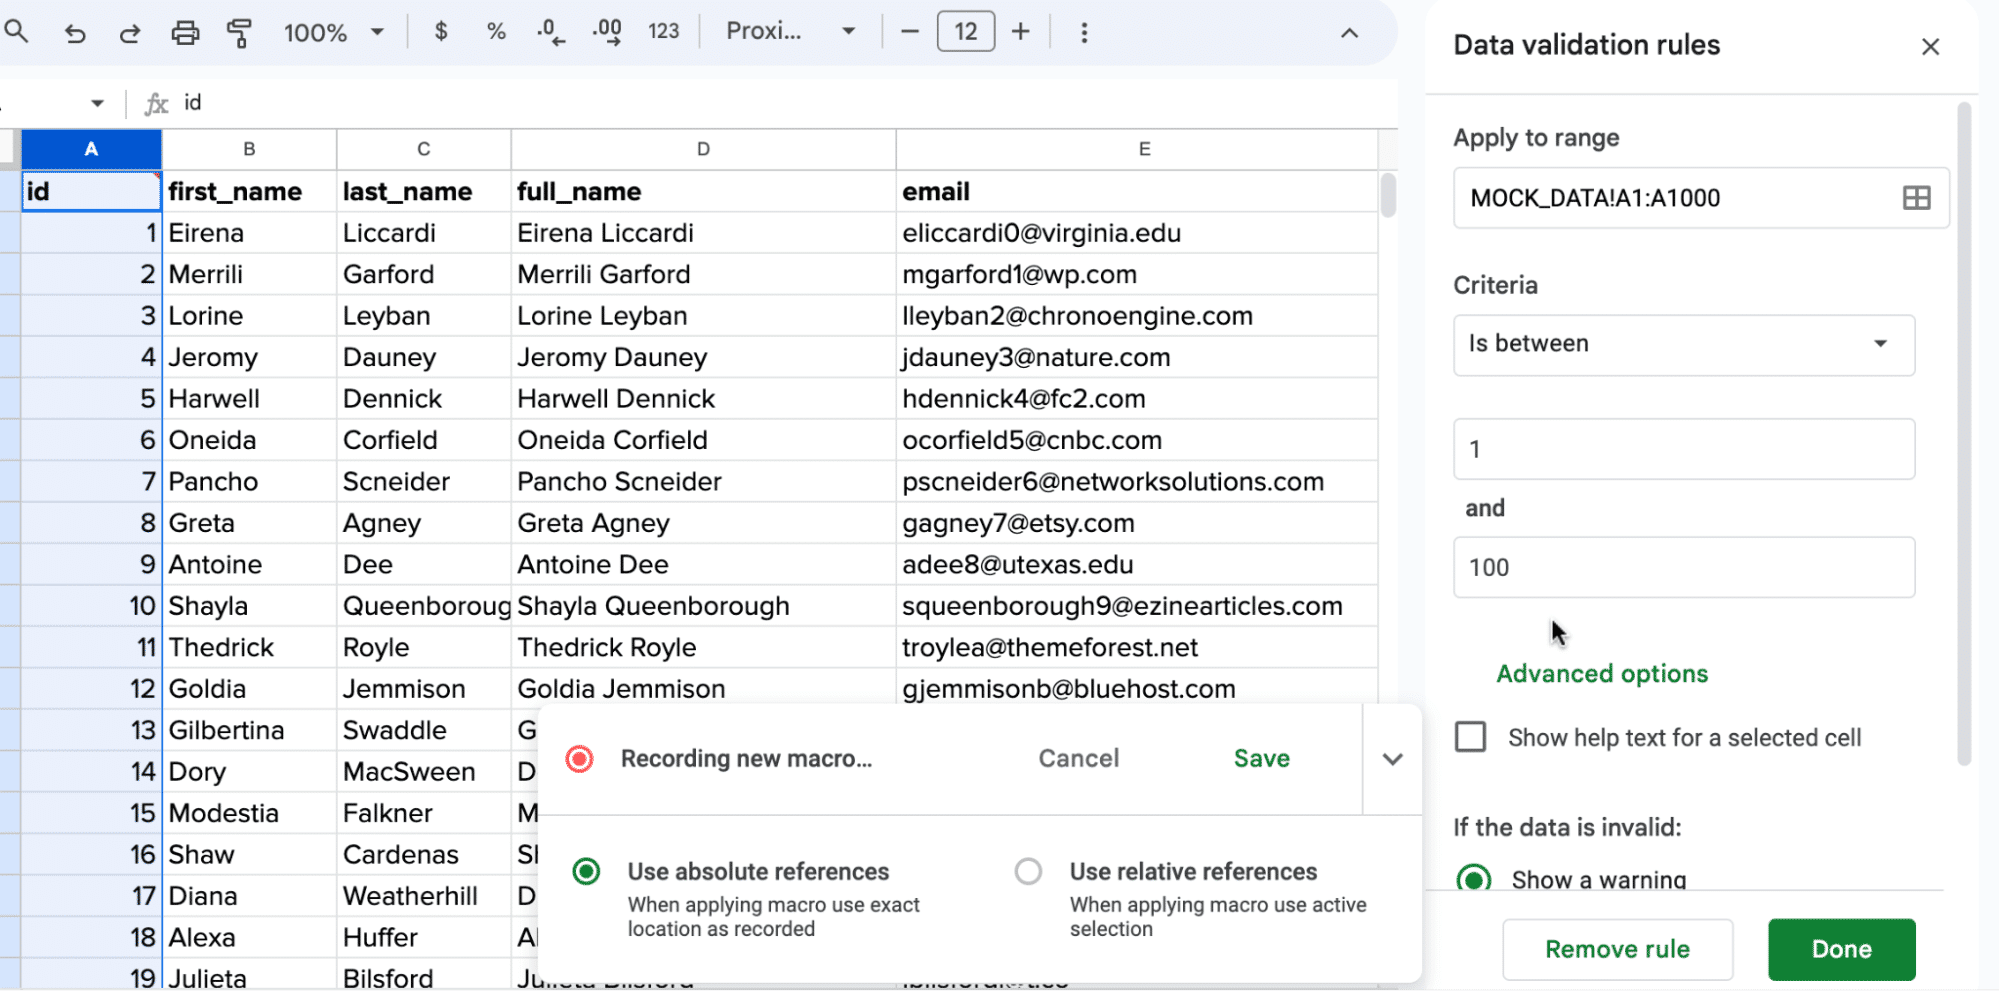
Note: You can create a custom error message to help guide users when entering data by clicking ‘Advanced Options.’
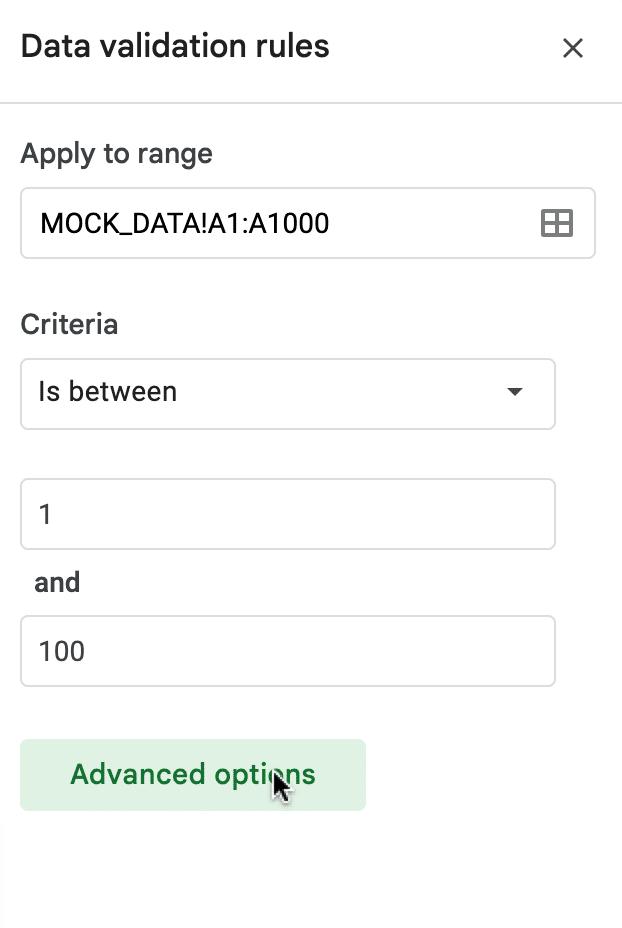
Click the box to enable helper text.

Type the text you want to display as your helper text. In this example, “Enter a number between 1 and 100.”

Click ‘Done’ once finished. Your validation rule will appear in the menu.
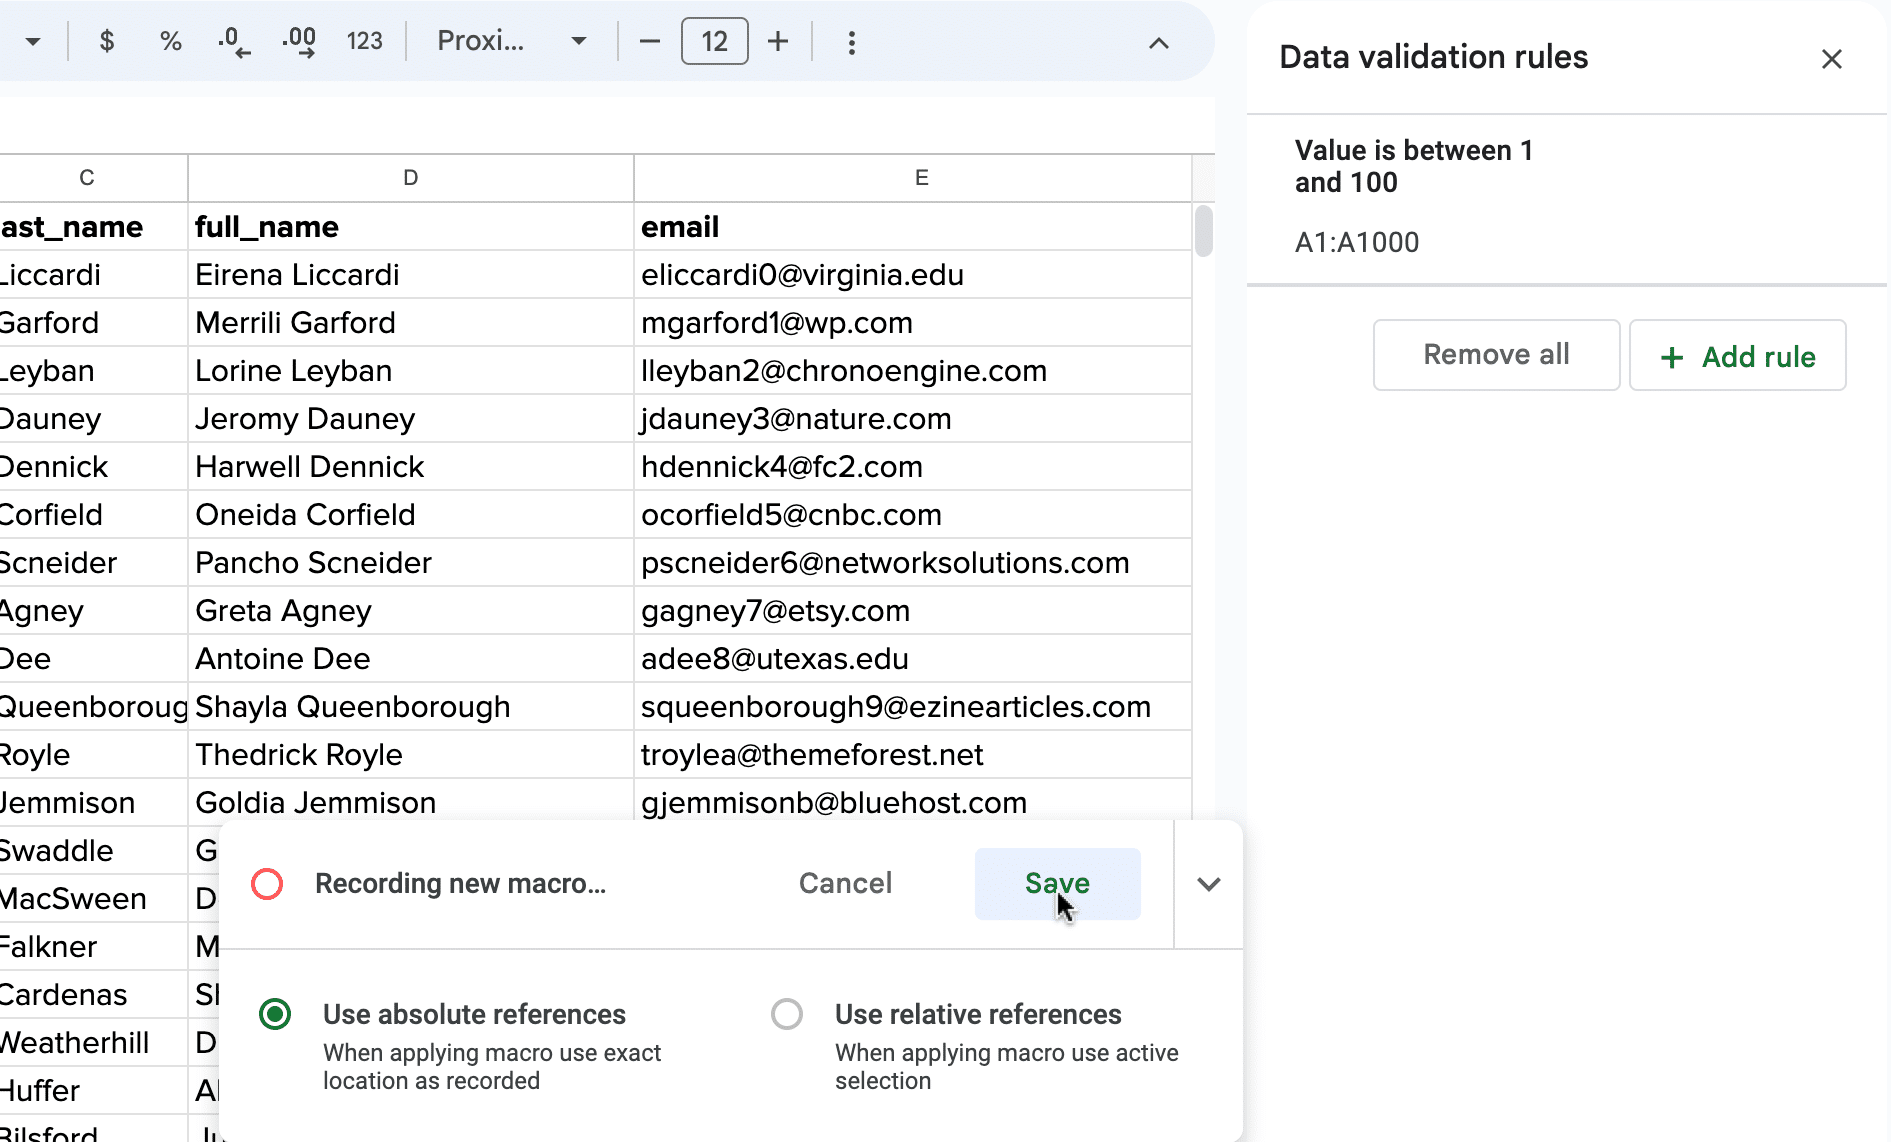
Click ‘Save’ to save your macro.
2. Google Sheets Automation with Sheets Plugins and Add-ons
Billions of people use Google Sheets because of its familiarity and flexibility. Google Sheets integrations and add-ons take it to the next level by introducing advanced features beyond its core capabilities.
Users can find and install these apps on the Google Workspace Marketplace for a variety of purposes, including productivity, collaboration, data management, and advanced analytics.
Coefficient, for example, is an extension that turns Google Sheets into an analytics hub. It allows business users to automatically sync real-time data from their business systems (e.g., CRMs) into their spreadsheets.
Coefficient Data Connector
Data is the lifeblood of organizations, the silent engine powering decision-making. Even so, many struggle with getting the right people the right data in an actionable format.
Why? Data Bottlenecks. Manual CSV extracts, complex Business Intelligence tools, or the lack of coding skills slows business teams down from getting the insights they need.
When you want to move fast, use Coefficient. By leveraging one-click integrations, pre-built dashboard templates, and spreadsheet automation, it sidesteps data bottlenecks, empowering teams to use the data they need when needed.
- Real-time Updates: Automatically refresh datasets and dashboards regularly, complete with snapshots to preserve historical data.
- Automated Alerting: Receive notifications when specific conditions are met via Slack or email.
- Seamless Collaboration: Share, re-use, and iterate on your team’s worksheets, ensuring everyone stays informed, aligned, and driven by the most up-to-date analyses.
How to Install Coefficient
To install Coefficient, open your Google Sheets spreadsheet.
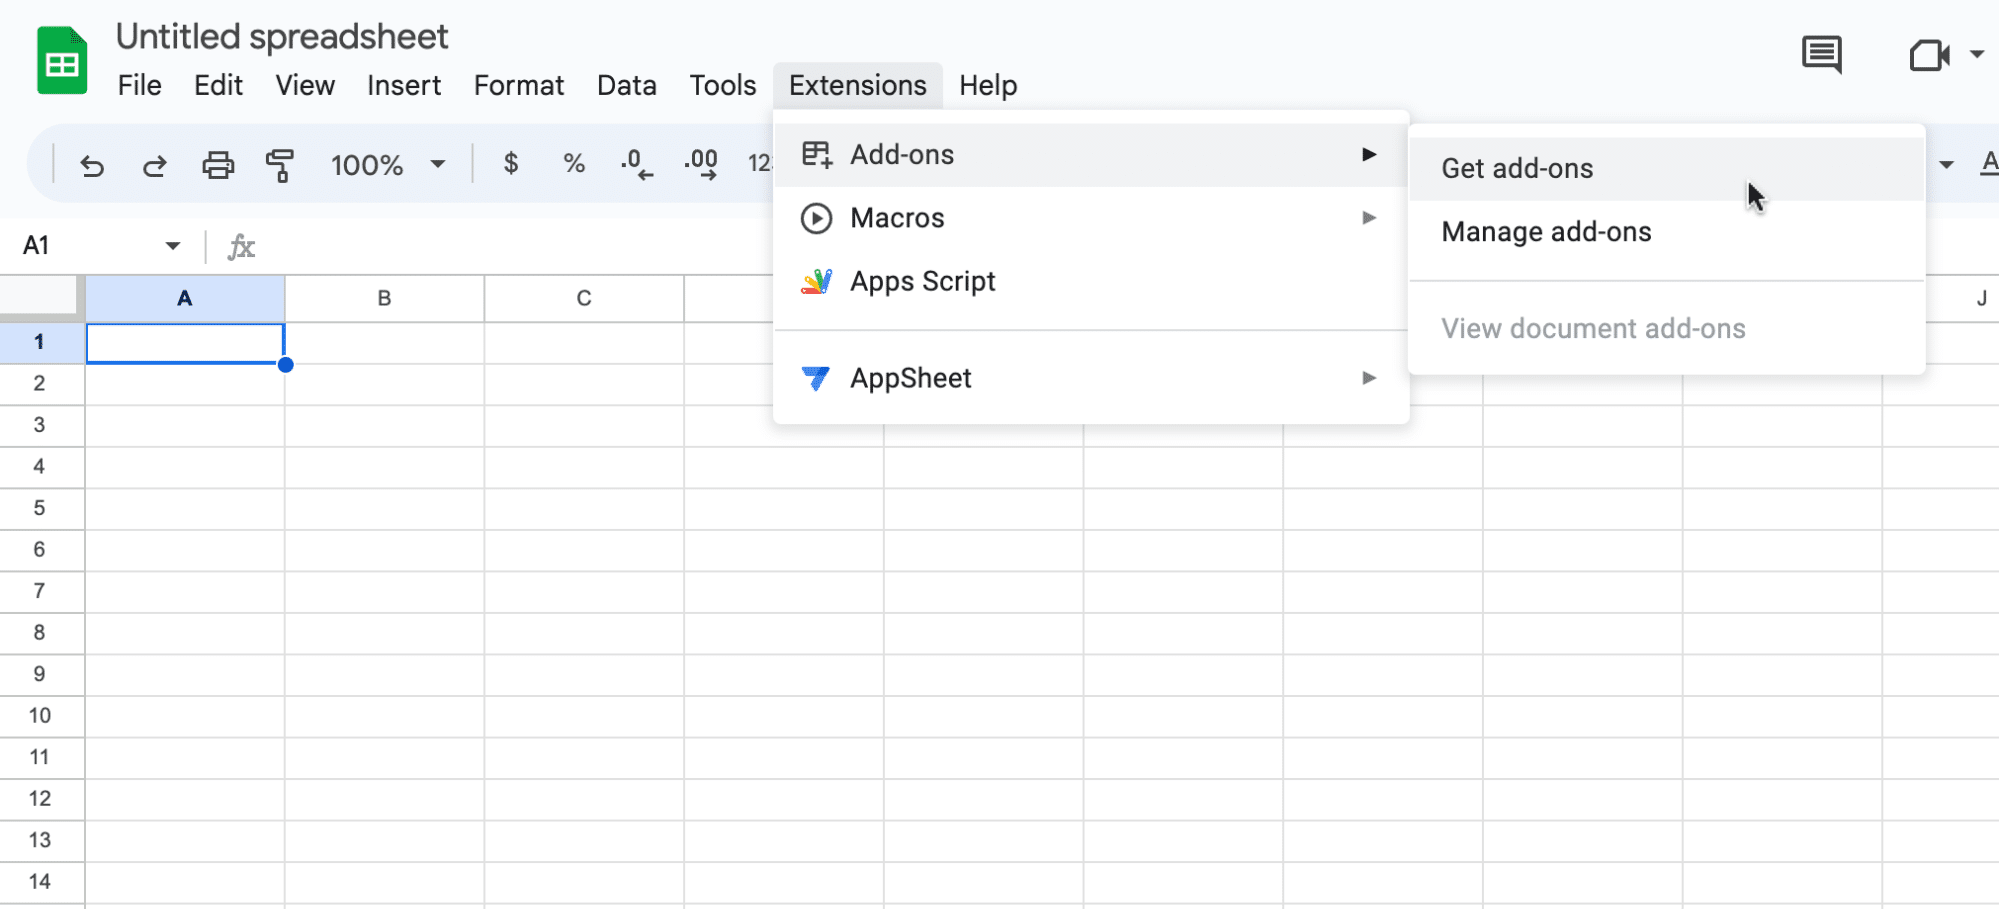
Navigate to the Google Workspace Marketplace by clicking Extensions > Add-ons > Get Add-ons.
Search for “Coefficient” in the Marketplace. Select the first app that appears on the left.
Click ‘Allow’ to grant Coefficient access to your Google account.
To launch Coefficient, navigate to the top navigation and click Extensions > Coefficient > Launch.

Coefficient will appear on the sidebar of your Google Sheet.
You can now use it for a variety of use cases.
Examples
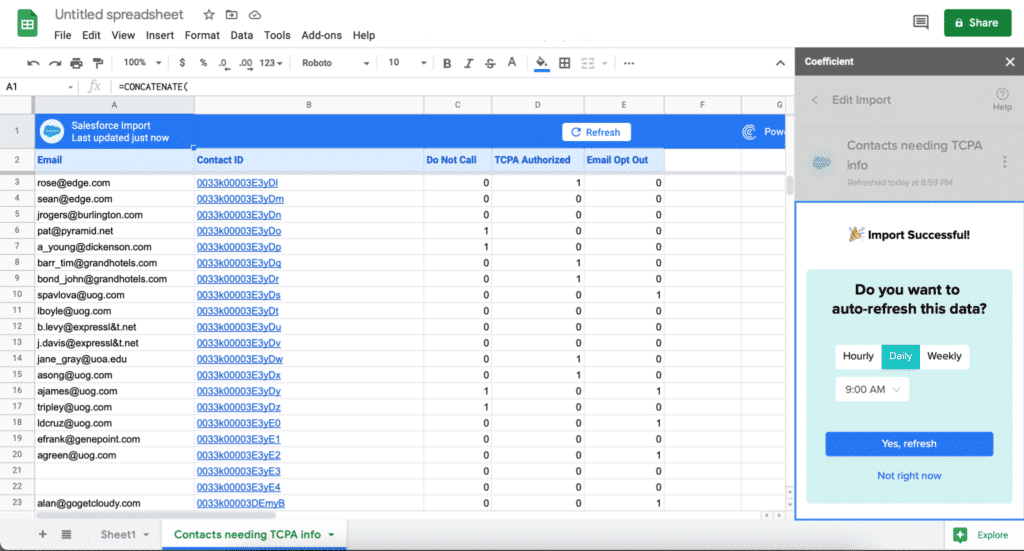
1. Syncing Data from Salesforce to Google Sheets
Coefficient’s Salesforce connector allows users to automatically sync Salesforce data into their spreadsheet in a few clicks.
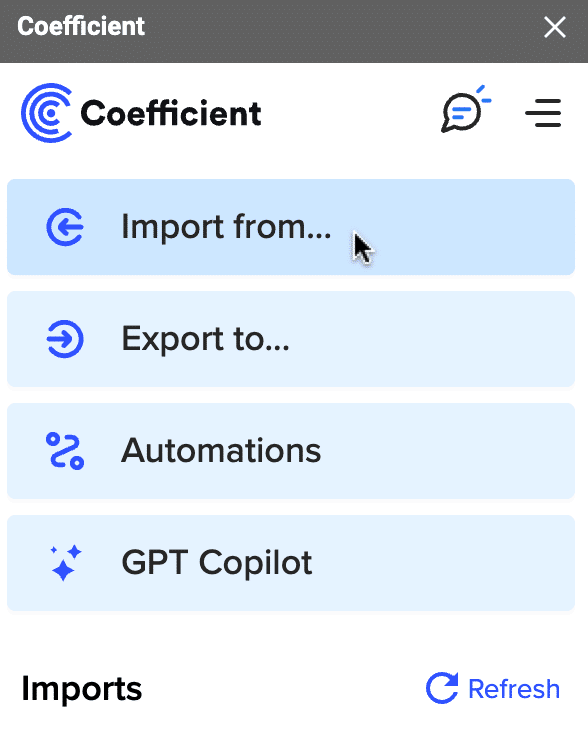
To get started, launch Coefficient from your spreadsheet.
Click ‘Import from…’
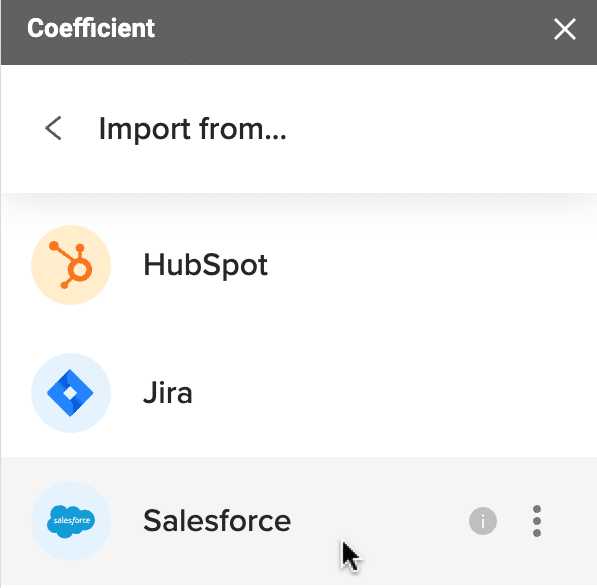
Select Salesforce as your data source.
Select the objects and fields you want to import like in the example below.
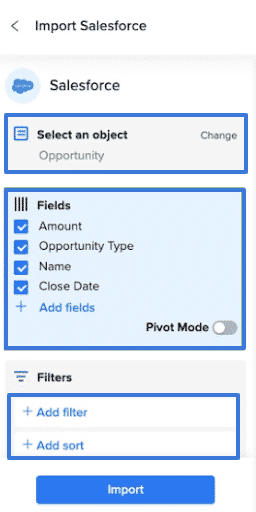
When you’re done, click import, and the data will populate your spreadsheet.
2. Automated Reporting
Coefficient’s Scheduled Imports feature allows users to automate reporting at whatever caden you want: hourly, daily, or weekly.
Coefficient will prompt you to configure a Scheduled Import automation immediately after you import data. You have 3 options: hourly, daily, and weekly.
Hourly
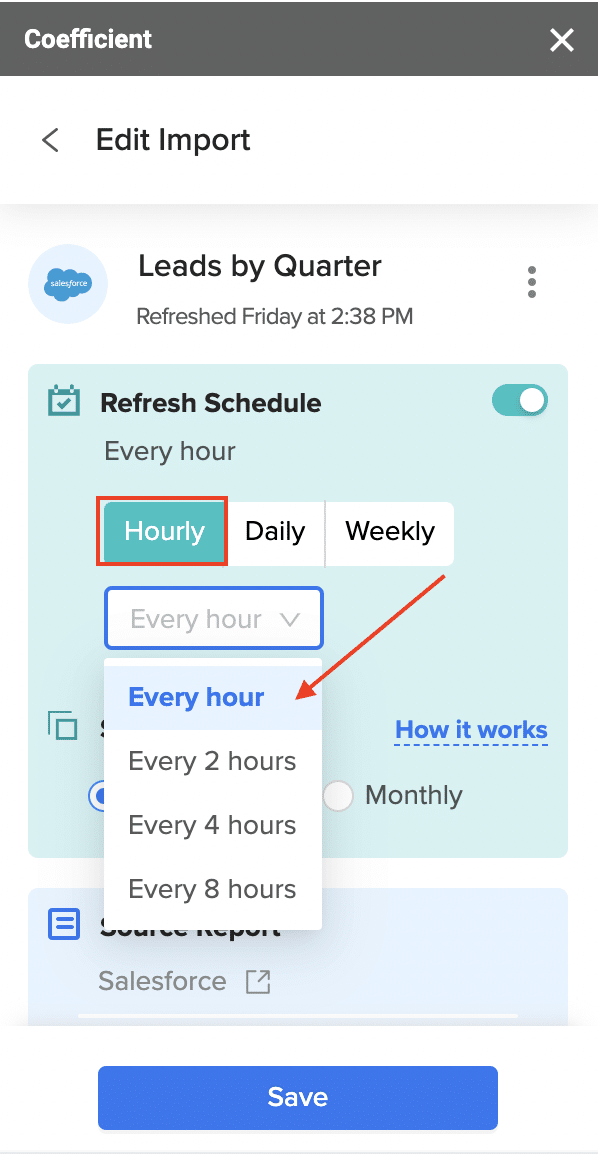
Daily updates allow you to chedule your data to update daily at a specific time.
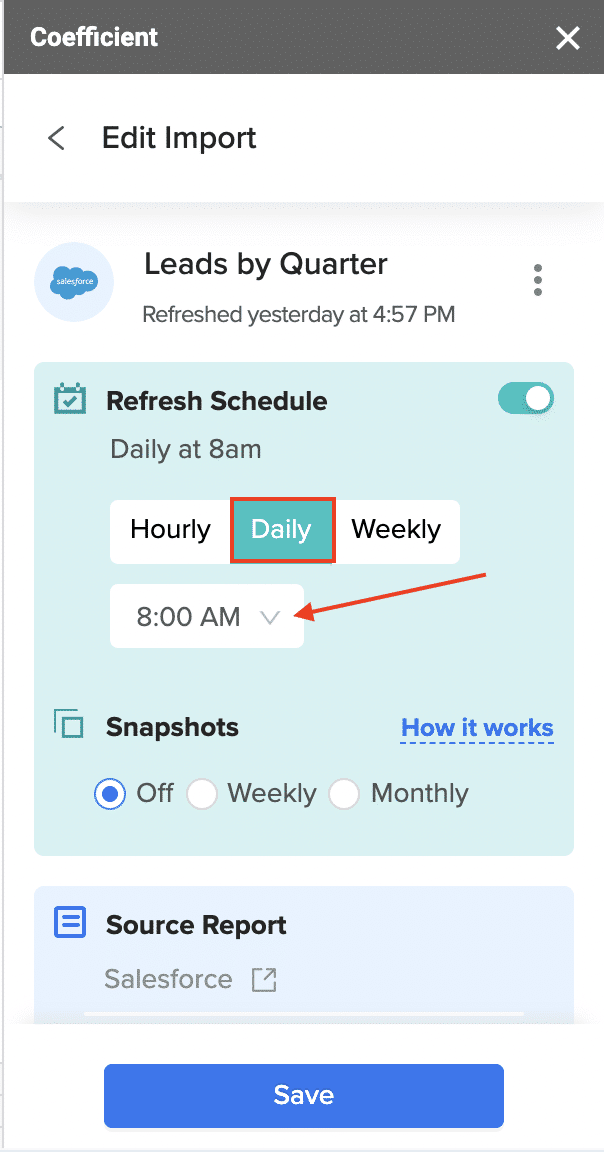
Weekly updates allow you to schedule single or multiple updates every week at a specified time.

3. Data Alerts
Coefficient Data Alerts provide automated notifications based on changes or activities in your data import. You can send these alerts via email or Slack, ensuring stakeholders can stay informed without constantly monitoring Sheets data.
Coefficient also lets you set up automations that send notifications via Slack or email when data in an import changes or updates.
For example, you can set Coefficient to send auto alerts to your sales team’s Slack channel when a new opportunity is added to your pipeline.
First, open Coefficient and import your Salesforce data into your Sheet.
Return to the Coefficient menu and click ‘Add Data Alert.’ After installing Coefficient and importing your Salesforce data into Google Sheets, set up the Slack alert by clicking Add Data Alert on the Coefficient sidebar.
Choose your preferred alert type.
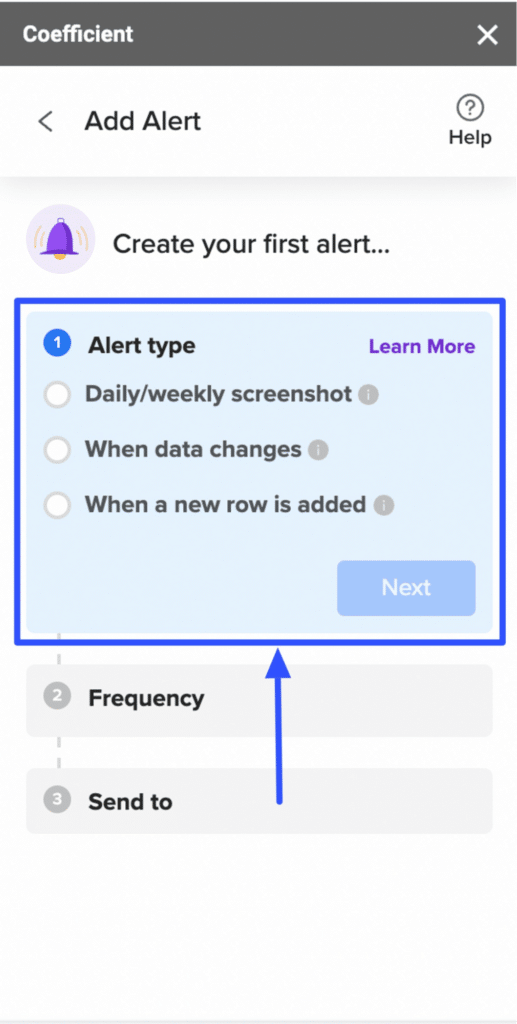
Set your automation’s frequency.

Connect and select the Slack channel where you want to send your alerts.
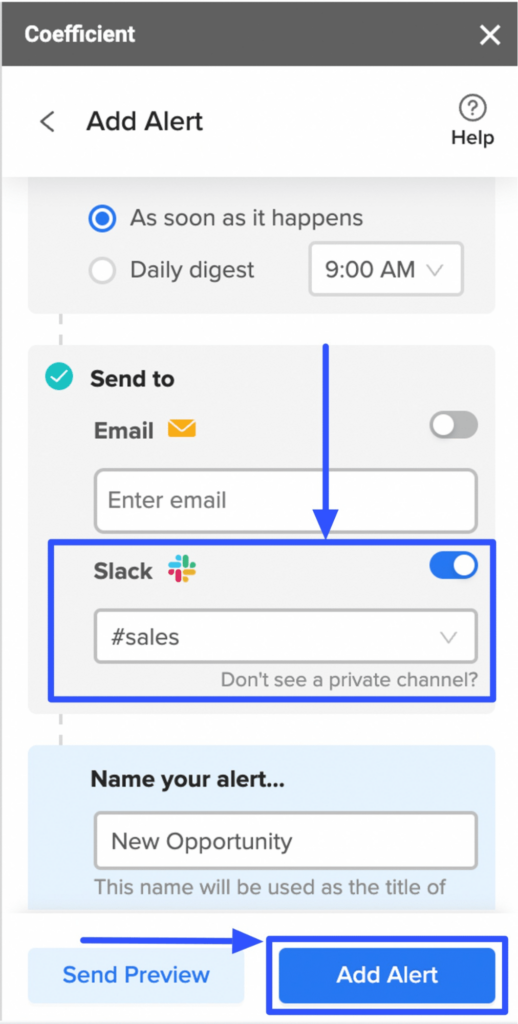
Click Add Alert, and your selected Slack channel should receive the notifications.

Prefer a visual guide? Watch the video below for a full walkthrough.
Embed: https://www.youtube.com/watch?v=cCoKnxpSni8
4. GPT CoPilot
Coefficient’s ChatGPT-powered GPT CoPilot allows users to streamline tasks that once required advanced spreadsheet skills, from constructing pivot tables to designing detailed charts.
GPT Copilot also introduces a suite of powerful formulas that help users with tasks like data cleaning, formatting, querying, and more.
See for yourself below.
Embed video: How to Use AI in Google Sheets with 15 GPT Functions
3. Google Sheets Automation with Apps Script
For those who prefer to do things manually, Google Apps Script is a powerful scripting platform that can be used to build custom functions, scheduled tasks, and other Google Sheets automations.
Setting Up Google Apps Script in Google Sheets
To access the Apps Script editor, open a new Sheet.
Navigate to Extensions > Apps Script.
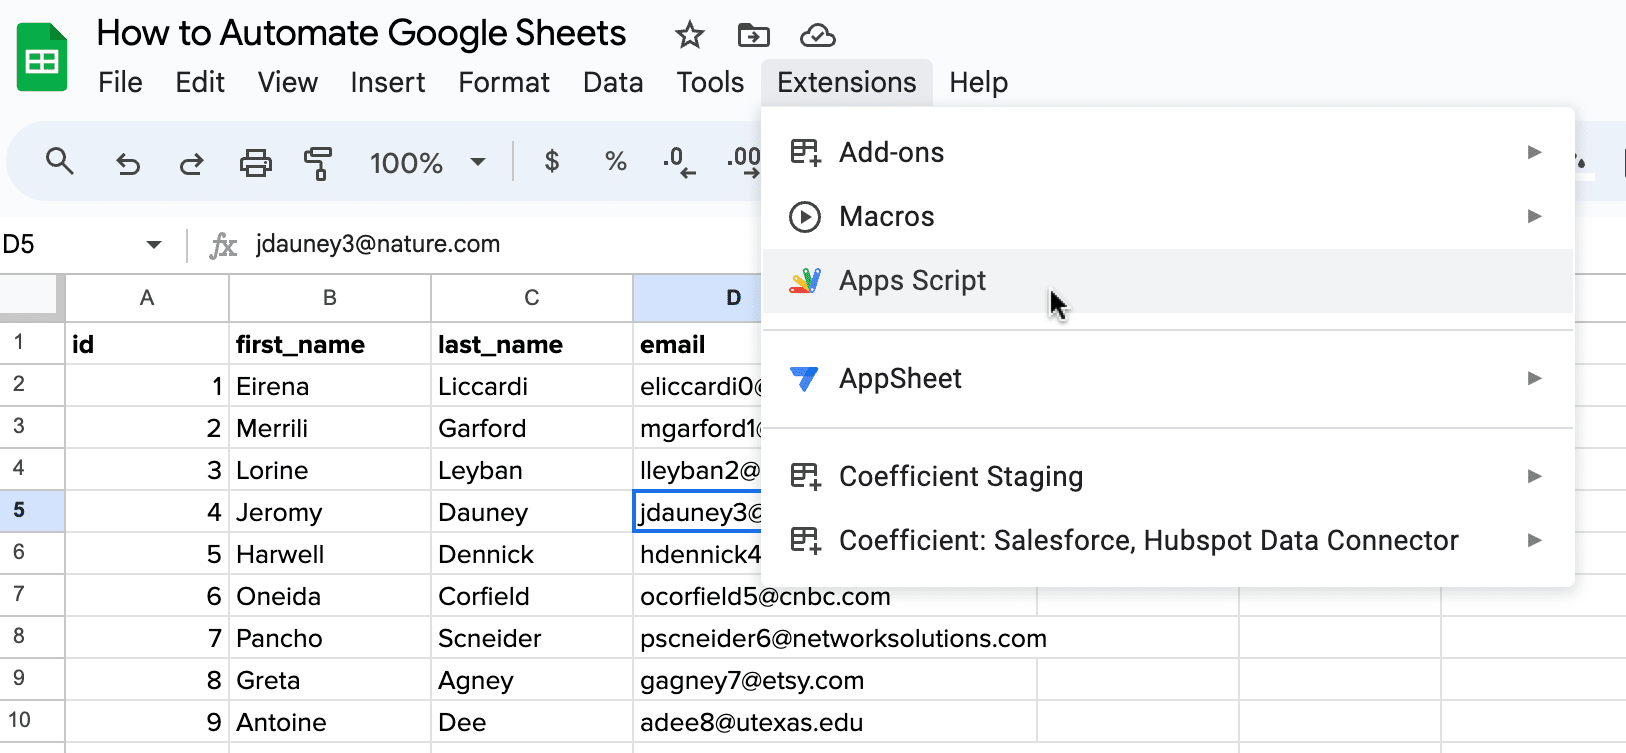
Google Apps Scripts will open in a new window.
Click the ‘+’ icon near the top-left corner near ‘Files.’
Select ‘Script.’
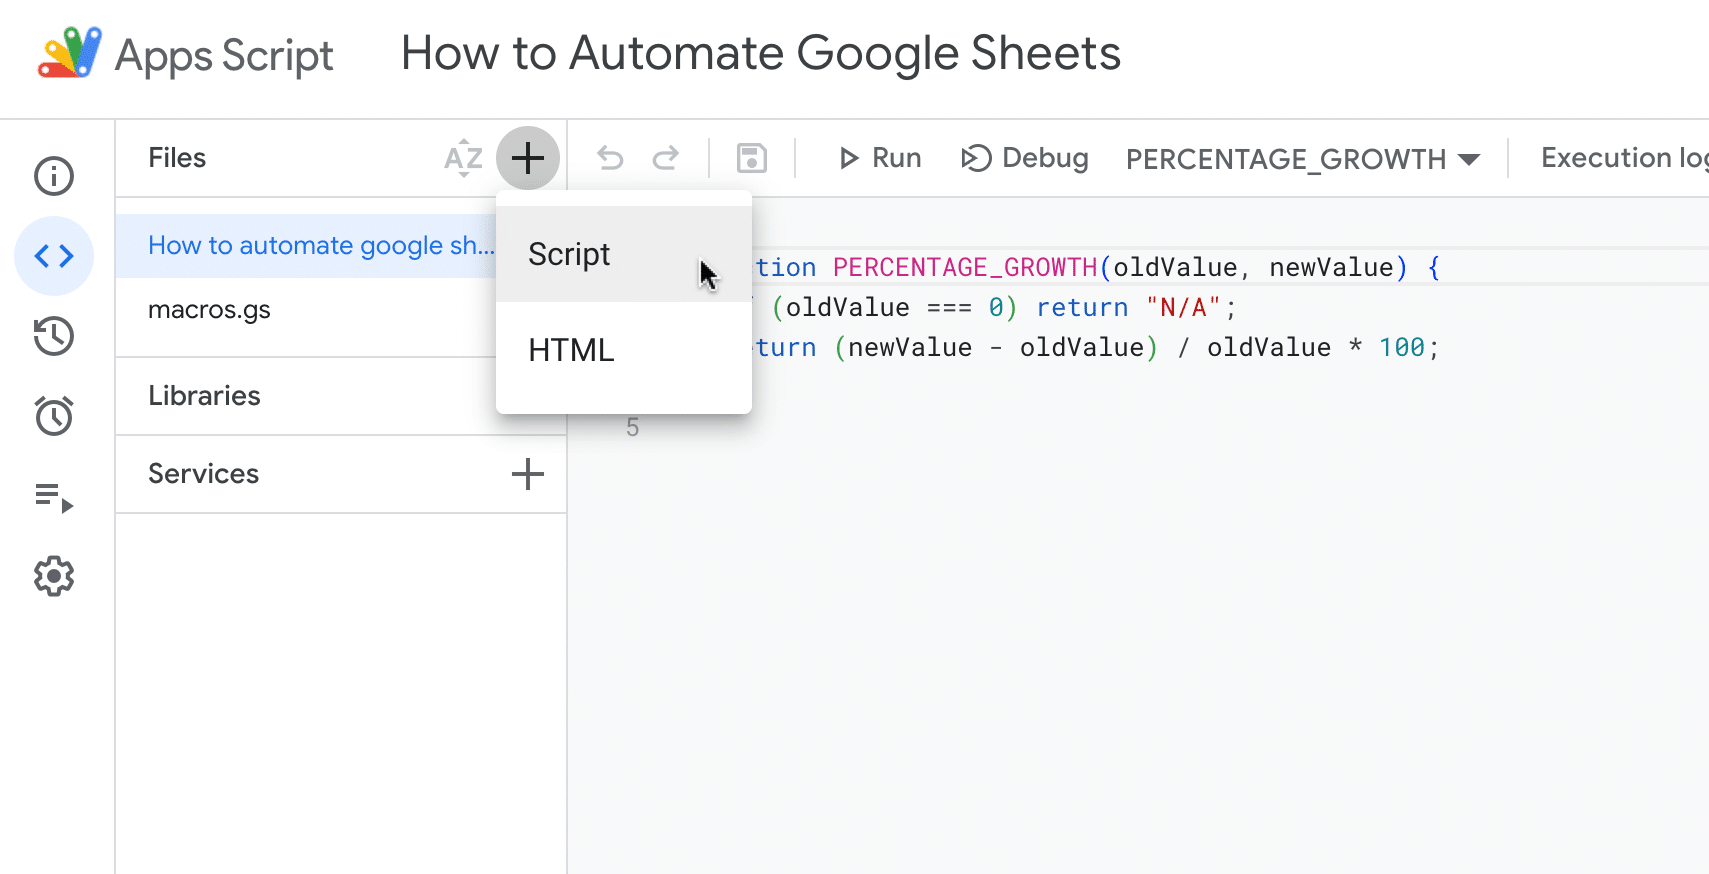
Name your script and press enter.

Supercharge your spreadsheets with GPT-powered AI tools for building formulas, charts, pivots, SQL and more. Simple prompts for automatic generation.

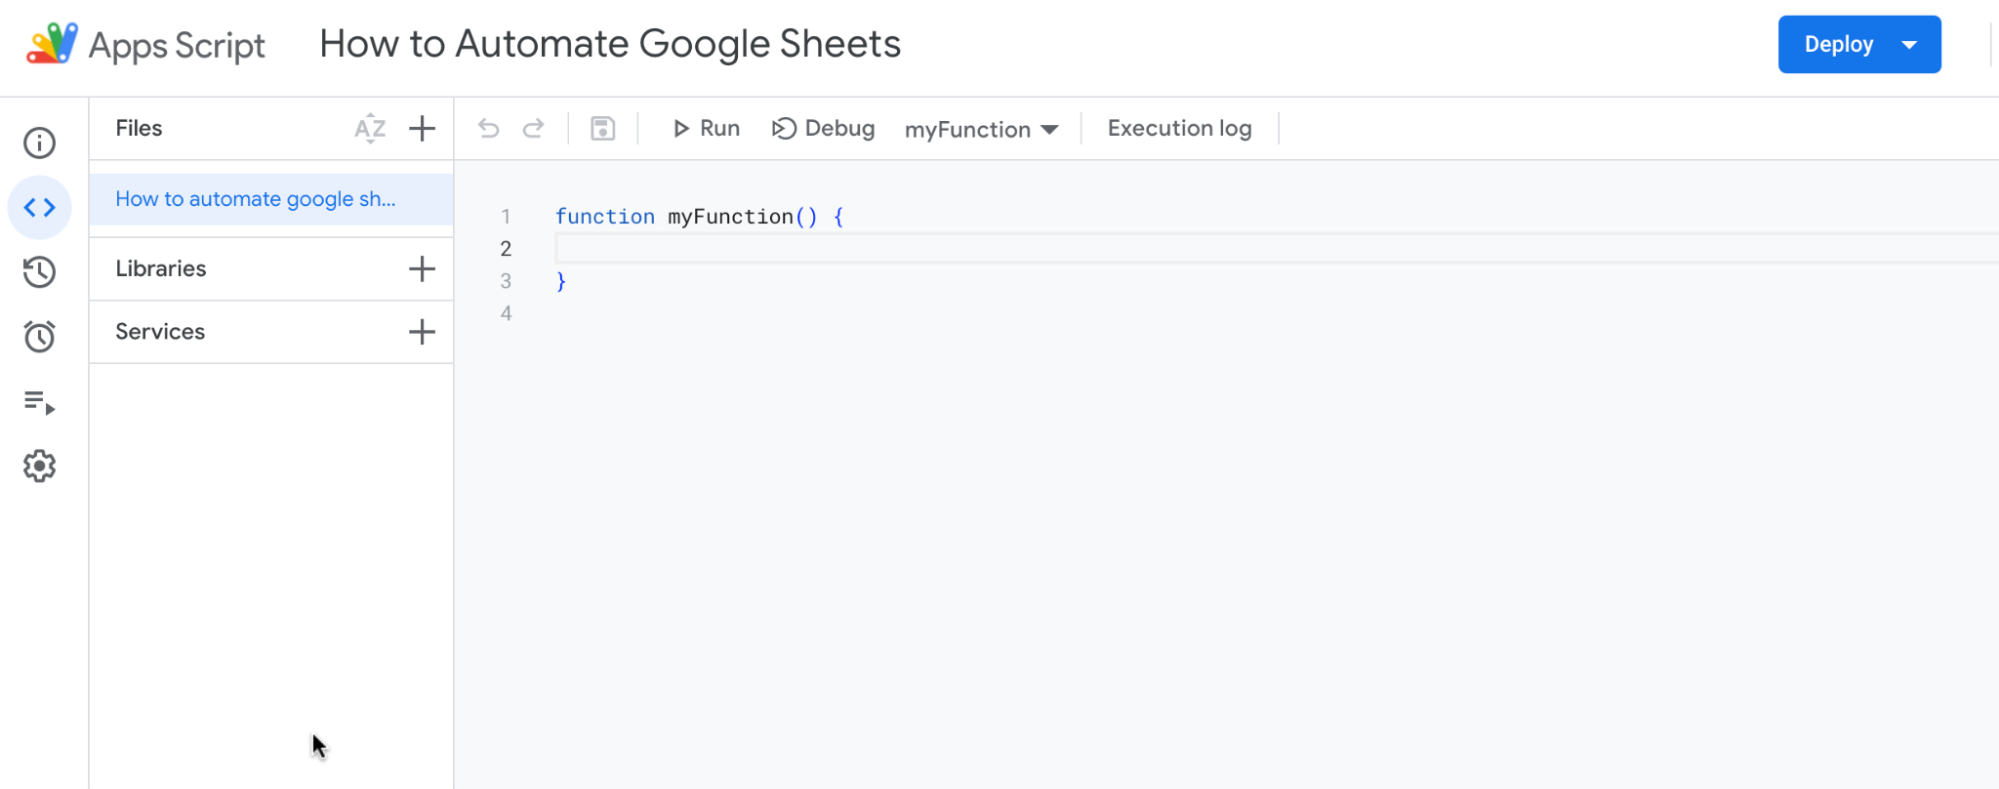
Now you can begin writing your custom scripts.
Examples:
1. Custom Functions
For this example, we’ll create a custom function that calculates the percentage growth from two numbers.
First, open the script editor from Google Sheets.
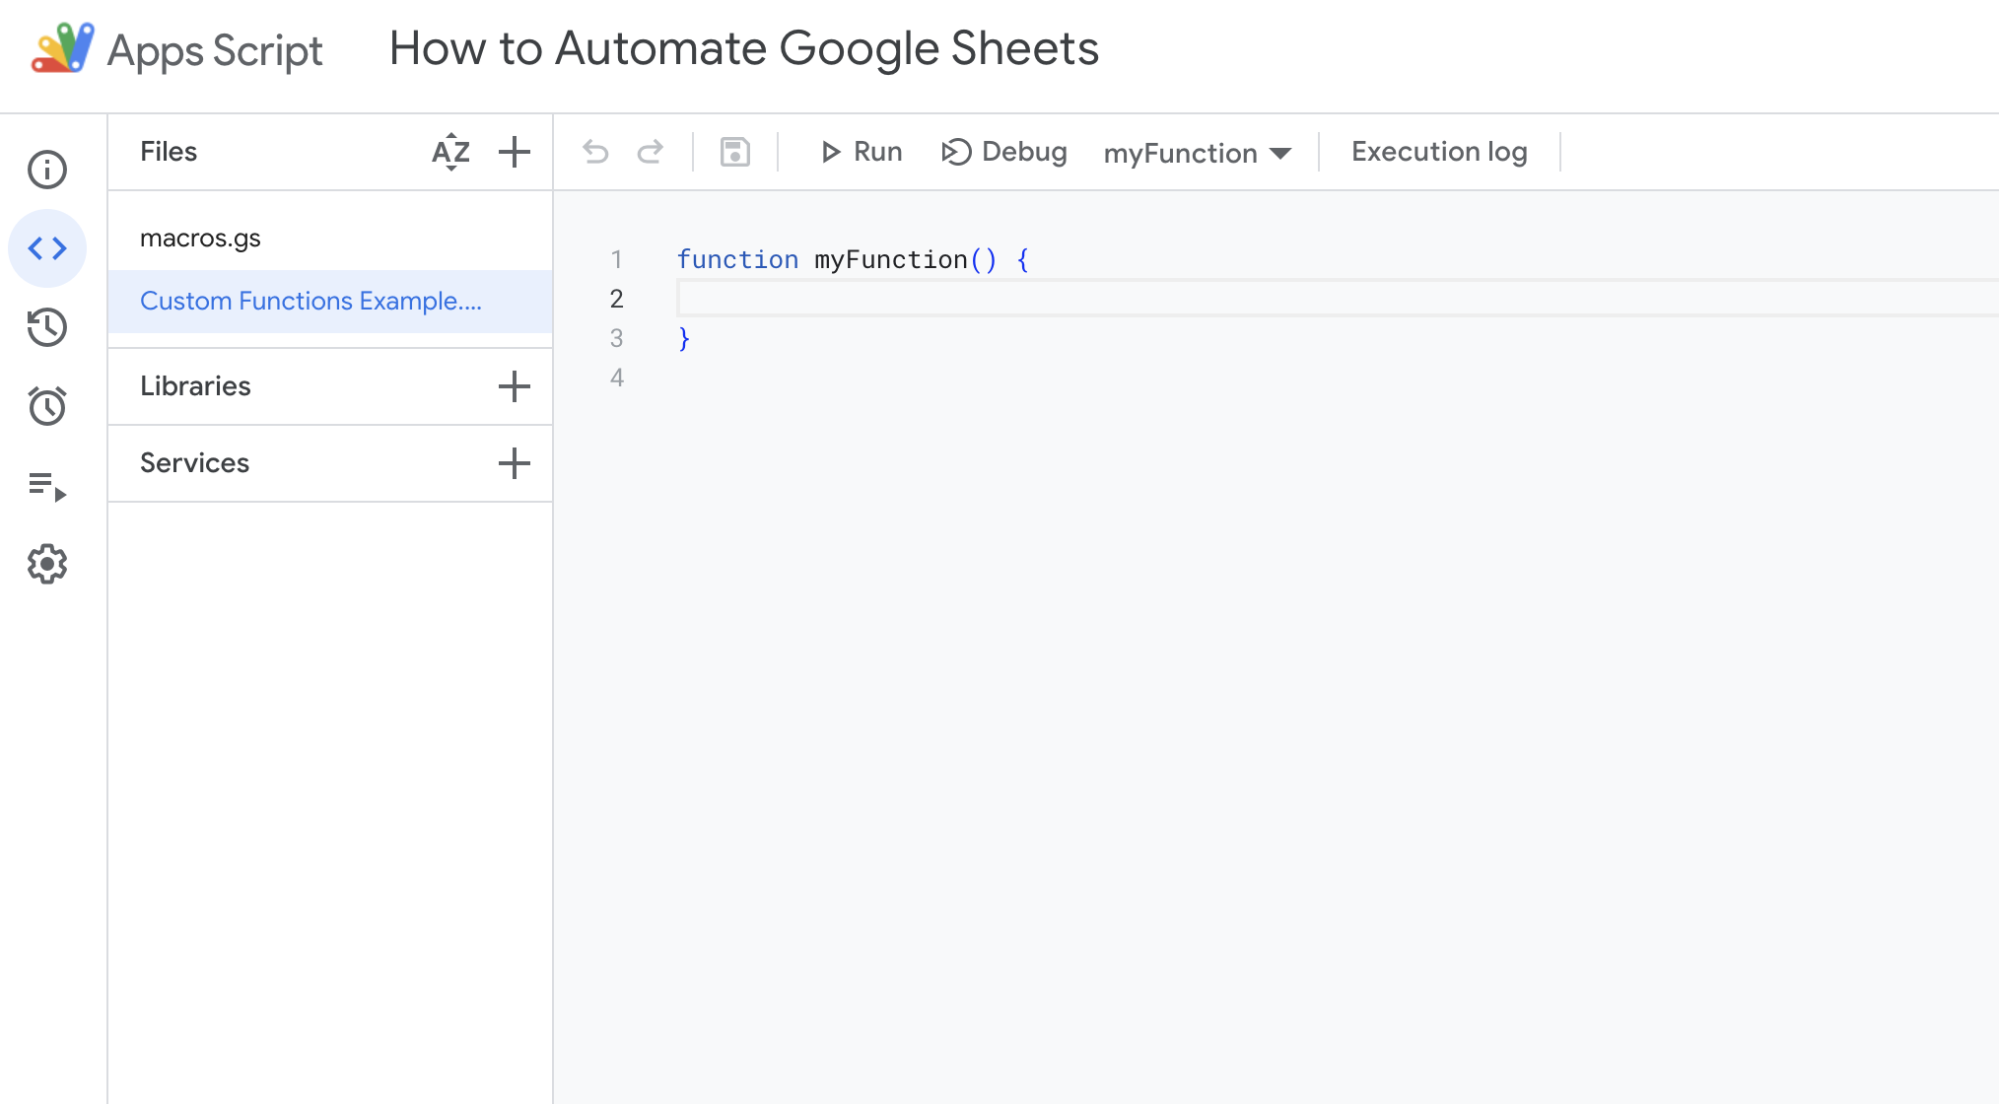
Paste the following function in the script editor:
function percentageGrowth(oldValue, newValue) {
if (oldValue === 0) {
throw new Error(“Old value cannot be zero when calculating percentage growth.”);
}
var growth = ((newValue – oldValue) / oldValue) * 100;
return growth;
}

Click ‘Run’ to execute the script.
Return to your Google Doc and refresh it.
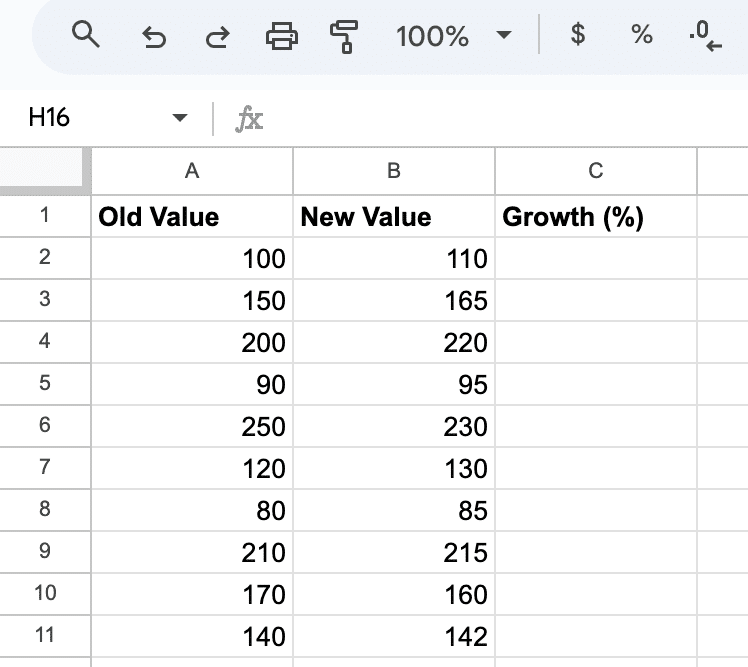
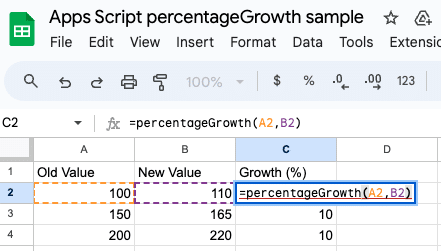
You can now calculate the percentage growth by using the following formula in any cell:
=percentageGrowth(A2, B2)
2. Automated Email Notification
You can also create a script to automate email notifications.
Looking for a no-code alternative? Automate the entire process in a few clicks using Coefficient Data Alerts. Simply set customer triggers to notify your team of data updates in Slack or email.
Product
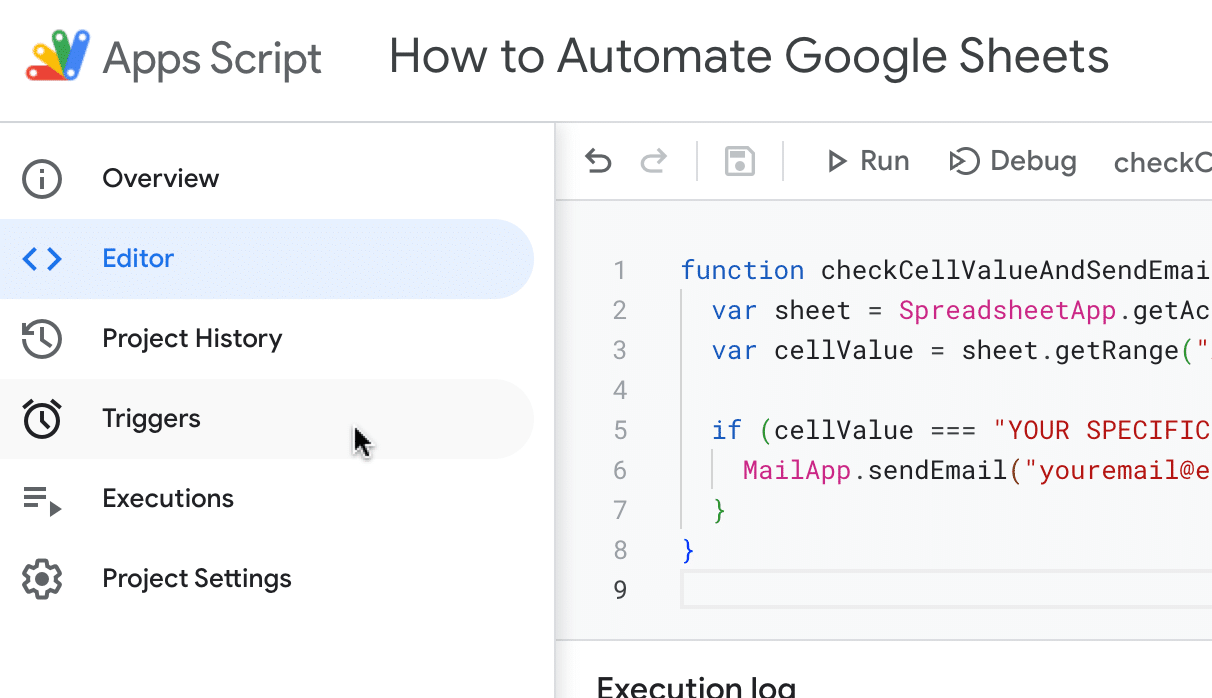
In this example, we’ll write a script that sends an email notification when a specific cell (e.g., A1) in the Google Sheet reaches a certain value.
Open a new file in the script editor.
Paste the following function in the editor:
function checkCellValueAndSendEmail() {
var sheet = SpreadsheetApp.getActiveSpreadsheet().getActiveSheet();
var cellValue = sheet.getRange(“A1”).getValue();
if (cellValue === “YOUR SPECIFIC VALUE”) {
MailApp.sendEmail(“[email protected]”, “Notification from Google Sheets”, “Cell A1 has reached the specified value!”);
}
}
Replace “YOUR SPECIFIC VALUE” with the value you want to check for and “[email protected]” with your email.
Run the script.
An authorization window will open.
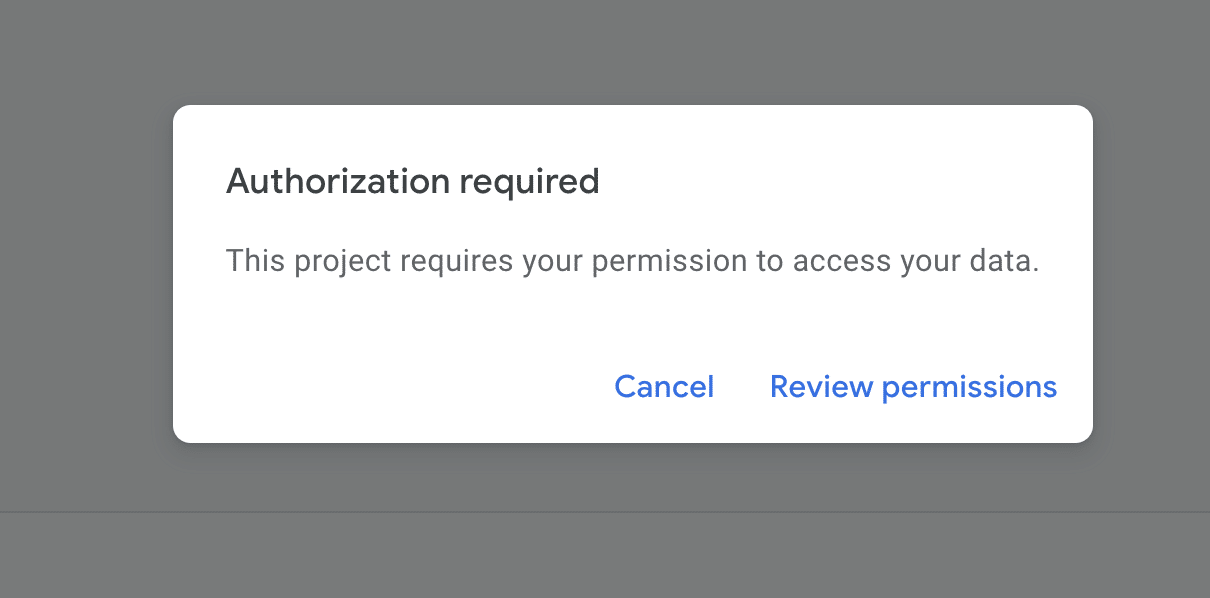
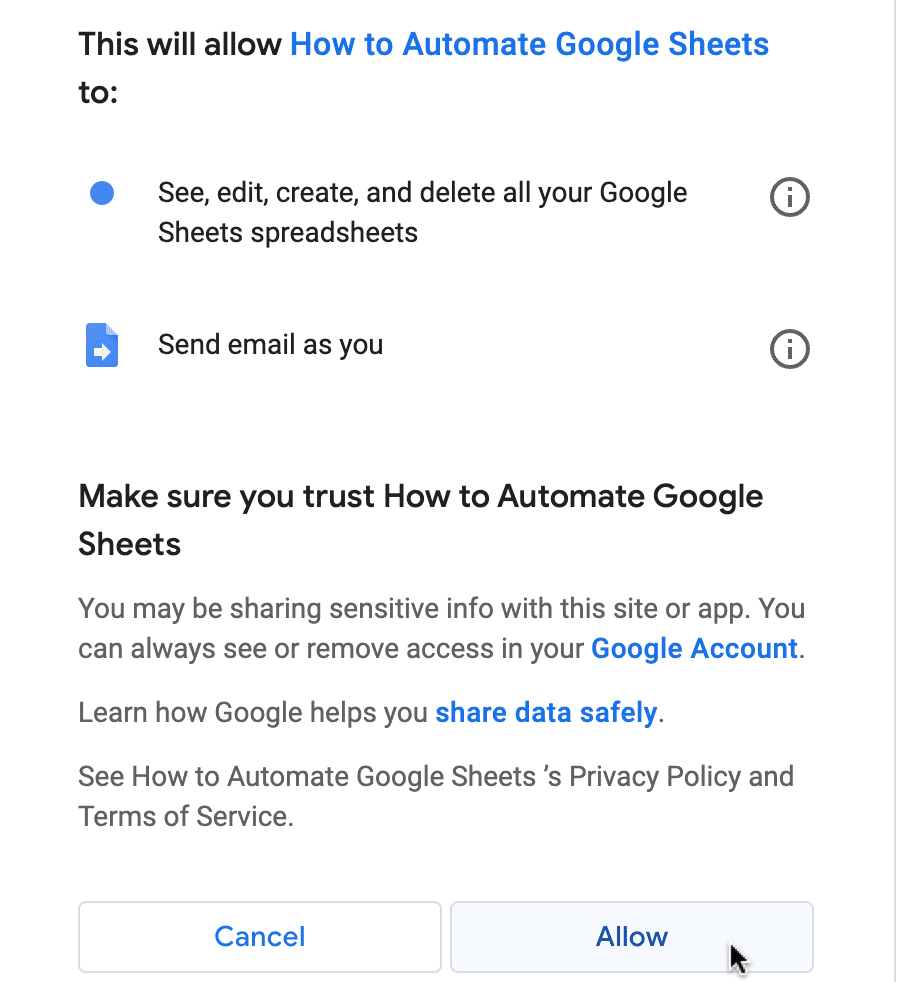
Click ‘Review permissions.’
Choose your account and click ‘Allow.’
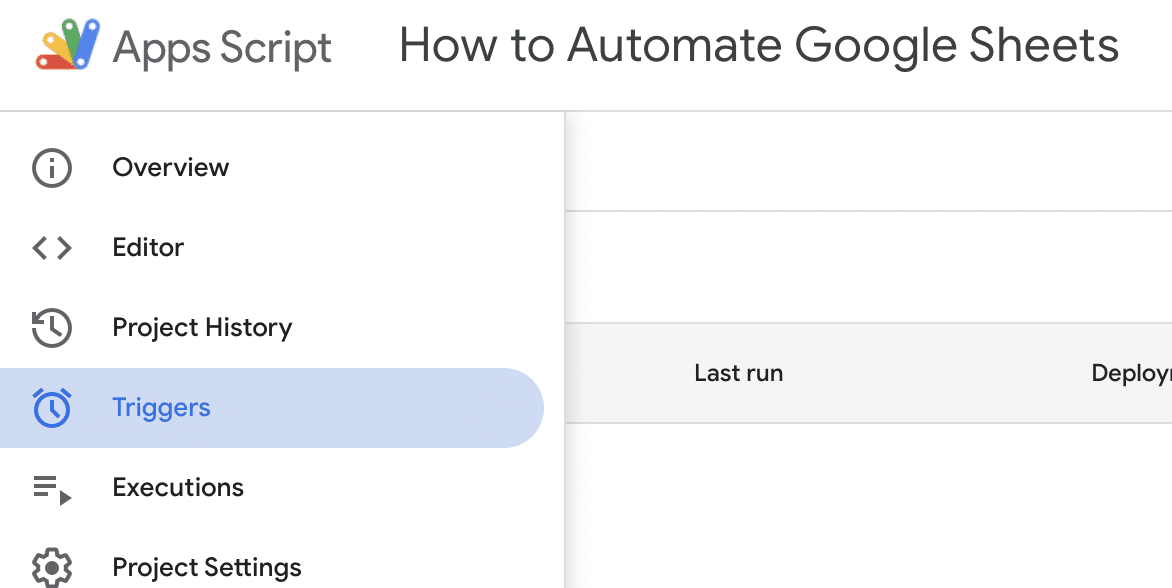
Set a trigger to run this function at your desired frequency by clicking on the clock icon in the left sidebar of the script editor.
Click on the ‘+ Add Trigger’ button at the bottom.
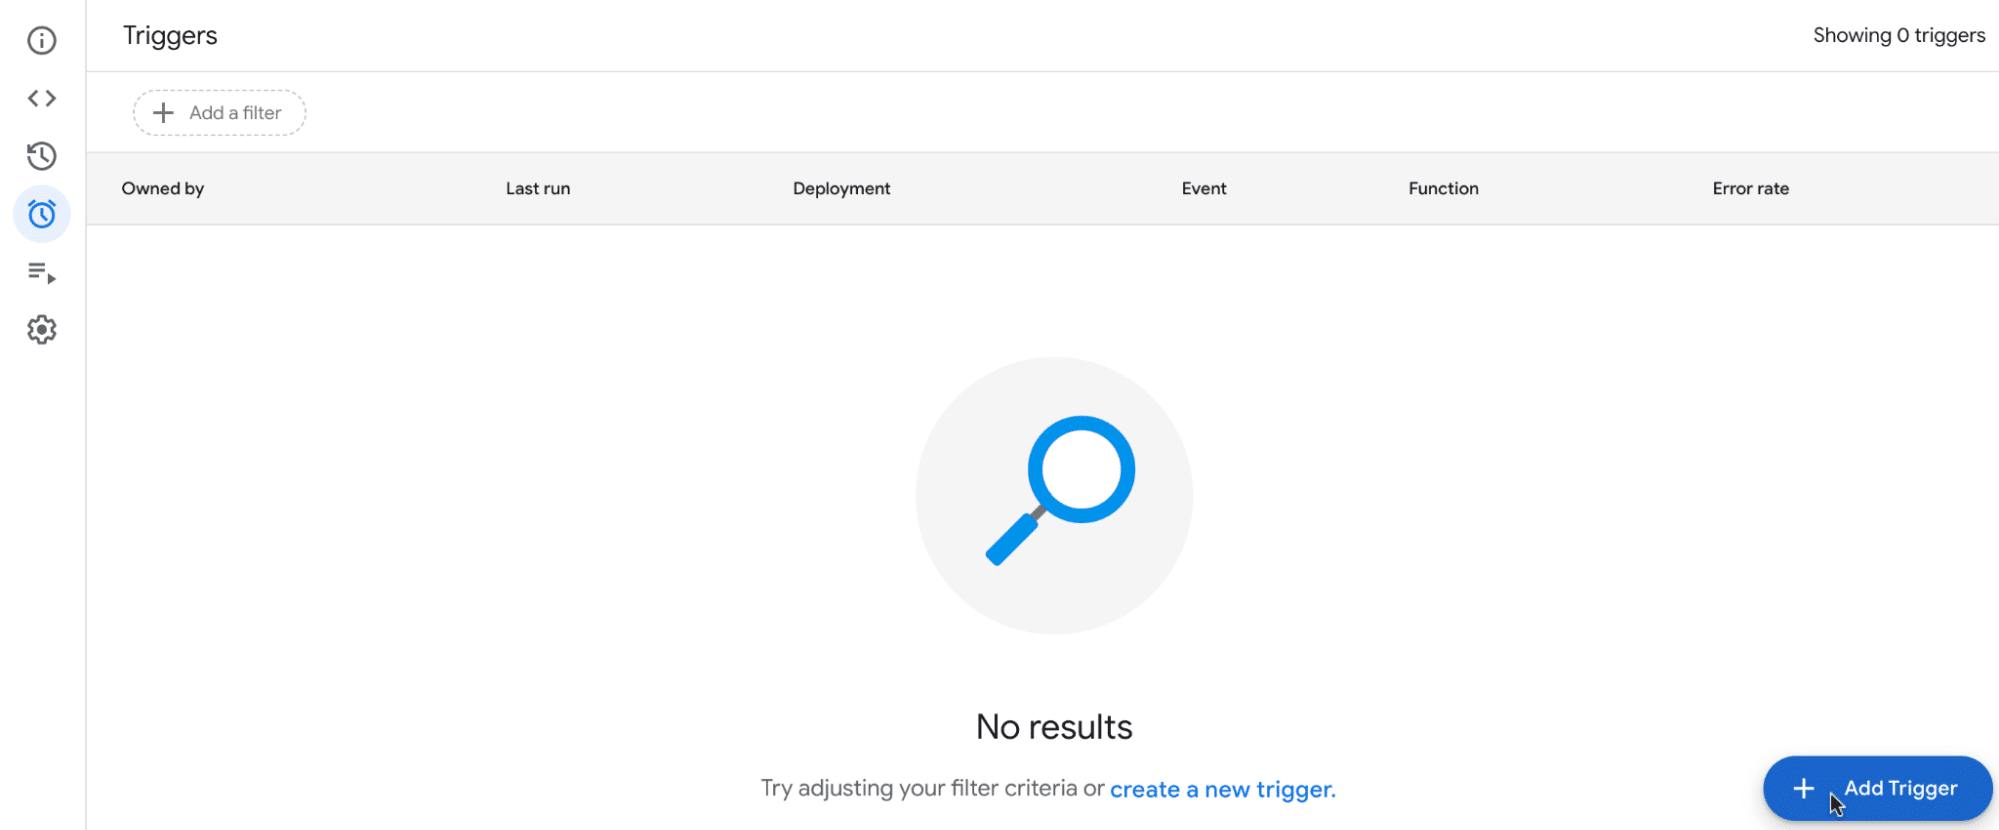
For the function to run, select ‘checkCellValueAndSendEmail.’
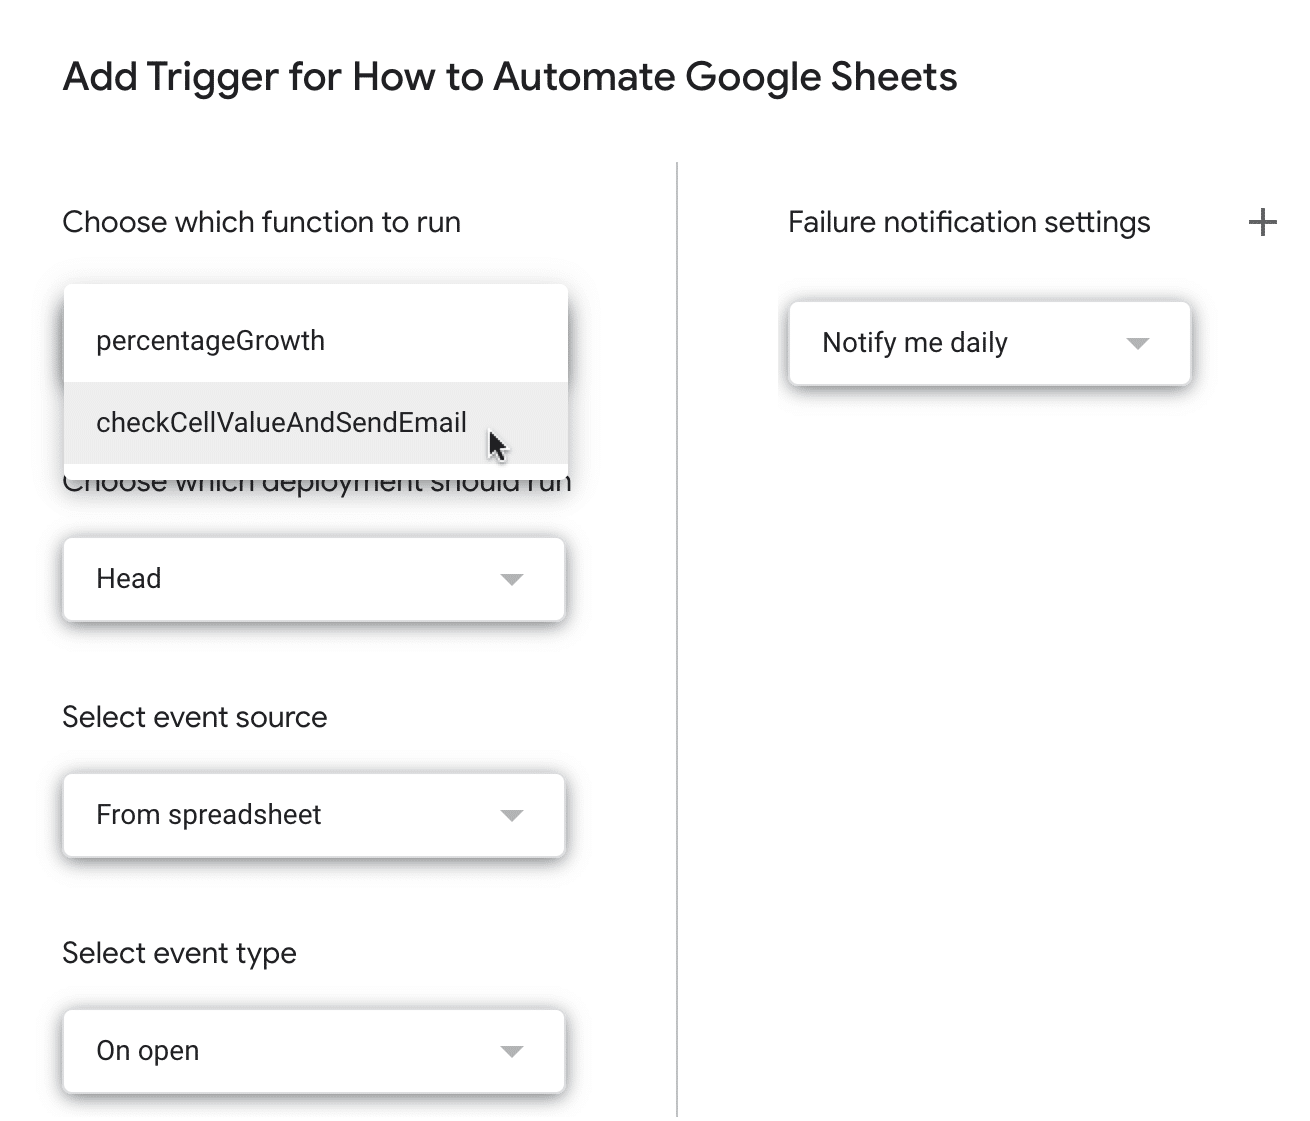
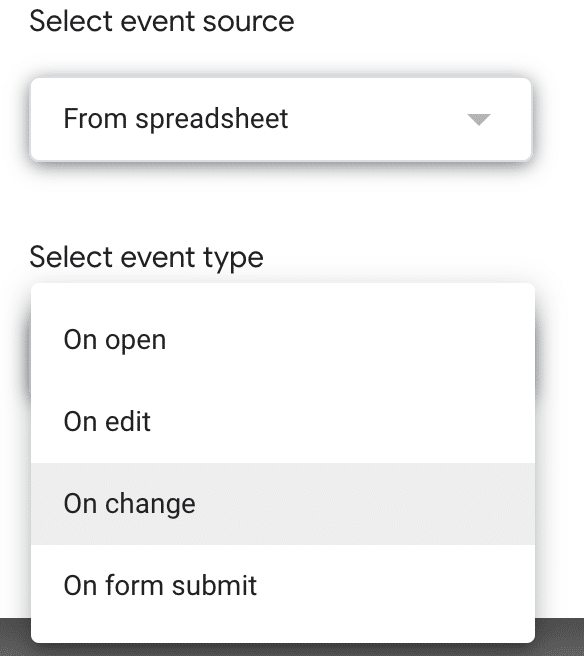
Select ‘From spreadsheet’ as the event source.
Click on the event type dropdown and select ‘On change.’
Click ‘Save’ to save the trigger.
Now you will receive an email whenever the threshold you defined in the “YOUR SPECIFIC VALUE” variable is crossed.
3. Scheduled Data Refresh
For our final example, we’ll demonstrate how to automatically update an external data source in your Google Sheet at a predetermined interval.
Note: This example assumes you have set up an external data source using =IMPORTDATA(“URL”) or any similar function.
Open Apps Script and create a new script like before.
Paste the following function in the script editor:
- Open the script editor.
- Paste the following function:
javascript
Copy code
function refreshData() {
var sheet = SpreadsheetApp.getActiveSpreadsheet().getActiveSheet();
var formula = sheet.getRange(“A1”).getFormula();
sheet.getRange(“A1”).setFormula(“”);
SpreadsheetApp.flush(); // Waits for all pending changes to be applied
sheet.getRange(“A1”).setFormula(formula);
}
Run your script.
We’ll schedule a data refresh by creating a new trigger.
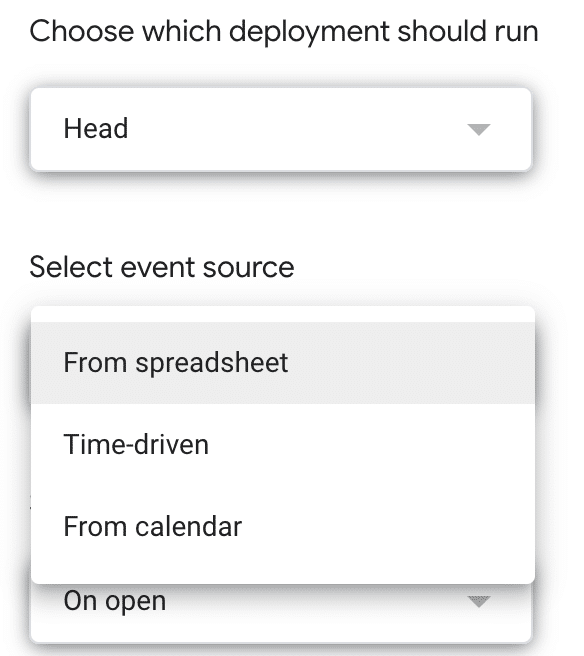
Select ‘Triggers’ from the Apps Script menu on the left-hand side of the screen.
Click the ‘Add Trigger’ button at the bottom-right corner.
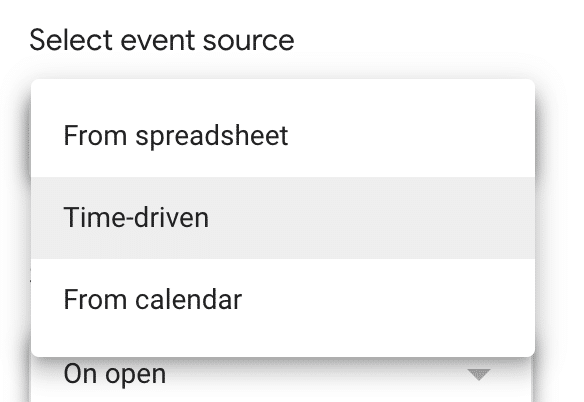
Select the function you want to create a trigger for from the drop-down.

Select ‘Time-driven’ as the event source.
Choose the frequency with which you want the function to run (e.g., every minute, every 5 minutes, etc.).
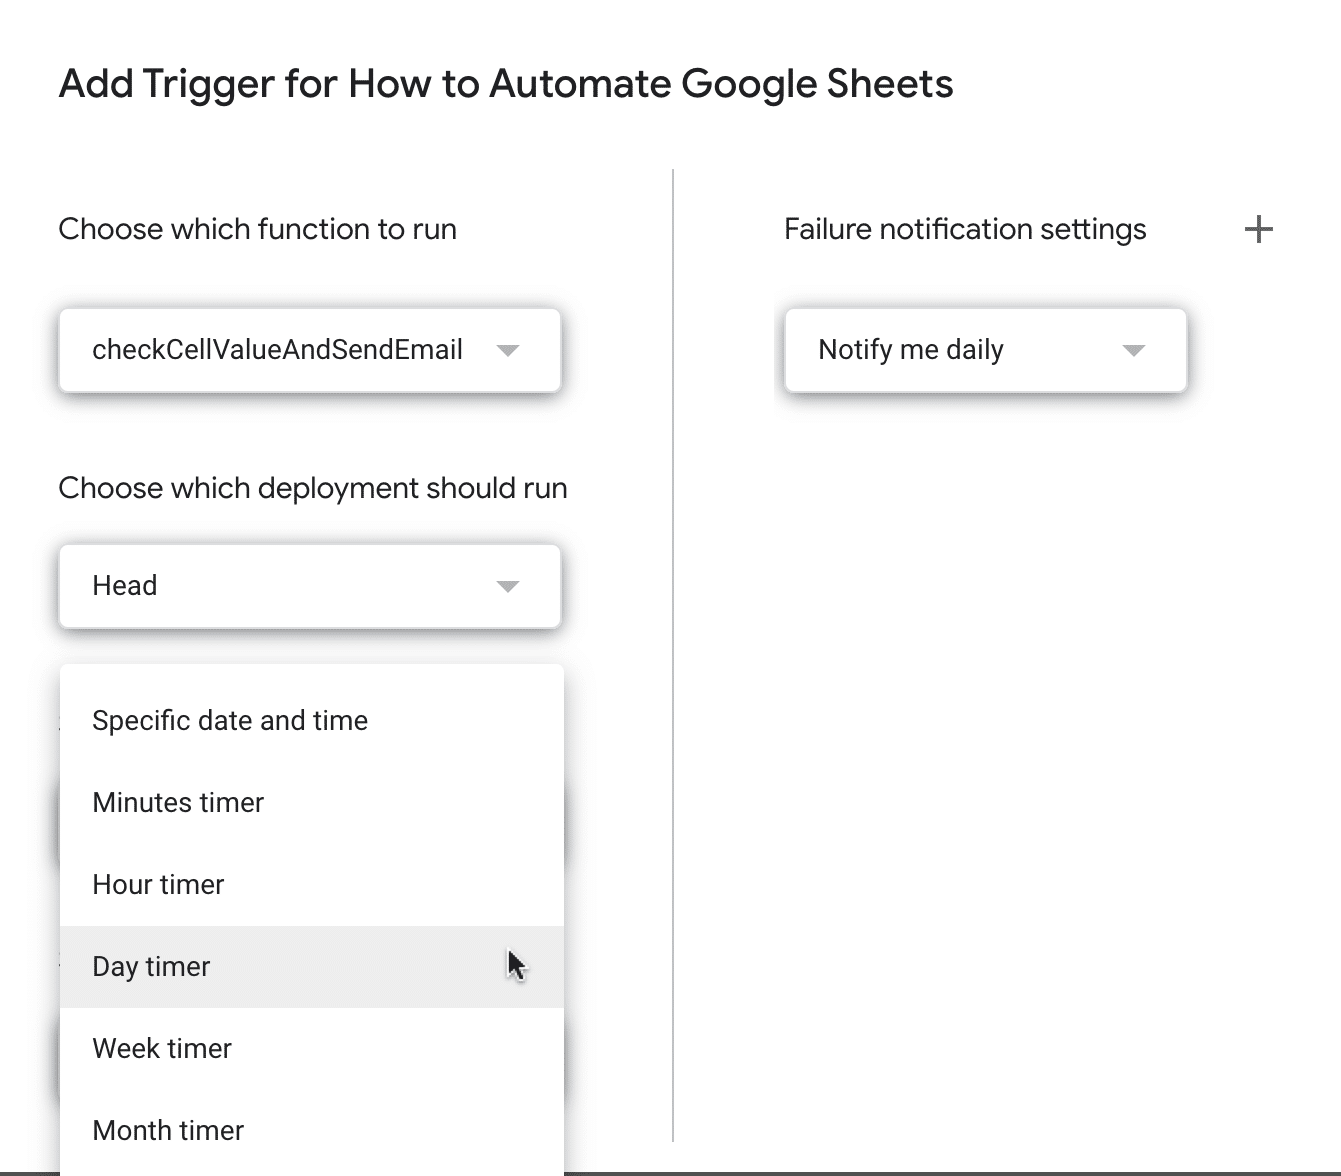
Click ‘Save’ to save the trigger.
Your spreadsheet will now update automatically every day.
How to Automate Google Sheets? Start with Coefficient.
Google Sheets is an incredibly versatile tool that can automate almost any task, provided you know how to code.
But what about everyone else?
Coefficient levels the playing field by providing a no-code interface that allows business users to automate their data workflows.
Get started for free today to see the magic for yourself.


