Are you looking to connect Salesforce to SQL Server? Whether you need to sync customer data, integrate sales information, or maintain data consistency across platforms, this guide will walk you through three proven methods to establish a reliable connection between Salesforce and SQL Server.
Why Connect Salesforce to SQL Server?
Before we dive into the how-to, let’s explore the benefits of connecting these two powerful platforms:
- Real-time Sales Analytics: By combining Salesforce CRM data with SQL Server’s robust analytics capabilities, you can create comprehensive sales performance dashboards and reports.
- Automated Data Synchronization: Say goodbye to manual data entry. Automatically sync customer information, leads, and opportunities between platforms to save time and reduce errors.
- Enhanced Data Consistency: Maintain a single source of truth by ensuring data accuracy across both systems while leveraging SQL Server’s advanced data processing capabilities.
Top 3 Methods to Connect Salesforce to SQL Server
There are several ways to establish a connection between Salesforce and SQL Server. Here’s a quick overview of the top three methods:
| Solution | Best For |
| Coefficient | Business users who need a no-code solution for bi-directional data sync between Salesforce and SQL Server using spreadsheets as an intermediate layer |
| SSIS (SQL Server Integration Services) | Technical teams requiring native Microsoft tools for complex ETL processes and data transformation |
| Salesforce Data Loader | Organizations seeking a native Salesforce solution for basic data import/export operations without real-time sync requirements |
Let’s explore each method in detail.
1. Coefficient: The No-Code Solution
Coefficient offers a spreadsheet-based solution that simplifies the connection between Salesforce and SQL Server. By using familiar interfaces like Google Sheets and Excel, users can create automated data pipelines without writing code.
Step-by-Step Implementation:
Step 1. Install Coefficient
For Google Sheets
- Open a new or existing Google Sheet, navigate to the Extensions tab, and select Add-ons > Get add-ons.
- In the Google Workspace Marketplace, search for “Coefficient.”
- Follow the prompts to grant necessary permissions.
- Launch Coefficient from Extensions > Coefficient > Launch.
- Coefficient will open on the right-hand side of your spreadsheet.

For Microsoft Excel
- Open Excel from your desktop or in Office Online. Click ‘File’ > ‘Get Add-ins’ > ‘More Add-Ins.’
- Type “Coefficient” in the search bar and click ‘Add.’
- Follow the prompts in the pop-up to complete the installation.
- Once finished, you will see a “Coefficient” tab in the top navigation bar. Click ‘Open Sidebar’ to launch Coefficient.

Step 2. Connect and Import Data from Salesforce
In the Coefficient sidebar, click “Import from…” and select Salesforce.

After authorizing your connection > ‘From Object & Fields’ > Select the objects (Contacts, Leads, Opportunities) and fields you want to import.

Customize your input and apply necessary filters. Then, click ‘Import.’

Step 3. Export Data from Your Spreadsheet to MS SQL
Before starting, make sure you’ve connected to MS SQL.
Then, navigate to Coefficient’s menu >Click “Export to…”
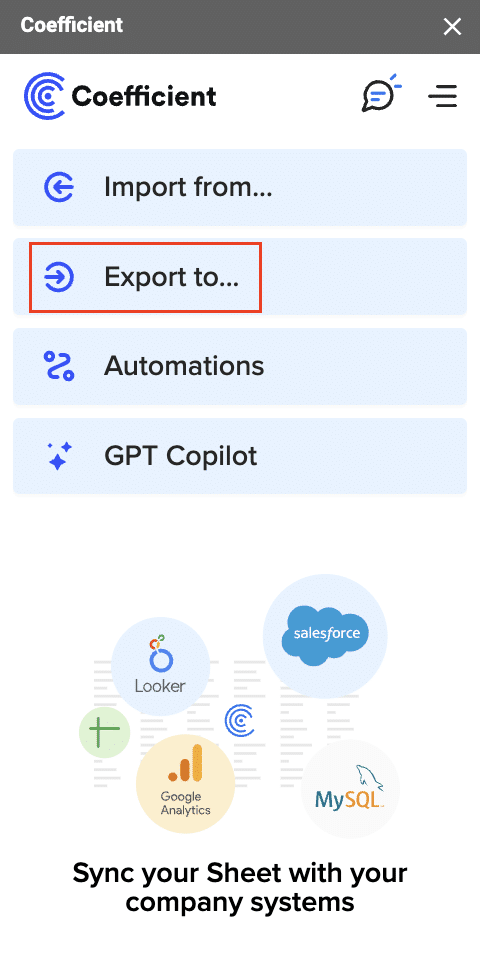
Select MS SQL.

Choose the tab in your workbook that contains the data you want to export and specify the header row that contains the database field headers.

Specify the table in your database where you want to insert the data and choose the appropriate action (Insert, Update, Delete).
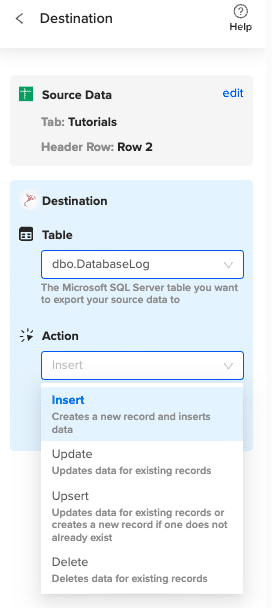
Complete the field mappings for the export. Then, confirm your settings and click “Export” to proceed.
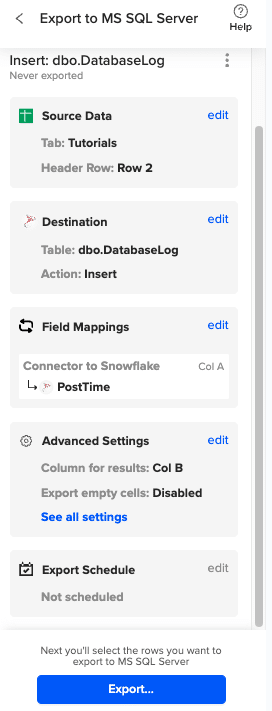
Then, highlight the specific rows in your sheet that you want to export, or choose to export all rows.
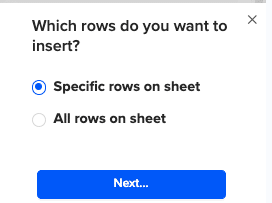
Review your settings and follow the prompts to push your data back to MS SQL.
Pros:
- No coding required
- Real-time bi-directional sync
- User-friendly interface
- Automated scheduling options
- Excel and Google Sheets compatibility
Cons:
- Requires spreadsheet as intermediate layer
- Premium features need paid subscription
For more information on connecting SQL Server to Google Sheets, check out this guide.
If you prefer using Excel, you can learn how to connect Excel to SQL Server with Coefficient.
2. SSIS (SQL Server Integration Services)
SSIS is Microsoft’s enterprise-level data integration platform that provides native connectivity between SQL Server and various data sources, including Salesforce.
Step-by-Step Implementation:
Step 1: Install SSIS and Required Components
Installation Requirements:
SQL Server Version: 2019 or later
Components:
Integration Services Engine
Integration Services Tools
Salesforce Connector
Prerequisites:
.NET Framework 4.7.2
Visual Studio 2019 or later
SSDT (SQL Server Data Tools)
Step 2: Create New SSIS Project
— Create destination tables
CREATE TABLE dbo.SalesforceAccounts (
AccountId VARCHAR(18) PRIMARY KEY,
Name NVARCHAR(255),
Type NVARCHAR(50),
Industry NVARCHAR(100),
BillingAddress NVARCHAR(MAX),
LastModifiedDate DATETIME2
);
CREATE TABLE dbo.SalesforceContacts (
ContactId VARCHAR(18) PRIMARY KEY,
AccountId VARCHAR(18),
FirstName NVARCHAR(100),
LastName NVARCHAR(100),
Email NVARCHAR(255),
Phone NVARCHAR(50),
LastModifiedDate DATETIME2
);
Step 3: Configure Salesforce Source
<SalesforceConnection>
<SecurityToken>YourSecurityToken</SecurityToken>
<Username>your.email@company.com</Username>
<Password>YourPassword</Password>
<Environment>Production</Environment>
<QueryTimeout>300</QueryTimeout>
<BatchSize>2000</BatchSize>
<Objects>
<Object>Account</Object>
<Object>Contact</Object>
<Object>Opportunity</Object>
</Objects>
</SalesforceConnection>
Step 4: Set Up SQL Server Destination
— Create stored procedures for data loading
CREATE PROCEDURE dbo.LoadSalesforceData
@TableName NVARCHAR(100),
@BatchId UNIQUEIDENTIFIER
AS
BEGIN
BEGIN TRY
BEGIN TRANSACTION;
IF @TableName = ‘Accounts’
MERGE dbo.SalesforceAccounts AS target
USING dbo.StagingAccounts AS source
ON target.AccountId = source.AccountId
WHEN MATCHED THEN UPDATE SET
target.Name = source.Name,
target.LastModifiedDate = source.LastModifiedDate
WHEN NOT MATCHED THEN
INSERT (AccountId, Name, LastModifiedDate)
VALUES (source.AccountId, source.Name, source.LastModifiedDate);
COMMIT TRANSACTION;
END TRY
BEGIN CATCH
ROLLBACK TRANSACTION;
THROW;
END CATCH;
END;
Step 5: Define Data Mappings
{
“AccountMapping”: {
“Id”: “AccountId”,
“Name”: “Name”,
“Type”: “Type”,
“Industry”: “Industry”,
“BillingStreet”: “BillingAddress”,
“LastModifiedDate”: “LastModifiedDate”
},
“ContactMapping”: {
“Id”: “ContactId”,
“AccountId”: “AccountId”,
“FirstName”: “FirstName”,
“LastName”: “LastName”,
“Email”: “Email”,
“Phone”: “Phone”
}
}
Step 6: Deploy and Schedule Package
— Create SQL Server Agent job
EXEC msdb.dbo.sp_add_job
@job_name = N’Salesforce_Data_Sync’;
EXEC msdb.dbo.sp_add_jobstep
@job_name = N’Salesforce_Data_Sync’,
@step_name = N’Execute SSIS Package’,
@subsystem = N’SSIS’,
@command = N’/FILE “”C:SSISSalesforceSync.dtsx”‘;
Pros:
- Native Microsoft solution
- Powerful transformation capabilities
- Enterprise-grade security
- Scheduled execution support
Cons:
- Requires technical expertise
- Complex setup process
- Additional licensing costs
- Limited real-time capabilities
3. Salesforce Data Loader
Data Loader is Salesforce’s native tool for importing and exporting data between Salesforce and external systems like SQL Server.
Step-by-Step Implementation:
Step 1: Download and Install Data Loader
Installation Requirements:
Java Runtime: Version 11 or later
Operating System: Windows 10/11

Stop exporting data manually. Sync data from your business systems into Google Sheets or Excel with Coefficient and set it on a refresh schedule.
Get Started
Memory: 4GB minimum
Disk Space: 500MB
Salesforce Edition: Enterprise or higher
Step 2: Configure SQL Server Connection
— Create staging tables for import
CREATE TABLE dbo.StagingSalesforceData (
ExternalId VARCHAR(18),
ObjectType VARCHAR(50),
JsonData NVARCHAR(MAX),
LoadDate DATETIME2 DEFAULT GETDATE()
);
— Create database user for Data Loader
CREATE LOGIN dataloader_user
WITH PASSWORD = ‘StrongPassword123!’;
CREATE USER dataloader_user FOR LOGIN dataloader_user;
GRANT INSERT, UPDATE, DELETE ON dbo.StagingSalesforceData TO dataloader_user;
Step 3: Create Export Mappings
<configuration>
<exportMapping>
<object>Account</object>
<fields>
<field>Id</field>
<field>Name</field>
<field>Type</field>
<field>Industry</field>
<field>LastModifiedDate</field>
</fields>
<query>
SELECT Id, Name, Type, Industry, LastModifiedDate
FROM Account
WHERE LastModifiedDate >= LAST_N_DAYS:1
</query>
</exportMapping>
</configuration>
Step 4: Schedule Data Extraction
@echo off
set JAVA_HOME=C:Program FilesJavajre11
set DL_HOME=C:Program FilesSalesforce Data Loader
cd %DL_HOME%bin
process.bat –config %DL_HOME%confprocess-conf.xml
Step 5: Import Data to SQL Server
CREATE PROCEDURE dbo.ProcessSalesforceImport
AS
BEGIN
SET NOCOUNT ON;
BEGIN TRY
BEGIN TRANSACTION;
— Process staged data
INSERT INTO dbo.SalesforceAccounts
SELECT
JSON_VALUE(JsonData, ‘$.Id’) as AccountId,
JSON_VALUE(JsonData, ‘$.Name’) as Name,
JSON_VALUE(JsonData, ‘$.Type’) as Type,
JSON_VALUE(JsonData, ‘$.Industry’) as Industry
FROM dbo.StagingSalesforceData
WHERE ObjectType = ‘Account’;
COMMIT TRANSACTION;
END TRY
BEGIN CATCH
ROLLBACK TRANSACTION;
THROW;
END CATCH;
END;
Step 6: Verify Data Integrity
CREATE PROCEDURE dbo.VerifyDataIntegrity
AS
BEGIN
SELECT
‘Accounts’ as ObjectType,
COUNT(*) as RecordCount,
MAX(LastModifiedDate) as LastUpdate
FROM dbo.SalesforceAccounts
UNION ALL
SELECT
‘Contacts’ as ObjectType,
COUNT(*) as RecordCount,
MAX(LastModifiedDate) as LastUpdate
FROM dbo.SalesforceContacts;
END;
Pros:
- Free native Salesforce tool
- Simple interface
- Bulk data handling
- Direct Salesforce support
Cons:
- Manual process for real-time sync
- Limited transformation options
- Basic scheduling capabilities
- No bi-directional sync
Start Syncing Your Salesforce and SQL Server Data Today
Connecting Salesforce to SQL Server doesn’t have to be complicated. While each method has its merits, Coefficient provides the most user-friendly approach for business users who need reliable, automated data synchronization without technical complexity.
By following the steps outlined in this guide, you can create a seamless data flow between your Salesforce CRM and SQL Server database. This integration will enable you to make more informed decisions, improve data consistency, and enhance your overall business operations.
Ready to streamline your data integration? Get started with Coefficient today and experience seamless data flow between your systems.
Frequently Asked Questions
How to get Salesforce data into SQL Server?
While there are multiple methods, Coefficient offers the simplest solution by allowing you to sync Salesforce data to SQL Server through an intuitive spreadsheet interface, with no coding required.
Can you use SQL in Salesforce?
Salesforce uses SOQL (Salesforce Object Query Language) instead of SQL. However, with Coefficient, you can work with your data in familiar spreadsheet formats while maintaining automated connections to both systems.
What is the difference between SQL Server and Salesforce?
SQL Server is a relational database management system, while Salesforce is a CRM platform. Coefficient bridges this gap by enabling seamless data flow between both systems through a user-friendly interface.

