Select the data range in your source worksheet by clicking and dragging to highlight the entire range of data you want to filter and transfer
Apply filters by going to the “Data” tab in Excel ribbon, clicking “Filter” to add dropdown arrows to each column header
Set your criteria by clicking the filter dropdown arrow for the column containing your criteria and choosing the specific criteria for your data transfer
Copy the filtered data by selecting all visible cells (excluding header if not needed) and copying them to your destination worksheet
Set up automatic updates by using Power Query or VBA macros to refresh data connections for ongoing automatic transfers
Excel users often need to move data between worksheets using specific conditions. This guide shows you how to automate this process, saving time and reducing errors.
How to Transfer Data Between Excel Worksheets Using Filters
Filters offer a quick way to transfer data between Excel worksheets based on criteria. Here’s how to do it:
Step 1: Select the data range in the source worksheet.
- Open your Excel workbook and navigate to the sheet containing your source data.
- Click and drag to highlight the entire range of data you want to filter and transfer.
Step 2: Apply a filter to the criteria column.
- With your data range selected, go to the “Data” tab in the Excel ribbon.

- Click on the “Filter” button. This will add filter dropdown arrows to each column header.

- Click the filter dropdown arrow for the column containing your criteria.

- Choose the specific criteria you want to use for your data transfer.
Step 3: Copy the filtered data to the destination worksheet.
- With your data filtered, select all the visible cells (excluding the header row if you don’t want to transfer it).
- Press Ctrl+C to copy the data.
- Switch to your destination worksheet.
- Select the cell where you want the transferred data to begin.
- Right-click and choose “Paste Special > Values” to ensure you’re only transferring the data, not formulas or formatting.
Step 4: Remove the filter from the source worksheet.
- Return to your source worksheet.
- Go back to the “Data” tab and click the “Filter” button again to remove the filter.

- This step ensures your source data is ready for future use without accidentally leaving filters in place.
Leveraging Excel’s Advanced Filter for Automated Data Transfer
Advanced Filter provides more complex filtering options and can automatically copy results to another location. Here’s how to use it:
Step 1: Access and configure Advanced Filter.
- Select your data range in the source worksheet.
- Go to the “Data” tab and click “Advanced” in the “Sort & Filter” group.

Step 2: Set up the criteria range for data transfer.
- In a separate area of your worksheet, set up a criteria range.
- This should include the column headers from your data and the specific criteria you want to use for filtering.
Step 3: Use Advanced Filter to copy data automatically.
- In the Advanced Filter dialog box:

-
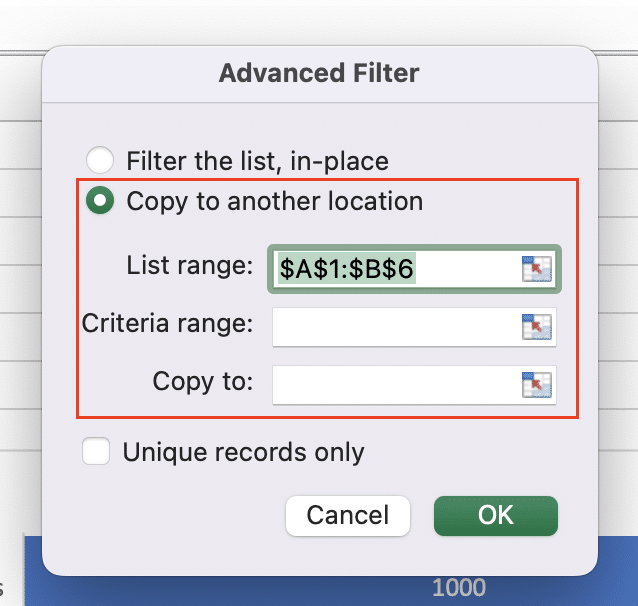
- Choose “Copy to another location” under “Action“.
- Specify your “List range” (your source data).
- Enter the location of your “Criteria range“.
- Specify the “Copy to” location (on your destination worksheet).
- Click “OK” to execute the filter and transfer the data.
How to Pull Data from One Excel Sheet to Another Using Power Query
Power Query offers a robust solution for transferring data between worksheets based on criteria. Here’s how to use it:
Step 1: Open Power Query editor.
- Go to the “Data” tab in Excel.
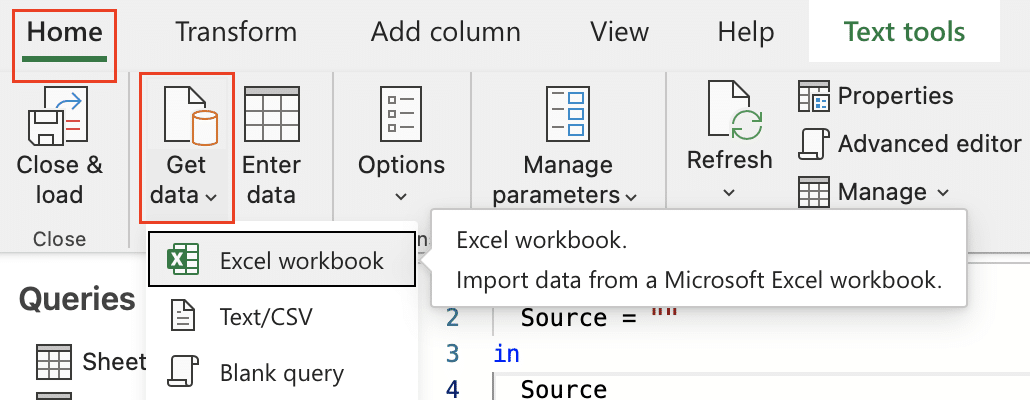
- Click “Get Data” > “From Other Sources” > “Blank Query“.

- In the Power Query Editor, go to “Home” > “New Source/Get Data” > “Excel“.

- Select your workbook and the sheet containing your source data.
Step 2: Create a query to filter and transfer data.
- In the Query Editor, select the column you want to filter.
- Go to “Home” > “Filter” and set your criteria.

- Once your data is filtered, go to “Home” > “Close & Load To“.

- Choose where you want the data to be placed in your destination worksheet.
Step 3: Refresh data connections for automatic updates.
- To update your transferred data, right-click on the query in the Queries & Connections pane.
- Select “Refresh” to pull the latest data based on your criteria.
Automating Data Transfer with VBA Macros
For recurring data transfers, VBA macros can fully automate the process. Here’s a basic approach:
Step 1: Open the Visual Basic Editor.
- Press Alt + F11 to open the VBA editor.
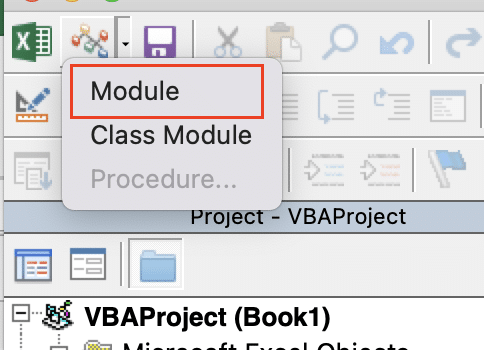
- Insert a new module by going to Insert > Module.

Step 2: Write a macro to copy data based on specific criteria.
- Here’s a sample VBA code to transfer data based on a criterion in column A:
vba
Copy
Sub TransferData()

Stop exporting data manually. Sync data from your business systems into Google Sheets or Excel with Coefficient and set it on a refresh schedule.
Get Started
Dim sourceWs As Worksheet
Dim destWs As Worksheet
Dim lastRow As Long
Dim i As Long
Set sourceWs = ThisWorkbook.Sheets(“SourceSheet”)
Set destWs = ThisWorkbook.Sheets(“DestinationSheet”)
lastRow = sourceWs.Cells(sourceWs.Rows.Count, “A”).End(xlUp).Row
For i = 2 To lastRow
If sourceWs.Cells(i, 1).Value = “YourCriteria” Then
sourceWs.Rows(i).Copy destWs.Rows(destWs.Rows.Count).End(xlUp).Offset(1)
End If
Next i
End Sub
Step 3: Assign the macro to a button for easy execution.
- Go back to your Excel sheet.
- Under the “Developer” tab, click “Insert” and choose a button shape.

- Assign your macro to this button.
- Now you can transfer data with a single click.
Streamlining Your Excel Data Transfer Process
We’ve covered six methods to transfer data from one Excel worksheet to another automatically based on criteria:
- Using Filters
- XLOOKUP function
- VLOOKUP function
- Advanced Filter
- Power Query
- VBA Macros
Each method has its strengths. Filters and Advanced Filter are great for one-time transfers. XLOOKUP and VLOOKUP work well for ongoing, formula-based transfers. Power Query shines for complex, repeatable transfers, while VBA offers full automation for frequent tasks.
Choose the method that best fits your specific needs, data complexity, and comfort level with Excel features. With practice, you’ll be transferring data between worksheets efficiently and accurately.
Ready to take your data management to the next level? Coefficient offers powerful tools to sync and manage your Excel data across multiple sources. Get started with Coefficient today and revolutionize your Excel workflow.

