Importing Excel data into SharePoint lists can significantly improve your organization’s data management and collaboration. This guide provides detailed steps for the process.
How to Import Excel Data into a New SharePoint List
Transferring your Excel data to a new SharePoint list is a straightforward process. Here’s how to do it:
Step 1. Open your Excel spreadsheet and select the data range you want to import.
- Launch Microsoft Excel and open the file containing the data you wish to import.
- Click and drag to highlight the entire range of cells you want to transfer to SharePoint.
- Ensure you include the header row in your selection, as these will become your column names in SharePoint.
Step 2. Format the selected data as a table in Excel.
- With your data range still selected, click on the “Insert” tab in the Excel ribbon.
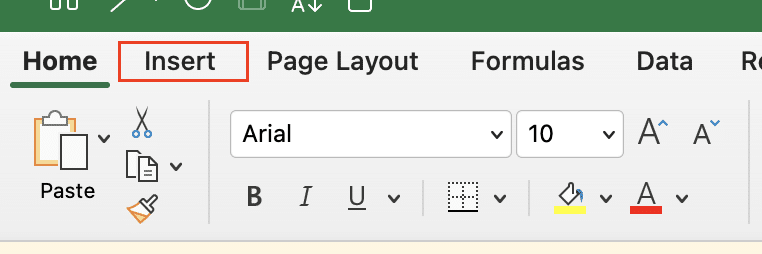
- Look for the “Table” button and click it.

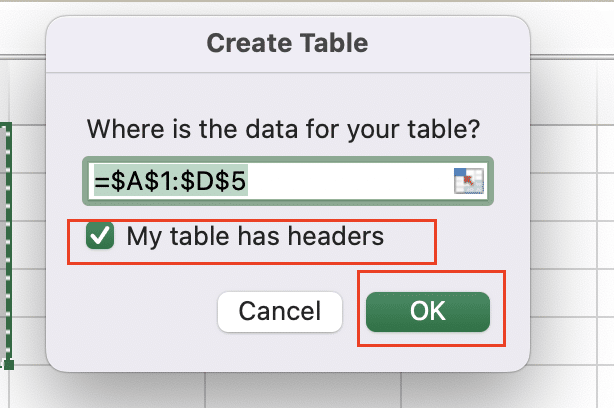
- A dialog box will appear asking you to confirm the range. Make sure the “My table has headers” box is checked if your data includes column headers.
- Click “OK” to convert your data range into a formatted table.
Step 3. Navigate to the “Table Design” tab in Excel’s ribbon menu.
- Once your data is formatted as a table, a new “Table Design” tab will appear in the Excel ribbon.

- Click on this tab to access table-specific options.
Step 4. Click on “Export” and choose “Export Table to SharePoint List”.
- In the “Table Design” tab, look for the “Export” button, usually located on the far right of the ribbon.

- Click on “Export” to reveal a dropdown menu.
- Select “Export Table to SharePoint List” from the options presented.

Step 5. Enter the URL of your SharePoint site and follow the prompts to complete the import.
- A new dialog box will open, asking for the SharePoint site URL where you want to create the new list.
- Enter the full URL of your SharePoint site (e.g., https://yourcompany.sharepoint.com/sites/yoursite).
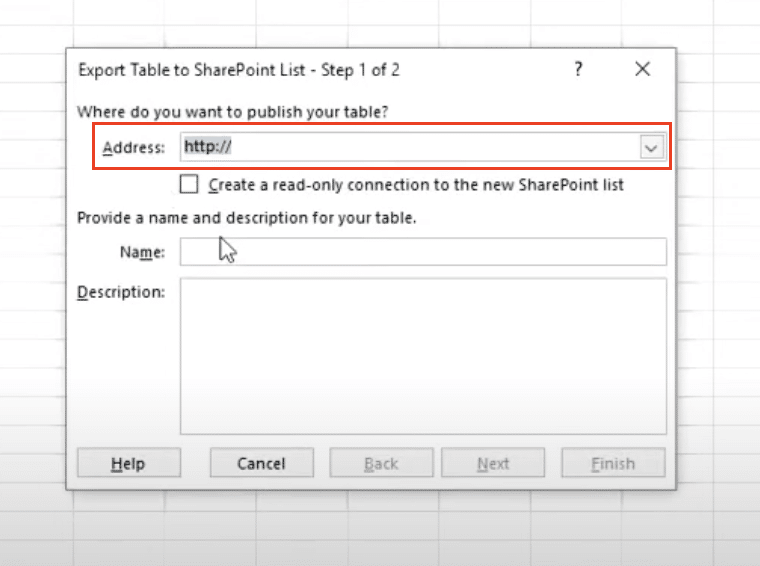
- Click “Next” to proceed.
- You’ll be asked to name your new SharePoint list. Enter a descriptive name that reflects the data content.
- Review the column mappings to ensure they match your Excel data structure.
- Click “Finish” to start the import process.

- Wait for the confirmation message indicating that your list has been successfully created.
Customizing Column Settings During Import
When importing Excel data into a new SharePoint list, you have the opportunity to customize various column settings:
Step 1. Review and adjust column types for each imported field.
- After clicking “Finish” in the export process, SharePoint will display a preview of your new list.
- Click on the “List settings” in the top right corner.
- Scroll down to the “Columns” section.
- For each column, click on its name to access the column settings.
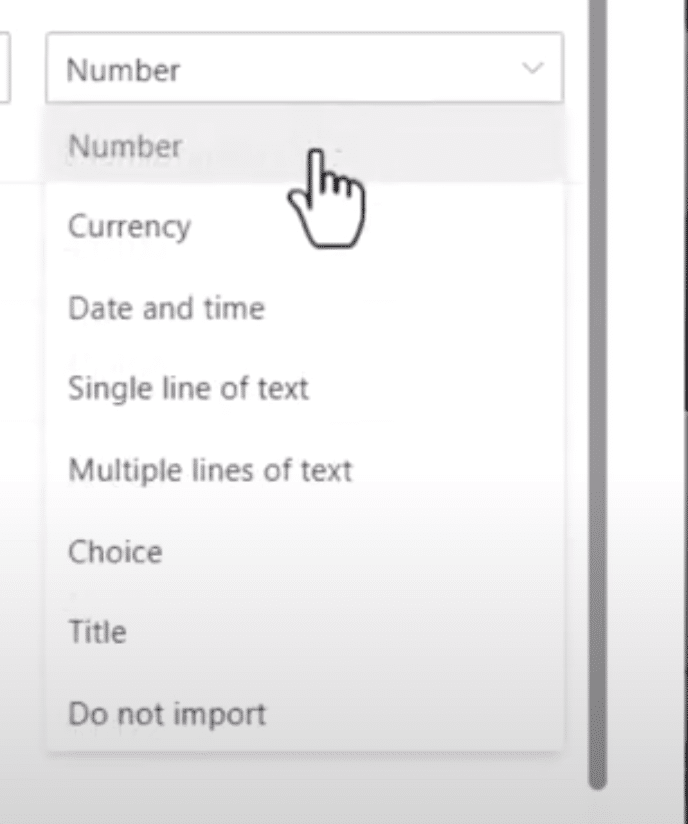
- In the “Type” dropdown, select the most appropriate data type for each column (e.g., Single line of text, Number, Date and Time, etc.).
- Click “OK” to save changes for each column.
Step 2. Set up calculated columns if needed.
- In the “List settings” page, scroll down and click “Add column“.
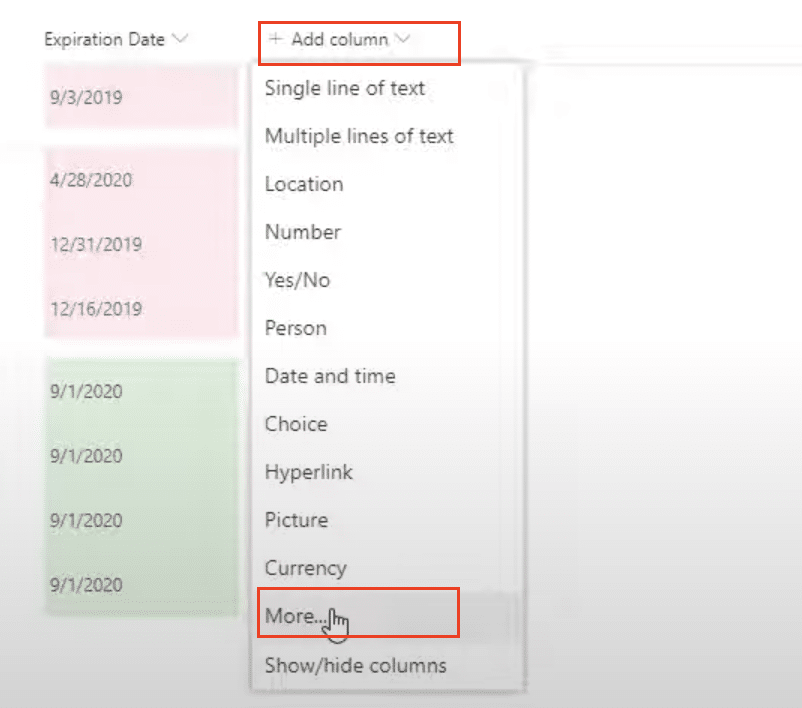
- Give your calculated column a name.

- For “The type of information in this column is“, select “Calculated“.
- In the formula field, enter your calculation using column names in square brackets (e.g., =[Price]*[Quantity]).
- Choose the appropriate data type for the result.
- Click “OK” to create the calculated column.
Step 3. Configure display names and descriptions for better clarity.
- Back in the “List settings” page, click on each column name.
- In the “Column name” field, enter a clear, descriptive name for the column.
- In the “Description” field, provide a brief explanation of the column’s purpose or contents.

- Click “OK” to save changes.
Step 4. Apply conditional formatting rules to highlight important data.
- From your SharePoint list view, click on the column header you want to format.
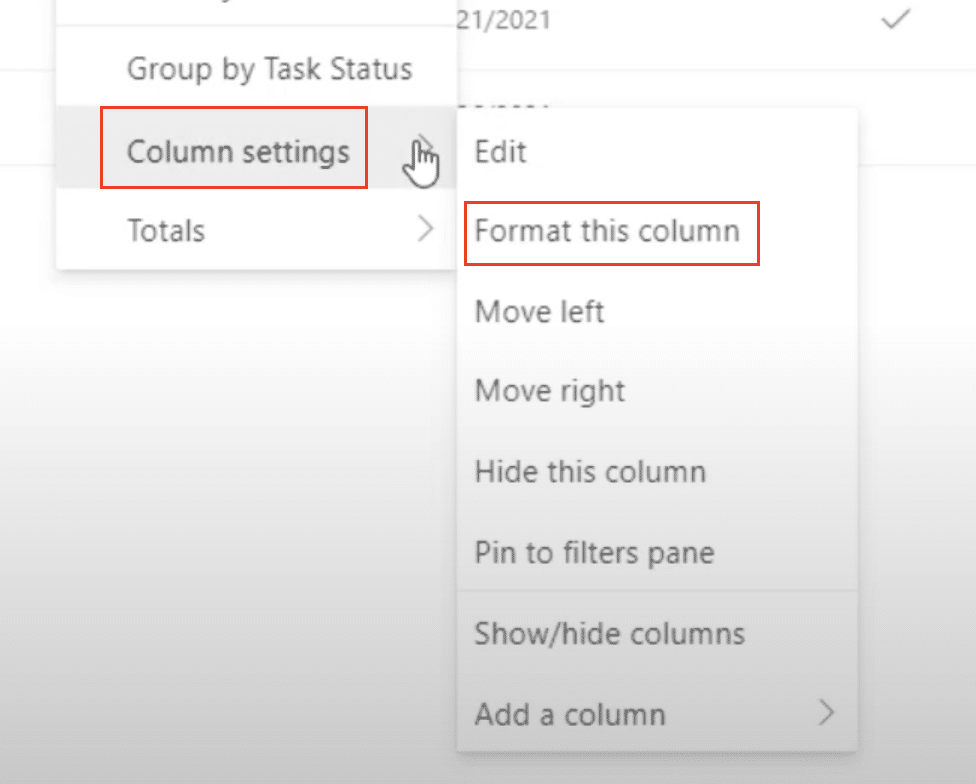
- In the column menu, select “Column settings“, then “Format this column“.
- Choose “Conditional formatting” from the options.
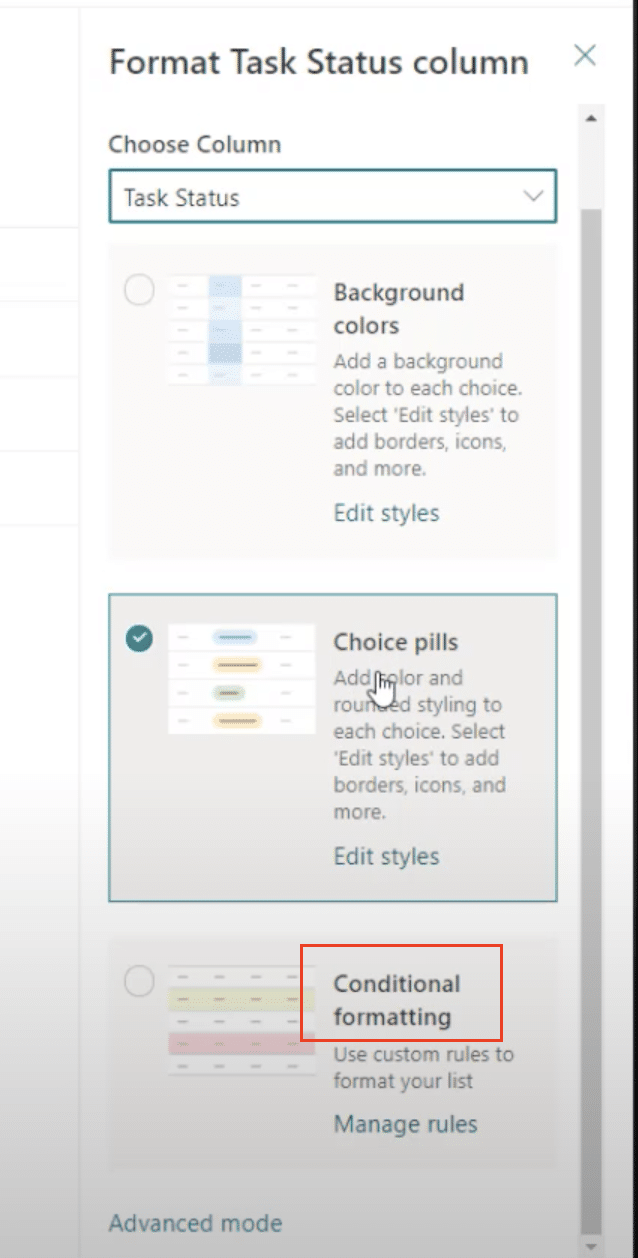
- Set up your rules based on column values (e.g., highlight values over a certain threshold).
- Click “Save” to apply the formatting.
Handling Date and Time Fields
Proper handling of date and time fields is crucial for accurate data import:
Step 1. Ensure date formats in Excel match SharePoint’s requirements.
- In your Excel spreadsheet, select the date column.
- Right-click and choose “Format Cells“.
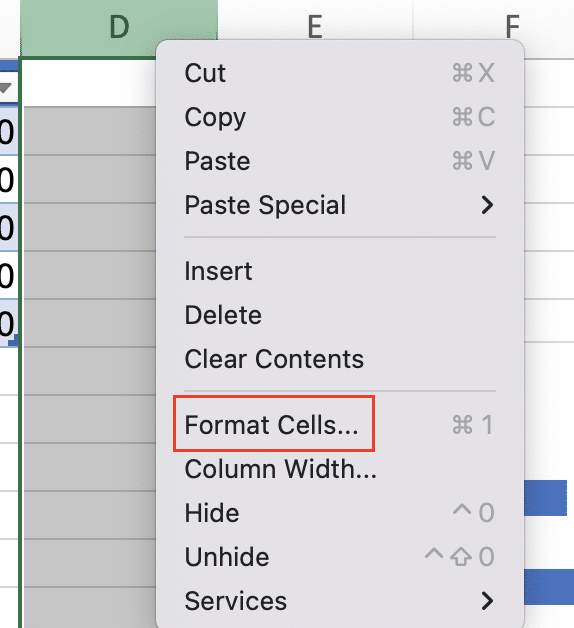
- Under “Date“, select a format that matches SharePoint’s default (typically mm/dd/yyyy).
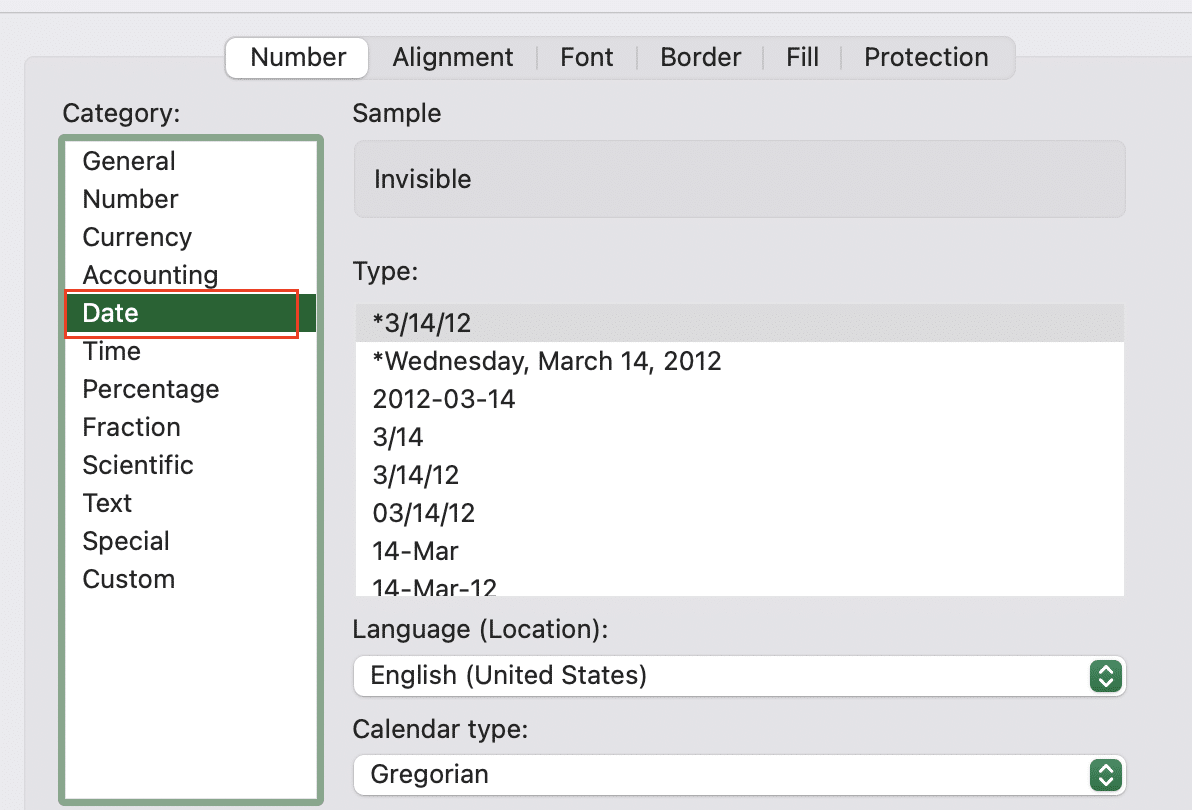
- Click “OK” to apply the format.
Step 2. Use ISO 8601 format (YYYY-MM-DD) for consistent date imports.
- For the most consistent results, consider using the ISO 8601 format in Excel.
- Select your date column in Excel.
- Right-click and choose “Format Cells“.

- Under “Custom“, enter the format code: yyyy-mm-dd
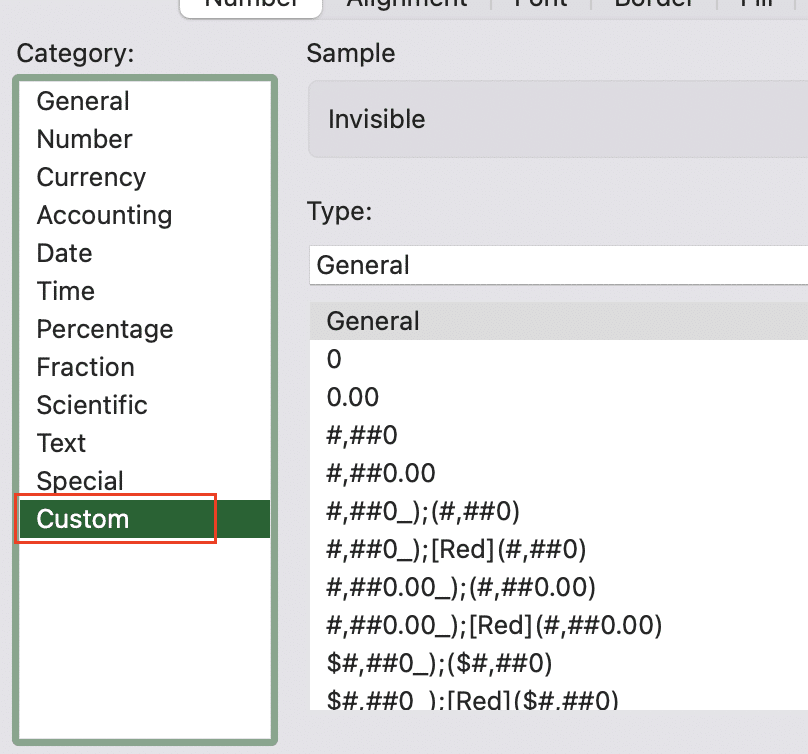
- Click “OK” to apply the format.
Step 3. Configure time zone settings for accurate timestamp imports.
- In SharePoint, go to your list settings.
- Click on the date/time column you want to configure.
- Under “Date and Time Format“, choose whether to include the time.
- Select the appropriate time zone if your data includes time information.
- Click “OK” to save changes.
Importing Excel Data into an Existing SharePoint List
If you need to add Excel data to a list that already exists in SharePoint, follow these steps:
Step 1. Open the target SharePoint list in your web browser.
- Navigate to your SharePoint site.
- Find and click on the list you want to update.
- Ensure you have the necessary permissions to edit the list.
Step 2. Click on “Edit in grid view” in the list’s command bar.
- Look for the “Edit in grid view” button in the command bar at the top of the list.
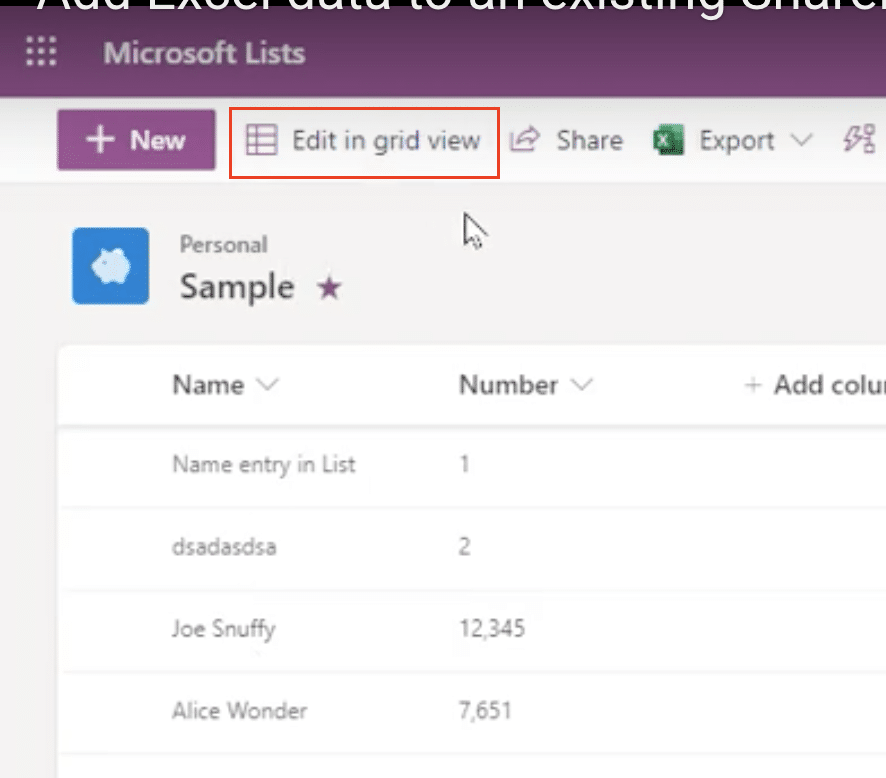
- Click this button to open the list in a spreadsheet-like interface.
Step 3. Copy the desired data from your Excel spreadsheet.
- Open your Excel file containing the data you want to import.
- Select and copy the rows you wish to add to your SharePoint list.
- Make sure to exclude the header row if your SharePoint list already has column headers.
Step 4. Paste the copied data directly into the grid view.
- Return to your SharePoint browser window with the list in grid view.
- Click on the first empty cell where you want to start pasting your data.
- Use the keyboard shortcut Ctrl+V (or Command+V on Mac) to paste the data.
Step 5. Verify that the pasted data aligns correctly with existing columns.
- After pasting, carefully review the data to ensure it’s in the correct columns.
- If needed, you can drag and drop columns in grid view to rearrange them.
- Make any necessary adjustments to ensure data integrity.
Matching Excel Columns to SharePoint List Fields
Proper column matching is essential for accurate data import:
Step 1. Ensure column headers in Excel match field names in SharePoint.
- Compare the column names in your Excel file with the field names in your SharePoint list.
- If they don’t match exactly, consider renaming your Excel columns to match SharePoint.
- Alternatively, you can rename SharePoint columns to match Excel (if appropriate for your use case).
Step 2. Use SharePoint’s “Edit columns” feature to align mismatched fields.
- In your SharePoint list, click on “List settings” in the top right corner.
- Scroll down to the “Columns” section.
- Click on each column name and update the “Column name” field as needed.
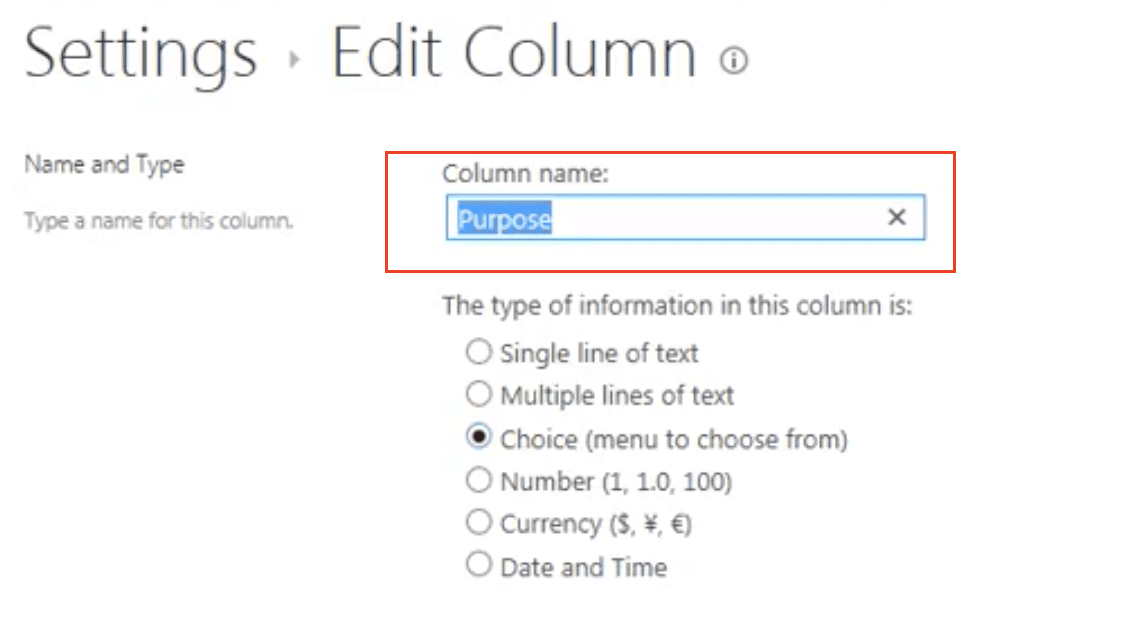
- Click “OK” to save changes for each column.
Step 3. Create new columns in SharePoint if necessary to accommodate all Excel data.
- If your Excel data includes columns not present in SharePoint, you’ll need to add them.
- In “List settings“, scroll down and click “Add column“.

- Choose the appropriate column type and name it to match your Excel data.
- Set any necessary column settings and click “OK” to create the new column.
- Repeat this process for any additional columns needed.
Using Power Automate for Automated Excel to SharePoint Imports
Power Automate can help automate the process of importing Excel data to SharePoint:
Step 1. Create a new flow in Power Automate.
- Go to https://flow.microsoft.com and sign in.
- Click “Create” in the left sidebar.

- Choose “Automated cloud flow” to start a new flow.


Stop exporting data manually. Sync data from your business systems into Google Sheets or Excel with Coefficient and set it on a refresh schedule.
Get Started
Step 2. Choose the “When a item is created or modified” trigger for your Excel file location.
- In the “Choose your flow’s trigger” dialog, search for “When a file is created or modified“.
- Select the appropriate connector (e.g., OneDrive for Business, SharePoint) where your Excel file is stored.
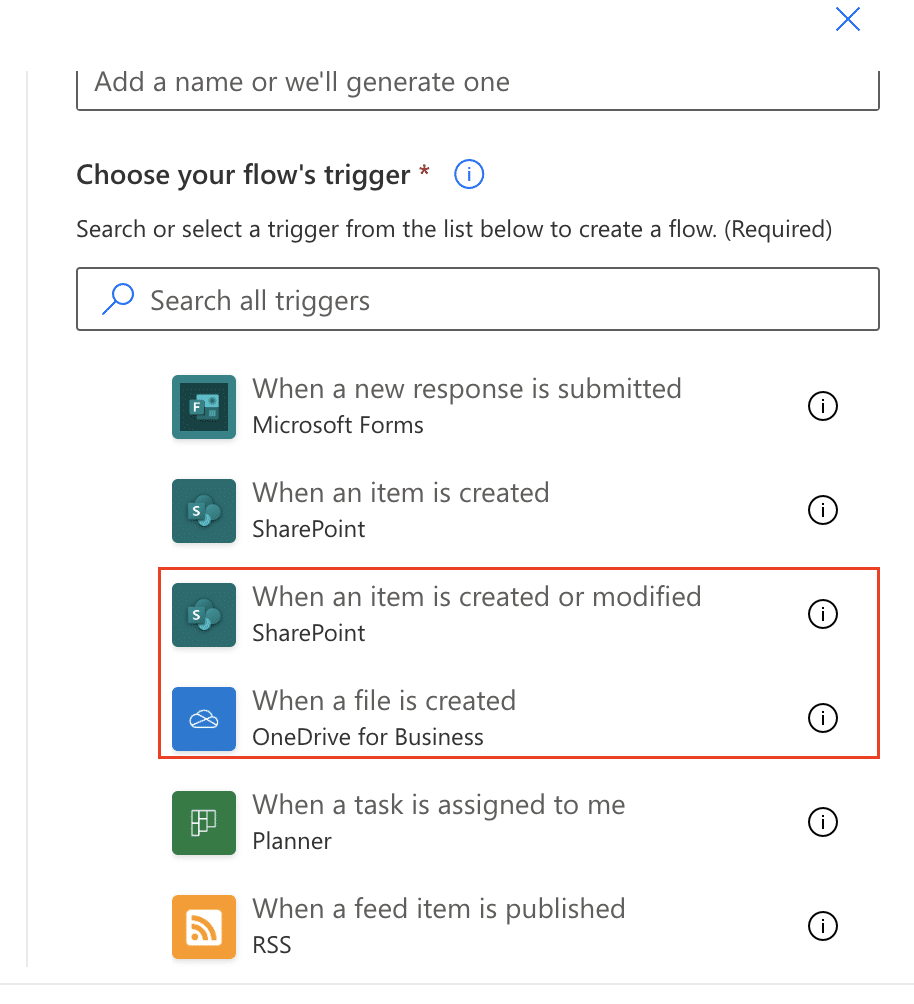
- Configure the trigger by selecting the folder path where your Excel file is located.
Step 3. Add an action to get the file content and parse the Excel data.
- Click “New step” to add an action.
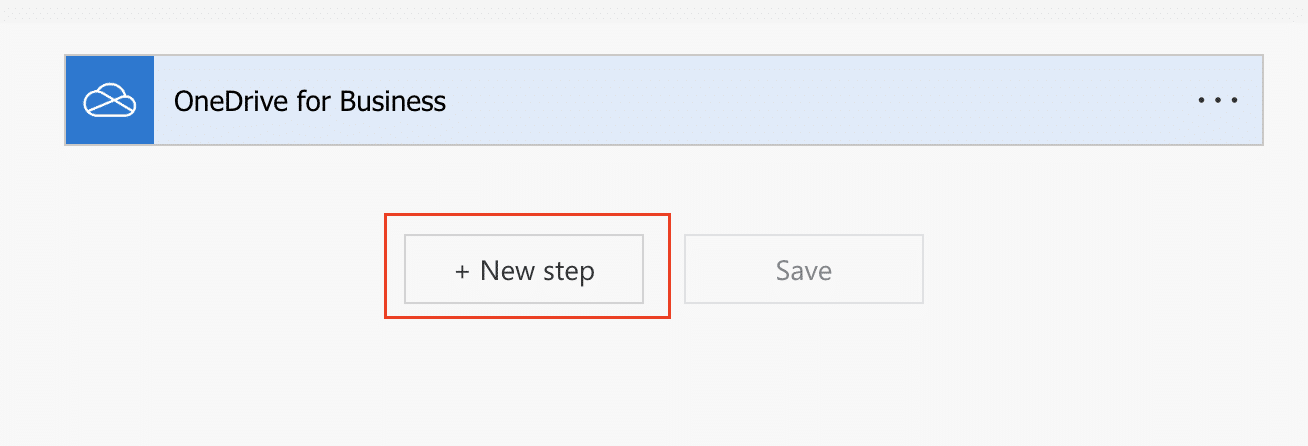
- Search for and select “Get file content” action, choosing the same connector as your trigger.
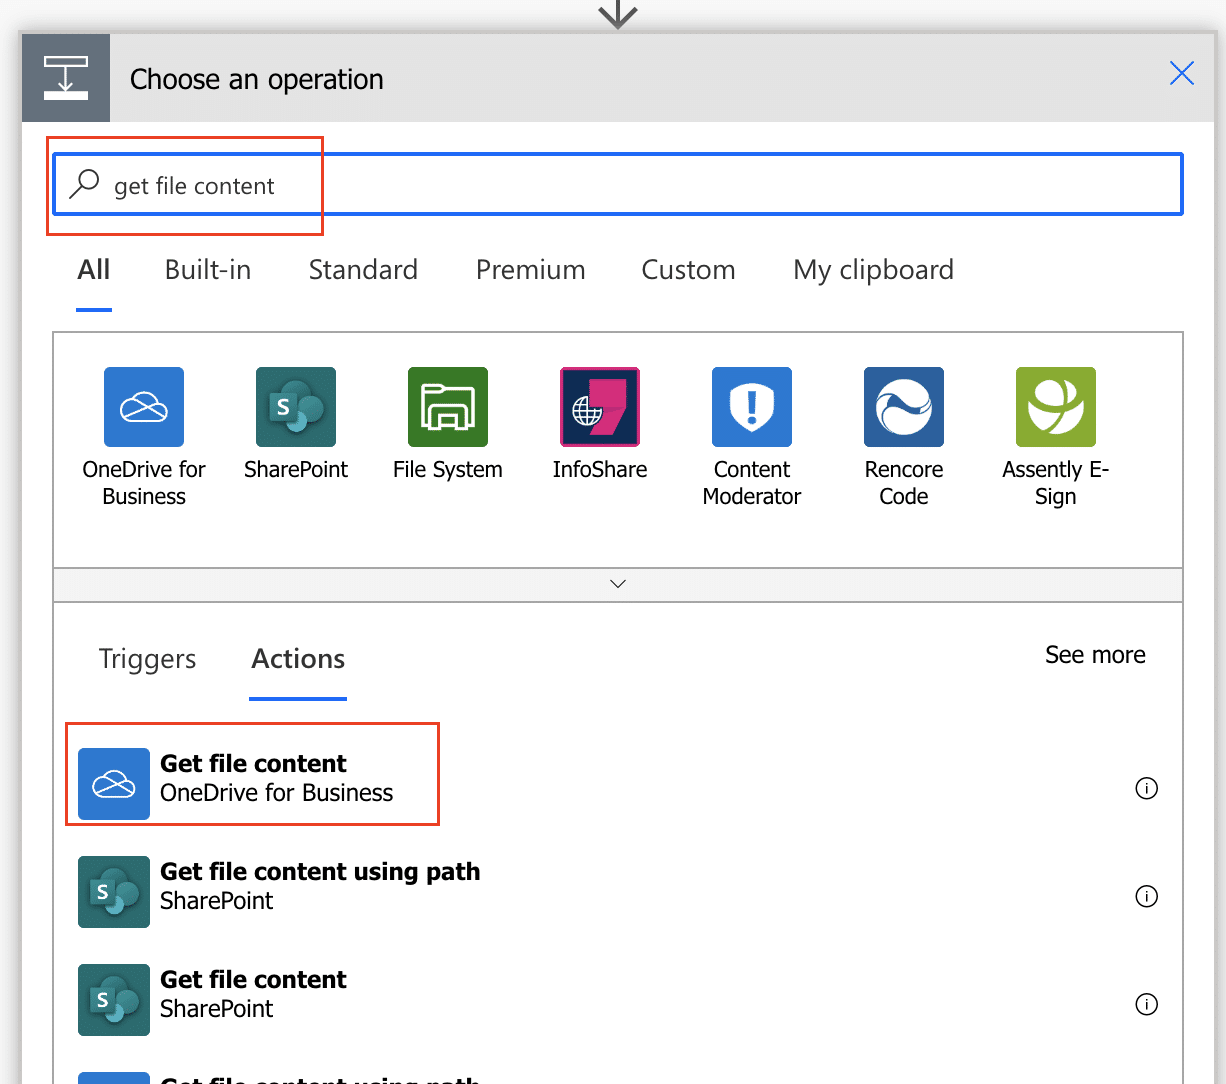
- Configure this action to get the content of the file that triggered the flow.
- Add another step and search for “Parse Excel“.
- Configure this action to parse the file content from the previous step.
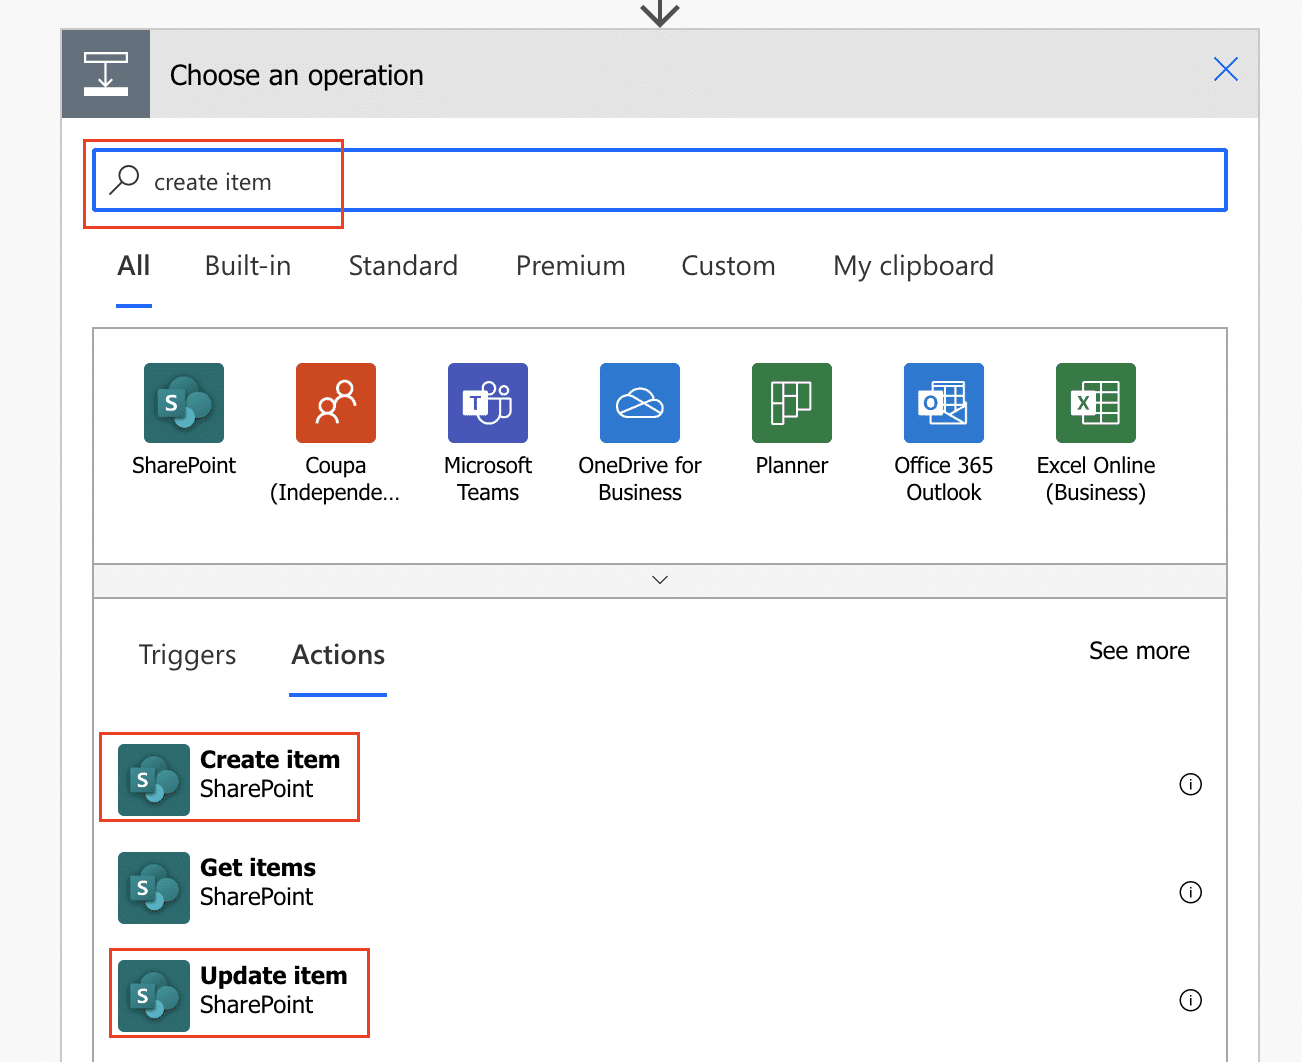
Step 4. Configure a “Create item” or “Update item” action for the target SharePoint list.
- Add another step and search for “Create item” (for new entries) or “Update item” (for existing entries).
- Select the SharePoint connector and choose your target list.
- Configure the action by mapping the parsed Excel data to the corresponding SharePoint list columns.
Step 5. Map Excel columns to corresponding SharePoint list fields in the flow.
- In the “Create item” or “Update item” action, click on each SharePoint field.
- From the dynamic content panel, select the corresponding parsed Excel column.
- Repeat this for all fields you want to import or update.
Scheduling Regular Excel to SharePoint Imports
For recurring imports, you can set up a scheduled flow:
Step 1. Set up a recurrence trigger in Power Automate for periodic imports.
- Start a new flow and choose “Scheduled cloud flow“.

- Set the recurrence interval (e.g., daily, weekly, monthly) as needed

- Configure any additional settings like time zone or specific days to run.
Step 2. Configure error handling and notifications for import failures.
- After your main flow actions, add a “Condition” control.
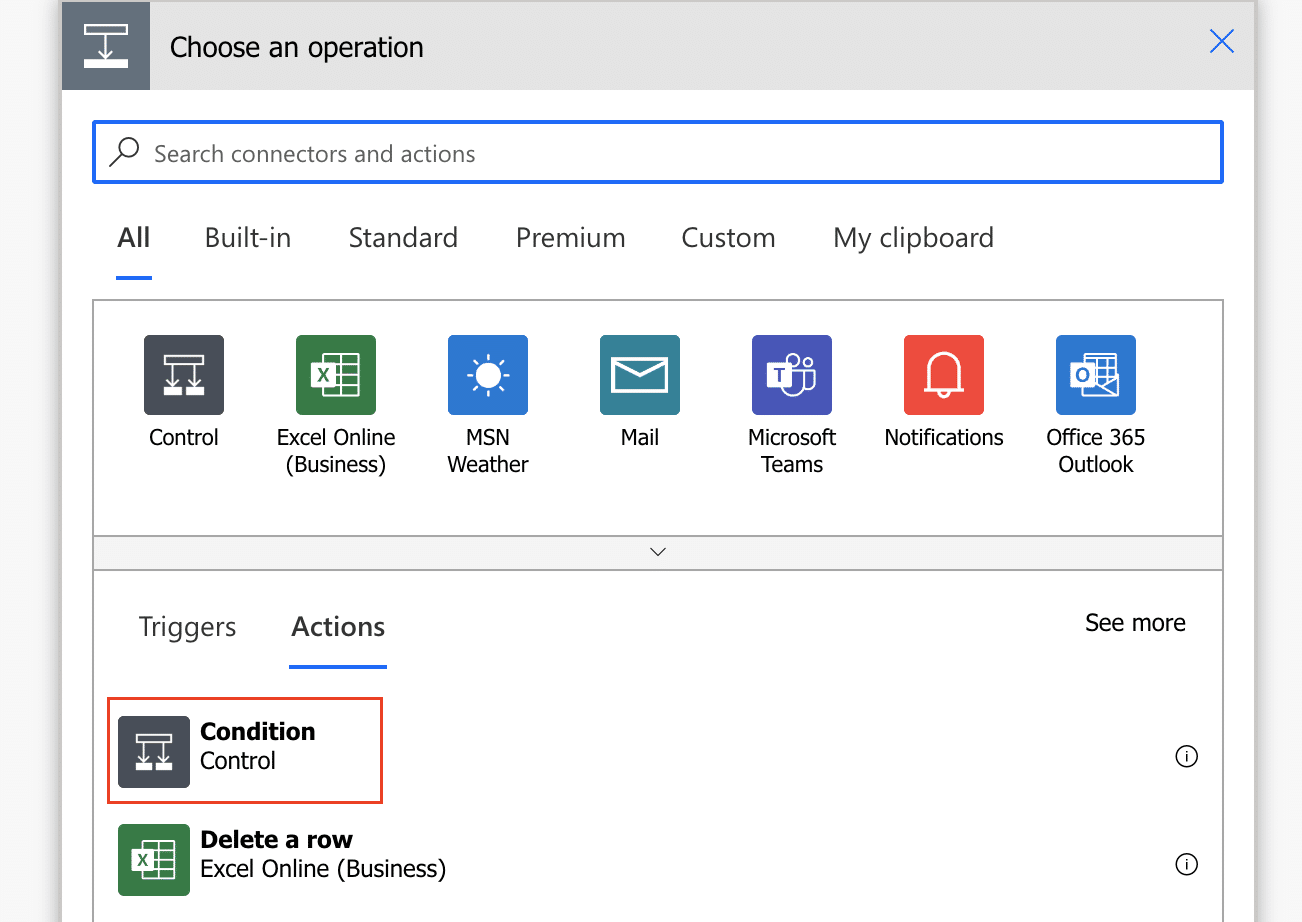
- Set the condition to check if the previous actions were successful.
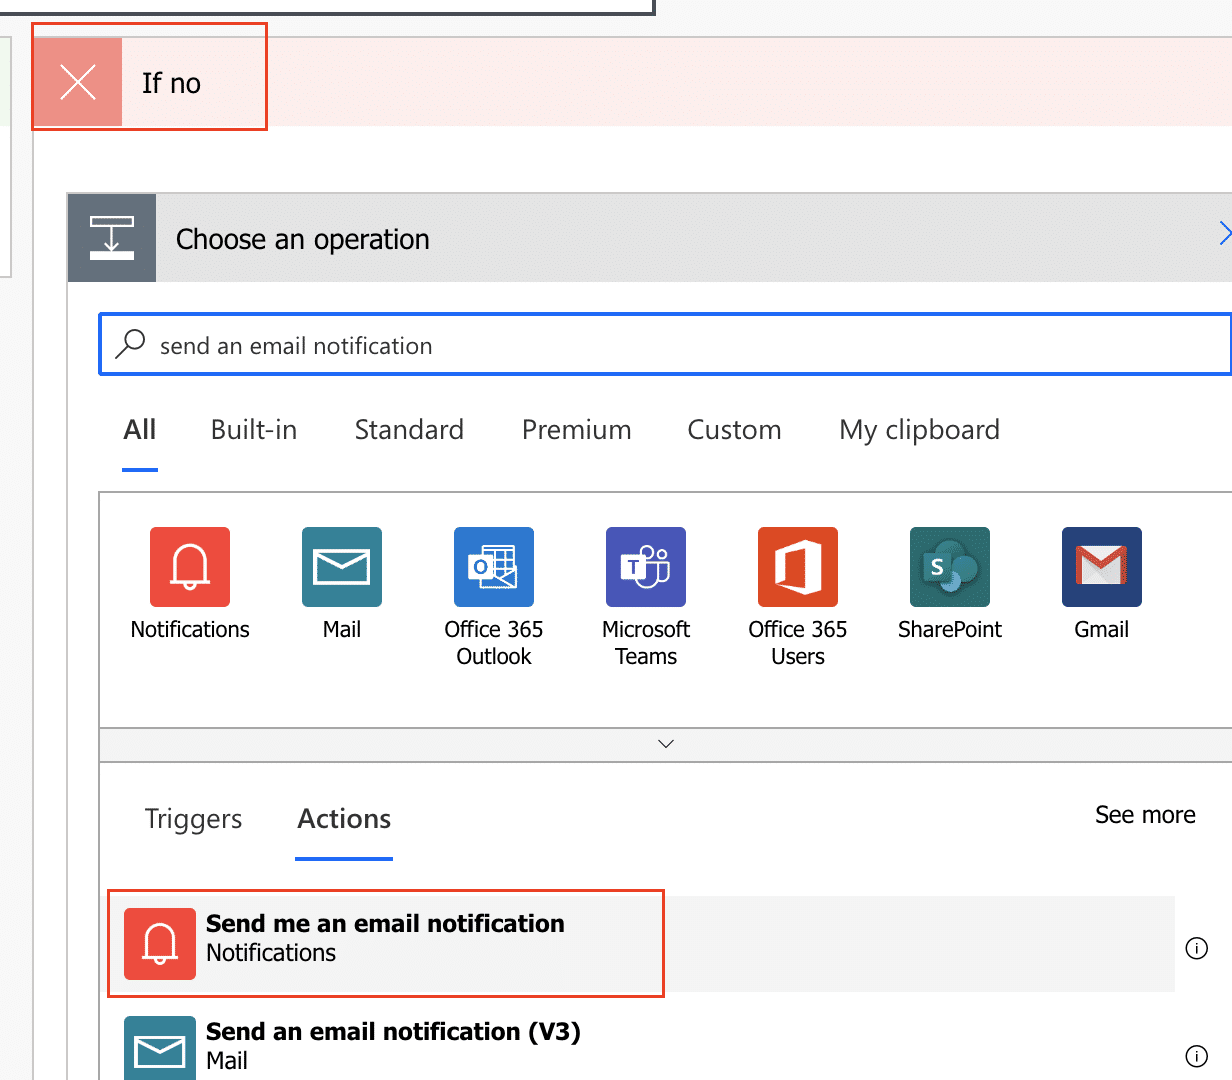
- In the “If no” branch, add actions to handle errors (e.g., send an email notification).
Step 3. Use variables to track import progress and generate summary reports.
- At the beginning of your flow, initialize variables to track metrics (e.g., rows imported, errors encountered).
- Update these variables throughout your flow as actions are completed.
- At the end of the flow, use these variables to generate a summary report (e.g., send an email with import statistics).
Bulk Importing Multiple Excel Files to SharePoint Lists
For large-scale imports involving multiple Excel files:
Step 1. Prepare your Excel files with consistent column structures.
- Ensure all Excel files you want to import have the same column structure.
- Use consistent naming conventions for columns across all files.
- Verify that data types are consistent (e.g., dates are formatted the same way in all files).
Step 2. Use SharePoint’s “Quick Edit” view for faster bulk imports.
- Open your target SharePoint list.
- Click “Edit in grid view” to open the Quick Edit view.

- Copy and paste data from multiple Excel files into this view.
- Be cautious with large datasets, as Quick Edit has limitations on the amount of data it can handle at once.
Step 3. Leverage Power Automate to process multiple files in a single flow.
- Create a flow that triggers when a file is added to a specific folder.
- Use a “Get files (properties only)” action to list all files in the folder.
- Add an “Apply to each” loop to process each file.
- Within the loop, use actions to read the file content, parse the Excel data, and create or update SharePoint list items.
Step 4. Consider using SharePoint’s REST API for large-scale programmatic imports.
- For very large datasets or complex import scenarios, consider using SharePoint’s REST API.
- This requires programming skills but offers more control and better performance for large-scale operations.
- Use a language like Python or C# to write a script that reads Excel files and makes API calls to create or update SharePoint list items.
Validating and Cleaning Data Before Import
Ensuring data quality before import is crucial:
Step 1. Use Excel’s data validation features to ensure data integrity.
- In Excel, select the column you want to validate.
- Go to “Data” > “Data Validation“.

- Set up rules based on your data requirements (e.g., date ranges, allowed values).

- Apply these validations before attempting to import the data.
Step 2. Remove duplicate entries and standardize formatting.
- Use Excel’s “Remove Duplicates” feature (Data > Remove Duplicates) to eliminate duplicate rows.

- Apply consistent formatting to columns (e.g., dates, currencies) using Excel’s format cells options.
Step 3. Handle missing values and apply default values where appropriate.
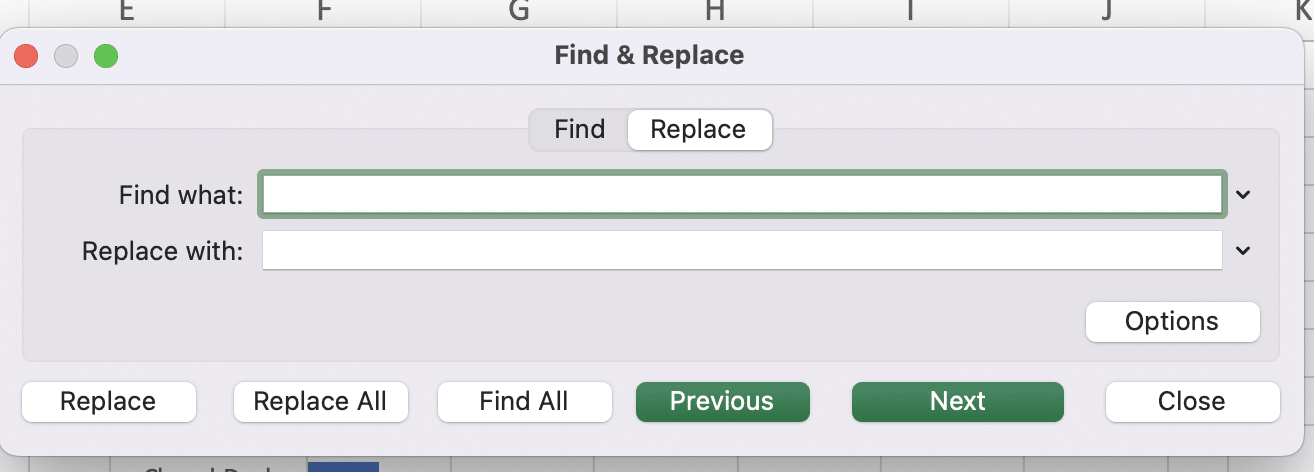
- Use Excel’s “Find and Replace” to locate blank cells.
- Decide on a strategy for missing data (e.g., using a default value or excluding the row).
- Consider using Excel formulas to fill in missing values based on other data in the row.
Enhancing SharePoint List Management
Importing Excel data into SharePoint lists can significantly improve your data management and collaboration processes. By following these techniques, you can streamline your workflow and increase productivity. Remember to regularly review and update your import processes to ensure they continue to meet your organization’s evolving needs.
Ready to take your spreadsheet data management to the next level? Get started with Coefficient to seamlessly sync your data across multiple platforms and create powerful, real-time reports and dashboards. Start your journey with Coefficient today!

